- Overview
- Configuration modes
- General settings
- Connection settings
- Data mapping
- Requests mapping
- Advanced configuration
- Workers settings
- Additional information
- Troubleshooting
- Next steps
Overview
This documentation will help you set up the MQTT connector for the ThingsBoard IoT Gateway. We’ll explain the configuration parameters in simple terms to make it easy for you to understand and follow. The MQTT(Message Queuing Telemetry Transport) is a lightweight publish-subscribe, machine-to-machine network protocol that is widely used for connections with remote locations with devices that have resource constraints or network transfer rate. Use general configuration to enable this connector.
Also, if you are new to ThingsBoard IoT Gateway, we recommend you to read the Getting Started guide to understand the basic concepts of ThingsBoard IoT Gateway and how it works with MQTT protocol.
The connector can be configured via the user interface form, which helps you set up a connection to an MQTT broker and read/write data by subscribing/publishing to MQTT topics, that can be defined statically or generated on the fly. Let’s look at all the available settings and explain each one clearly. This will help you understand how everything works.
Please note: To access the actual UI for the gateway - you need to a have connected gateway before adding a connector. Otherwise, you will see the old UI.
Configuration modes
The MQTT connector can be configured in two modes: Basic and Advanced.
- Basic mode is designed for users who are new to ThingsBoard IoT Gateway and want to quickly set up the connector with minimal configuration. It provides a simplified interface with essential settings.
- Advanced mode is intended for experienced users who need more control over the configuration. It offers additional options and flexibility for advanced use cases.
Please note: If you are new to IoT Gateway, use the “Basic” configuration mode. If you are familiar with configuring IoT Gateway, you can use the “Advanced” configuration mode.
You can switch between these modes using the toggle button at the top of the configuration page:

General settings
This configuration section contains general connector settings, such as:
- Name - connector name used for logs and saving to persistent devices;
- Logs configuration - settings for local and remote logging:
- Enable remote logging - enables remote logging for the connector;
- Logging level - logging level for local and remote logs: NONE, ERROR, CRITICAL, WARNING, INFO, DEBUG, TRACE;
- Report strategy - strategy for sending data to ThingsBoard:
- Report period - period for sending data to ThingsBoard in milliseconds;
- Type - type of the report strategy:
- On report period - sends data to ThingsBoard after the report period;
- On value change - sends data to ThingsBoard when the value changes;
- On value change or report period - sends data to ThingsBoard when the value changes or after the report period;
- On received - sends data to ThingsBoard after receiving data from the device (default strategy).
Additional information about the report strategy can be found here.
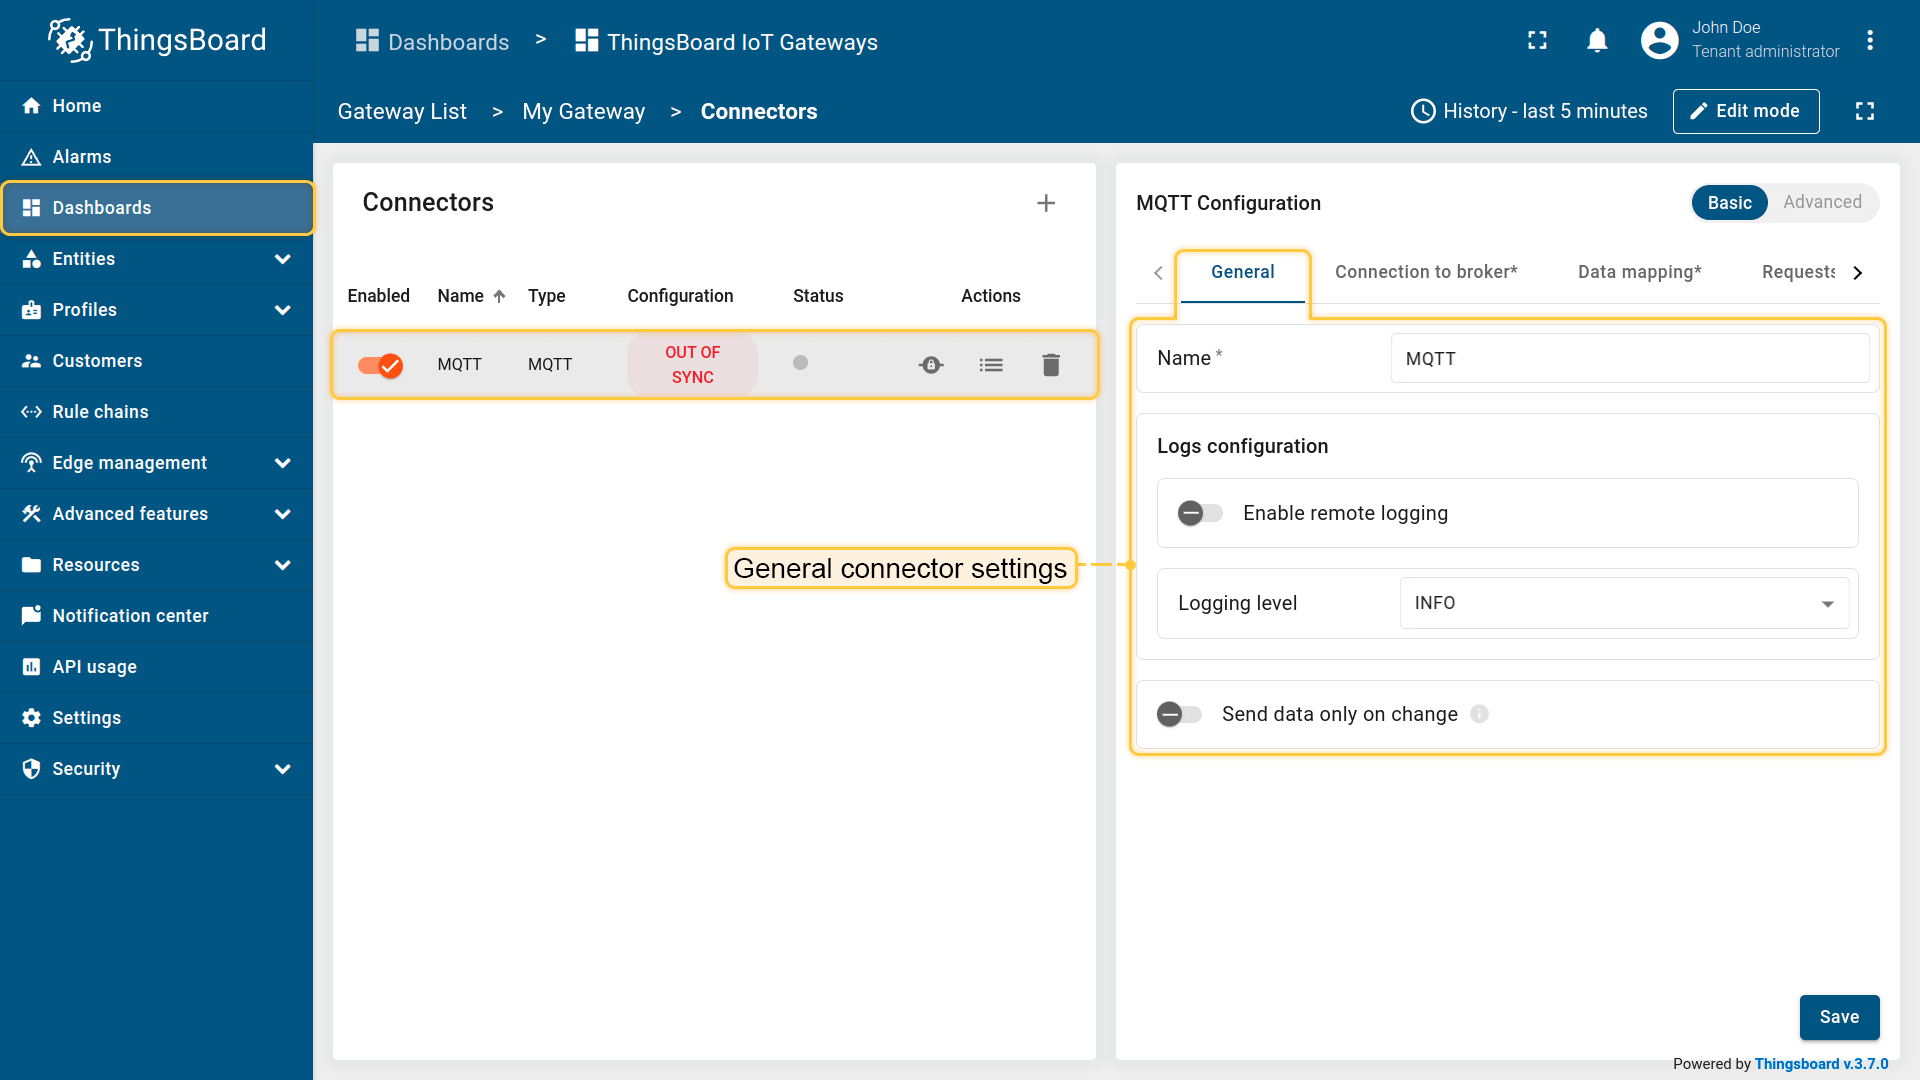
The General tab in settings is the same for both the basic and advanced configurations.
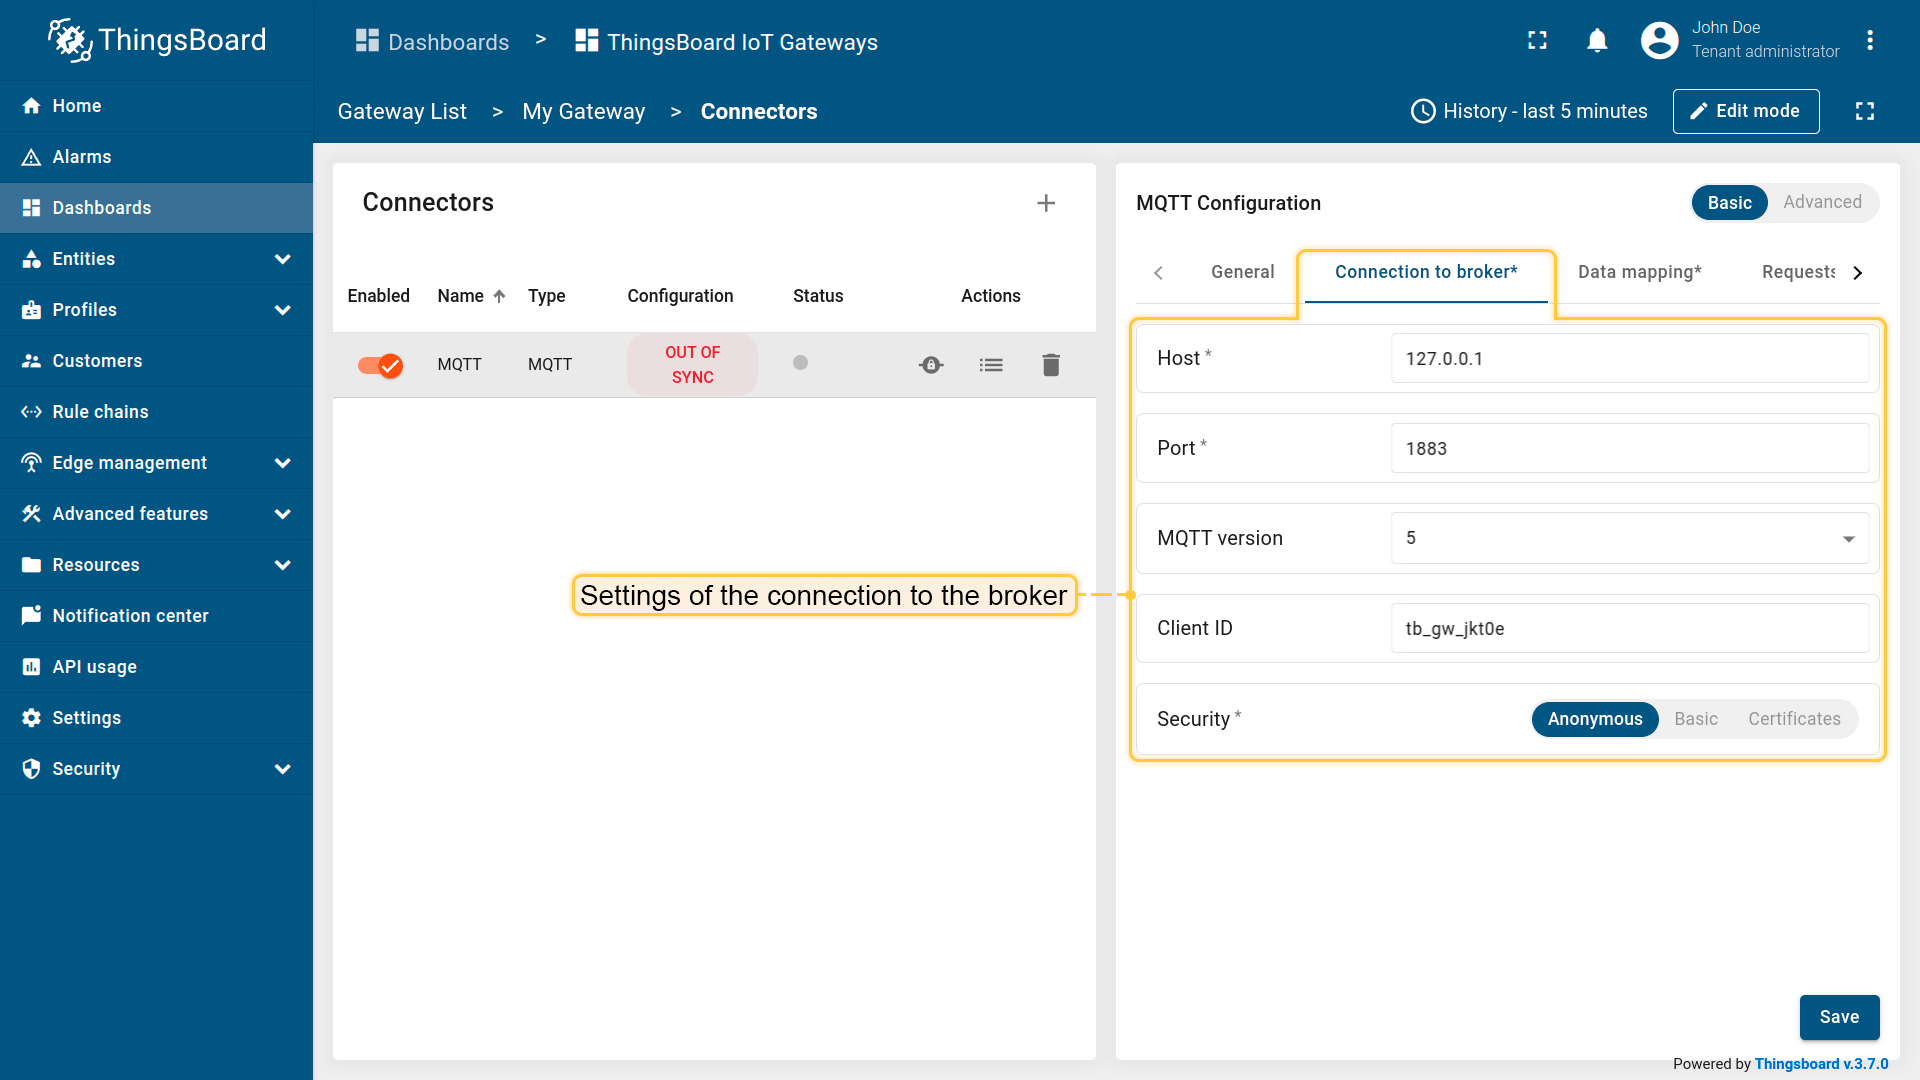
Connection settings
Connection settings how the MQTT connector establishes and maintains communication with the MQTT broker. These settings configure the basic connection parameters, the MQTT protocol version used, and the corresponding security and authentication modes.
Connection to broker
This subsection specifies the target MQTT broker and how the gateway interacts with it. It includes the broker’s host, port, mqtt version protocol and client id.
This configuration section contains settings of the MQTT broker connection, such as:
- Host - MQTT broker hostname or ip address;
- Port - listening port on the MQTT broker that will be used for establishing connection;
- MQTT version - MQTT protocol version (there are three versions currently supported by gateway - 3.1, 3.11, 5);
- Client ID ** - Unique identifier for each client’s session on the broker;
- Security - configuration for client authorization at MQTT Broker (anonymous, basic, or certificates).
Please note: ** – The broker (or broker cluster) does not allow two simultaneous sessions with the same Client ID. If a second connection uses that ID, the broker closes the existing session and accepts the new one (session takeover). The Client ID can be any valid UTF-8 string; if you don’t have a descriptive one, you can generate it in the MQTT connector configuration UI—see the last screenshots under this subsection.
All configuration parameters list, and their detailed description can be found in the Advanced configuration section.
If you want the UI to generate a Client ID, leave the Client ID field blank and click Generate Client ID (see the screenshot below). The gateway will create a unique identifier.
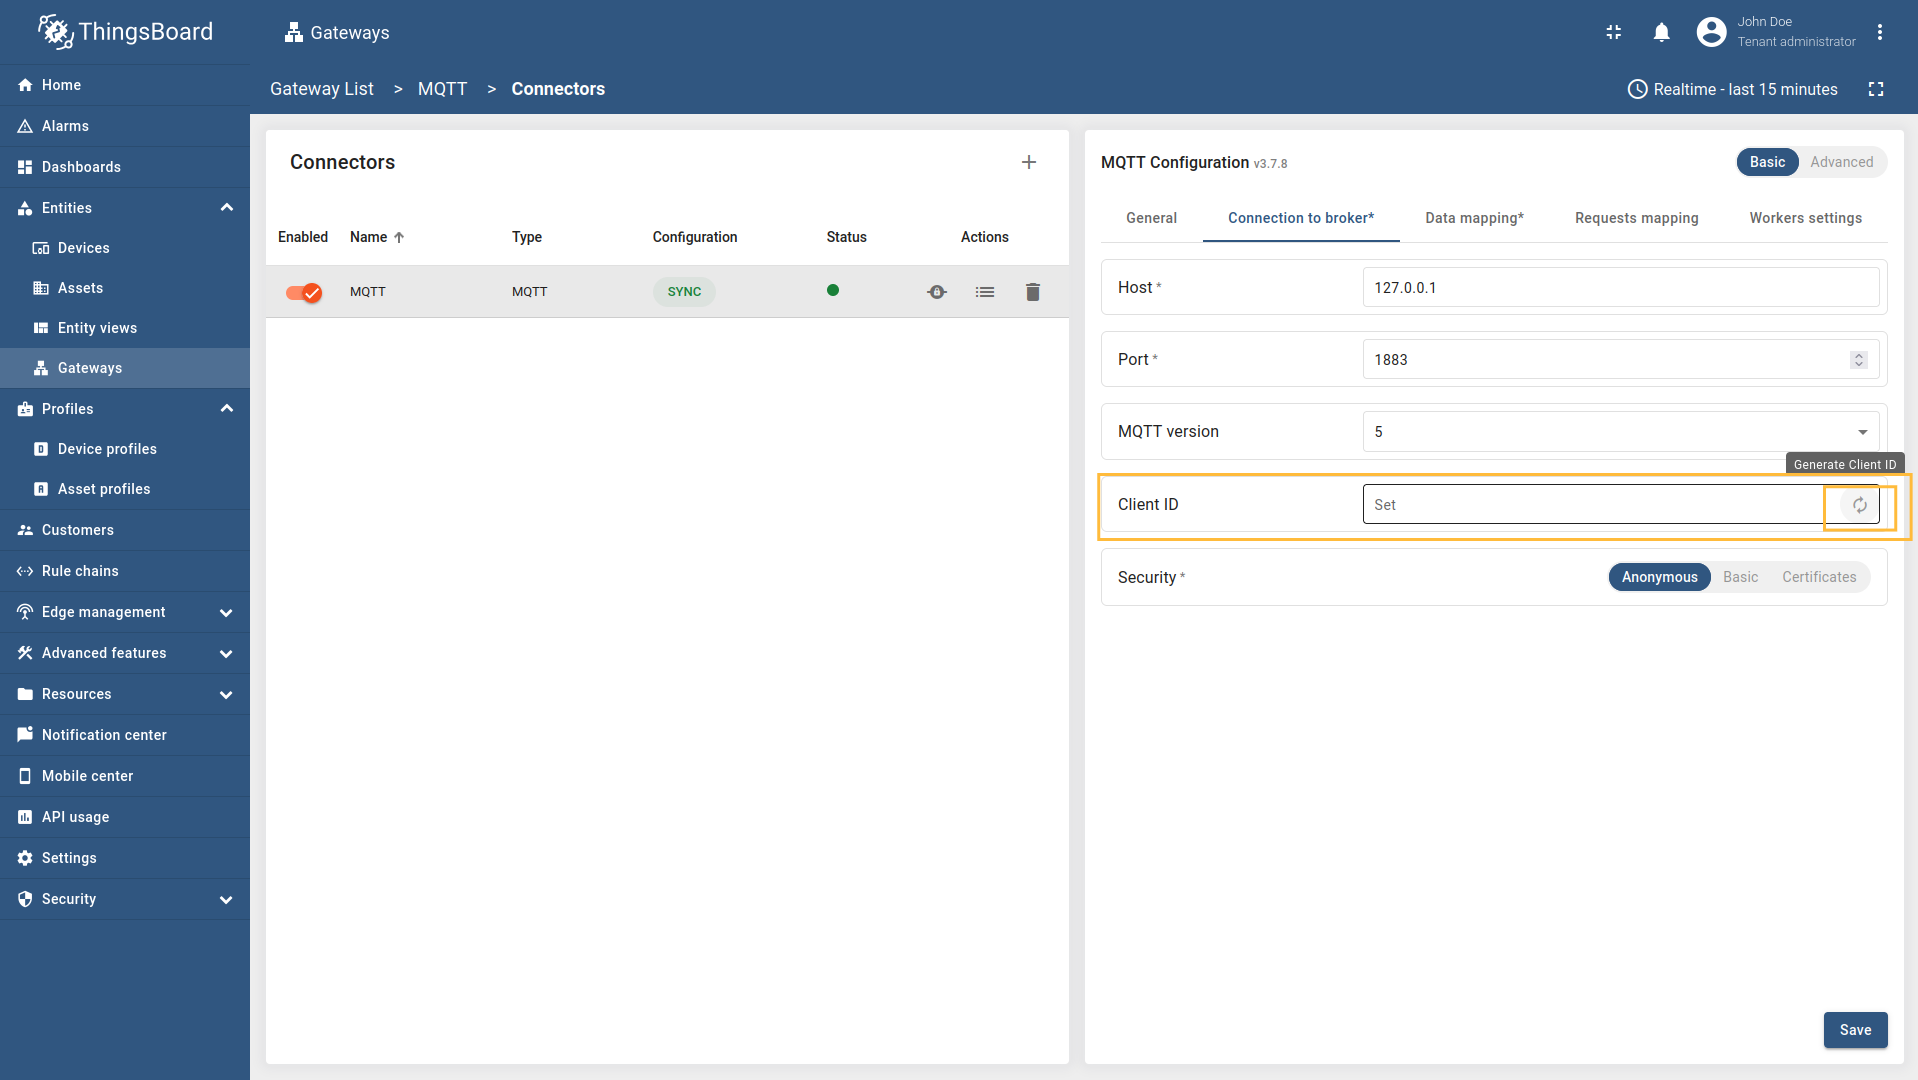
UI form with generated Client ID identifier e.g., tb_gw_rfpev — this is just an example; your value will be different.

Security
MQTT broker connections offer three distinct security types: Anonymous, Basic, Certificates.
Anonymous is the simplest option: no credentials are required to publish/subscribe on the MQTT broker.
It can be useful for testing 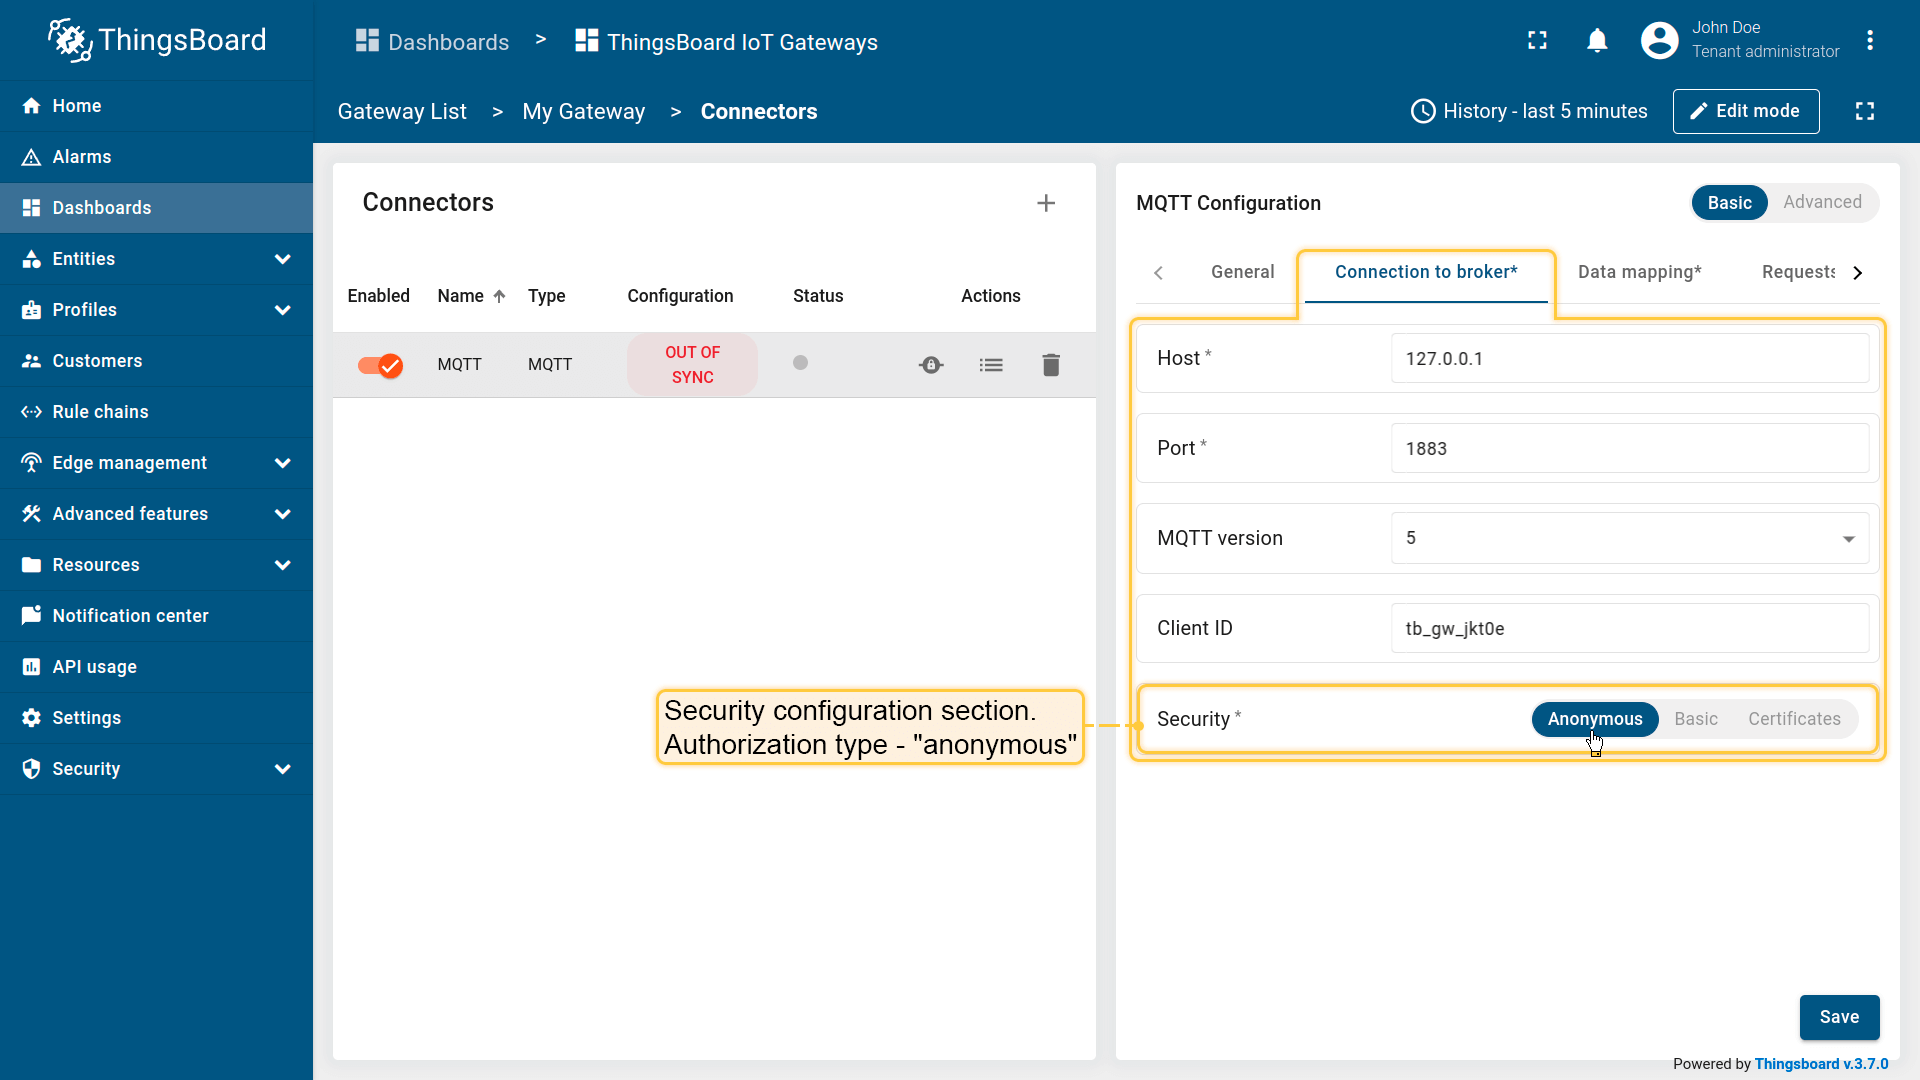 |
Basic authentication option uses a username and password configured on the MQTT broker. It’s a good default for most setups - just use strong, unique credentials. For stronger identity and mutual verification, consider certificate-based authentication. 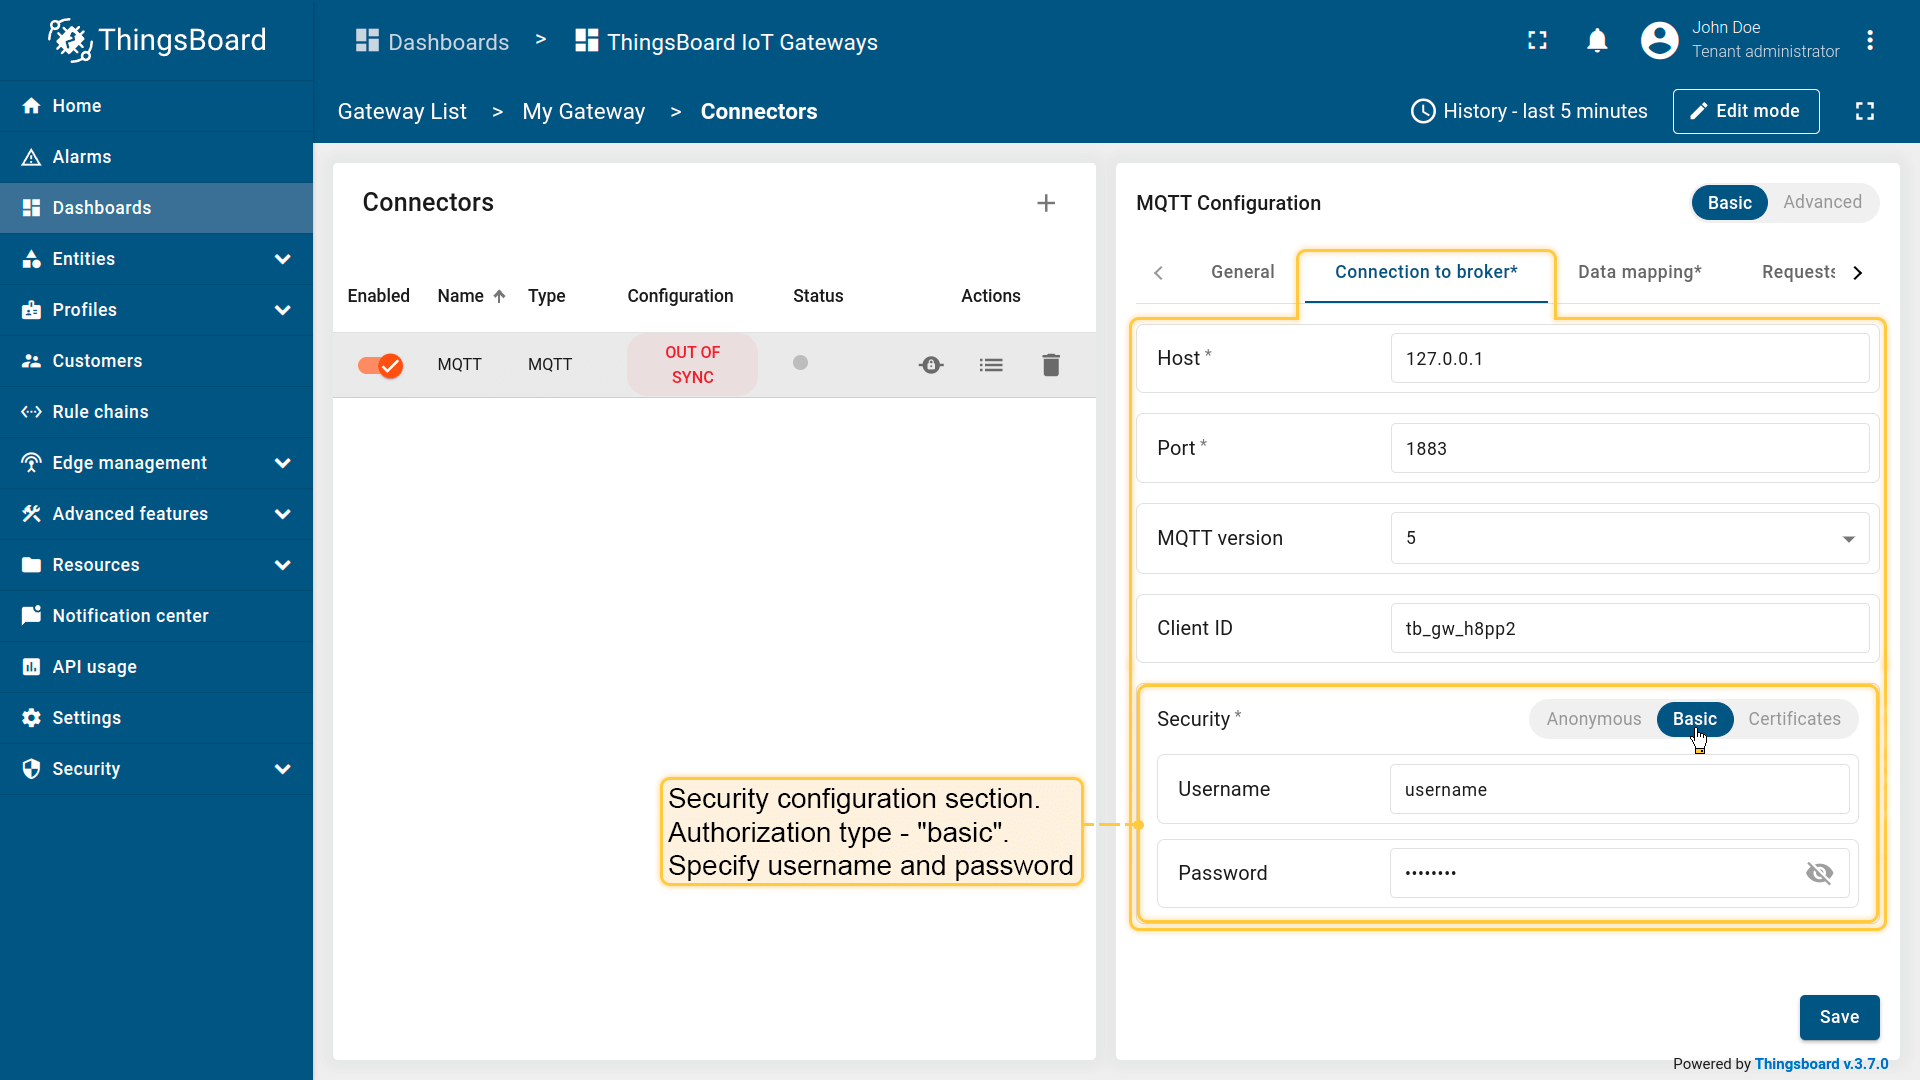 |
Certificate-based authentication uses TLS so the gateway and broker verify each other. Set the Path to CA certificate file to your CA certificate (to trust the broker), Path to client certificate file to the gateway’s client certificate, and Path to private key file to its private key (so the broker can authenticate the gateway). Use the broker’s TLS port (typically 8883) for encrypted, production-grade security. 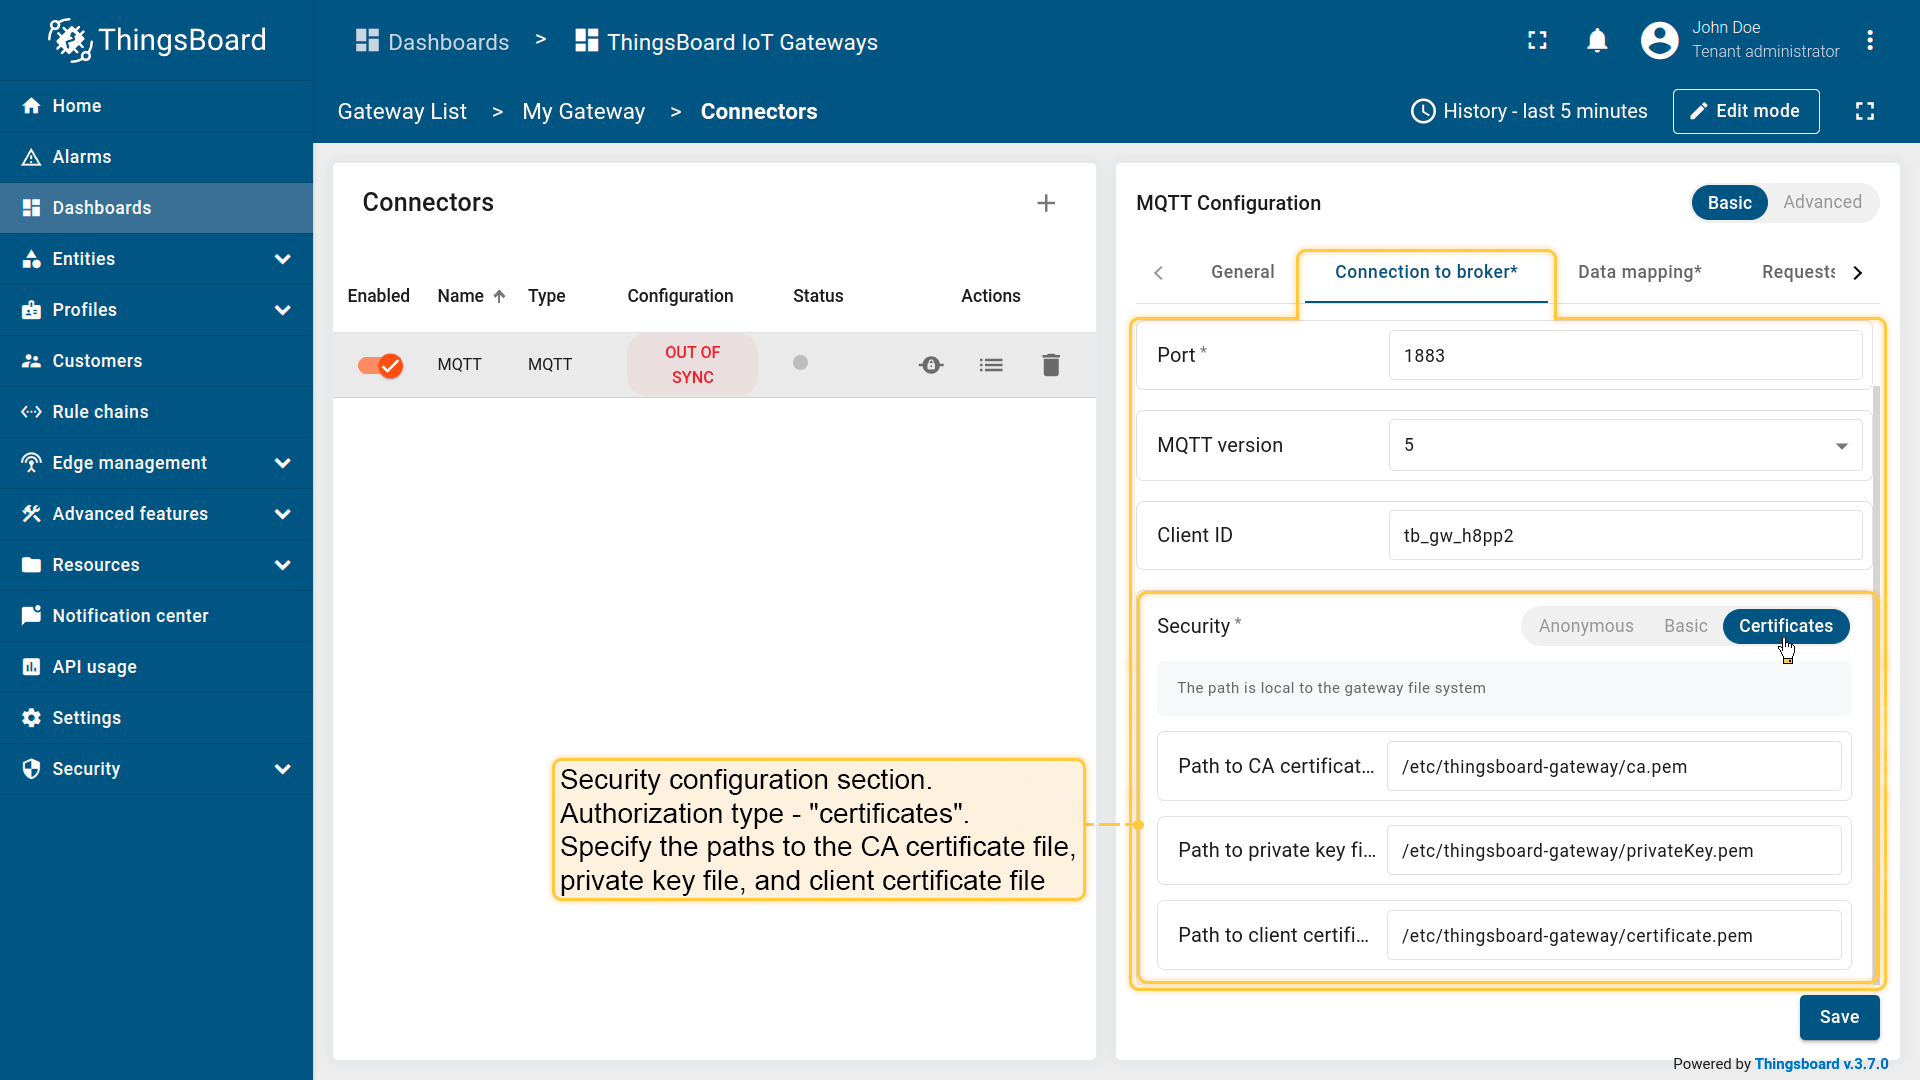 |
All configuration parameters list for each authentication mode, and their detailed description can be found in the Advanced configuration section.
Data mapping
Data Mapping lets you configure the topic/topics the gateway subscribes to for device creation and incoming data handling. You can generate topic/topics and device names on the fly, and choose what data is sent as device attributes or telemetry. This section provides the essential settings for flexible device and data management.
The following parameters configure the topic(s) the gateway subscribes to for data feed, device creation (name and profile), and the reporting strategy:
- Topic filter - The topic/topics the gateway will subscribe to that is used for data feed .The Topic filter supports special symbols: ‘#’ and ‘+’ wildcards (more information how you may use them for matching topic patterns Additional information section).
- Also MQTT connector supports shared subscriptions to create one you need to add
$share/as a prefix for Topic filter and shared subscription group name (more information how you may use it Additional information section) and problems. that may appear while using them Shared subscriptions limitations. - QoS - MQTT Quality of Service is an agreement between the message sender and receiver that defines the level of delivery guarantee for a specific message. (0-At most once, 1-At least once, 2-Exactly once)
- Report strategy - strategy for sending data to ThingsBoard:
- Report period - period for sending data to ThingsBoard in milliseconds;
- Type - type of the report strategy:
- On report period - sends data to ThingsBoard after the report period;
- On value change - sends data to ThingsBoard when the value changes;
- On value change or report period - sends data to ThingsBoard when the value changes or after the report period;
- On received - sends data to ThingsBoard after receiving data from the device (default strategy).
Data conversion
- Payload type - The incoming data type that will be processed as
JSON,Bytes,Custom(more information about supported Payload types see in the Additional information Convertor types section ). - Device Name - The name of the device in ThingsBoard. It can be parsed from
Message,Topic,Constant(more information about sources with screenshot examples can be found in the Usage examples section). - Device Profile name - The device profile in ThingsBoard. It can be parsed from
Message,Topic,Constant(more information about sources with screenshot examples can be found in the Usage examples section).
To add a new device, use the following steps:
-
Click the + Add mapping button.
-
Provide the following fields for the Data mapping section in the opened modal window: Topic filter, QoS, Payload type (can be
JSON,BytesorCustom). -
Provide the following fields in the Data conversion subsection of the opened modal window: Name and Profile name (can be sourced from
Message,TopicorConstant).
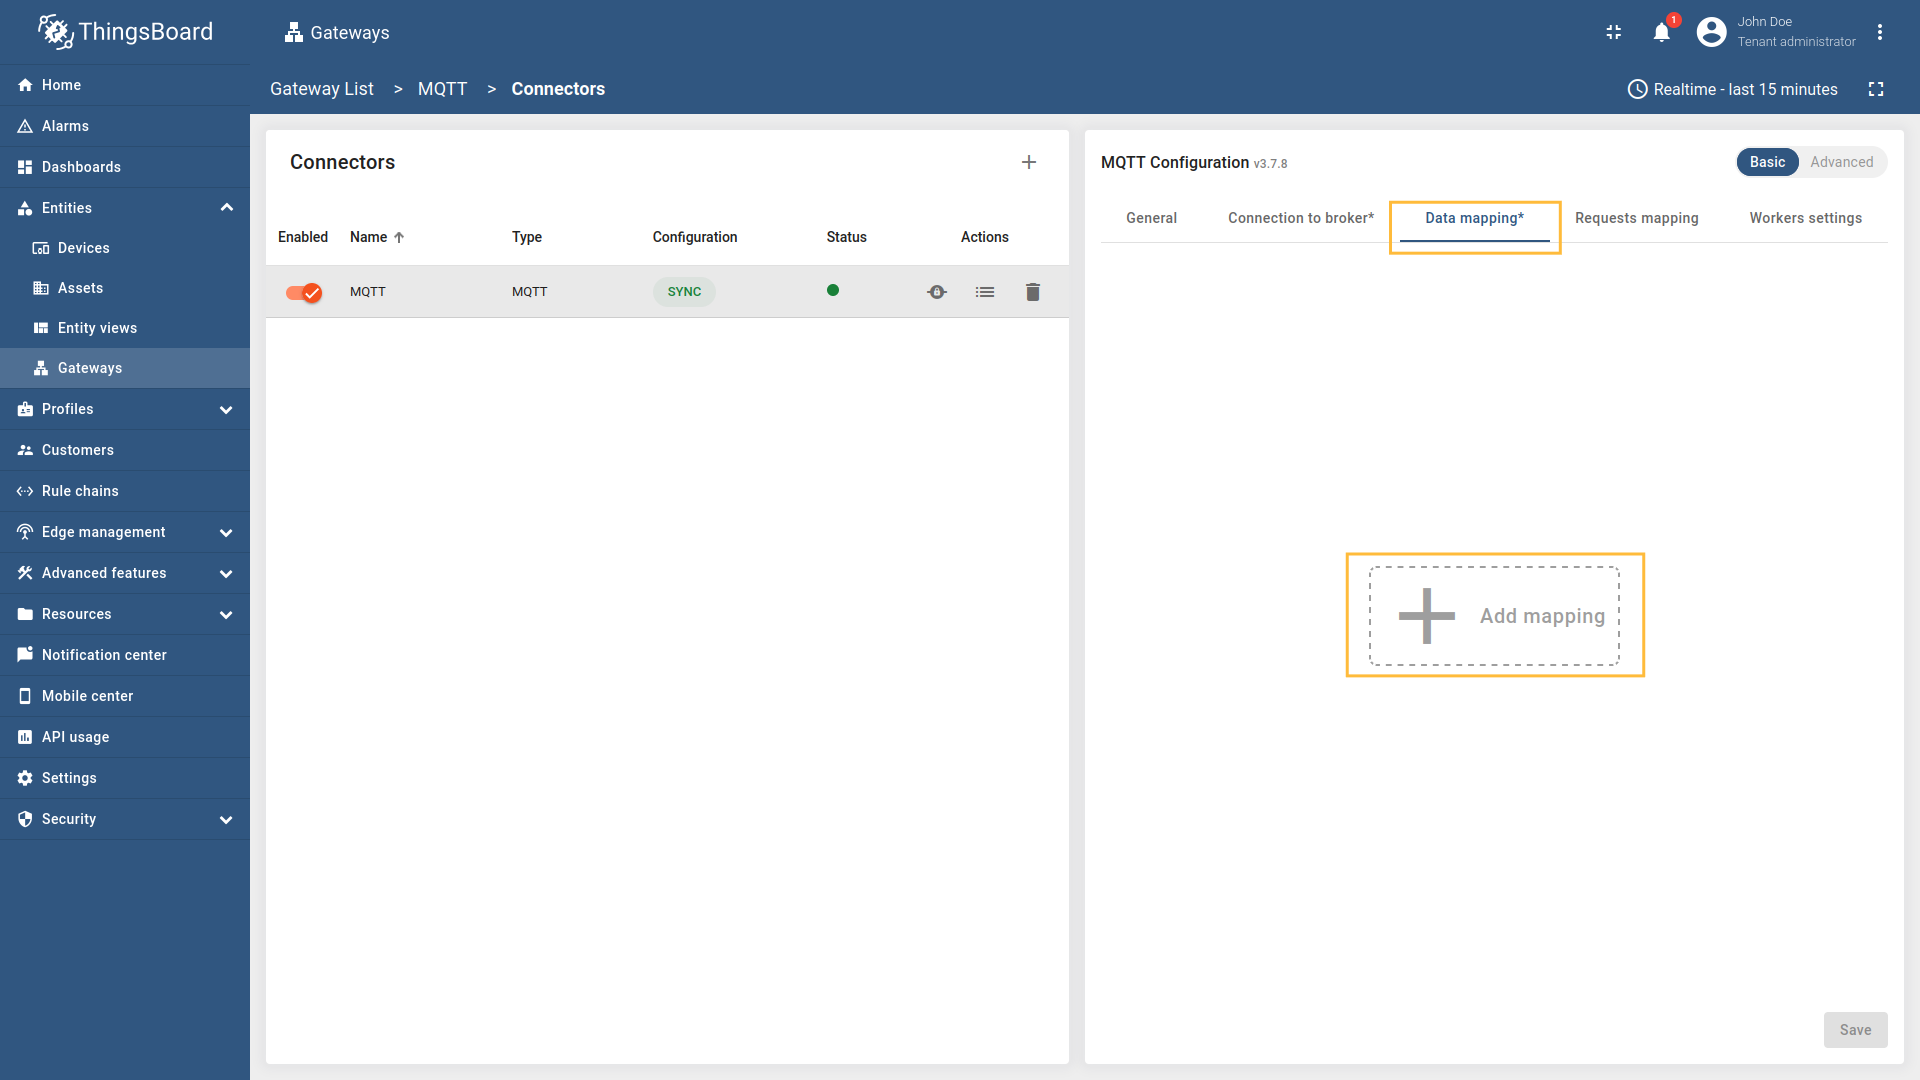
Click the + Add mapping button.

Provide the following fields for the Data mapping section in the opened modal window: Topic filter, QoS, Payload type (can be JSON, Bytes or Custom).
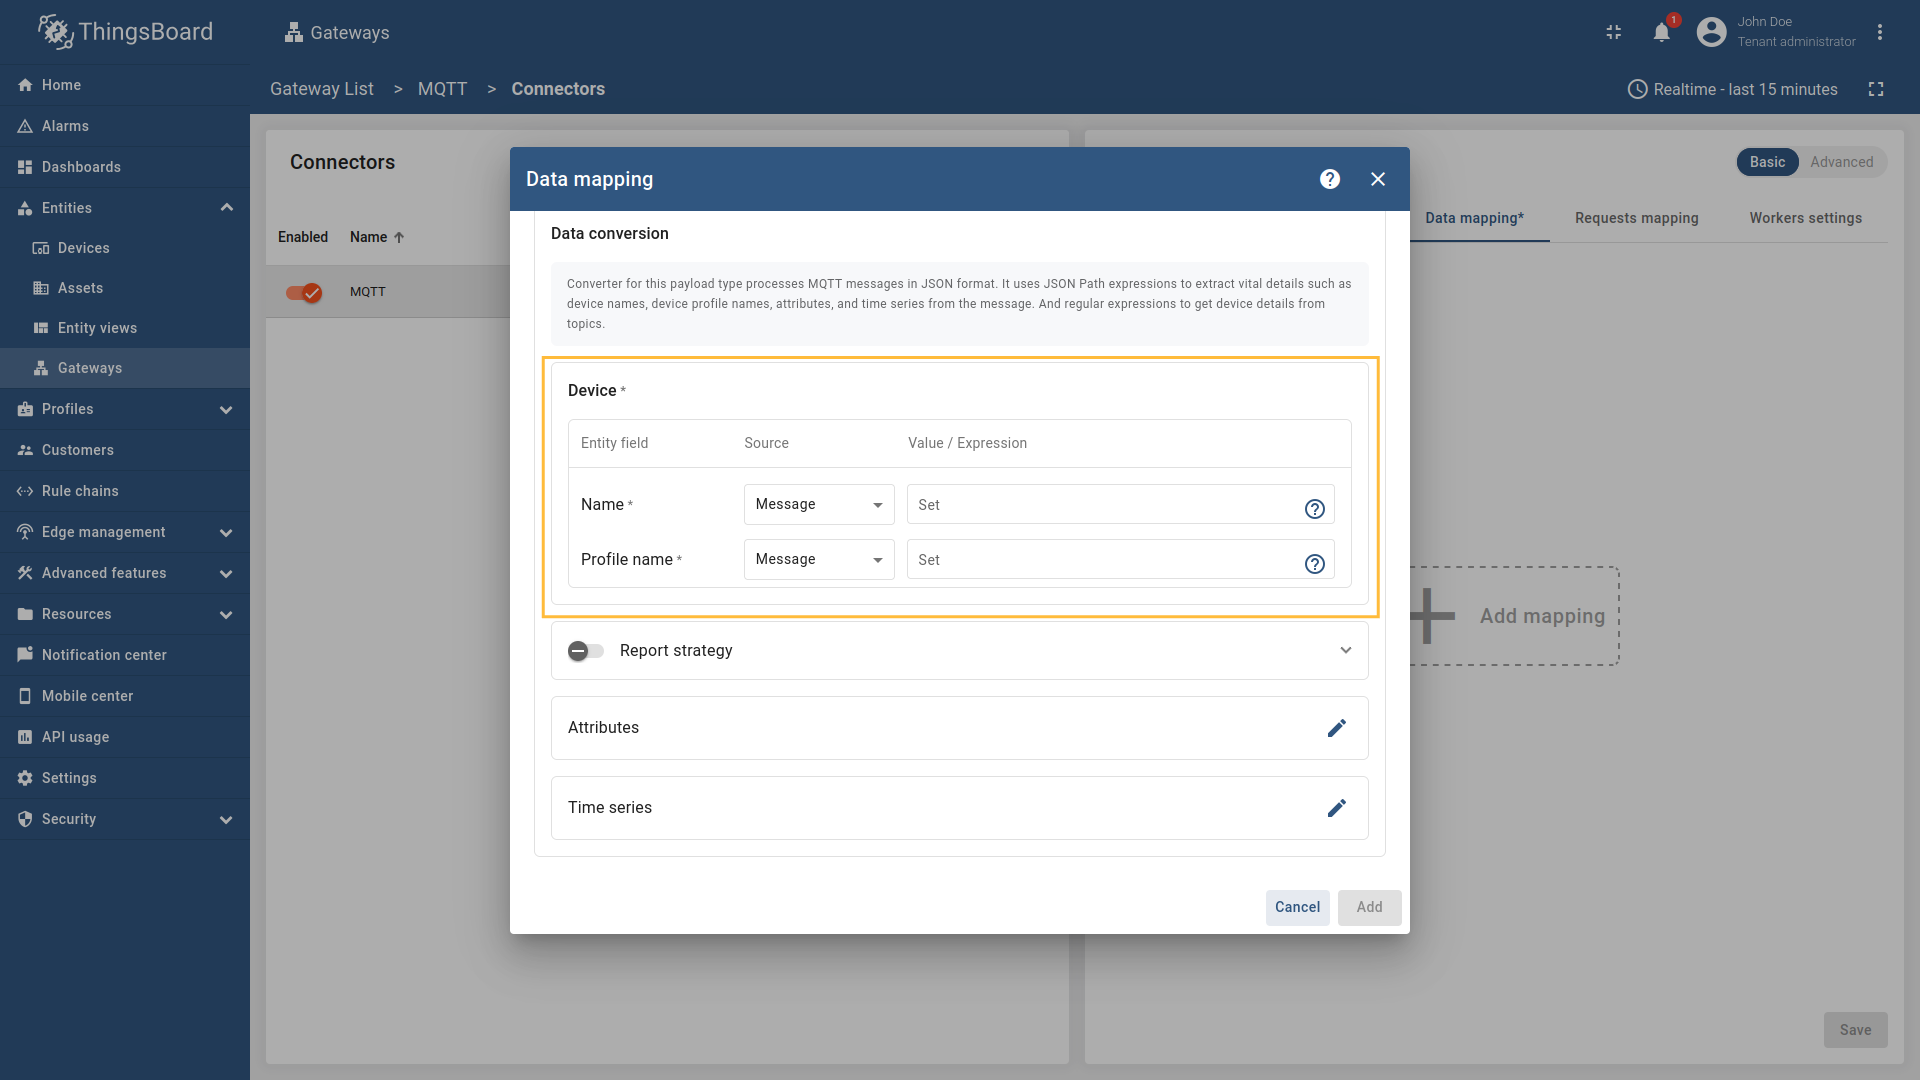
Provide the following fields in the Data conversion subsection of the opened modal window: Name and Profile name (can be sourced from Message, Topic or Constant).
Additional information about the report strategy can be found here.
All configuration parameters list, and their detailed description can be found in the Advanced configuration section.
More usage examples can be found in the Usage examples section.
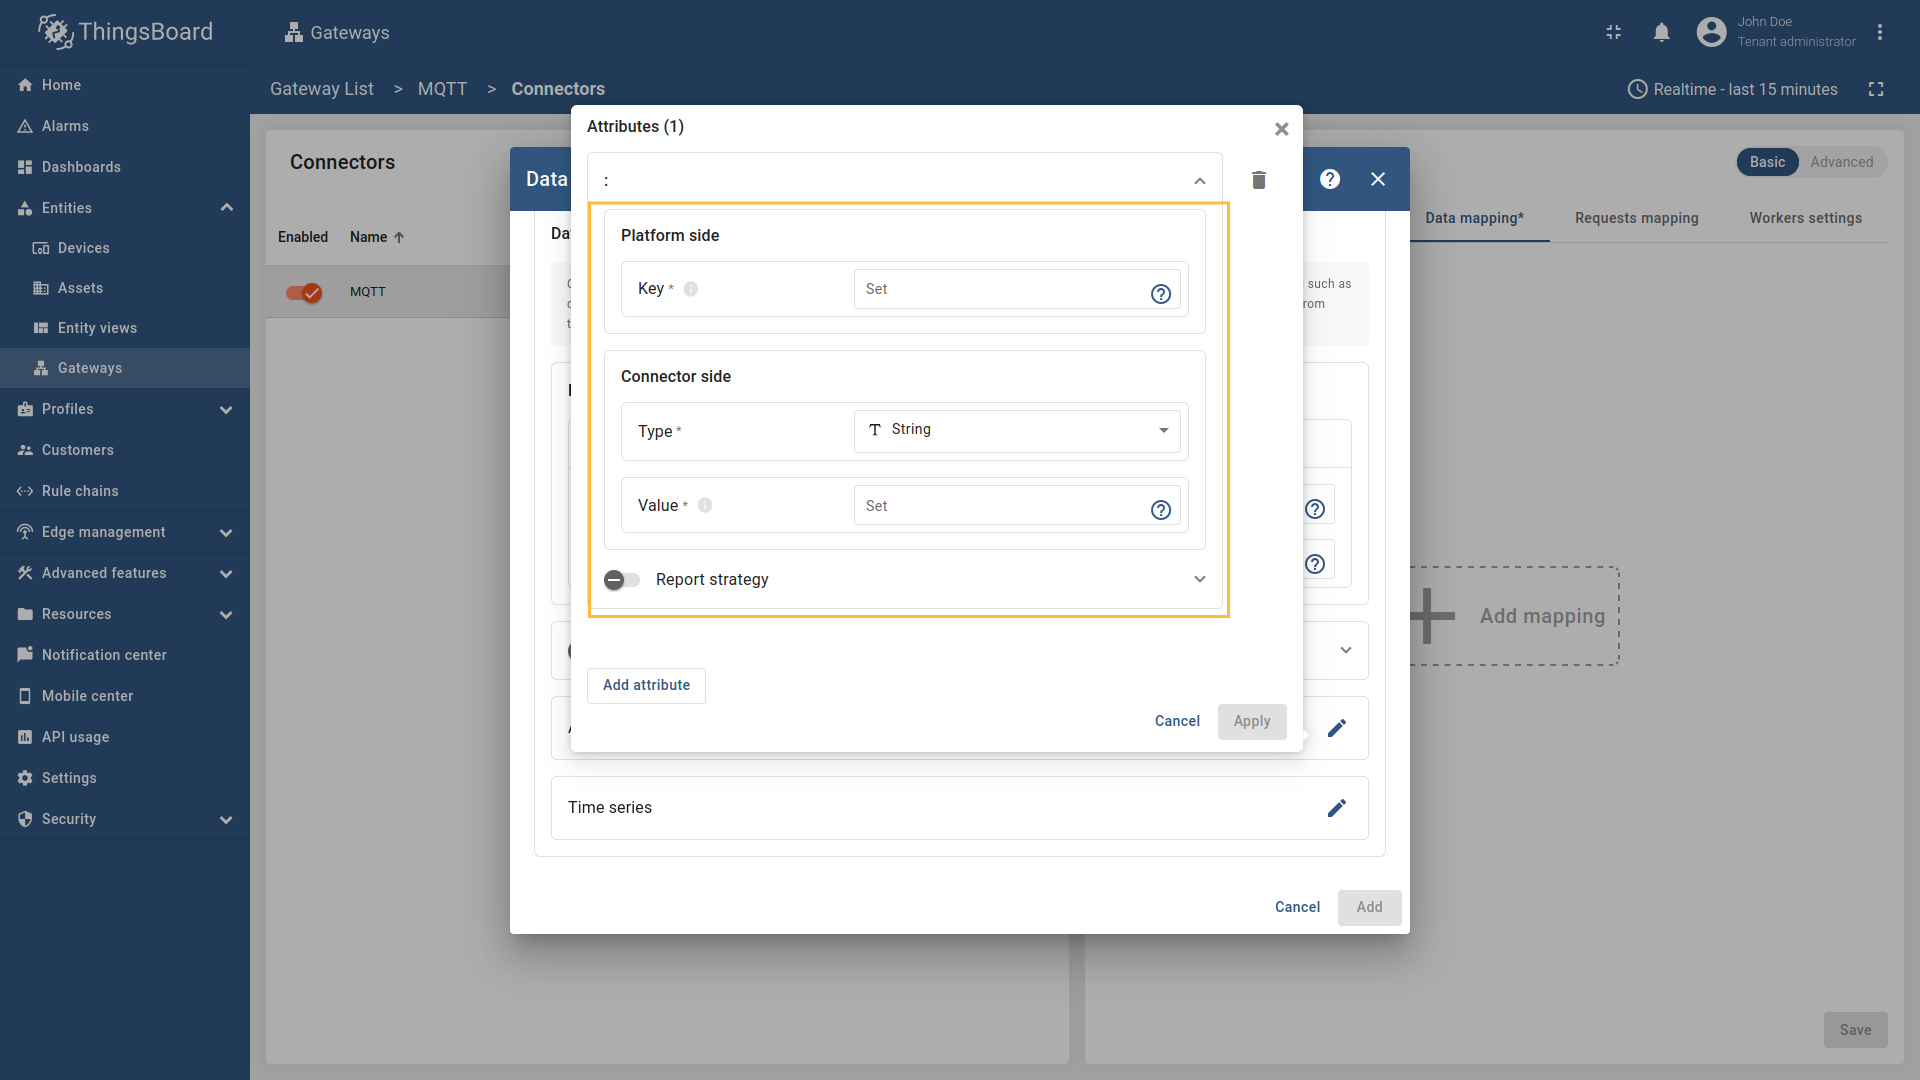
Attributes and Time series
The configuration in this subsection provides settings for processing data from MQTT topic/topics. These settings will be interpreted in ThingsBoard platform instance as attributes/time series of the device.
The following parameters are used to configure device attributes and time series:
- Key - the key of the attribute/time series in ThingsBoard. It can be specified as a static value.
- Type - the type of attribute/time series field (It could be one of the following
string,boolean,integer,doubleorRawif the Payload typeBytes.): - Value - the value of the attribute/time series that will be sent to the platform device. It should be specified depending on the selected Payload type (
Bytes,JSON,CUSTOM).
All configuration parameters list, and their detailed description can be found in the Advanced configuration section.
More usage examples can be found in the Usage examples section.
To add new time series or attribute key, follow these steps:
-
Click the “pencil” icon in the “Attributes” section to add new attribute key;
-
Click on “Add attribute” in the opened window;
-
Enter the “Key” field, select the “Type” (It could be one of the following
string,boolean,integer,doubleorRawif the Payload typeBytes.), enter “Value” and click “Apply” button; -
Now click on the “pencil” icon in the “Time series” section to add new time series key;
-
Click on “Add time series” in the opened window;
-
Enter the “Key” field, select the “Type” (It could be one of the following
string,boolean,integer,doubleorRawif the Payload typeBytes.), enter “Value” and click “Apply” button.

Click the “pencil” icon in the “Attributes” section to add new attribute key;
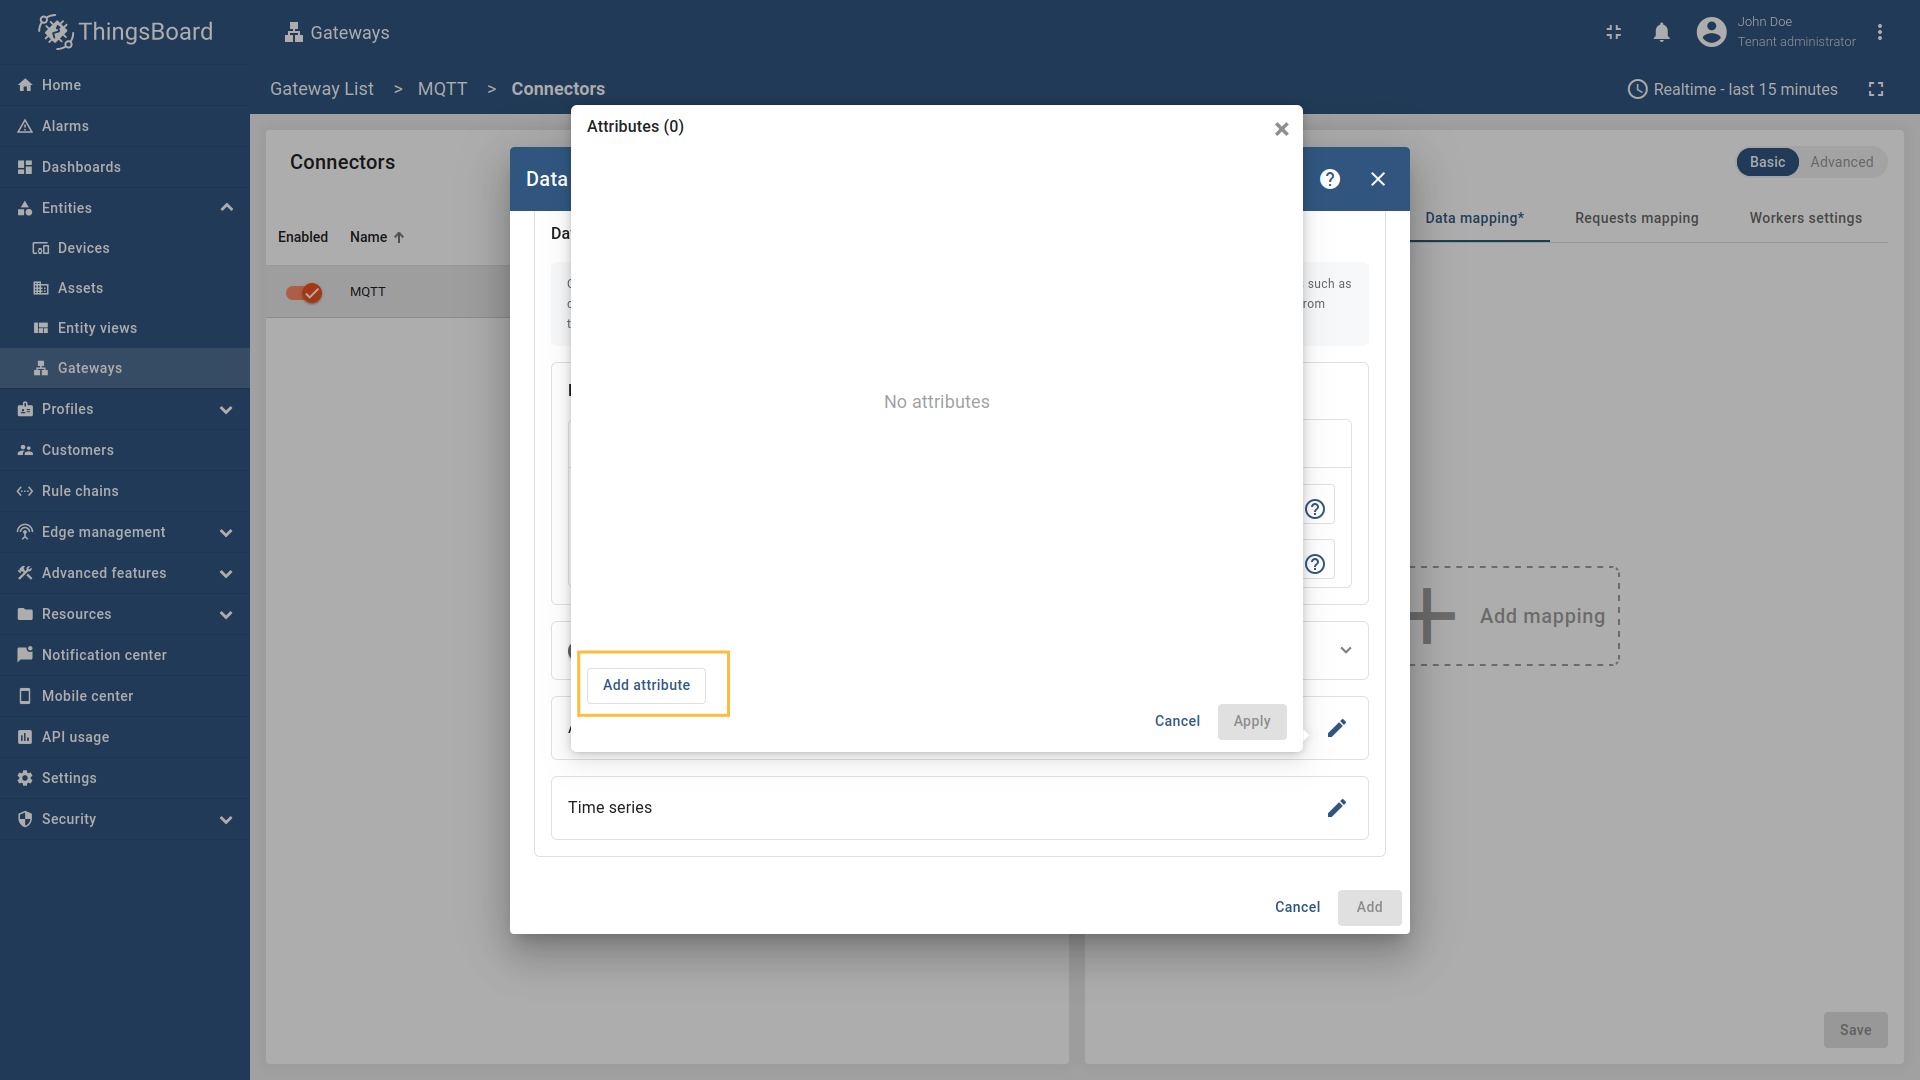
Click on “Add attribute” in the opened window;
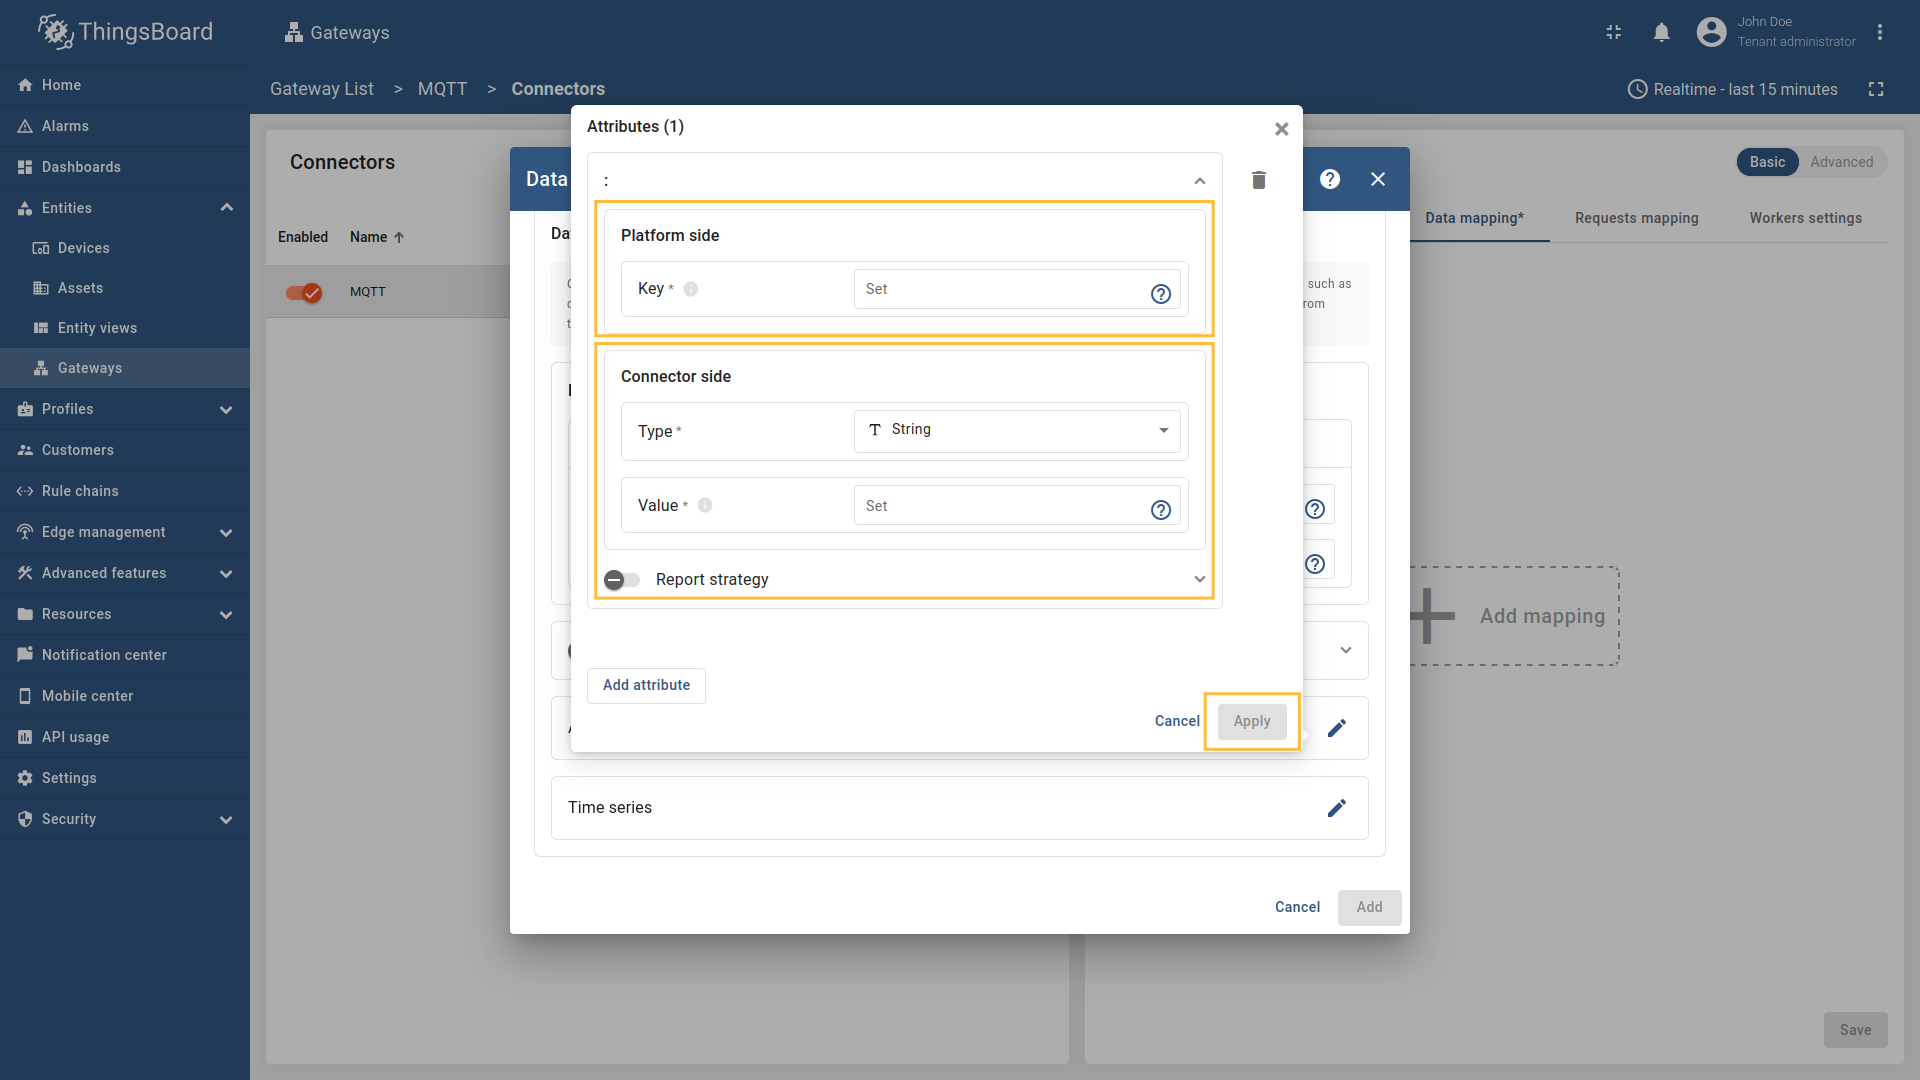
Enter the “Key” field, select the “Type” (It could be one of the following string, boolean, integer, double or Raw if the Payload type Bytes.), enter “Value” and click “Apply” button;
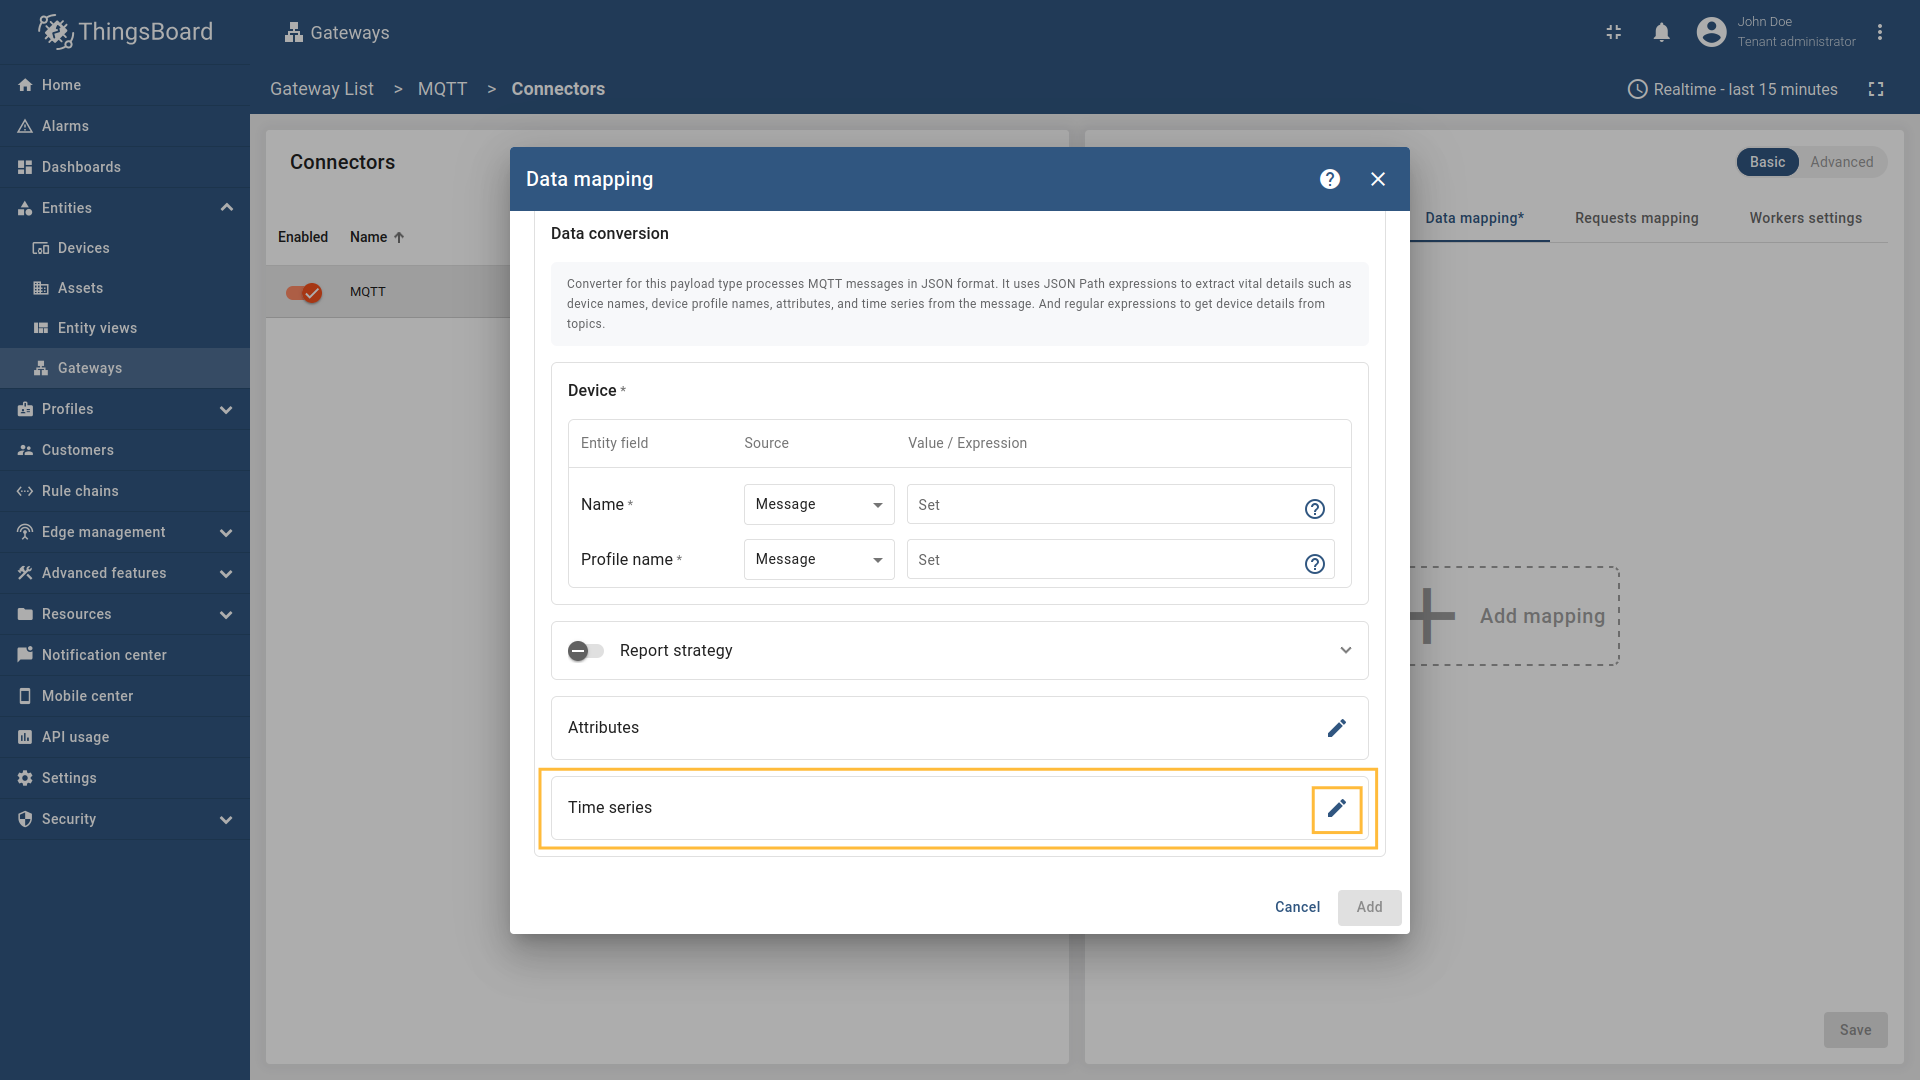
Now click on the “pencil” icon in the “Time series” section to add new time series key;
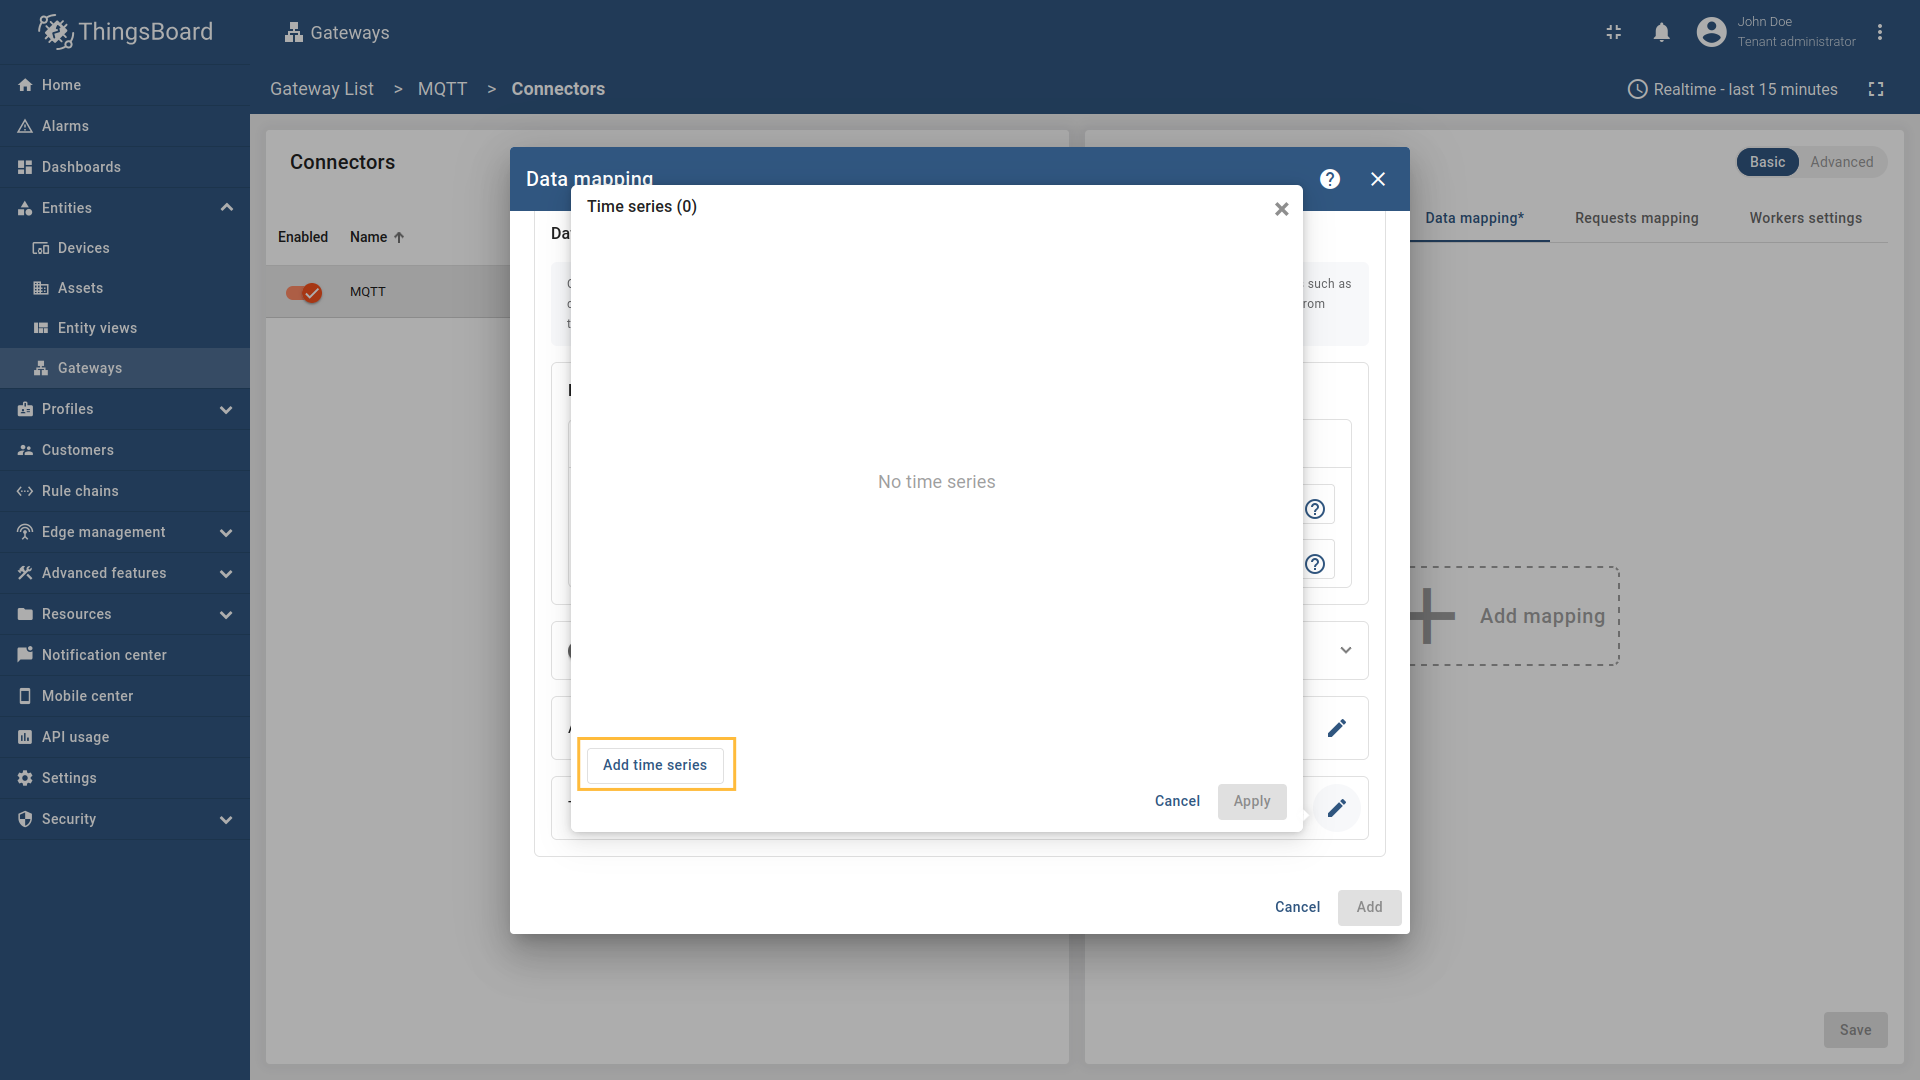
Click on “Add time series” in the opened window;
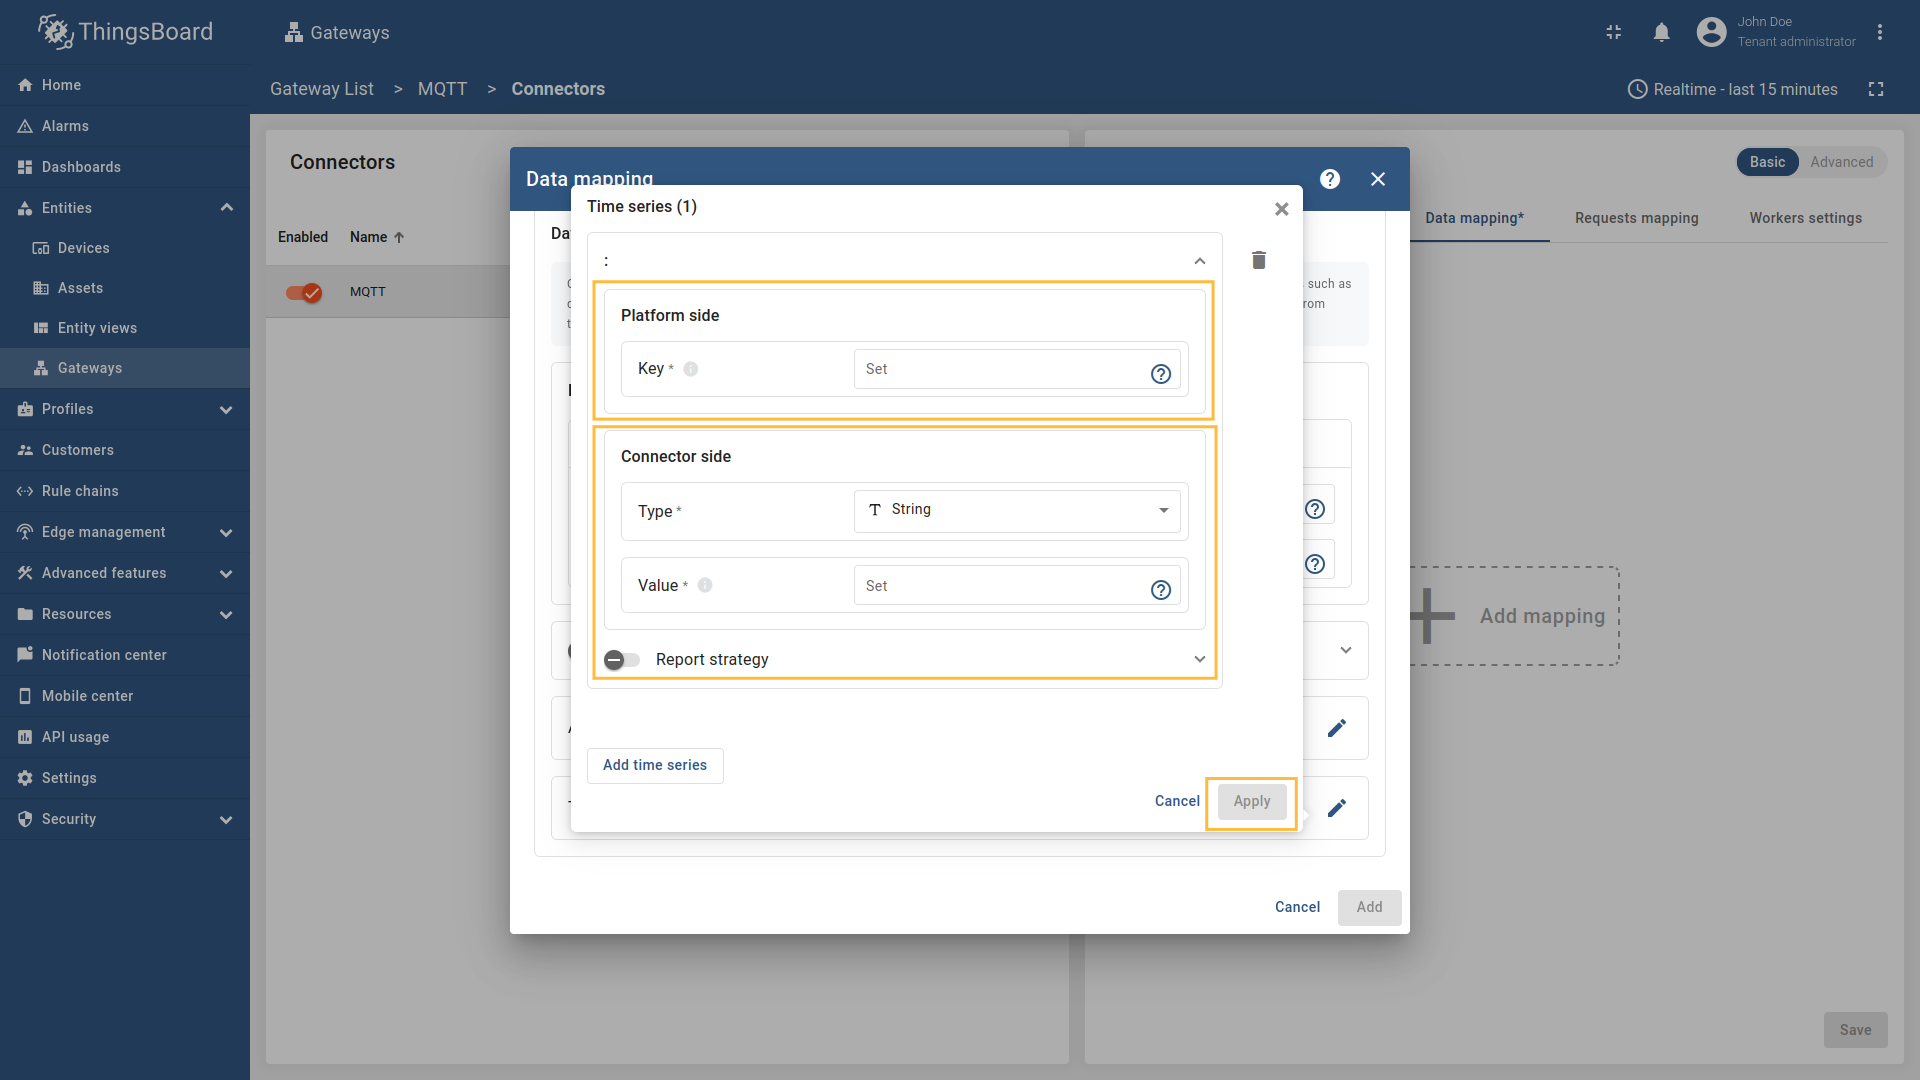
Enter the “Key” field, select the “Type” (It could be one of the following string, boolean, integer, double or Raw if the Payload type Bytes.), enter “Value” and click “Apply” button.
You can enable a specific report strategy for each time series or attribute. This strategy defines how often
data is sent to the ThingsBoard server. The following strategies are available:
- On report period - sends data to ThingsBoard after the report period;
- On value change - sends data to ThingsBoard when the value changes;
- On value change or report period - sends data to ThingsBoard when the value changes or after the report period;
- On received - sends data to ThingsBoard after receiving data from the device (default strategy).
Additional information about the report strategy can be found here.

Usage examples
Note: If you are running the gateway in Docker and using our MQTT Demo broker from Getting Started , you must use host.docker.internal as the host.
The device name and profile can be extracted from the incoming message. In this example, we will use As an example, we will use ThingsBoard MQTT Demo Broker, which can be run using Docker and the following command: The broker available at We also want to extract the device name from the
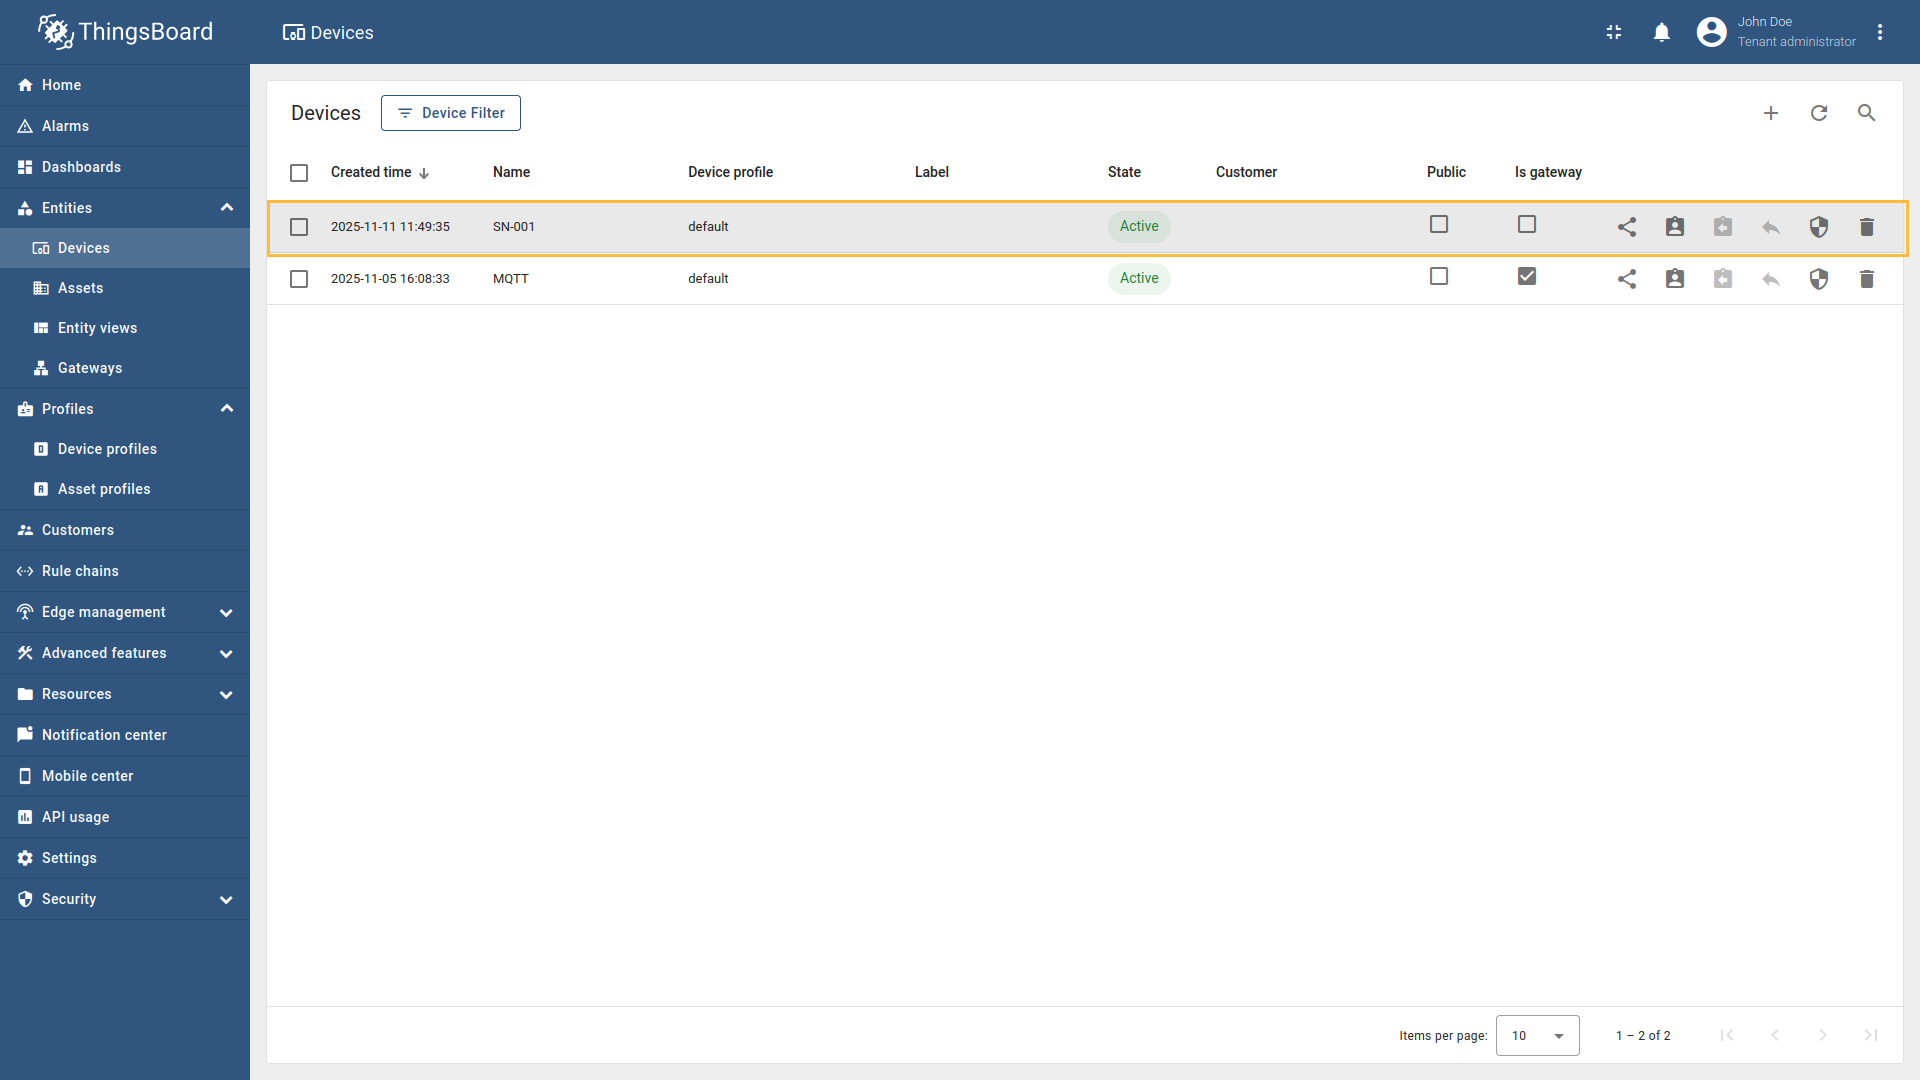
 Go to “Entities” → “Gateways” on the left sidebar and select your gateway. 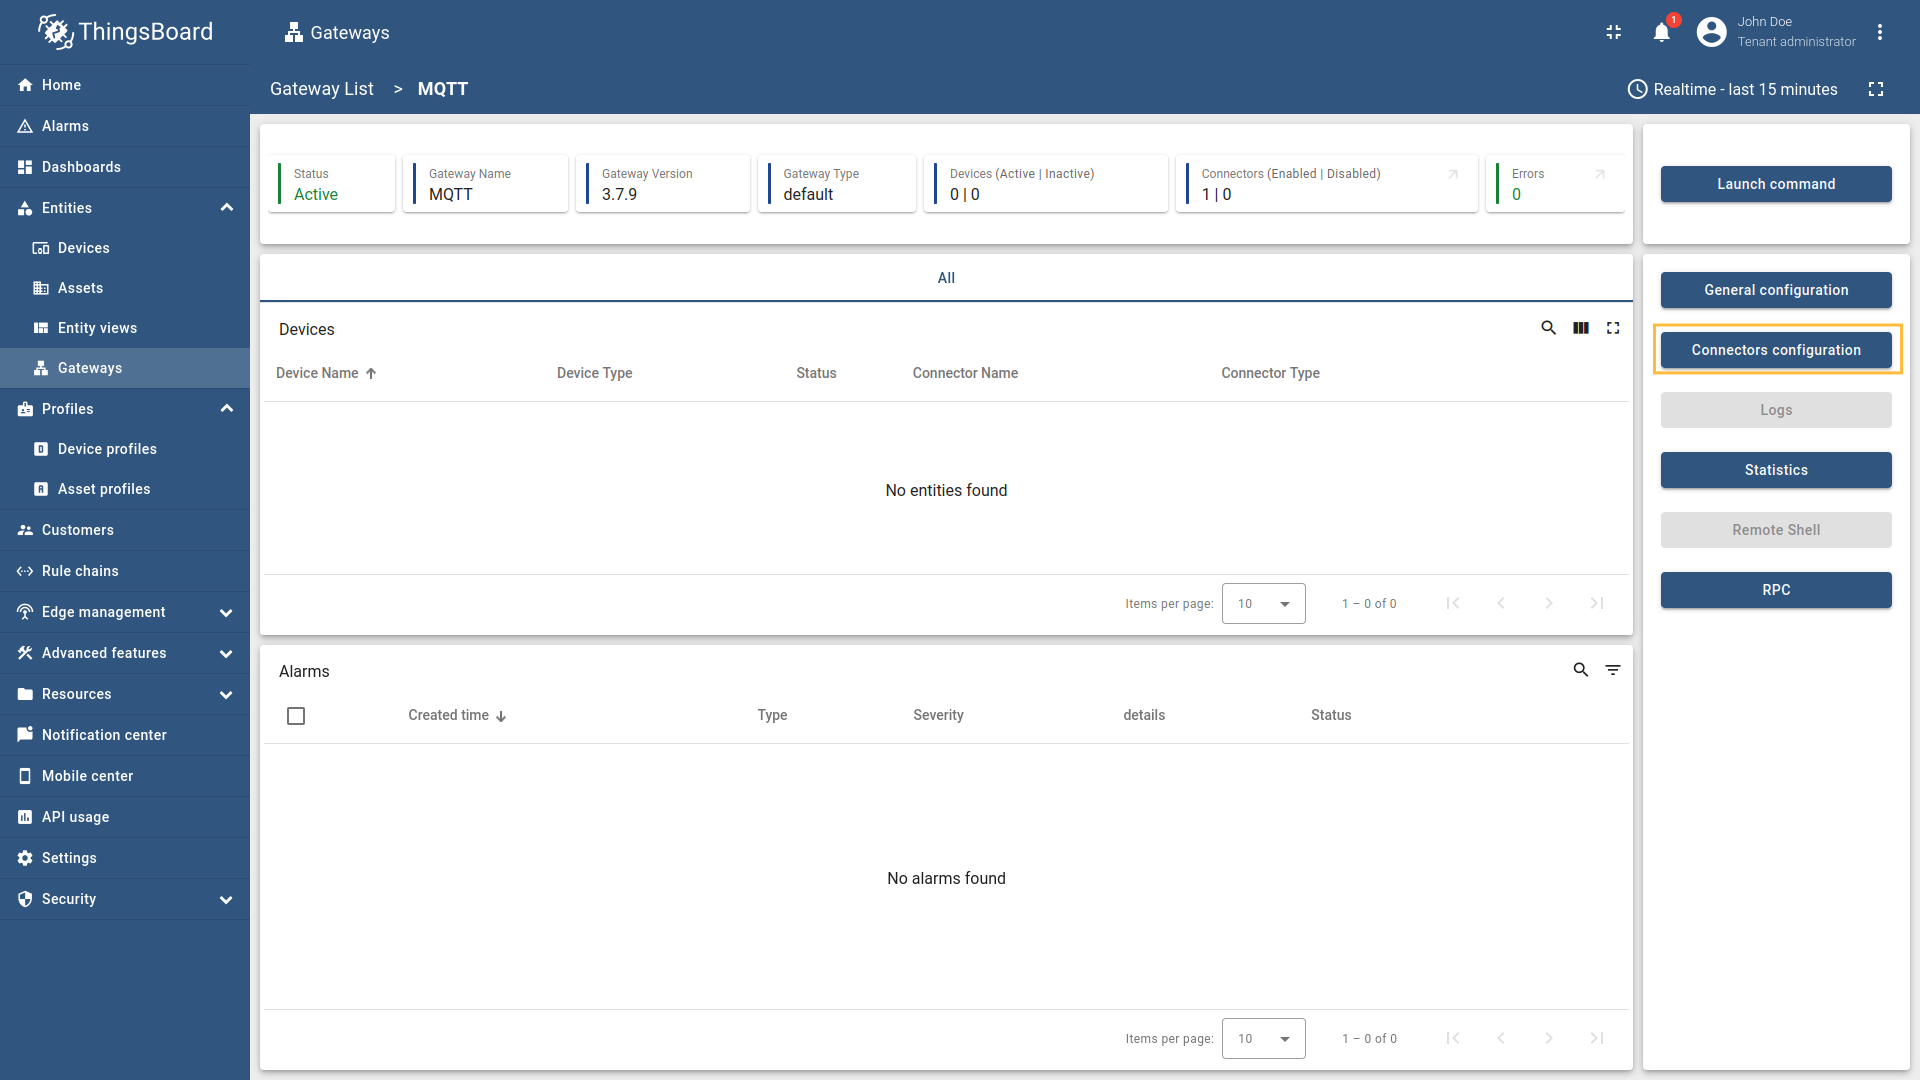 Click on the “Connectors configuration” button on the right side menu. 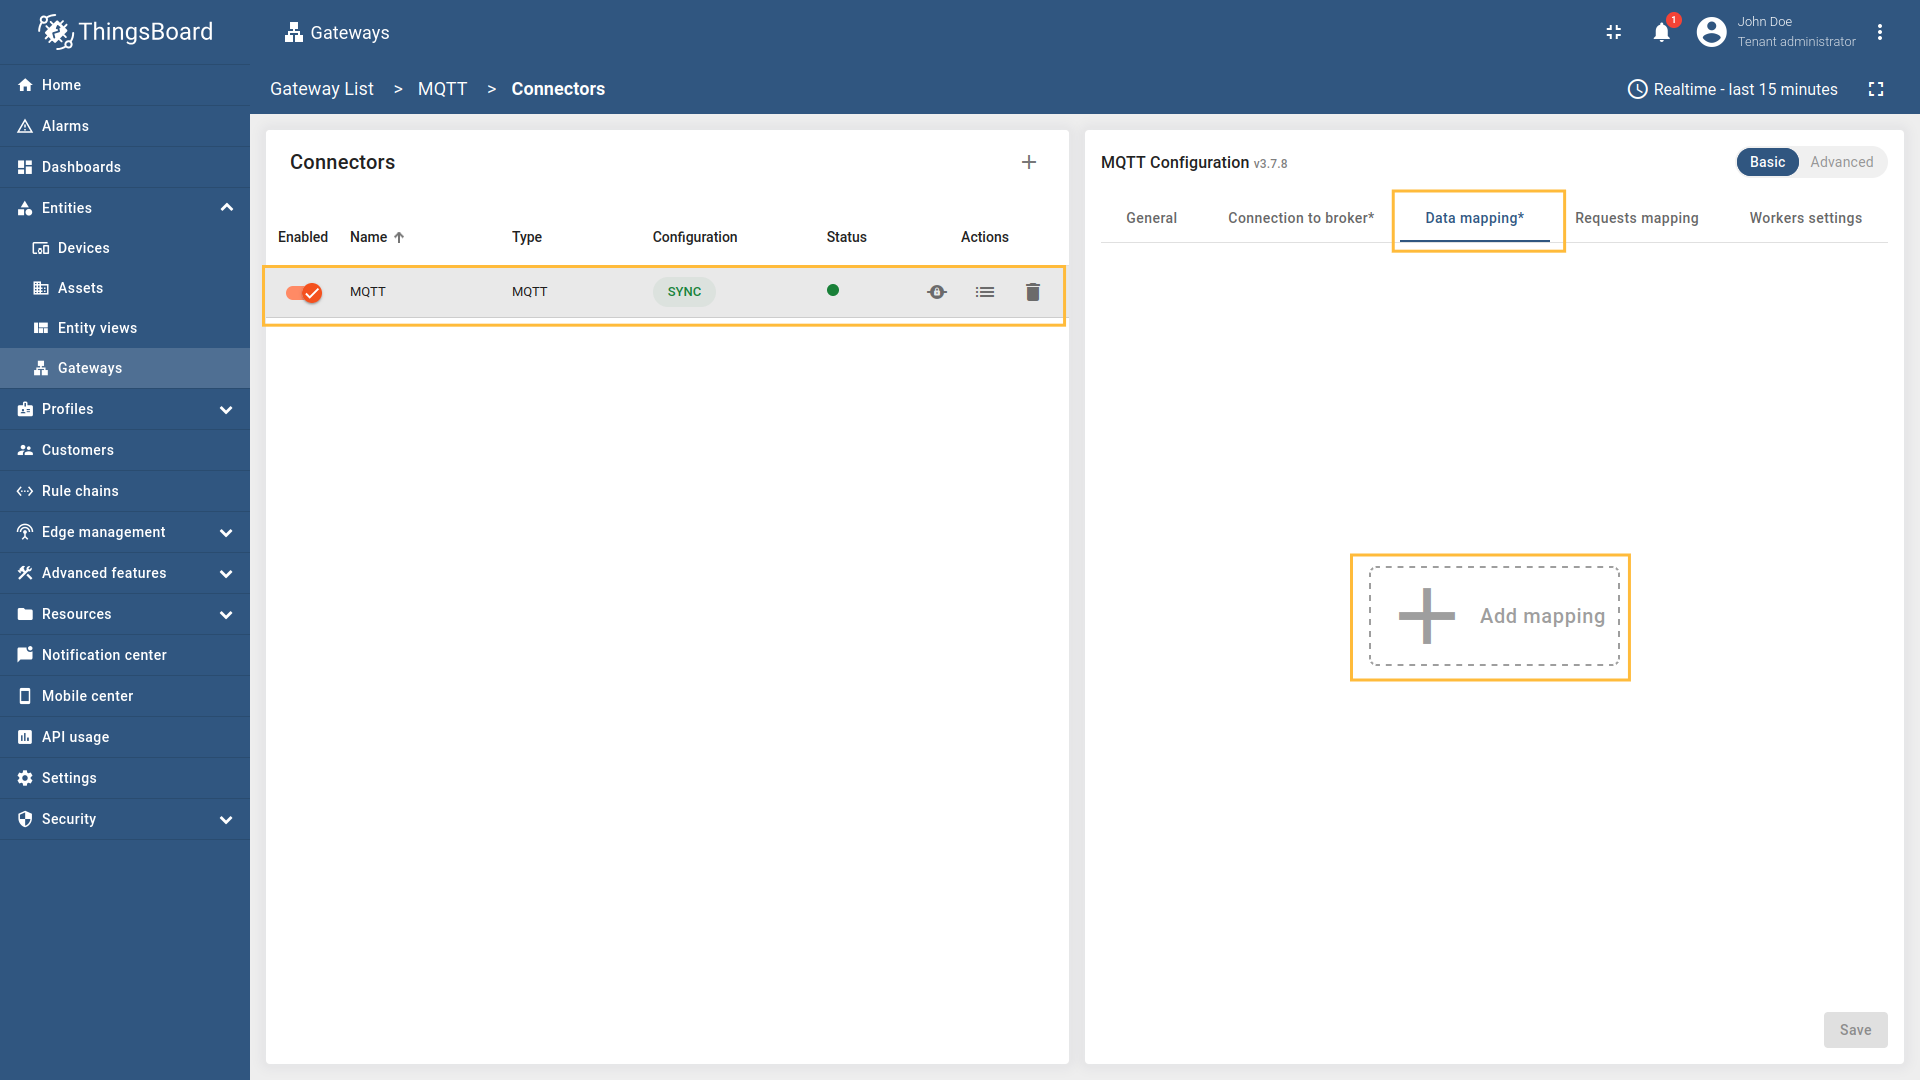 Select the created MQTT connector, select “Basic” click on the “Data mapping” Click on the “+ Add mapping” button.  In the opened window, fill in “Topic filter” field with  to the field that contains the device name.](/images/gateway/mqtt-connector/examples/device-name-and-profile-message-json-5.png) Then under “Device” subsection choose “Message” for the “Name” field, enter  to the field that contains the device name.](/images/gateway/mqtt-connector/examples/device-name-and-profile-message-json-6.png) Then under “Profile name” subsection choose “Message” for the “Name” field, enter  Also, we need to add at least one attribute/time series because the connector will not add a device without any data to read. Click on the “pencil” icon next to the “Time series” section. 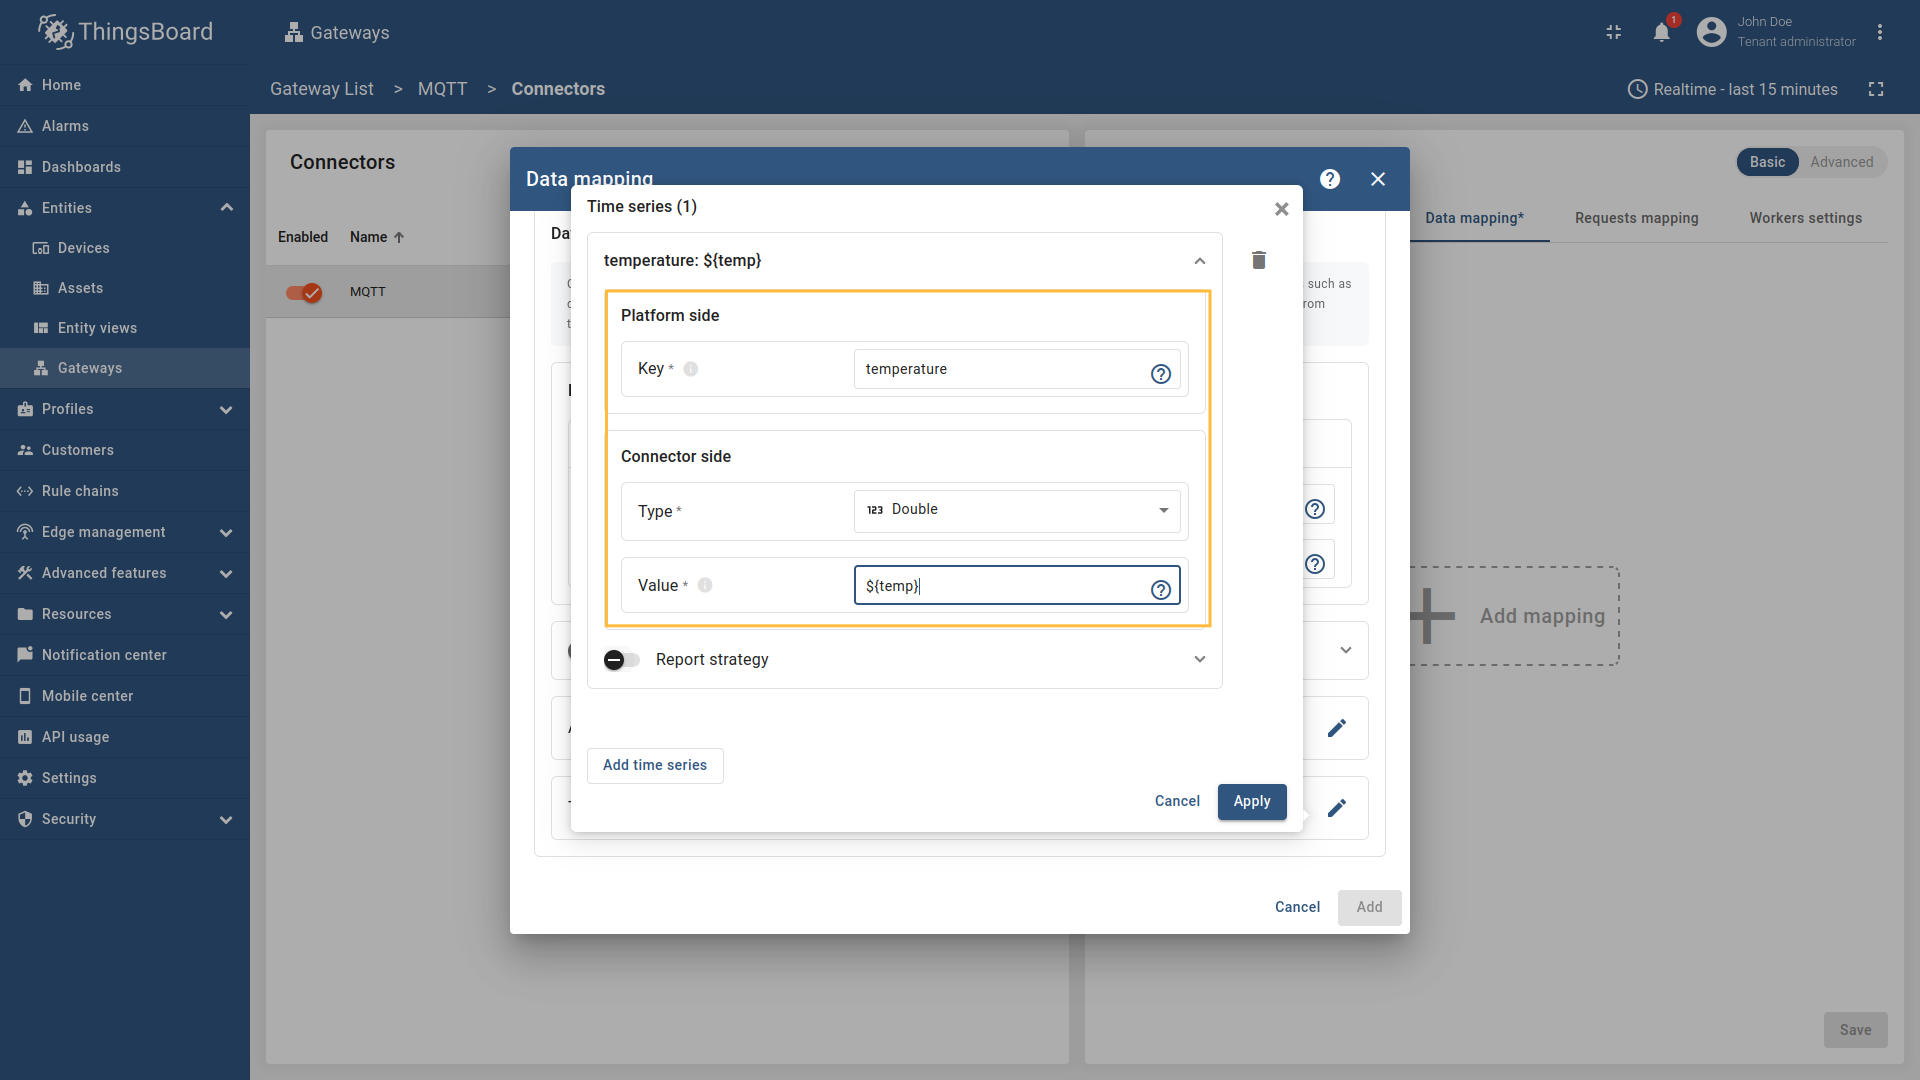 In the opened window, click on the “Add time series” button and fill the fields as on the corresponding image. Do not forget to save changes. Now we can check if the device name and profile are set correctly. Go to “Entities” > “Devices” and as you can see, the device
name is set to
If you are using advanced configuration mode and want to set the device name and profile using topic and json path, you can use the following configuration: |

The device name and profile can be extracted from the topic. In this example, we will use As an example, we will use ThingsBoard MQTT Demo Broker, which can be run using Docker and the following command: The broker available at To match this topic, either enter Let’s configure the MQTT connector to take the device name from the topic and use a constant for the device profile (e.g.,
Go to “Entities” → “Gateways” on the left sidebar and select your gateway. Click on the “Connectors configuration” button on the right side menu. Select the created MQTT connector, select “Basic” click on the “Data mapping” Click on the “+ Add mapping” button. 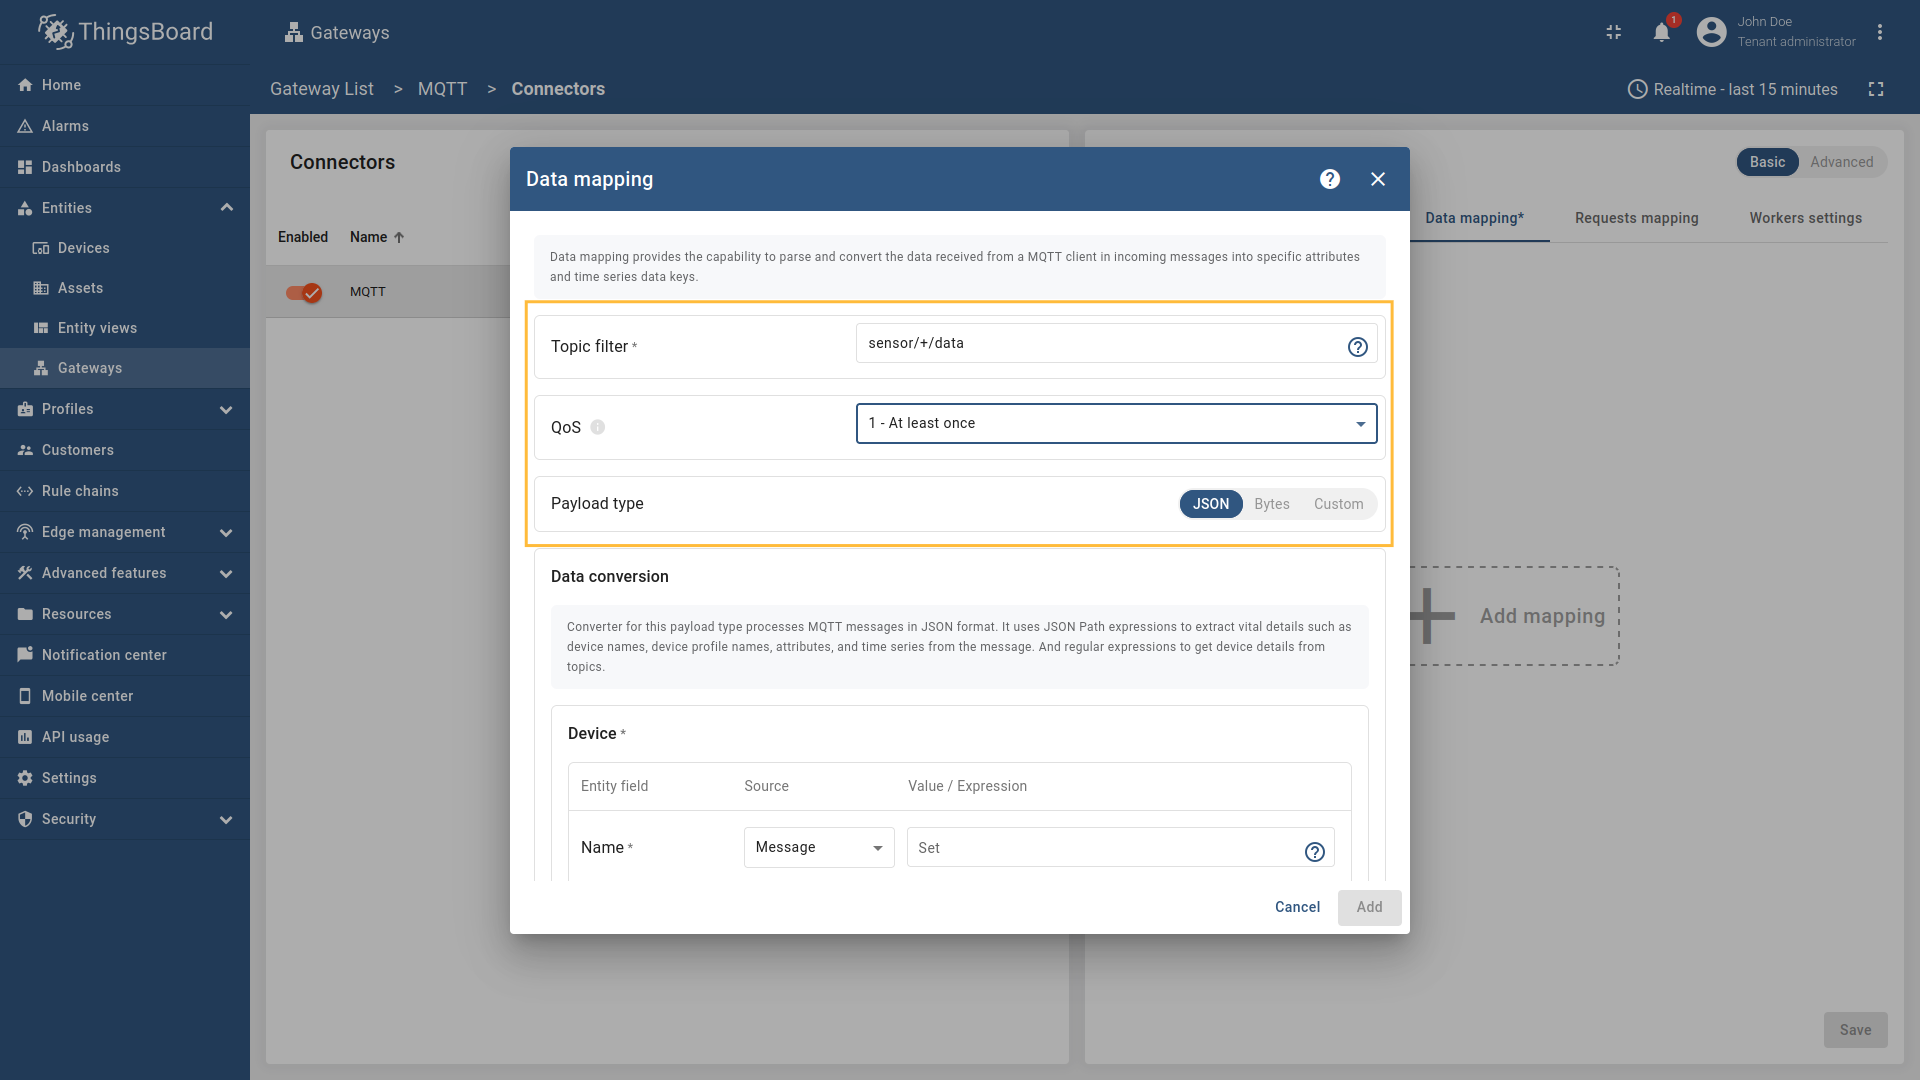 In the opened window, fill in “Topic filter” field with  used to extract device name.](/images/gateway/mqtt-connector/examples/device-name-and-profile-topic-constant-json-5.png) Then under “Device” subsection choose “Topic” for the “Name” field, enter 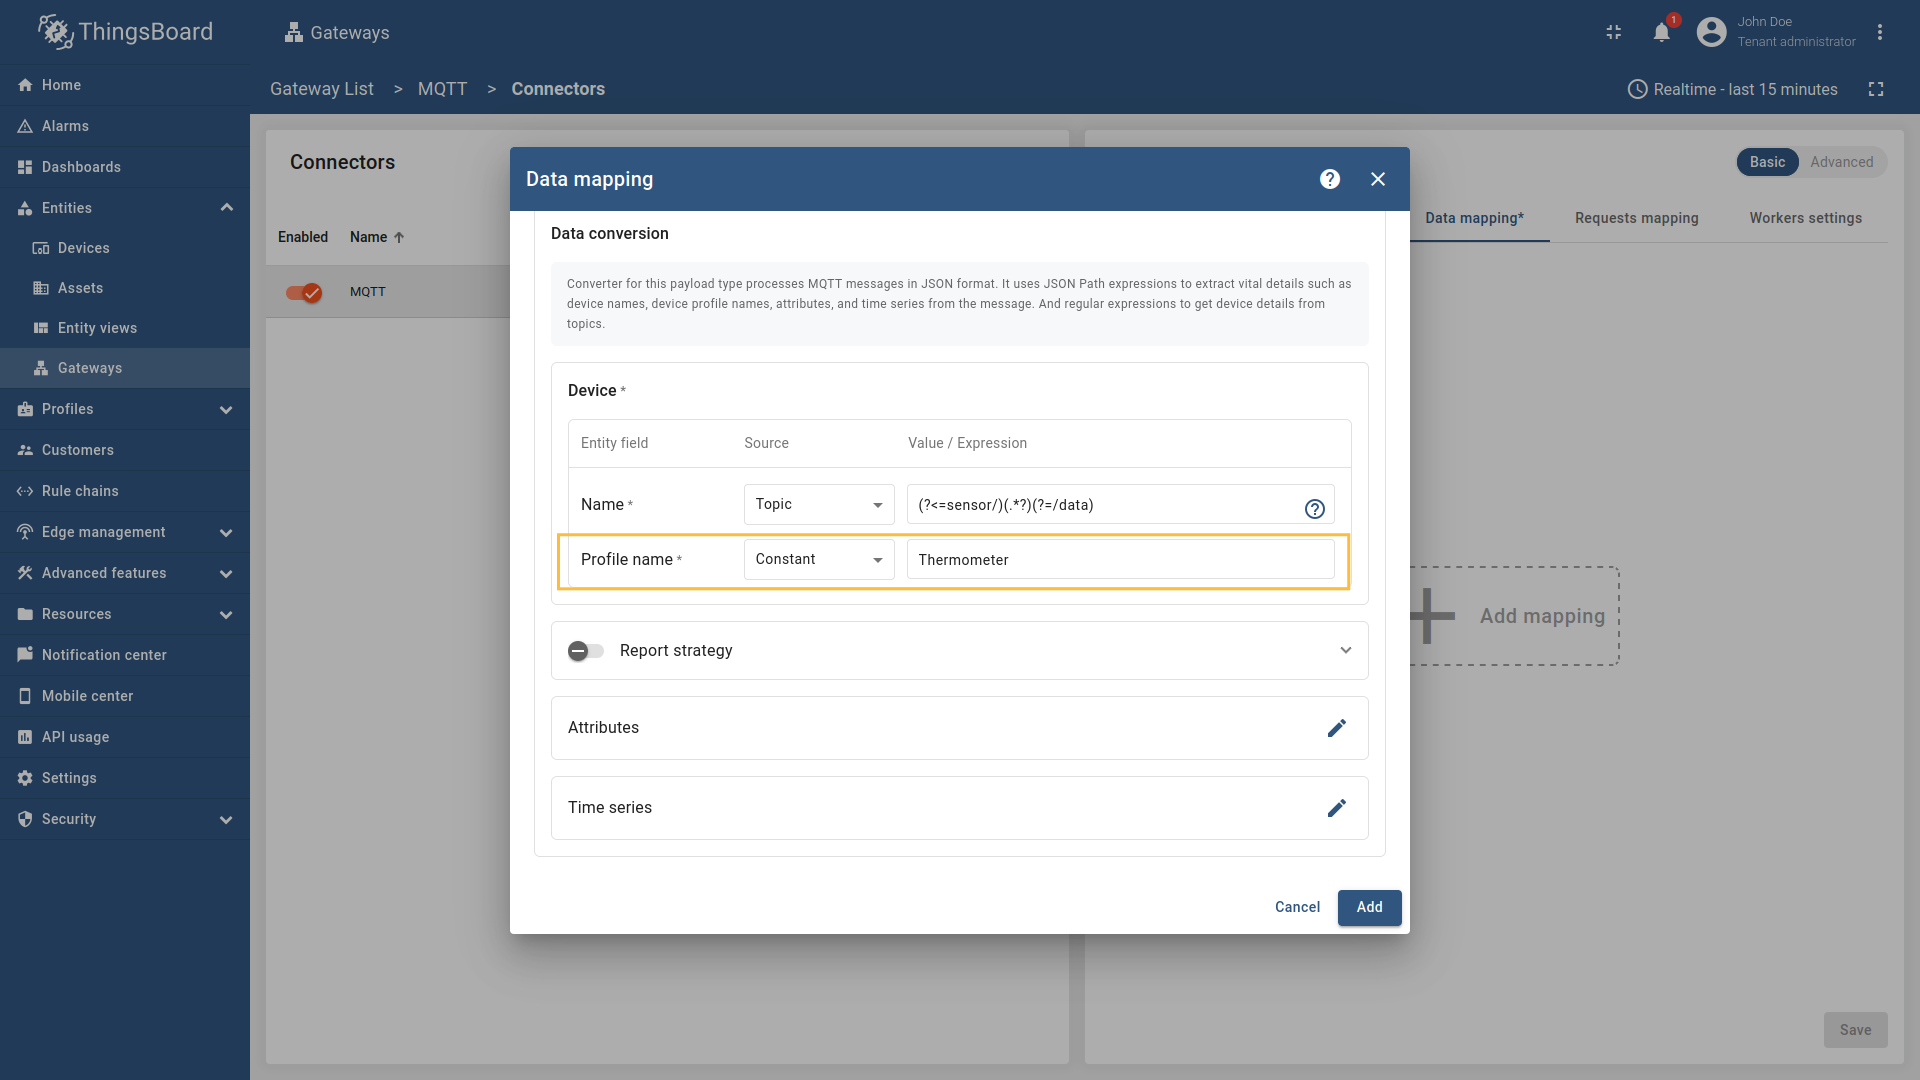 Then under “Profile name” subsection choose “Constant” for the “Name” field, enter  Also, we need to add at least one attribute/time series because the connector will not add a device without any data to read. Click on the “pencil” icon next to the “Time series” section. In the opened window, click on the “Add time series” button and fill the fields as on the corresponding image. Do not forget to save changes. Now we can check if the device name and profile are set correctly. Go to “Entities” > “Devices” and as you can see, the device
name is set to
If you are using advanced configuration mode and want to set the device name and profile using topic and json path, you can use the following configuration: |

The device name and profile can be extracted from the message source and bytes payload. In this example, we will use As an example, we will use ThingsBoard MQTT Demo Broker, which can be run using Docker and the following command: The broker available at
Suppose we want to create a device from this payload. The first four bytes represent the device name, and the remaining bytes represent the temperature value. Configure the MQTT connector to extract the device name from the raw bytes and use a constant value for the device profile (for example, Follow these steps:
Go to “Entities” → “Gateways” on the left sidebar and select your gateway. Click on the “Connectors configuration” button on the right side menu. Select the created MQTT connector, select “Basic” click on the “Data mapping” Click on the “+ Add mapping” button. 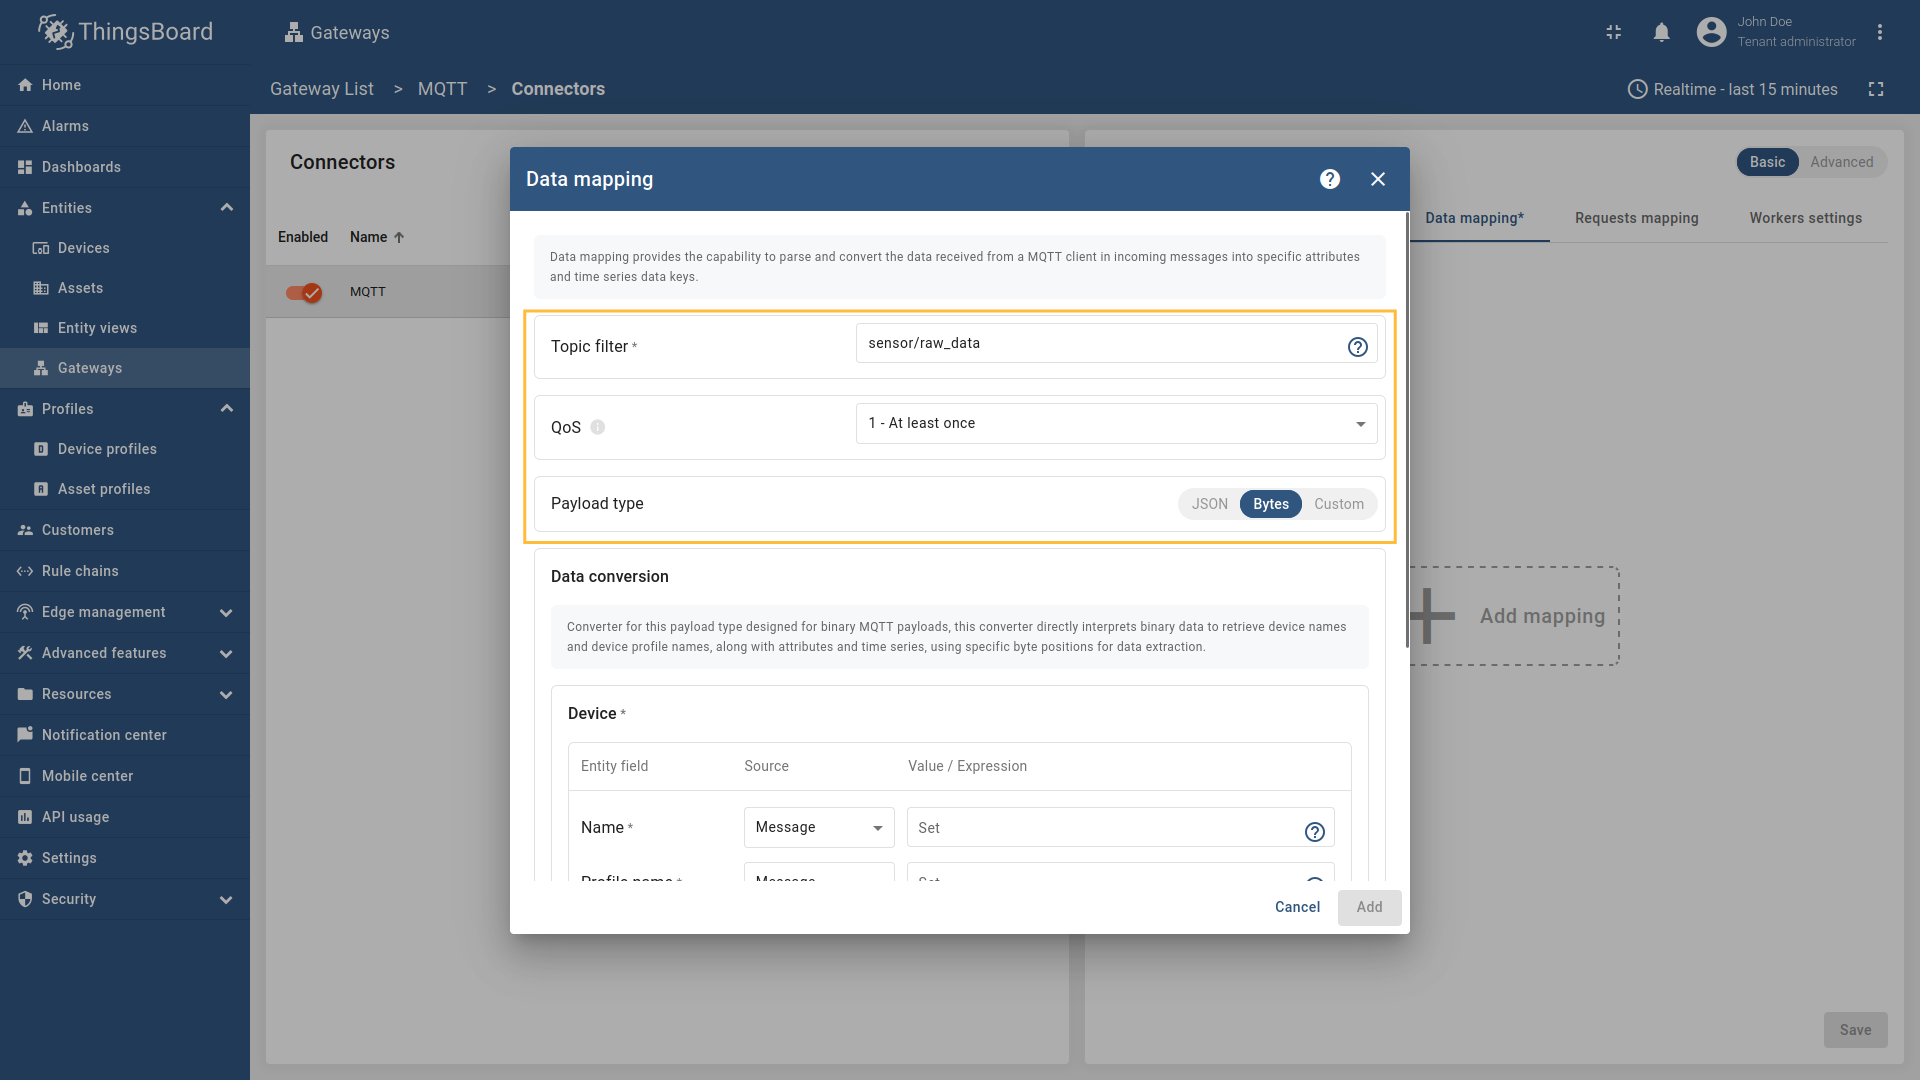 In the opened window, fill in “Topic filter” field with ![Then under "Device" subsection choose "Message" for the "Name" field, enter `[0:4]`, those are the [slices](/docs/iot-gateway/config/mqtt/#slices) used to extract device name.](/images/gateway/mqtt-connector/examples/device-name-and-profile-message-and-constant-bytes-5.png) Then under “Device” subsection choose “Message” for the “Name” field, enter 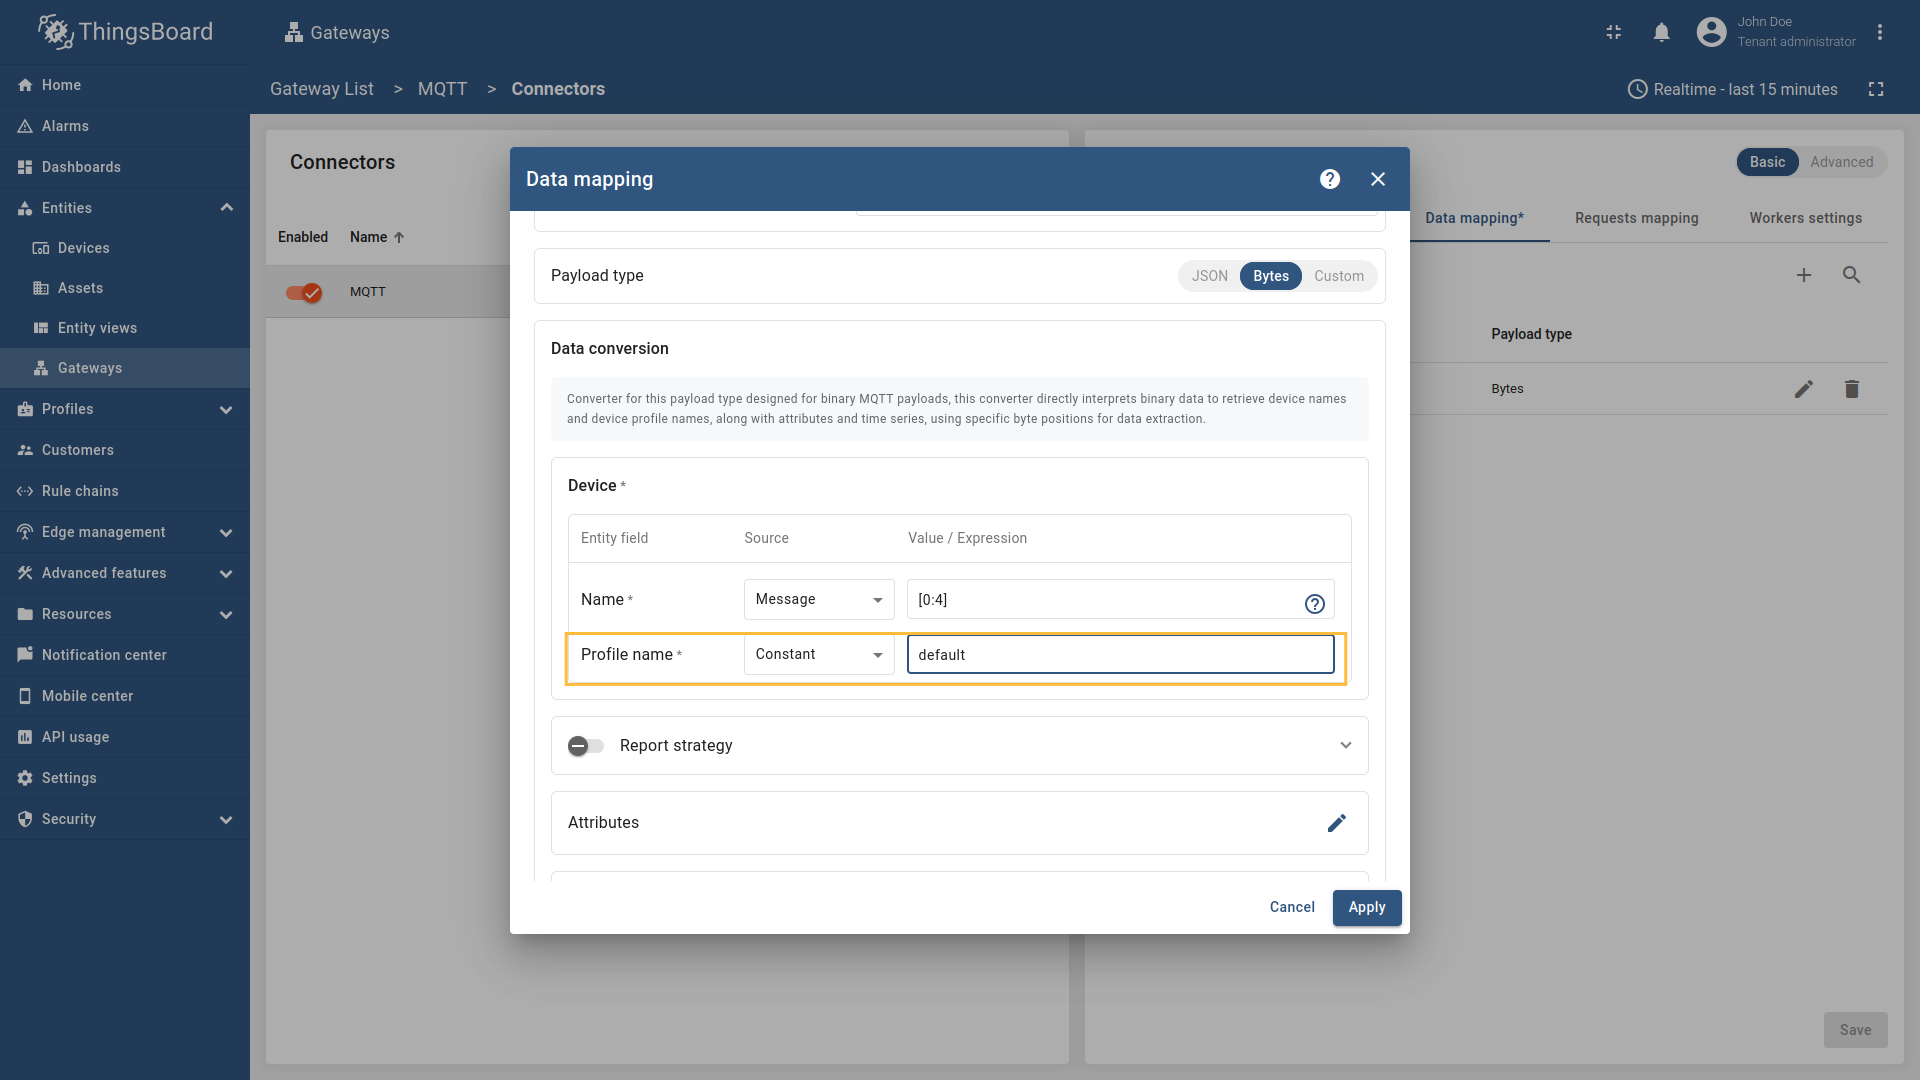 Then under “Profile name” subsection choose “Constant” for the “Name” field, enter  Also, we need to add at least one attribute/time series because the connector will not add a device without any data to read as we remember. The first four bytes represent the device name, and the remaining bytes represent the temperature value. Click on the “pencil” icon next to the “Time series” section. 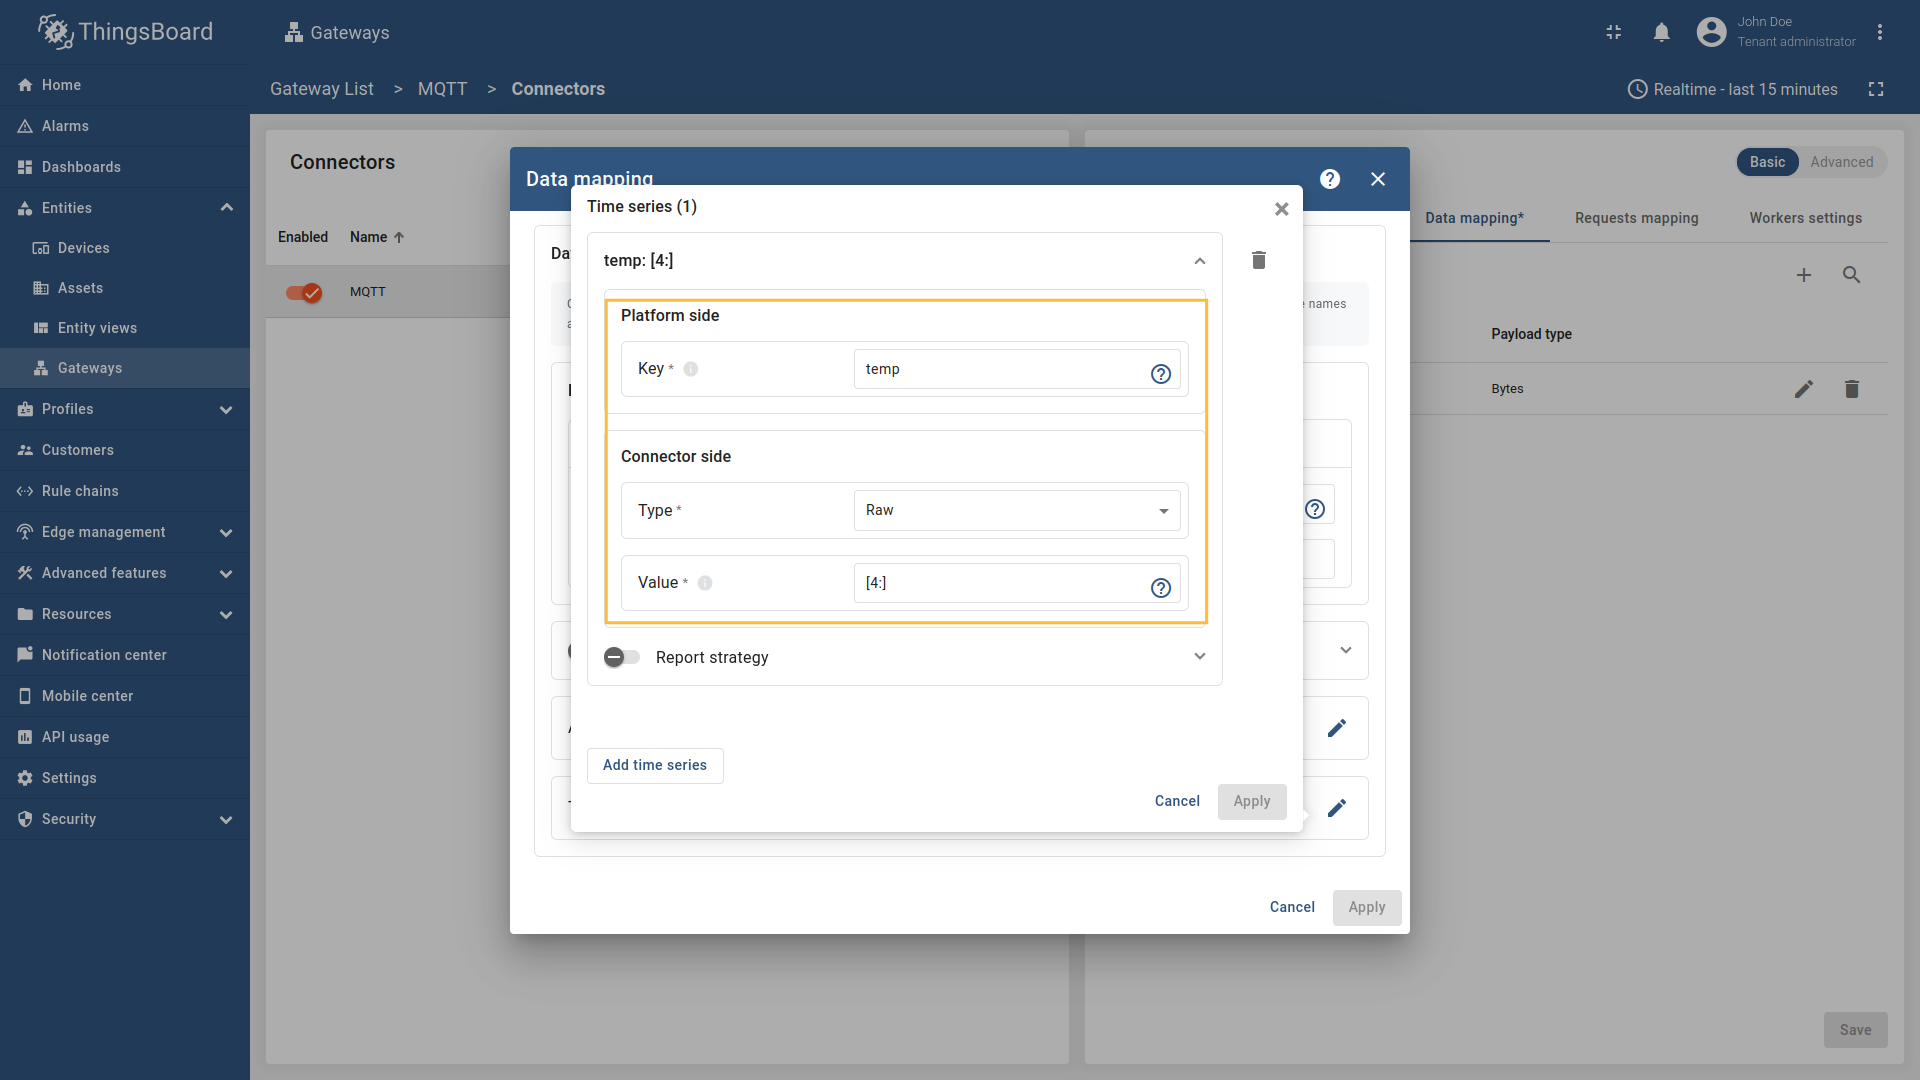 In the opened window, click on the “Add time series” button and fill the fields as on the corresponding image. Do not forget to save changes. Now we can check if the device name and profile are set correctly. Go to “Entities” > “Devices” and as you can see, the device
name is set to
If you are using advanced configuration mode and want to set the device name and profile using topic and json path, you can use the following configuration: |

Attributes and time series data can be retrieved using json-path
in the MQTT Connector. This allows to extract the required field(s) from the As an example, we will use ThingsBoard MQTT Demo Broker, which can be run using Docker and the following command: The broker available at We’ll map
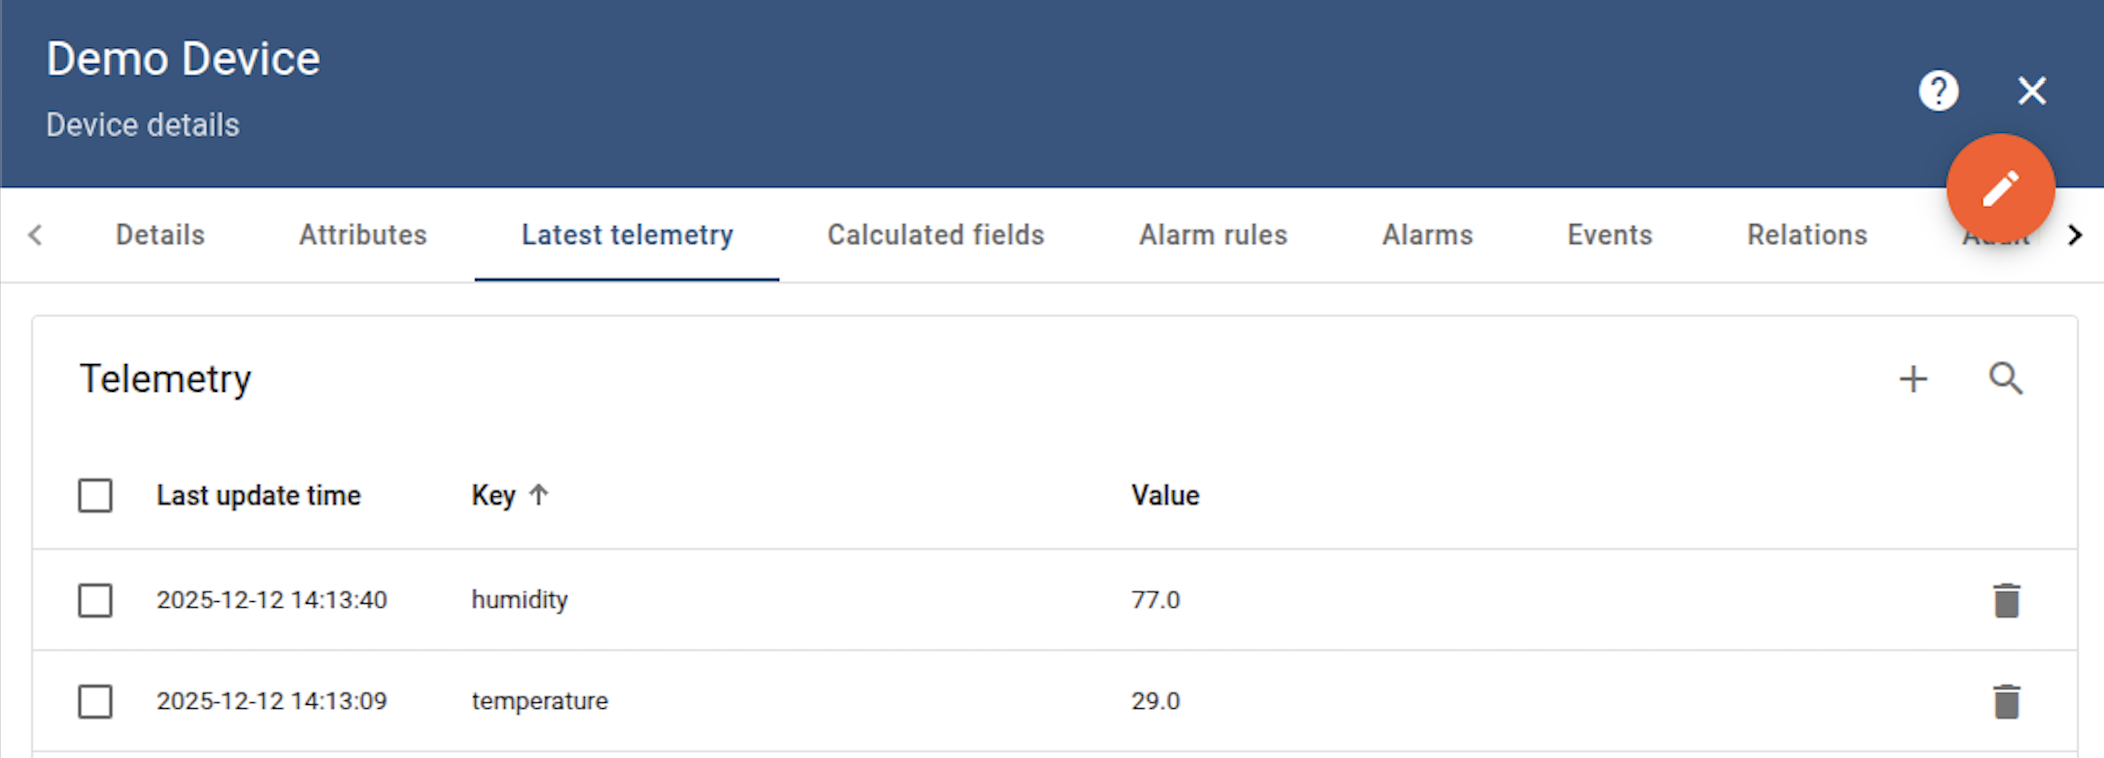
Go to “Entities” → “Gateways” on the left sidebar and select your gateway. Click on the “Connectors configuration” button on the right side menu. Select the MQTT connector, click on the “Data mapping” tab. Select data mapping with device to which you want to add time series data (if you do not know how to add a new device, see the Getting Started guide or Data mapping section of this guide with respective examples).  In the opened data mapping windows, click on the “pencil” icon next to the “Attributes” section. .](/images/gateway/mqtt-connector/examples/attributes-time-series-json-path-3.png) Click on the “Add attribute” button. Fill in the “Key” field with 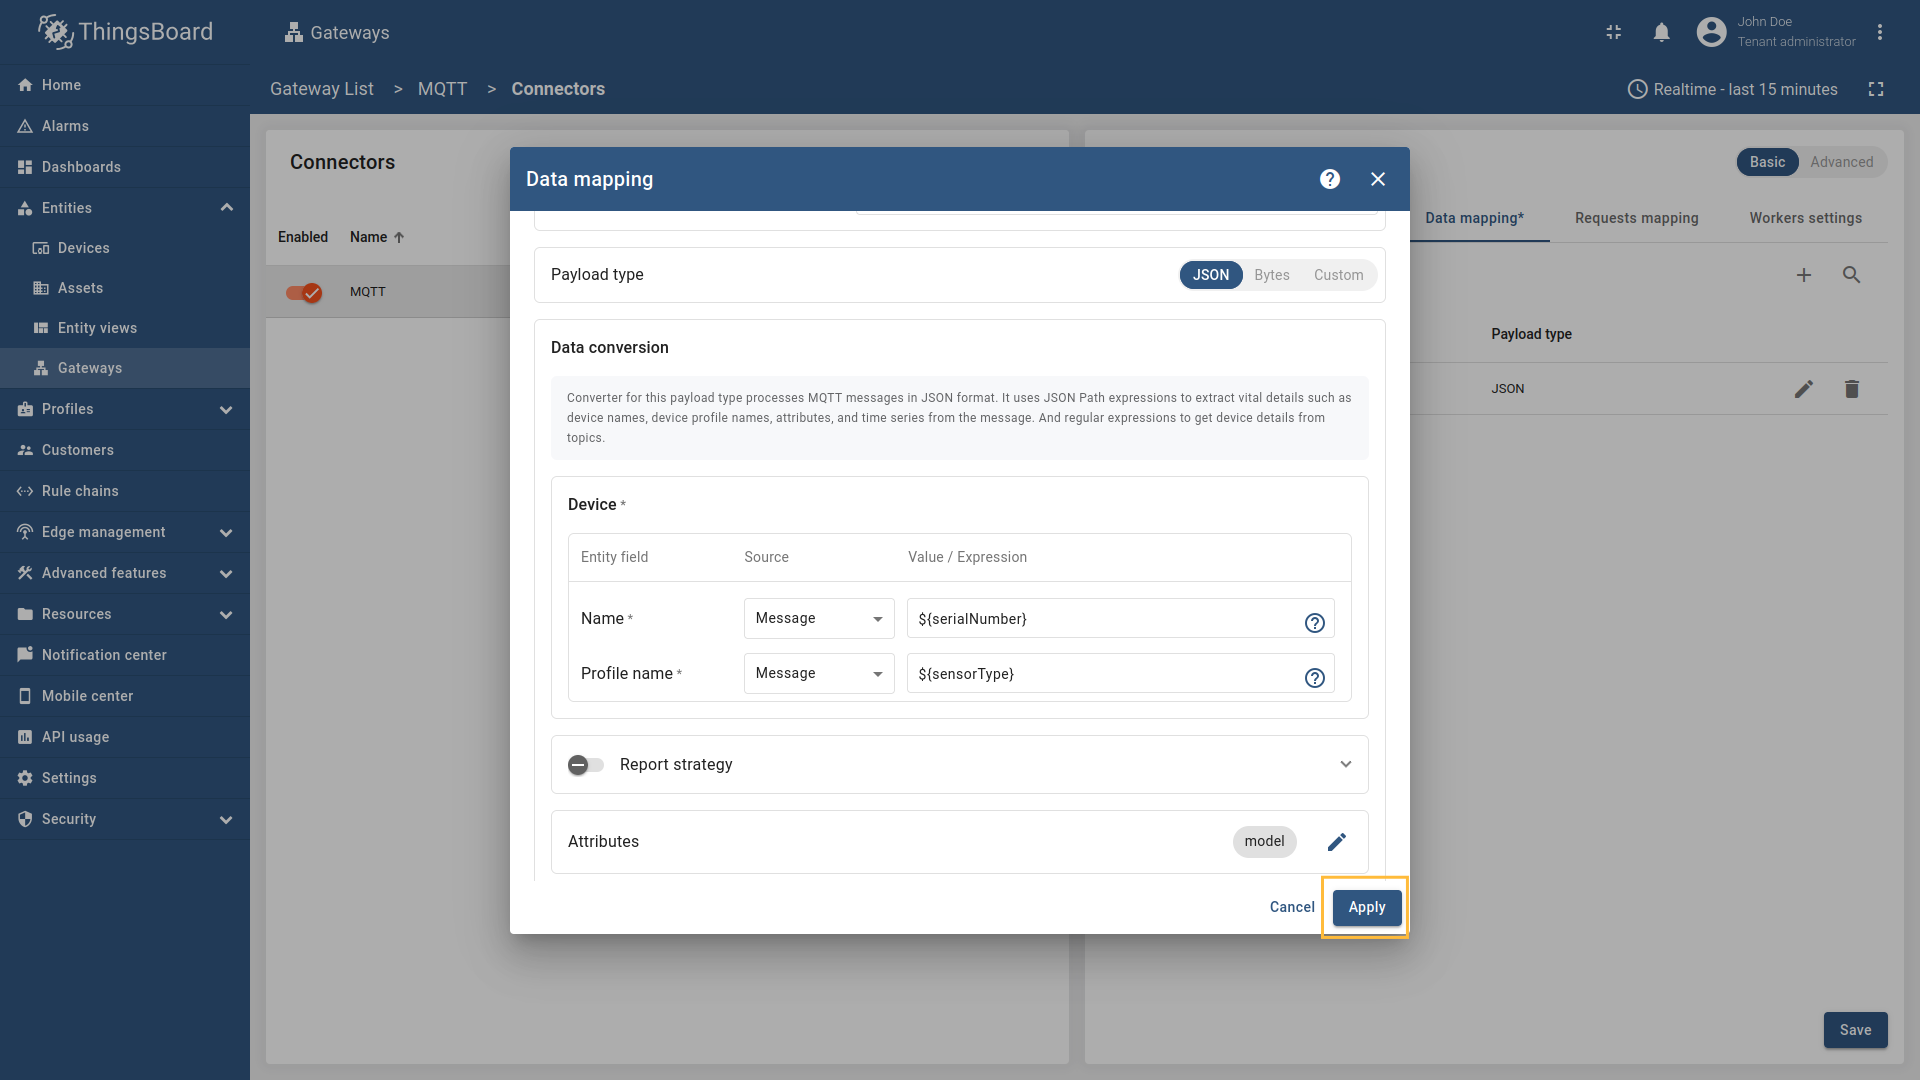 Remember to save your changes by clicking the designated button.  In the opened data mapping windows, click on the “pencil” icon next to the “Time series” section.  - `${temp}`. This is a [json-path](/docs/iot-gateway/config/mqtt/#json-path).](/images/gateway/mqtt-connector/examples/attributes-time-series-json-path-6.png) Click on the “Add time series” button. Fill in the “Key” field with 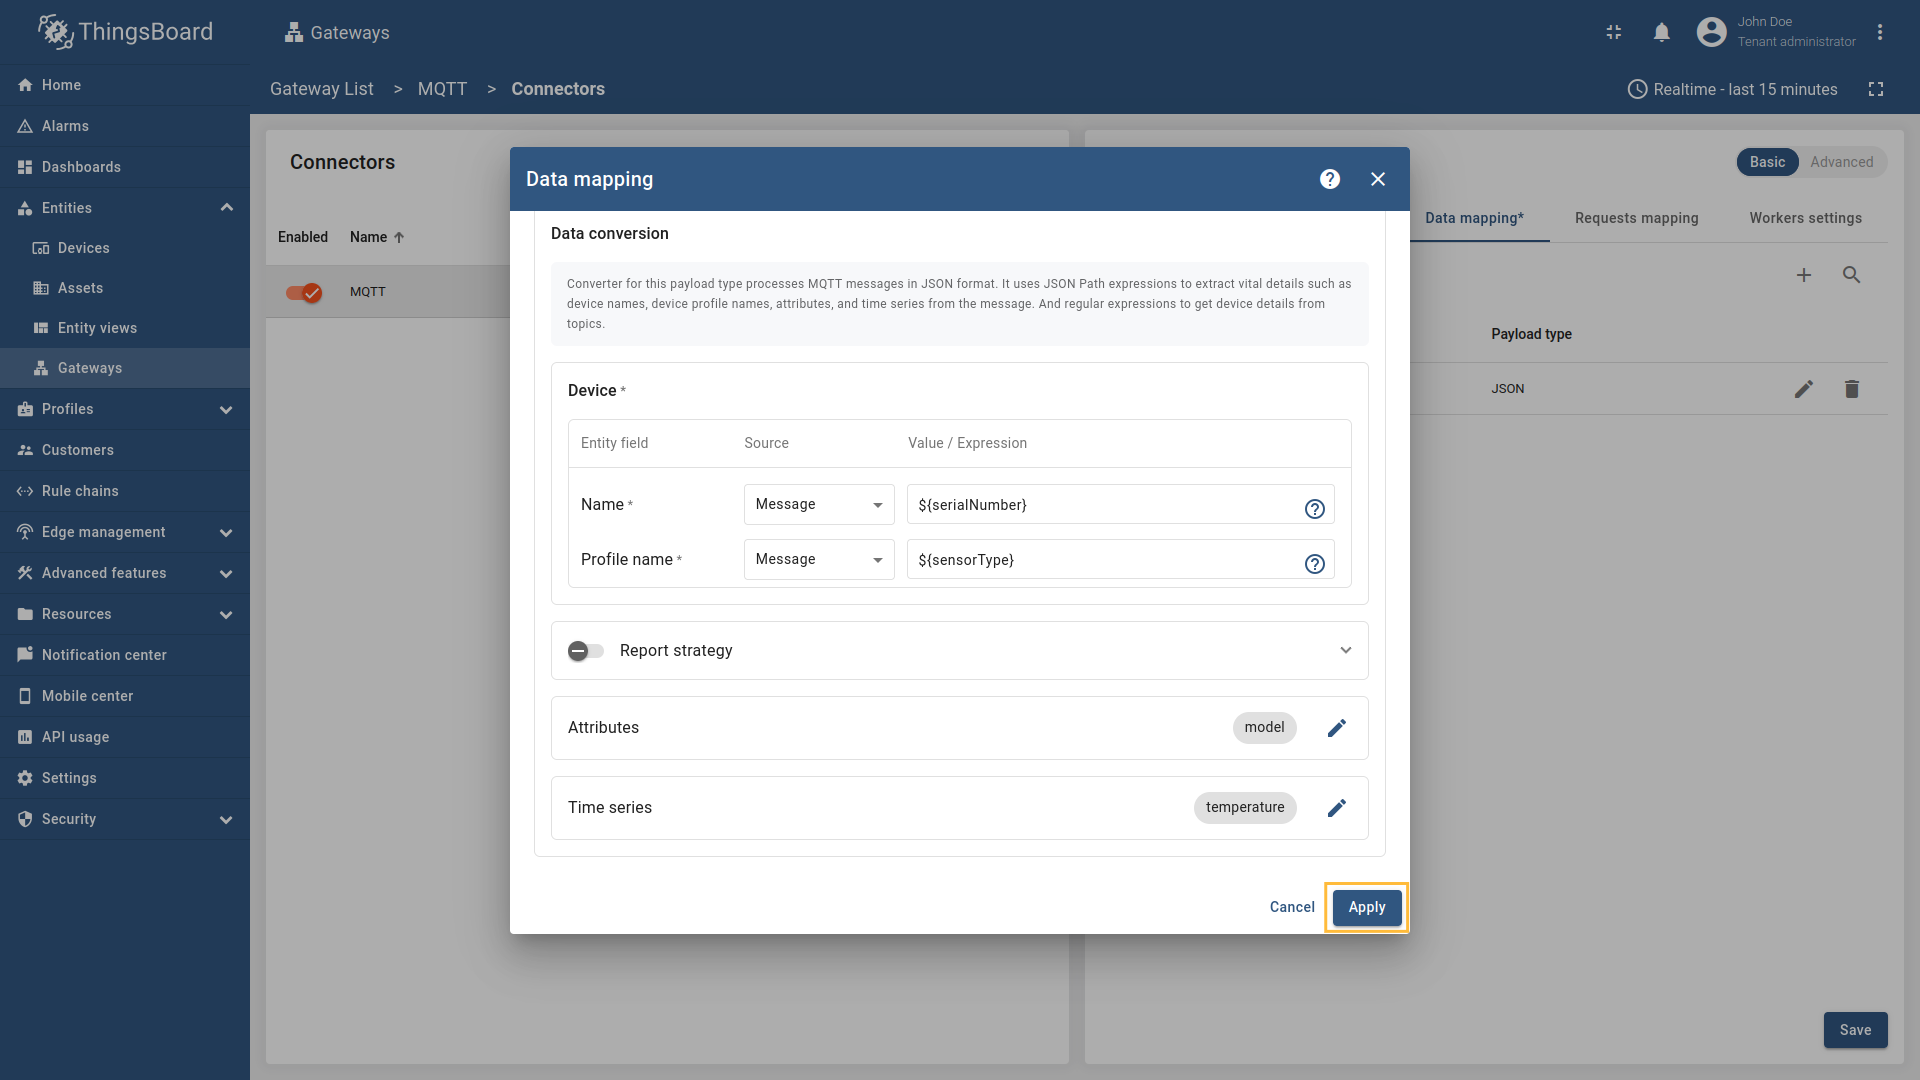 Remember to save your changes by clicking the designated button. Now we can check if the attribute data is set correctly. Go to “Entities” > “Devices”, select a created device and as you can see, the humidity data is available in the “Attributes” section:
Now we can check if the temperature data is sending correctly. Go to “Entities” > “Devices”, select a created device and as you can see, the humidity data is available in the “Latest telemetry” section:
If you are using advanced configuration mode and want to set the |


Attributes and time series data can be retrieved using slices
in the MQTT Connector. This allows to extract the required field(s) from the As an example, we will use ThingsBoard MQTT Demo Broker, which can be run using Docker and the following command: The broker available at
The first four bytes represent the device name, and the remaining bytes represent the temperature value.
Configure the MQTT connector to store the entire raw payload in the Follow these steps:
Go to “Entities” → “Gateways” on the left sidebar and select your gateway. Click on the “Connectors configuration” button on the right side menu. Select the MQTT connector, click on the “Data mapping” tab. Select data mapping with device to which you want to add time series data (if you do not know how to add a new device, see the Getting Started guide or Data mapping section of this guide with respective examples).  In the opened data mapping windows, click on the “pencil” icon next to the “Attributes” section. ![Click on the "Add attribute" button. Fill in the "Key" field with `rawData`, also select `Raw` in "Type" field, and fill in the "Value" field with `[:]`. Those are [slices](/docs/iot-gateway/config/mqtt/#slices).](/images/gateway/mqtt-connector/examples/attributes-time-series-bytes-3.png) Click on the “Add attribute” button. Fill in the “Key” field with  Remember to save your changes by clicking the designated button on the screenshot.  In the opened data mapping windows, click on the “pencil” icon next to the “Time series” section. ![Click on the "Add time series" button. Fill in the "Key" field with `temp`, also select `Raw` in "Type" field, and fill in the "Value" field with `[4:]`. Those are [slices](/docs/iot-gateway/config/mqtt/#slices).](/images/gateway/mqtt-connector/examples/attributes-time-series-bytes-6.png) Click on the “Add time series” button. Fill in the “Key” field with 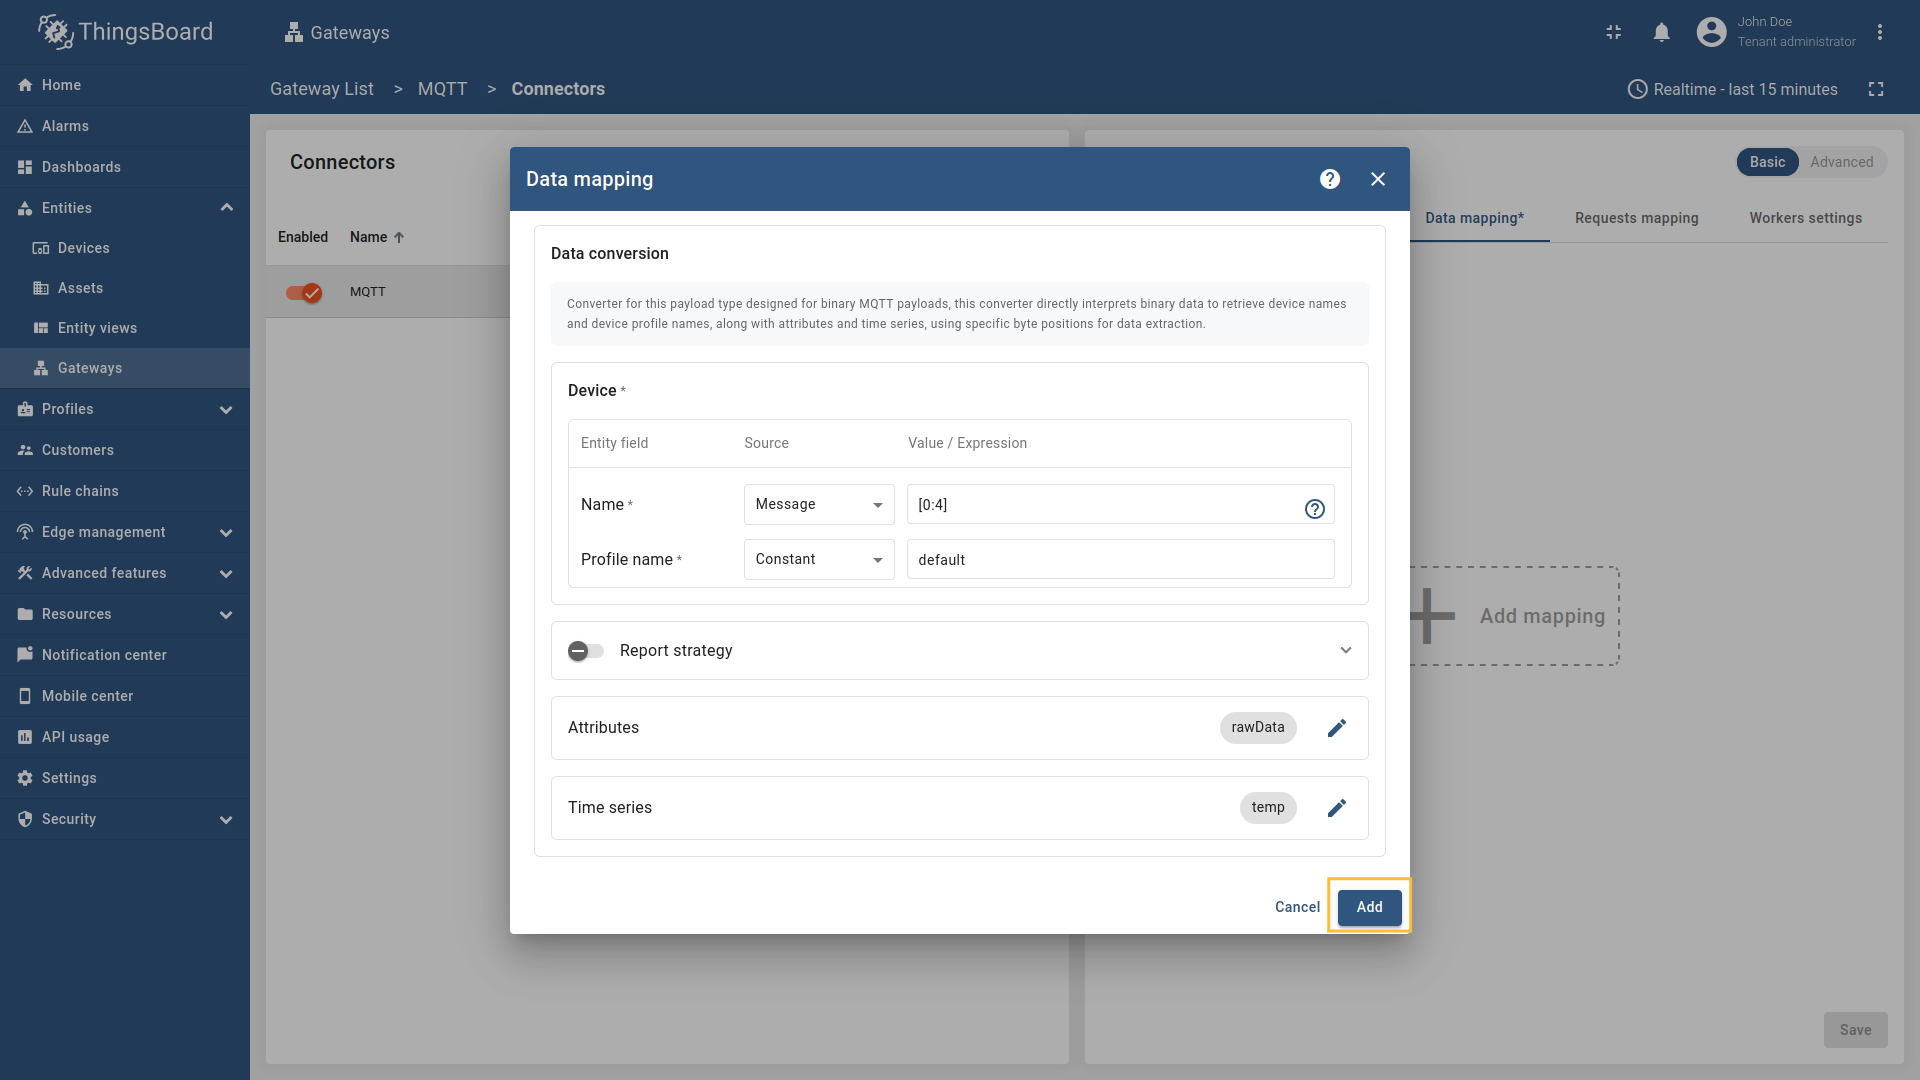 Remember to save your changes by clicking the designated button on the screenshot. Now we can check if the attribute data is set correctly. Go to “Entities” > “Devices”, select a created device and as you can see, the humidity data is available in the “Attributes” section:
Now we can check if the temperature data is sending correctly. Go to “Entities” > “Devices”, select a created device and as you can see, the humidity data is available in the “Latest telemetry” section:
If you are using advanced configuration mode and want to set the |


There are scenarios where the key names for time-series data and attributes need to be extracted directly from the MQTT topic structure. This can be particularly useful when dealing with dynamic topics or when the topic structure conveys important metadata. In this example, we will demonstrate how to configure the MQTT connector to extract key names for both time-series data directly from the topic using regular expression. As an example, we will use ThingsBoard MQTT Demo Broker, which can be run using Docker and the following command: The broker available at So the topics will look like this:
We’ll map the Copy and paste the following configuration into the MQTT connector advanced configuration mode: Let’s review the key parts of this configuration:
After applying this configuration, the MQTT connector will extract the sensor name from the topic and use it as the key name for both time-series data. So you will see that the corresponding time series are being updated correctly:
|
Requests mapping
The Requests mapping section allows you to configure how the ThingsBoard platform instance will interact with the devices. That is, how the platform will request data from the devices, how it will update/request device attributes, and how it will send RPC commands to the devices.
MQTT connector supports the following requests mapping:
- Connect requests - tell the ThingsBoard platform that a device is online on the MQTT broker by publishing a “connect” message the Gateway listens for.
- Disconnect requests - inform ThingsBoard (via the Gateway) that a device is offline by publishing a disconnect message to the configured topic.
- Attribute updates - push shared attributes from ThingsBoard to the device by publishing an update message to the configured topic via the Gateway.
- Attribute requests - the device asks ThingsBoard for attributes by publishing a request to a specific topic; the Gateway replies on the response topic with the values.
-
RPC methods - allows sending RPC commands to devices. MQTT connector supports different types of RPC methods, such as:
-
Reserved GET/SET methods - these methods are automatically created for each attribute and time series parameter. You can use them to get or set values of the device. For every configured attribute or timeseries key, the connector exposes built-in RPCs:
get- reads the current value (as the connector can provide/resolve it)set- sets/updates the value (the connector applies or forwards it)
These do not require extra mapping, because they are managed by the connector and the result is returned to ThingsBoard. The command will be processed by the connector, and the result will be sent back to the ThingsBoard platform instance.
-
Configurable RPC methods to device - These methods allow you to configure custom RPC commands in connector configuration that can be sent to the devices.
-
One Way and Two Way RPC methods - All RPC’s can be two types:
One Way- if you do not want to get a response back from a deviceTwo Way- if you do want to get a response back from a device
-
Connect request
Connect request is used for sending a message to the Gateway indicating that a device has connected, so the device can be marked as online on the platform.
Suppose we have a scenario where the device connects to the MQTT broker but doesn’t send any telemetry data. By default, after 10 minutes of inactivity, the device becomes offline for the ThingsBoard platform instance. However, we may want to be able to send RPC/attribute updates to this device even if it does not send any telemetry data. In this case, the platform needs to know if the target device is connected and what gateway or session is used to connect the device at the moment. If your device is constantly sending telemetry data, you may skip this section - ThingsBoard already knows how to push notifications.
The following parameters are used to configure connect requests:
- Request type - the type of the request sent to ThingsBoard (set to “Connect request”).
- Topic filter - the topic/topics the gateway will subscribe to and wait for device to publish the connect request. The Topic filter supports special symbols: ‘#’ and ‘+’ wildcards (more information how you may use them for matching topic patterns Additional information section).
- Name - the name of the device in ThingsBoard to which the request will be sent to. It can be parsed from
Message,Topic,Constant, (more information about sources with screenshot examples can be found in the Usage examples section). - Profile name - the name of the device in ThingsBoard to which the request will be sent to. It can be parsed from
Message,Topic,Constant(more information about sources with screenshot examples can be found in the Usage examples section).
All configuration parameters list, and their detailed description can be found in the Advanced configuration section.
More usage examples can be found in the Usage examples section.

In order to add new connect request mapping, follow these steps:
-
Click the “Add mapping” under “Requests mapping” section to add new connect request mapping.
-
Select “Connect request” in the Request type field, enter the “Topic filter”, and select source type for Name and Profile name fields (
Message,Constant, orTopic). Enter the corresponding value which can be json path, regex, or constant value based on the selected source type.

Click the “Add mapping” under “Requests mapping” section to add new connect request mapping.
, [regex](/docs/iot-gateway/config/mqtt/#regular-expressions), or constant value based on the selected source type.](/images/gateway/mqtt-connector/mqtt-gateway-configuring-12-ce.png)
Select “Connect request” in the Request type field, enter the “Topic filter”, and select source type for Name and Profile name fields (Message, Constant, or Topic). Enter the corresponding value which can be json path, regex, or constant value based on the selected source type.
Disconnect request
Disconnect request is used for sending a message to the Gateway indicating that a device has disconnected, so the device can be marked as offline on the platform.
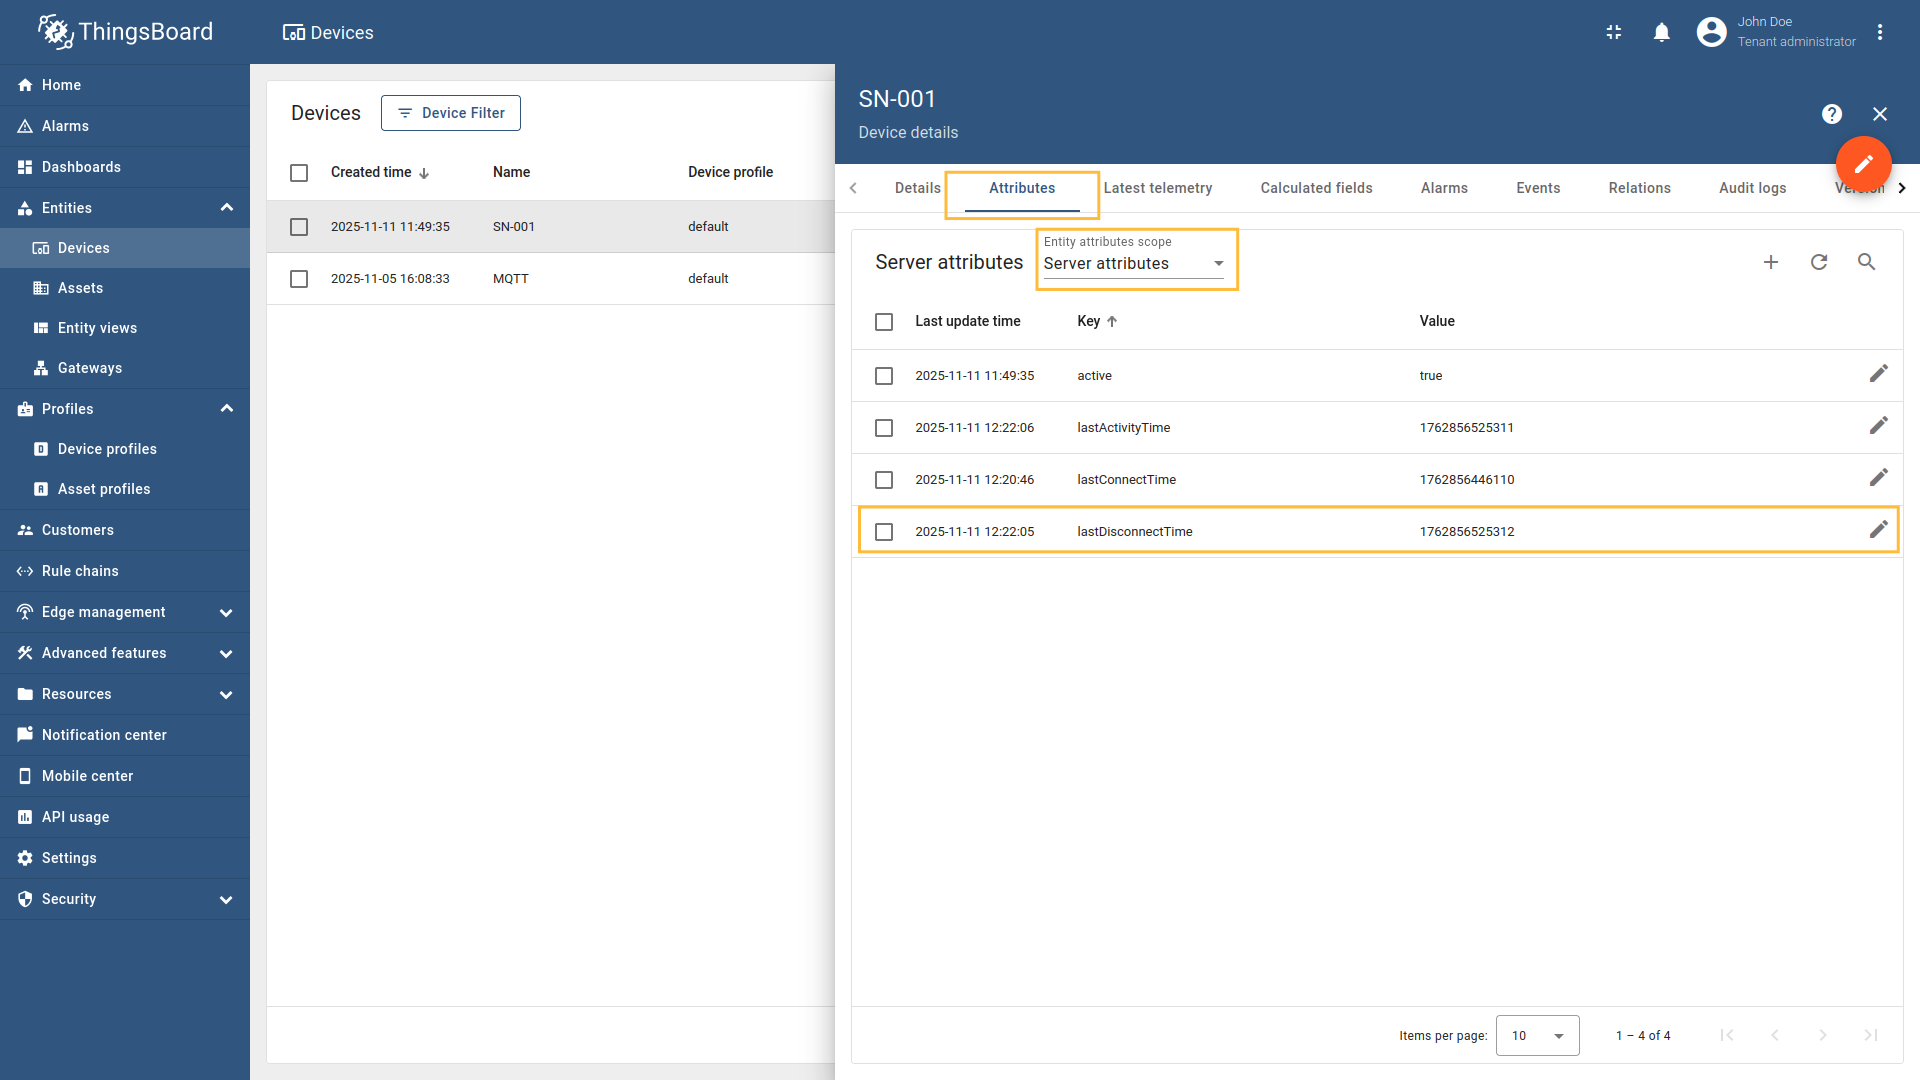
When a device disconnects from the MQTT broker, ThingsBoard needs to be notified to update the device’s status and last disconnect time. The disconnect request allows the gateway to inform ThingsBoard when a device disconnects from the MQTT broker. This information is stored as server attributes and can be used for monitoring device connectivity patterns, troubleshooting connection issues, or triggering workflows based on disconnect events. If your device uses a clean disconnect process (rather than just timing out), configuring disconnect requests provides more immediate and accurate status updates in ThingsBoard.
The following parameters are used to configure disconnect requests:
- Request type - the type of the request sent to ThingsBoard (set to “Disconnect request”).
- Topic filter - the topic/topics the gateway will subscribe to and wait for device to publish the disconnect notification. The Topic filter supports special symbols: ‘#’ and ‘+’ wildcards (more information how you may use them for matching topic patterns in the Additional information section).
- Name - the name of the device in ThingsBoard to which the disconnect status will be applied. It can be parsed from
Message,Topic, orConstant(more information about sources with screenshot examples can be found in the Usage examples section).
All configuration parameters list, and their detailed description can be found in the Advanced configuration section.
More usage examples can be found in the Usage examples section.

In order to add new disconnect request mapping, follow these steps:
-
Click the “Add mapping” under “Requests mapping” section to add new disconnect request mapping.
-
Select “Disconnect request” in the Request type field, enter the “Topic filter”, and select source type for Name field (
Message,Topic, orConstant). Enter the corresponding value which can be json path, regex, or constant value based on the selected source type.
Click the “Add mapping” under “Requests mapping” section to add new disconnect request mapping.
, [regex](/docs/iot-gateway/config/mqtt/#regular-expressions), or constant value based on the selected source type.](/images/gateway/mqtt-connector/mqtt-gateway-disconnect-configuring-12-ce.png)
Select “Disconnect request” in the Request type field, enter the “Topic filter”, and select source type for Name field (Message, Topic, or Constant). Enter the corresponding value which can be json path, regex, or constant value based on the selected source type.
Attribute requests
Attribute requests are used for requesting the values of its client-side or shared attributes from ThingsBoard via the Gateway.
When a device needs to retrieve attribute values from ThingsBoard, it can send an attribute request. This allows devices to request shared or client attributes stored on the ThingsBoard platform. When a device publishes a request to a specific topic, the gateway fetches the requested shared/client attributes from ThingsBoard and publishes a response to a response topic.
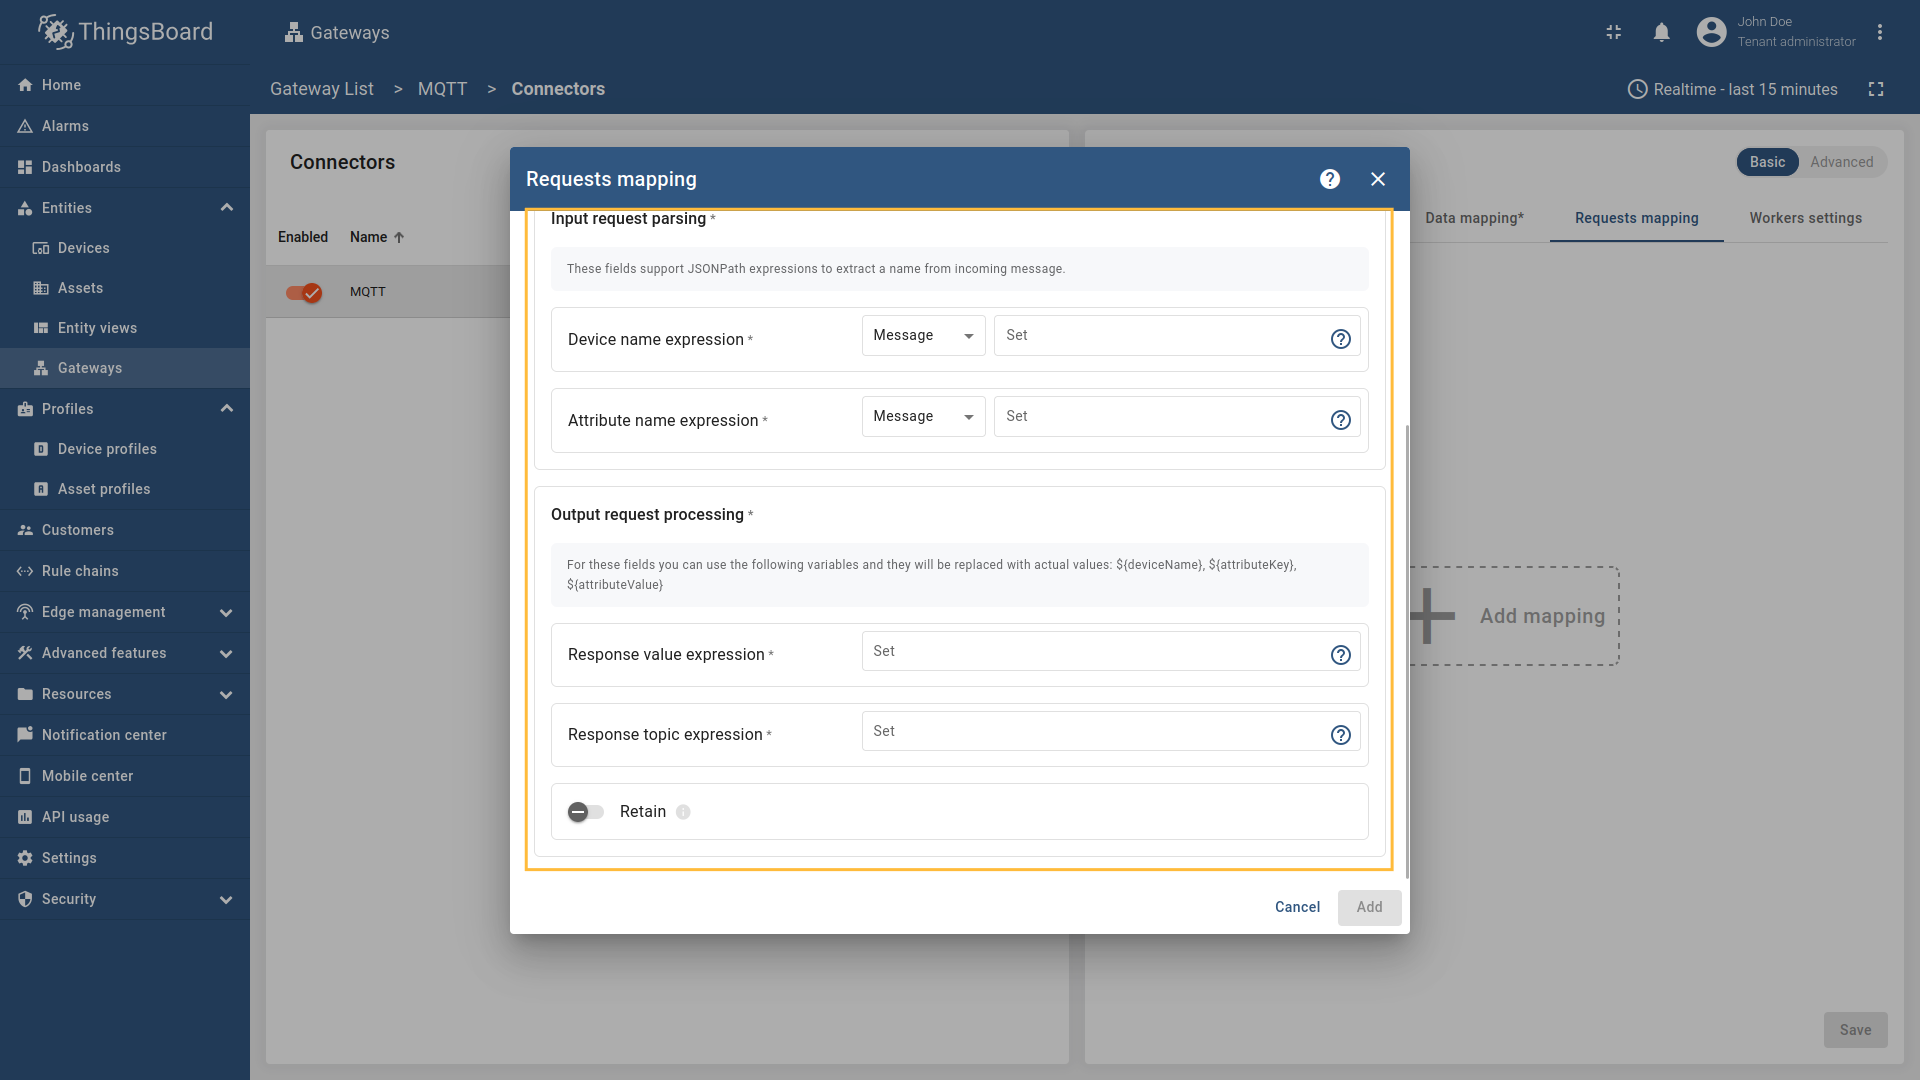
The following parameters are used to configure attribute requests:
- Request type - the type of the request sent to ThingsBoard (set to “Attribute request”).
- Topic filter - the topic/topics that the gateway subscribes to for incoming requests. The Topic filter supports special symbols:
#and+wildcards (more information how you may use them for matching topic patterns in the Additional information section). - Device name expression - the name of the device in ThingsBoard from which to request the attributes. It can be parsed from
Message,Topic, orConstant(more information about sources with screenshot examples can be found in the Usage examples section). - Attribute name expression - the name of the attribute in ThingsBoard to be requested. It can be parsed from
Message,Topic, orConstant(more information about sources with screenshot examples can be found in the Usage examples section). - Response value expression - the format of the attribute value in the response message. It can be parsed from
Message,Topic, orConstant(more information about sources with screenshot examples can be found in the Usage examples section). - Response topic expression - the topic/topics the gateway will publish the attribute response message to. It can be parsed from
Message,Topic, orConstant(more information about sources with screenshot examples can be found in the Usage examples section). - Retain - whether the attribute response message should be retained by the MQTT broker.
All configuration parameters list, and their detailed description can be found in the Advanced configuration section.
More usage examples can be found in the Usage examples section.


In order to add new attribute request mapping, follow these steps:
-
Click the “Add mapping” under “Requests mapping” section to add new attribute request mapping.
-
Select “Attribute request” in the Request type field, enter the “Topic filter”
-
Configure the Device name expression, Response topic expression, and Attribute name expression fields. Select the source type for each field (
Message,Topic, orConstant) and enter the corresponding values. You can also set the Retain option to determine whether the attribute response message should be retained by the MQTT broker.
Click the “Add mapping” under “Requests mapping” section to add new attribute request mapping.
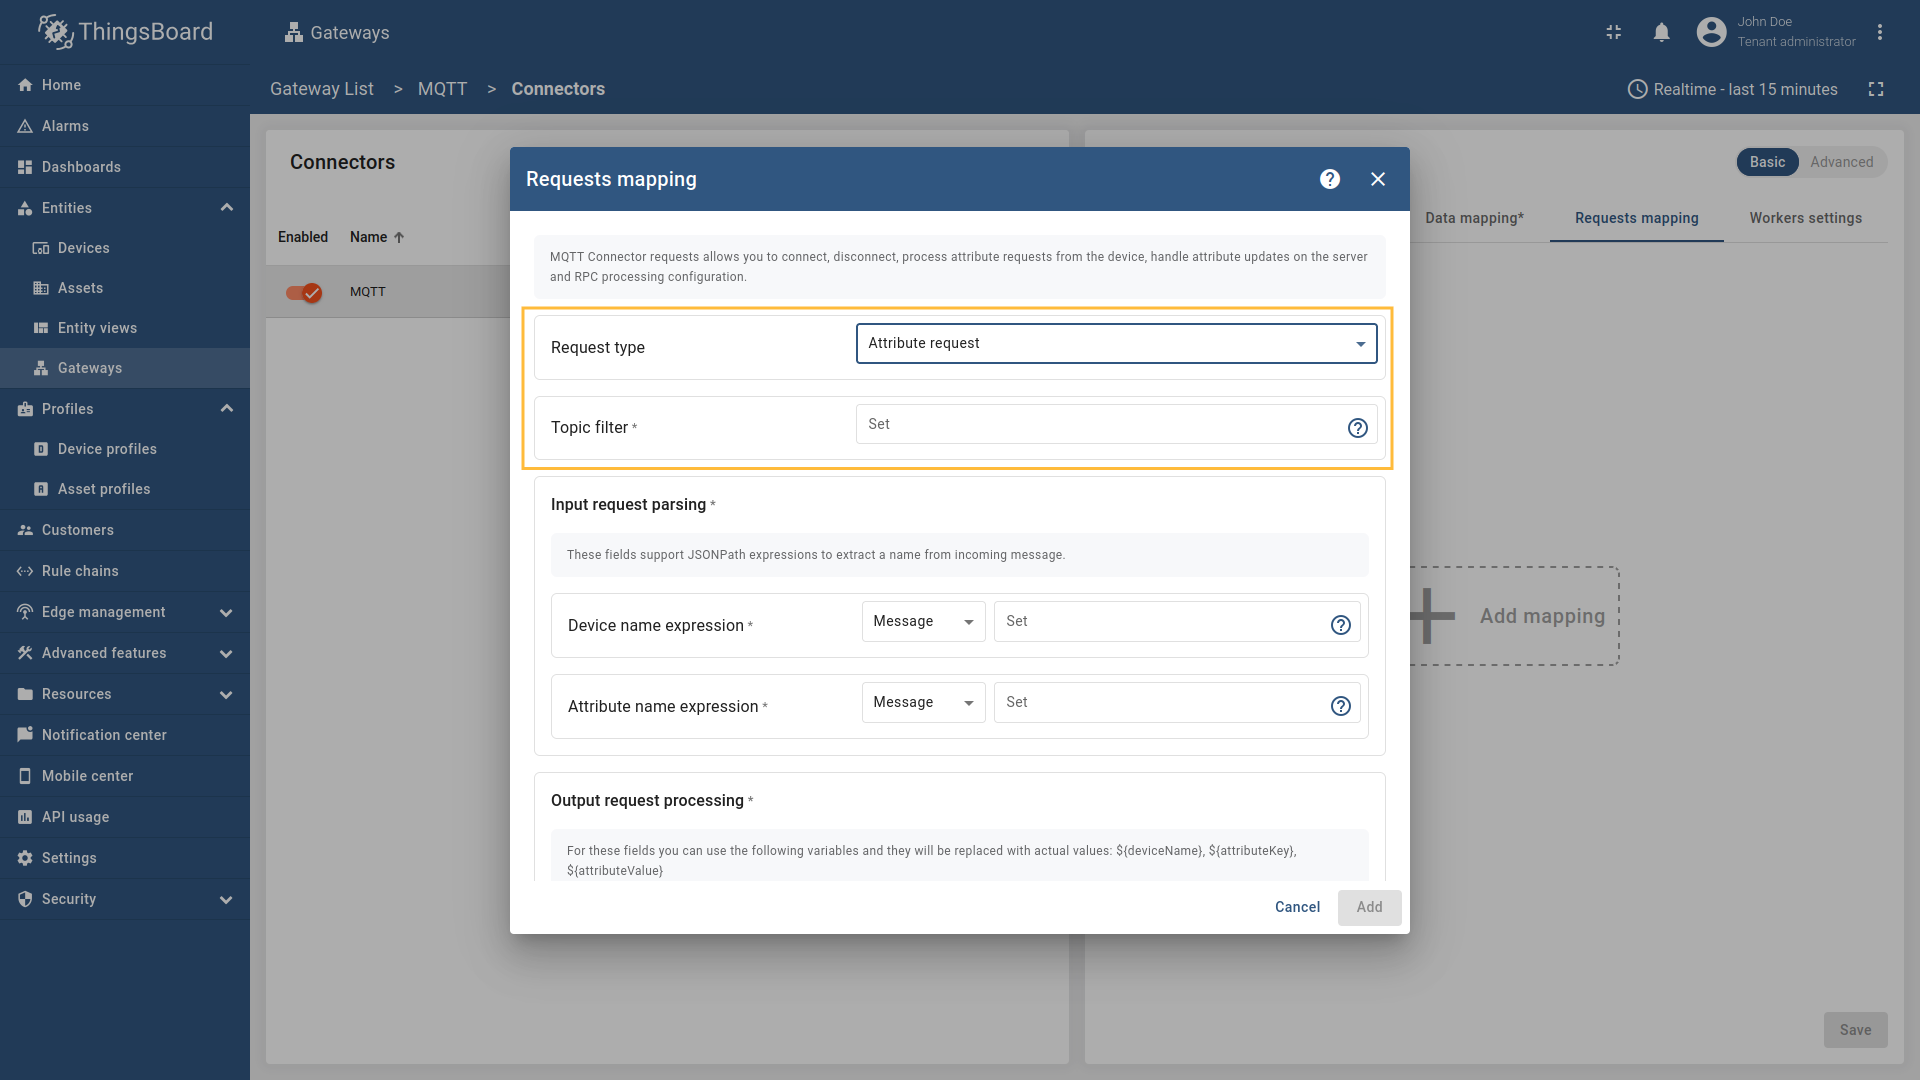
Select “Attribute request” in the Request type field, enter the “Topic filter”
Configure the Device name expression, Response topic expression, and Attribute name expression fields. Select the source type for each field (Message, Topic, or Constant) and enter the corresponding values. You can also set the Retain option to determine whether the attribute response message should be retained by the MQTT broker.
Attribute updates
Attribute updates are used for provisioning or updating its client-side or shared attributes on ThingsBoard through the Gateway.
You can treat this as a remote configuration for devices, enabling them to request shared attributes from ThingsBoard. See user guide for more details.
The following parameters are used to configure attribute updates:
- Request type - the type of the request sent to ThingsBoard (set to “Attribute updates”).
- Device name filter - regular expression device name filter, used to determine which devices should receive attribute updates see regex (more information with screenshot examples can be found in the Usage examples section.
- Attribute filter - regular expression attribute name filter, used to determine which attributes should be updated see regex (more information with screenshot examples can be found in the Usage examples section).
- Response value expression - the format of the attribute value in the response message. It can be parsed from json-path (more information with screenshot examples can be found in the Usage examples section).
- Response topic expression - the topic/topics the gateway will publish the attribute response message to. It can be parsed from json-path (more information with screenshot examples can be found in the Usage examples section).
- Retain - whether the attribute response message should be retained by the MQTT broker.
All configuration parameters list, and their detailed description can be found in the Advanced configuration section.
More usage examples can be found in the Usage examples section.

In order to add new attribute update mapping, follow these steps:
-
Click the “Add mapping” under “Requests mapping” section to add new attribute request mapping.
-
Select “Attribute update” in the Request type field, enter the “Device name filter”
-
Configure the Attribute filter, Response value expression, and Response topic expression fields. You can also set the Retain option to determine whether the attribute response message should be retained by the MQTT broker.
Click the “Add mapping” under “Requests mapping” section to add new attribute request mapping.

Select “Attribute update” in the Request type field, enter the “Device name filter”

Configure the Attribute filter, Response value expression, and Response topic expression fields. You can also set the Retain option to determine whether the attribute response message should be retained by the MQTT broker.
Server side RPC commands
Server side RPC commands are used for delivering remote procedure call (RPC) commands from ThingsBoard to a device connected via the Gateway.
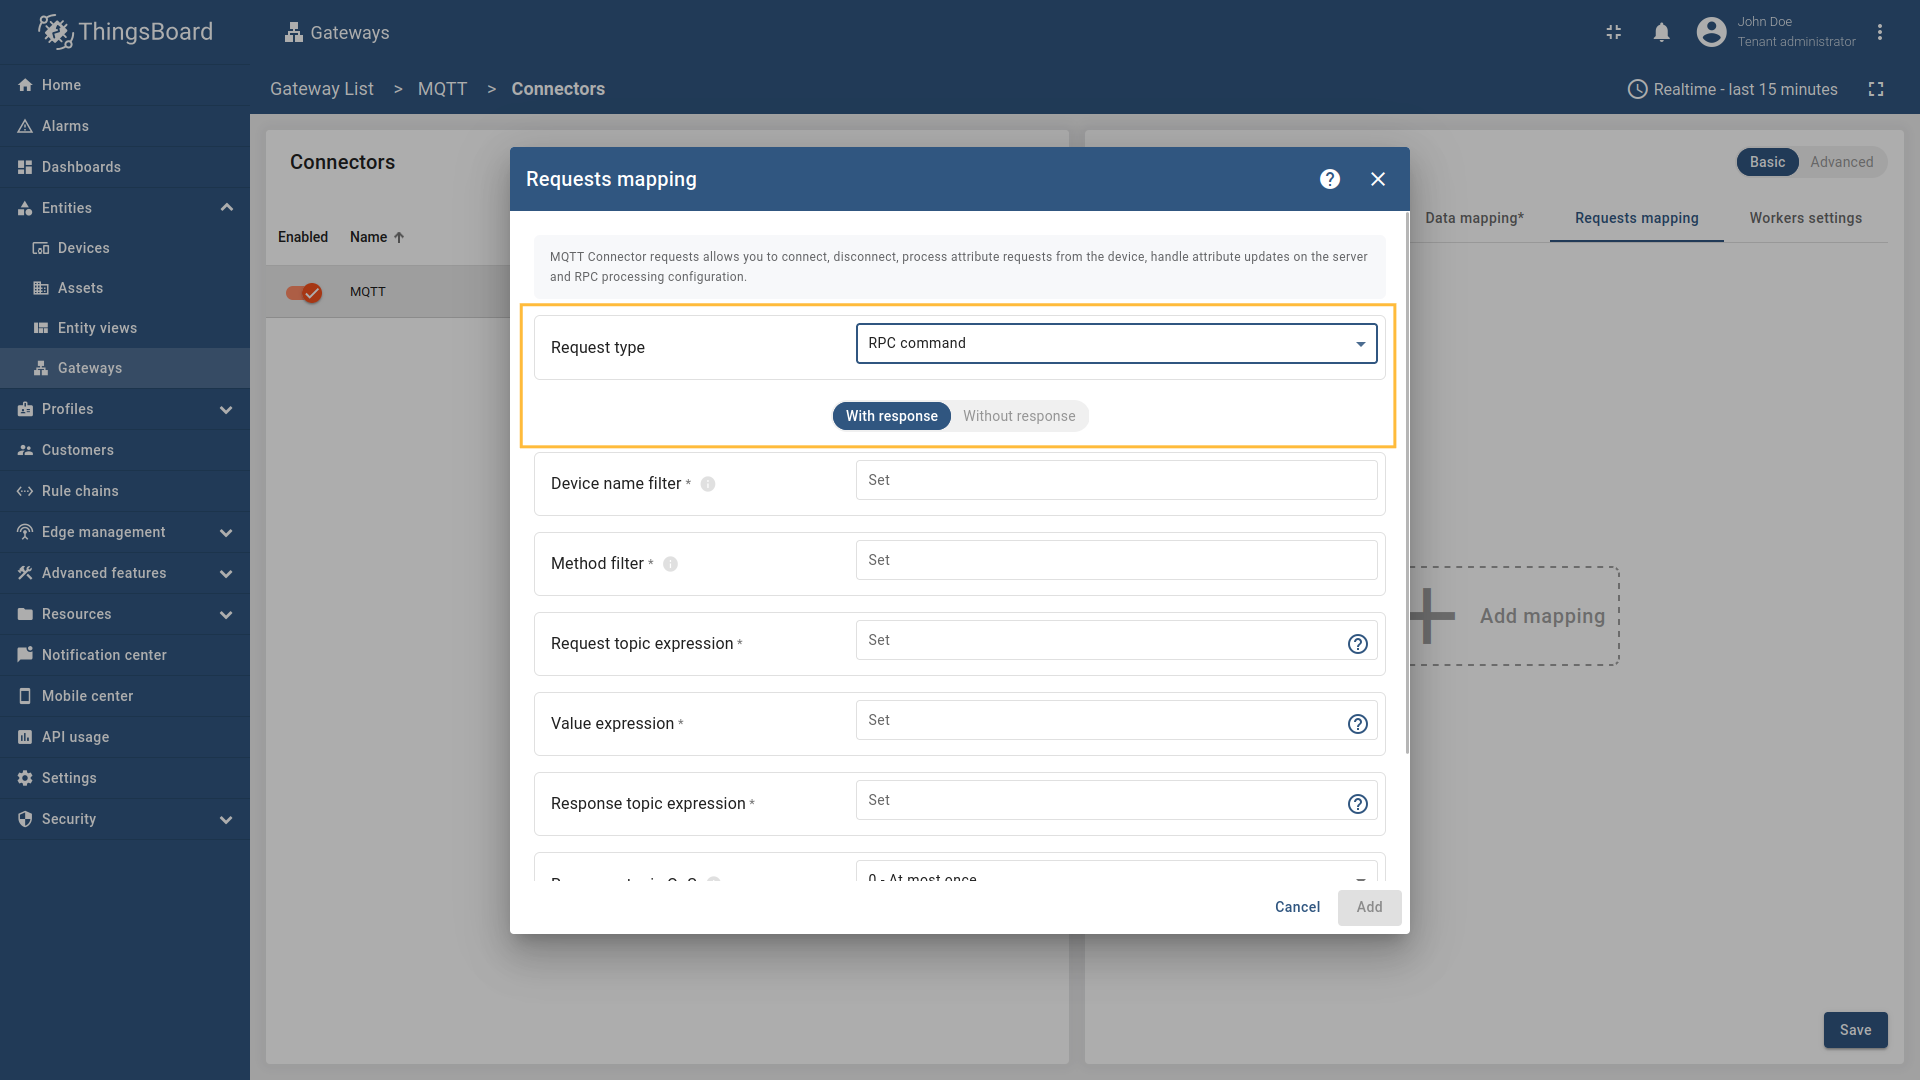
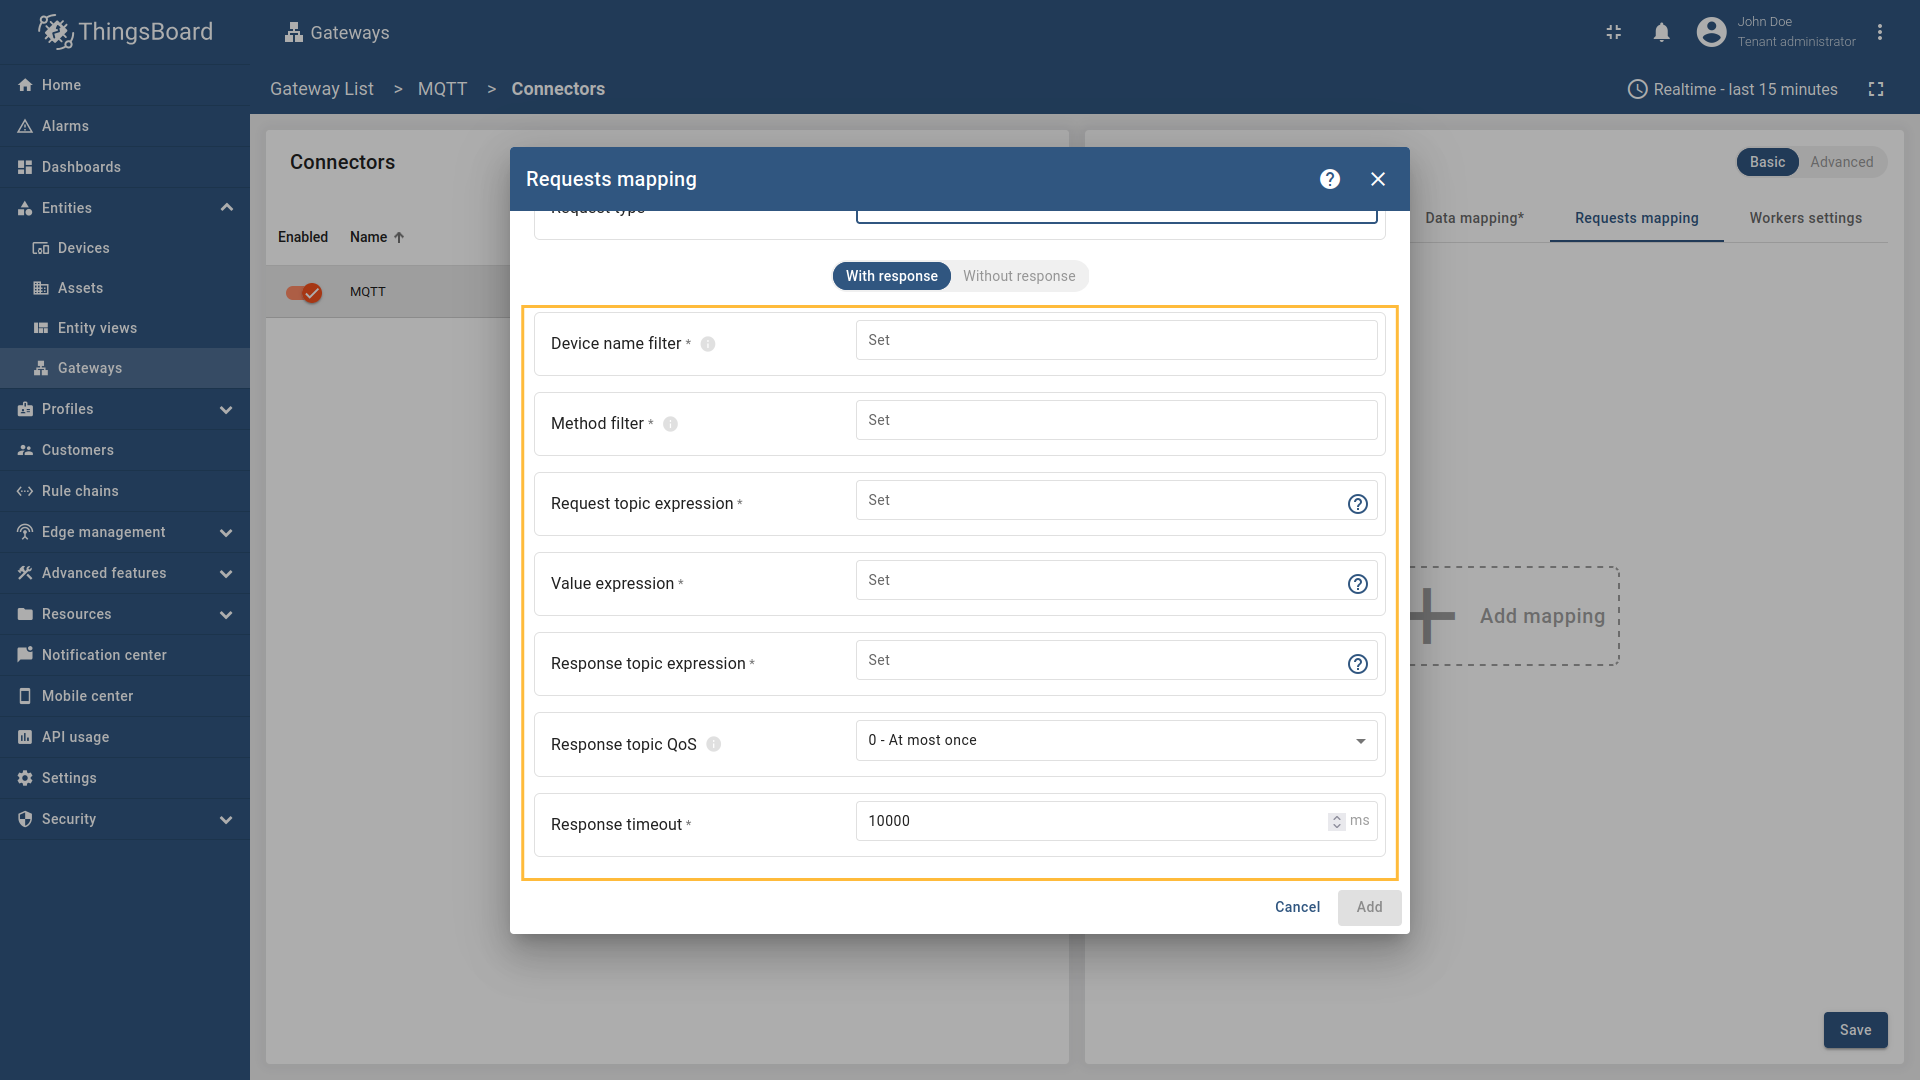
ThingsBoard allows sending RPC commands to devices connected directly to ThingsBoard or via Gateway. The following parameters are used to configure RPC methods:
- Request type - set to RPC command. Can be with response (
Two Way) or without response (One Way). - Device name filter - regular expression device name filter, used to determine which devices should receive RPC commands.
- Method filter - regular expression method name filter, used to determine which RPC methods should be processed.
- Request topic expression - JSON-path expression used for creating topic address to send RPC request.
- Value expression - JSON-path expression used for creating data for sending to broker.
- Response topic expression (only for
Two Way) - JSON-path expression used for creating topic address to subscribe for response message. - Response topic QoS (only for
Two Way) - quality of Service level for the response topic subscription. - Response timeout (only for
Two Way) - timeout in milliseconds. If there is no response within this period after sending the request, gateway will unsubscribe from the response topic.
All configuration parameters list, and their detailed description can be found in the Advanced configuration section.
More usage examples can be found in the Usage examples section.
One way and Two way RPC overview:
-
Two way RPC expects response from a topic.
-
Since Two way RPC expects response from a topic, we also need to specify Response topic expression, Response topic Qos, Response timeout.
-
One way RPC does not expect response from a topic.
Two way RPC expects response from a topic.
Since Two way RPC expects response from a topic, we also need to specify Response topic expression, Response topic Qos, Response timeout.
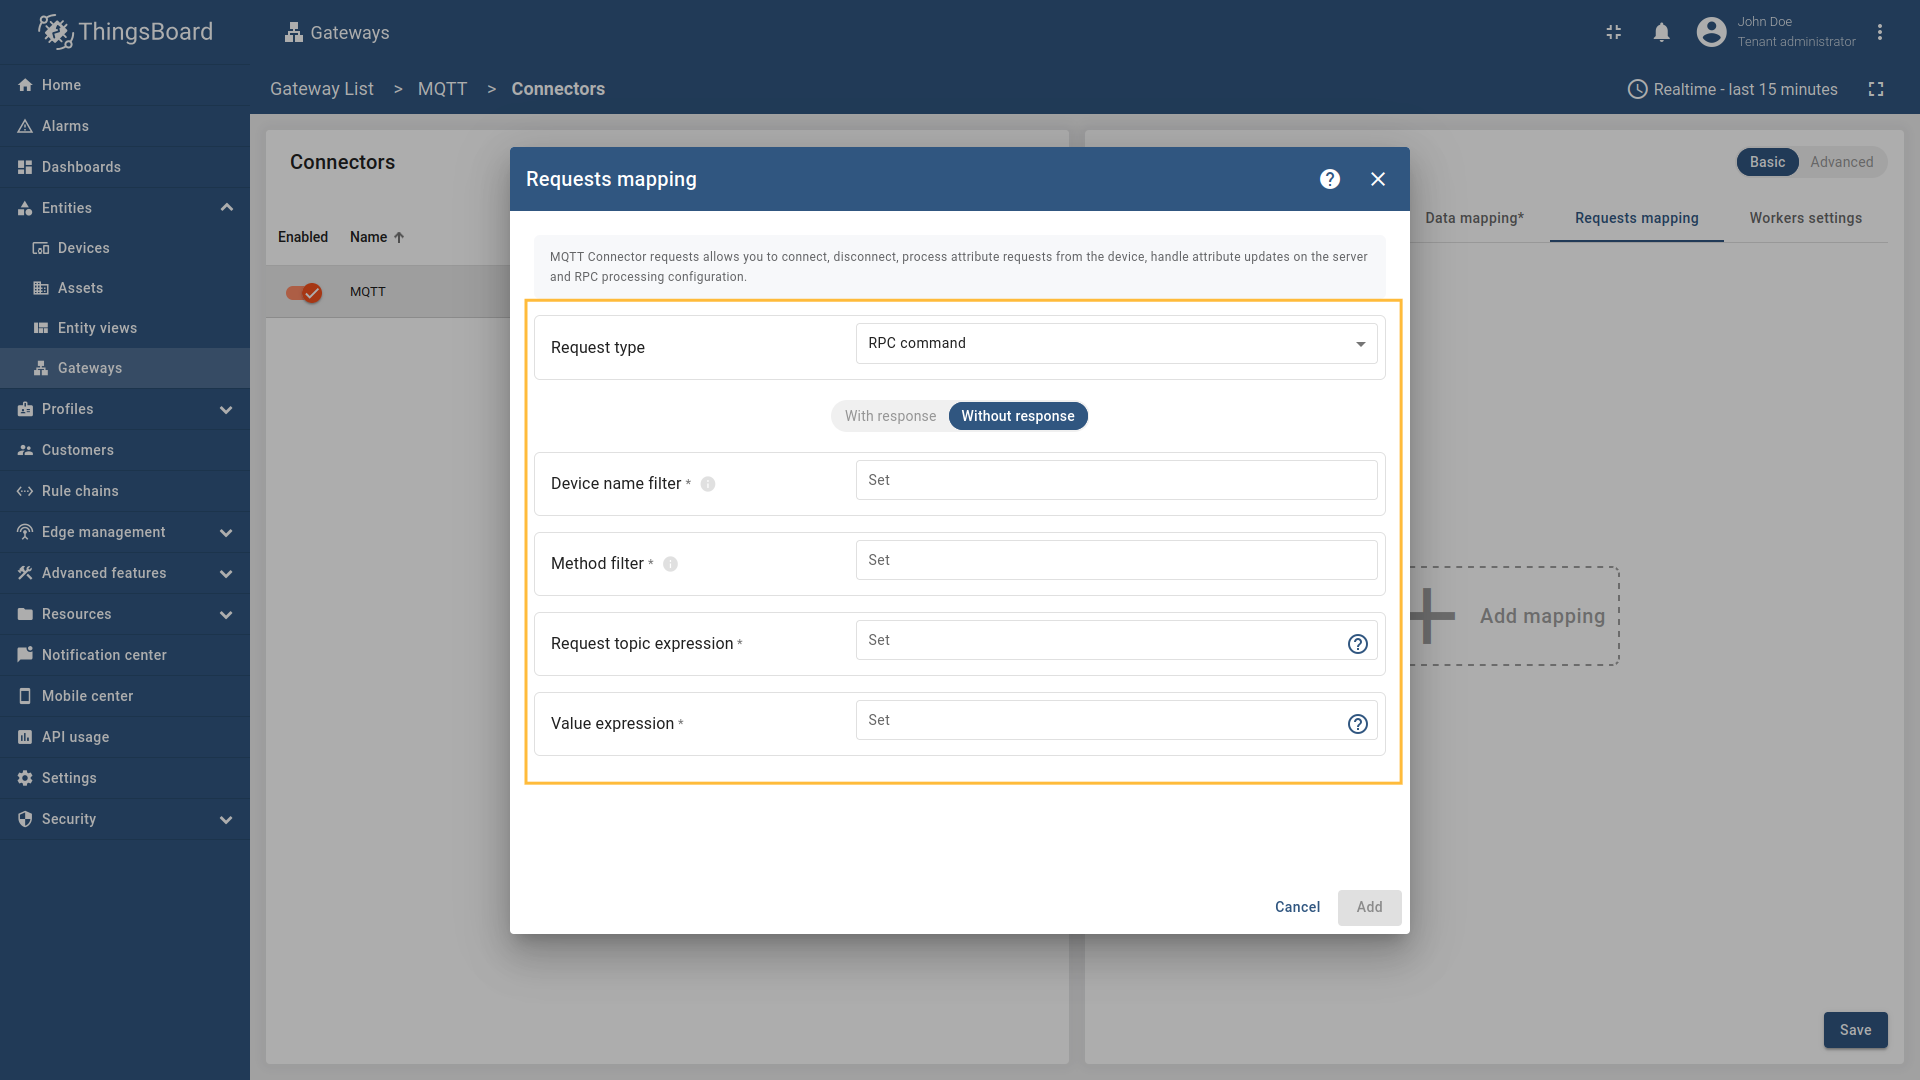
One way RPC does not expect response from a topic.
In order to add a new RPC method, follow these steps:
-
Click the “Add mapping” under “Requests mapping” section to add new server side rpc command.
-
Choose the “Request type”:
With responseorWithout response. -
Fill in the required fields - “Device name filter”, “Method filter”, “Request topic expression”, and “Value expression”.
-
For two-way RPC, also configure “Response topic expression”, “Response topic QoS”, and “Response timeout”. Click “Add” when done.
Click the “Add mapping” under “Requests mapping” section to add new server side rpc command.
Choose the “Request type”: With response or Without response.
Fill in the required fields - “Device name filter”, “Method filter”, “Request topic expression”, and “Value expression”.
For two-way RPC, also configure “Response topic expression”, “Response topic QoS”, and “Response timeout”. Click “Add” when done.
Also, every telemetry and attribute parameter has built-in GET and SET RPC methods out of the box, so you don’t need to configure it manually. See the guide.
Usage examples
Note: If you are running the gateway in Docker and using our MQTT Demo broker from Getting Started , you must use host.docker.internal as the host.
For a Connect request, the gateway must know which device name to target. You can extract it either from the Device
Follow these steps:
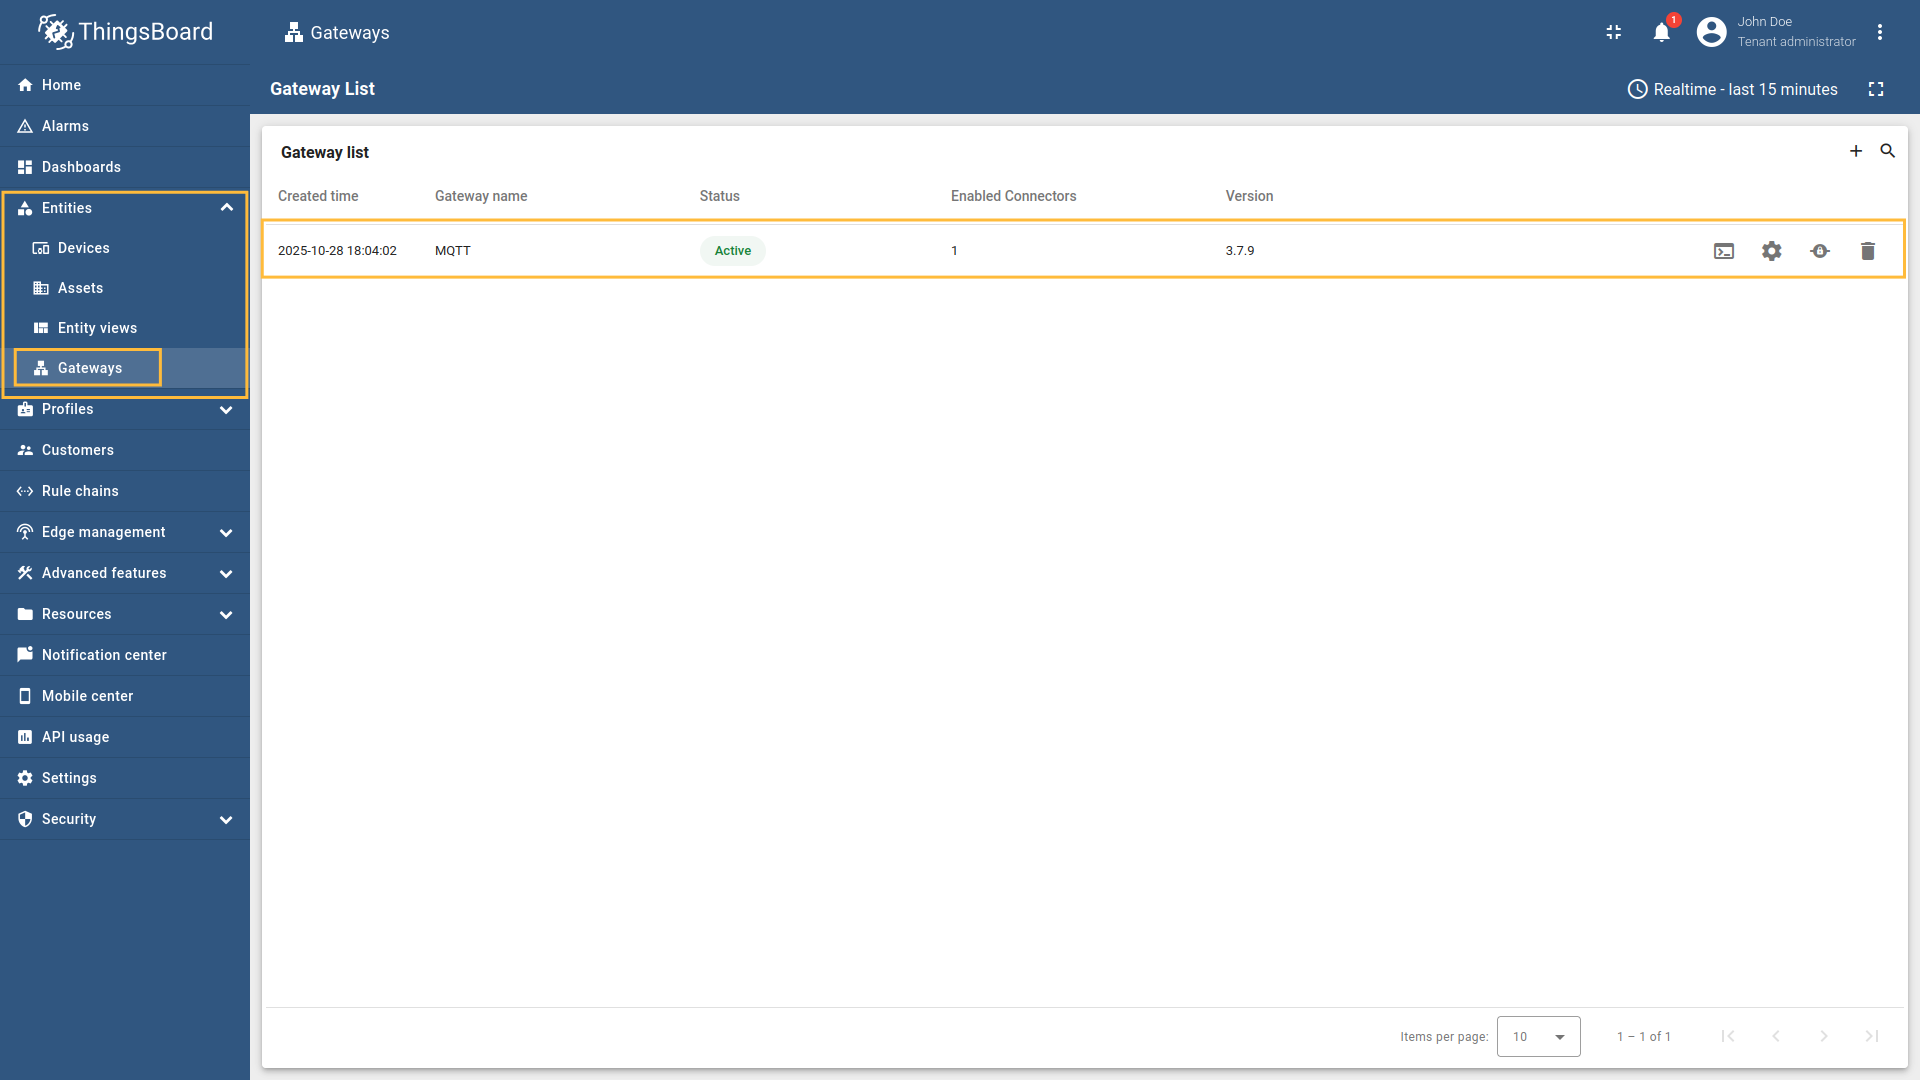
Go to “Entities” - “Gateways” on the left sidebar and select your gateway. 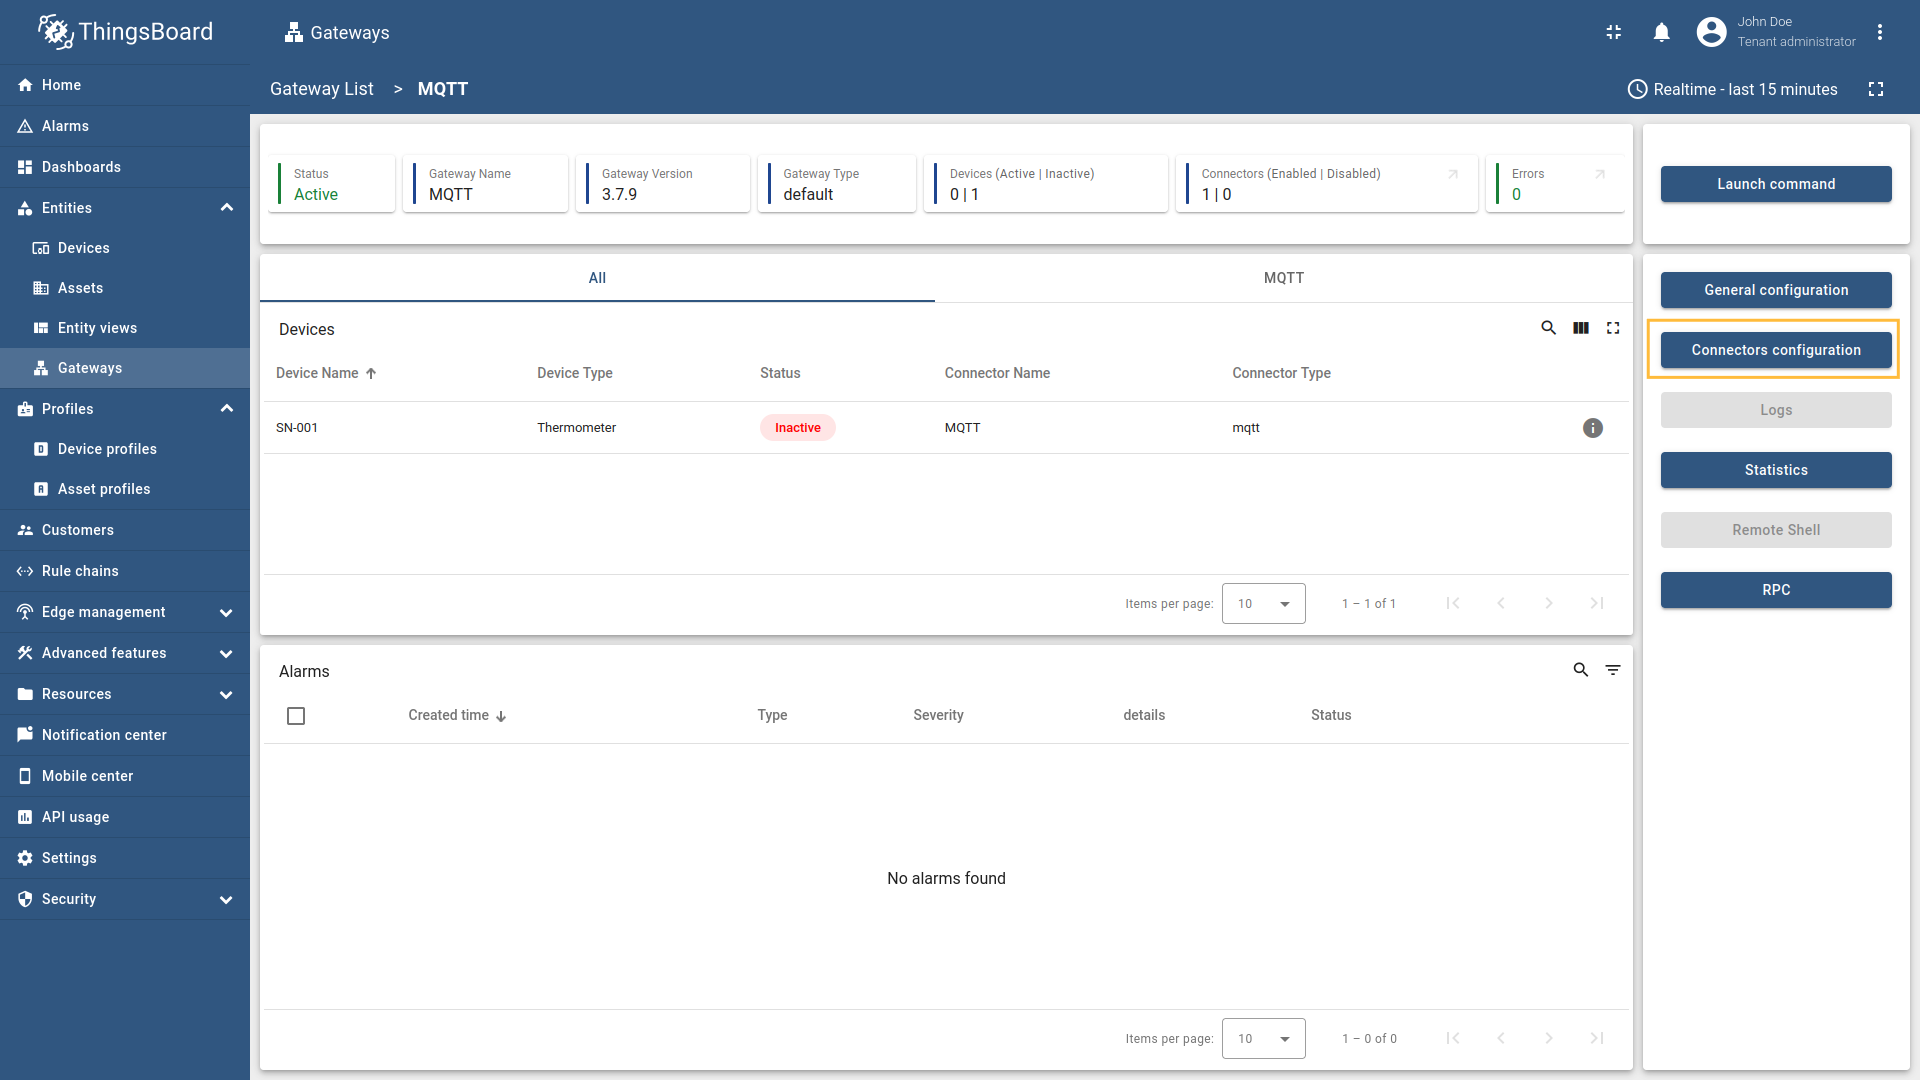 Click on the “Connectors configuration” button on the right side menu. 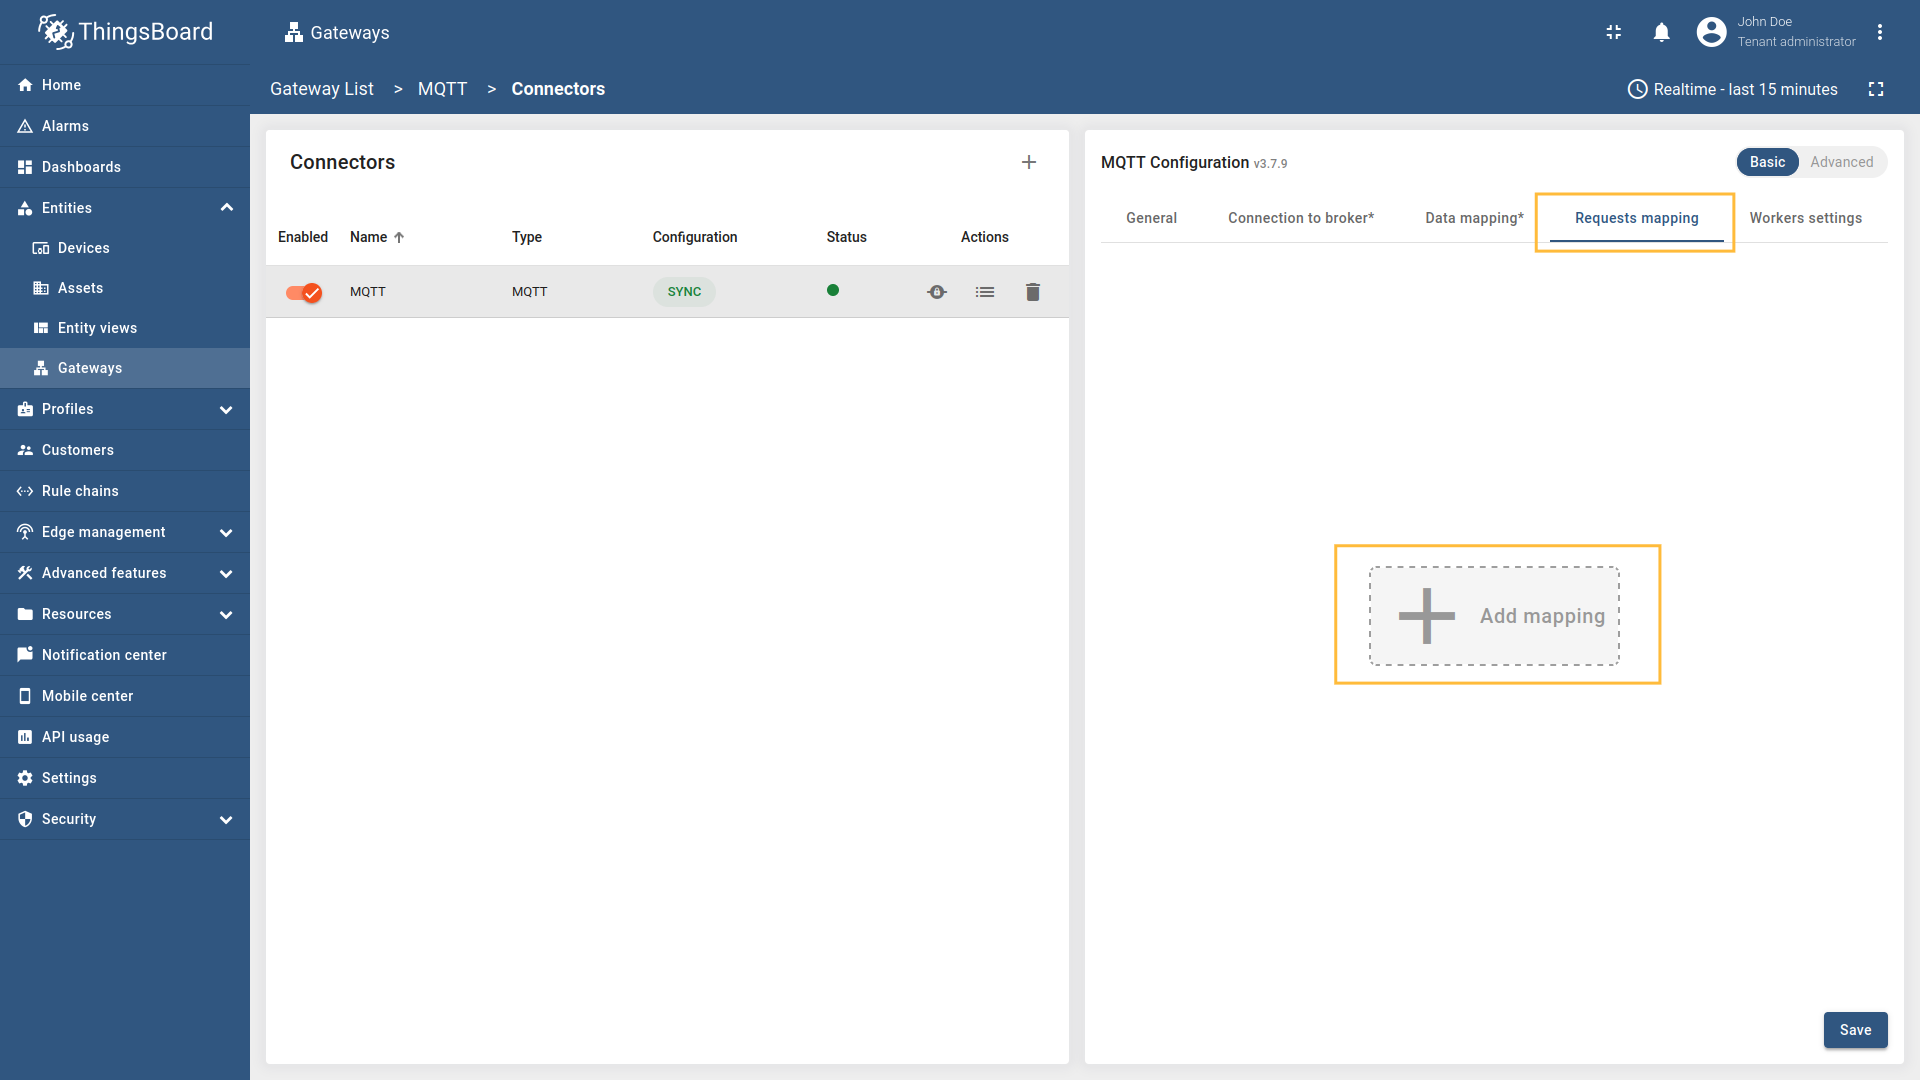 Select the MQTT connector, click on the “Basic”. Click the “Add mapping” under “Requests mapping” section to add new connect request mapping.  Select 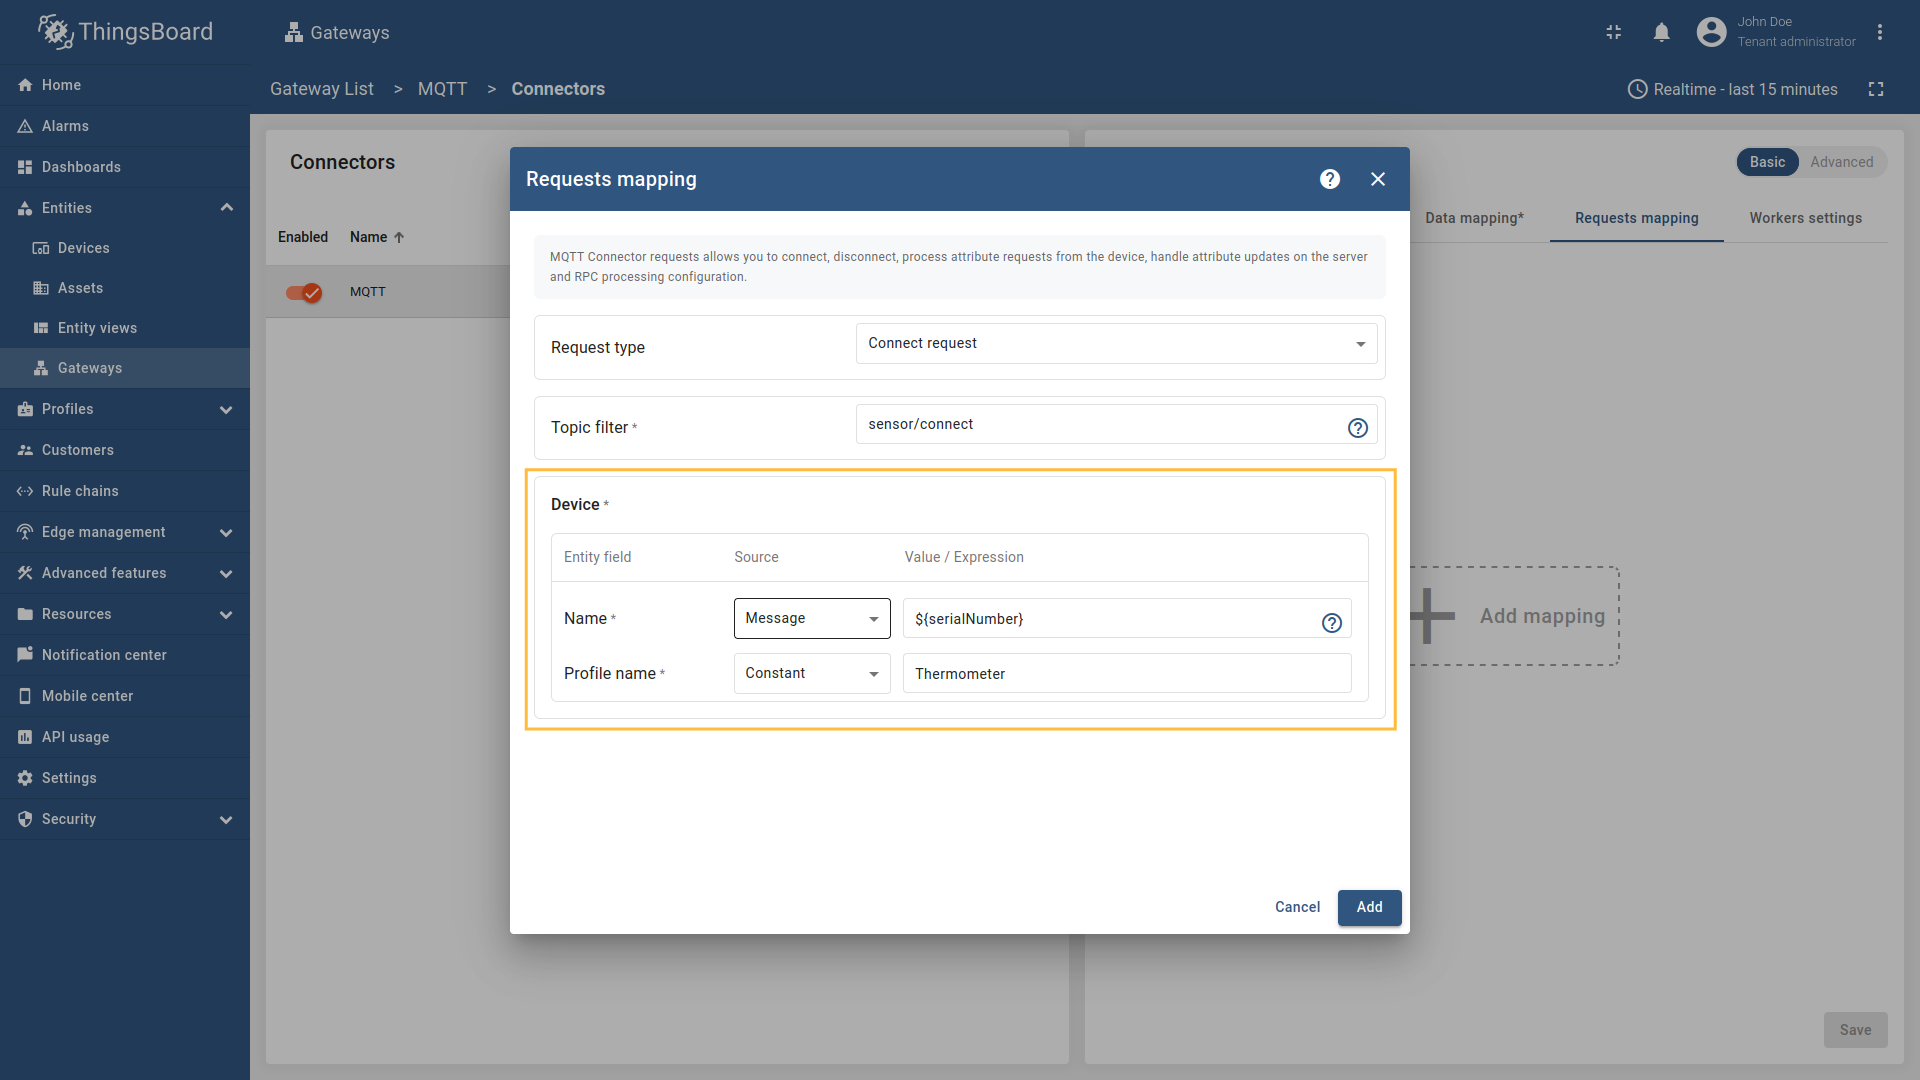 Select Name - source  Remember to save your changes by clicking the designated button. 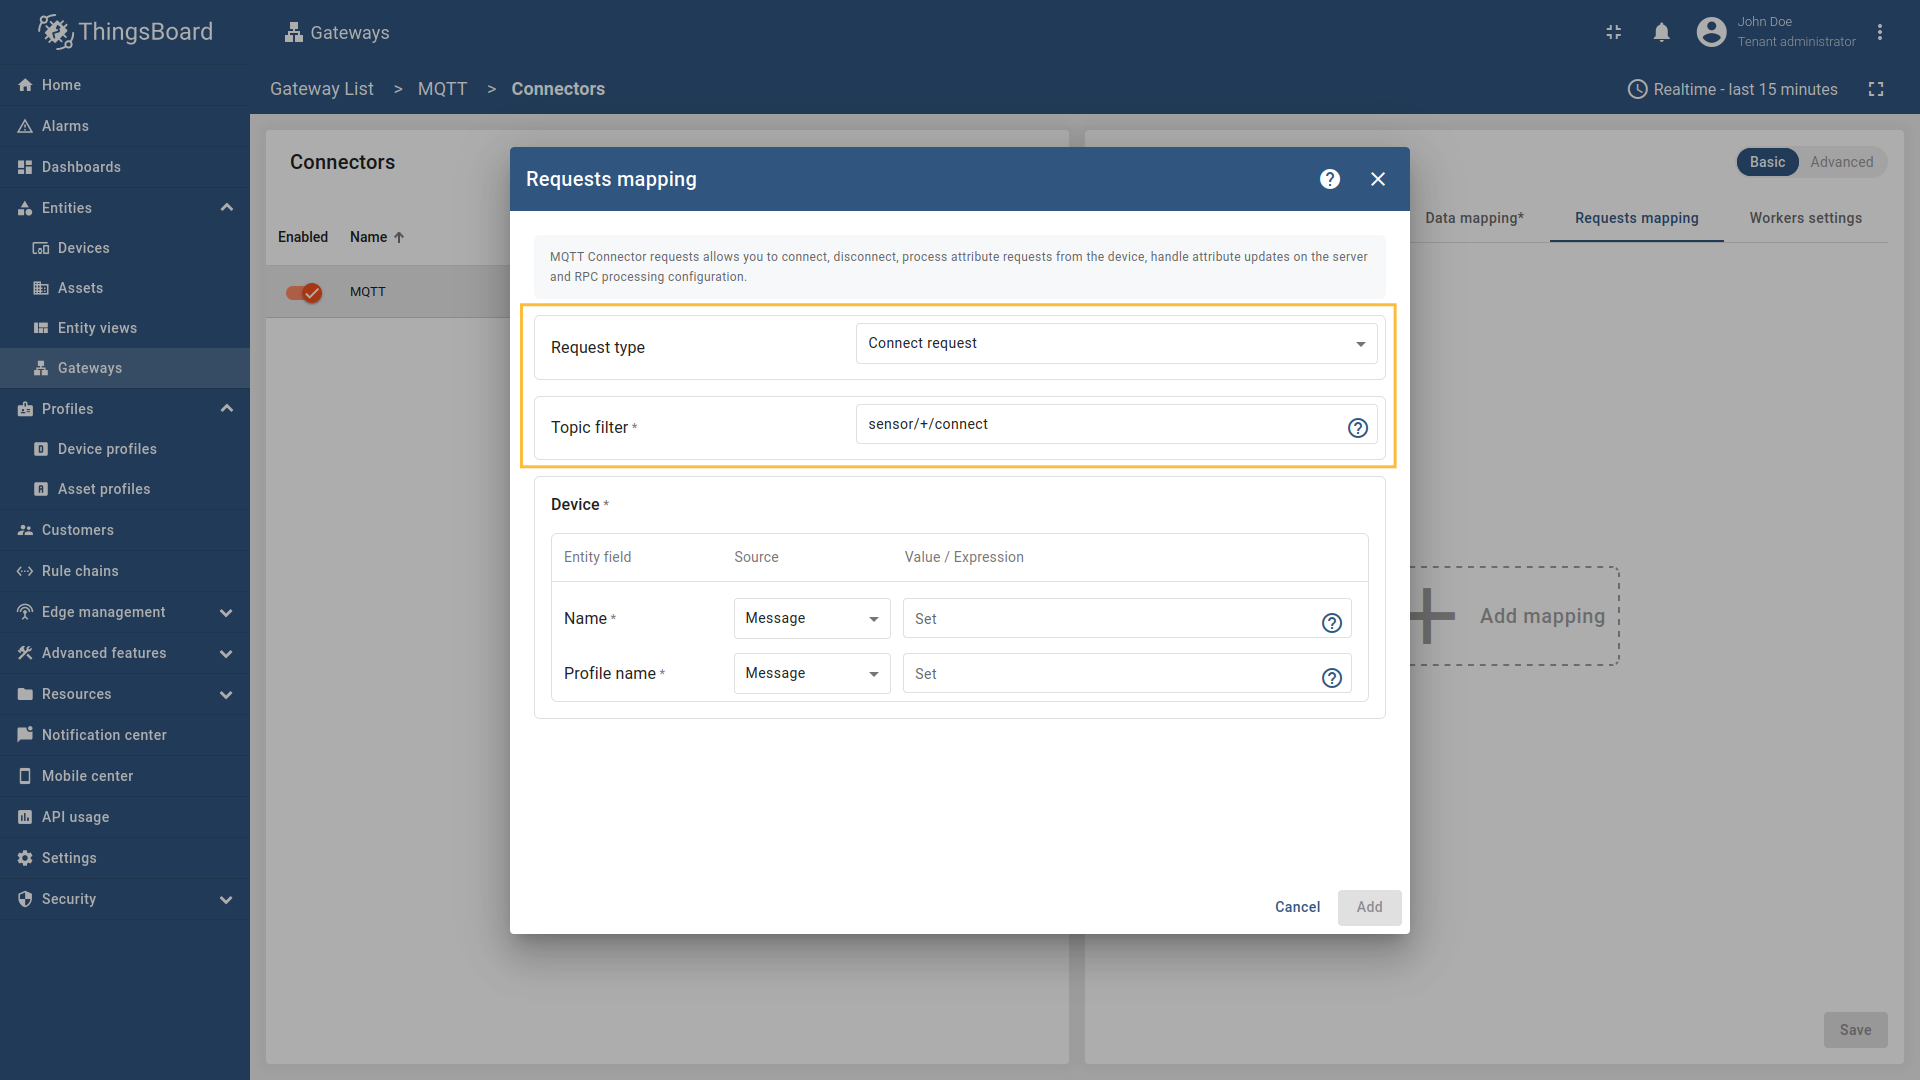 Select  Select Name - source  Remember to save your changes by clicking the designated button. After 10 minutes without sending telemetry, device
To reactivate the device so it can receive RPC commands, we need to send a Connect request. Let’s demonstrate this with two examples: Example 1: Device name from message payloadUse a terminal to simulate sending a message from the device to the MQTT broker with the device name in the JSON payload: After sending this message, ThingsBoard updates both the lastActivityTime and lastConnectTime of the
Example 2: Device name from topicThe same reactivation can be achieved using the second mapping configuration, where the device name is extracted from the topic instead of the message payload: If you are using advanced configuration mode, you can use the following configuration: |


For a Disconnect request, the gateway must know which device name to target. You can extract it either from the Suppose you want to disconnect device Please note: A Disconnect request tells the platform the device is offline immediately and stops routing RPCs and attribute updates to it. It does not block MQTT traffic: if the device (or gateway) continues publishing, new messages will arrive and the device may be marked active again based on the inactivity timeout which is 10 minutes. The UI “Active” flag follows last-activity timing; it may remain active until the timeout elapses unless no further messages arrive. . Let’s configure a Disconnect request in the MQTT connector to notify the platform when a device disconnects. We’ll demonstrate two ways to extract the device name:
Follow these steps:
Go to “Entities” - “Gateways” on the left sidebar and select your gateway. 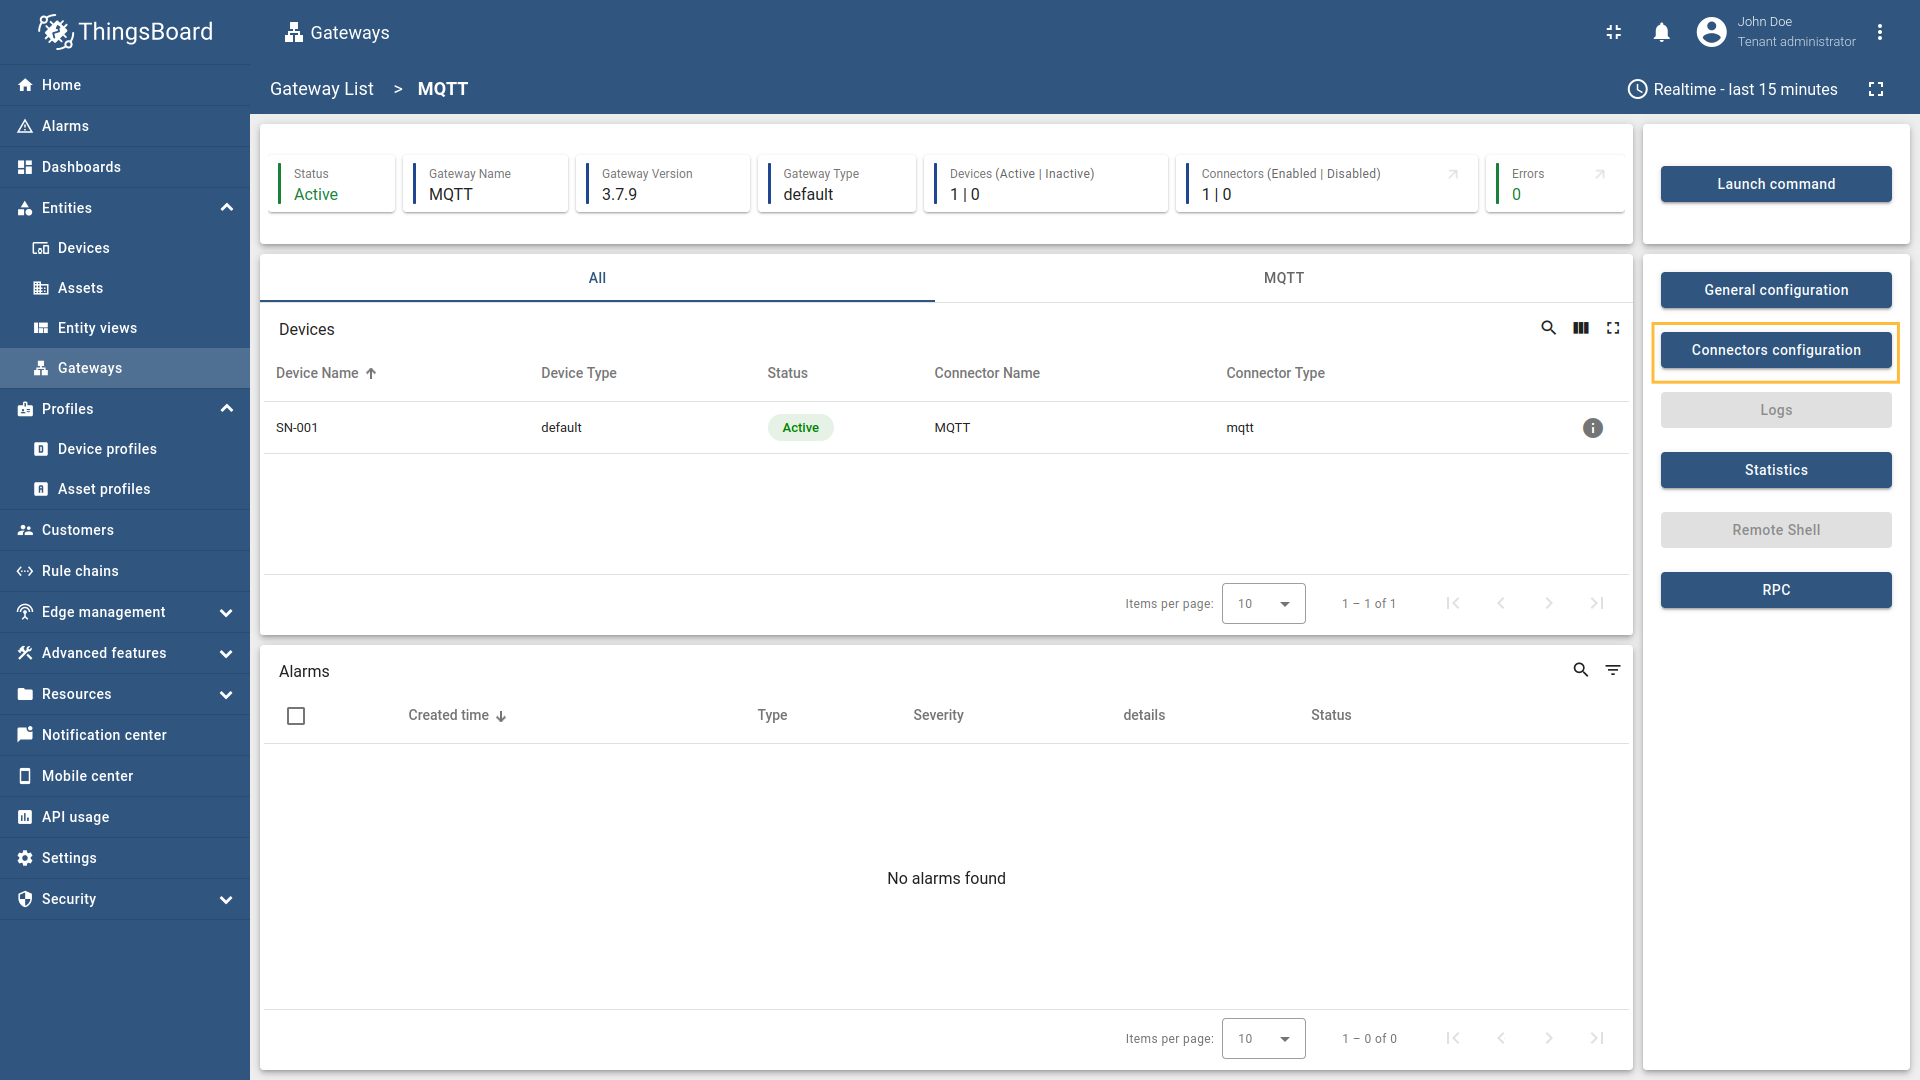 Click on the “Connectors configuration” button on the right side menu. Select the MQTT connector, click on the “Basic”. Click the “Add mapping” under “Requests mapping” section to add new disconnect request mapping.  Select “Disconnect request” in the Request type field, enter the “Topic filter” as  Select source type for Name field as 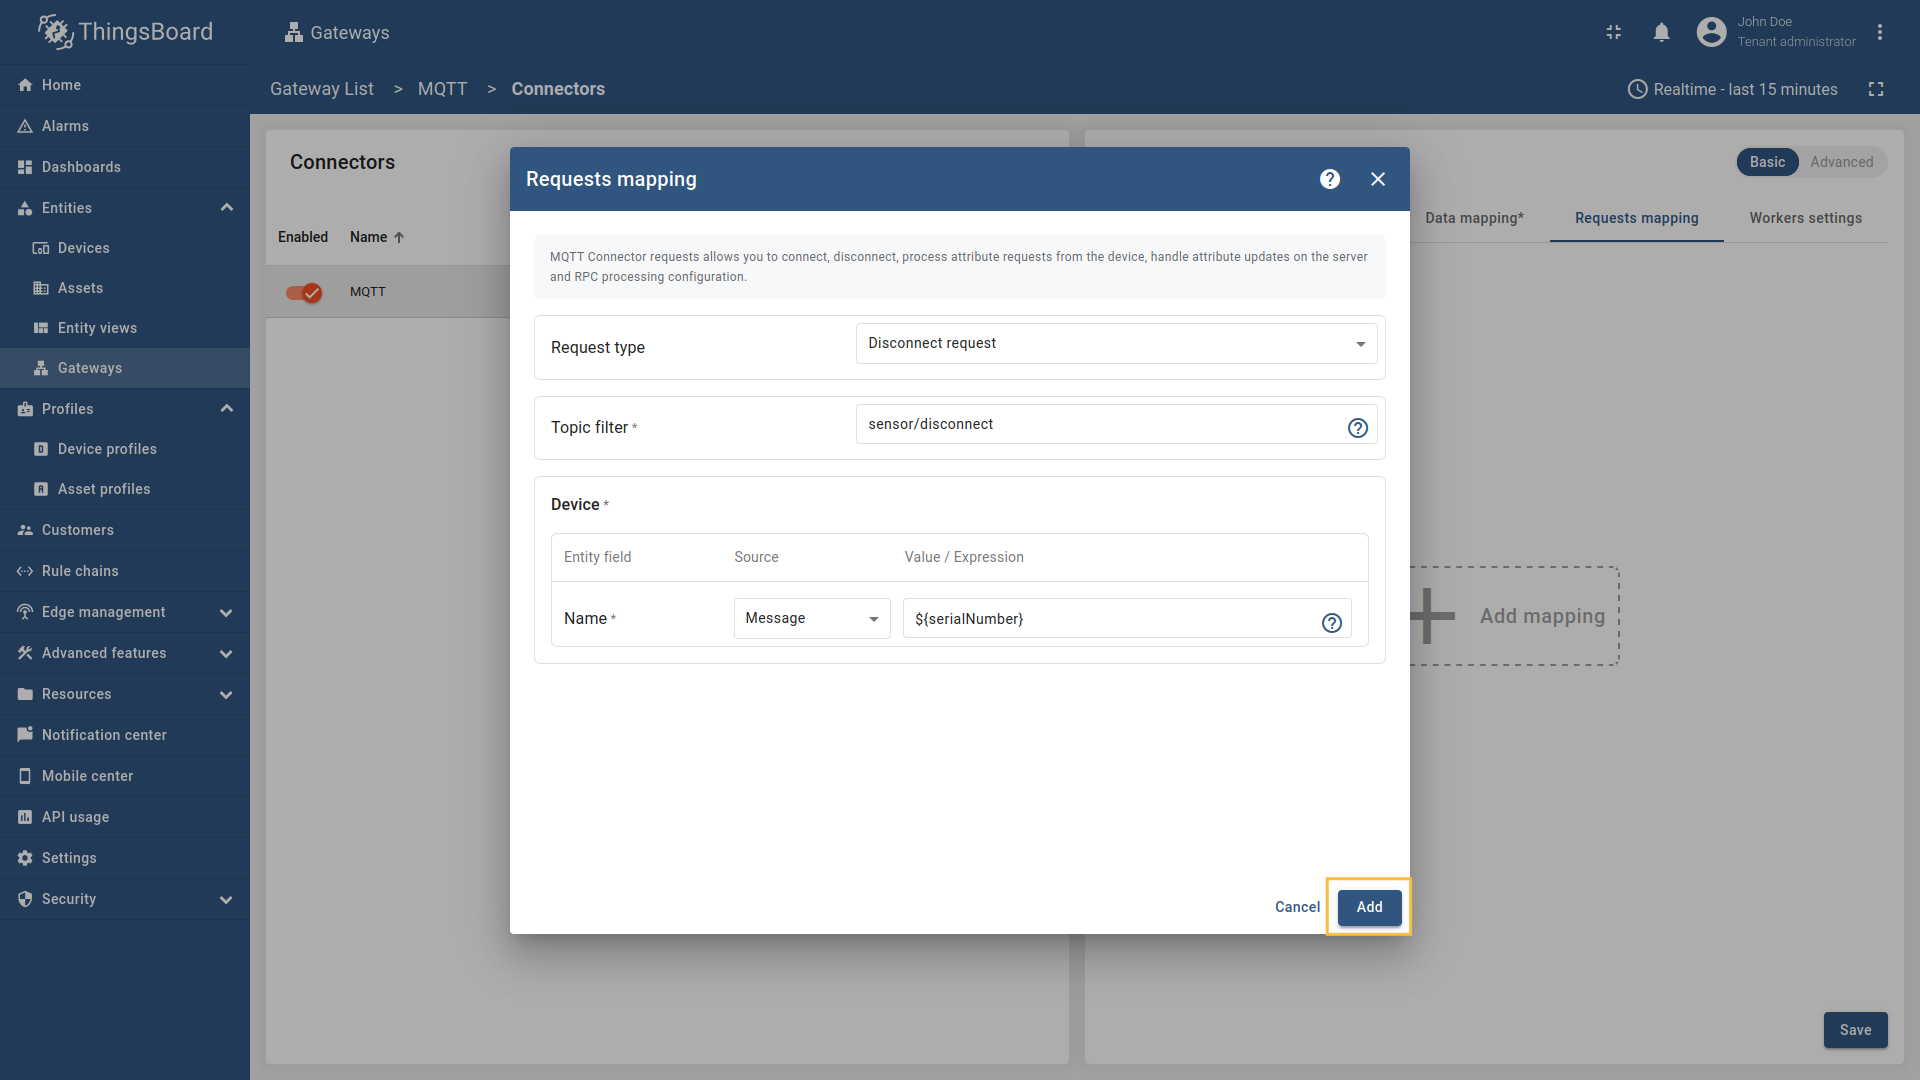 Remember to save your changes by clicking the designated button.  Select “Disconnect request” in the Request type field then fill the “Topic filter” with  Select source type for Name field as  Remember to save your changes by clicking the designated button. Let’s demonstrate how to use these disconnect request configurations with two examples:
Example 1: Device name from message payloadWhen the device name is included in the message payload, you can send a disconnect request as follows: This message contains the device name in the JSON payload, which is extracted using the
Example 2: Device name from topicWhen the device name is encoded in the topic path, you can send a disconnect request as follows: In this case, the device name is extracted from the topic using the regular expression If you are using advanced configuration mode, you can use the following configuration: |
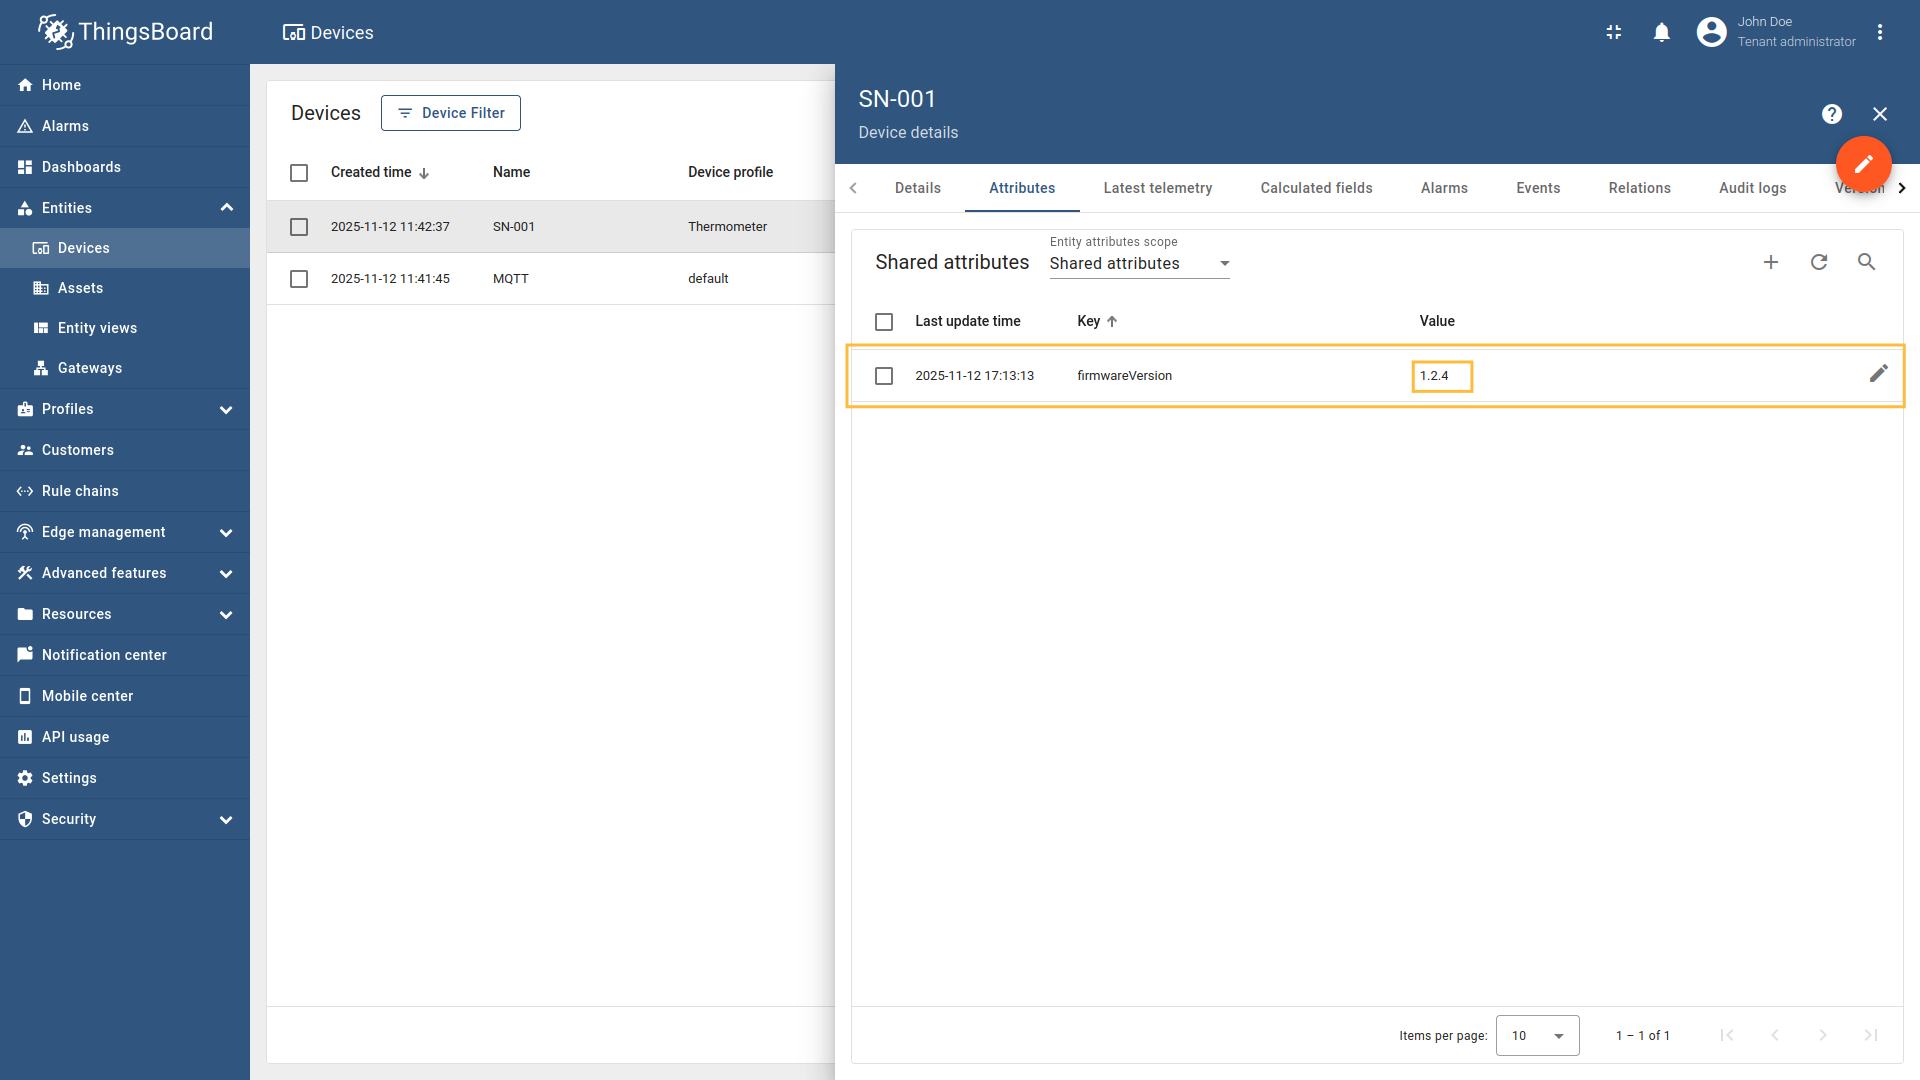
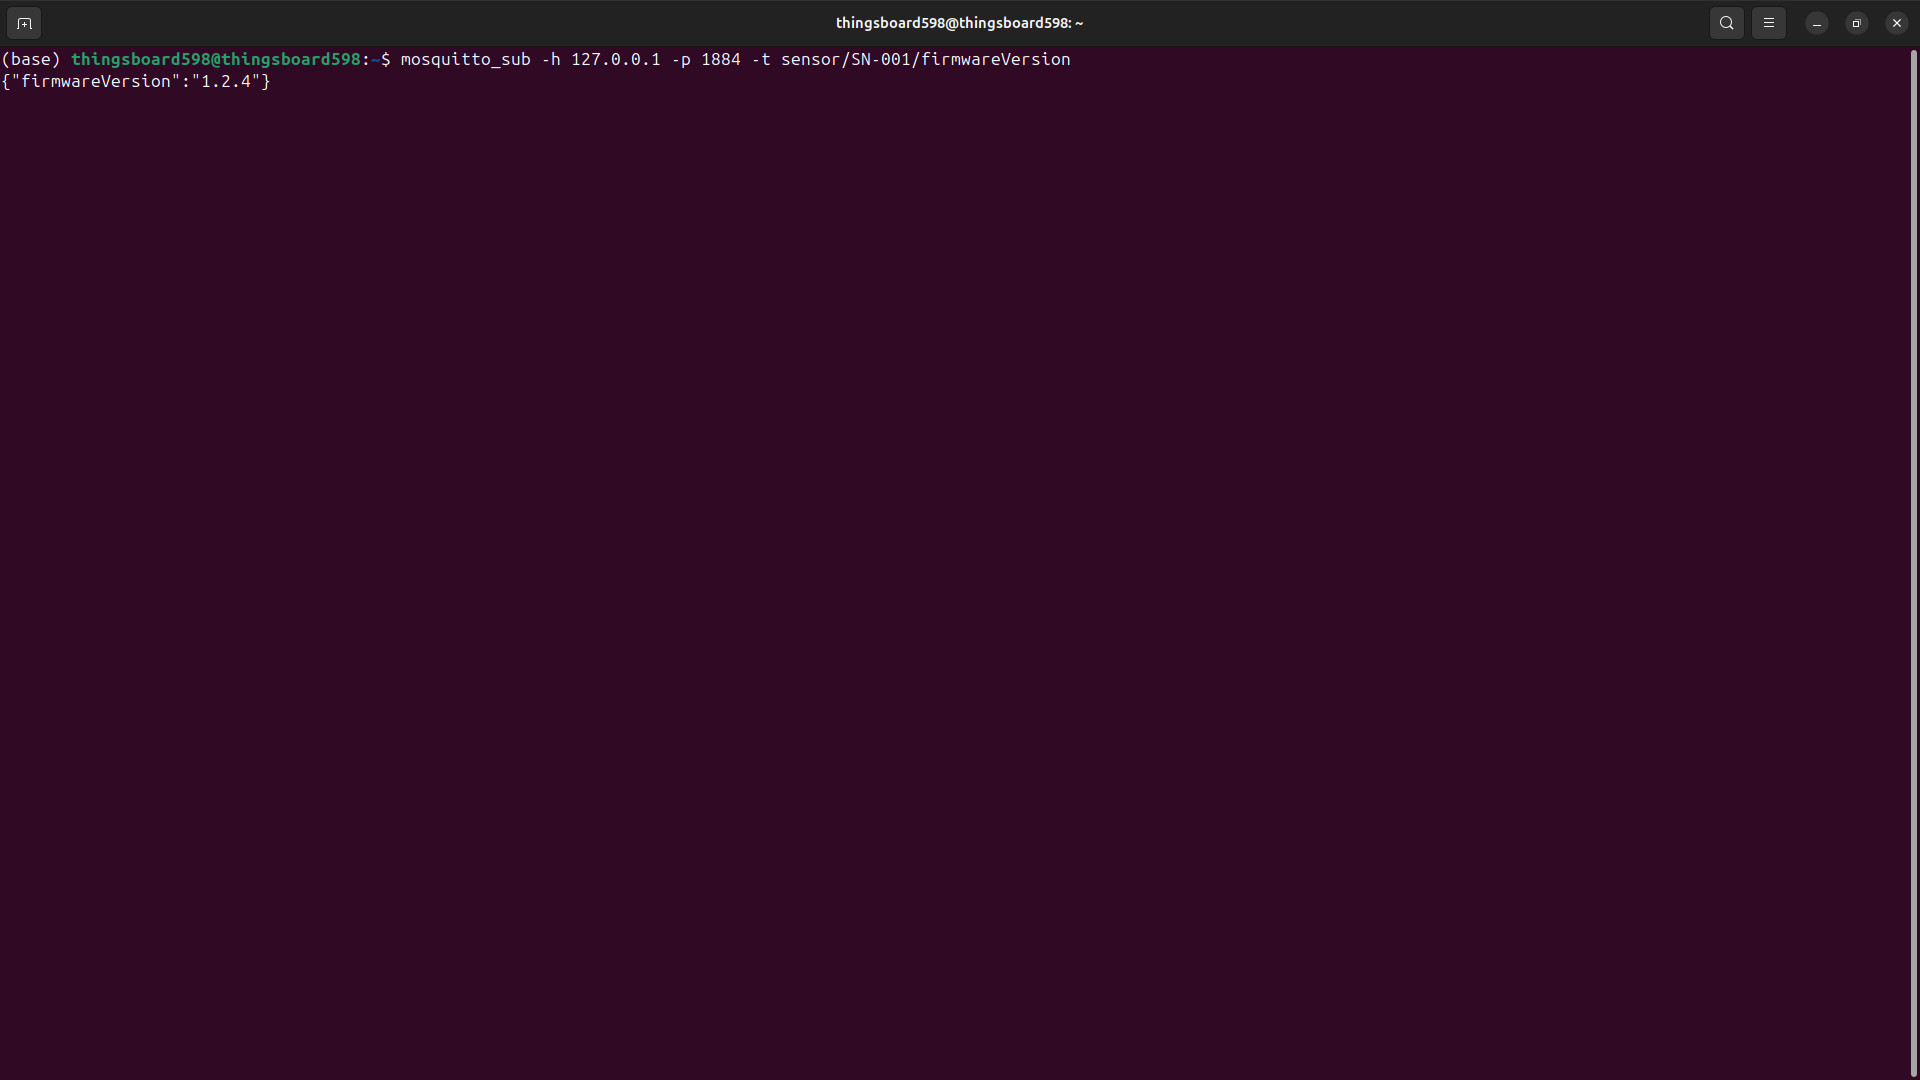
For an Attribute request, the gateway must know which device name to target and which attribute to request. You can extract the device name either from the Suppose you want to retrieve the current firmware version for device Please note: An Attribute request allows a device to retrieve attribute values from ThingsBoard. This is useful for:
The gateway acts as a bridge, receiving the attribute request from the device, fetching the attribute from ThingsBoard, and delivering the response back to the device. Let’s configure an Attribute request in the MQTT connector to allow devices to request attribute values from ThingsBoard. We’ll demonstrate two ways to extract the device name:
Follow these steps:
Go to “Entities” - “Gateways” on the left sidebar and select your gateway. Click on the “Connectors configuration” button on the right side menu. Select the MQTT connector, click on the “Basic”. Click the “Add mapping” under “Requests mapping” section to add new attribute request mapping.  Select “Attribute request” in the Request type field, enter the “Topic filter” as  Configure the device name and attribute settings. For device name expression, select source type as  Configure the response topic as  Remember to save your changes by clicking the designated button. Let’s demonstrate how to use these attribute request configurations with two examples: Example 1: Device name and attribute from message payloadSuppose we have a device with an attribute Let’s add this attribute to the device
This message contains the device name in the JSON payload, which is extracted using the The response will be published to the topic Open another terminal to simulate sending a message from the device to the MQTT broker with the device name and attribute name in the JSON payload: This message contains the device name in the JSON payload, which is extracted using the
If you are using advanced configuration mode, you can use the following configuration: |


For Attribute updates, the gateway needs to know which devices should receive updates for which attributes. You configure this using regular expressions for both device names and attribute names. When an attribute is updated in ThingsBoard, the gateway publishes the new value to a configured MQTT topic. Suppose you want ThingsBoard to automatically push firmware version updates to your devices. When you update the Please note: Attribute updates allow ThingsBoard to push shared attribute changes to devices. This is useful for:
The gateway acts as a bridge, detecting attribute changes in ThingsBoard and publishing them to MQTT topics that devices can subscribe to. Let’s configure Attribute updates in the MQTT connector to allow ThingsBoard to push attribute changes to devices. Follow these steps:
Go to “Entities” - “Gateways” in the left sidebar and select your gateway. Click on the “Connectors configuration” button on the right side menu. Select the MQTT connector, click on the “Basic”. Click the “Add mapping” under “Requests mapping” section to add new attribute update mapping.  Select “Attribute update” in the Request type field, enter the “Device name filter” as  Configure the Attribute filter as  Remember to save your changes by clicking the designated button. 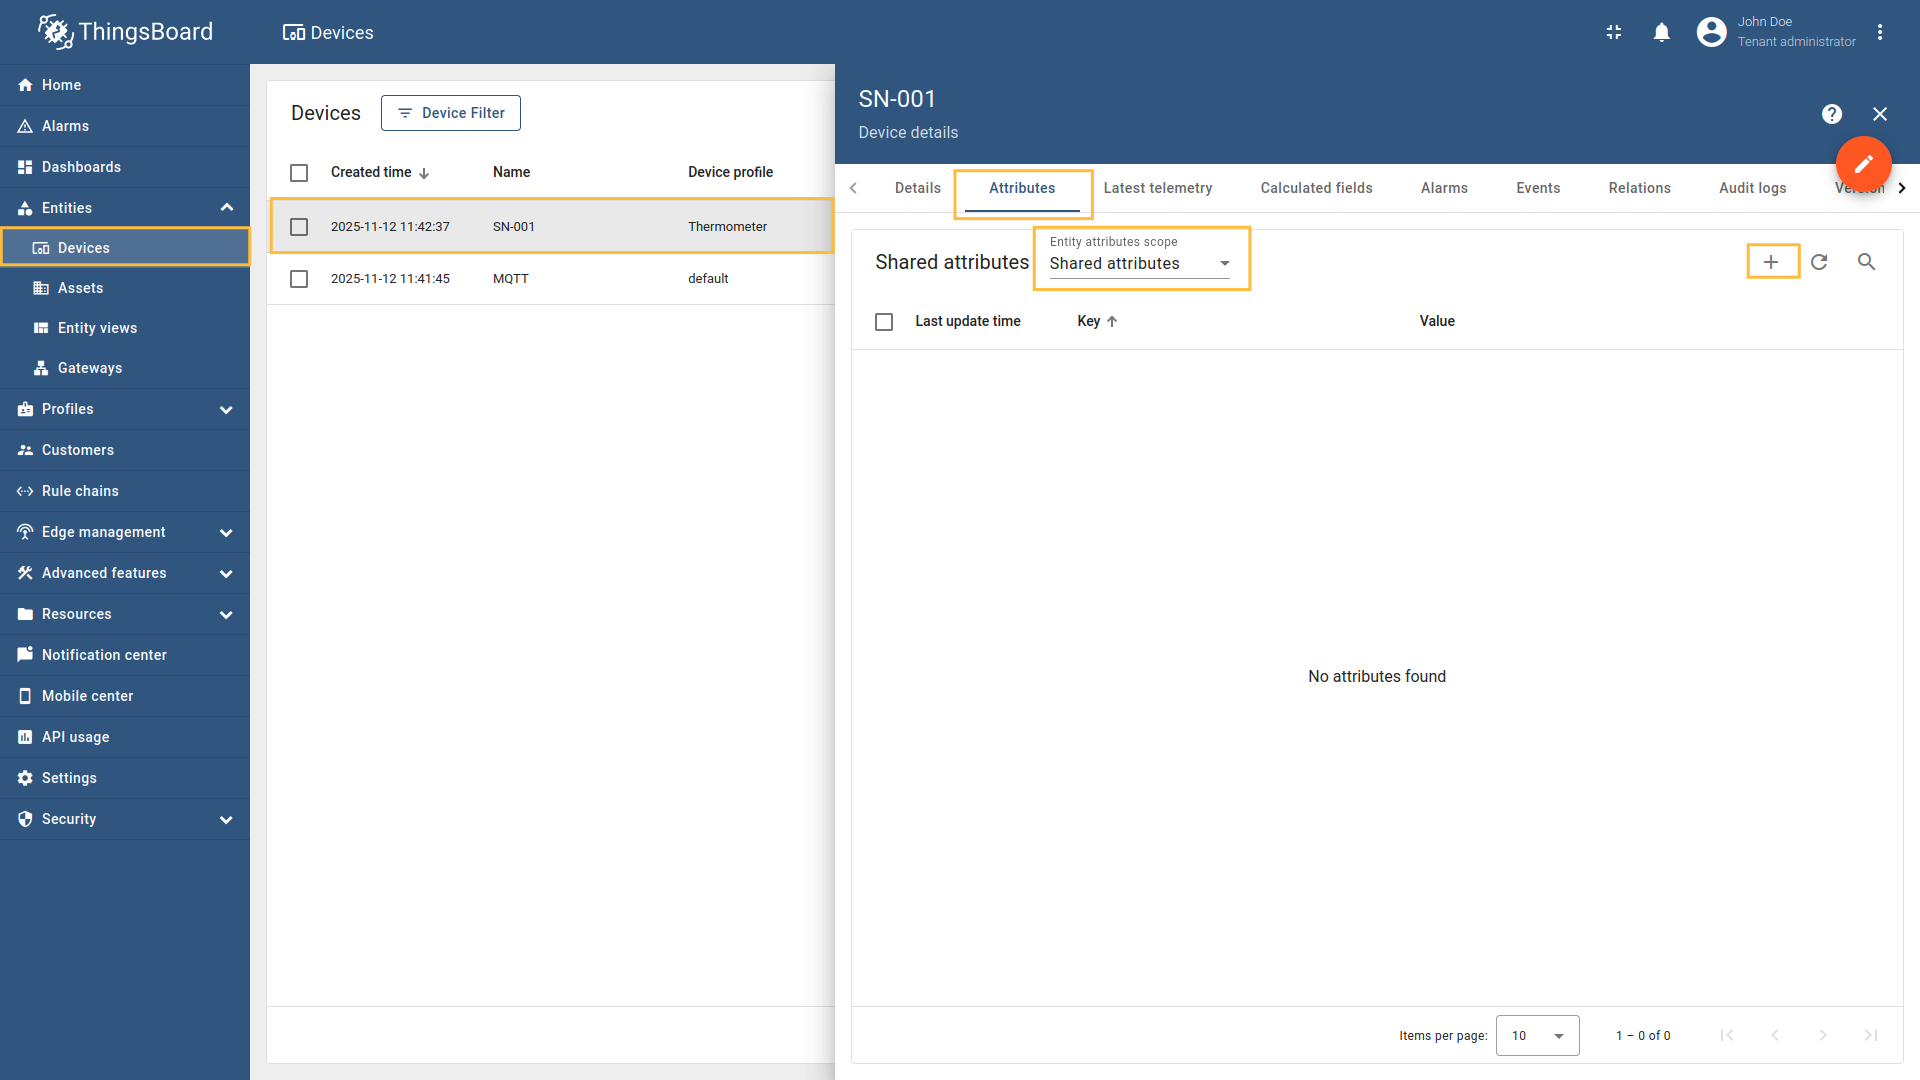 Go to “Devices” - select device 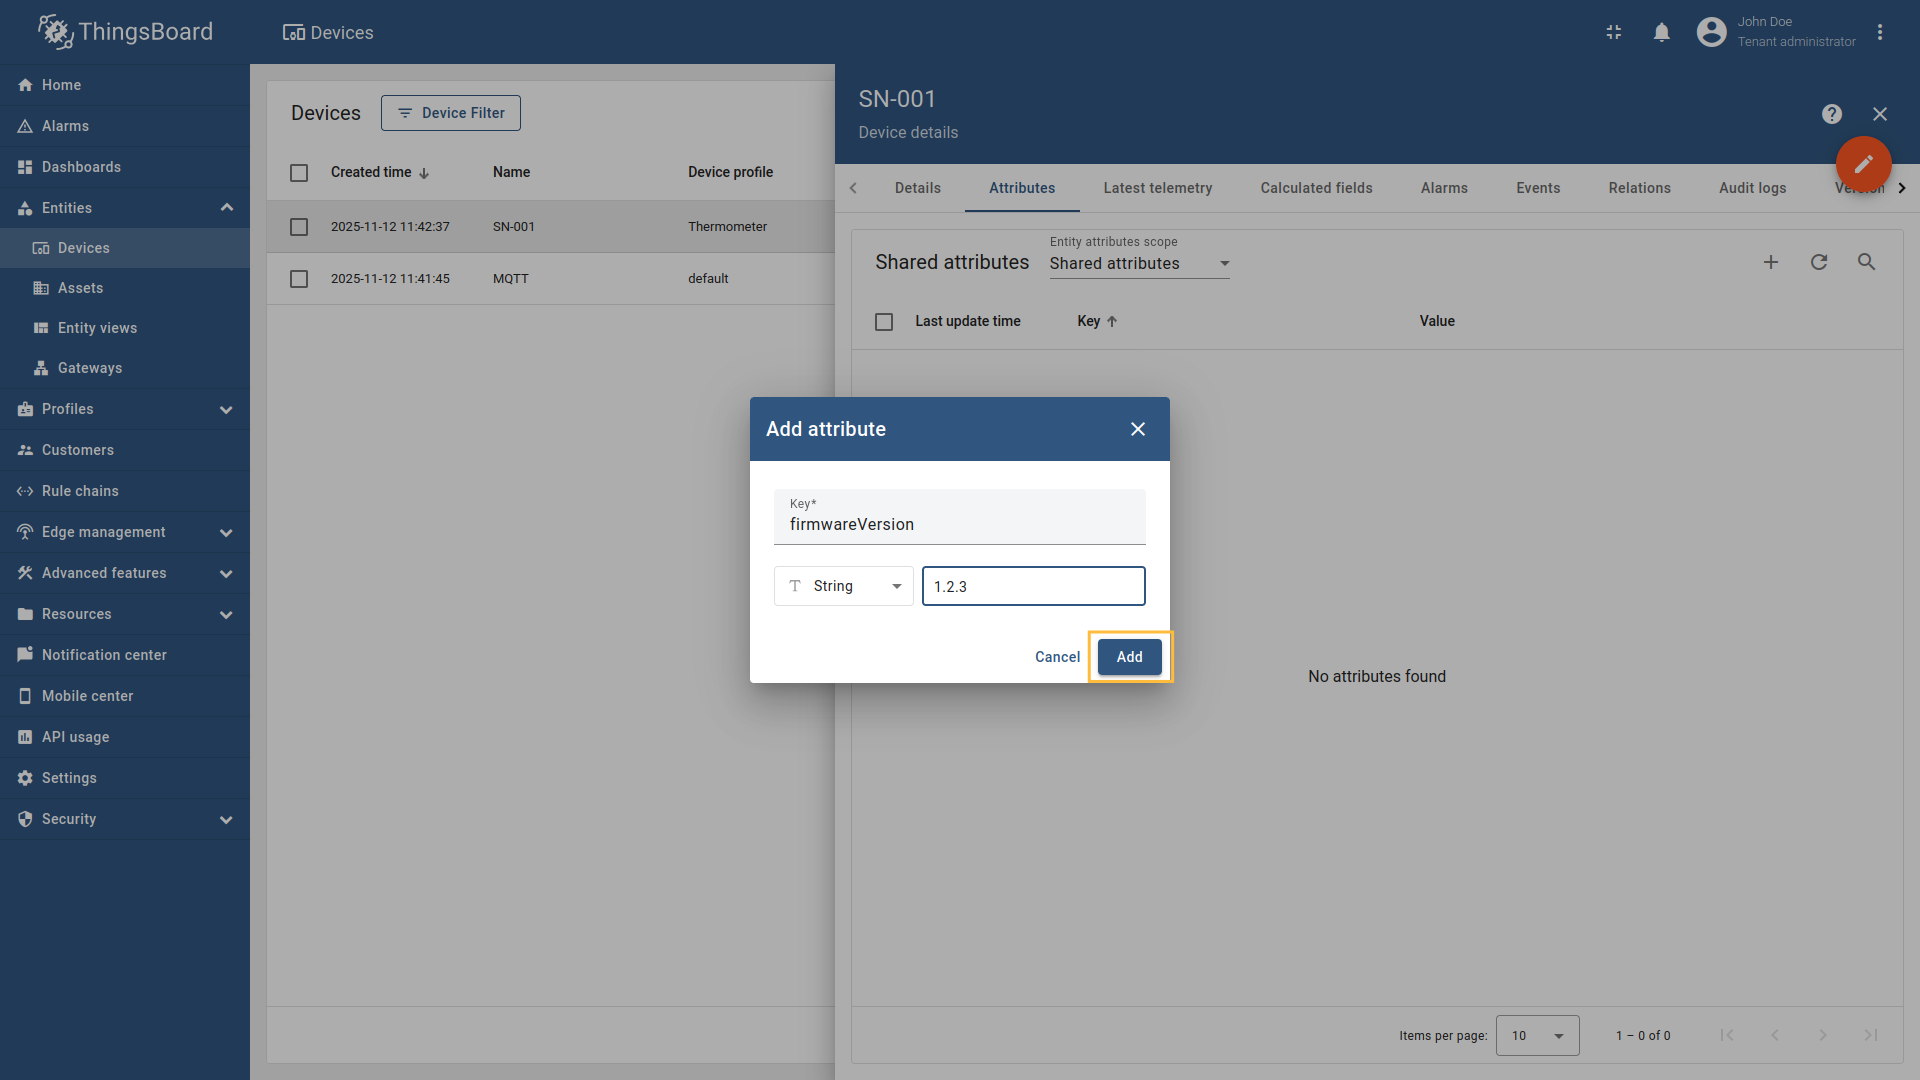 Add the 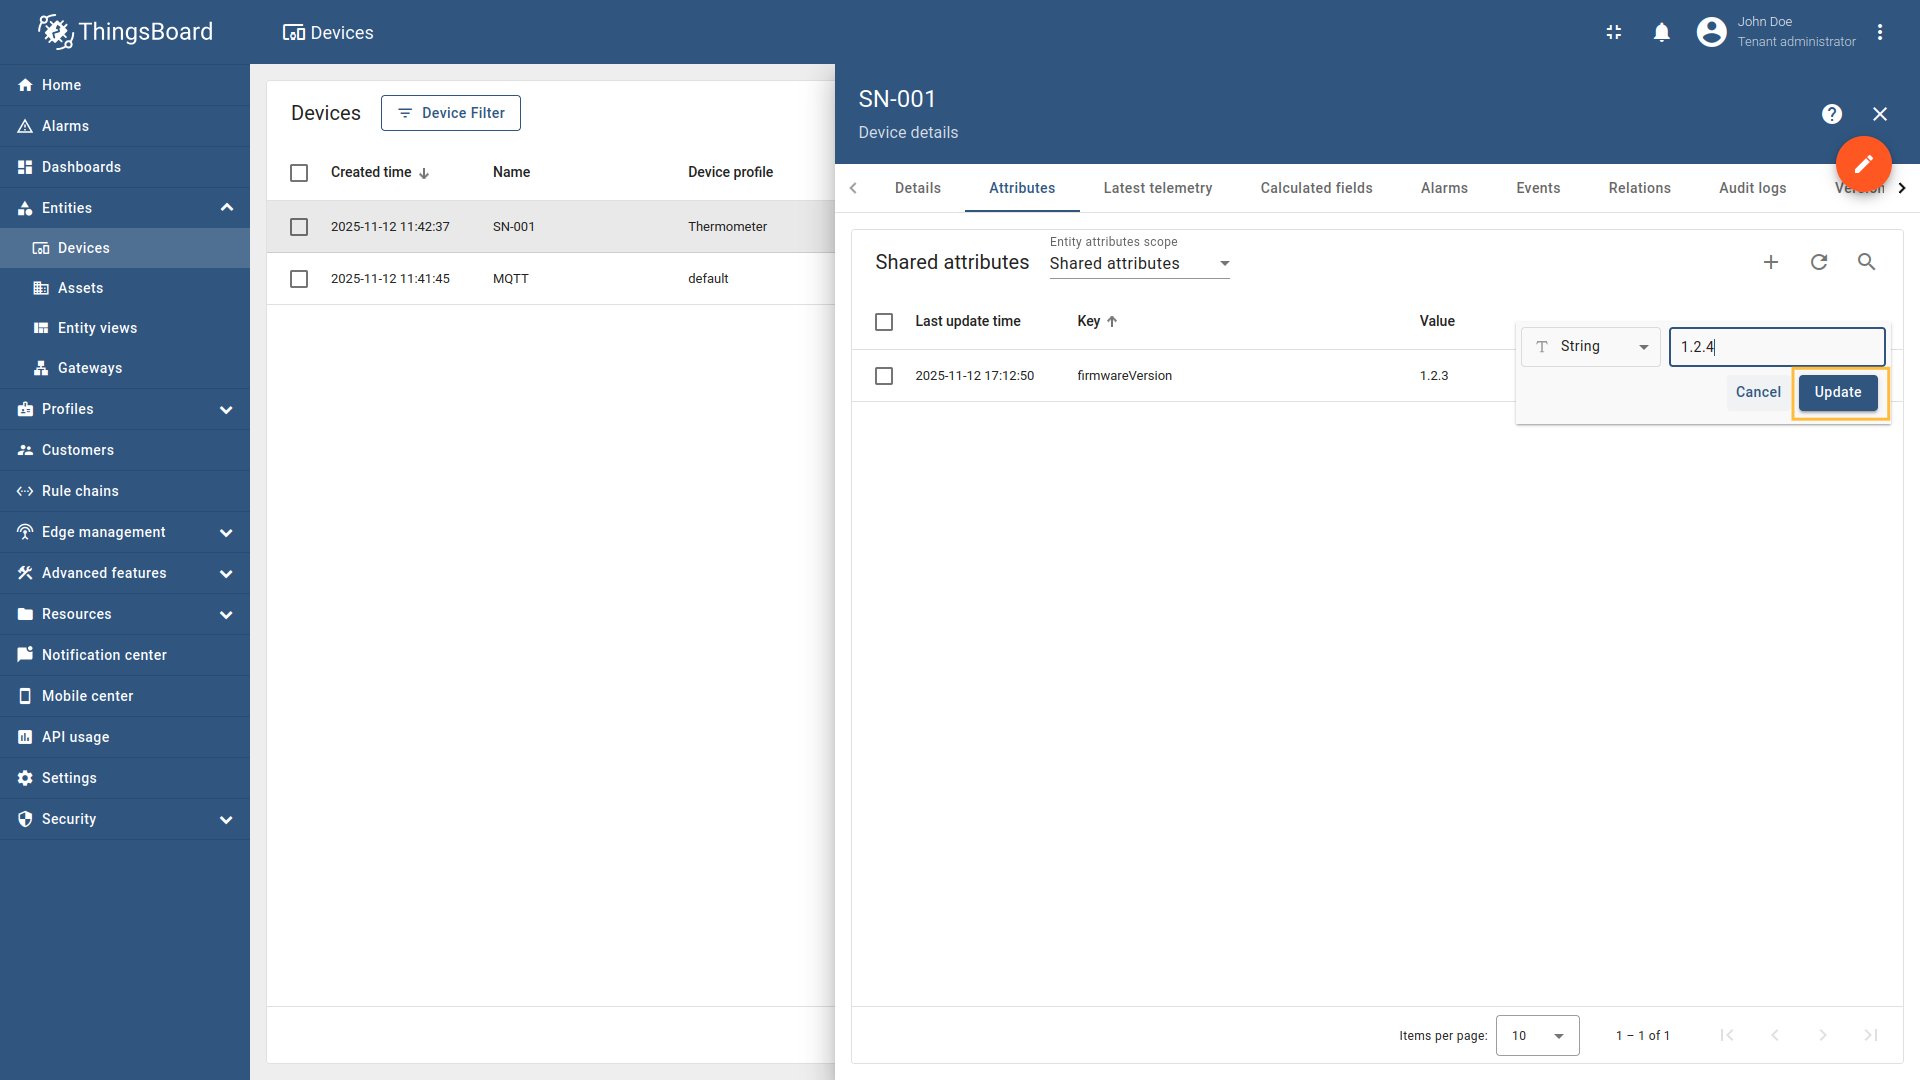 Find the Let’s demonstrate how to use this attribute update configuration: Example: Updating a device attribute in ThingsBoard
This message will be received by any device subscribed to the topic
If you are using advanced configuration mode, you can use the following configuration: |
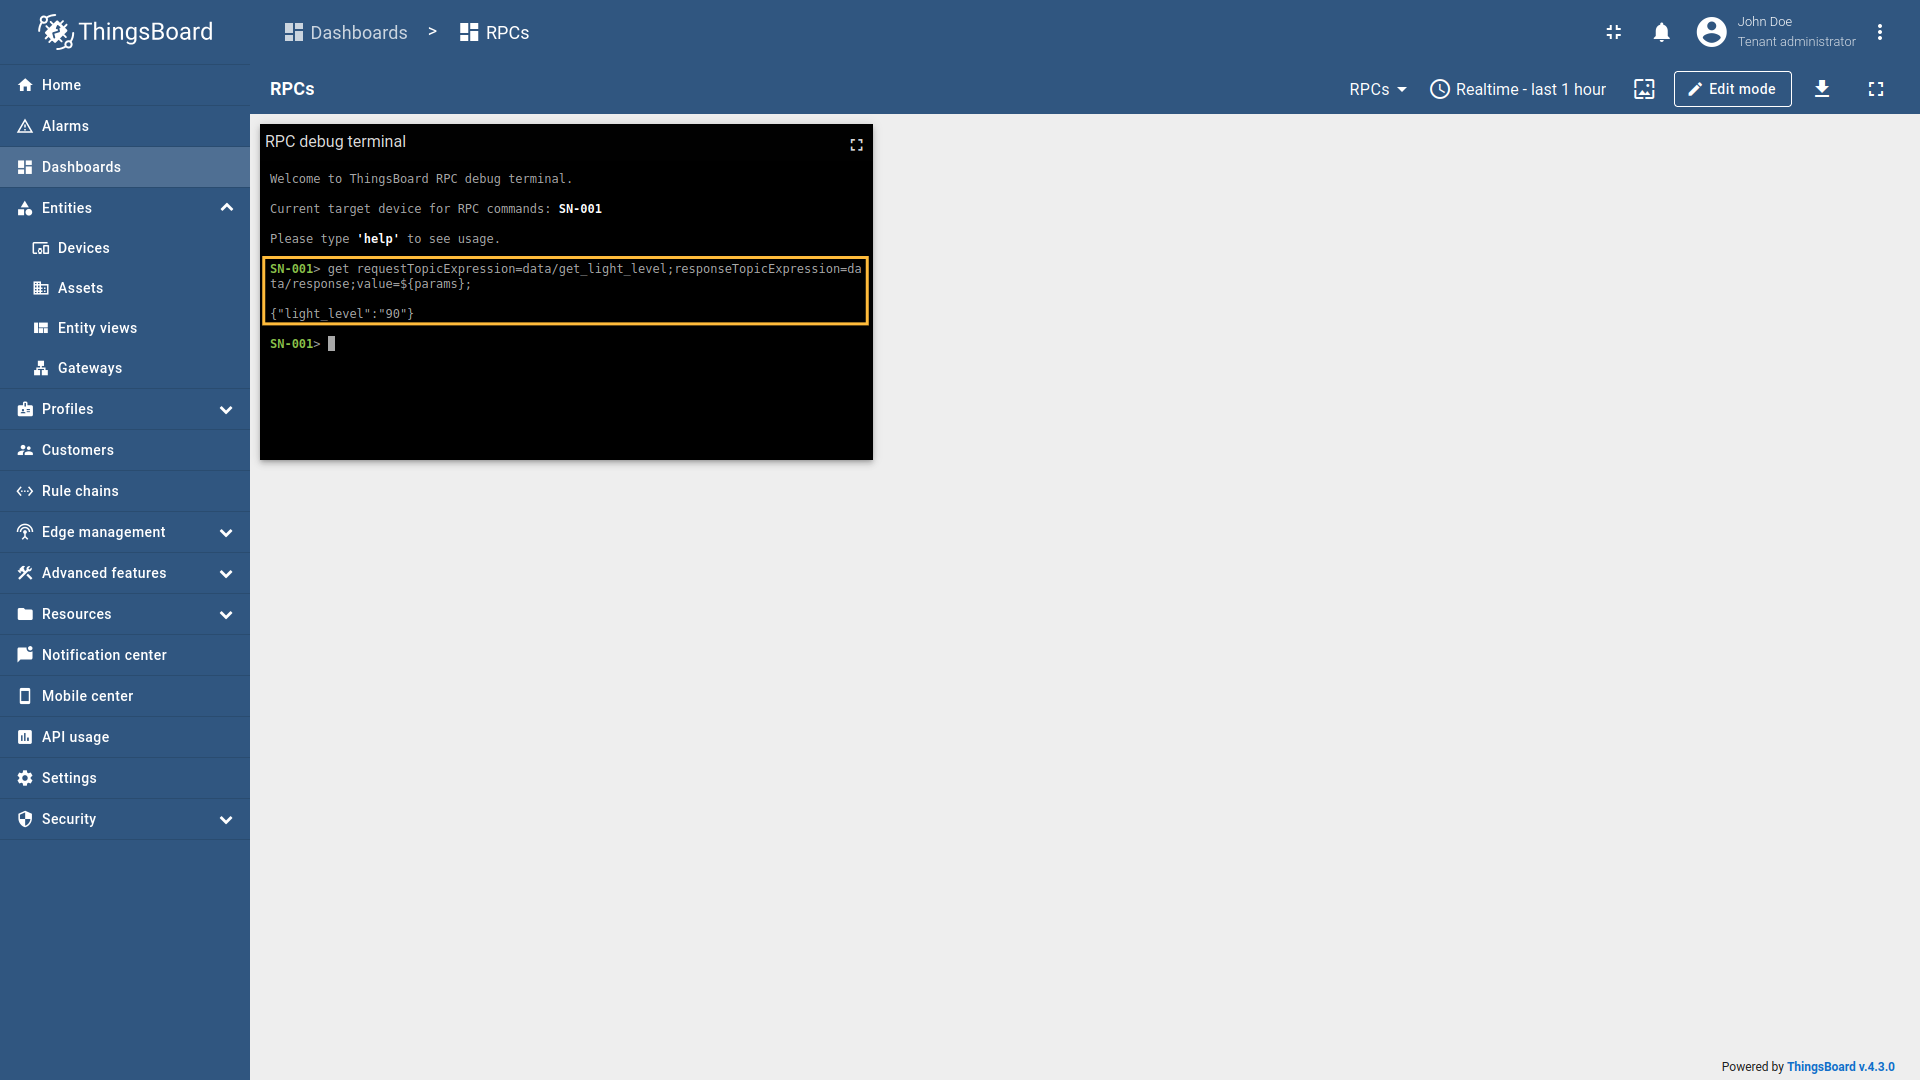
Reserved RPC Methods
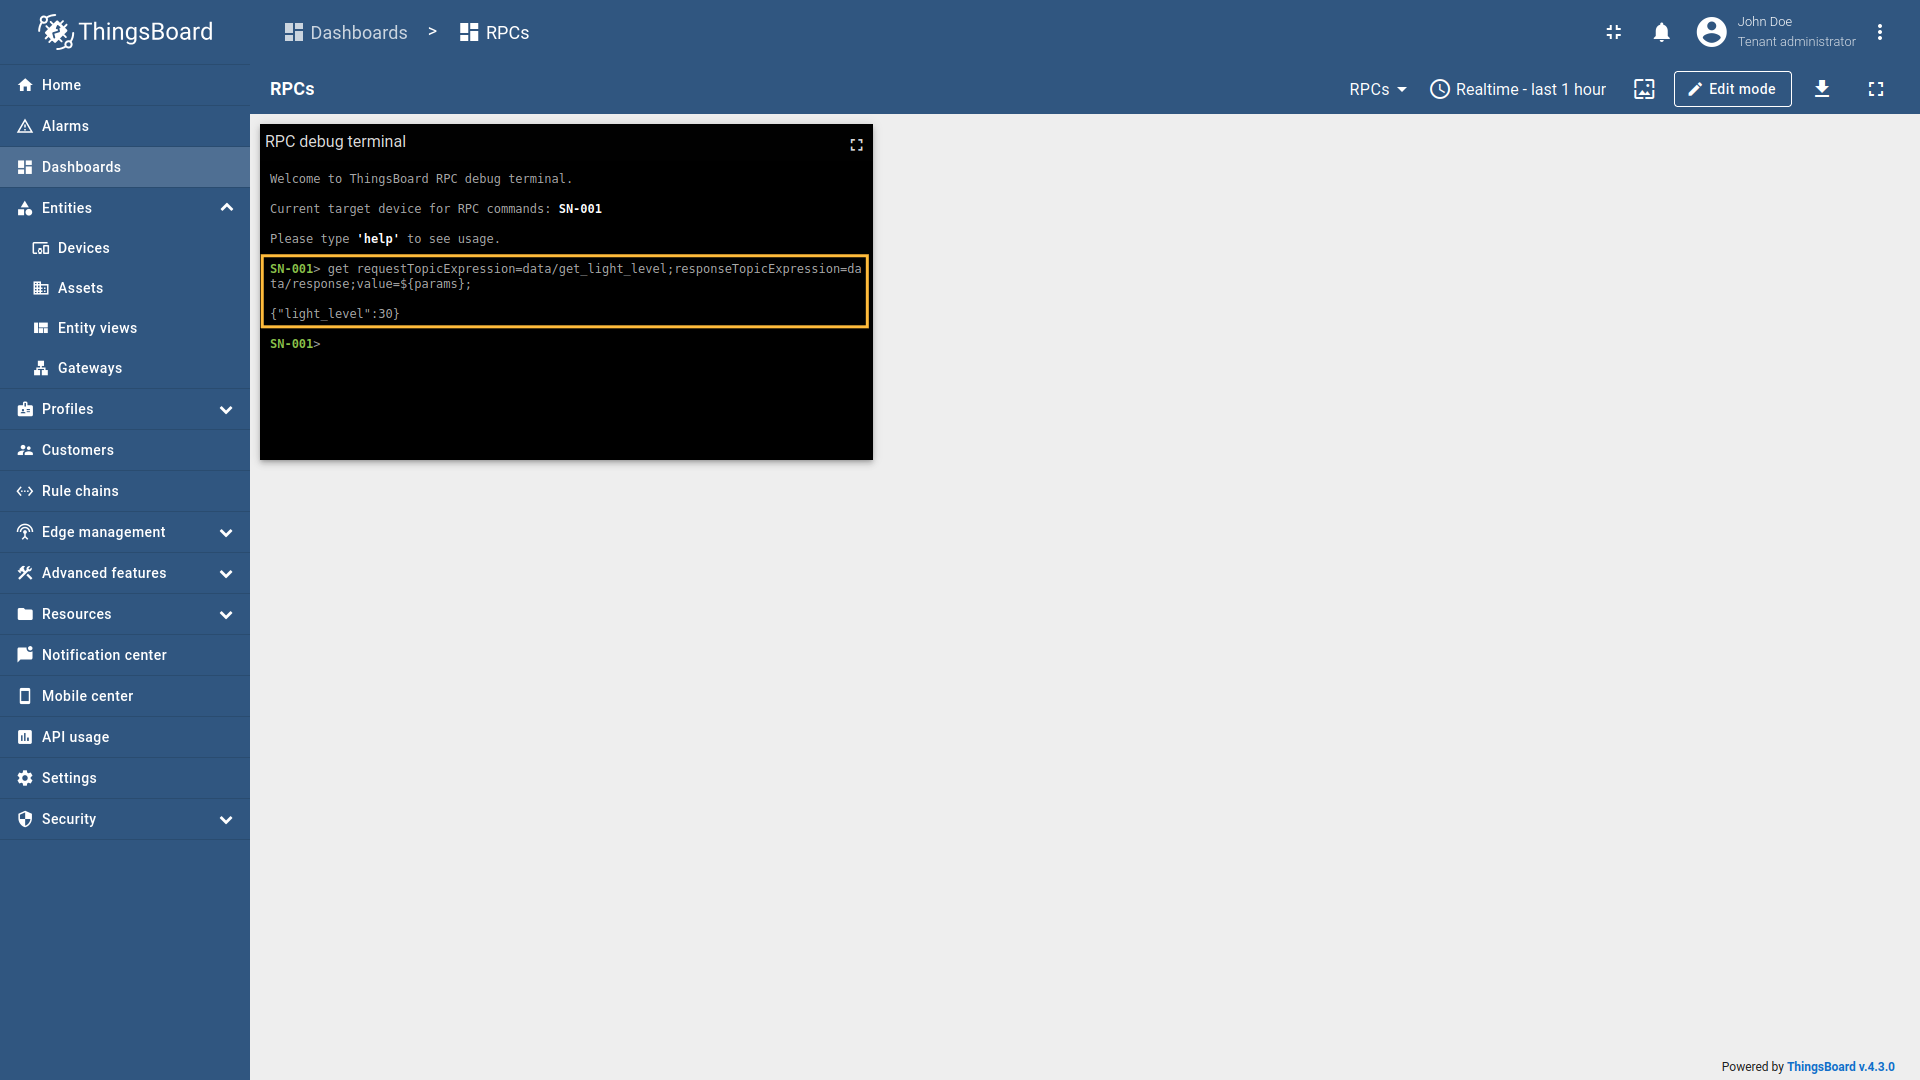
Suppose we have a device As an example, we will use ThingsBoard MQTT Demo Broker, which can be run using Docker and the following command: The broker available at Please note: The RPC Debug Terminal is used only for example purposes, so you can use any other widget that supports RPC calls. The custom MQTT publisher is used only to simulate the device behavior, but it is not applicable for real-production use cases. Example 1: Get current light level (Two Way RPC with response)In the RPC Debug Terminal widget, run the following command to send a two-way RPC request: The gateway will:
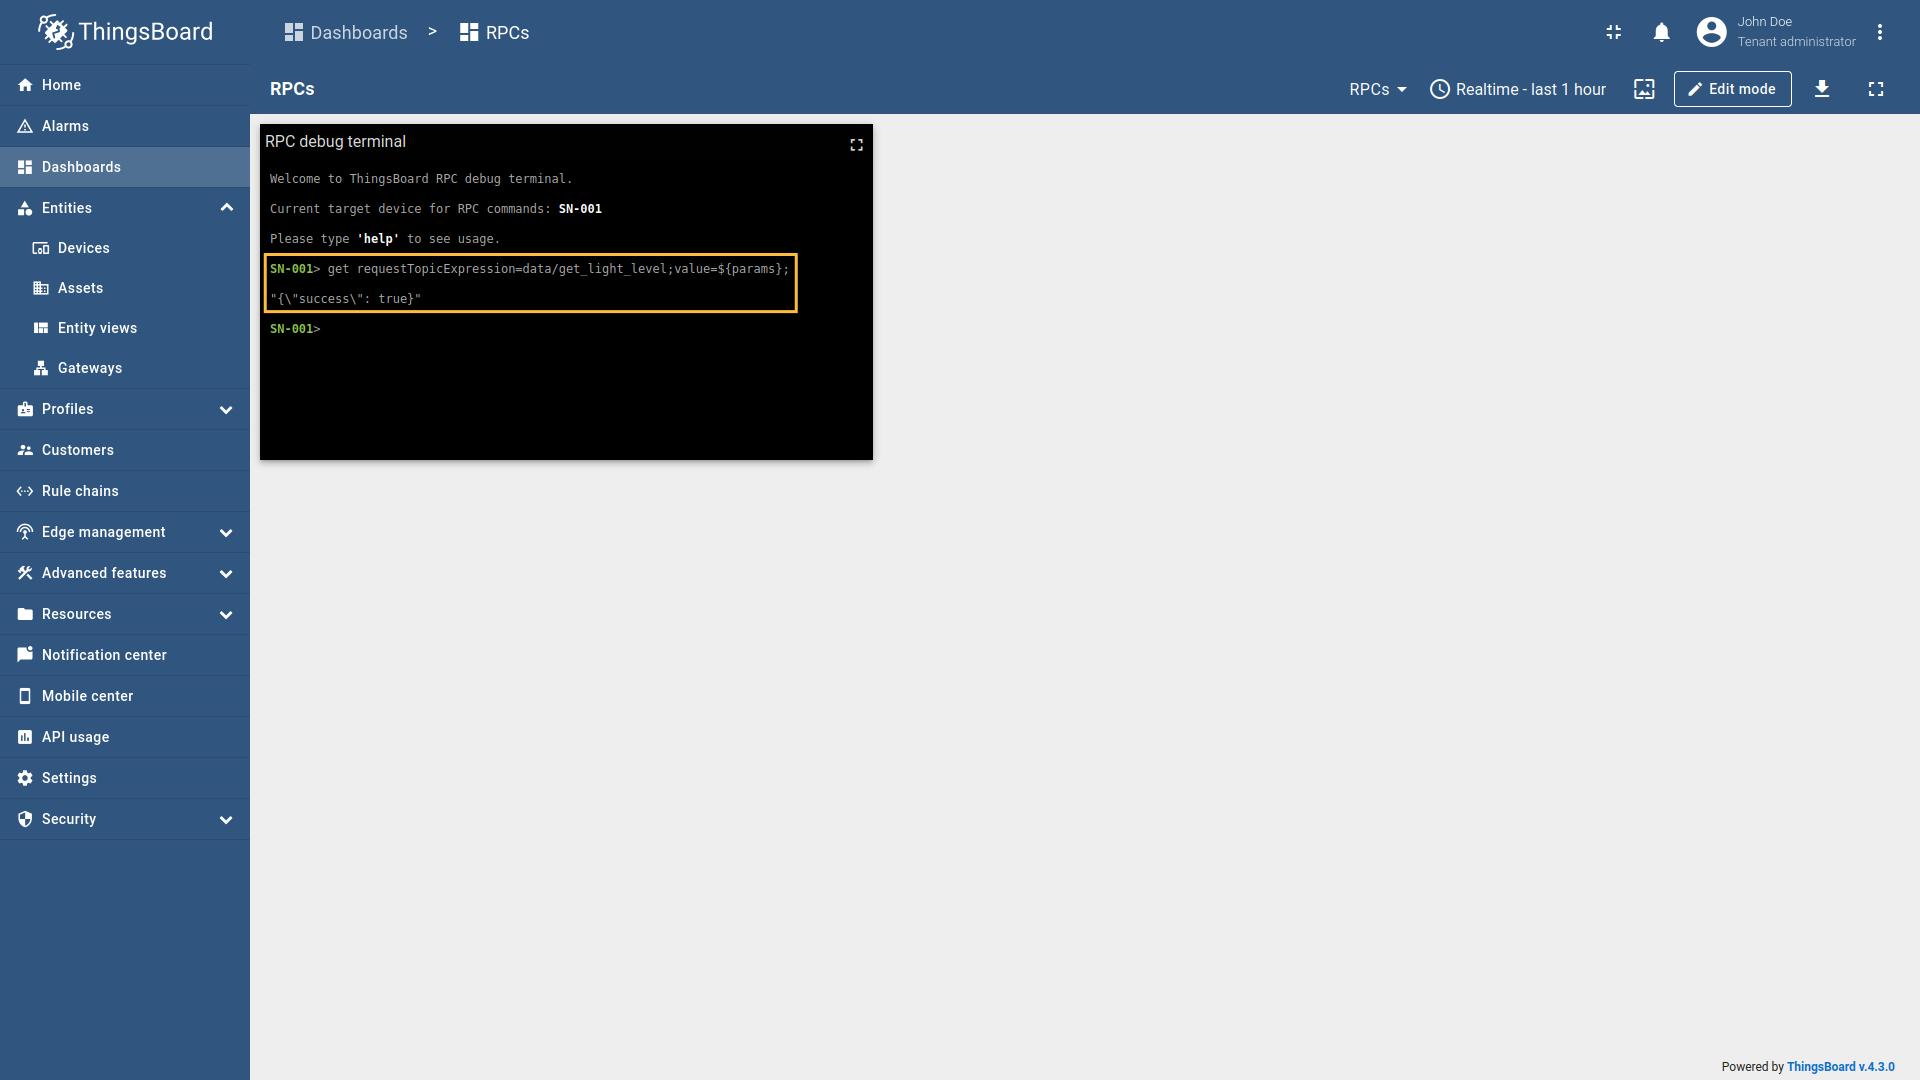
Example 2: Get current light level with no response (One Way RPC)In the RPC Debug Terminal widget, run the following command to send a one-way RPC request: The gateway will:
Example 3: SET new light level (One Way RPC)In the RPC Debug Terminal widget, run the following command to set a new light level value: The gateway will:
Example 4: Check updated light level (Two Way RPC with response)After setting the new light level, you can verify the updated value by running: The gateway will process this request as in Example 1, and you should see the updated light level value in the response.
If you are using advanced configuration mode, you can use the following configuration: |

RPC to Device allows sending RPC commands to the device that is connected to ThingsBoard directly or via Gateway. Suppose we have a device As an example, we will use ThingsBoard MQTT Demo Broker, which can be run using Docker and the following command: The demo broker runs at Please note: The RPC Debug Terminal is used only for example purposes, so you can use any other widget that supports RPC calls. The custom MQTT publisher is used only to simulate the device behavior, but it is not applicable for real-production use cases. Let’s configure RPC commands in the MQTT connector to allow ThingsBoard to send commands to devices. Follow these steps:
Go to “Entities” - “Gateways” on the left sidebar and select your gateway. Click on the “Connectors configuration” button on the right side menu. Select the MQTT connector, click on the “Basic”. Click the “Add mapping” under “Requests mapping” section to add new RPC mapping. 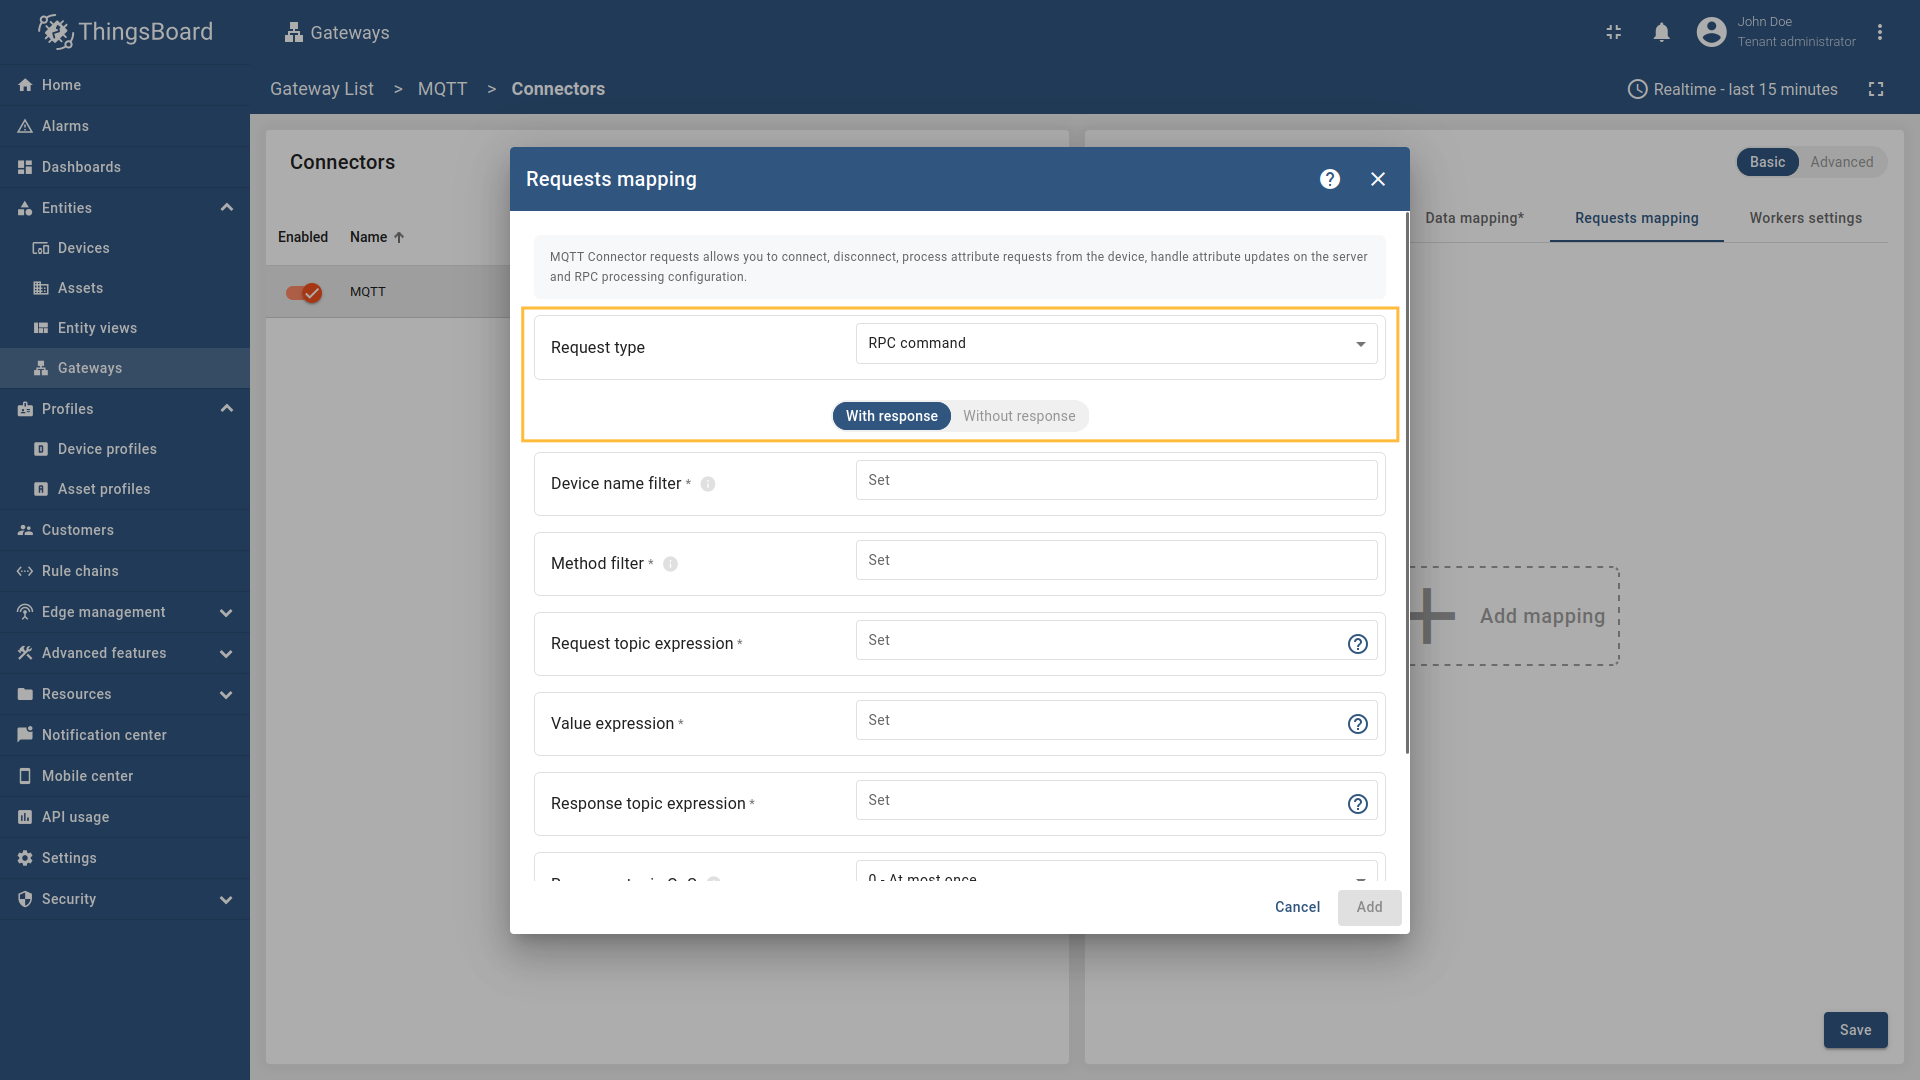 Select “RPC command” in the Request type field. For two-way RPC (with response).  Configure the Device name filter as 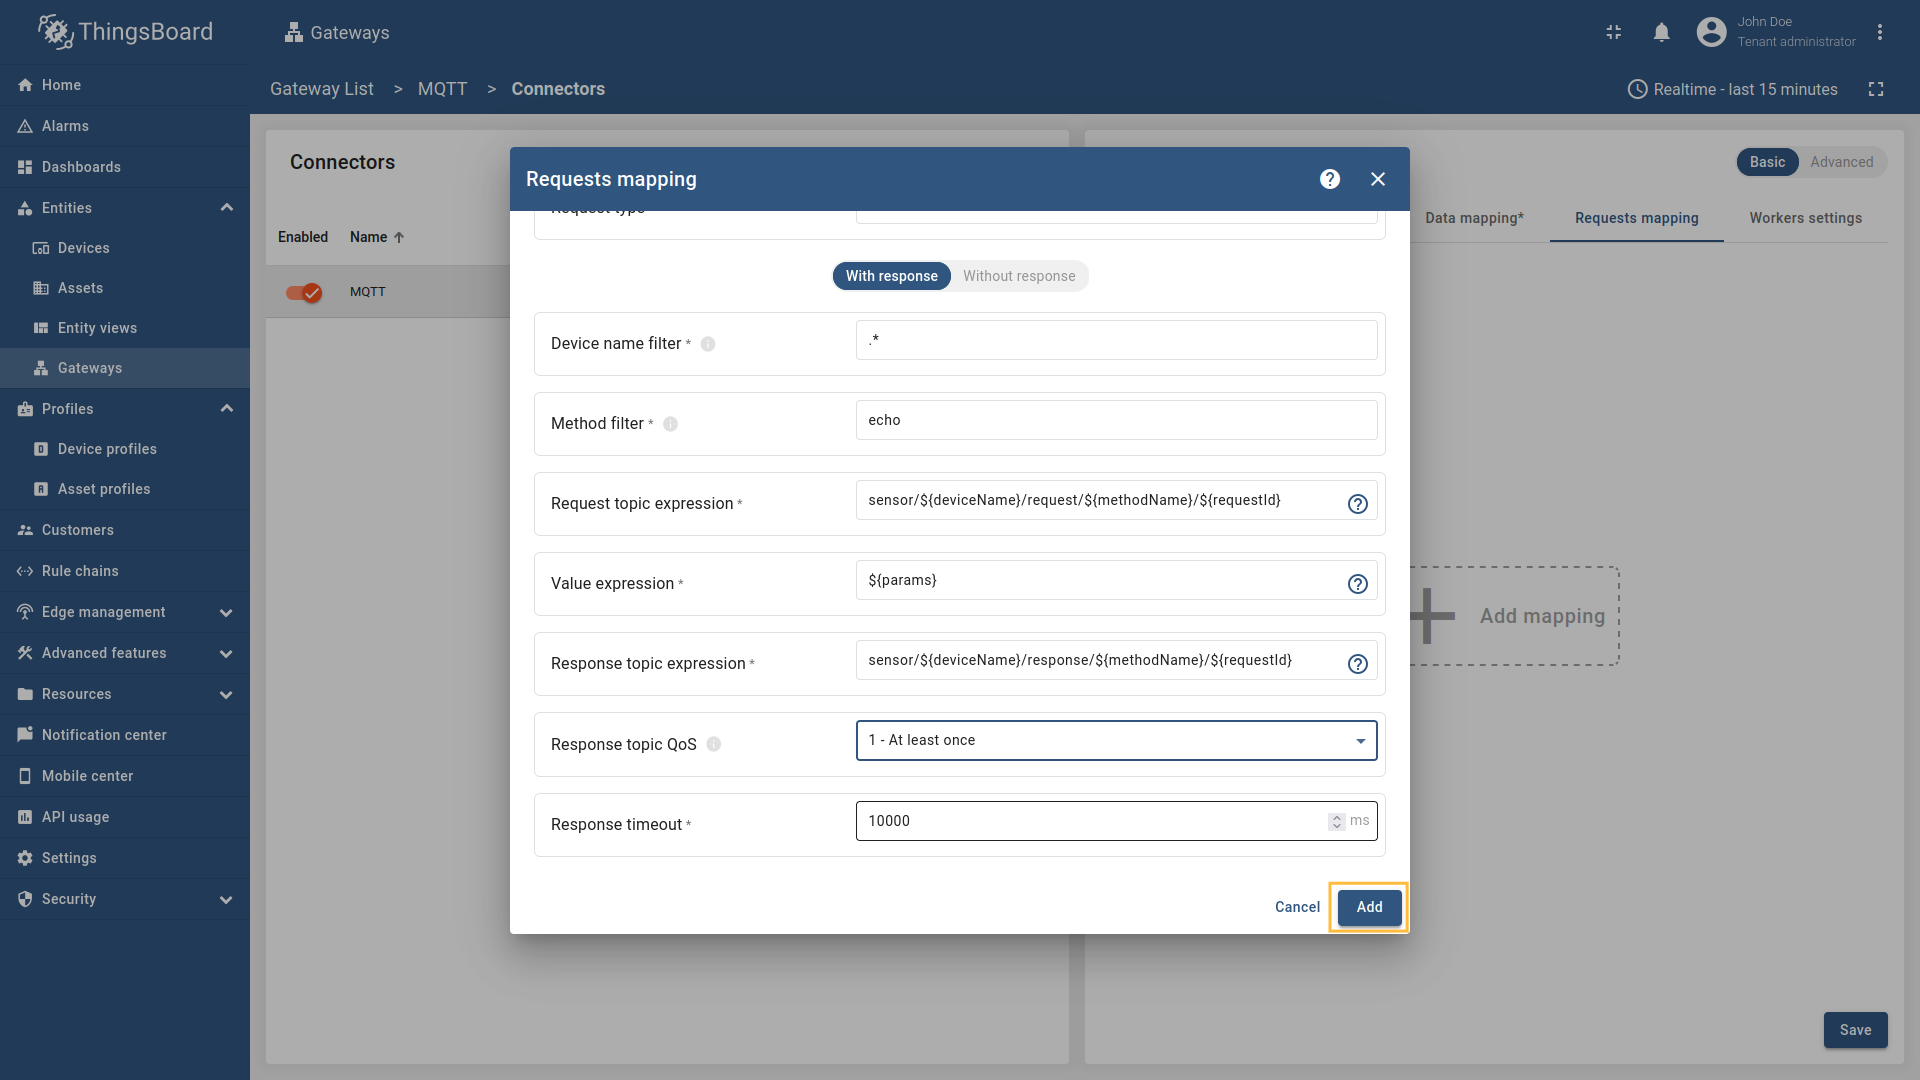 Remember to save your changes by clicking the designated button.  For one-way RPC (without response), click on the Without response tab. Configure the Device name filter as 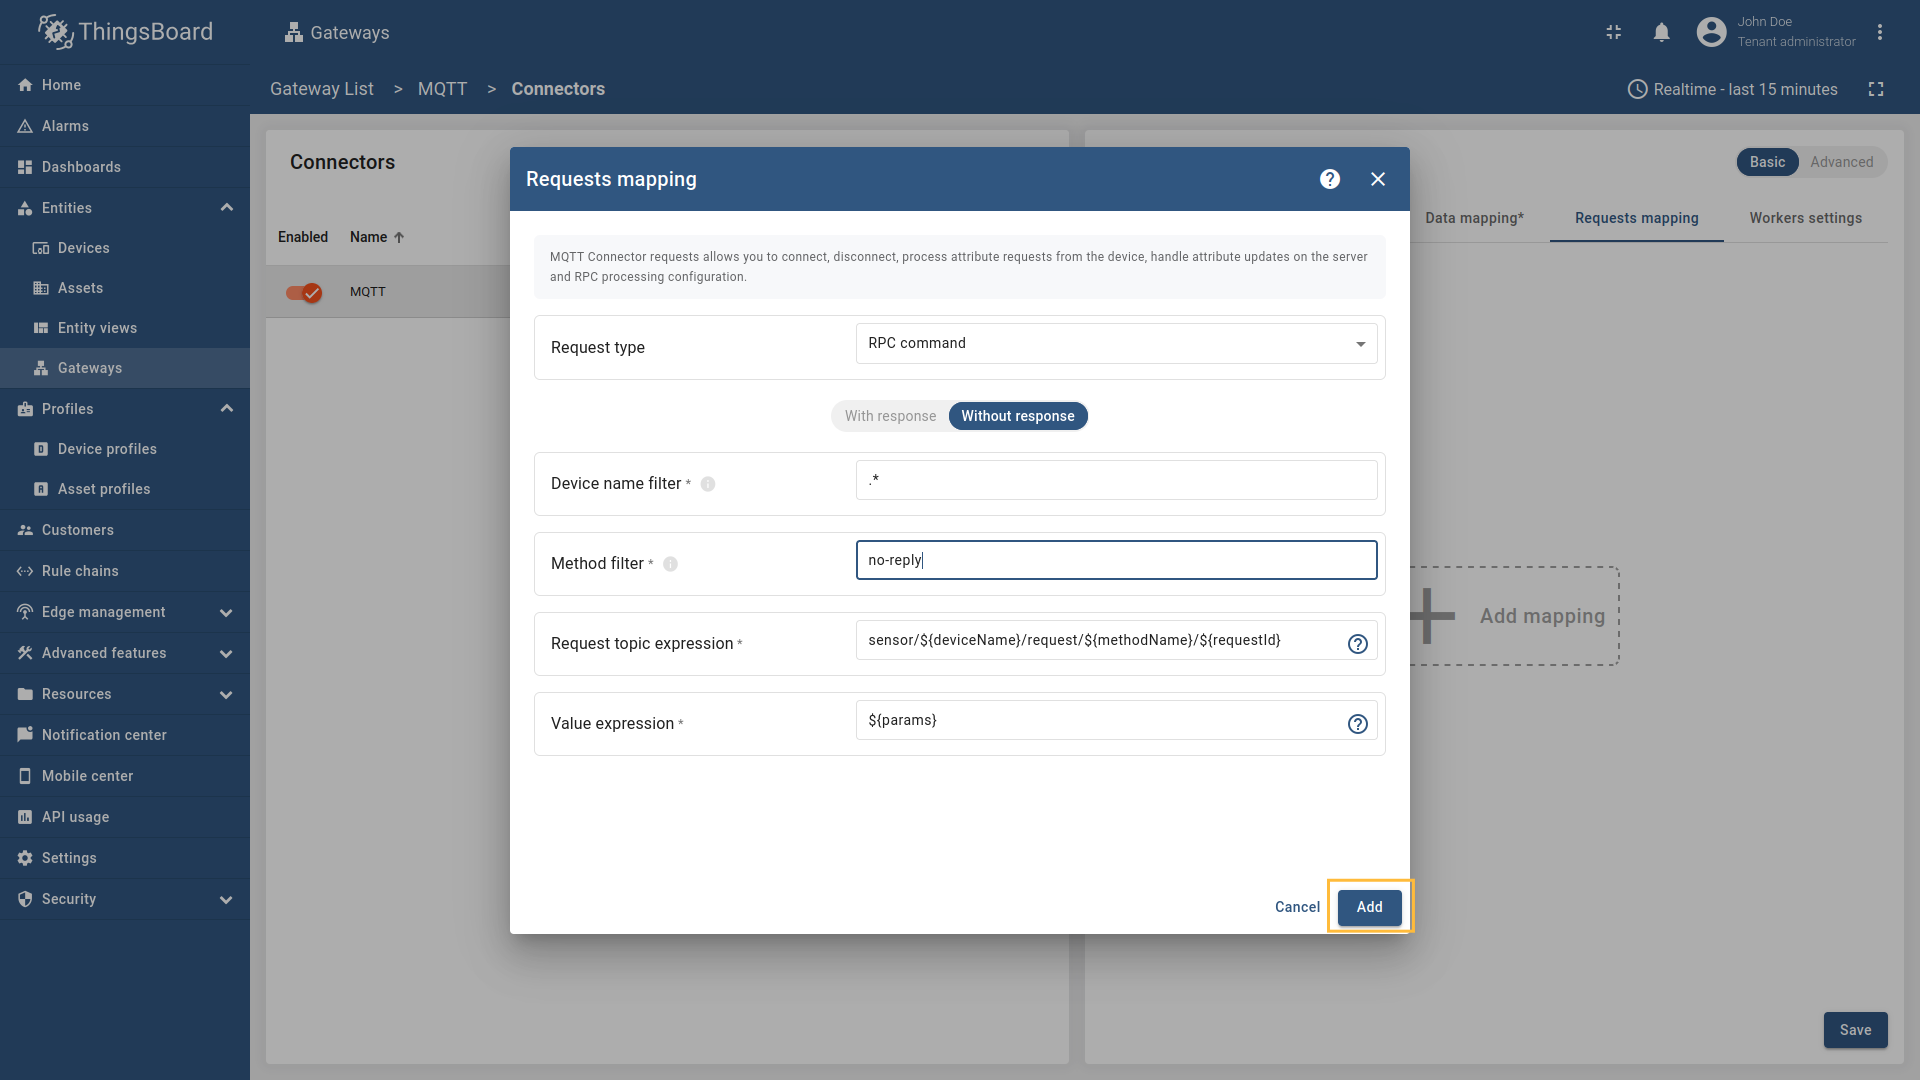 Remember to save your changes by clicking the designated button. Let’s demonstrate how to use this RPC configuration: Example 1: Two Way RPC (with response)In the RPC Debug Terminal widget, run the following command to send a two-way RPC request: The gateway will:
Example 2: One Way RPC (without response)In the RPC Debug Terminal widget, run the following command to send a one-way RPC request: The gateway will:
If you are using advanced configuration mode, you can use the following configuration: |


Advanced configuration
The advanced configuration section provides a detailed overview of all available parameters for the MQTT connector.
Connection to broker
The broker section defines the target MQTT broker and how the gateway interacts with it.
| Parameter | Default value | Description |
|---|---|---|
| broker | The broker object specifies the target mqtt broker and how the gateway interacts with it. | |
| broker.host | Hostname or ip address that will be used for establishing connection to MQTT broker. | |
| broker.port | 1883 | Listening MQTT port on the broker that will accept connection from a client. |
| broker.version | 5 | MQTT protocol version (there are three versions currently supported by gateway - 3.1, 3.11, 5). |
| broker.clientId ** | ThingsBoard_gateway | Unique identifier for each client’s session on the broker. |
| broker.maxMessageNumberPerWorker | 10 | (Optional) Maximum number of MQTT messages a single worker (a background helper that processes queued messages) handles in one pass before letting other workers run. You may read more about this in the Workers settings. |
| broker.maxNumberOfWorkers | 100 | (Optional) Maximum number of workers (background helpers that process queued messages) the gateway can run in parallel to handle MQTT traffic. You may read more about this in the Workers settings. |
| broker.keepAlive (in seconds) | 60 | (Optional) Seconds between pings; e.g., default is 60s, the broker expects traffic within the given interval * 1.5 or it closes the connection. |
| broker.cleanSession | true | (Optional) Tells the broker whether to start fresh or keep your previous session, Use false, if you want offline message queueing; use true if you always reconnect cleanly and don’t need persistence(Only for 3.1, 3.11 see details here - MQTT Parameter Version Differences. |
| broker.cleanStart | true | (Optional) Simular to broker.cleanSession, but unlike it, only decides what happens at the start of a connection; use true, if you want discard an old session; use false if you want to try to resume it (For MQTT 5.0 only see details here - MQTT Parameter Version Differences. |
| broker.sessionExpiryInterval (in seconds) | 0 | (Optional) How long the broker should keep your session after you disconnect (For MQTT 5.0 only see details here - MQTT Parameter Version Differences. |
Please note: ** – The broker (or broker cluster) does not allow two simultaneous sessions with the same broker.clientId. If a second connection uses that ID, the broker closes the existing session and accepts the new one (session takeover). The Client ID can be any valid UTF-8 string; if you don’t have a descriptive one, you can generate it in the MQTT connector configuration UI—see the last screenshots under Connection to broker subsection.
Example of the server configuration:
1
2
3
4
5
6
7
8
9
10
11
12
13
14
15
"broker": {
  "host": "127.0.0.1",
  "port": 1883,
  "version": 5,
  "clientId": "ThingsBoard_gateway",
  "maxMessageNumberPerWorker": 10,
  "maxNumberOfWorkers": 100,
  "keepAlive": 60,
  "cleanSession": true,
  "cleanStart": true,
  "sessionExpiryInterval": 0,
  "security": {
    "type": "anonymous"
  }
}
Security
MQTT broker connections offer three distinct security types: Anonymous, Basic, Certificates.
Anonymous
Anonymous is the simplest option: no credentials are required to publish/subscribe on the MQTT broker. not recommended for production, because it allows unattended access.
| Parameter | Default value | Description |
|---|---|---|
| broker.security | The broker security object specifies authentication type for establishing connection to MQTT broker. | |
| broker.security.type | anonymous | Type of authentication. |
Example of the security configuration for anonymous authentication option.
1
2
3
"security": {
  "type": "anonymous"
}
Basic
Basic authentication option uses a username and password configured on the MQTT broker. It’s a good default for most setups - just use strong, unique credentials.
| Parameter | Default value | Description |
|---|---|---|
| broker.security | The broker security object specifies authentication type for establishing connection to MQTT broker. | |
| broker.security.type | basic | Type of authentication. |
| broker.security.username | username | Username that will be used for establishing connection with MQTT broker. |
| broker.security.password | password | Password that will be used for establishing connection with MQTT broker. |
Example of the security configuration for basic authentication option:
1
2
3
4
5
"security": {
  "type": "basic",
  "username": "username",
  "password": "password"
}
Certificates
Certificate-based authentication uses TLS certificates so the gateway and broker verify each other. The safest authentication mode, setting up use the broker’s TLS port (typically 8883) for encrypted, production-grade security.
| Parameter | Default value | Description |
|---|---|---|
| broker.security | The broker security object specifies authentication type for establishing connection to MQTT broker. | |
| broker.security.type | certificates | Type of authentication. |
| broker.security.pathToCACert | /etc/thingsboard-gateway/ca.pem | Path to the pathToCACert your CA certificate your MQTT client uses it to check the broker’s certificate during TLS, ensuring you’re connecting to a trusted server. |
| broker.security.pathToPrivateKey | /etc/thingsboard-gateway/privateKey.pem | Path to the pathToPrivateKey the key that proves the client’s identity and enables secure TLS handshakes. |
| broker.security.pathToClientCert | /etc/thingsboard-gateway/certificate.pem | Path to the pathToClientCert your certificate that identifies the gateway to the MQTT broker during TLS handshake. It’s paired with the gateway’s private key and is usually signed by a trusted CA. |
Example of the security configuration for certificates authentication option:
1
2
3
4
5
6
"security": {
  "type": "certificates",
  "pathToCACert": "/etc/thingsboard-gateway/ca.pem",
  "pathToPrivateKey": "/etc/thingsboard-gateway/privateKey.pem",
  "pathToClientCert": "/etc/thingsboard-gateway/certificate.pem"
}
Mapping
Mapping lets you configure the topic/topics the gateway subscribes to for device creation and incoming data handling. You can generate topic/topics and device names on the fly, and choose what data is sent as device attributes or telemetry. This section provides the essential settings for flexible device and data management.
Device mapping
| Parameter | Description |
|---|---|
| mapping[].topicFilter | The topic/topics the gateway will subscribe to that is used for data feed .Wildcards can be used for topic creation. |
| mapping[].subscriptionQos | An agreement between the message sender and receiver that defines the level of delivery guarantee for a specific message. (0-At most once, 1-At least once, 2-Exactly once). |
| mapping[].convertor.type | Explains how the connector parses MQTT payloads and extracts device information can be json, bytes, custom. |
| mapping[].deviceInfo.convertor.deviceNameExpressionSource | Source of the device name (can be message, topic or constant). |
| mapping[].deviceInfo.convertor.deviceNameExpression | Expression used to extract the device name from the selected source (Message/Topic/Constant). Supports JSON path, regular expression, byte slice, or literal - see expression. |
| mapping[].deviceInfo.convertor.deviceProfileSource | Source of the device profile (can be message, topic or constant). |
| mapping[].deviceInfo.convertor.deviceProfileExpression | Expression used to extract the device profile from the selected source (Message/Topic/Constant). Supports JSON path, regular expression, byte slice, or literal - see expression. |
| mapping[].reportStrategy | (Optional) Report strategy object using for configuring report strategy for device. |
| mapping[].timeout | (Optional) Timeout for triggering “Device Disconnected” event by default - 60000(in milliseconds). |
Example of the device mapping configuration:
1
2
3
4
5
6
7
8
9
10
11
12
13
14
15
16
17
"mapping": [
  {
    "topicFilter": "sensor/data",
    "subscriptionQos": 1,
    "converter": {
      "type": "json",
      "deviceInfo": {
        "deviceNameExpressionSource": "message",
        "deviceNameExpression": "${serialNumber}",
        "deviceProfileExpressionSource": "message",
        "deviceProfileExpression": "${sensorType}"
      },
      "attributes": [],
      "timeseries": []
    }
  }
]
Device attributes and timeseries
| Parameter | Description |
|---|---|
| mapping[].attributes[] | List of attributes that will be sent to the ThingsBoard platform instance. |
| mapping[].attributes[].keySource | (Optional, available since Gateway v.3.8.1) Source for attribute key name. Can be: message (default) or topic. See Usage examples for more information. |
| mapping[].attributes[].key | Key name of the attribute in ThingsBoard. It can be specified as a static value, JSON path or regular expression. |
| mapping[].attributes[].type | The type of attribute field (It could be one of the following string, boolean, integer, double or Raw if the Payload type Bytes). |
| mapping[].attributes[].value | The value of the attribute that will be sent to the platform device. It should be specified depending on the selected Payload type (Bytes, JSON, CUSTOM). |
| mapping[].attributes[].reportStrategy | (Optional) Report strategy for the attributes data. If not specified, the device report strategy will be used. |
| mapping[].timeseries[] | List of telemetry data that will be sent to the ThingsBoard platform instance. |
| mapping[].timeseries[].keySource | (Optional, available since Gateway v.3.8.1) Source for time series key name. Can be: message (default) or topic. See Usage examples for more information. |
| mapping[].timeseries[].key | Key name of the telemetry data in ThingsBoard. It can be specified as a static value. |
| mapping[].timeseries[].type | The type of telemetry field (It could be one of the following string, boolean, integer, double or Raw if the Payload type Bytes). |
| mapping[].timeseries[].value | Value of the telemetry data that will be sent to the platform. It should be specified depending on the selected type (json path, regular expressions or slices). |
| mapping[].timeseries[].tsField | (Optional) json-path expression for field that carries a datetime string. If not present, the ts or timestamp properties from incoming message will be used as timestamp for data entry. |
| mapping[].timeseries[].dayfirst | (Optional) Points out that the first number is the day (DD.MM.YY HH:mm:ss.SSS).• false → 10.11.24 10:10:10.252 → 11 Oct 2024 10:10:10.252• true → 10.11.24 10:10:10.252 → 10 Nov 2024 10:10:10.252. |
| mapping[].timeseries[].yearfirst | (Optional) Points out that the first number is the year (DD.MM.YY HH:mm:ss.SSS). • false → follows dayfirst rule• true → 10.11.24 10:10:10.252 → 24 Nov 2010 10:10:10.252. |
| mapping[].timeseries[].reportStrategy | (Optional) Report strategy for the time series data. If not specified, the device report strategy will be used. |
Example of the attributes and telemetry configuration:
1
2
3
4
5
6
7
8
9
10
11
12
13
14
15
16
17
18
19
20
21
22
23
24
25
26
27
28
29
30
31
"attributes": [
  {
    "type": "string",
    "key": "model",
    "value": "${sensorModel}"
  },
  {
    "type": "string",
    "key": "${sensorModel}",
    "value": "on"
  }
],
"timeseries": [
  {
    "type": "double",
    "key": "temperature",
    "value": "${temp}"
  },
  {
    "type": "double",
    "key": "humidity",
    "value": "${hum}",
    "tsField": "${timestampField}",
    "dayfirst": true
  },
  {
    "type": "string",
    "key": "combine",
    "value": "${hum}:${temp}"
  }
]
Request mapping
Device connect requests
| Parameter | Description |
|---|---|
| requestsMapping.connectRequests[].topicFilter | The topic/topics the gateway will subscribe to and wait for device to publish the connect request.Wildcards can be used for topic creation. |
| requestsMapping.connectRequests[].deviceInfo.deviceNameExpressionSource | Source of the device name to which the request will be sent to (can be message, topic or constant). |
| requestsMapping.connectRequests[].deviceInfo.deviceNameExpression | Expression used to extract the device name from the selected source (Message/Topic/Constant). Supports JSON path, regular expression, byte slice, or literal - see expression. |
| requestsMapping.connectRequests[].deviceInfo.deviceProfileExpressionSource | Source of the device profile to which the request will be sent to (can be message, topic or constant). |
| requestsMapping.connectRequests[].deviceInfo.deviceProfileExpression | Expression used to extract the device name from the selected source (Message/Topic/Constant). Supports JSON path, regular expression, byte slice, or literal - see expression. |
Example of the connect request configuration:
1
2
3
4
5
6
7
8
9
10
11
12
13
"requestsMapping": {
  "connectRequests": [
    {
      "topicFilter": "sensor/connect",
      "deviceInfo": {
        "deviceNameExpressionSource": "message",
        "deviceNameExpression": "${serialNumber}",
        "deviceProfileExpressionSource": "constant",
        "deviceProfileExpression": "Thermometer"
      }
    }
  ]
}
Device disconnect requests
| Parameter | Description |
|---|---|
| requestsMapping.disconnectRequests[].topicFilter | The topic/topics the gateway will subscribe to and wait for device to publish the disconnect request.Wildcards can be used for topic creation. |
| requestsMapping.disconnectRequests[].deviceInfo.deviceNameExpressionSource | Source of the device name to which the request will be sent to (can be message, topic or constant). |
| requestsMapping.disconnectRequests[].deviceInfo.deviceNameExpression | Expression used to extract the device name from the selected source (Message/Topic/Constant). Supports JSON path, regular expression, byte slice, or literal - see expression. |
Example of the disconnect request configuration:
1
2
3
4
5
6
7
8
9
10
11
"requestsMapping": {
  "disconnectRequests": [
    {
      "topicFilter": "sensor/disconnect",
      "deviceInfo": {
        "deviceNameExpression": "${serialNumber}",
        "deviceNameExpressionSource": "message"
      }
    }
  ]
}
Device attribute requests
| Parameter | Description |
|---|---|
| requestsMapping.attributeRequests[].scope | (Optional) Determines the scope from where the attributes are taken use client if want to request client attributes |
| requestsMapping.attributeRequests[].retain | Whether the attribute response message should be retained by the MQTT broker can be true or false. |
| requestsMapping.attributeRequests[].topicFilter | The topic/topics that the gateway subscribes to for incoming requests. The Topic filter supports special symbols: # and + |
| requestsMapping.attributeRequests[].deviceInfo.deviceNameExpressionSource | Source of the device name to which the request will be sent to (can be message, topic or constant). |
| requestsMapping.attributeRequests[].deviceInfo.deviceNameExpression | Expression used to extract the device name from the selected source (Message/Topic/Constant). Supports JSON path, regular expression, byte slice, or literal - see expression. |
| requestsMapping.attributeRequests[].attributeNameExpressionSource | Source of the attribute name to which the request will be sent to (can be message, topic or constant). |
| requestsMapping.attributeRequests[].attributeNameExpression | Expression used to extract the attribute name from the selected source (Message/Topic/Constant). Supports JSON path, regular expression, byte slice, or literal - see expression. |
| requestsMapping.attributeRequests[].topicExpression | Expression used to format the response topic. It can be parsed from message, topic, or constant. |
| requestsMapping.attributeRequests[].valueExpression | Expression used to format the response value. It can be parsed from message, topic, or constant. |
Example of the attribute requests configuration:
1
2
3
4
5
6
7
8
9
10
11
12
13
14
15
16
"requestsMapping": {
  "attributeRequests": [
    {
      "retain": false,
      "topicFilter": "v1/devices/me/attributes/request",
      "deviceInfo": {
        "deviceNameExpressionSource": "message",
        "deviceNameExpression": "${serialNumber}"
      },
      "attributeNameExpressionSource": "message",
      "attributeNameExpression": "${versionAttribute}",
      "topicExpression": "devices/${deviceName}/attrs",
      "valueExpression": "${attributeKey}: ${attributeValue}"
    }
  ]
}
Device attribute updates
| Parameter | Description |
|---|---|
| requestsMapping.attributeUpdates[].retain | Whether the attribute response message should be retained by the MQTT broker. |
| requestsMapping.attributeUpdates[].deviceNameFilter | Regular expression device name filter, used to determine which devices should receive attribute updates see expression |
| requestsMapping.attributeUpdates[].attributeFilter | Regular expression attribute name filter, used to determine which attributes should be updated see expression |
| requestsMapping.attributeUpdates[].topicExpression | JSON-path expression used for creating topic address to send a message. Supports variables like ${deviceName} and ${attributeKey} see expression. |
| requestsMapping.attributeUpdates[].valueExpression | JSON-path expression used for creating the message data that will be sent to the topic. Supports variables like ${attributeKey} and ${attributeValue} see expression . |
Example of the attribute updates configuration:
1
2
3
4
5
6
7
8
9
10
11
"requestsMapping": {
  "attributeUpdates": [
    {
      "retain": true,
      "deviceNameFilter": ".*",
      "attributeFilter": "firmwareVersion",
      "topicExpression": "sensor/${deviceName}/${attributeKey}",
      "valueExpression": "{\"${attributeKey}\":\"${attributeValue}\"}"
    }
  ]
}
Device RPC methods
Device RPC (Remote Procedure Call) methods allow you to send commands from ThingsBoard to your devices through the MQTT connector. The gateway acts as an intermediary, translating ThingsBoard RPC calls into MQTT messages that your devices can understand.
There are two types of RPC requests supported by the MQTT connector:
- Two-way (with response) - The gateway sends a request to the device and waits for a response. This is useful when you need to get data back from the device.
- One-way (without response) - The gateway sends a request to the device without expecting a response. This is useful for simple commands that don’t require confirmation.
| Parameter | Description |
|---|---|
| requestsMapping.serverSideRpc[].deviceNameFilter | Regular expression device name filter, is used to determine which devices this RPC configuration applies to. See expression |
| requestsMapping.serverSideRpc[].methodFilter | Regular expression method name filter, is used to determine which RPC methods this configuration applies to. See expression |
| requestsMapping.serverSideRpc[].requestTopicExpression | JSON-path expression, is used for creating topic address to send RPC request. Supports variables like ${deviceName} and ${attributeKey} applies to. See expression |
| requestsMapping.serverSideRpc[].responseTopicExpression | JSON-path expression, is used for creating topic address to subscribe for response message. Supports variables like ${deviceName} and ${attributeKey} applies to. See expression |
| requestsMapping.serverSideRpc[].responseTopicQoS | Quality of Service level for the response topic subscription. |
| requestsMapping.serverSideRpc[].responseTimeout | Value in milliseconds. If there is no response within this period after sending the request, gateway will unsubscribe from the response topic. |
| requestsMapping.serverSideRpc[].valueExpression | JSON-path expression, is used for creating data for sending to broker. Supports variables like ${deviceName} and ${attributeKey} applies to. See expression |
The configuration for Device RPC methods is defined in the “serverSideRpc” section of the MQTT connector configuration:
1
2
3
4
5
6
7
8
9
10
11
12
13
14
15
16
17
18
19
20
21
"requestsMapping": {
  "serverSideRpc": [
    {
      "type": "twoWay",
      "deviceNameFilter": ".*",
      "methodFilter": "echo",
      "requestTopicExpression": "sensor/${deviceName}/request/${methodName}/${requestId}",
      "responseTopicExpression": "sensor/${deviceName}/response/${methodName}/${requestId}",
      "responseTopicQoS": 1,
      "responseTimeout": 10000,
      "valueExpression": "${params}"
    },
    {
      "type": "oneWay",
      "deviceNameFilter": ".*",
      "methodFilter": "no-reply",
      "requestTopicExpression": "sensor/${deviceName}/request/${methodName}/${requestId}",
      "valueExpression": "${params}"
    }
  ]
}
Additionally, every telemetry and attribute parameter has built-in GET and SET RPC methods available out of the box, so you don’t need to configure them manually.
For more information on using the built-in GET and SET RPC methods, see the guide.
Workers settings
This configuration settings provides fields for configuring connector performance and message reading/formatting speed:
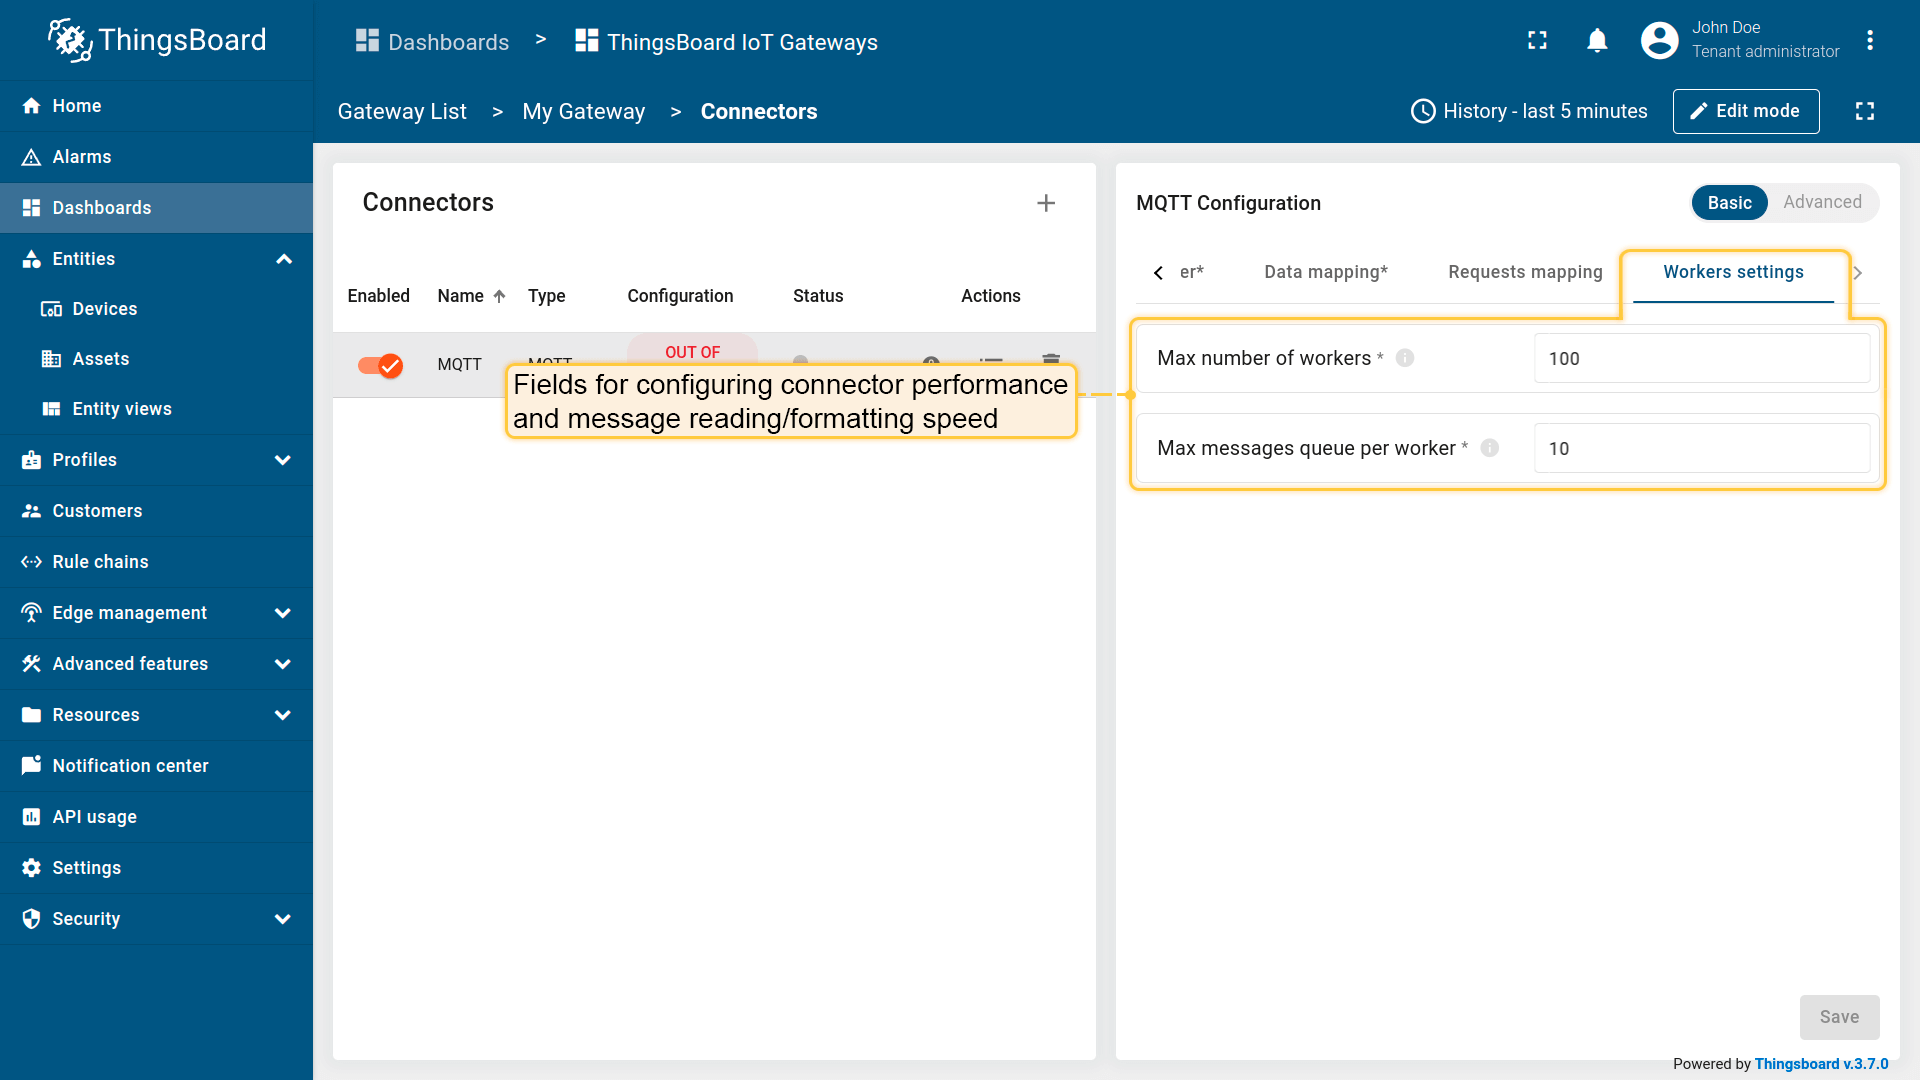
-
Max messages queue per worker
How many MQTT messages one worker handles in a single turn before letting others run. Bigger number = higher throughput; smaller = lower latency. Example: ~100 for heavy telemetry, ~10–20 for fast RPC. -
Max number of workers
How many workers run at the same time. More workers use more CPU cores but can cause contention if too high. Start near your CPU core count and tweak based on backlog and CPU.
Additional information
Wildcard usage
Wildcards let the gateway subscribe to many topics with one pattern, or to topics whose exact names you don’t know, but whose structure you do.
-
(
#) - wildcardA (
#) - wildcard matches this level and all following levels. Put it only at the end.Expression:
sensor/data/#Matching examples:
sensor/data/room1sensor/data/room1/tempsensor/data/ -
(
+) - wildcardA (
+) - wildcard uses exactly one level may be used anywhere at the topic level.Expression:
sensor/+/dataMatching examples:
sensor/A/datasensor/B/dataNon-Matching examples:
sensor/A/lab/data
Shared subscriptions
Shared subscription is a special type of subscription that let multiple MQTT clients “share” a single subscription
so the broker load-balances messages among them.
Instead of every subscriber getting every message (fan-out), only one member of the group receives each matching
publish.
For example to subscribe to the sensor/+/data in group workers you can set the topic filter to.
Example:
$share/workers/sensor/+/data
Convertor types
The Convertor types section explains how the connector parses MQTT payloads and extracts device information (Name, Profile) and data (attributes/telemetry); choose a convertor based on your payload format and preferred extraction method.
JSON
Use this type of conversion if incoming data is json.
Example:
{"serialNumber": "SN-001", "sensorType": "Thermometer", "sensorModel": "T1000", "temp": 42, "hum": 58}
BYTES
Use this type of conversion if incoming data are sequence of bytes.
Example:
b'AM-120'
CUSTOM
Use the CUSTOM converter when incoming data is neither BYTES nor JSON. Implement your custom converter and configure it in the MQTT connector (see
Usage examples for examples with screenshots).
Expression types
The Expression types section explains how to extract device information (Name, Profile) from different sources—Message, Topic, or Constant—using JSON paths, regular expressions, or byte slices.
Json path
Use Json path when the Name and/or Profile Name must be extracted from the Message source and the Payload type is JSON. In other words, these values are read directly from fields in the incoming JSON payload.
Expressions:
${serialNumber}
${sensorType}
Payload example:
{"serialNumber": "SN-001", "sensorType": "Thermometer", "sensorModel": "T1000", "temp": 42, "hum": 58}
Converted data:
SN-001
Thermometer
Regular expressions
Regular expression Use regular expression when the Name and/or Profile Name must be extracted from the Topic. In other words, these values will be extracted from your topic depending on the regular expression you write.
Expression:
(?<=sensor/)(.*?)(?=/data)
Matching example:
sensor/Thermo-A/data
Converted data:
Thermo-A
Slices
Slices (Bytes source)
Use Slices when the Name and/or Profile Name must be extracted from the bytes sequence and the Payload type is BYTES.Slices use Python-style indexing over the raw byte sequence. Example rule: device name = first 4 bytes; temperature = the rest.
Expressions:
[0:4]
[4:]
Payload example:
b'AM-120'
Converted data:
AM-1
20
Troubleshooting
MQTT Parameter Version Differences
-
broker.cleanSession MQTT 3.1, 3.11 only; in MQTT 5.0 it’s replaced by broker.cleanStart (on connect behavior) plus broker.sessionExpiryInterval (how long the session is kept after disconnect).
-
broker.sessionExpiryInterval MQTT 5.0 only; if it is
0drop session on disconnect, if it is bigger than0keep it for that many seconds. -
broker.cleanStart MQTT 5.0 only; controls what happens at connect:
truediscards any previous session,falsetries to resume it.
Shared subscriptions limitations
-
Don’t subscribe to both
sensor/+/dataand$share/workers/sensor/+/datain the same connector you will risk double handling. -
Make sure your broker supports shared subscriptions, because some don’t.
Next steps
Explore guides related to main ThingsBoard features:
- Data Visualization - how to visualize collected data.
- Device attributes - how to use device attributes.
- Telemetry data collection - how to collect telemetry data.
- Using RPC capabilities - how to send commands to/from devices.
- Rule Engine - how to use rule engine to analyze data from devices.