Only Professional Edition supports Platform Integrations feature.
Use ThingsBoard Cloud or install your own platform instance.
- Prerequisites
- Create ChirpStack integration
- Configure integration on your ChirpStack application
- Processing uplink message
- Advanced usage: downlink
- Next steps
The ChirpStack open-source LoRaWAN Network Server stack provides open-source components for LoRaWAN networks. After integrating ChirpStack with ThingsBoard, you can connect, communicate, process and visualize data from devices in the ThingsBoard IoT platform.
Prerequisites
To receive data, you need to have a configured instance of the ChirpStack Network Server stack. In this guide, we’ll use a local instance installed via Docker compose.
Click here to learn how to install the ChirpStack Network Server using Docker Compose.
Additionally, you must connect your device to the network. You can find detailed instructions in the official ChirpStack device connection guide.
Create ChirpStack integration
You will need to have access to ThingsBoard Professional Edition. The easiest way is to use ThingsBoard Cloud server. The alternative option is to install ThingsBoard using installation guide.
Let’s move on to setting up the integration between the ThingsBoard platform and ChirpStack.
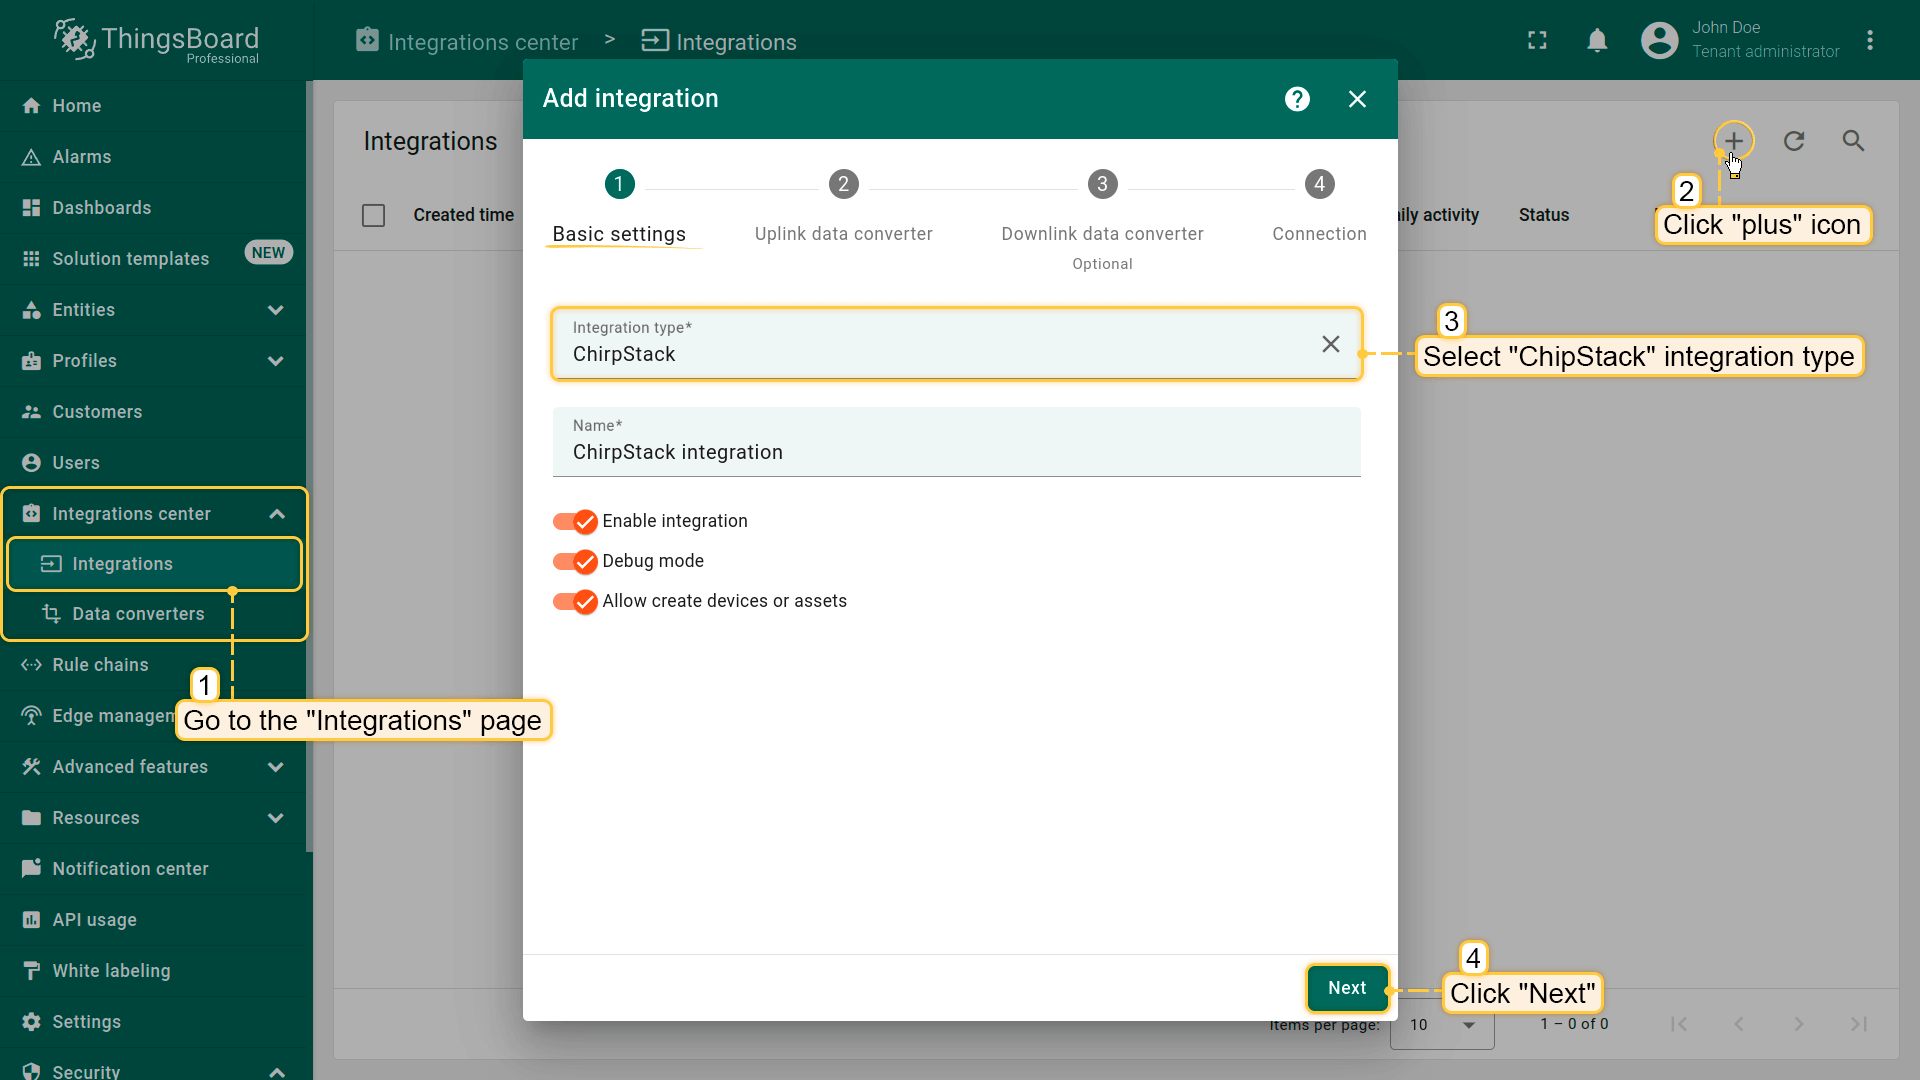
1. Basic settings.
- Sign in to your ThingsBoard account.
- Navigate to the “Integrations” page under the “Integrations center” section. Click “plus” button to add a new integration.
- From the list, select the integration type “ChirpStack”.
- If you’d like to monitor events and troubleshoot, enable debug mode.
Debug mode
Enabling debug mode allows you to track events, states, and potential errors related to the execution of integrations. This greatly simplifies development and troubleshooting.
Note: Debug mode can quickly increase disk usage because all debug events are stored in the database. Starting from ThingsBoard 3.9, the platform stores the full set of debug events only during the first 15 minutes after the integrations is created; afterward, only error events are retained.
Debug mode settings can be combined or disabled entirely.
- Click “Next”.
2. Uplink data converter.
Uplink is necessary in order to convert the incoming data from the device into the required format for displaying them in ThingsBoard.
Starting from ThingsBoard 4.0, we have simplified the process of writing converters for Loriot integration. You can now easily choose where the message fields from the integration should go (attributes or telemetry) without manually defining this in the decoder function.
Note: Converters created before the release of ThingsBoard 4.0 will still be available and will continue to function properly.
- Enter a name for the converter. It must be unique.
- To view the events, enable debug mode.
- In the “Main decoding configuration” section
- Select the entity type (Device or Asset) that will be created as a result of the integration, and specify the entity name. The $eui pattern will dynamically fetch the device's unique identifier from the Loriot message.
- Use the existing script for parsing and transforming data, or provide your own custom script.
Note: The converter shown below will work only with ThingsBoard versions 3.9 and earlier.
One can use either TBEL (ThingsBoard expression language) or JavaScript to develop user defined functions. We recommend utilizing TBEL as it’s execution in ThingsBoard is much more efficient compared to JS.

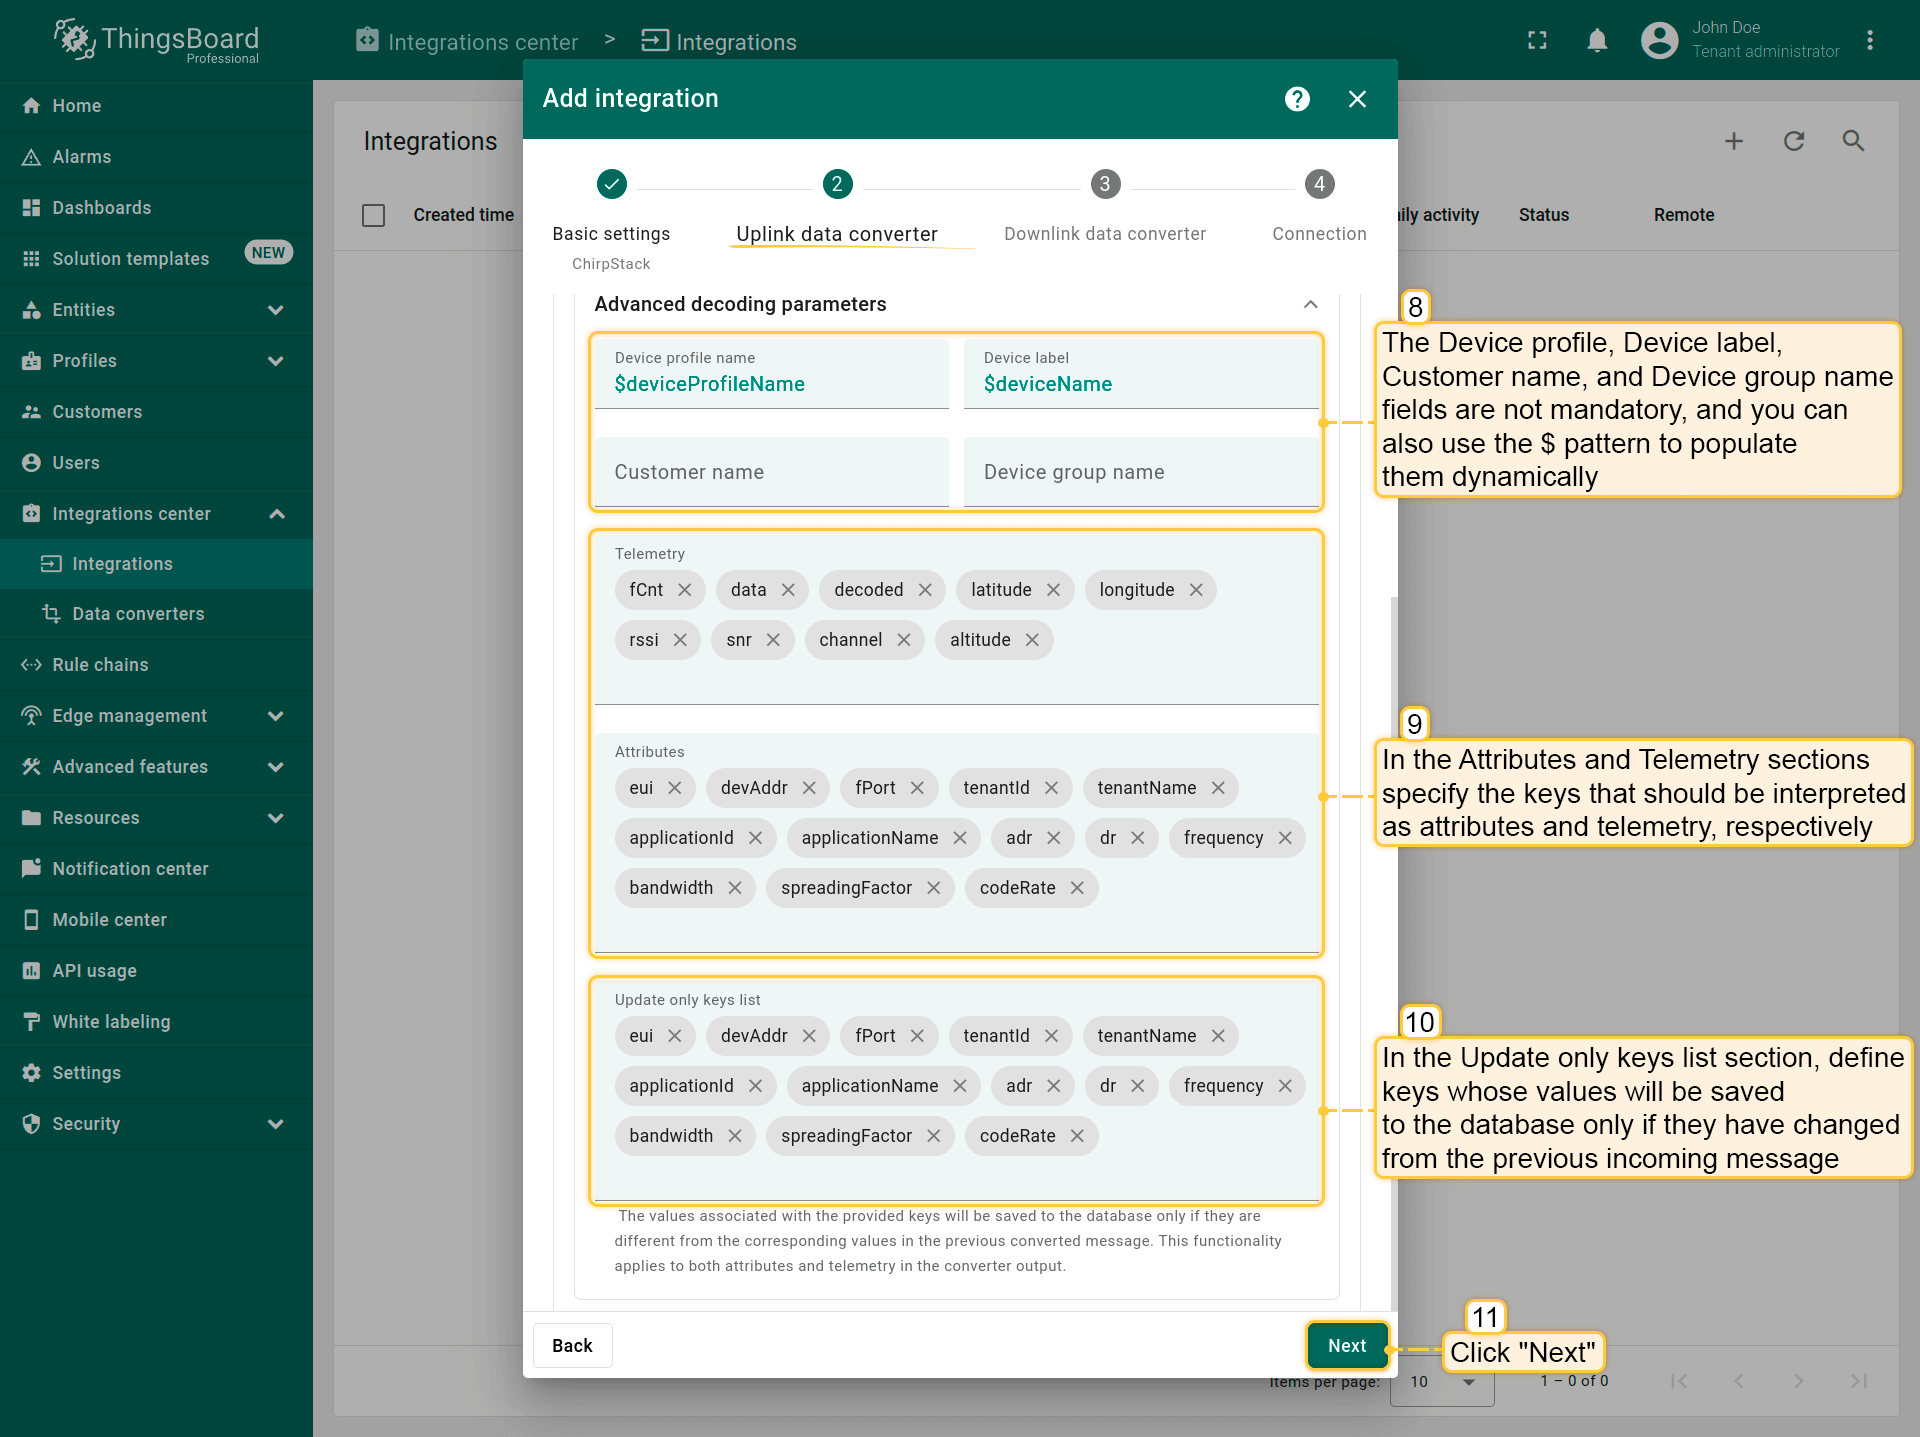
- Advanced decoding parameters” section:
- The Device profile, Device label, Customer name, and Device group name fields are not mandatory, and you can also use the $ pattern to populate them dynamically.
- In the Attributes and Telemetry sections specify the keys that should be interpreted as attributes and telemetry, respectively.
- In the Update only keys list section, define keys whose values will be saved to the database only if they have changed from the previous incoming message.This applies to both Attributes and Telemetry, helping optimize data storage.
- Once the uplink converter is set up, click “Next”.
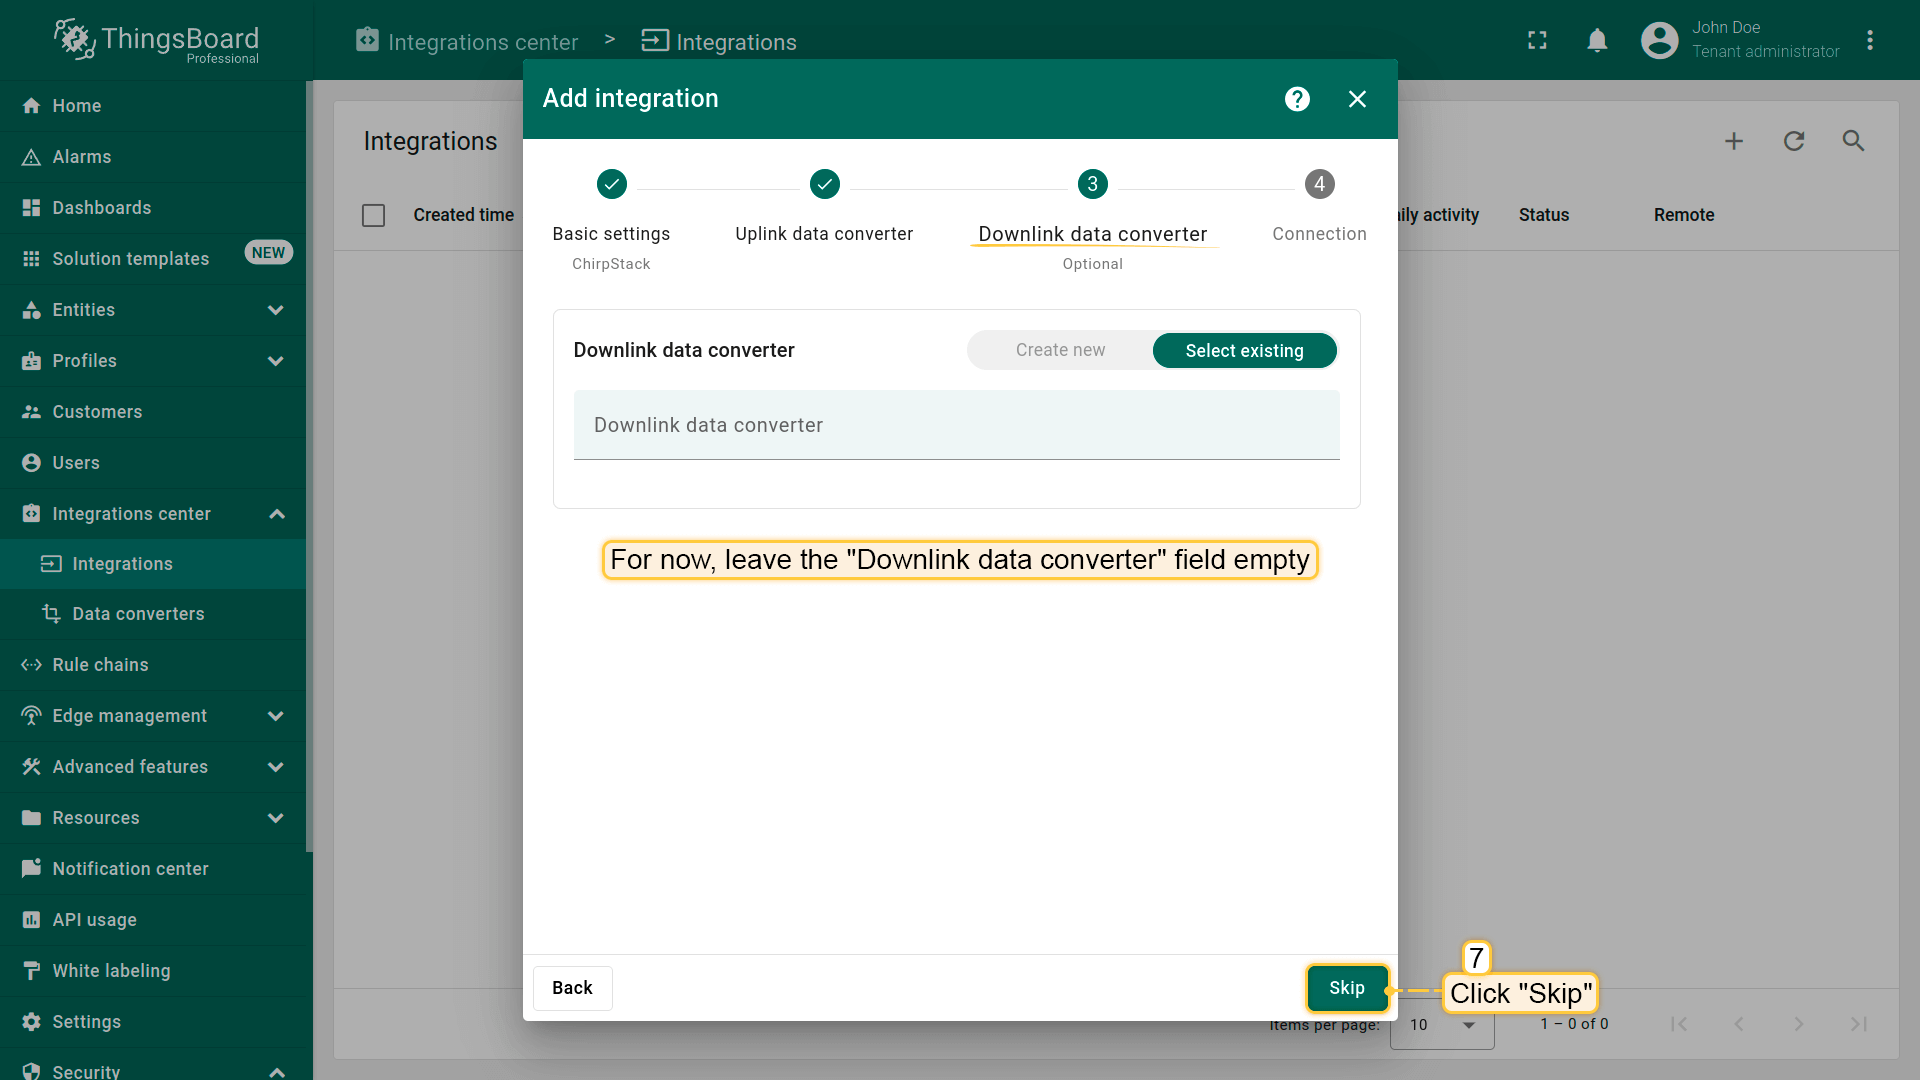
3. Downlink data converter.
At the step of adding a downlink converter, you can also select a previously created or create a new downlink converter. But for now, leave the “Downlink data converter” field empty. Click “Skip”;
4. Connection.
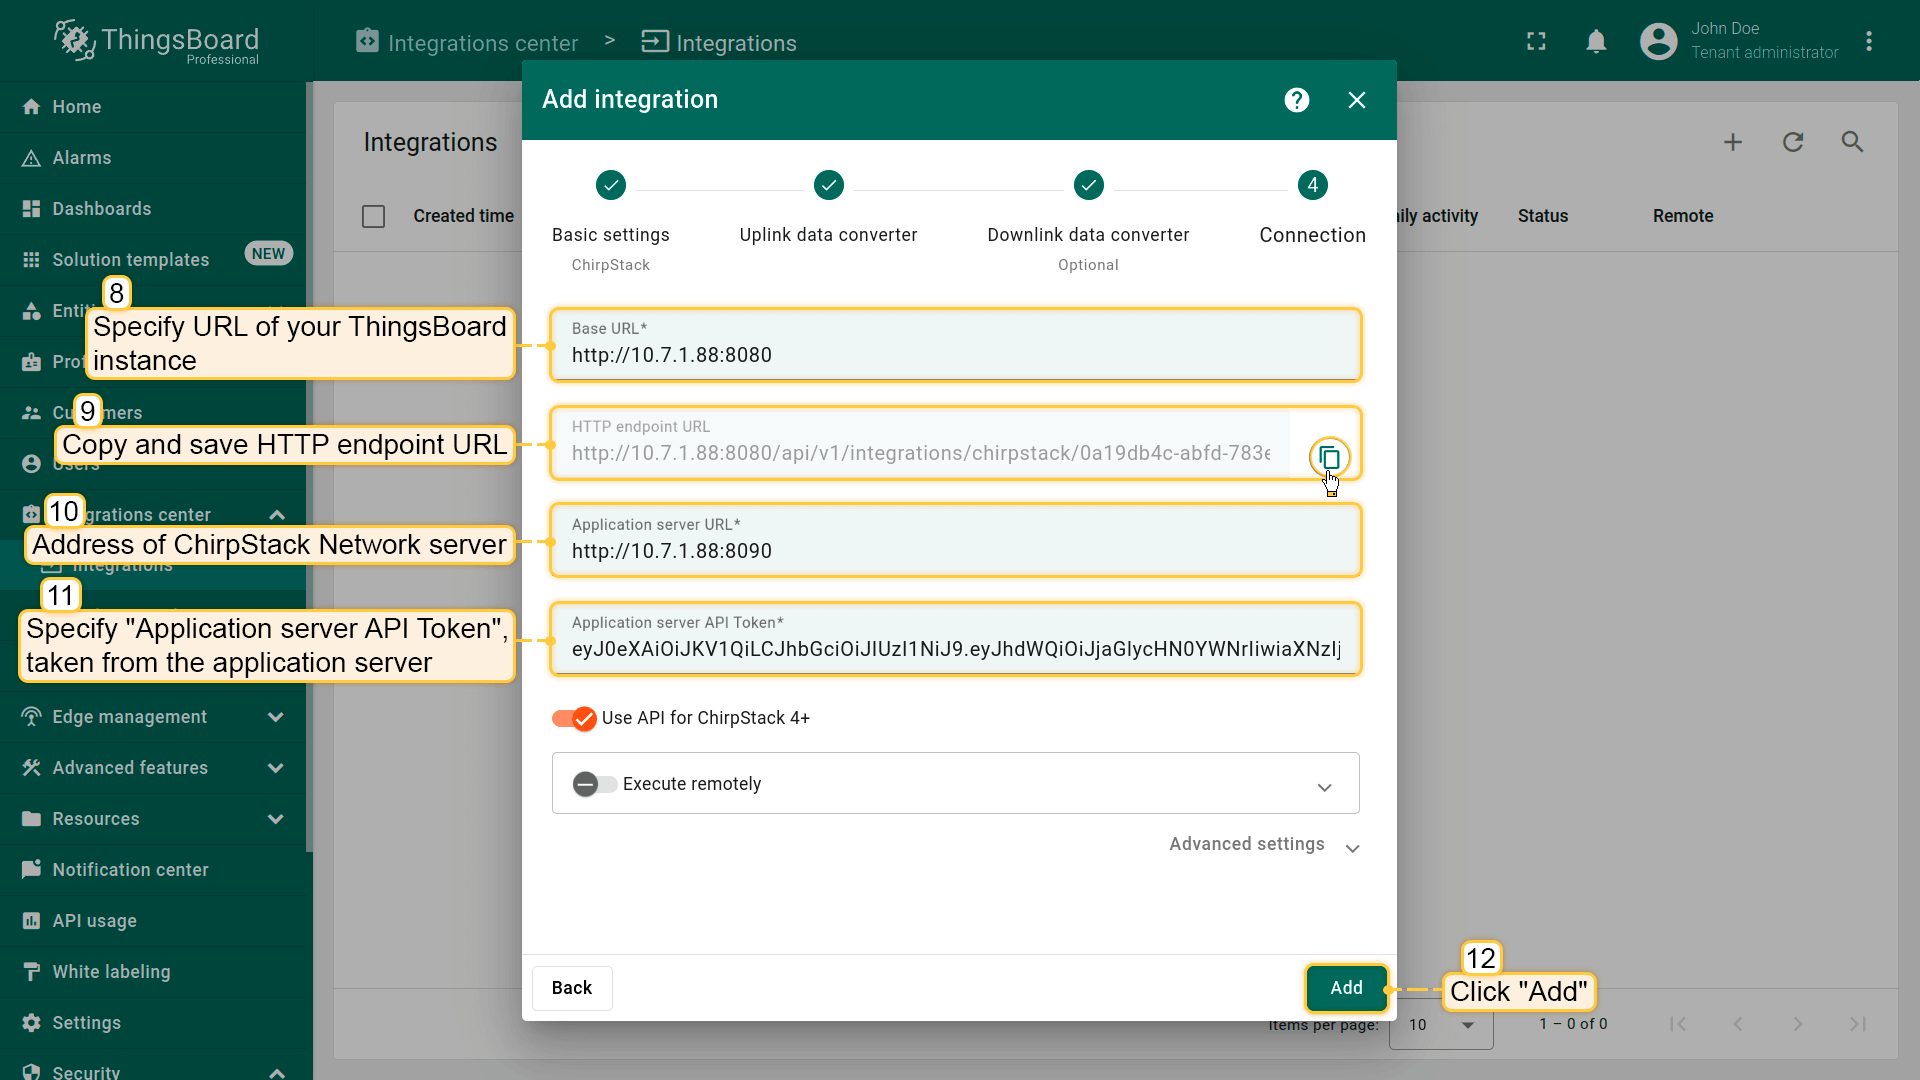
To complete adding integration, you need to:
- Specify your “Base URL”;
- Note down “HTTP endpoint URL” we will use this value later;
- Specify “Application server URL” - address of application server or REST API service. Usually, with a standard installation, only the port is changed to 8090;
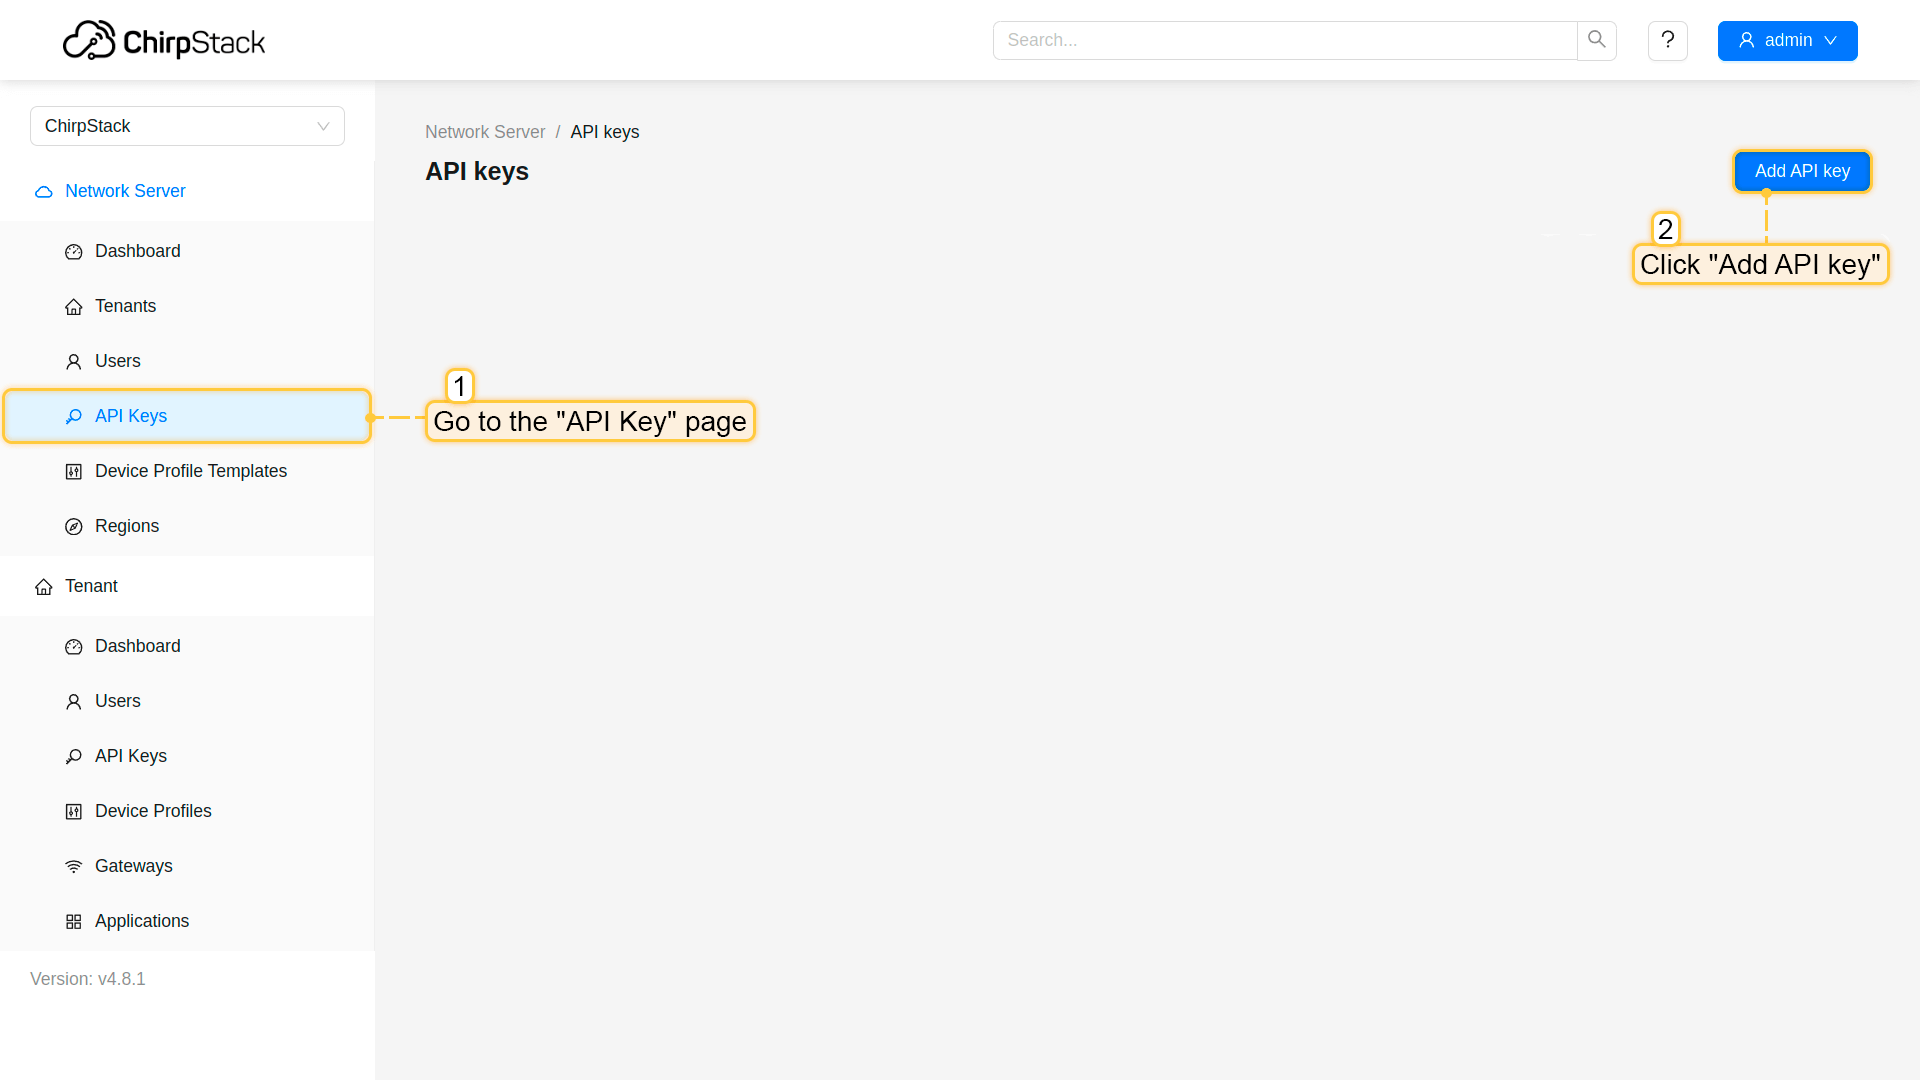
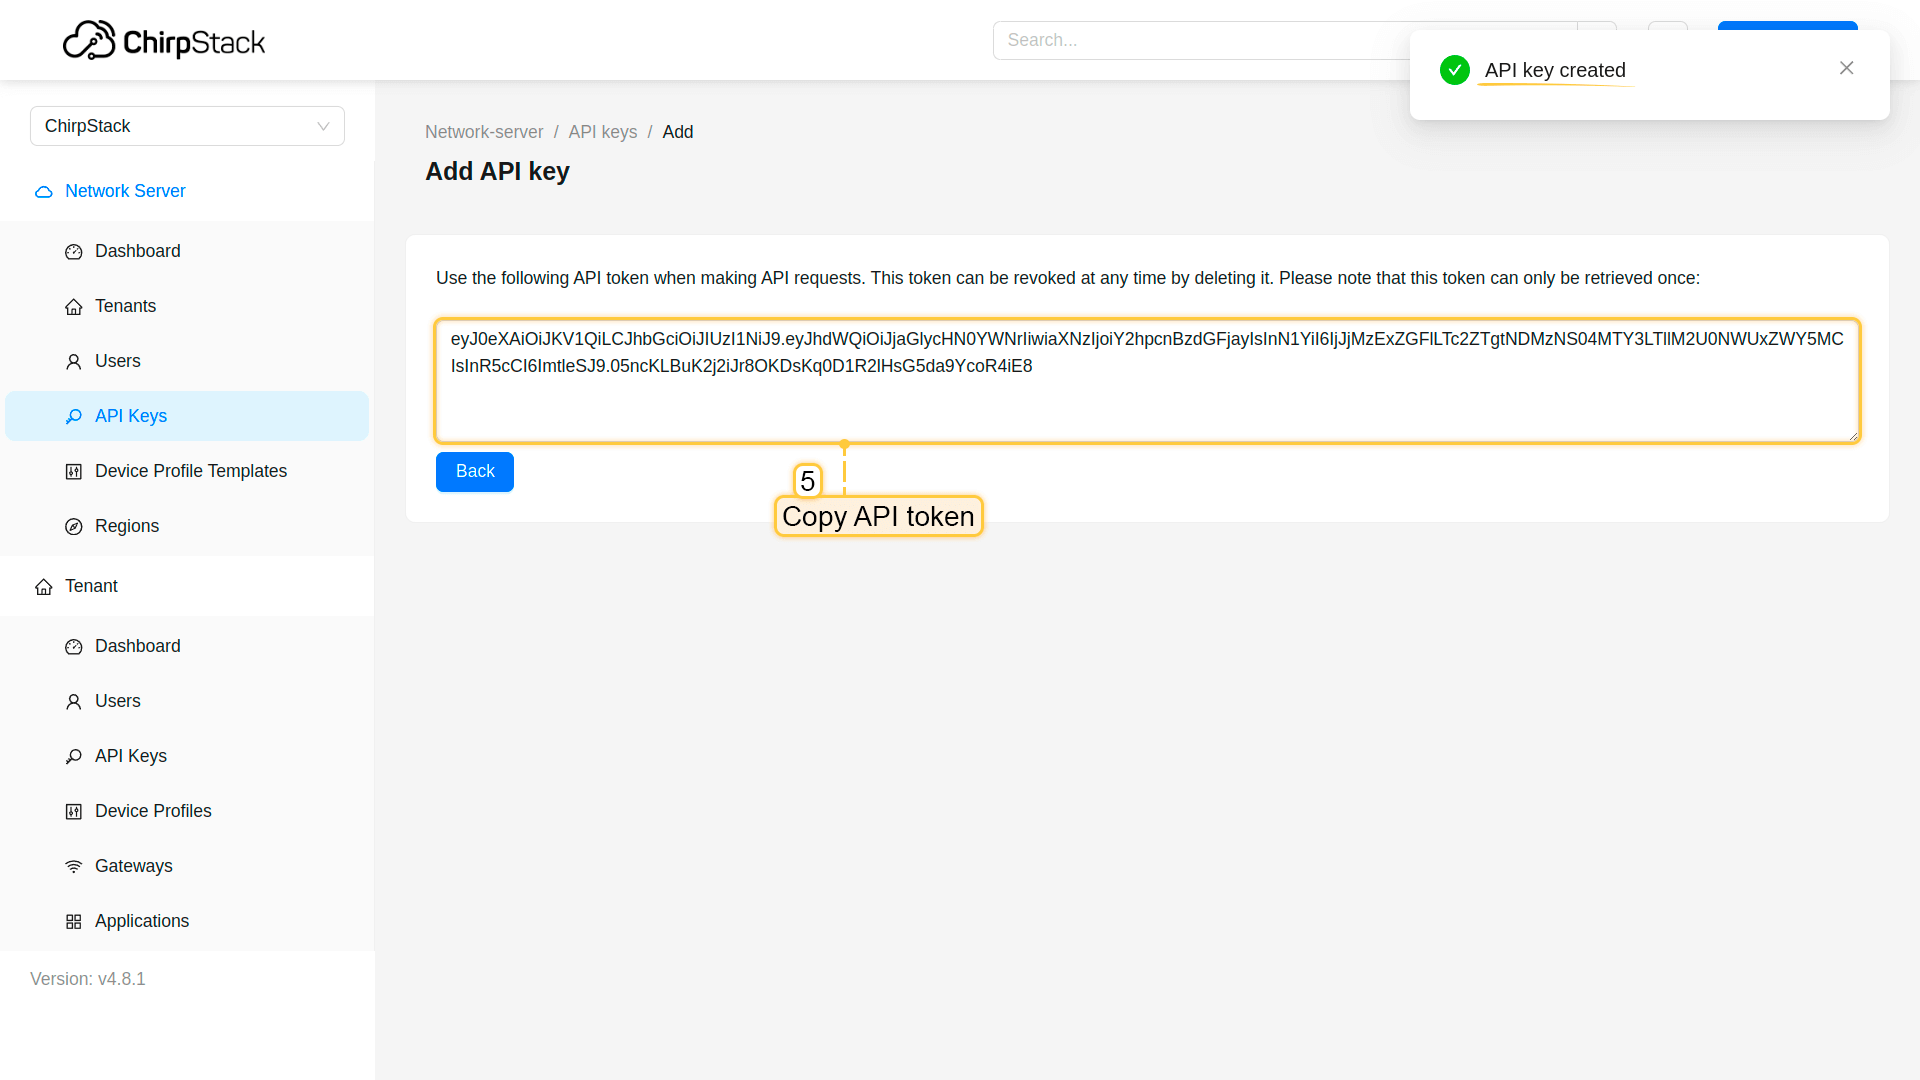
- Specify “Application server API Token” - taken from the application server. To get its we need to open ChirpStack application server UI, navigate to the “API keys” page from the left top menu and create new an API key.
Finally, click “Add” button to complete adding the ChirpStack integration.
Configure integration on your ChirpStack application
In order for data to be transferred from ChirpStack to ThingsBoard, you need to configure an integration in your ChirpStack application.
To create integration on ChirpStack Network server stack, we need to do the following steps:
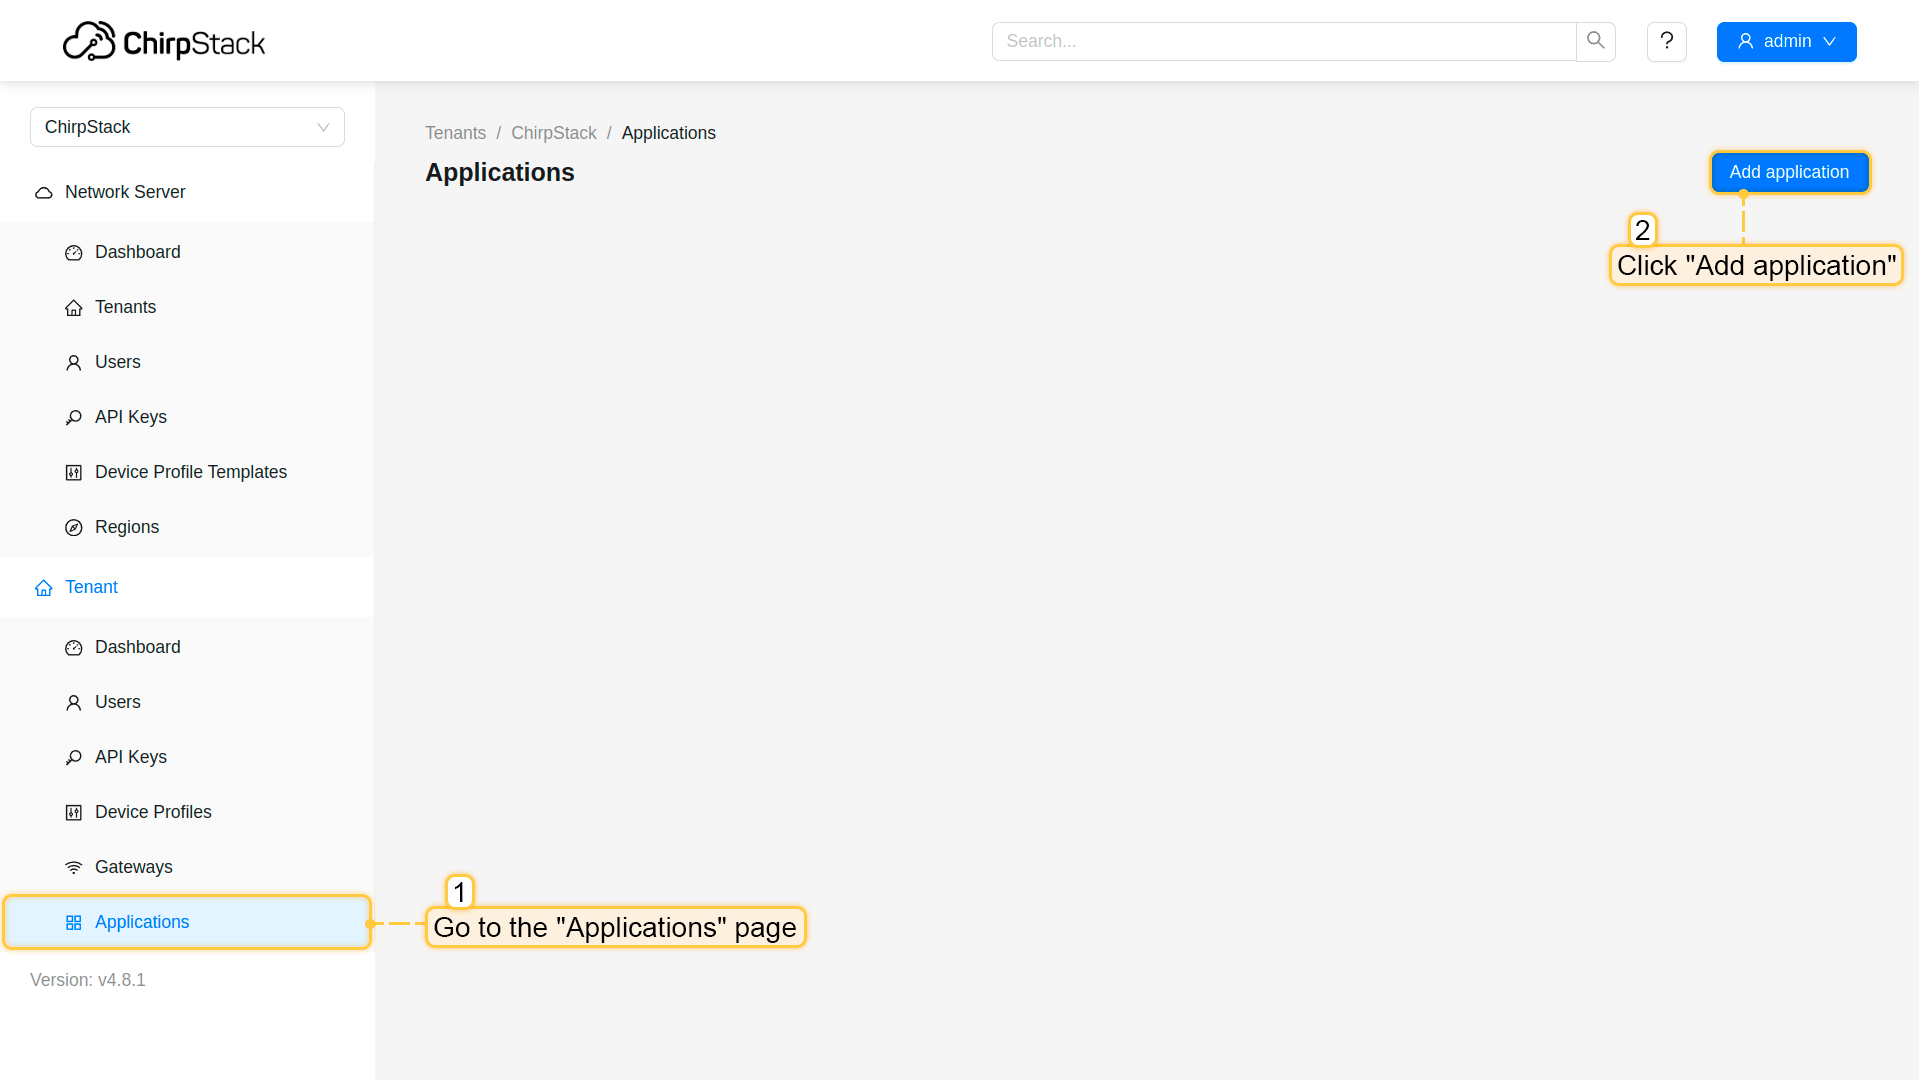
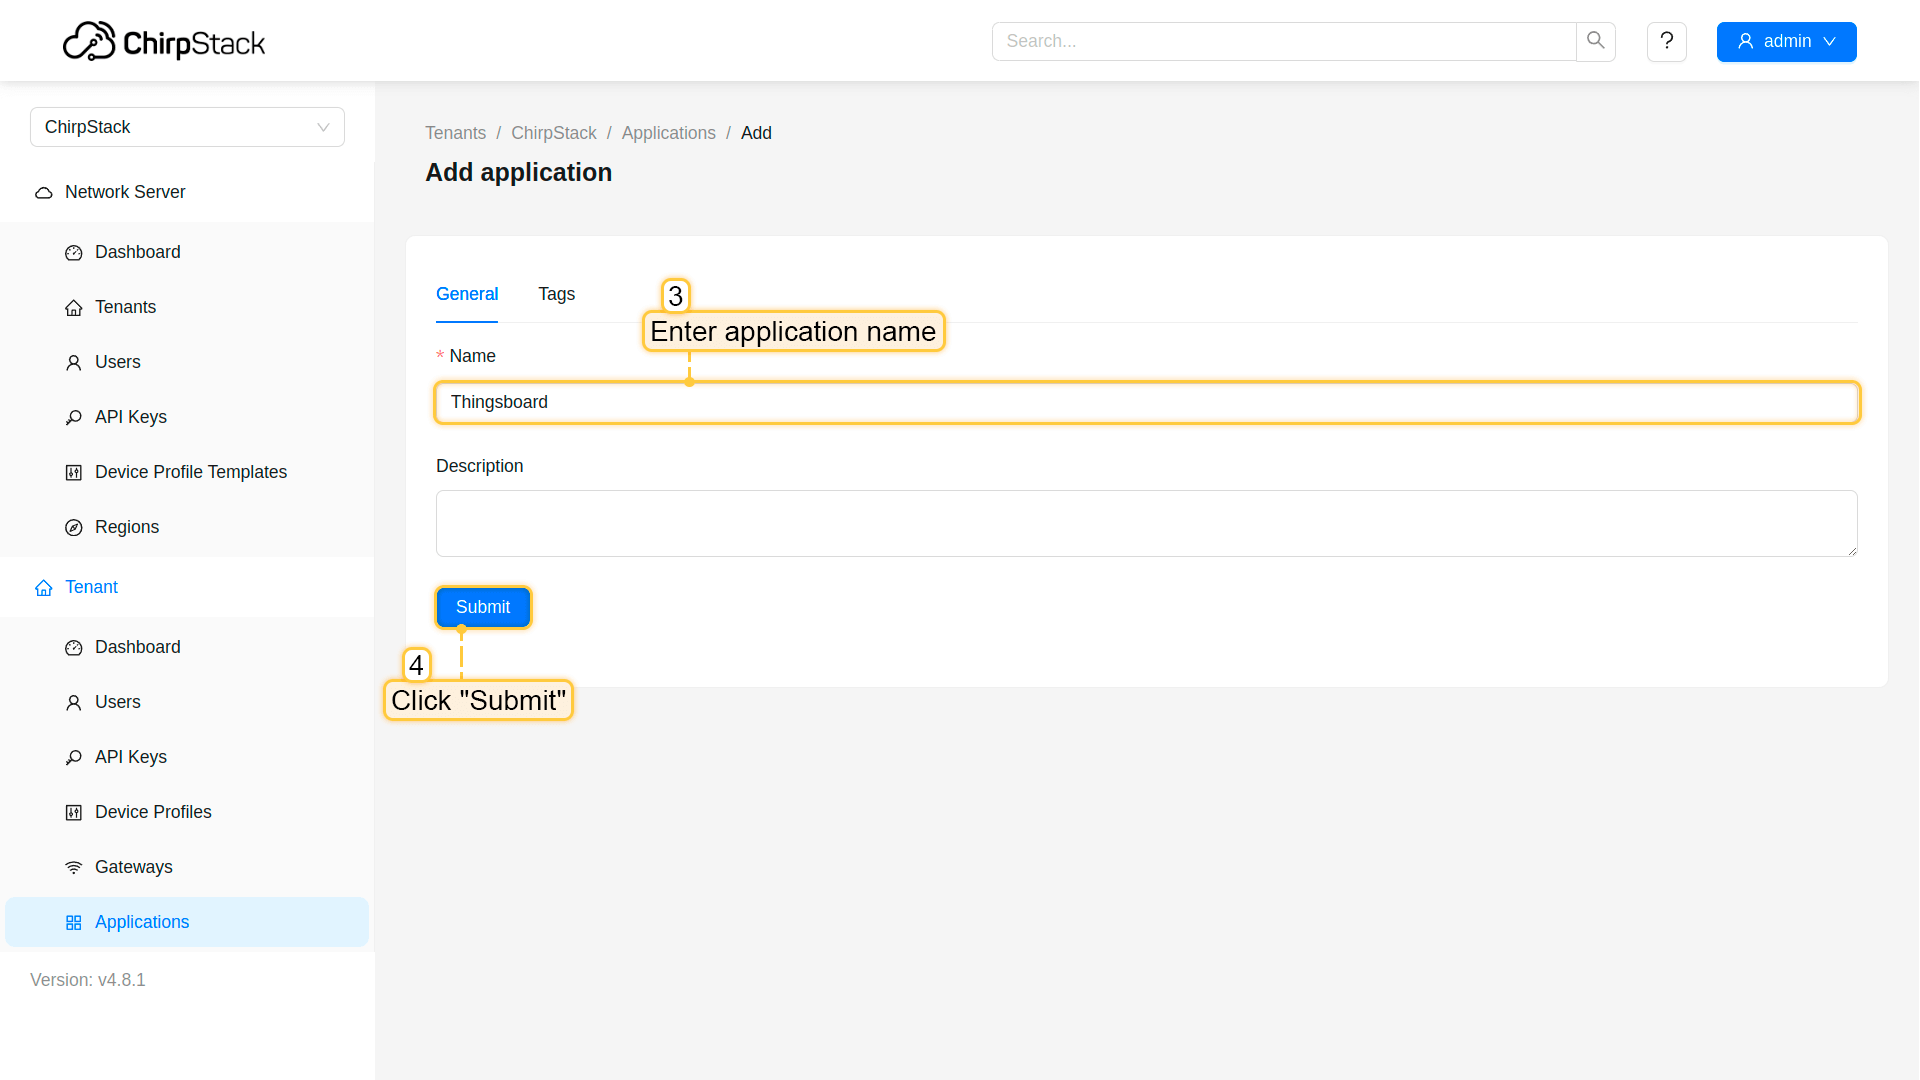
- Go to the “Applications” page in the left menu of the ChirpStack Network server user interface, and click “Add application” button;
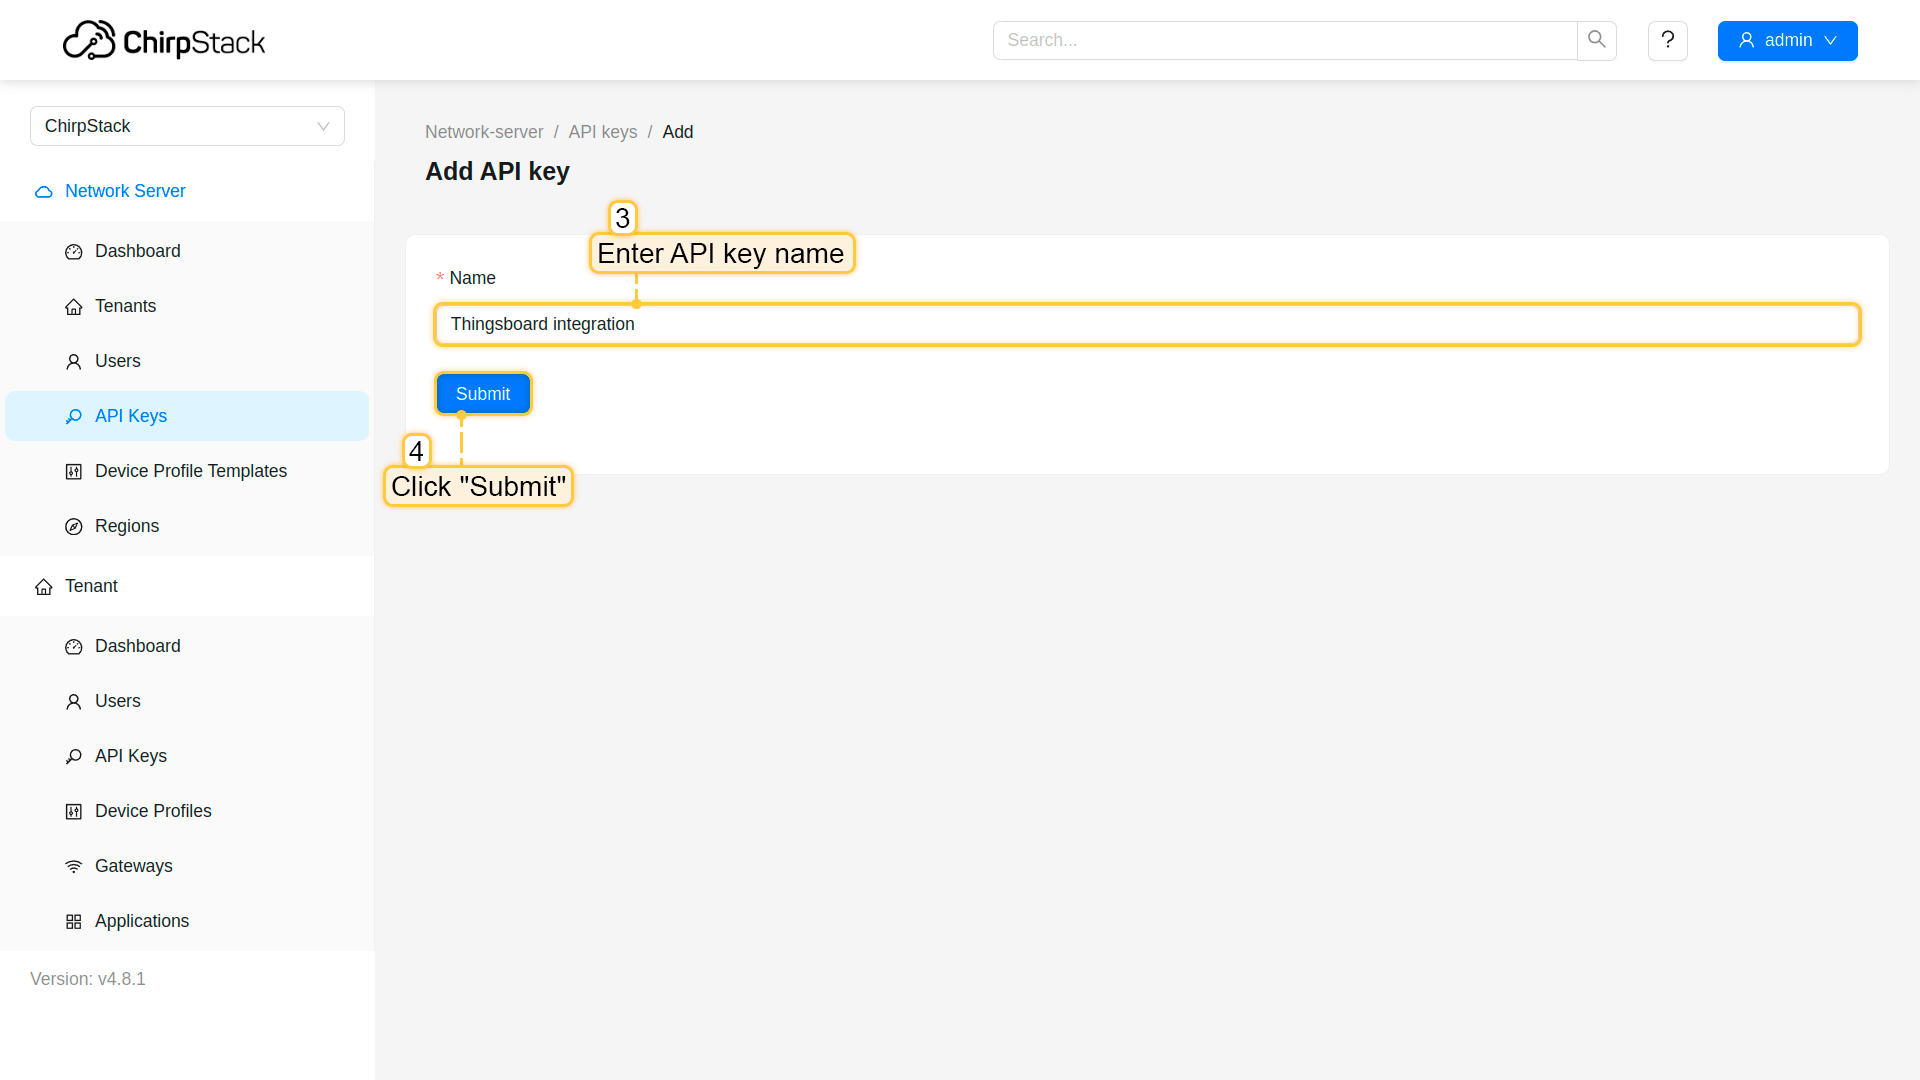
- Named it and click “Submit” button;
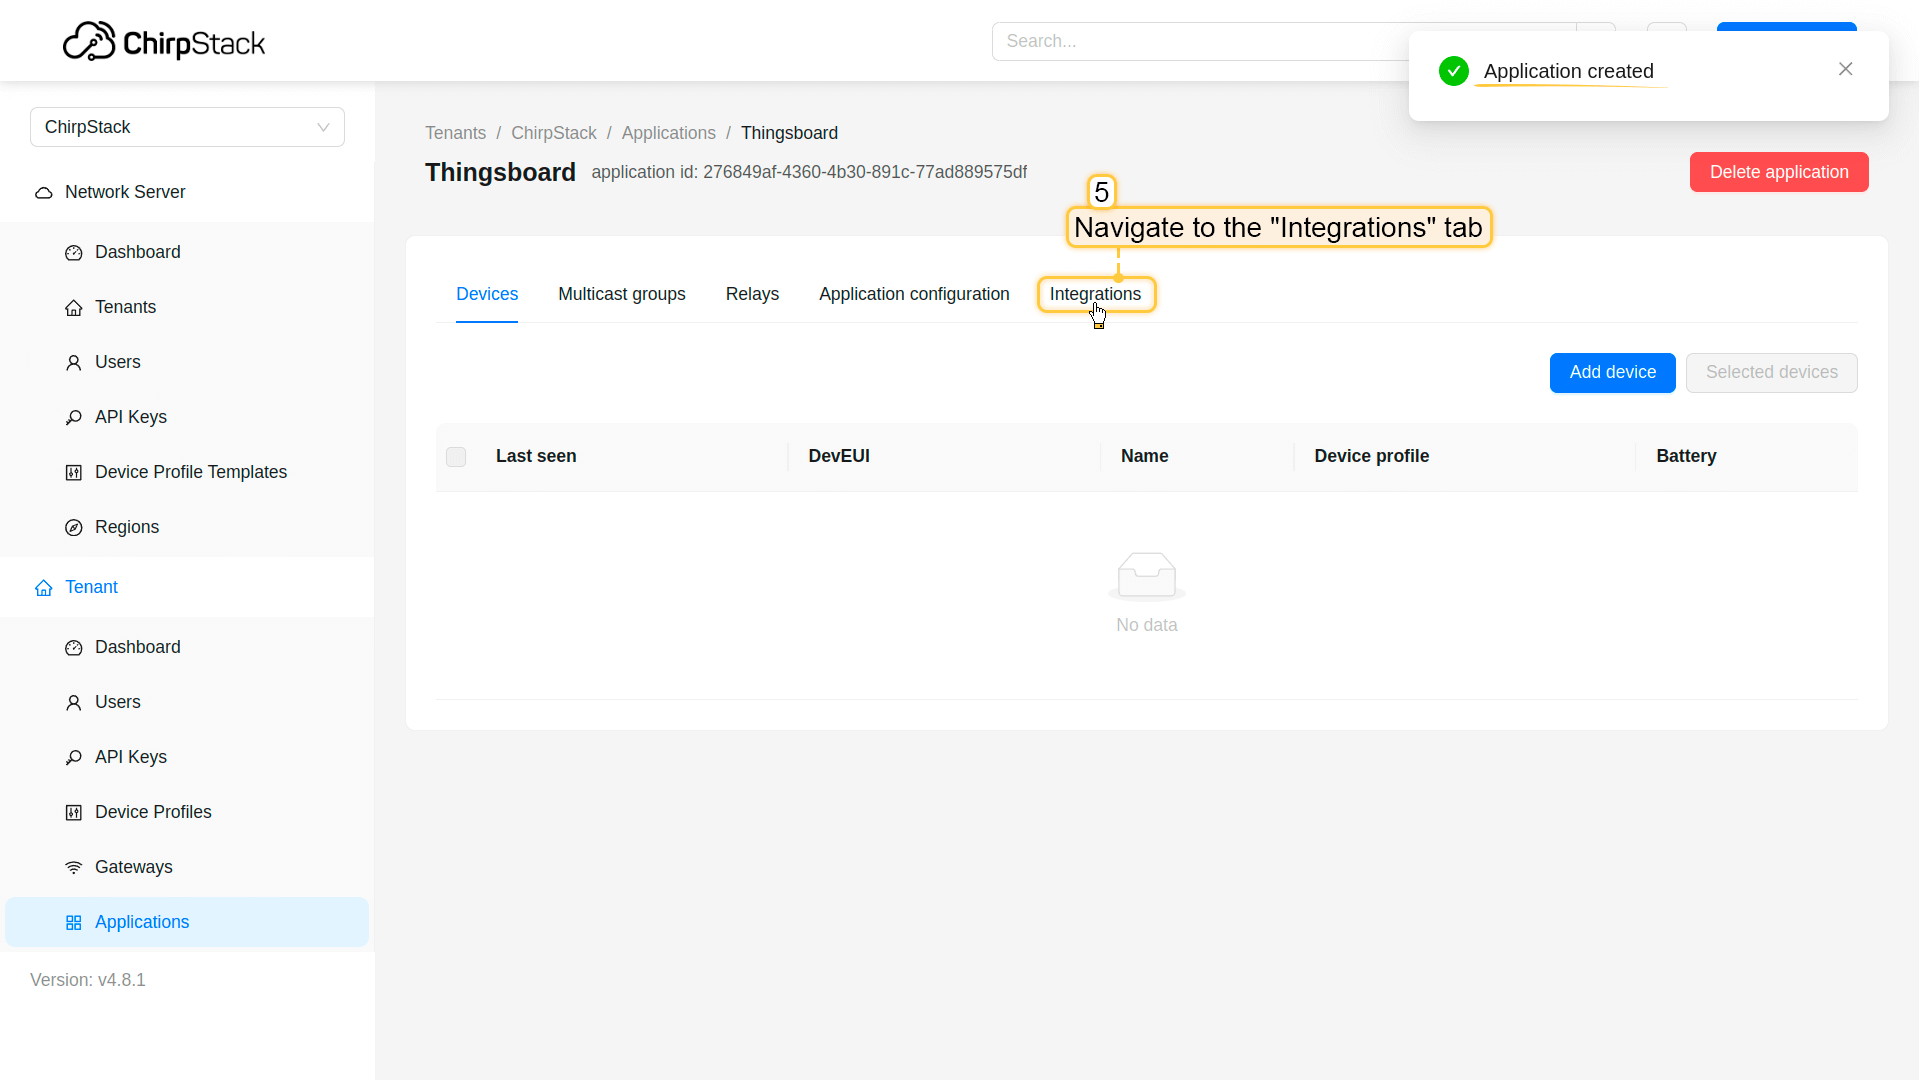
- Application created. Now, navigate to the “Integrations” tab;
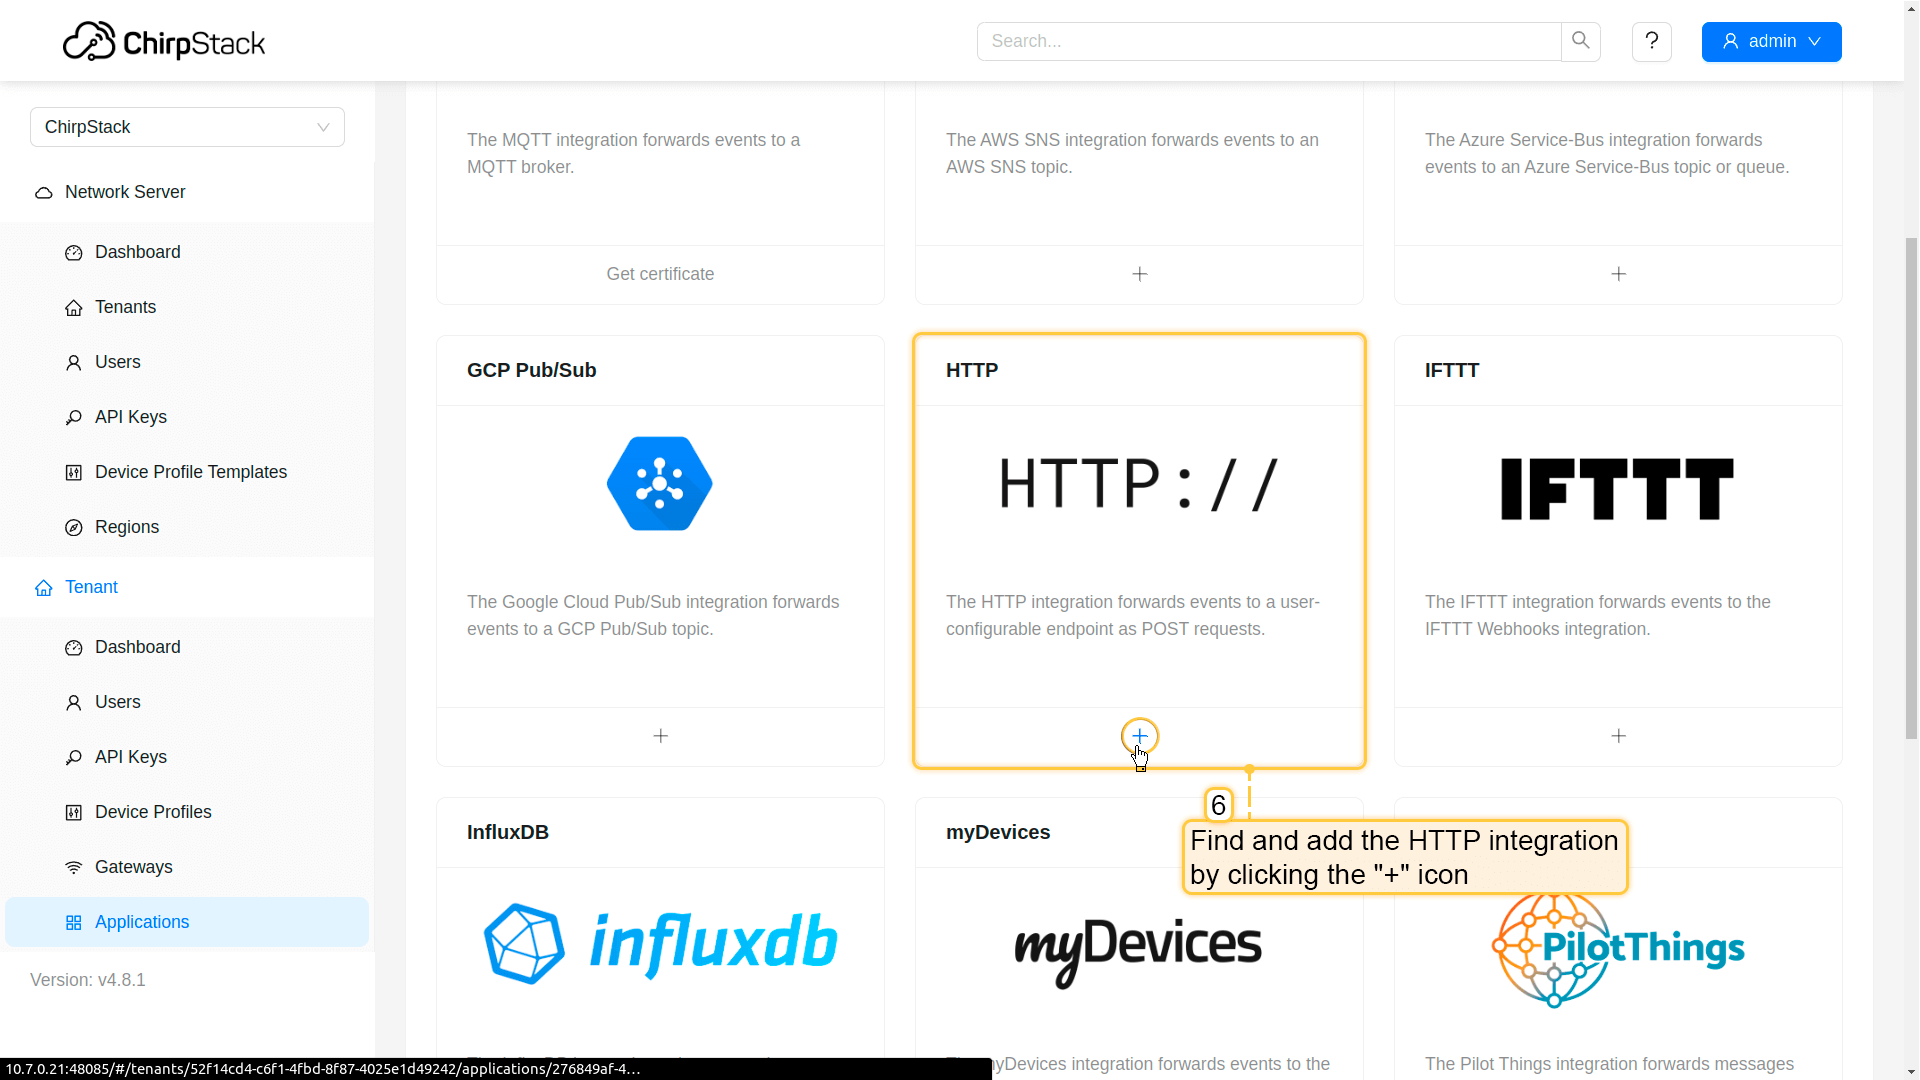
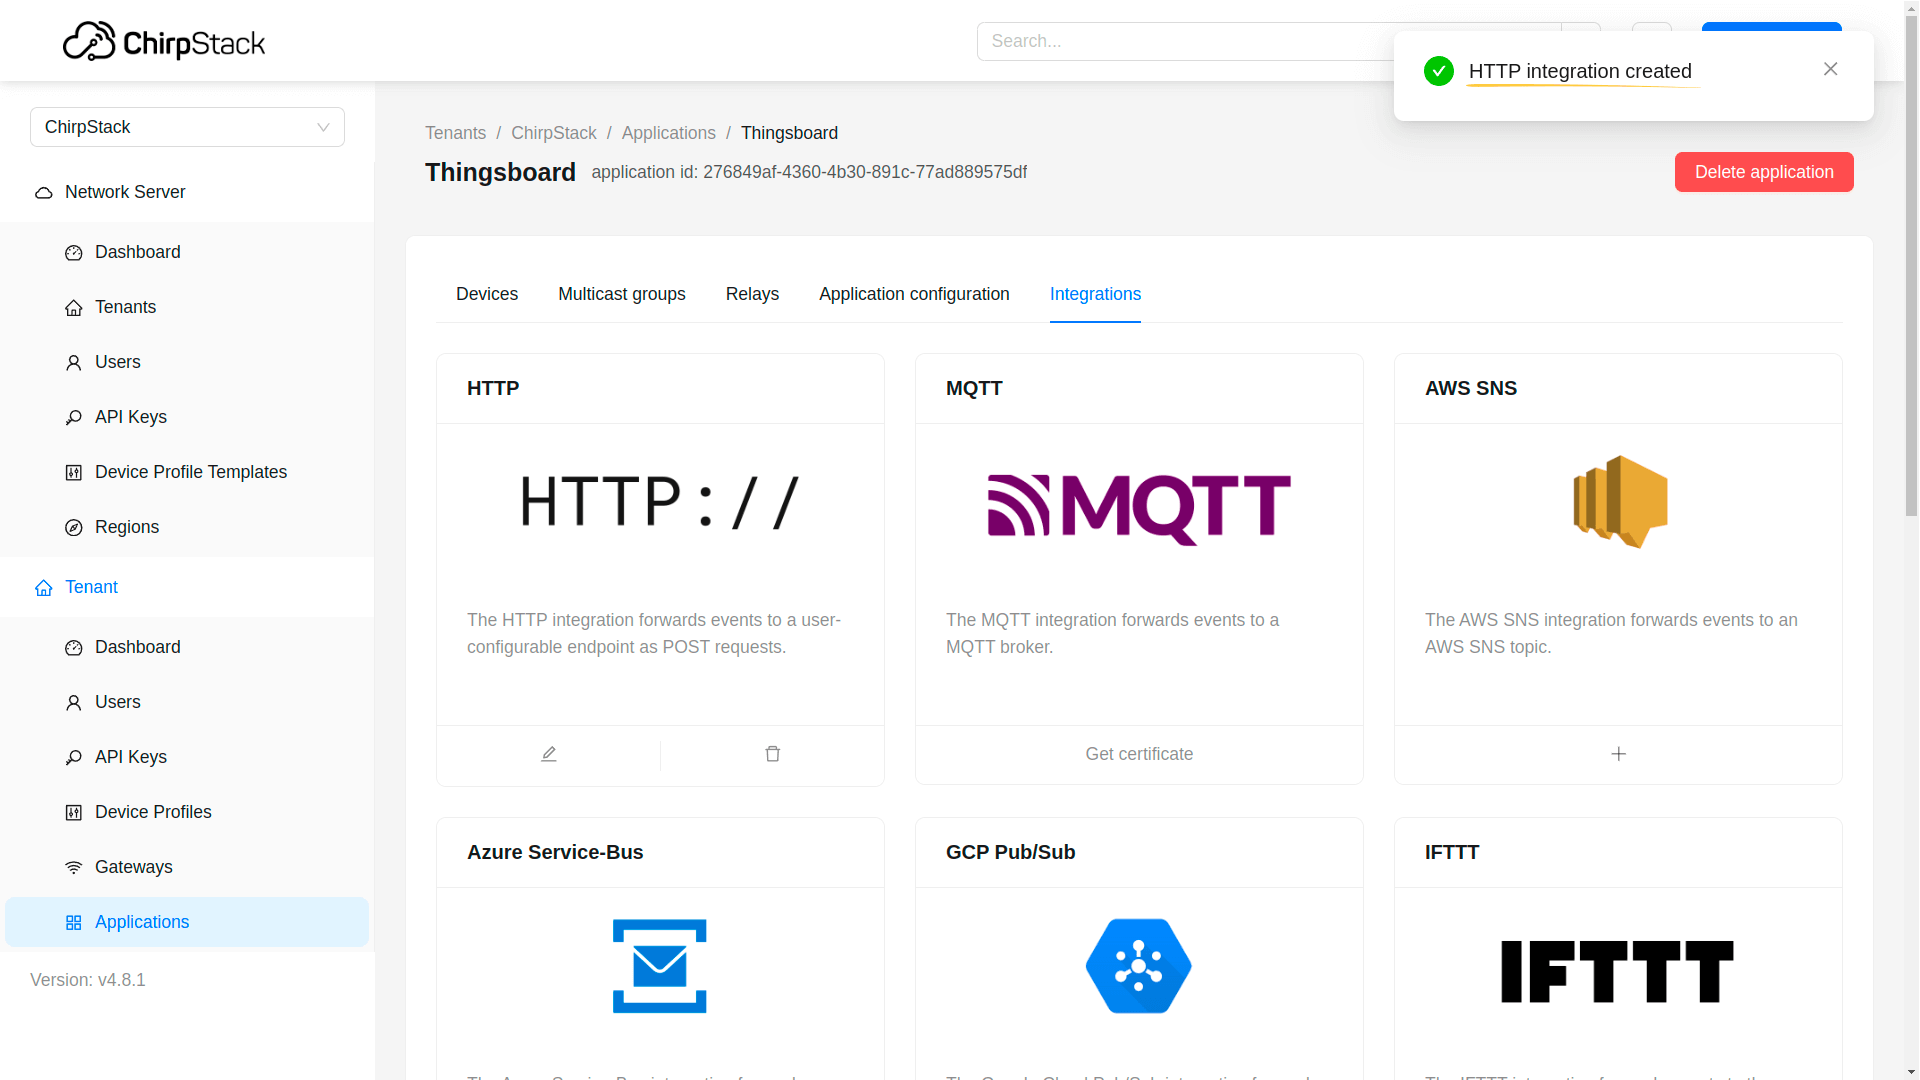
- Find and add a HTTP integration by clicking “+” icon;
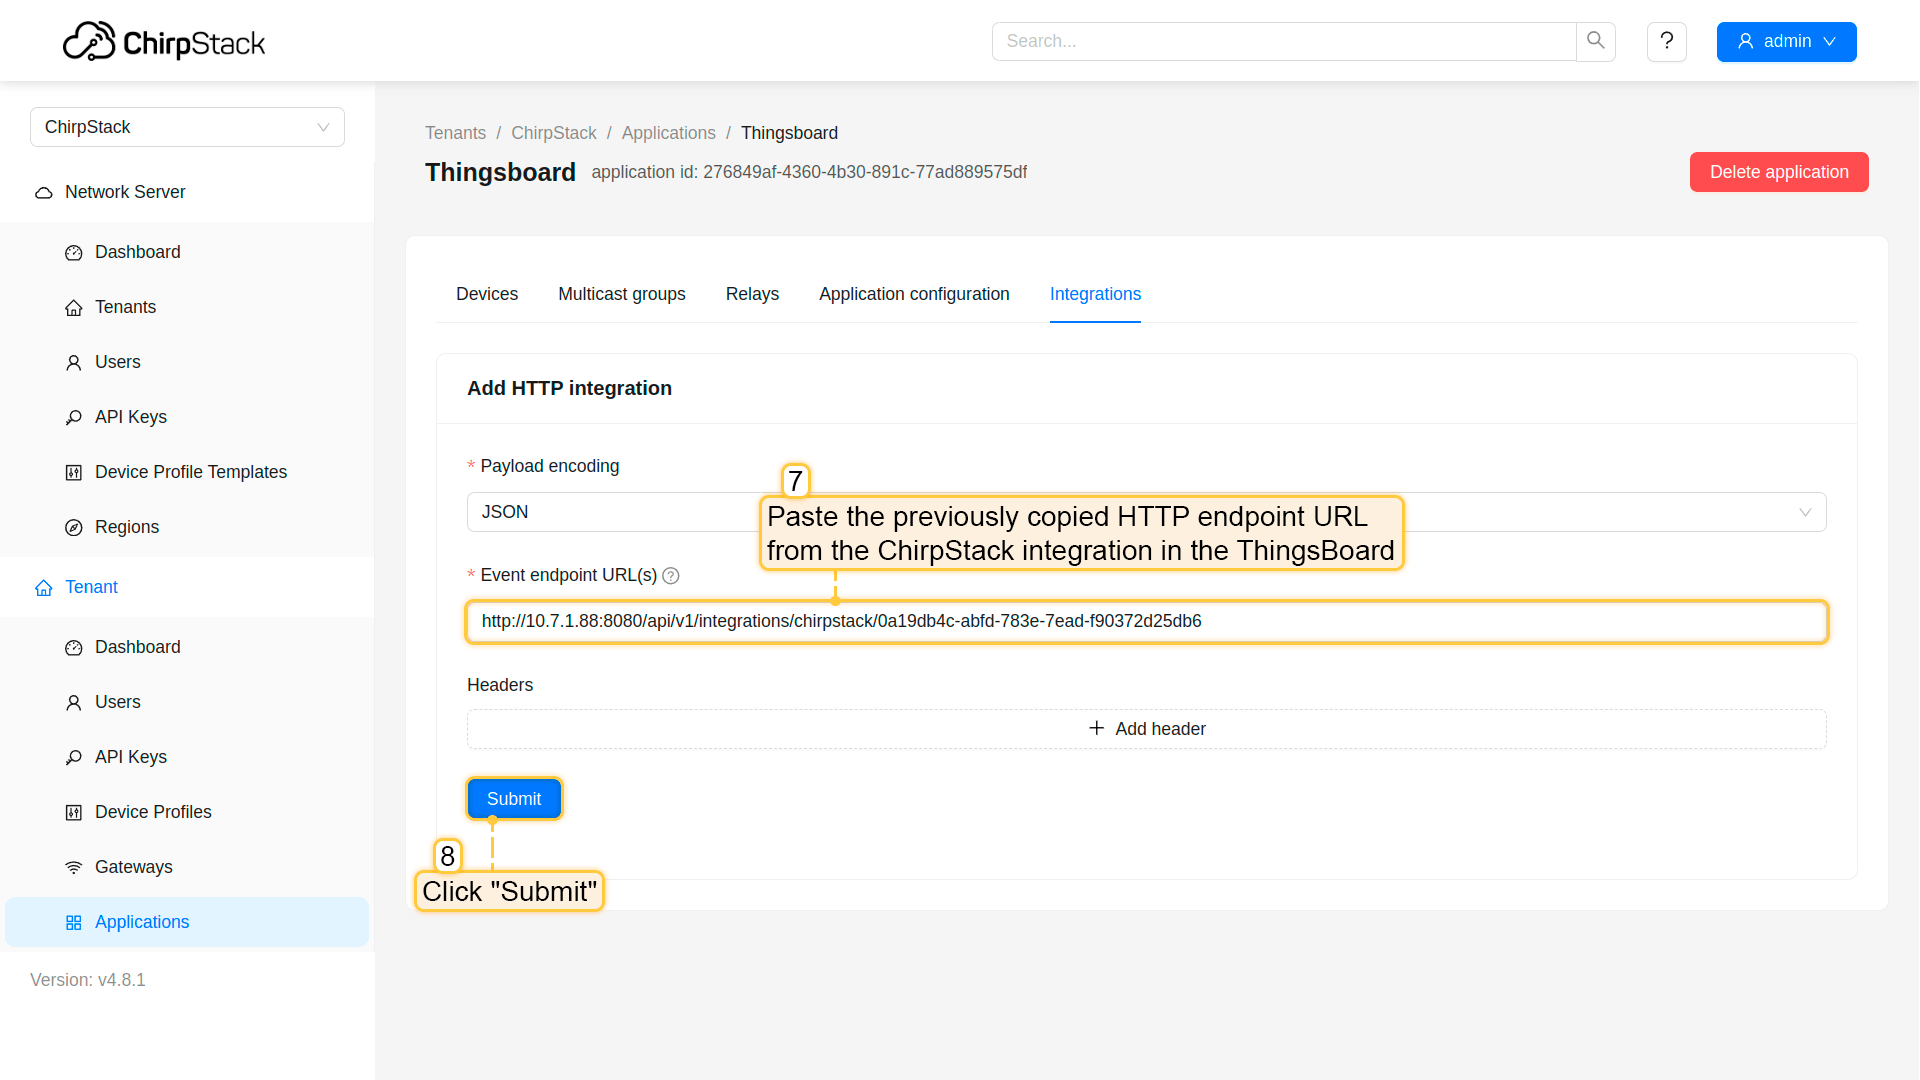
- Fill in the field with the “HTTP endpoint URL” previously copied from the ChirpStack integration in the ThingsBoard. Then, click “Submit” button.
HTTP integration created.
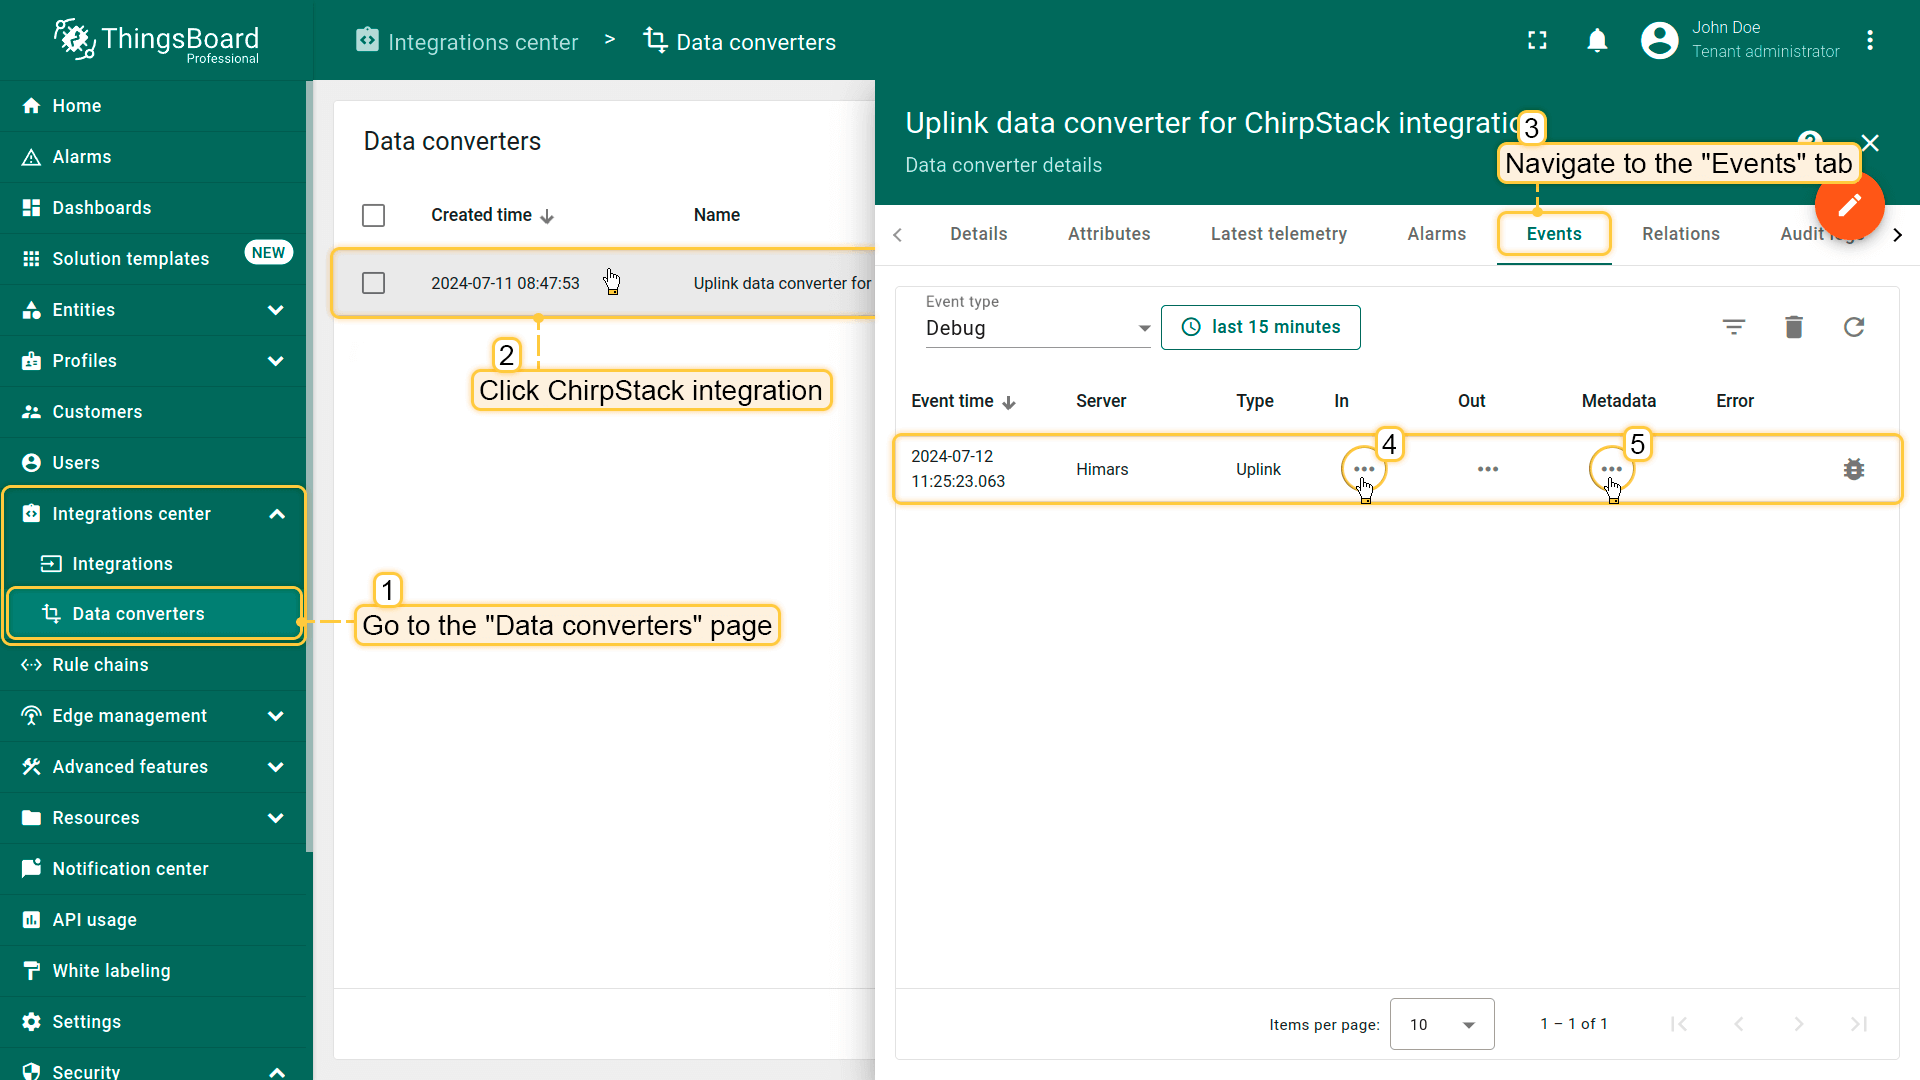
Processing uplink message
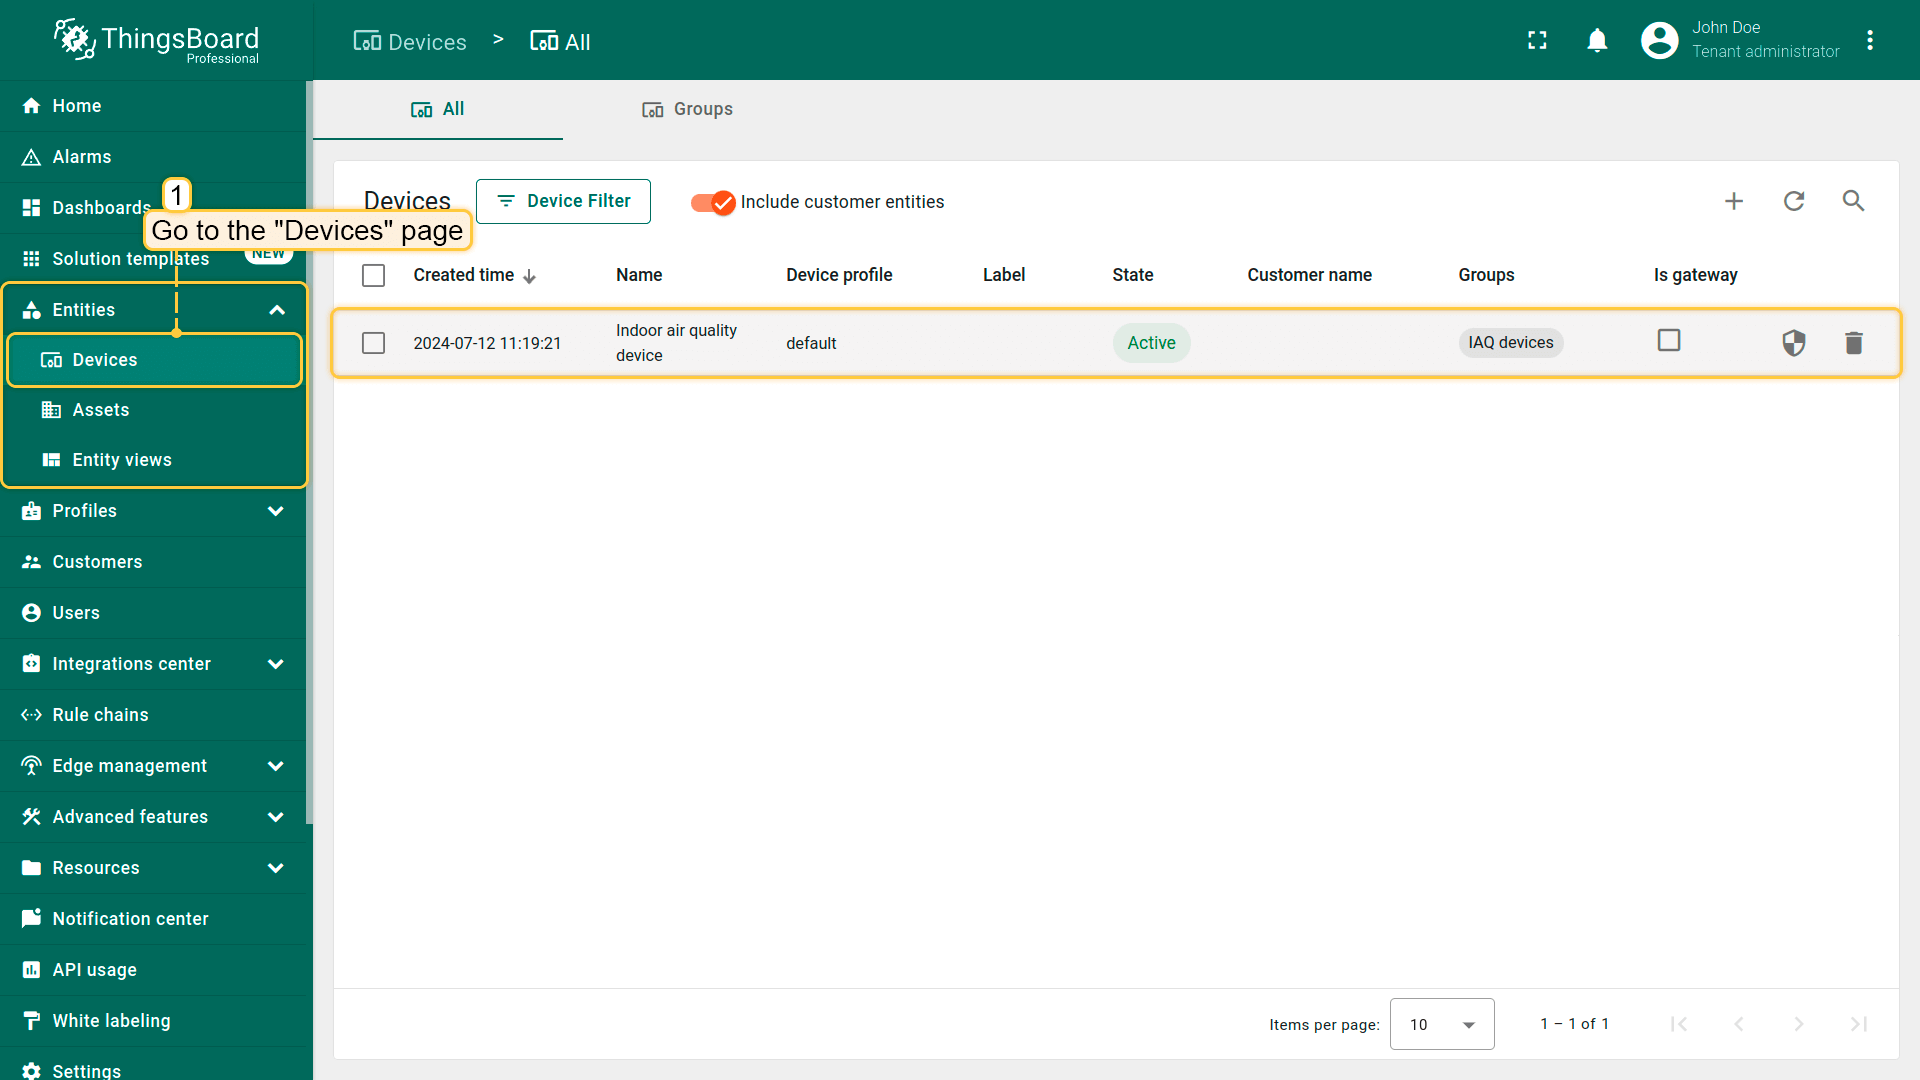
When your device sends an uplink message, a new device will appear in the ThingsBoard user interface.
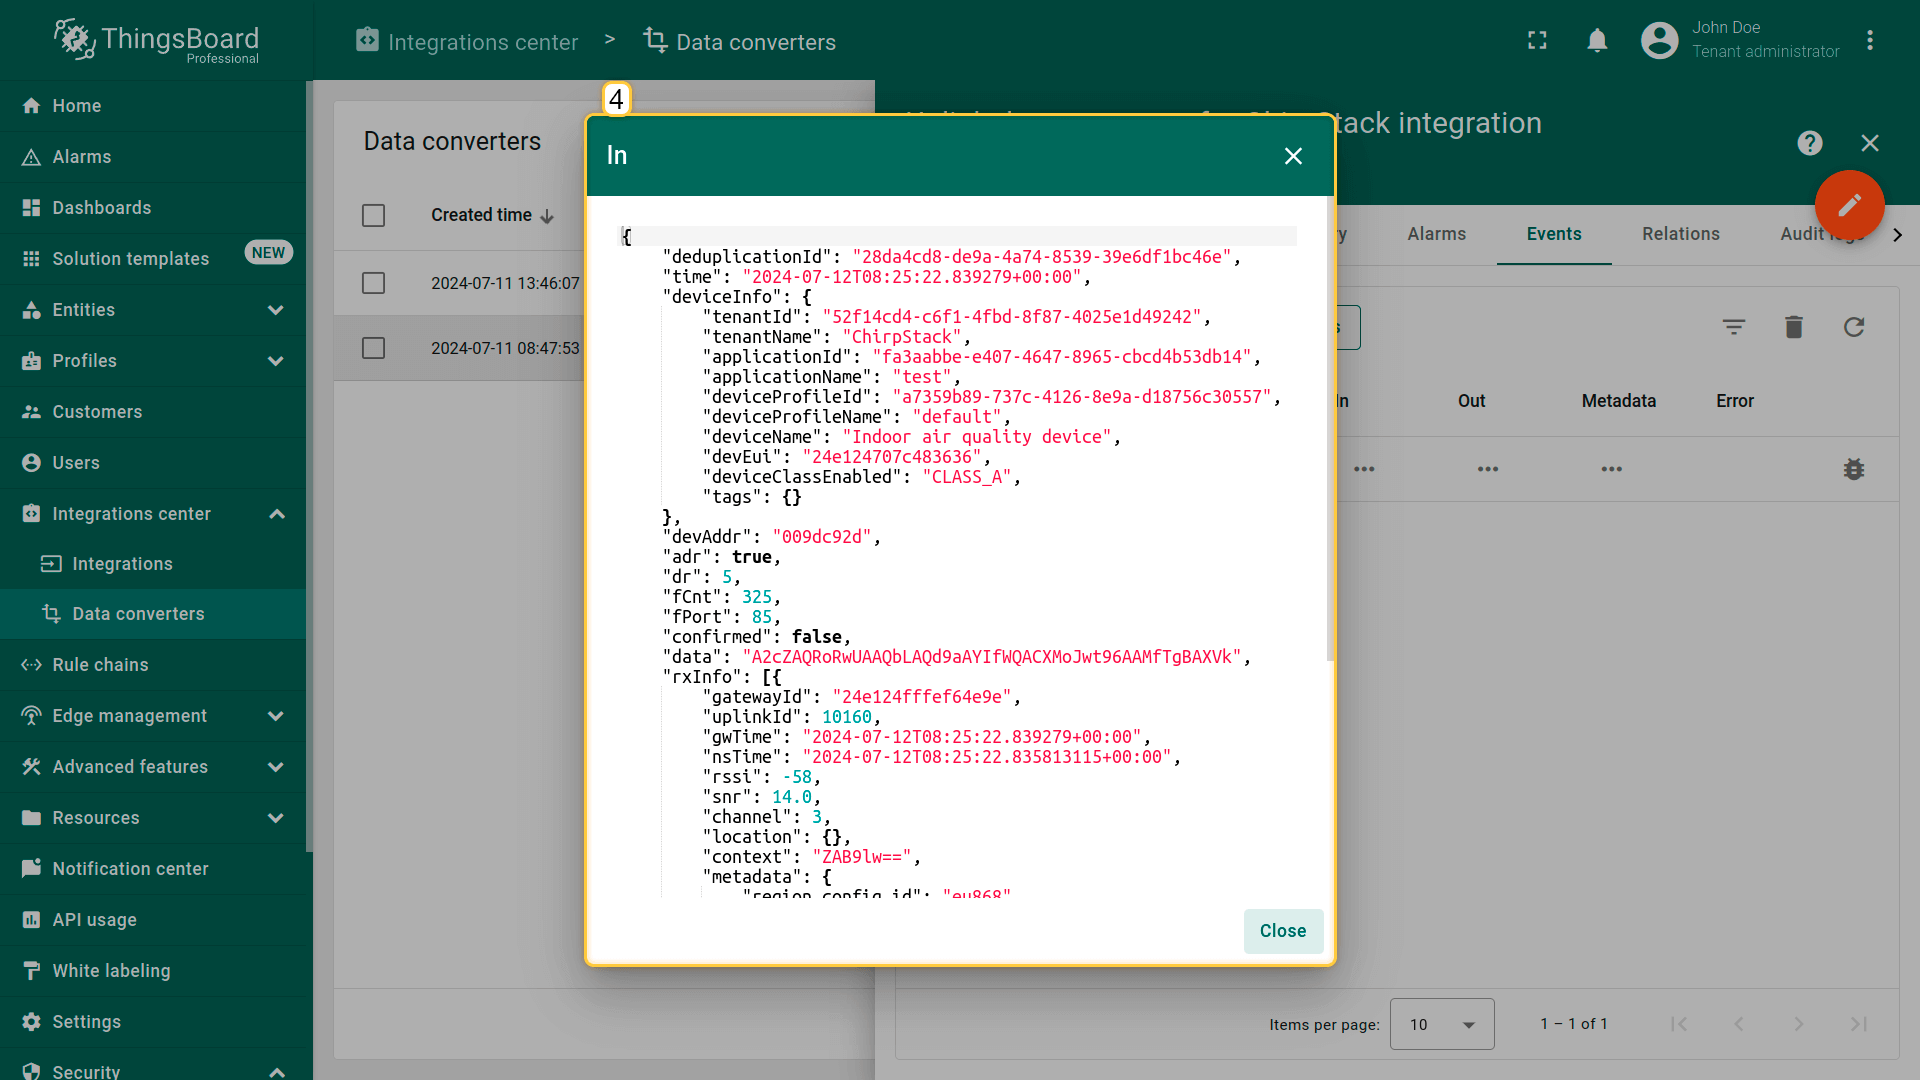
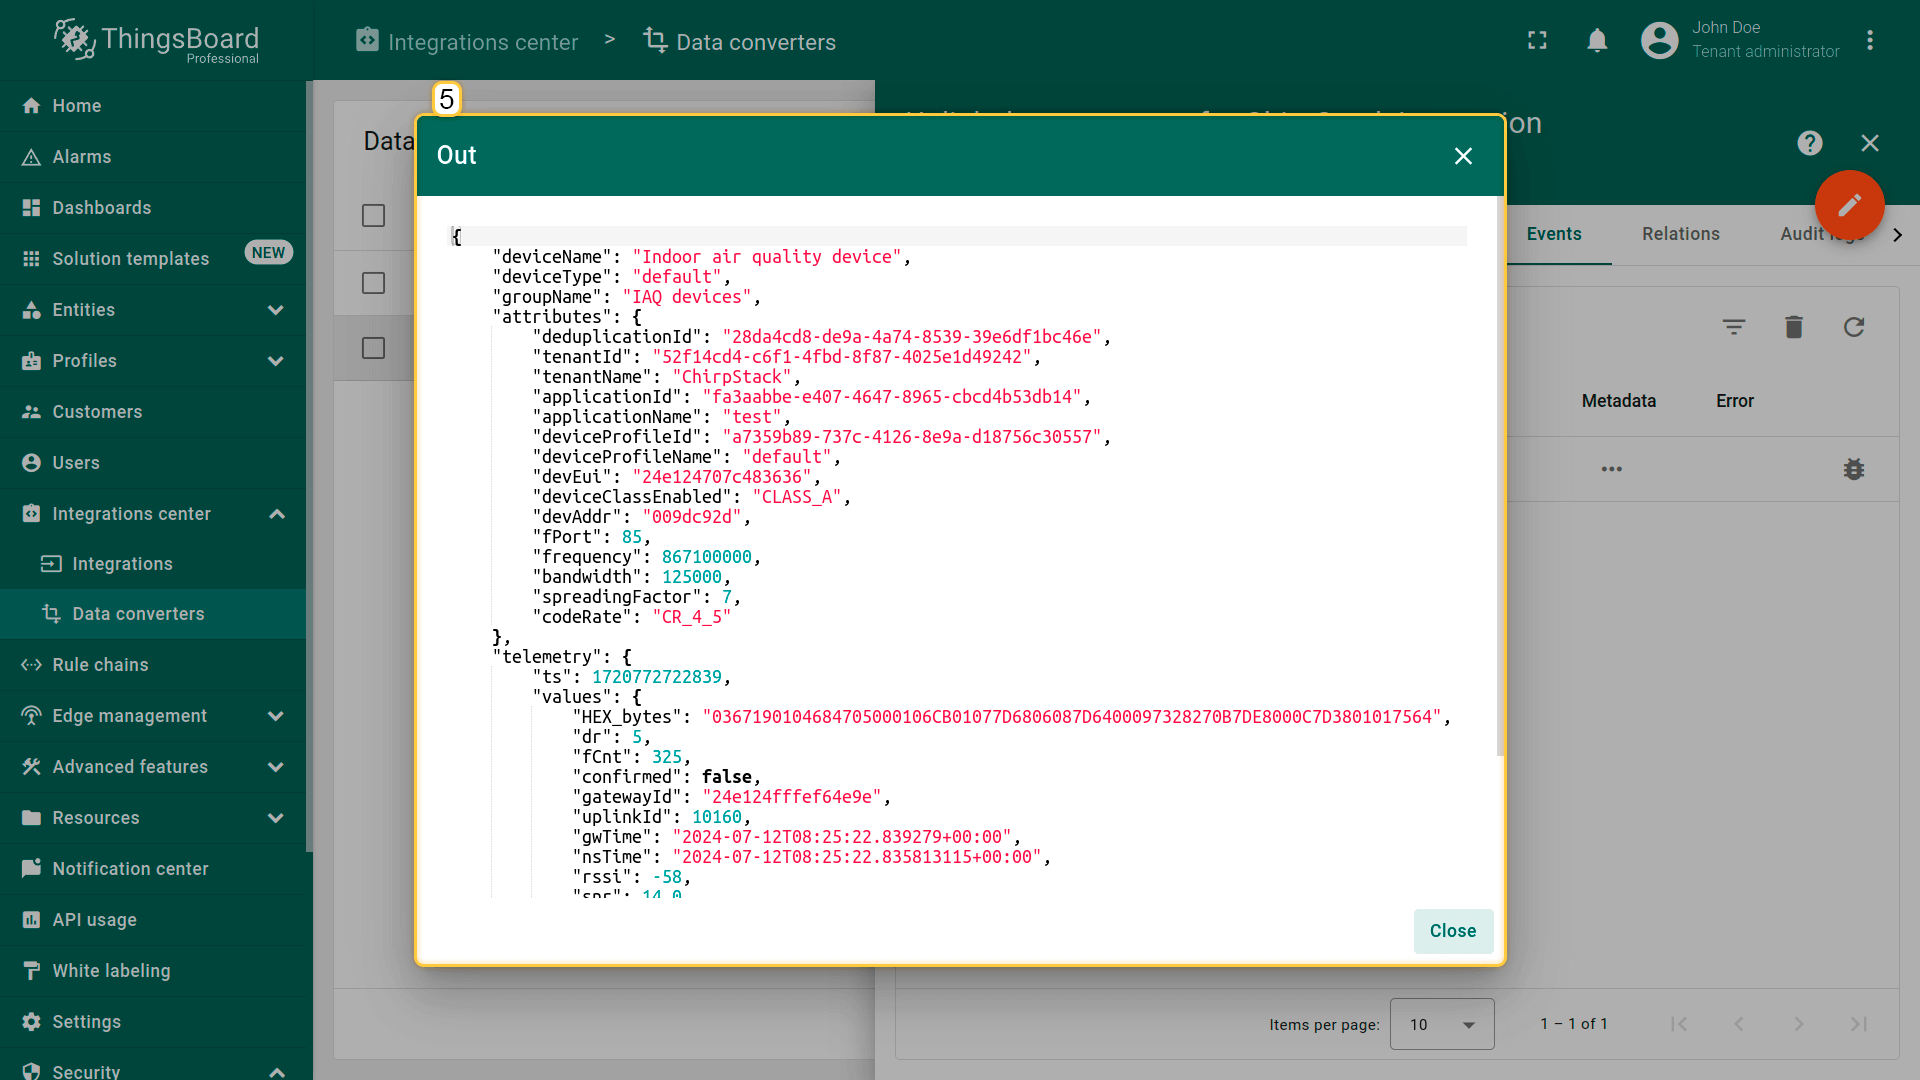
You will receive an uplink event in the ChirpStack integration.
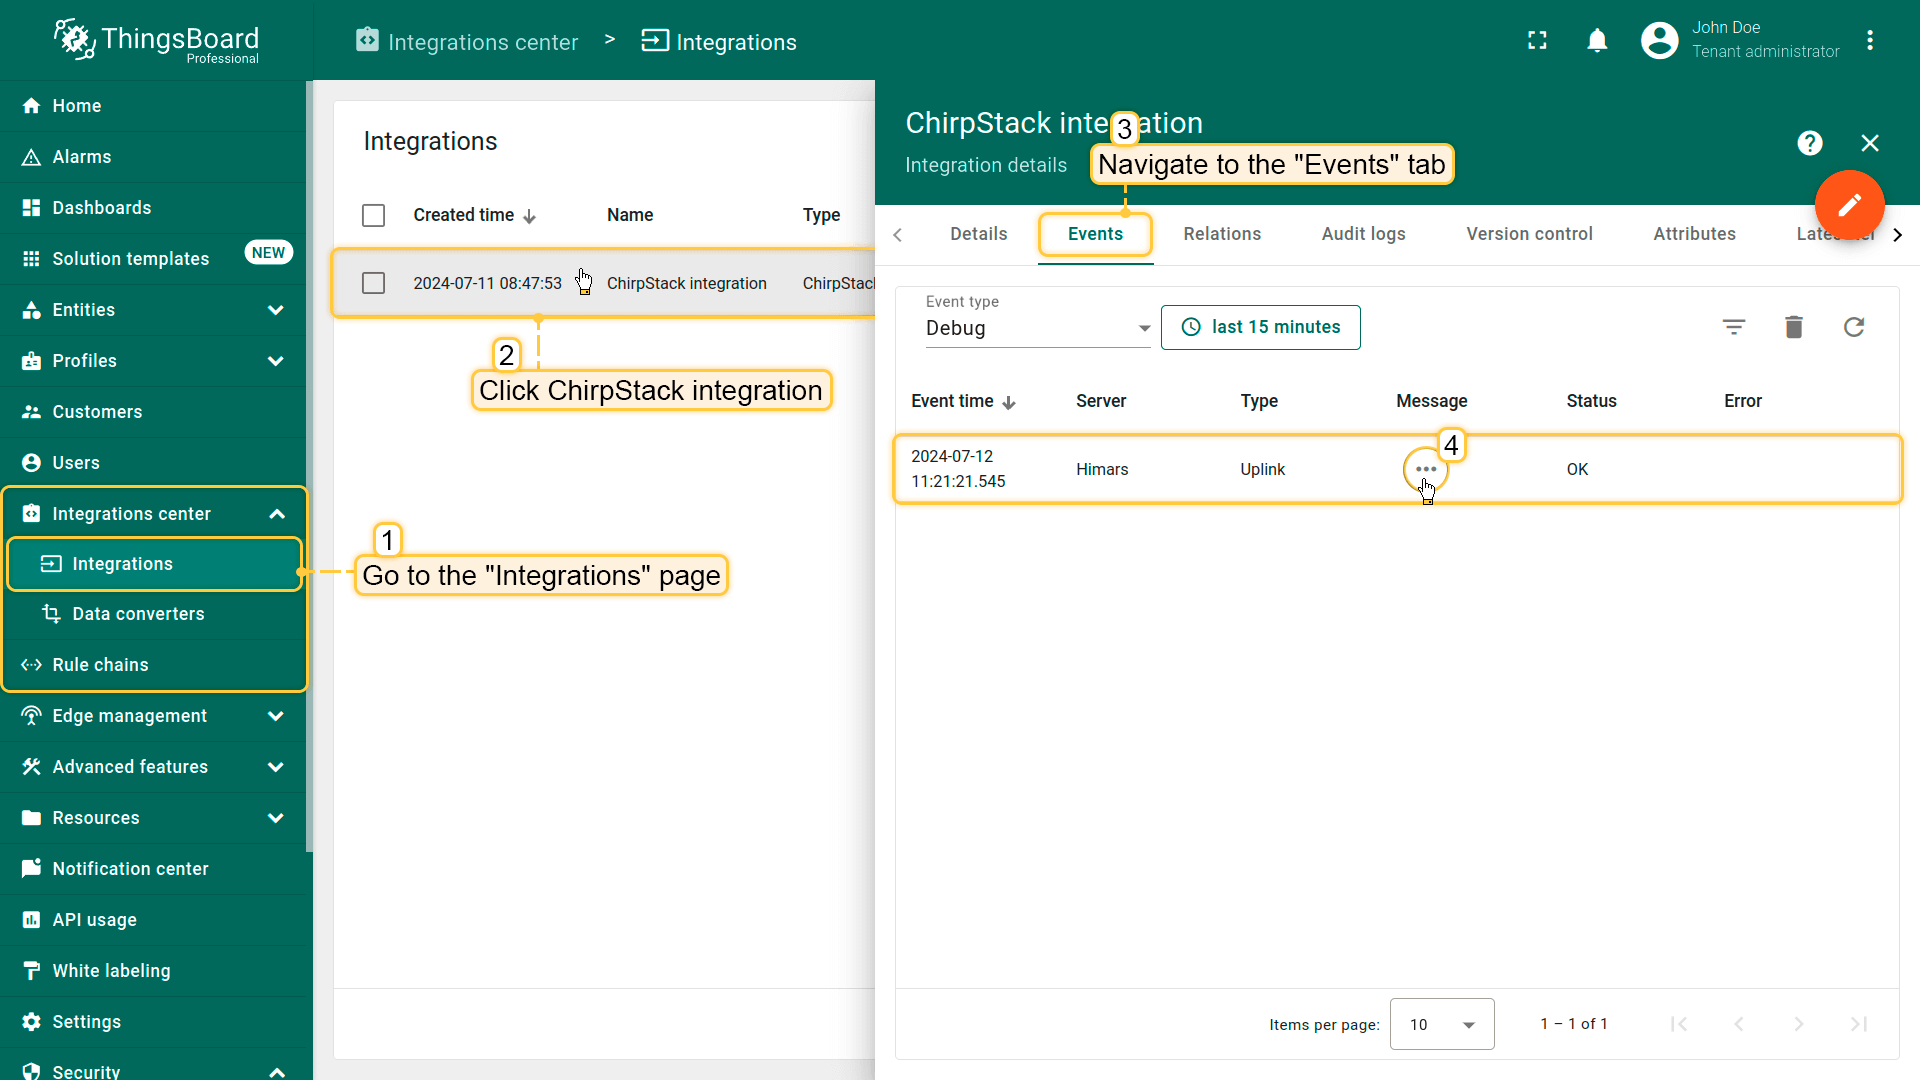
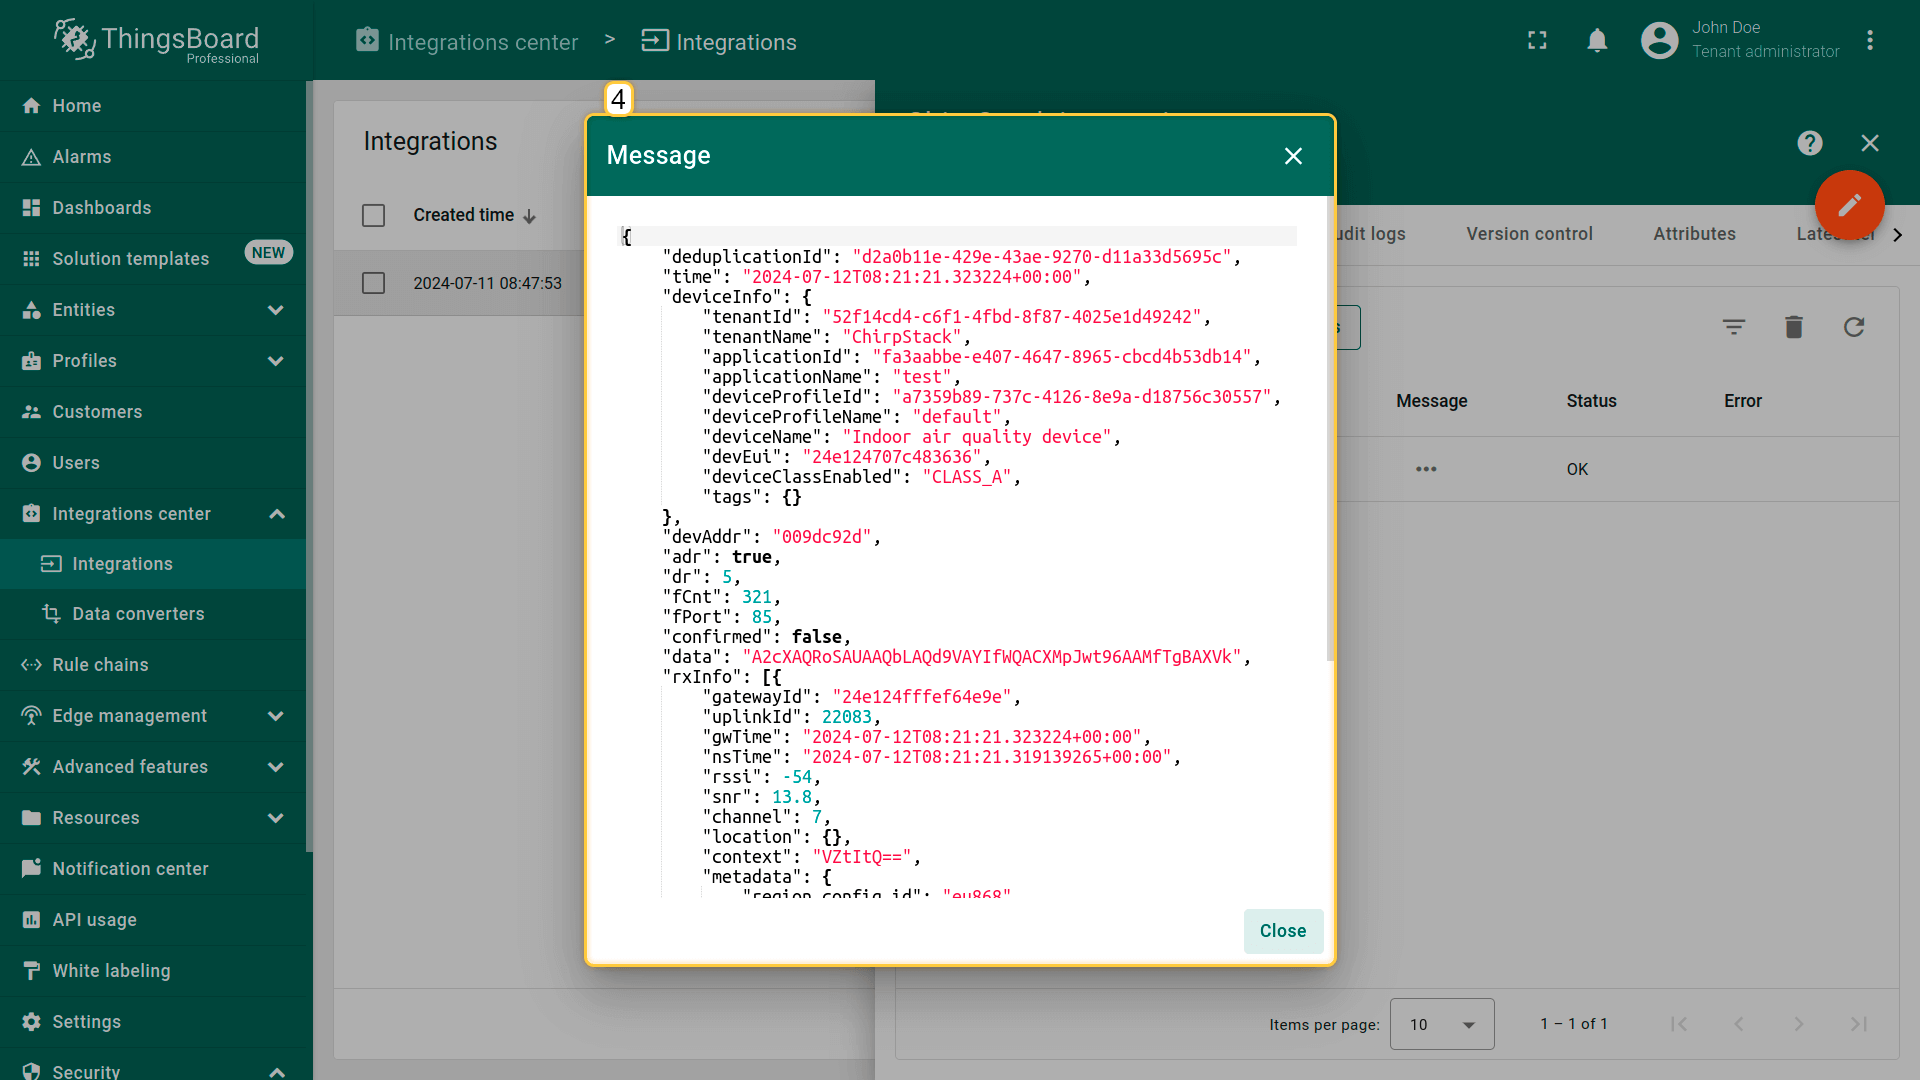
Received data can be viewed in the uplink converter. In the “In” and “Out” blocks of the “Events” tab:
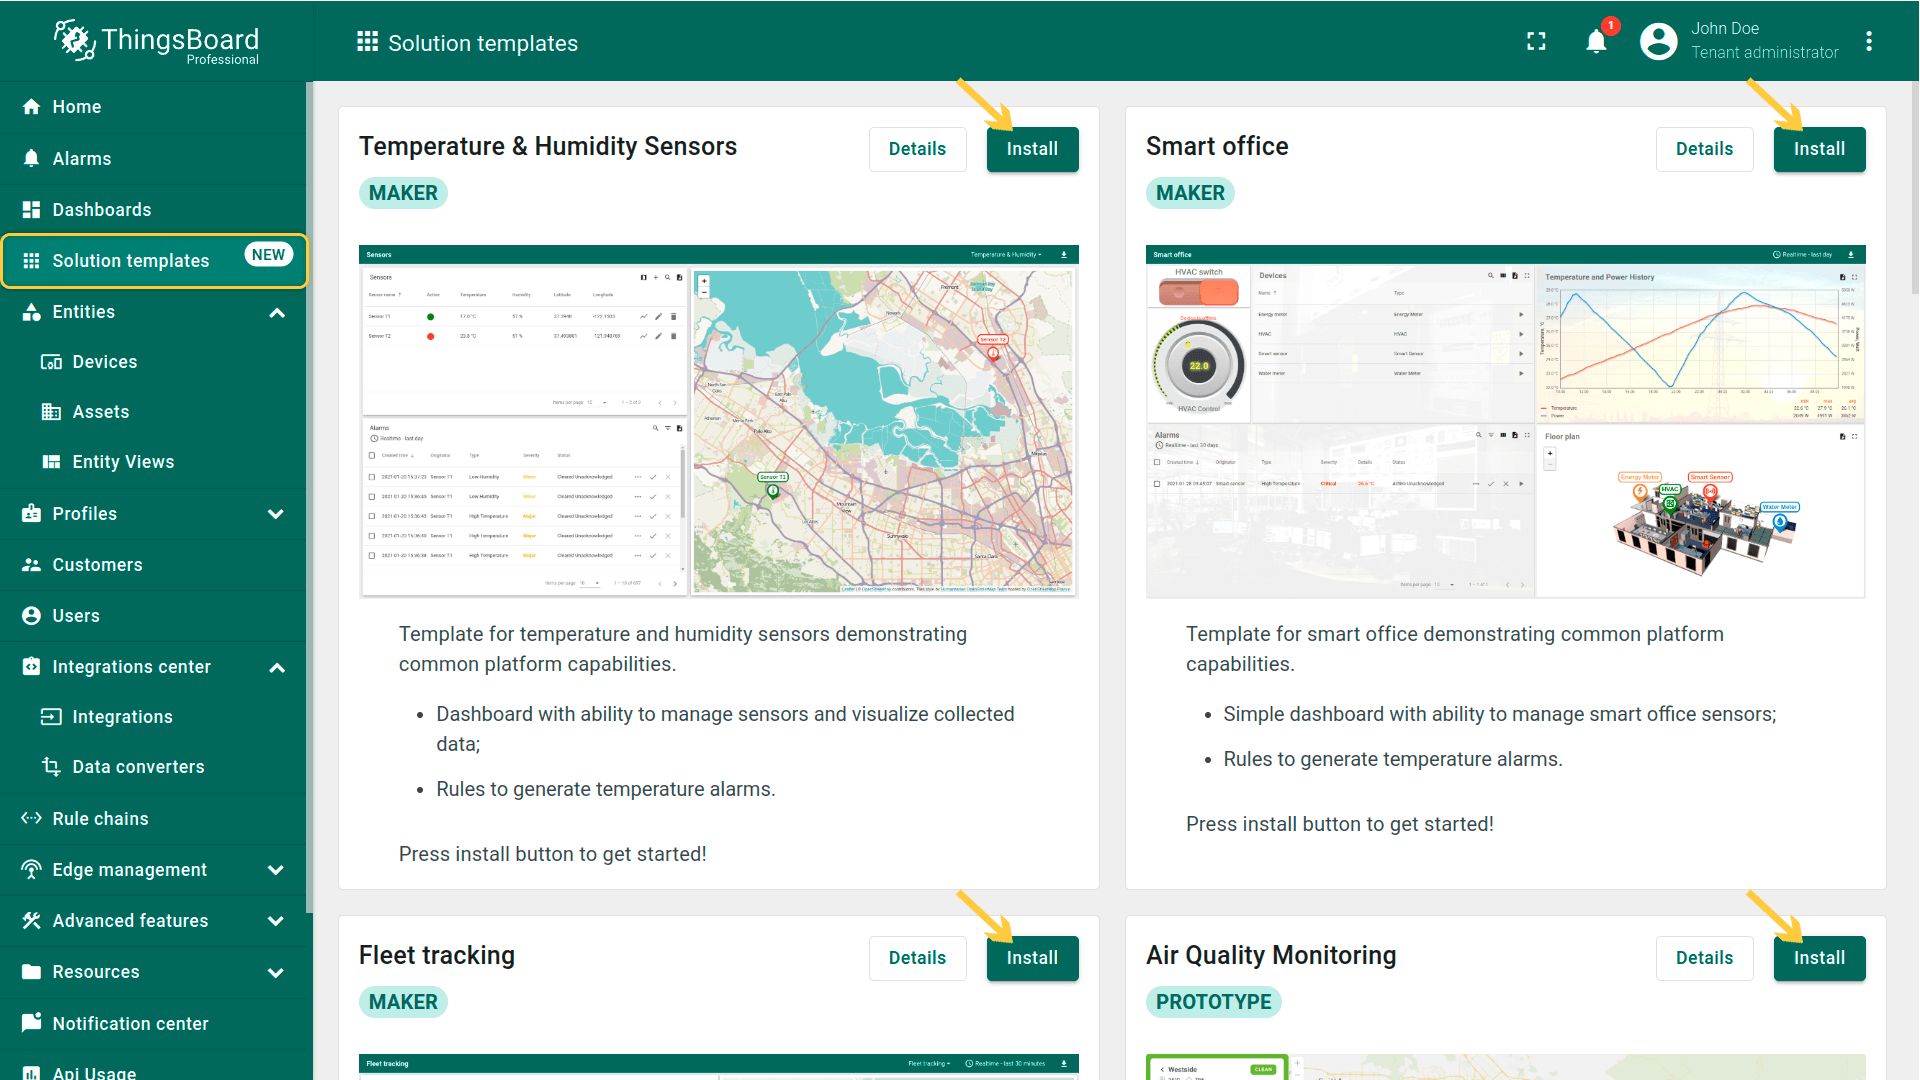
Use the Dashboards to work with data. Dashboards are a modern format for collecting and visualizing data sets. Visibility of data presentation is achieved through a variety of widgets.
ThingsBoard has examples of several types of dashboards that you can use. Learn more about Solution templates here.
Advanced usage: downlink
For sending downlink messages from the Thingsboard to the device, we need to define a downlink converter. You can customize the downlink according to your configuration.
Add downlink converter
Let’s consider an example where we send an attribute update message.
One can use either TBEL (ThingsBoard expression language) or JavaScript to develop user defined functions. We recommend utilizing TBEL as it’s execution in ThingsBoard is much more efficient compared to JS.
You can use our example of downlink converter, or write your own according to your configuration: To add the downlink converter to the integration, follow this steps:
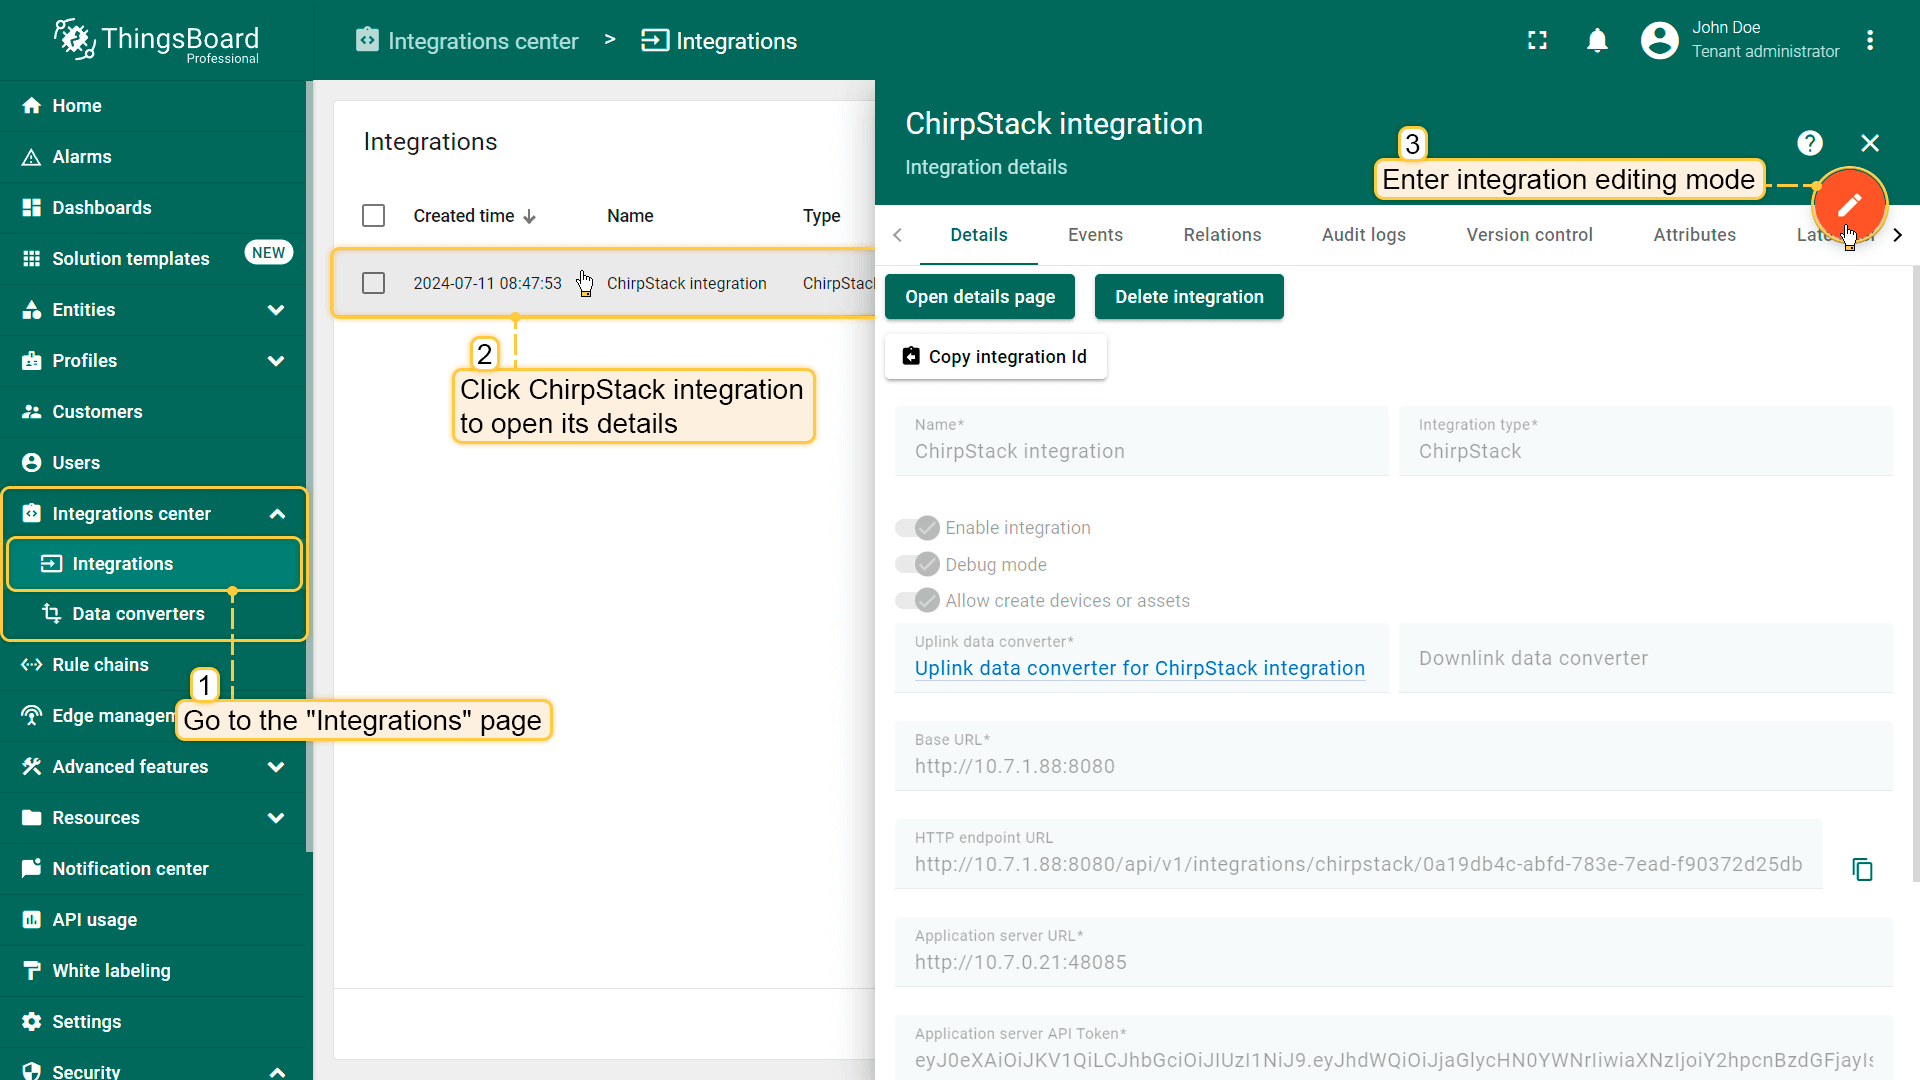 Go to the “Integrations” page, click ChirpStack integration to open its details, and enter integration editing mode by clicking the “pencil” icon; 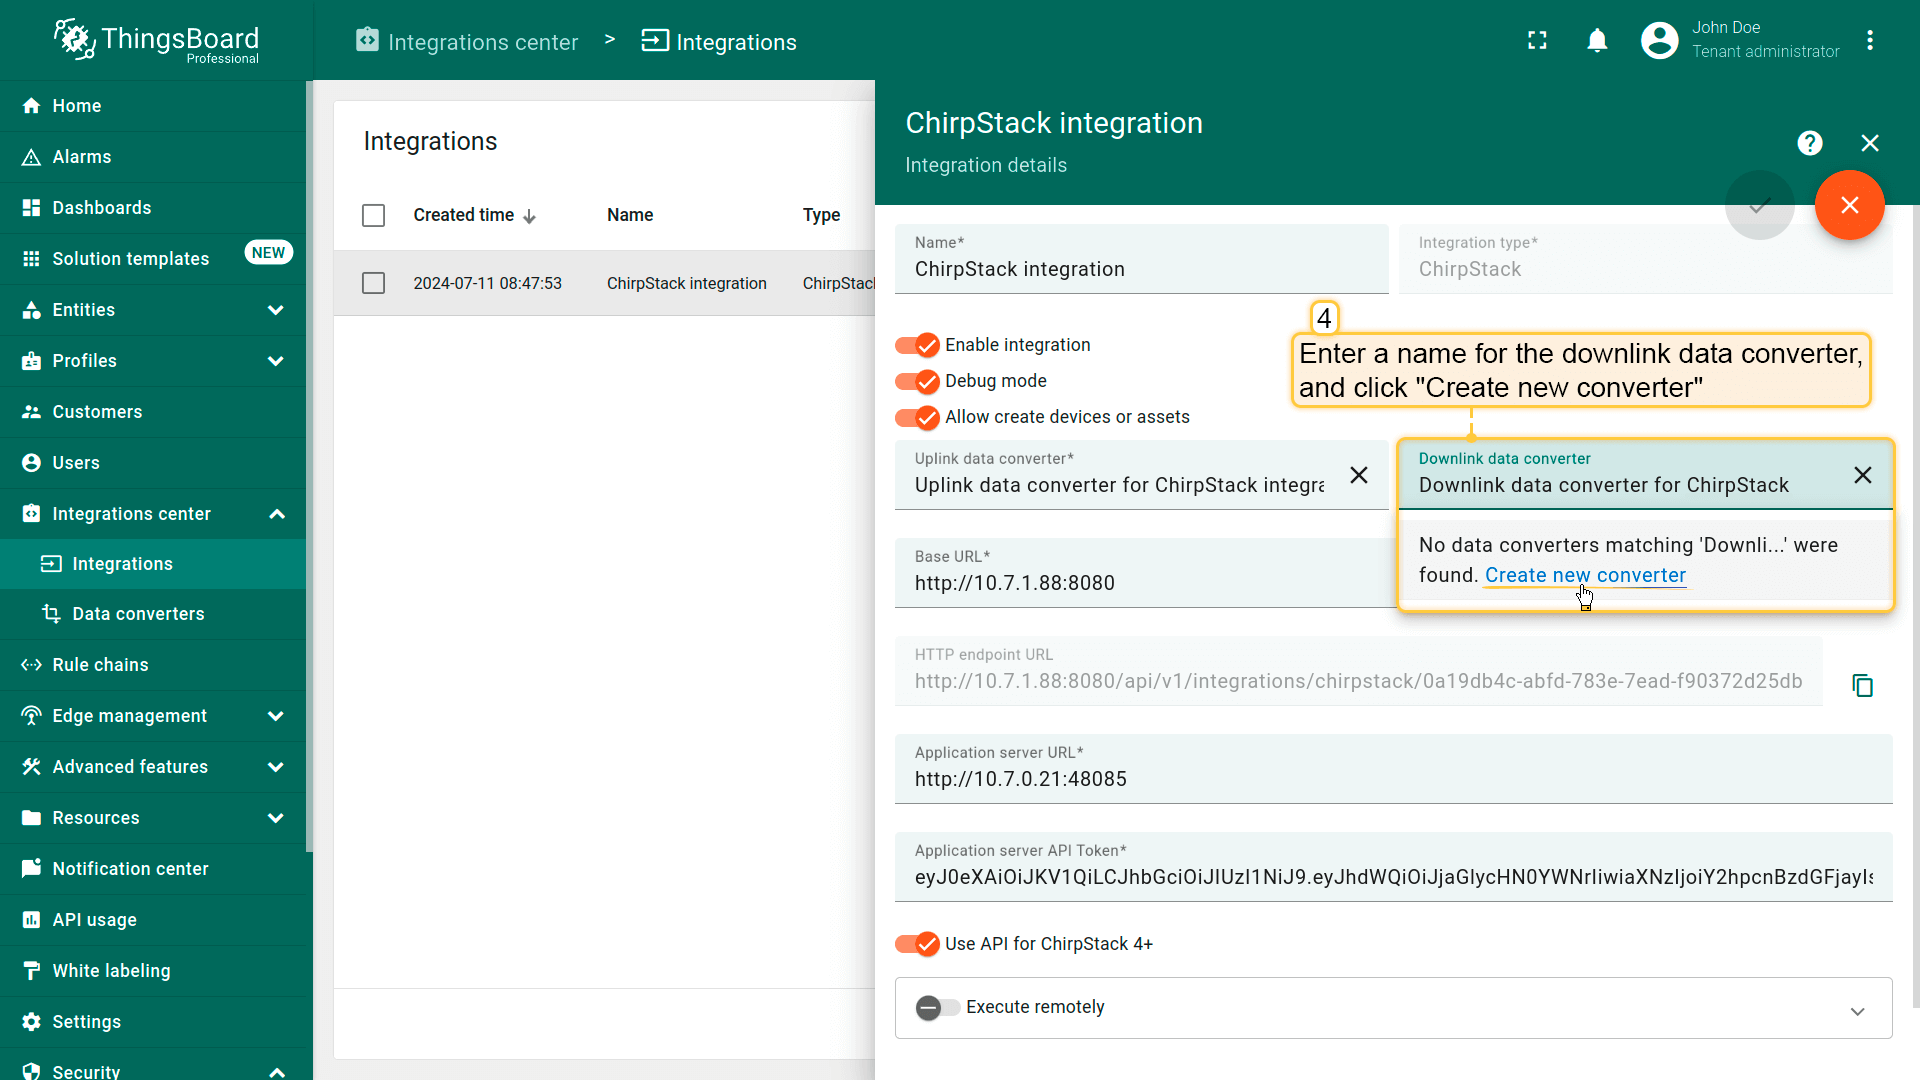 Enter a name for the downlink data converter and click “Create new converter”; 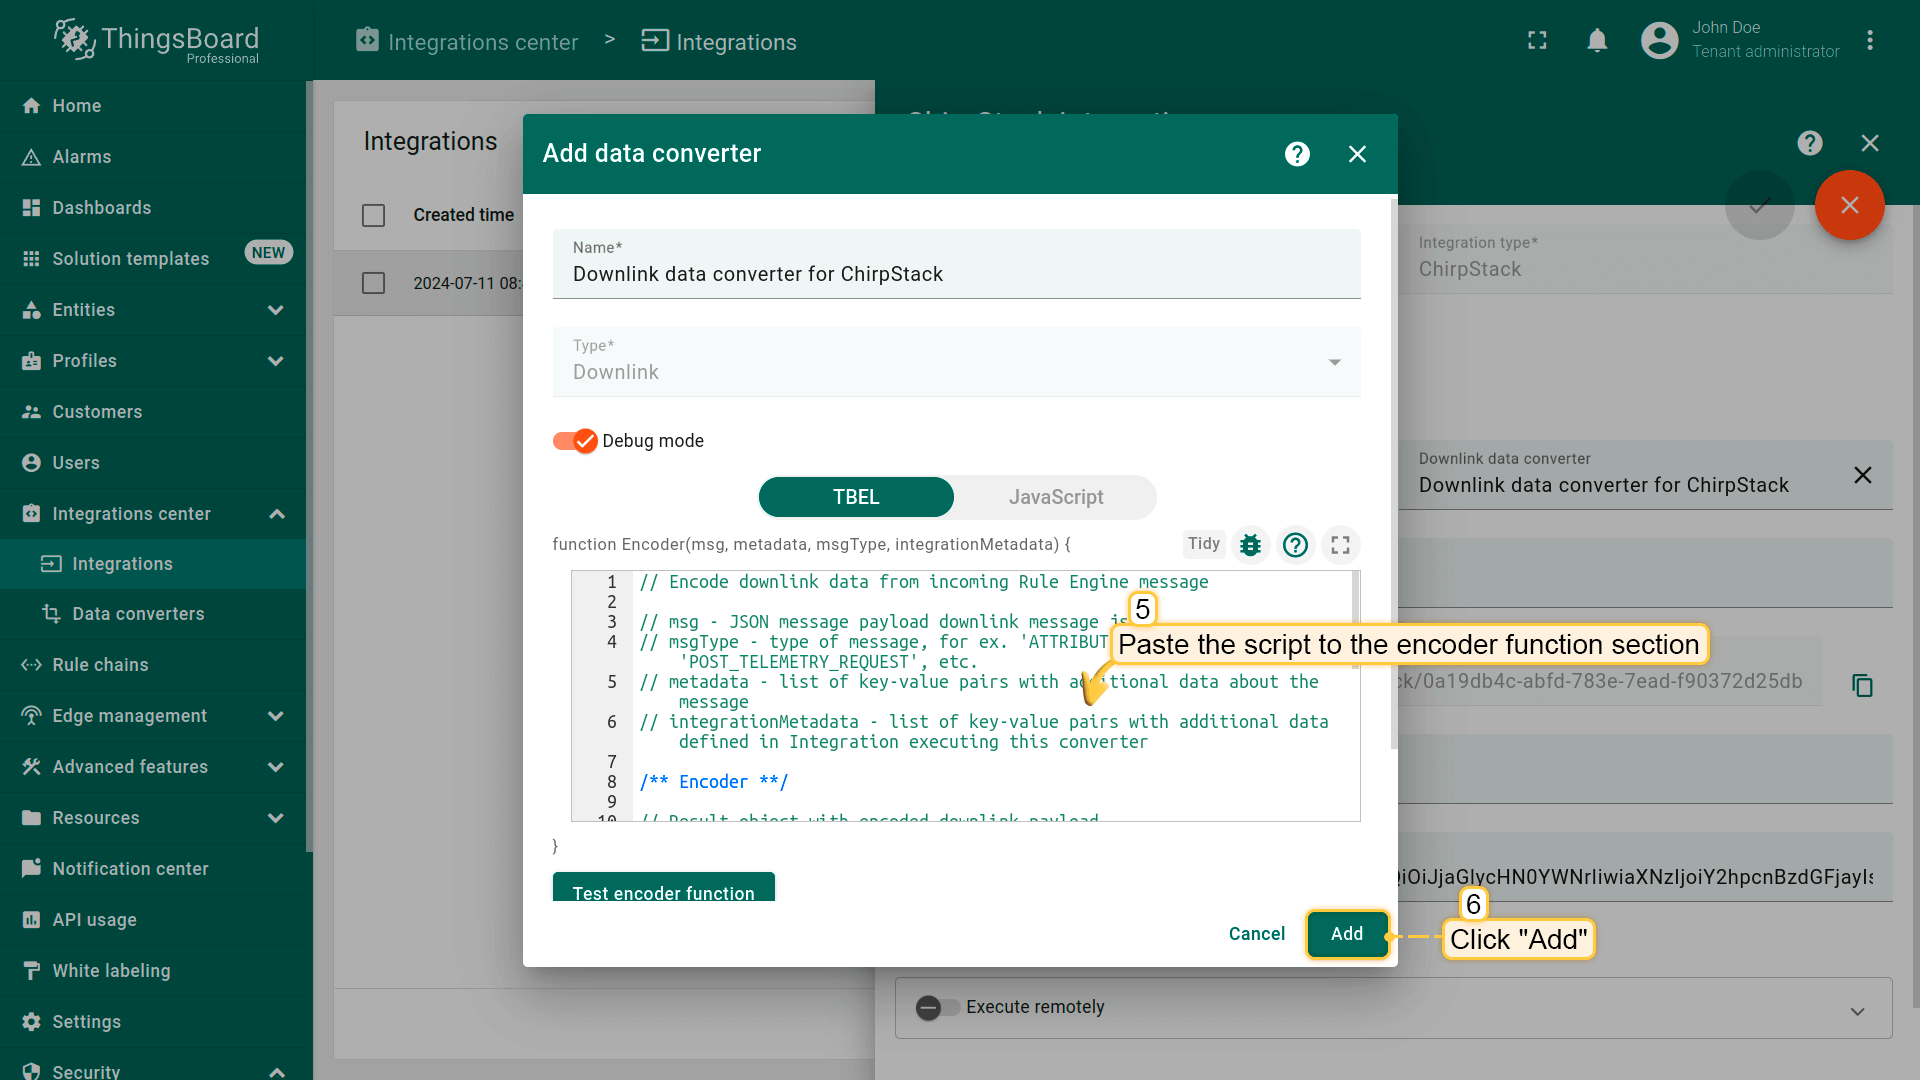 Paste the script to the encoder function section, and click “Add”; 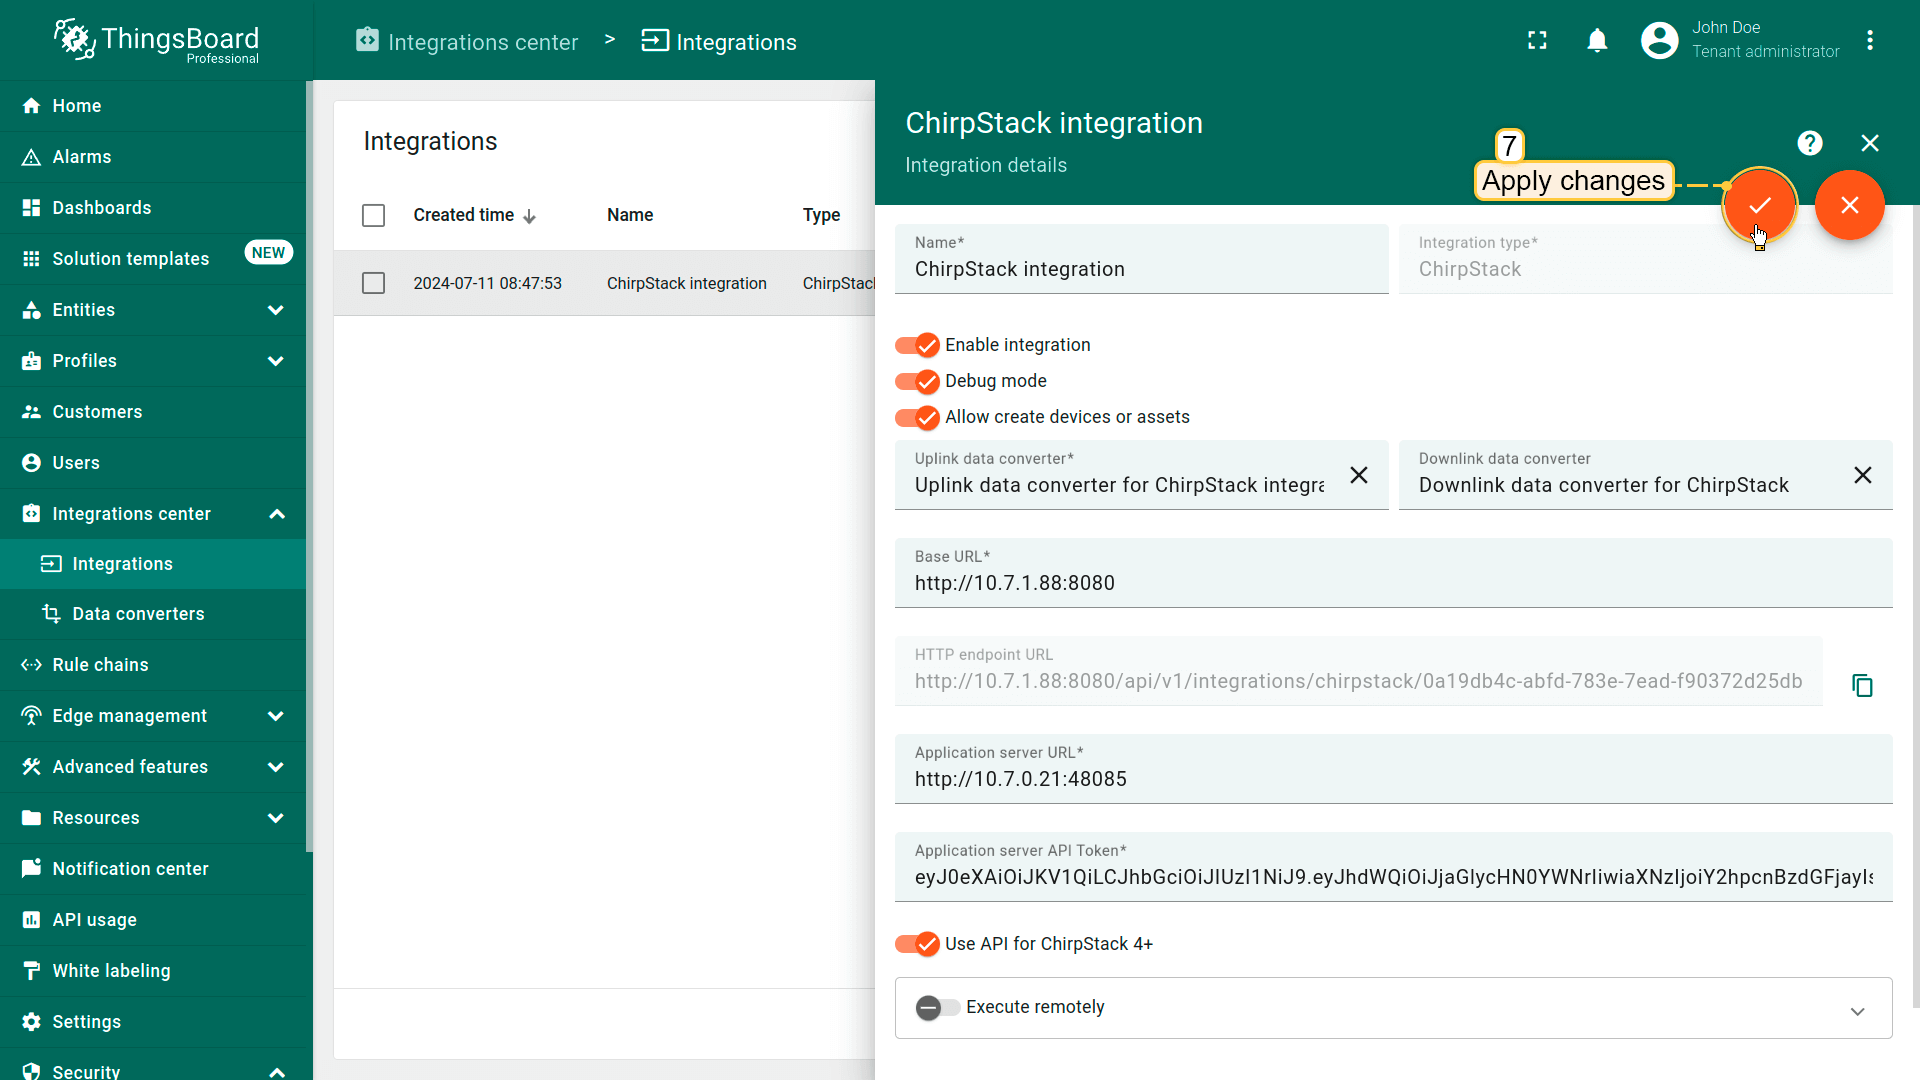 Apply changes. |
You can use our example of downlink converter, or write your own according to your configuration: To add the downlink converter to the integration, follow this steps:
Go to the “Integrations” page, click ChirpStack integration to open its details, and enter integration editing mode by clicking the “pencil” icon; Enter a name for the downlink data converter and click “Create new converter”; 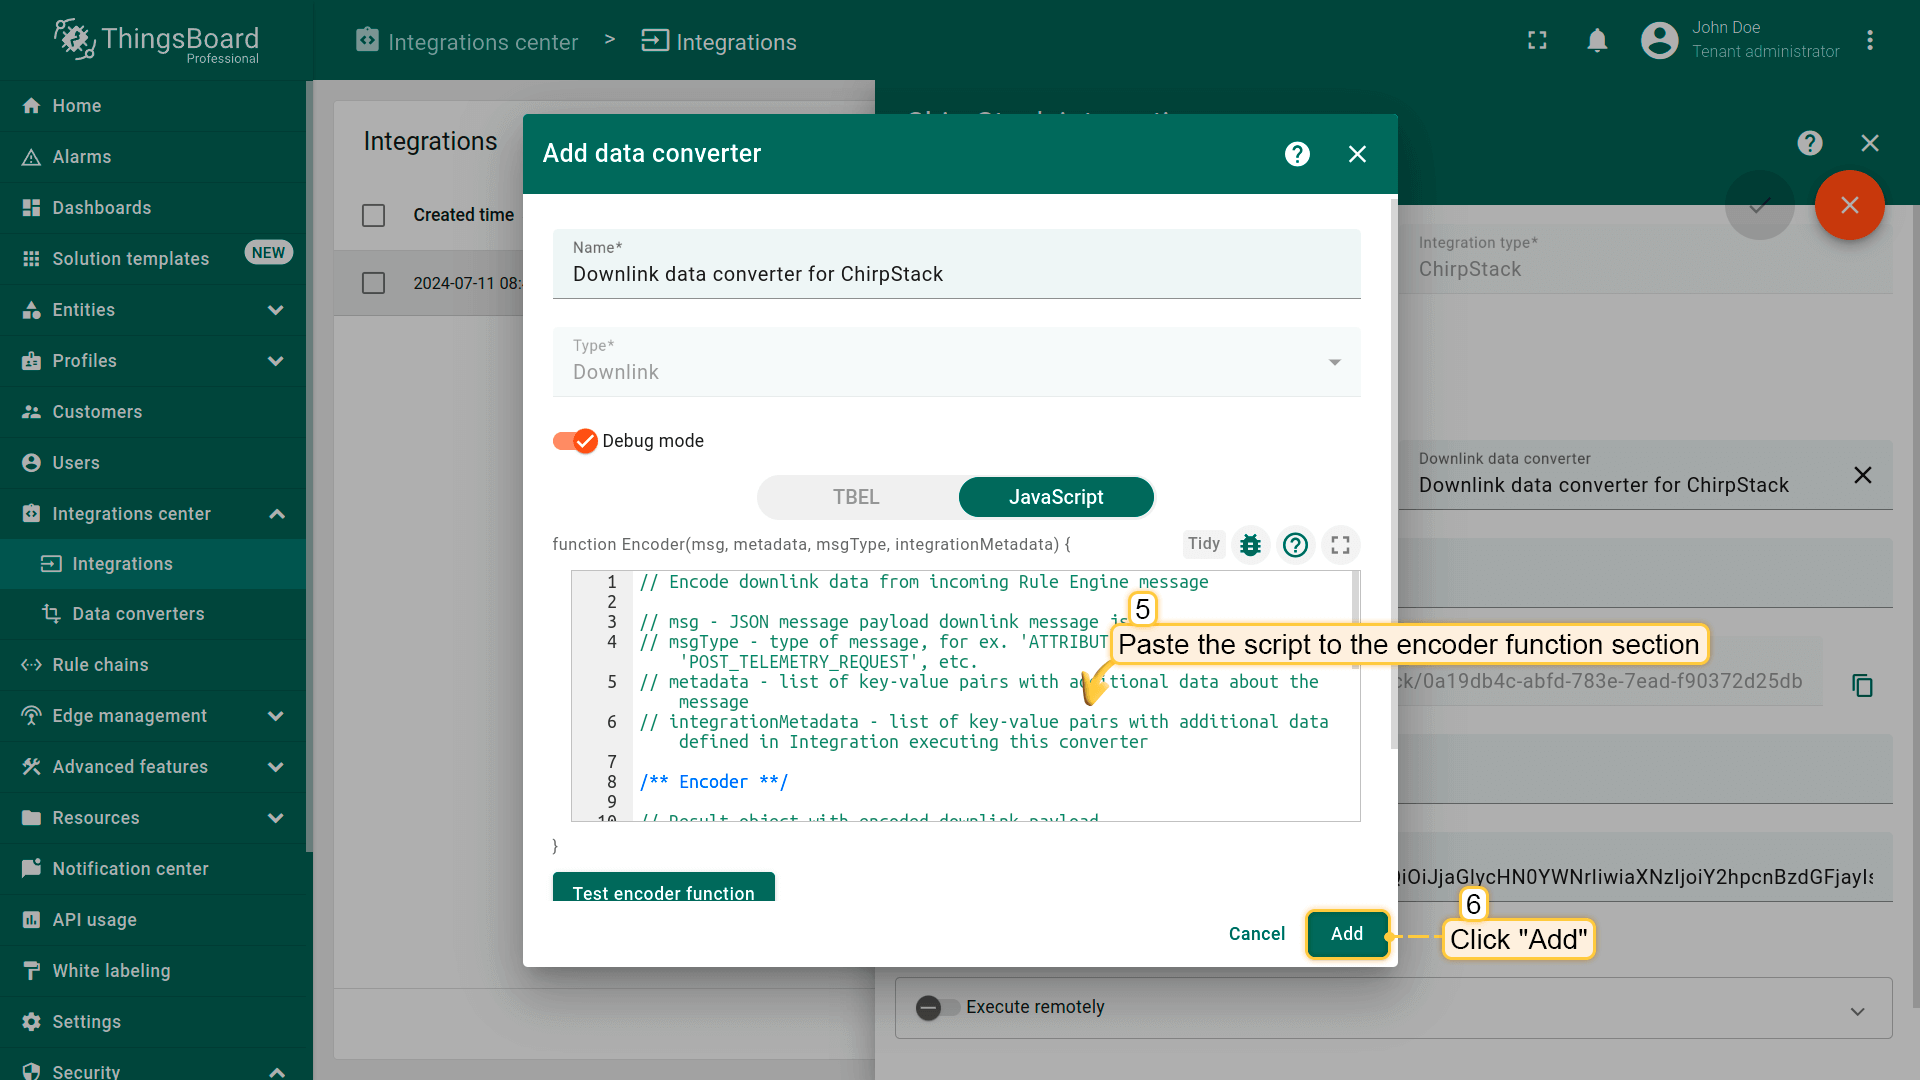 Paste the script to the encoder function section, and click “Add”; Apply changes. |
You can add a downlink converter when creating or editing an integration.
Modify Root Rule Chain
In order to send downlink, we’ll use the rule chain to process shared attribute update. Let’s import this rule chain:
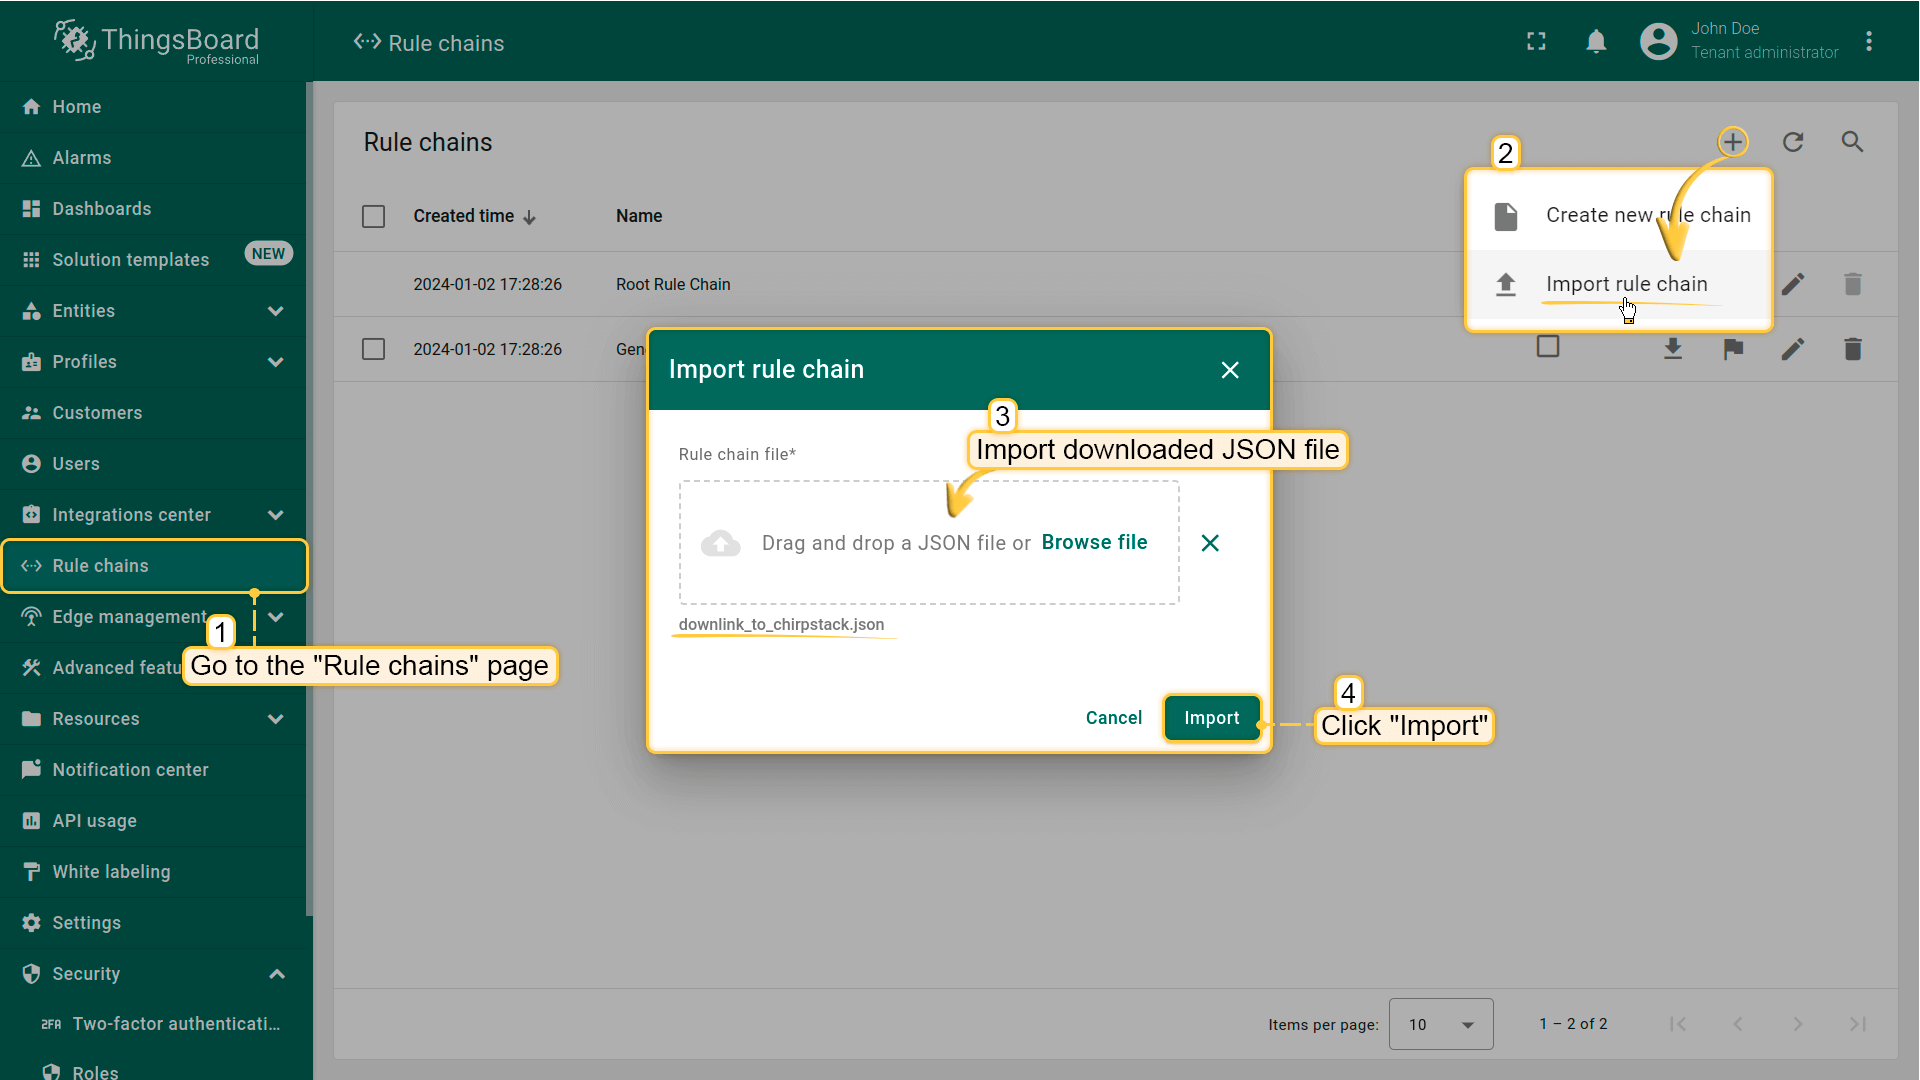
- Download the downlink_to_chirpstack.json file;
- Go to the “Rule Chains” page. To import this JSON file, click the “+” icon in the upper right corner of the screen and select “Import rule chain”;
- Drag the downloaded JSON file into the import rule chain window. Click “Import”;
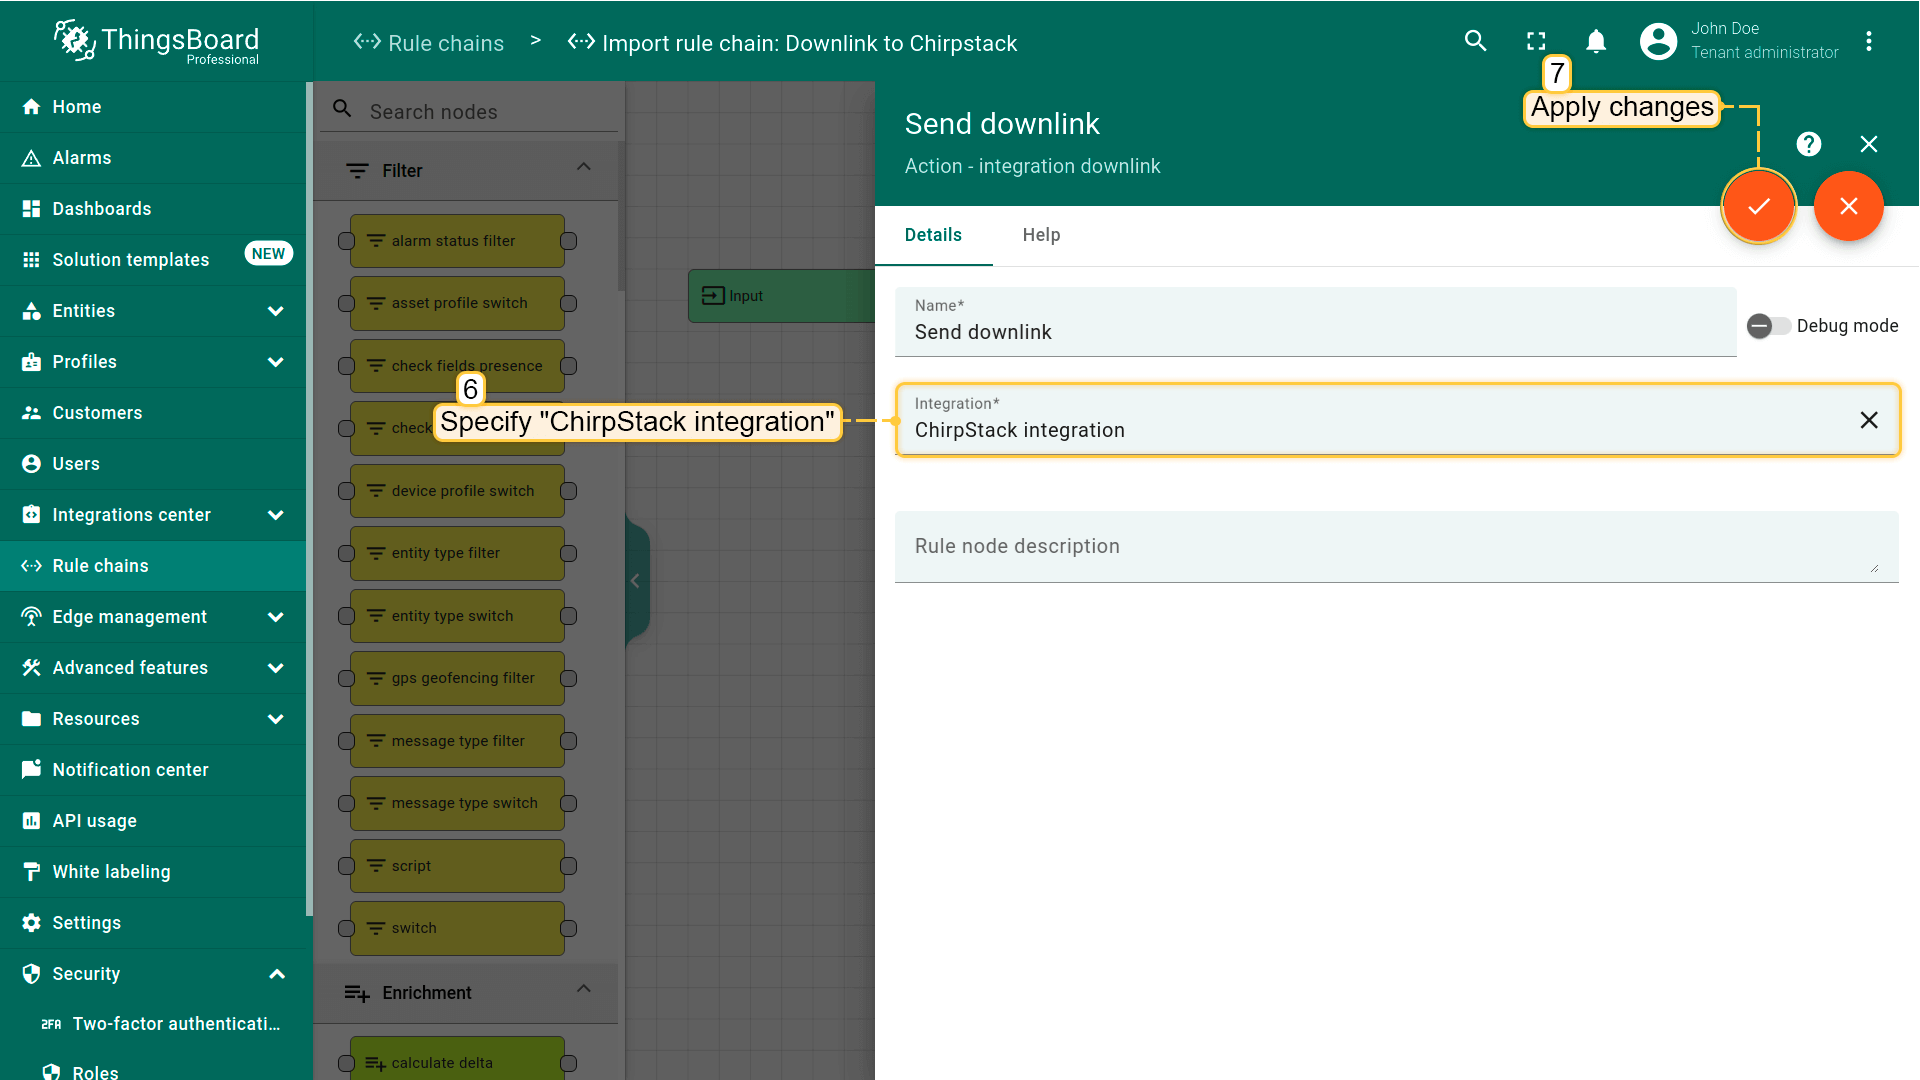
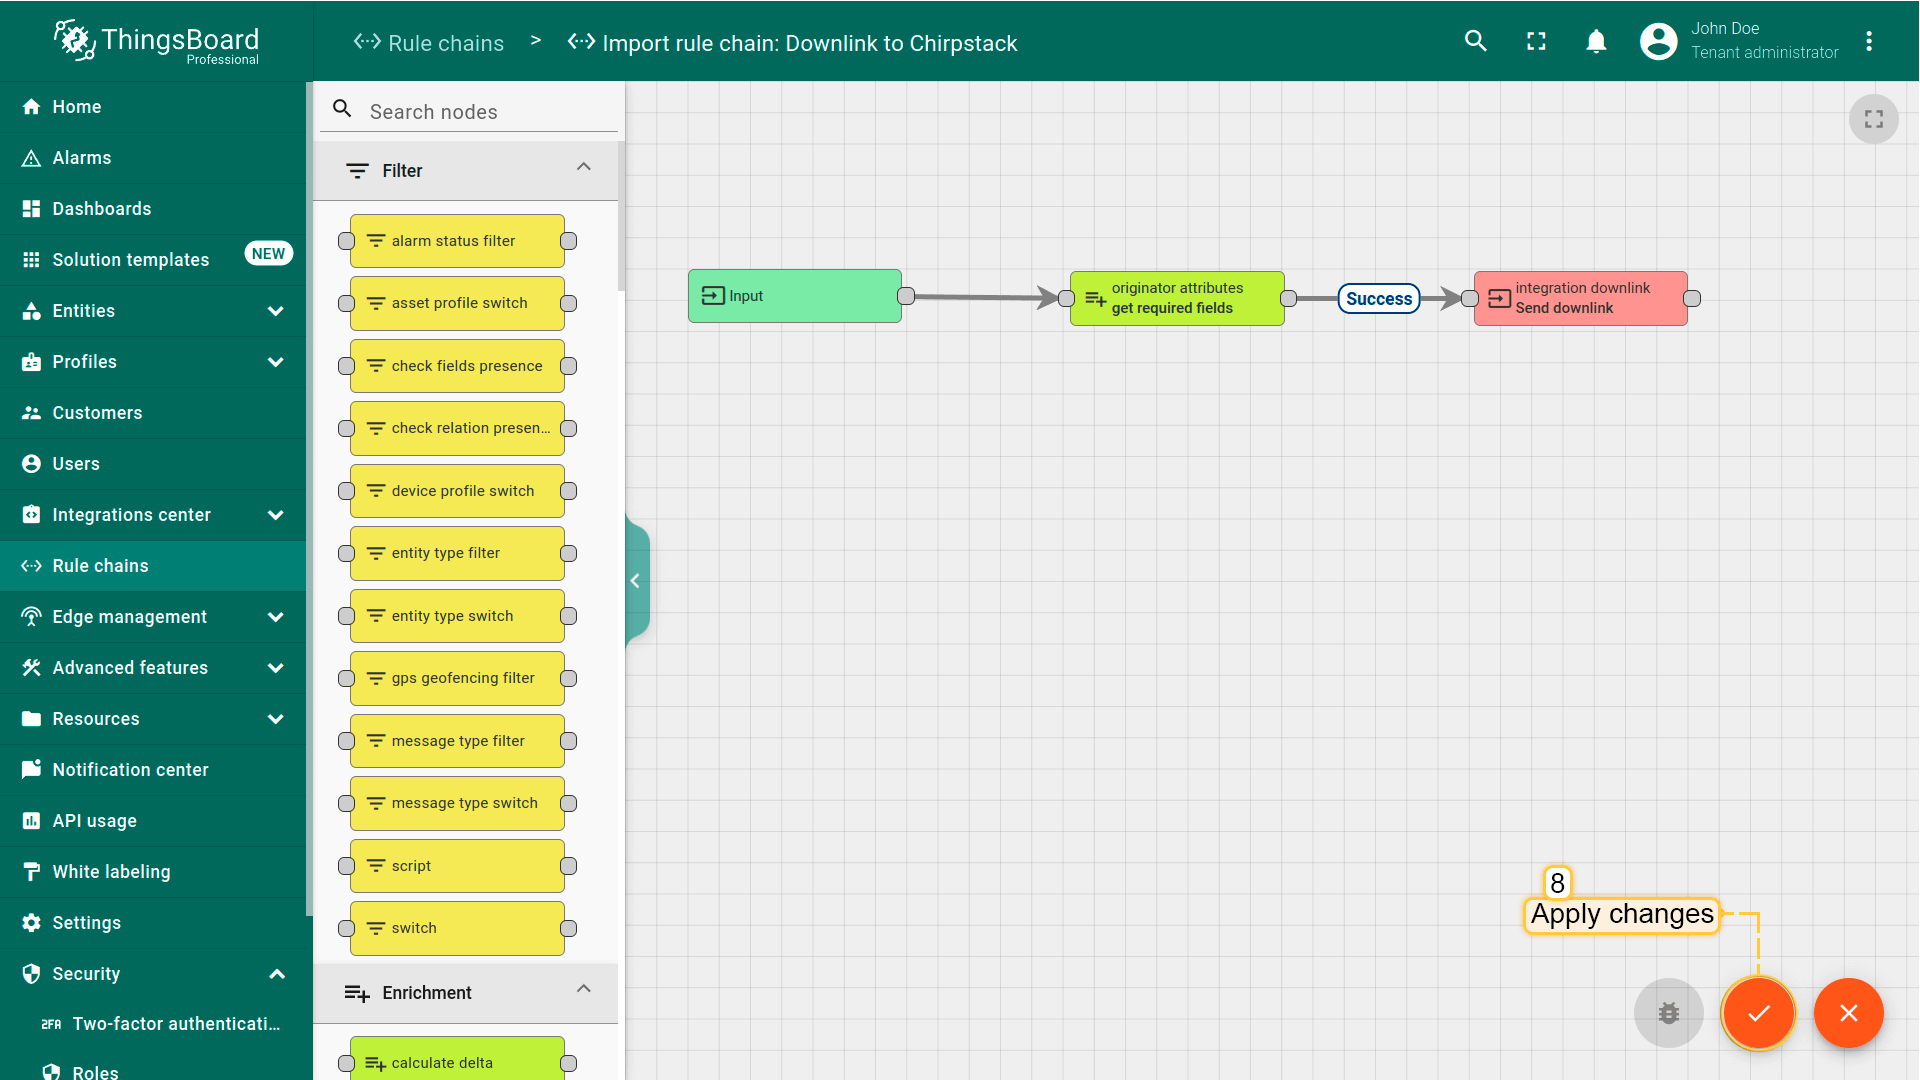
- The “Downlink to Chirpstack” rule chain will open. Double-click on the “integration downlink” node, specify ChirpStack integration in the “Integration” field and save changes;
- Save rule chain by pressing on checkmark.

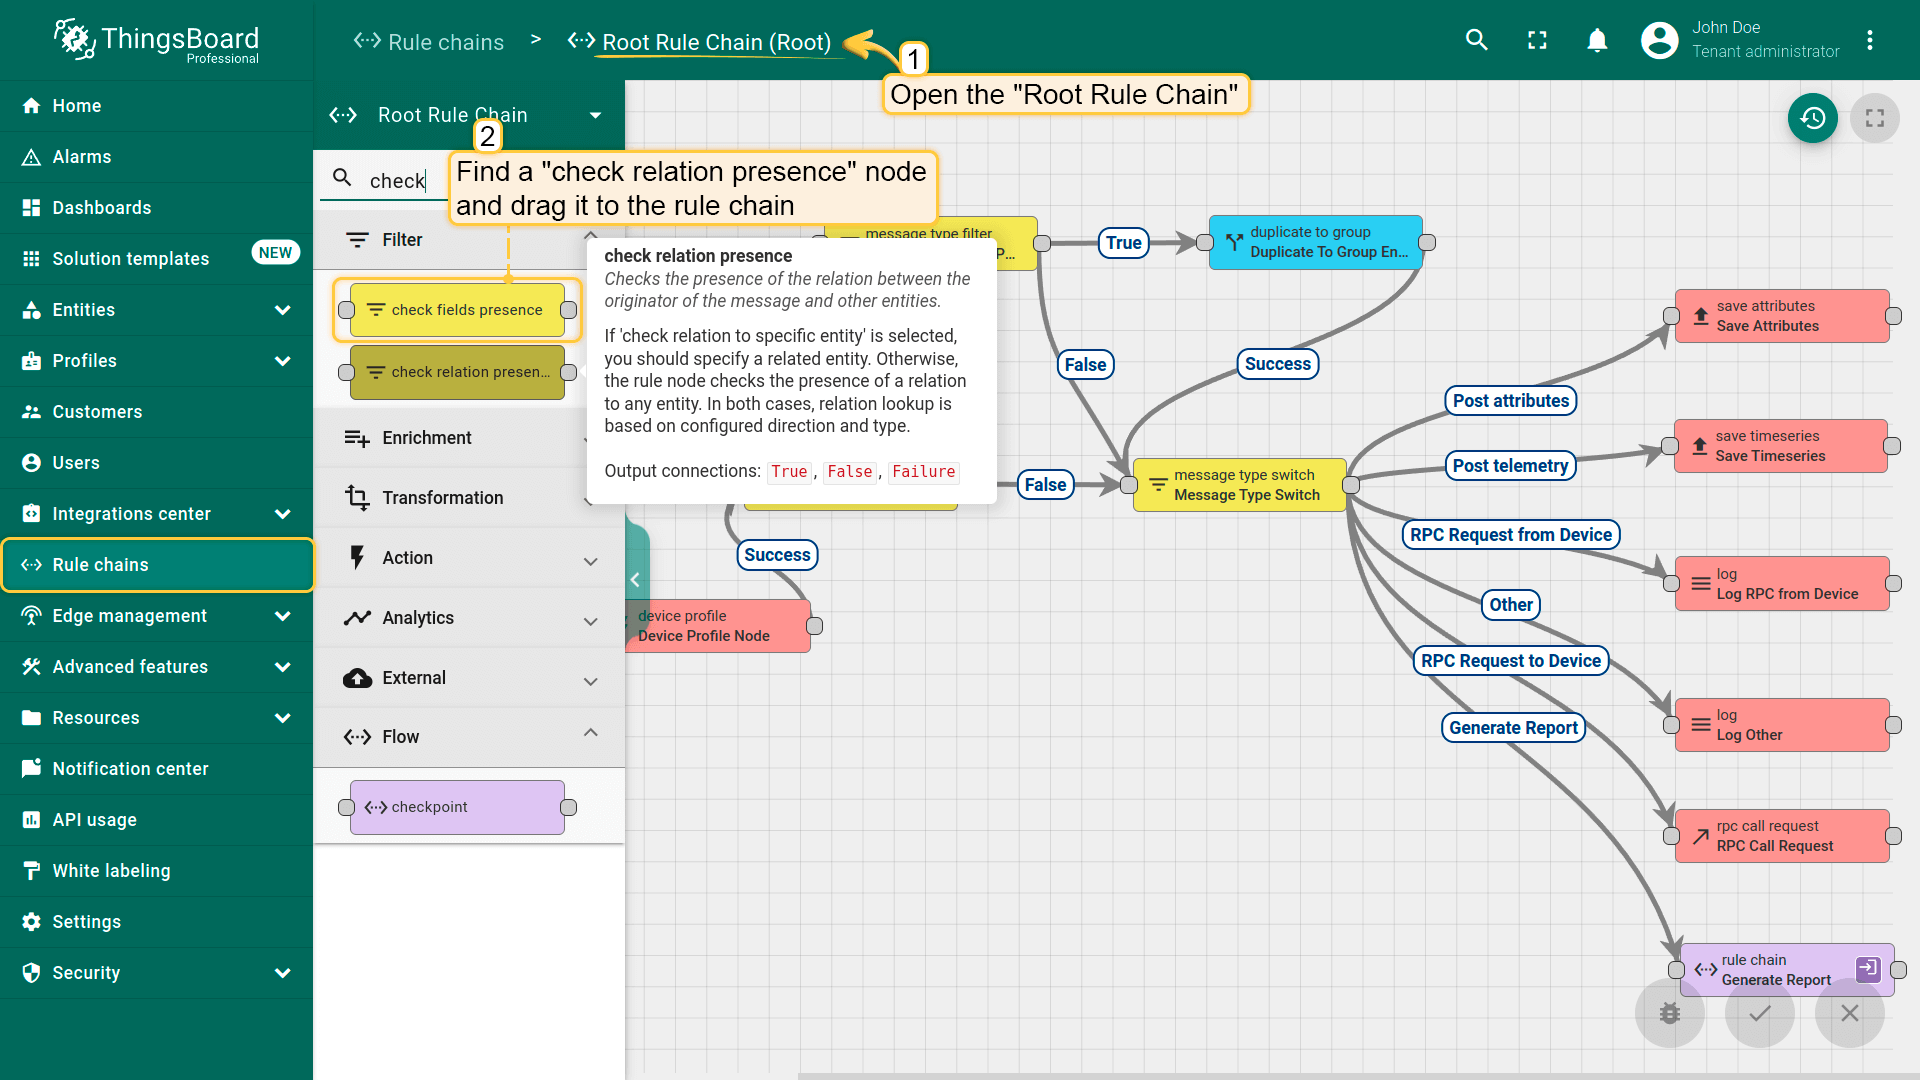
Now you need to configure the Root Rule Chain:
- Open the "Root Rule Chain", and find a "check relation presence" node;
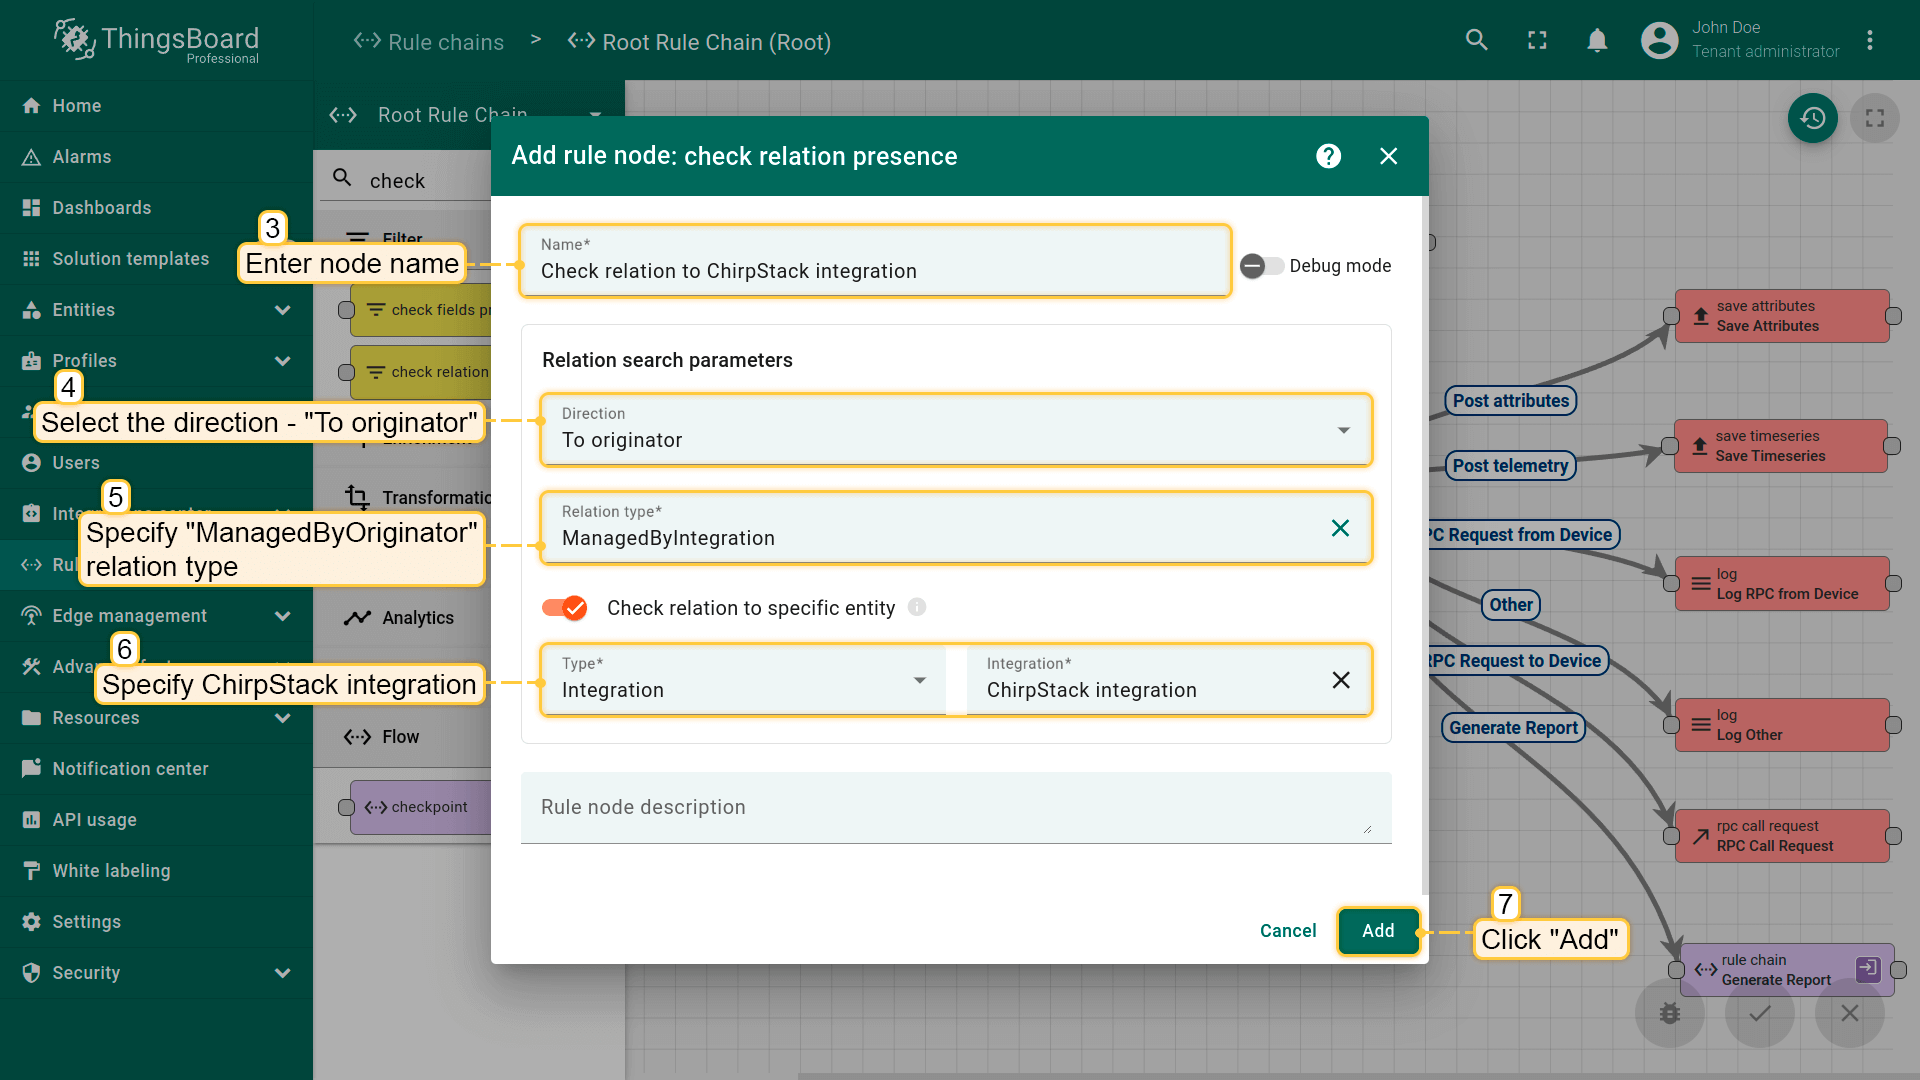
- Drag it to the rule chain. Name it "Check relation to ChirpStack integration", select the direction - "To originator", specify "ManagedByOriginator" relation type. Specify ChirpStack integration and click "Add";
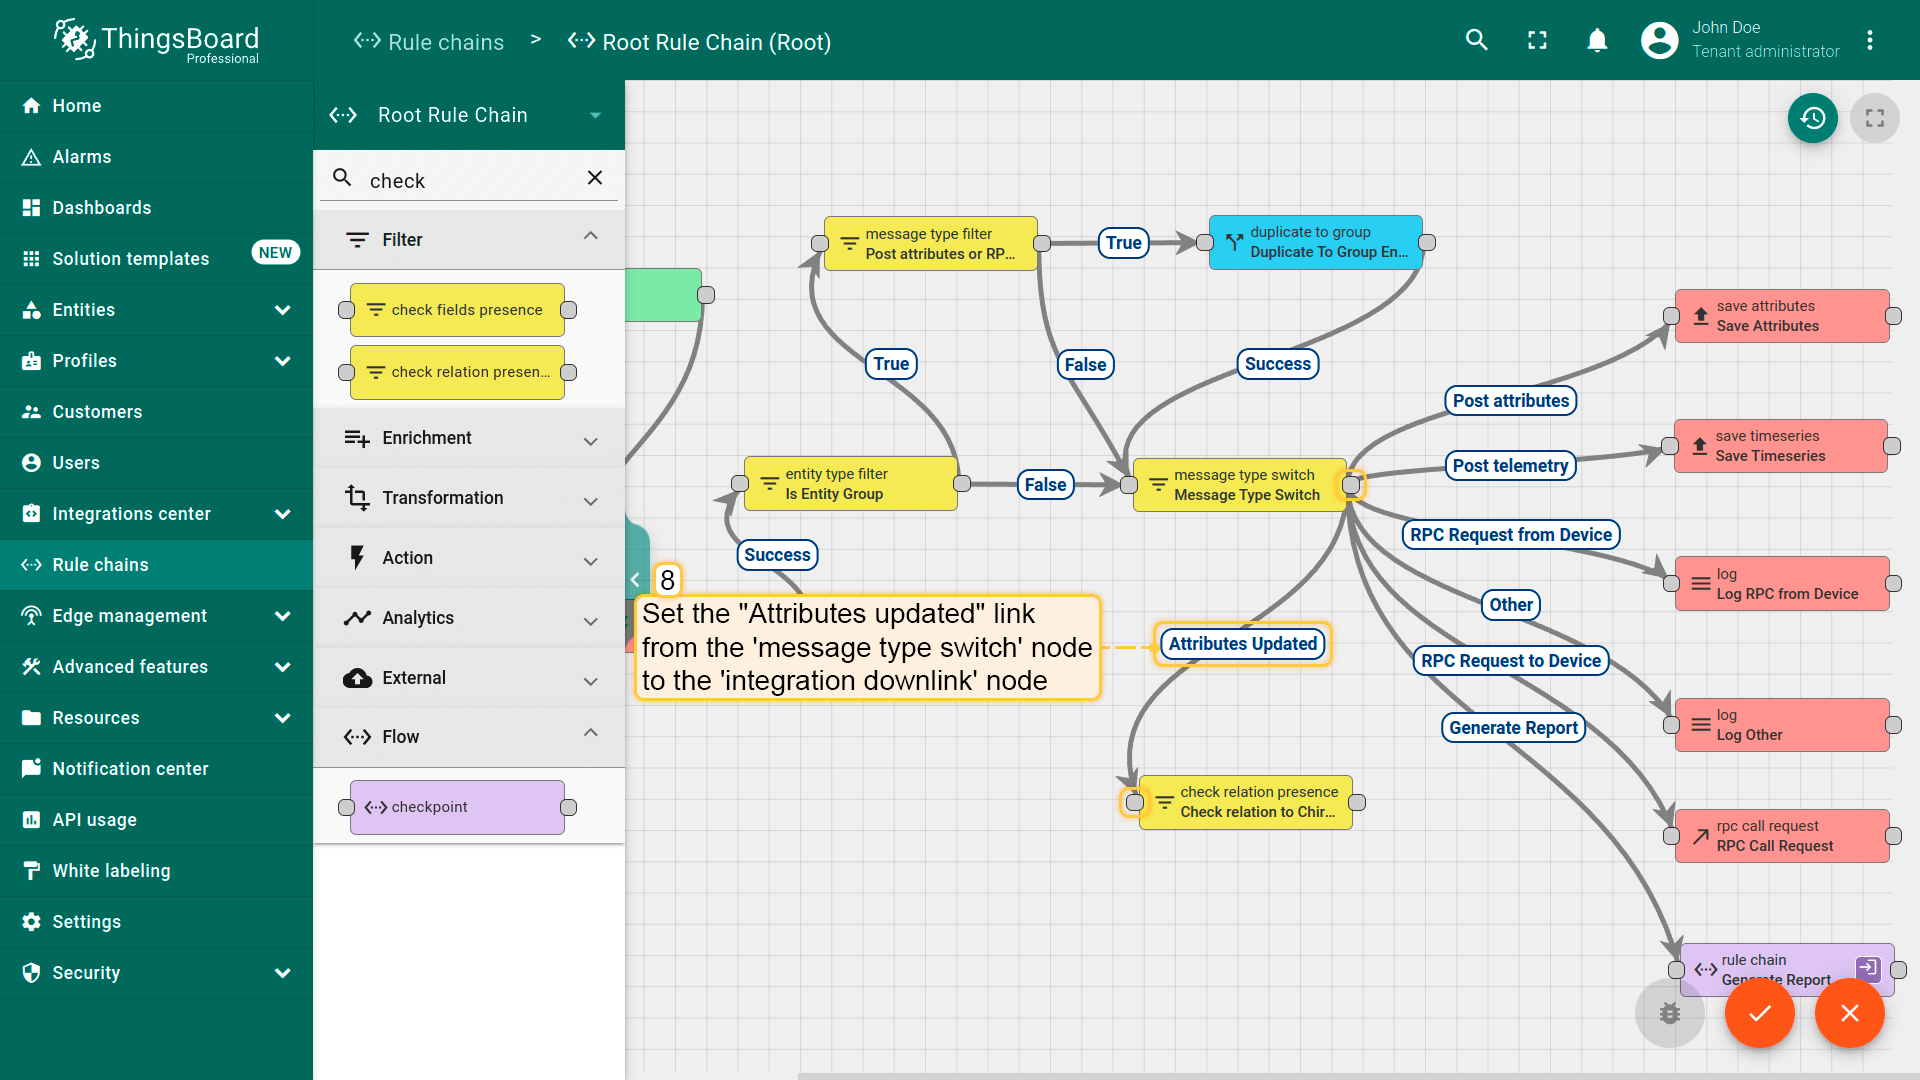
- Tap on a right grey circle of "message type switch" node and drag this circle to the left side of "check relation presence" node. Here, add the "Attributes Updated" link, and click "Add";
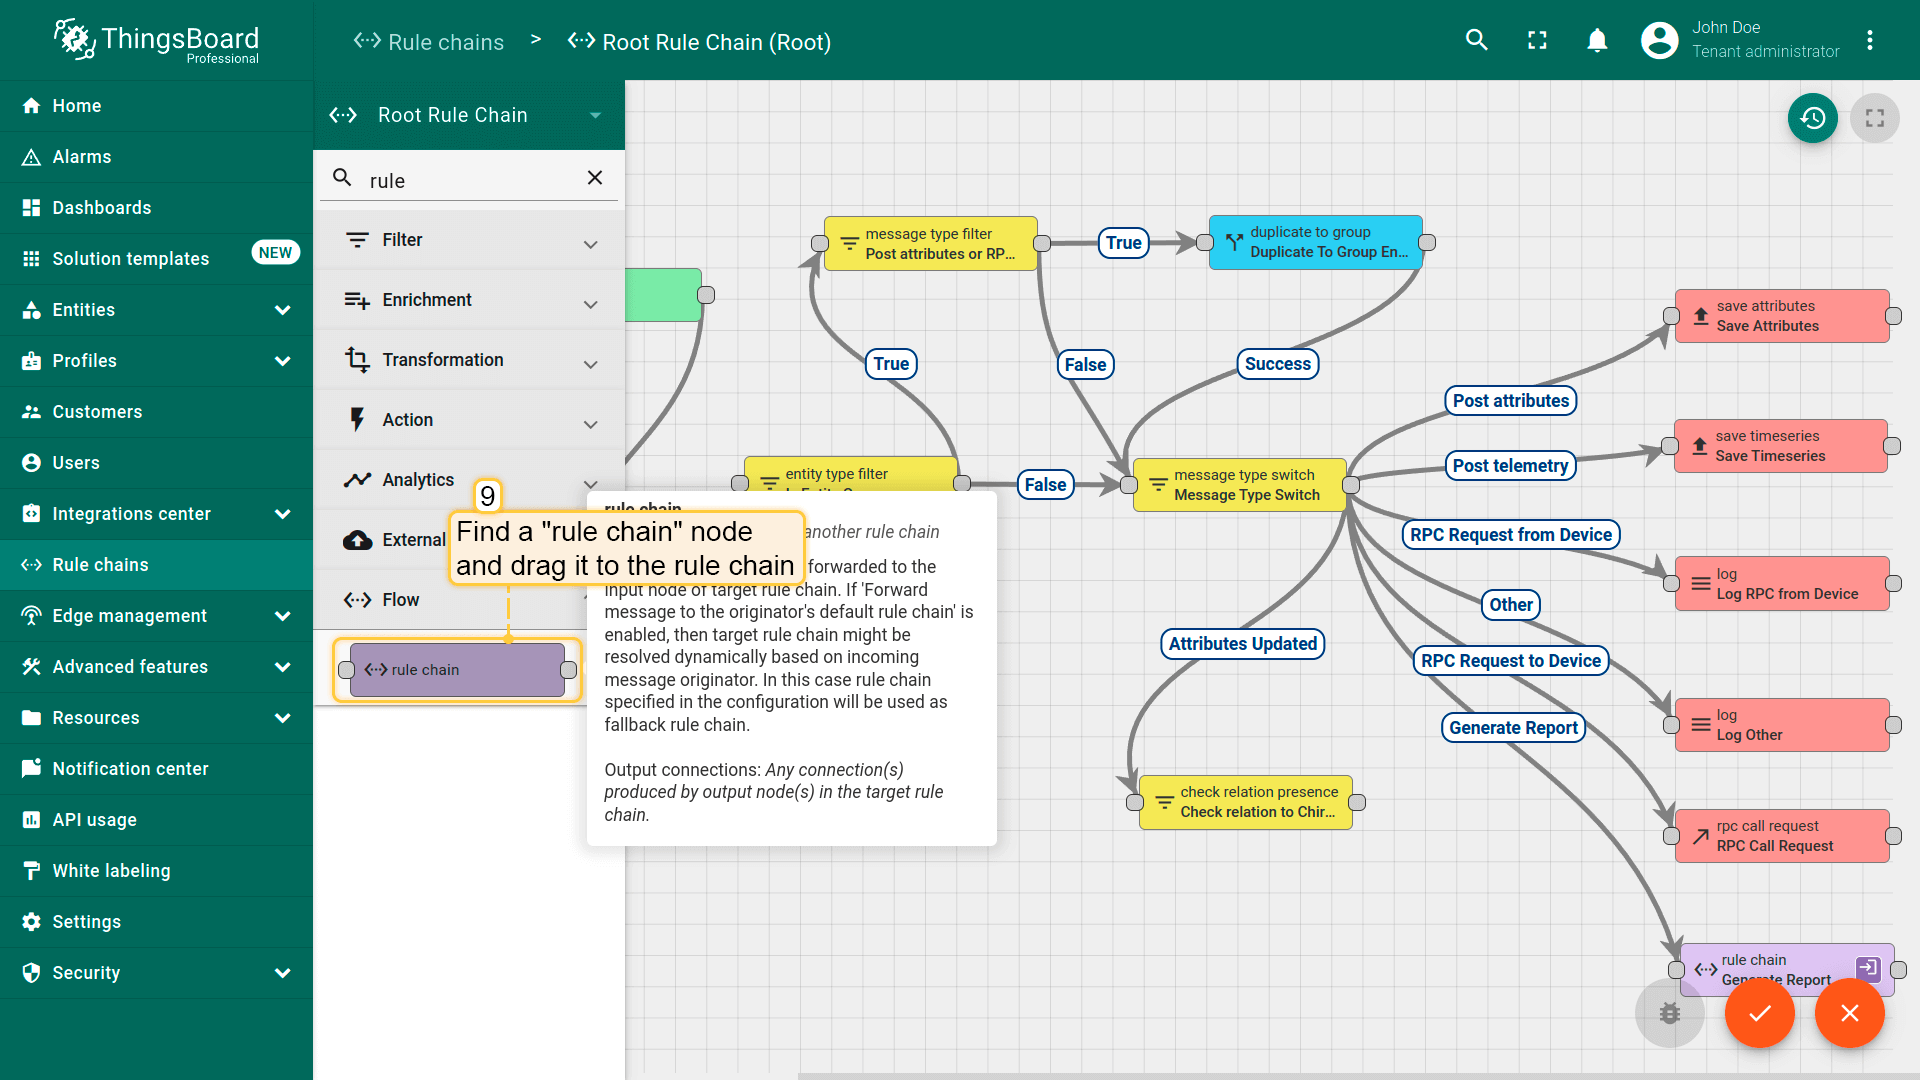
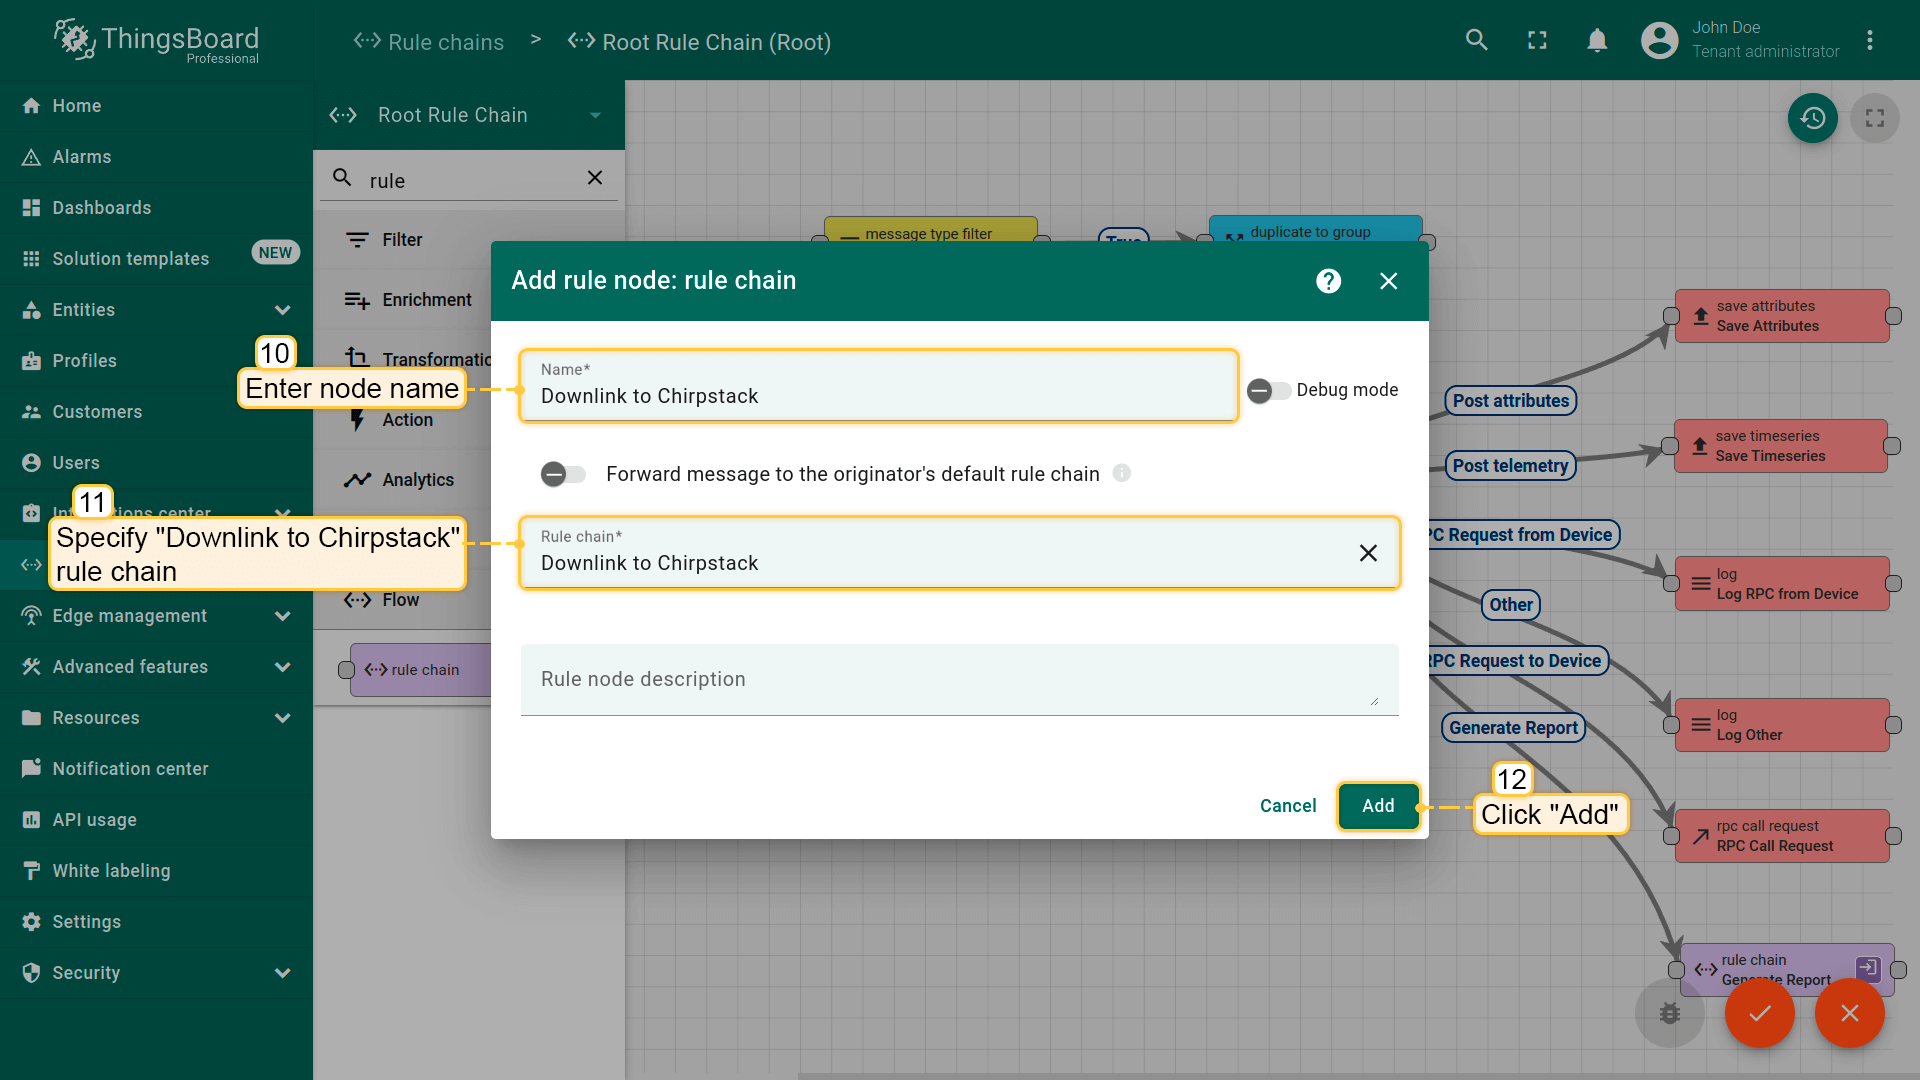
- Find a "rule chain" node;
- Drag it to the rule chain. Name it "Downlink to Chirpstack", specify "Downlink to Chirpstack" rule chain, and click "Add";
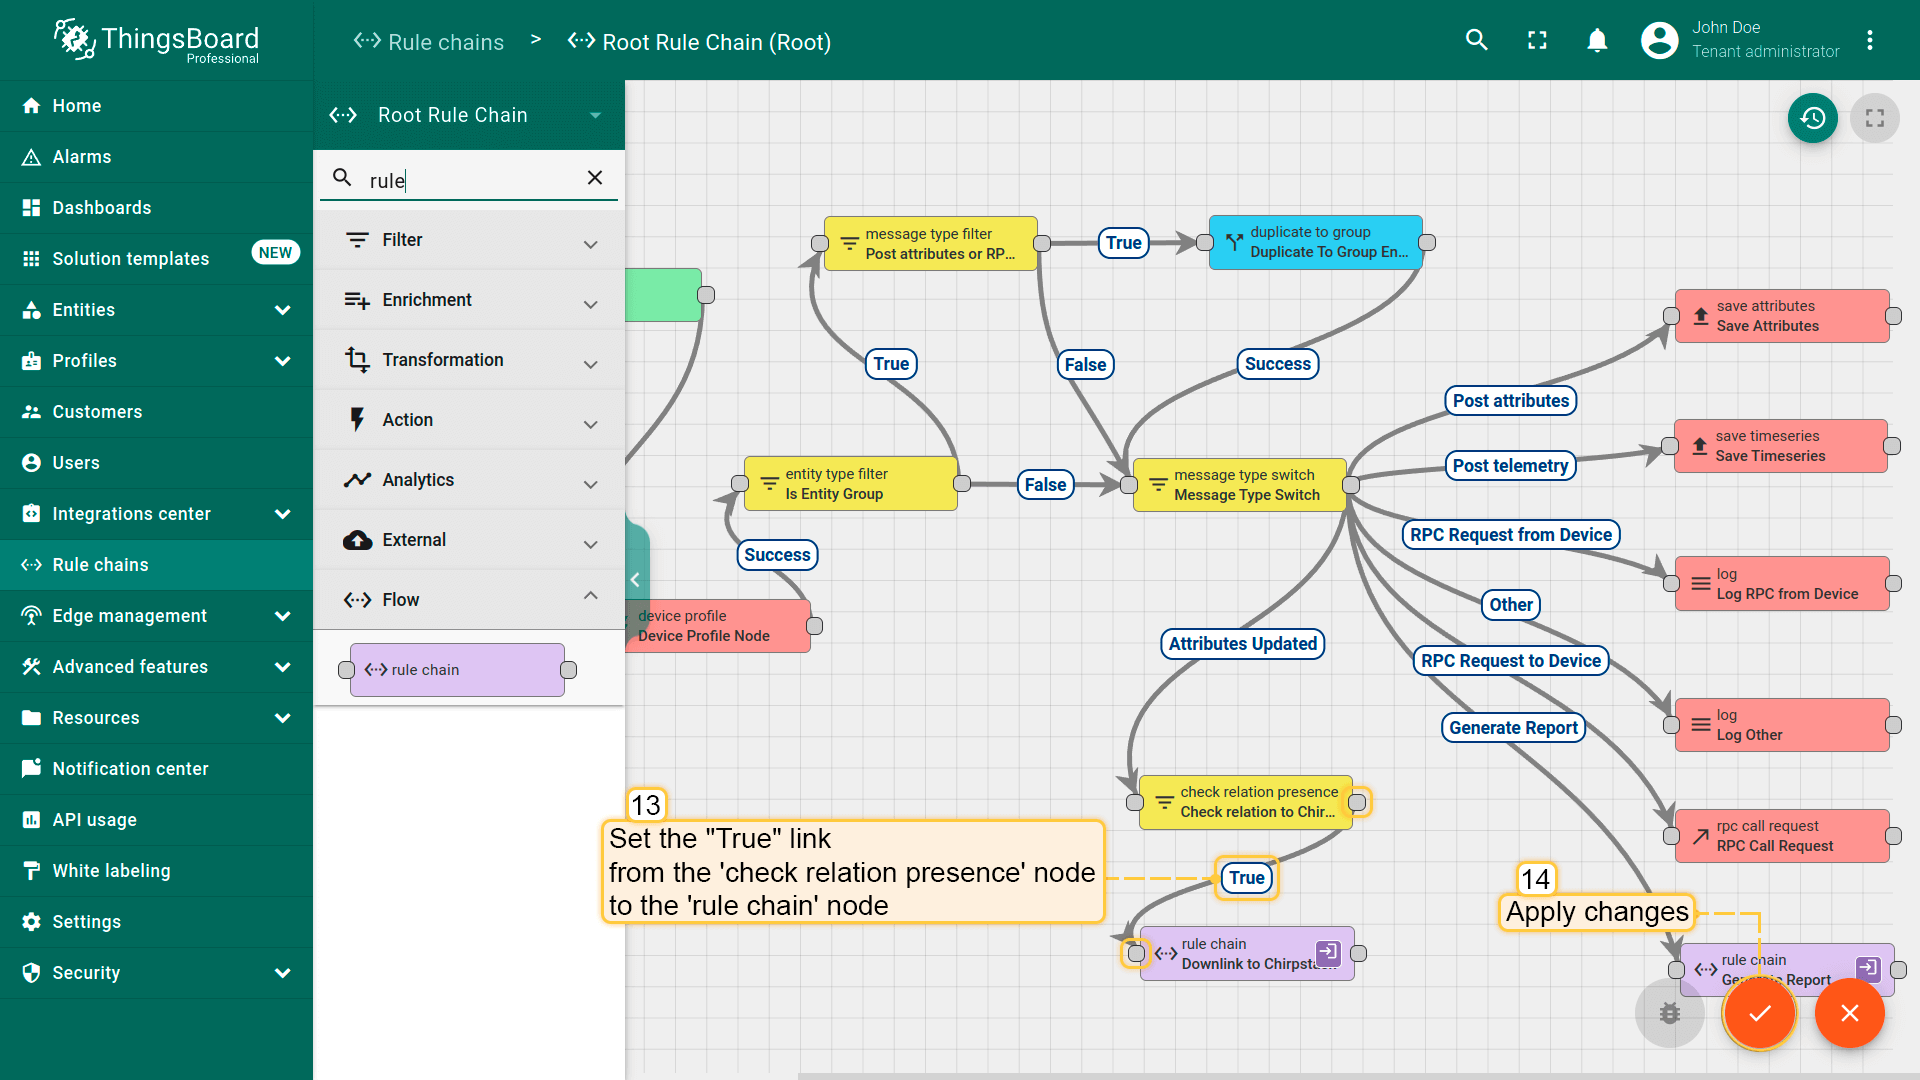
- Tap on the right grey circle of the "check relation presence" node and drag this circle to left side of “rule chain” node. Here, select the "True" link, and click "Add". Finally, save Root Rule Chain.
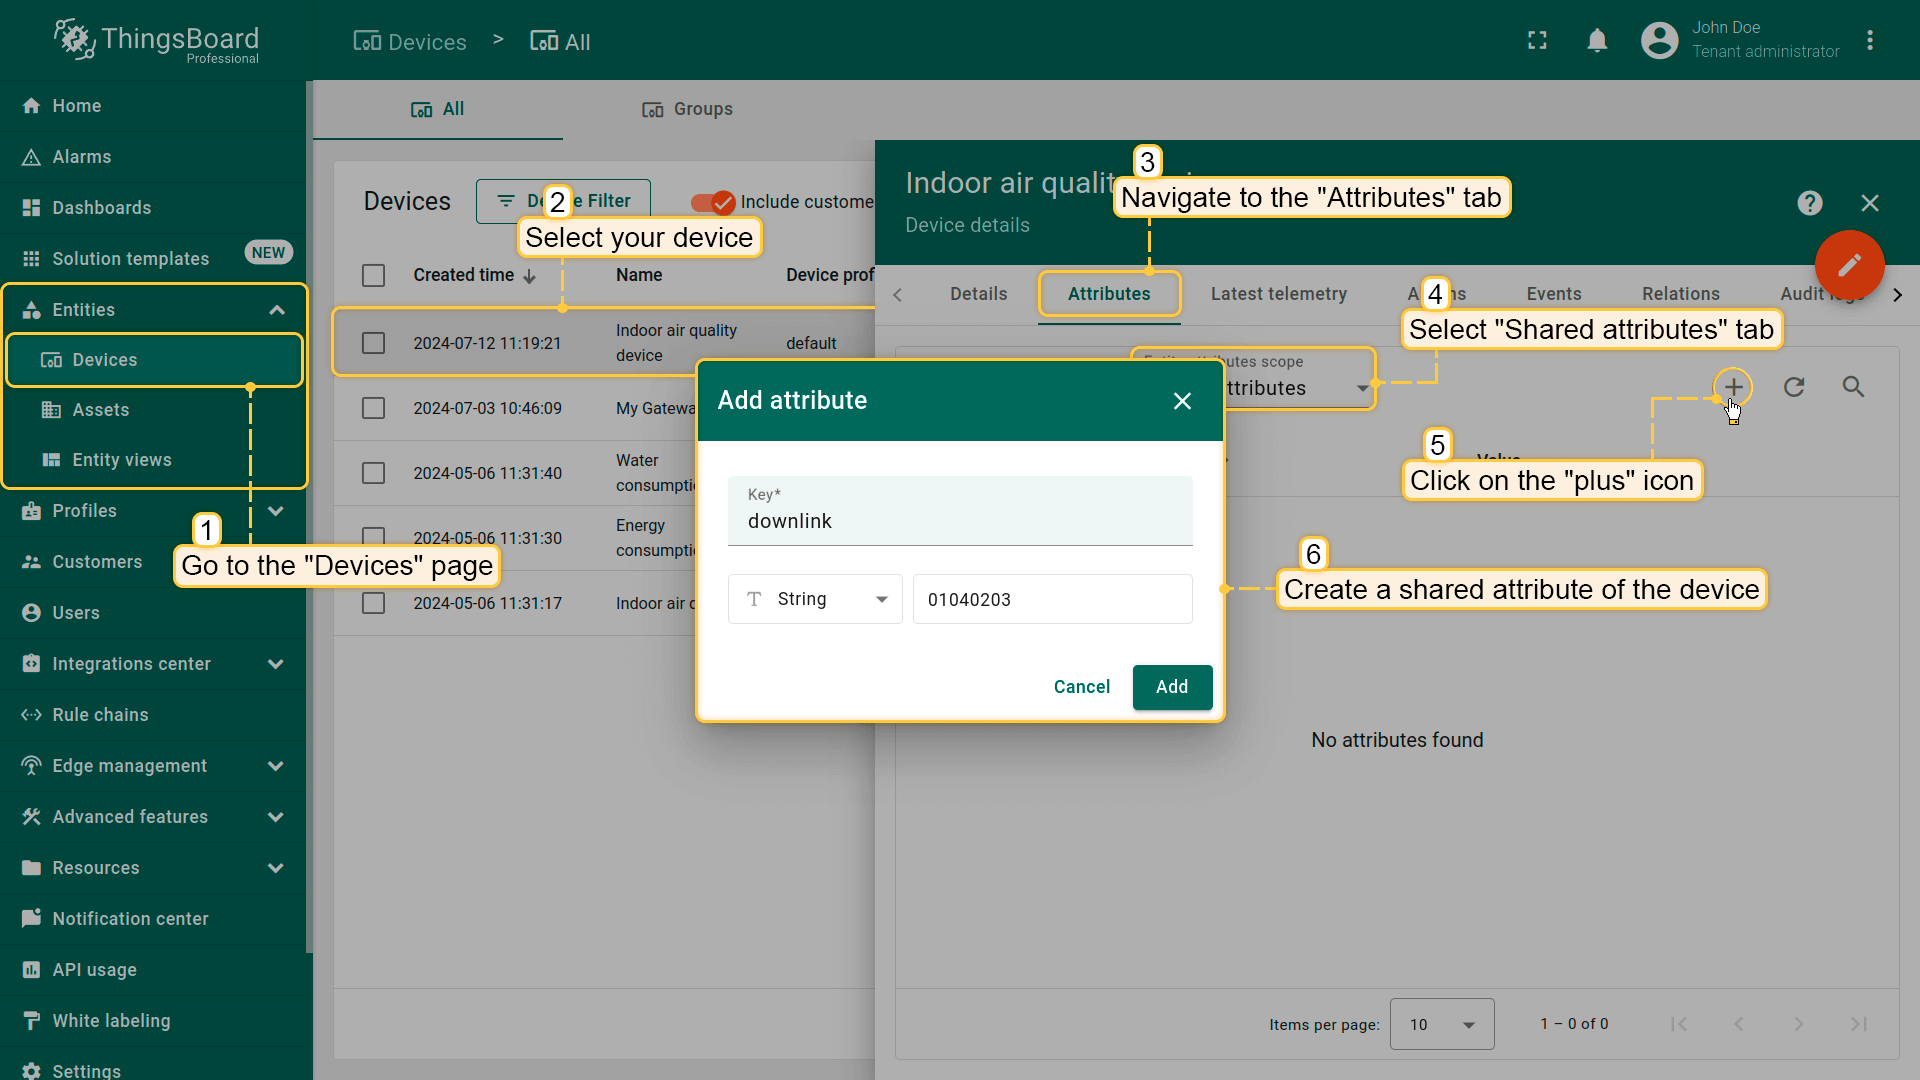
Test downlink
A downlink message will be sent to the integration when an attribute is added or modified.
To see this with an example, we go to the “Devices” page. Select your device and navigate to the “Attributes” tab. Select “Shared attributes” and click on the “plus” icon to add new attribute. Then enter the attribute name and its value (for example, the key name is ‘downlink’, value: ‘01040203’) and click “Add”.
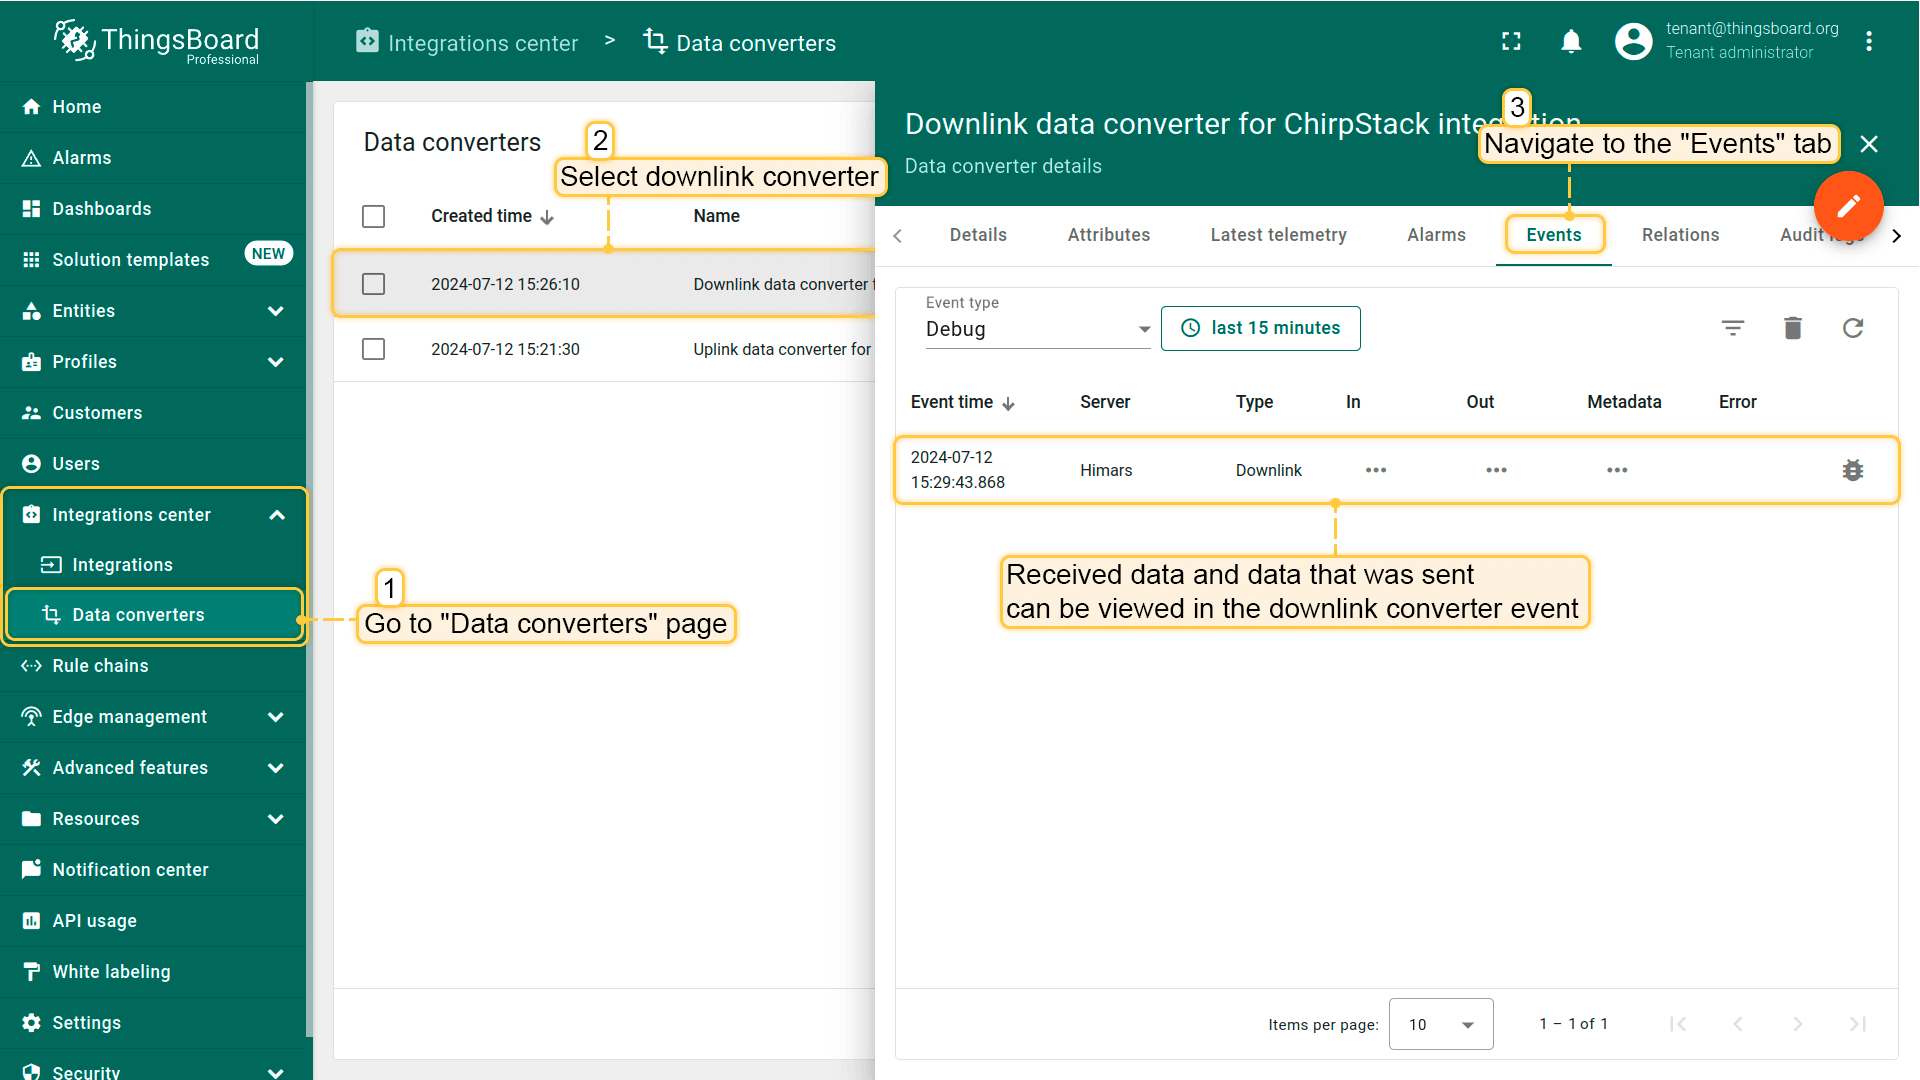
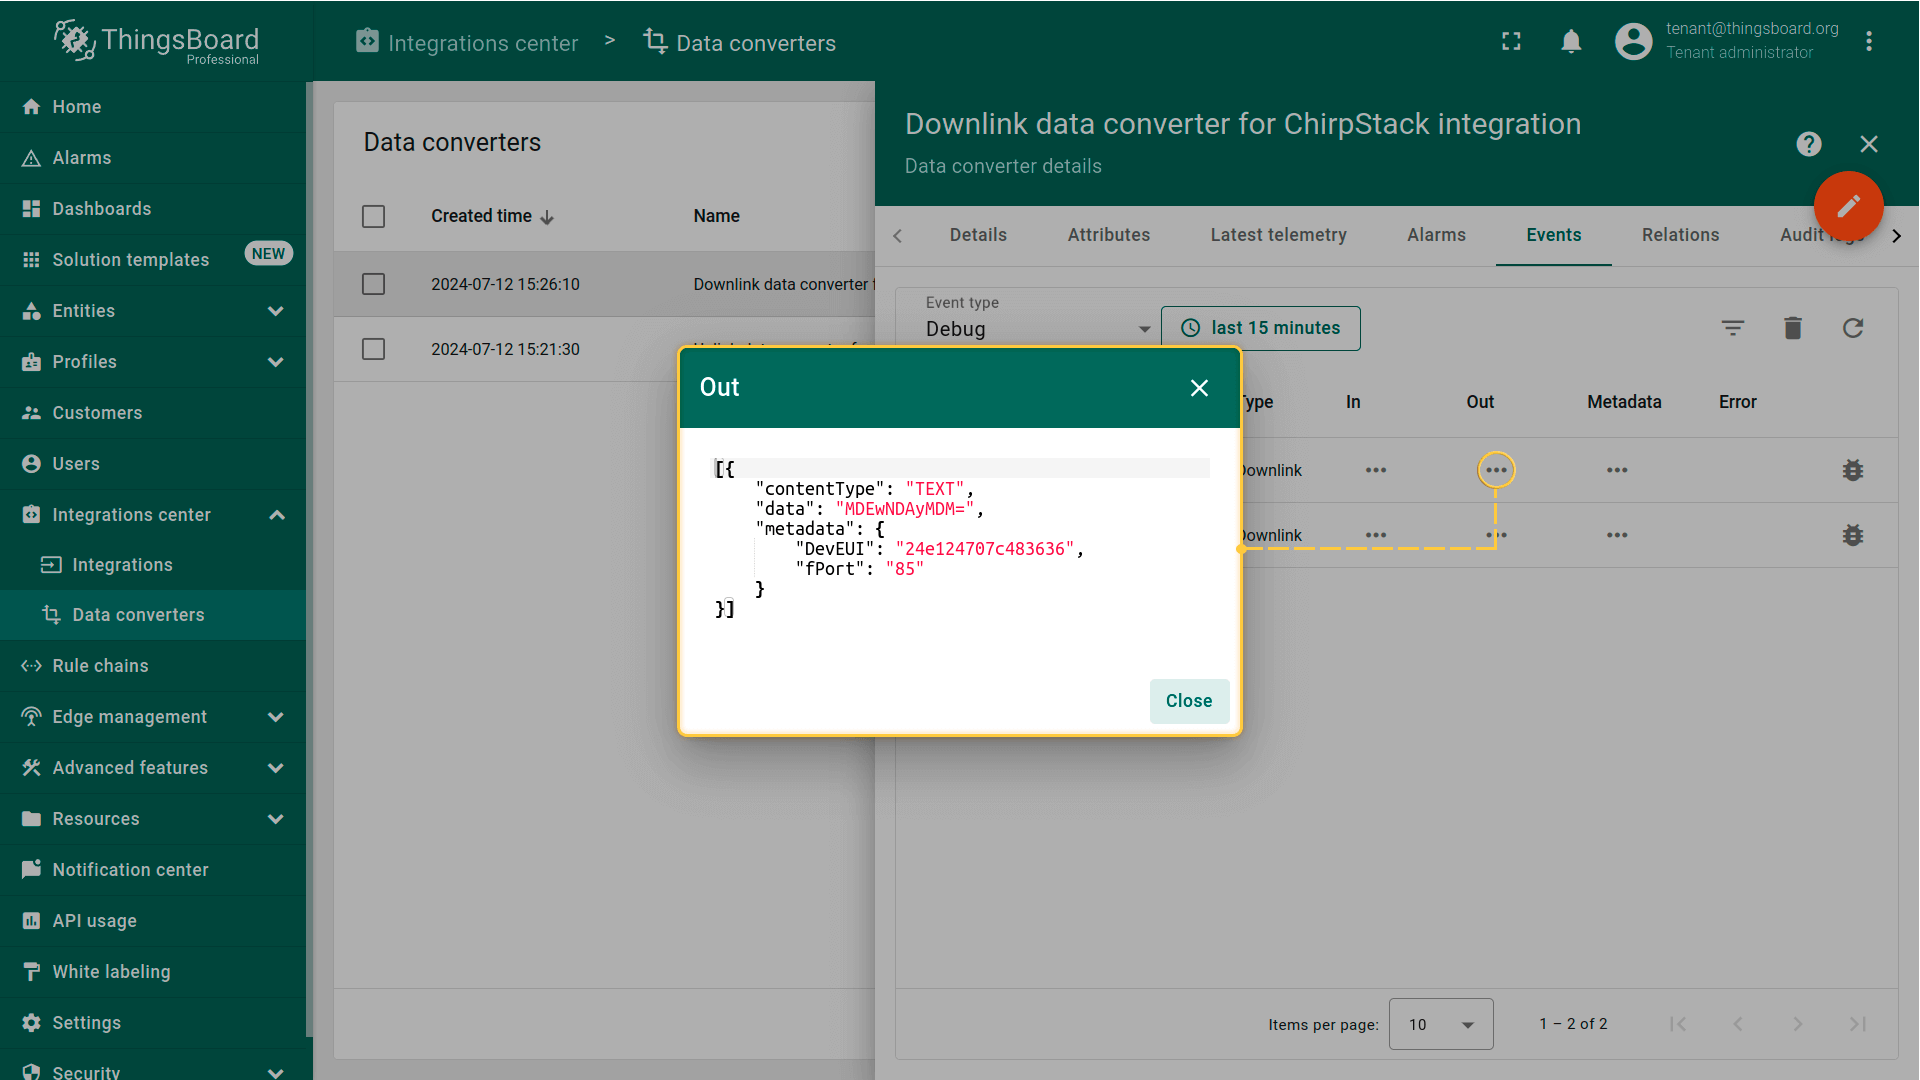
Received data and data that was sent can be viewed in the downlink converter. In the “In” block of the “Events” tab, we see what data entered and the “Out” field displays messages to device:

Next steps
-
Getting started guides - These guides provide quick overview of main ThingsBoard features. Designed to be completed in 15-30 minutes.
-
Installation guides - Learn how to set up ThingsBoard on various available operating systems.
-
Data visualization - These guides contain instructions on how to configure complex ThingsBoard dashboards.
-
Data processing & actions - Learn how to use ThingsBoard Rule Engine.
-
IoT Data analytics - Learn how to use rule engine to perform basic analytics tasks.
-
Advanced features - Learn about advanced ThingsBoard features.