- Prerequisites
- Manual Installation and Configuration
- Step 1. Install Java 17 (OpenJDK)
- Step 2. Configure the ThingsBoard Edge database
- Step 3. Select the Queue service
- Step 4. ThingsBoard Edge Service Installation
- Step 5. Configure the ThingsBoard Edge
- Step 6. Run the installation script
- Step 7. Start the ThingsBoard Edge service
- Step 8. Open the ThingsBoard Edge UI
- Troubleshooting
- Next Steps
Version Compatibility Rules - Read before proceeding
Before installing ThingsBoard Edge, ensure that ThingsBoard Server is installed and updated to the latest version.
Additionally, verify that the ThingsBoard Edge and ThingsBoard Server versions are compatible.
Compatibility rules:
- ThingsBoard Edge version X.Y.Z works with ThingsBoard Server version X.Y.Z and the next two versions.
- Example: ThingsBoard Edge 3.8.0 works with ThingsBoard Server 3.8.0 and two later versions (3.9.0 and 3.9.1). View the ThingsBoard Server Release Notes here.
- ThingsBoard Edge version X.Y.Z does not work with older ThingsBoard Server versions.
- Example: ThingsBoard Edge 3.9.1 does not support ThingsBoard Server 3.8.0 or earlier versions. The ThingsBoard Server must be upgraded to the latest version first.
Note: If you run an older version of ThingsBoard Edge (e.g., version 3.6.0), the ThingsBoard team cannot guarantee the availability or proper functioning of all features.
This guide provides step-by-step instructions for installing ThingsBoard Edge on Ubuntu 22.04 LTS / 24.04 LTS.
Prerequisites
To start running ThingsBoard Professional Edition Edge, you will need an active ThingsBoard Professional Edition account that supports Edge functionality.
Sign up for a ThingsBoard Cloud account, which is the easiest way to get started. Throughout the rest of this tutorial, this URL will be referred to as SERVER_URL Log in using your ThingsBoard Cloud tenant credentials. |
|
You can install the ThingsBoard Professional Edition local server. For this, please refer to the ThingsBoard installation guide. The local server can be accessed via http://localhost:8080. Throughout this tutorial, we will refer to this URL as SERVER_URL. Log in with:
|
Edge Hardware Requirements
The hardware requirements for ThingsBoard Edge are determined by the number of connected devices and the intensity of interactions with the platform interface. To ensure optimal performance, we recommend the following:
- At least 1GB of RAM (Light workload): It is suitable for minimal interactions with the platform interface, such as dashboards and device management, and fewer than 100 connected devices.
- At least 4GB of RAM (Heavy workload): This configuration is suitable for intense platform interactions and 100+ devices connected to a single machine.
Deploying a New Edge Instance
To create a new Edge:
-
Sign in to your ThingsBoard PE instance and navigate to the Edge Management > Instances section. Click the ”+” icon in the top right corner and select the “Add new edge” option.
-
Enter a name for the Edge you are creating. For example, “My New Edge”. If needed, update the cloud endpoint.
- If the Edge runs in a Docker container, do not use “localhost” as the endpoint. Instead, use the IP address of the machine where ThingsBoard PE is hosted and accessible by the Edge container. For example, http://10.7.2.143:8080.
- If you are using the ThingsBoard Cloud, there’s no need to change this setting — keep it as is.
- Click the “Add” button to confirm the addition of the Edge instance.
-
Your new Edge is created and will appear at the top of the list, as entries are sorted by creation time by default.
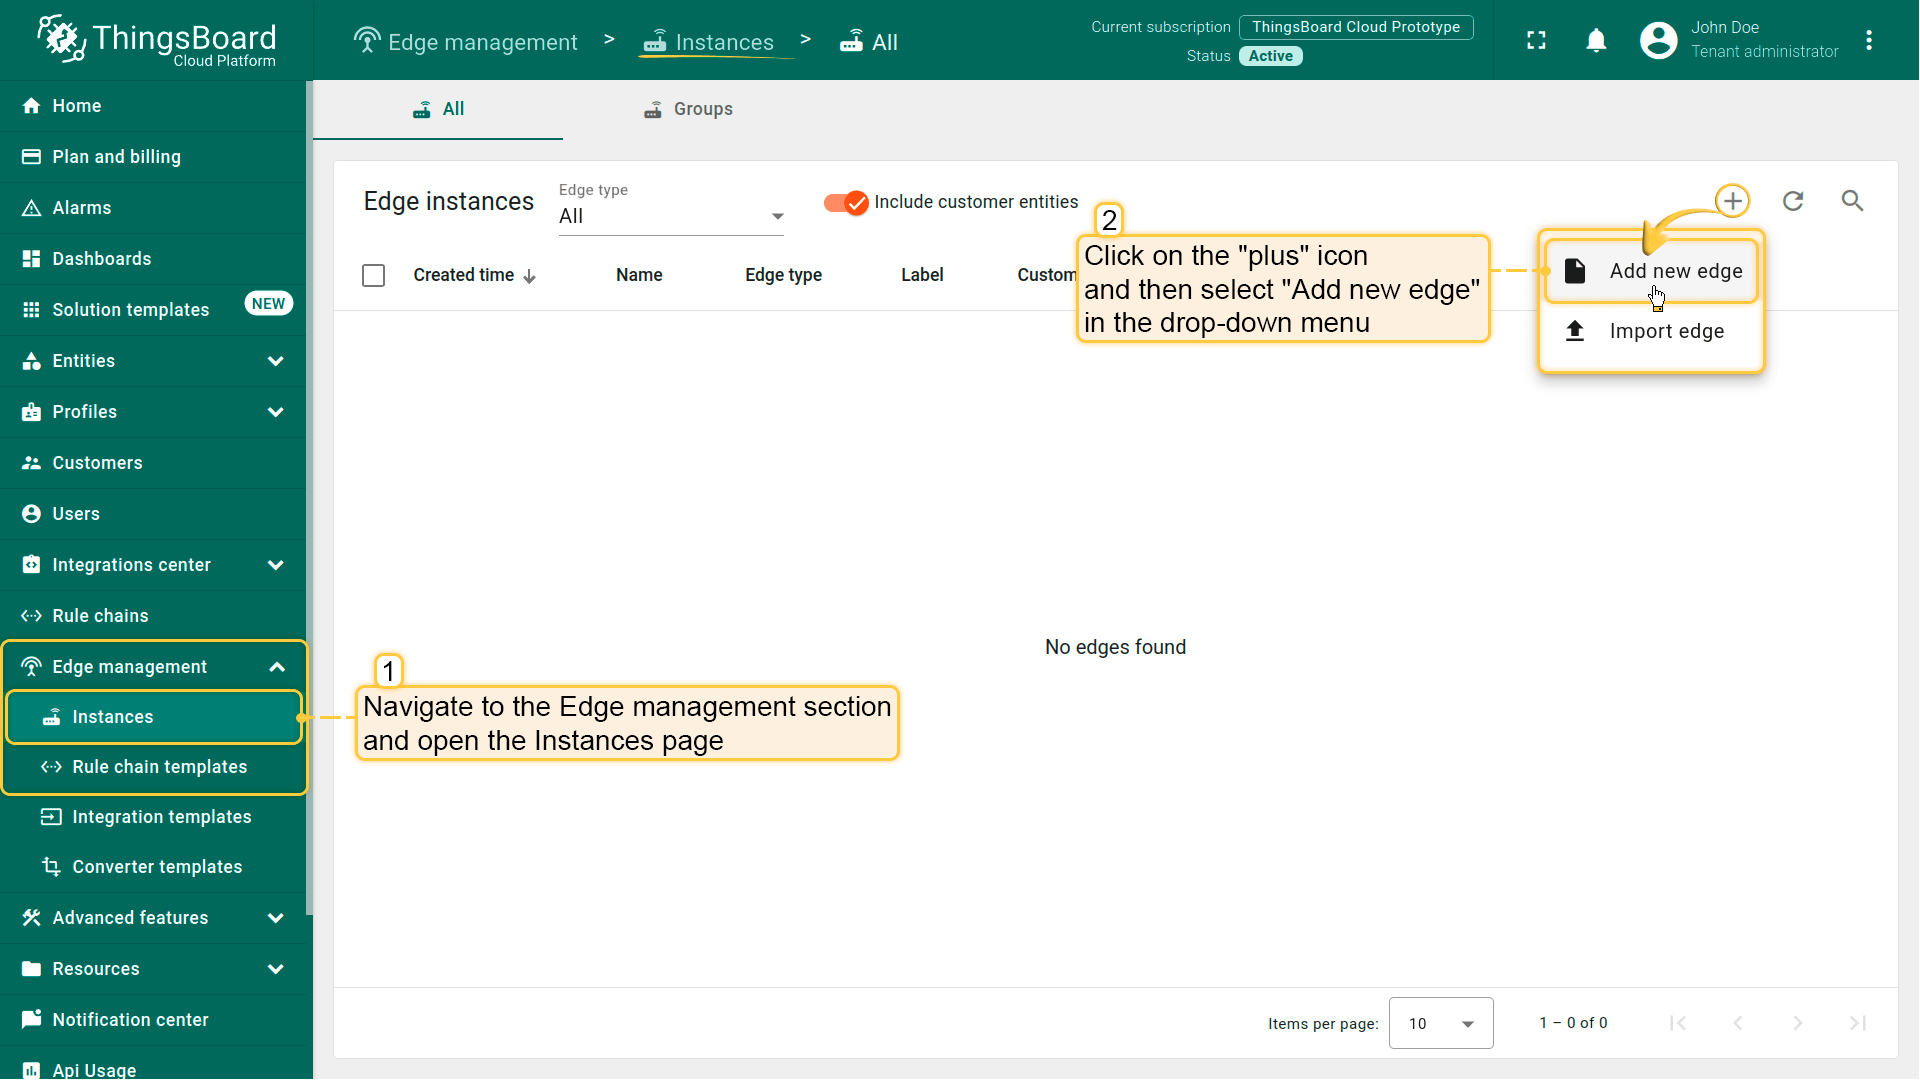
Sign in to your ThingsBoard PE instance and navigate to the Edge Management > Instances section. Click the ”+” icon in the top right corner and select the “Add new edge” option.
{:target="_blank"}, do not use “localhost” as the endpoint. Instead, use the IP address of the machine where ThingsBoard PE is hosted and accessible by the Edge container. For example, http://10.7.2.143:8080.
If you are using the ThingsBoard Cloud, there’s no need to change this setting — keep it as is.
Click the "Add" button to confirm the addition of the Edge instance.](/images/pe/edge/installation-add-edge-item-2.png)
Enter a name for the Edge you are creating. For example, “My New Edge”. If needed, update the cloud endpoint.
- If the Edge runs in a Docker container, do not use “localhost” as the endpoint. Instead, use the IP address of the machine where ThingsBoard PE is hosted and accessible by the Edge container. For example, http://10.7.2.143:8080.
- If you are using the ThingsBoard Cloud, there’s no need to change this setting — keep it as is.
- Click the “Add” button to confirm the addition of the Edge instance.
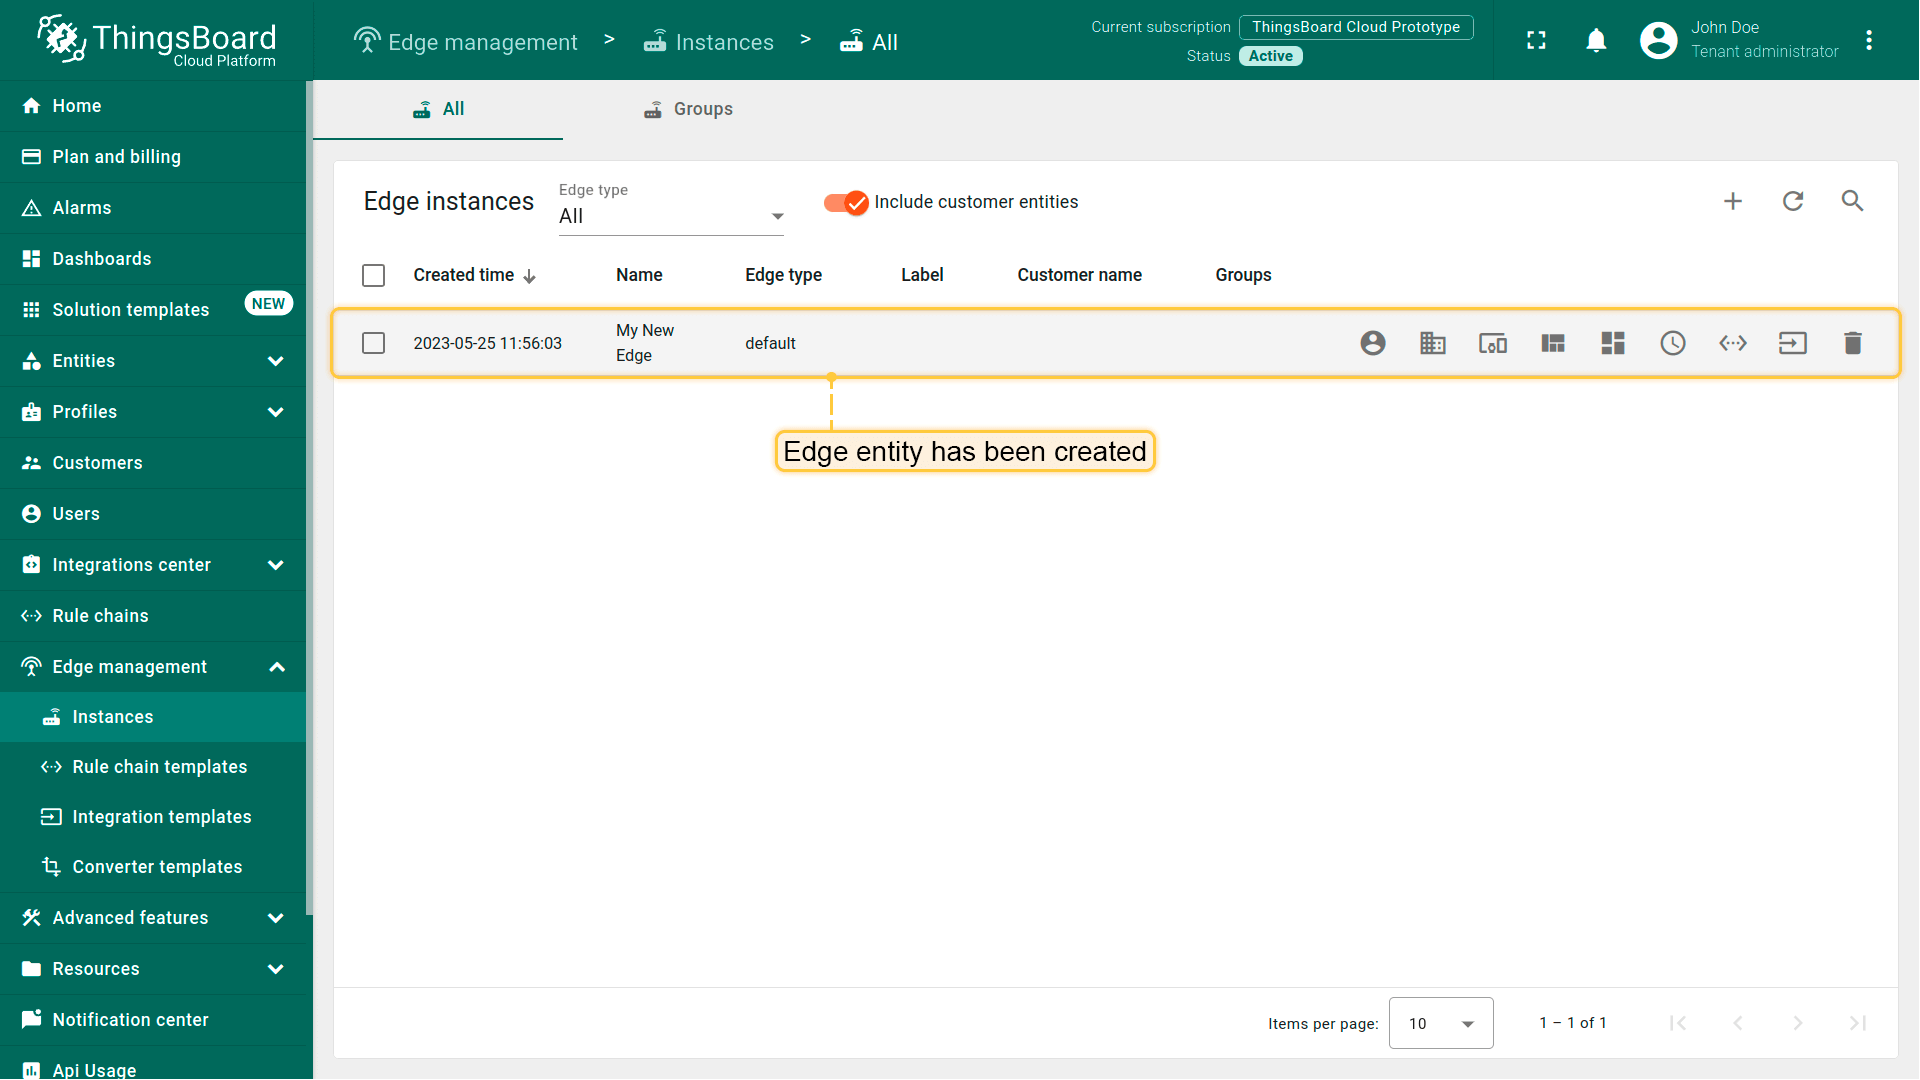
Your new Edge is created and will appear at the top of the list, as entries are sorted by creation time by default.
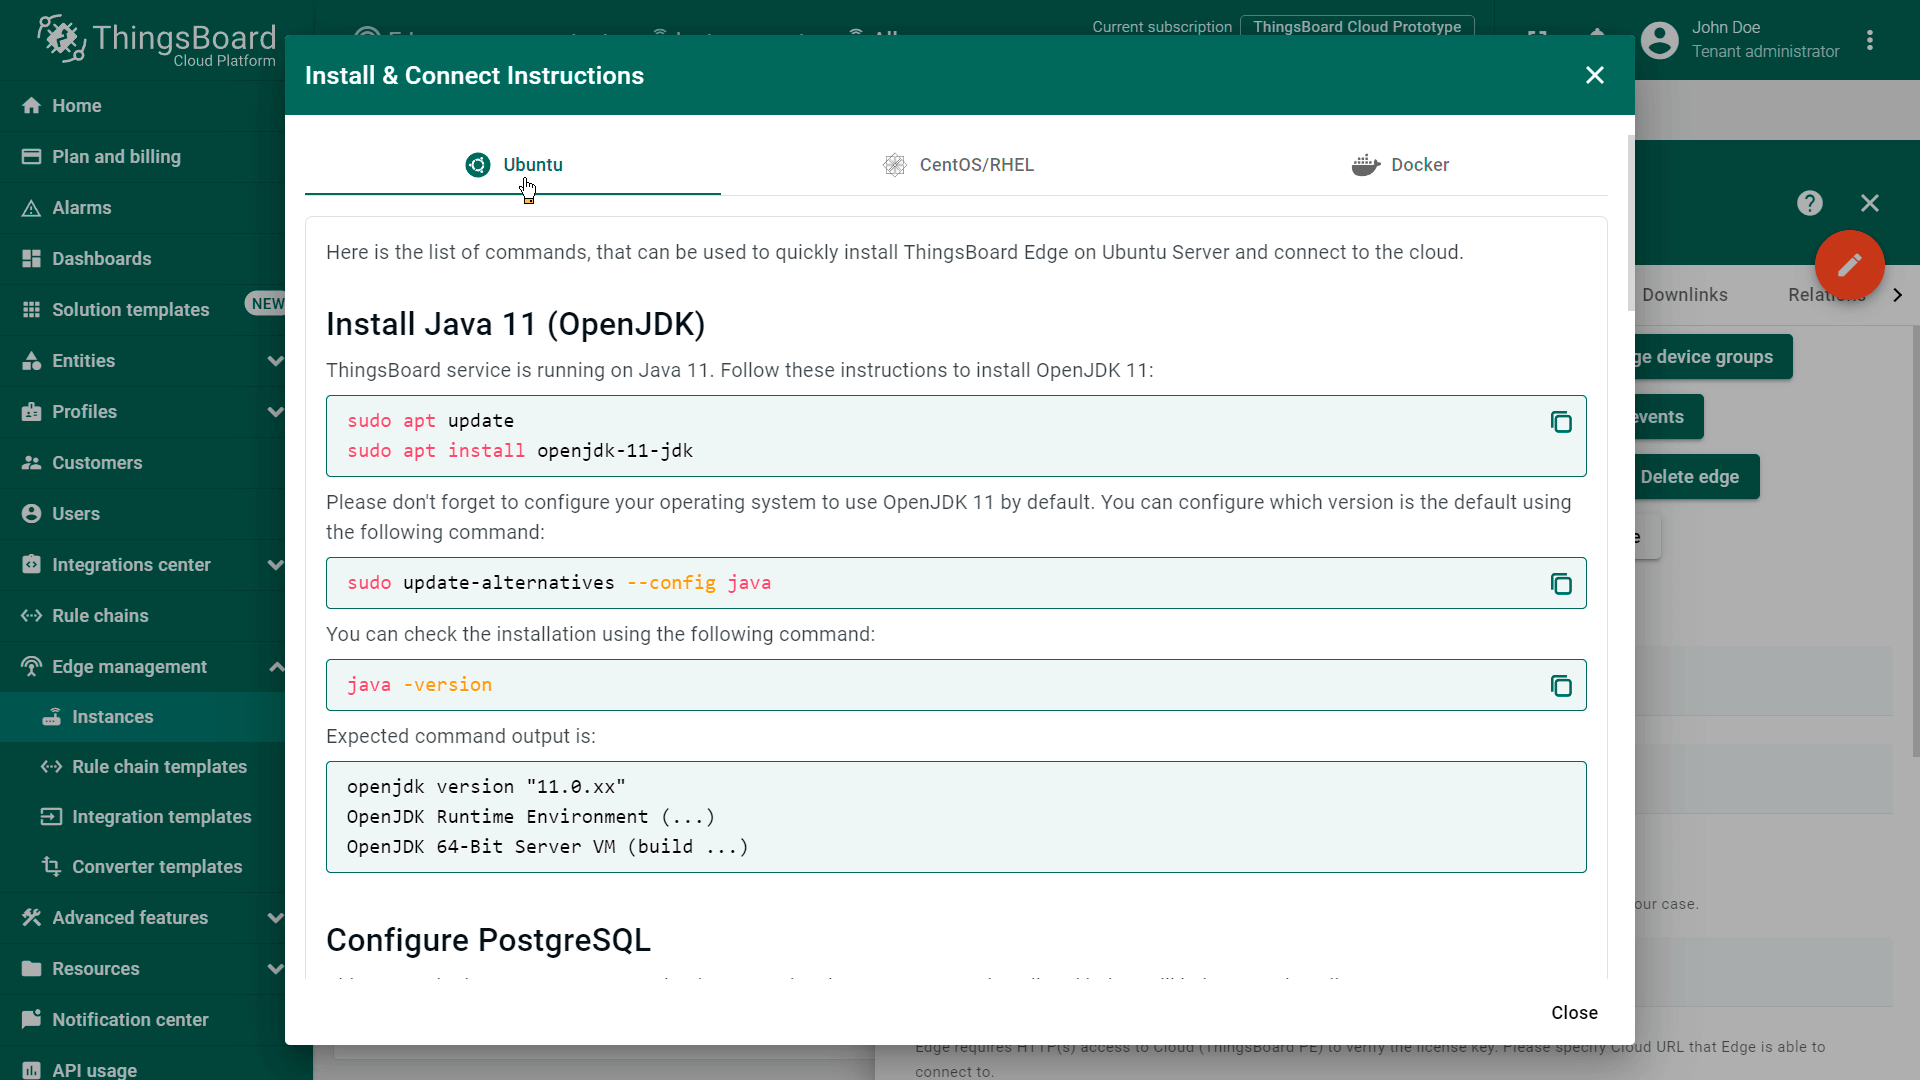
Guided installation using pre-configured instructions in the Server UI
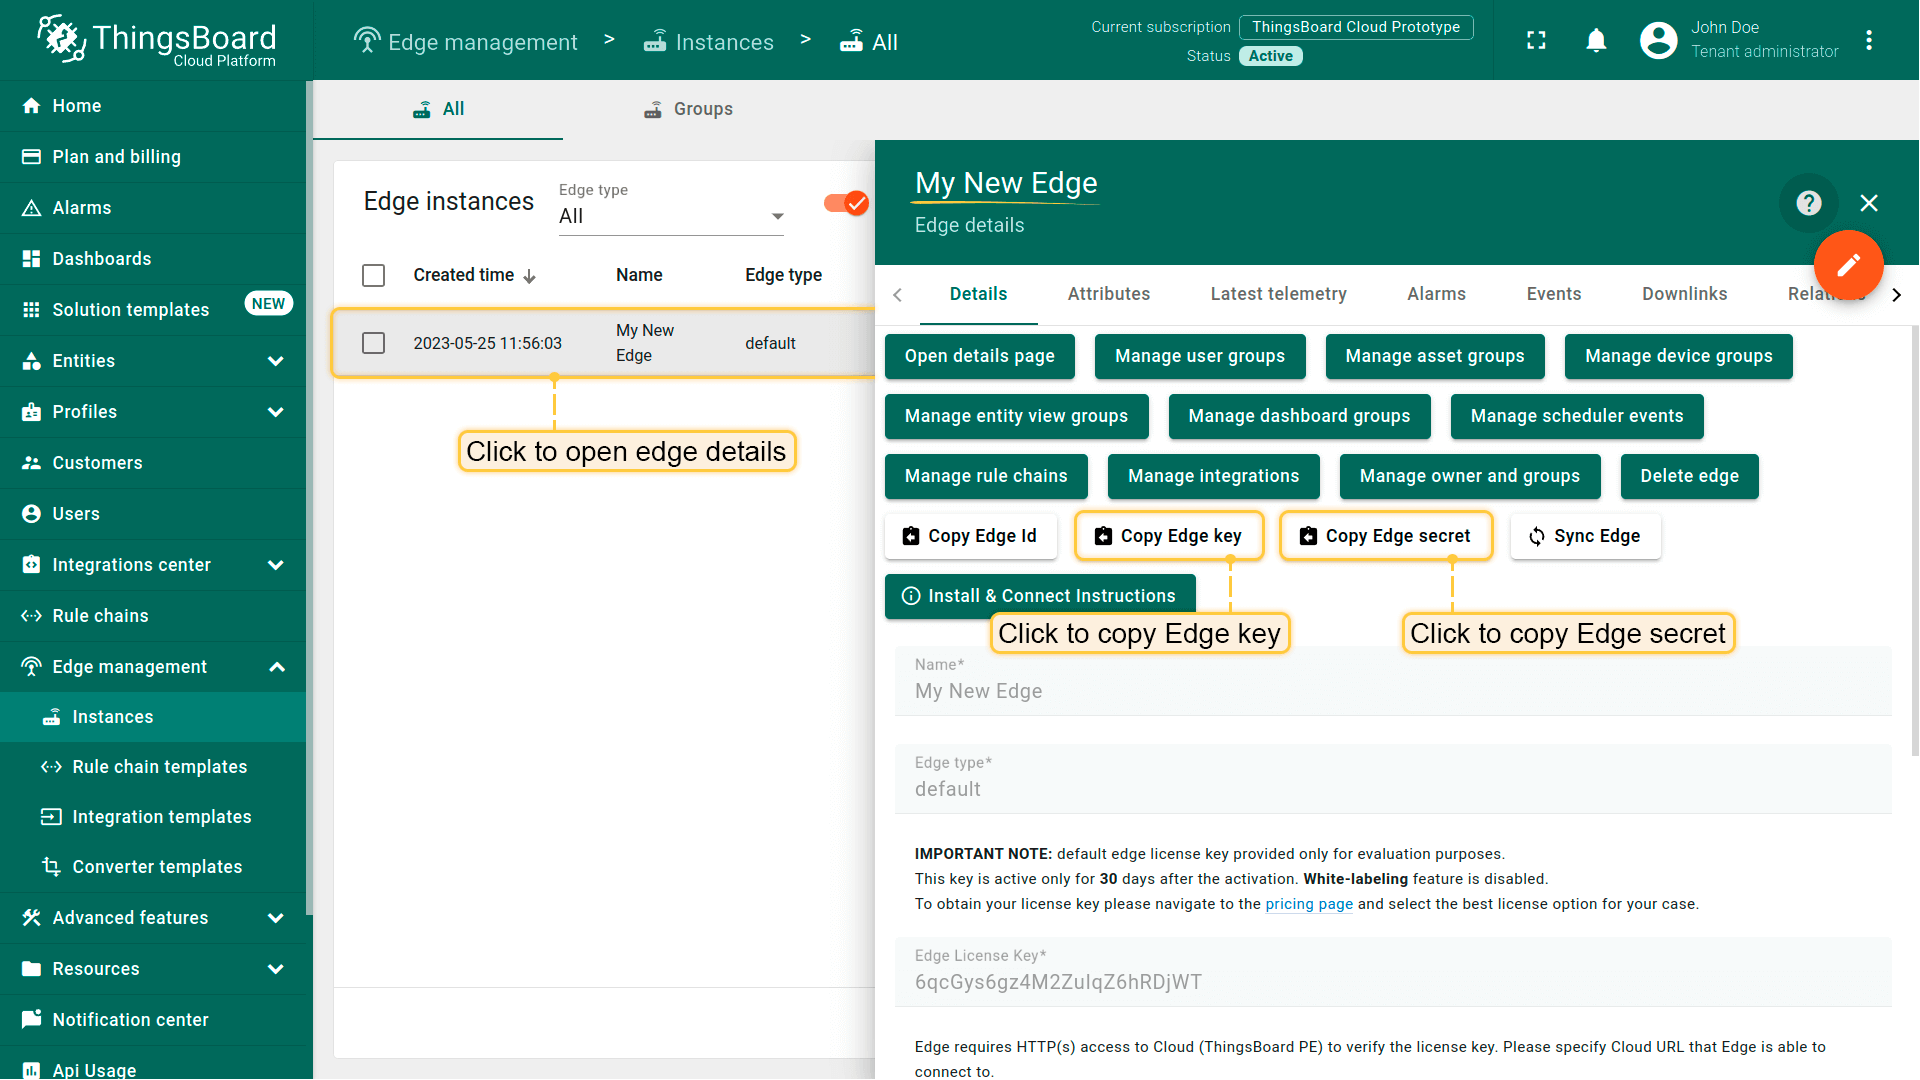
Once the Edge instance has been created, the installation instructions will be available for use. Each Edge has preset configurations that contain important credentials, such as Edge Secret, Edge Key, etc. To access these configurations:
-
Click on the Edge entity to open its details.
-
Click the “Install & Connection Instructions” button.
-
Follow the instructions to install Edge and connect it to the server.
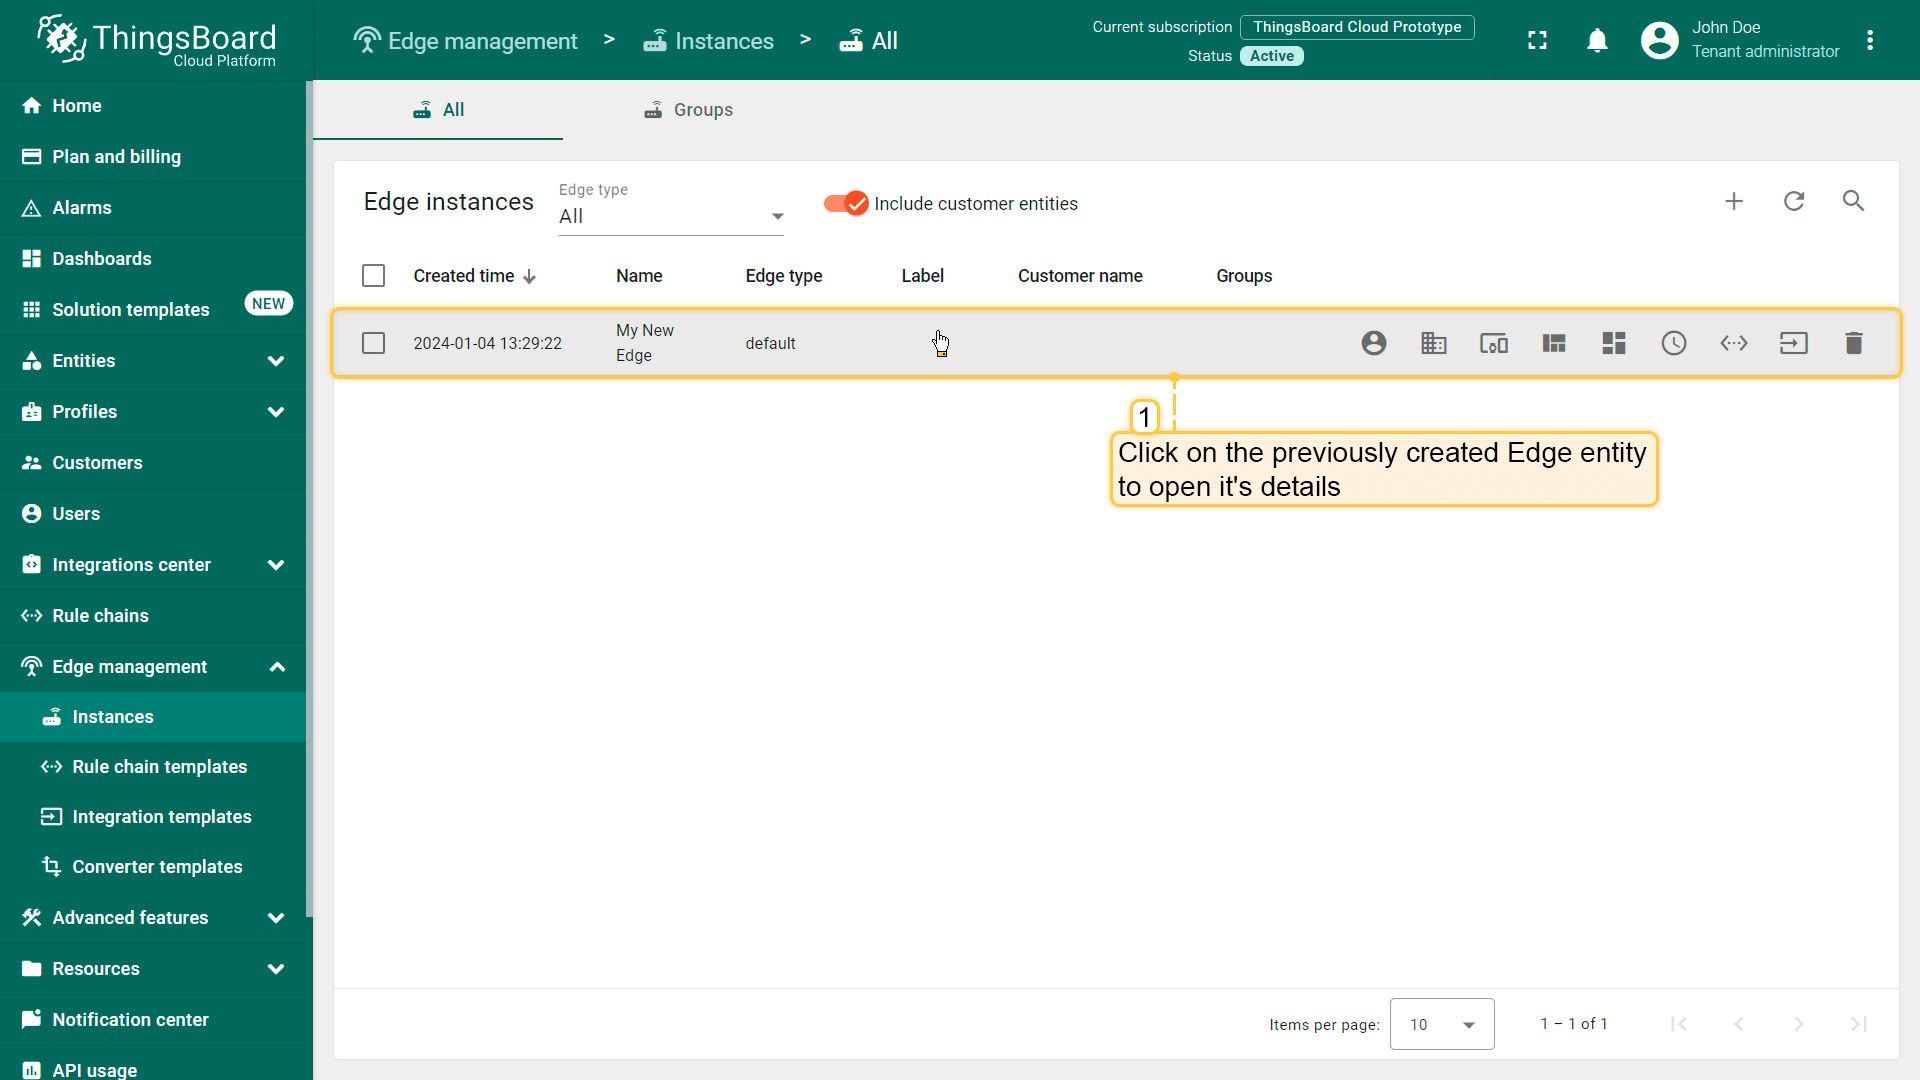
Click on the Edge entity to open its details.
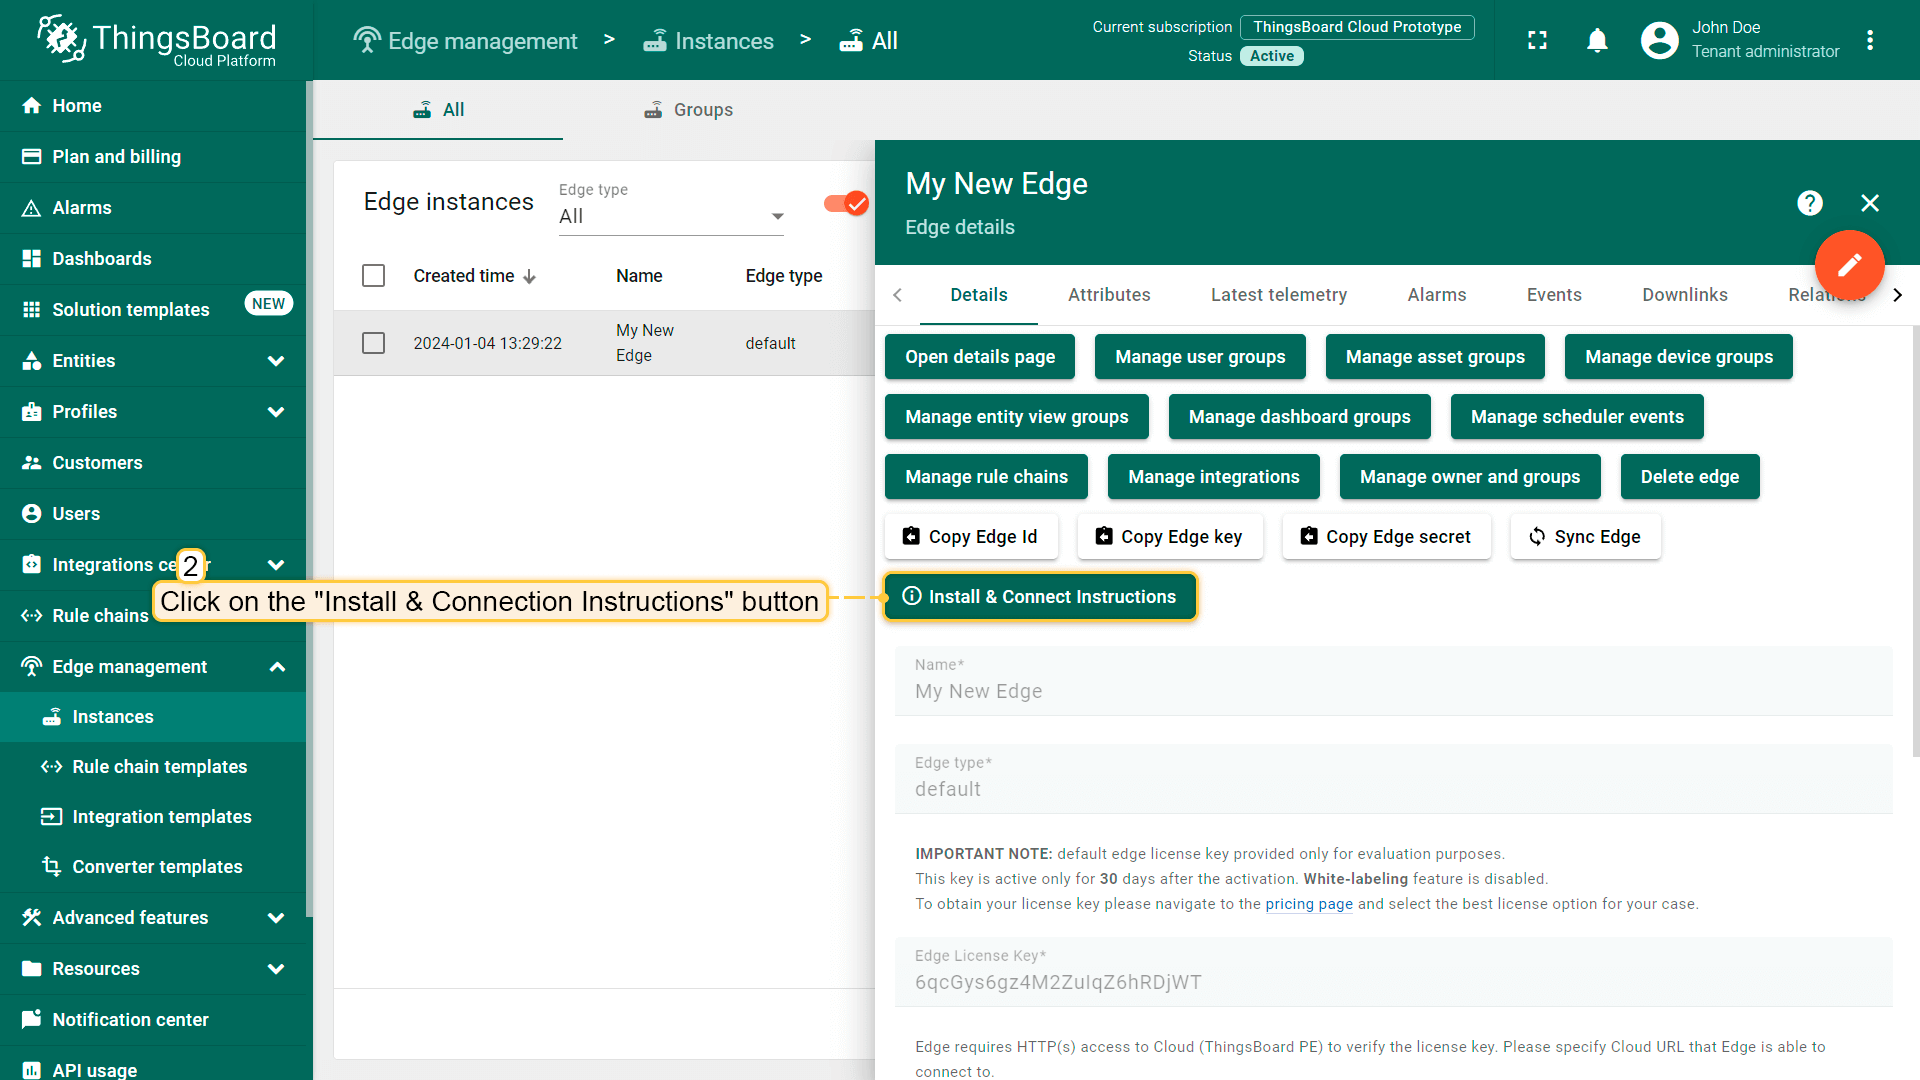
Click the “Install & Connection Instructions” button.
Follow the instructions to install Edge and connect it to the server.
Manual Installation and Configuration
If for any reason you are unable to use the prepared ThingsBoard Server Instructions above, please follow the steps below. These steps will guide you through installing and configuring the Edge by yourself.
Step 1. Install Java 17 (OpenJDK)
ThingsBoard service is running on Java 17. To install OpenJDK 17, follow these instructions
1
sudo apt update && sudo apt install openjdk-17-jdk-headless
Configure your operating system to use OpenJDK 17 by default. You can configure the default version by running the following command:
1
sudo update-alternatives --config java
To check the installed Java version on your system, use the following command:
1
java -version
The expected result is:
1
2
3
openjdk version "17.x.xx"
OpenJDK Runtime Environment (...)
OpenJDK 64-Bit Server VM (...)
Step 2. Configure the ThingsBoard Edge database
ThingsBoard Edge supports SQL and hybrid database approaches. See the architecture page for details.
|
The ThingsBoard team recommends using PostgreSQL for development and production environments with moderate load (less than 5000 msg/sec). Many cloud providers offer managed PostgreSQL services, making it a cost-effective solution for most ThingsBoard deployments. ThingsBoard Edge uses PostgreSQL database as a local storage. To install the PostgreSQL database, run these commands: Once PostgreSQL is installed, it is recommended to set the password for the PostgreSQL main user. The following command will switch the current user to the PostgreSQL user and set the password directly in PostgreSQL. Then, enter and confirm the password. Finally, create a new PostgreSQL database named tb_edge by running the following command: |
|
The ThingsBoard team recommends using a hybrid database approach if you plan to manage 1M+ devices in production or handle high data ingestion rate (more than 5000 msg/sec). In this case, ThingsBoard Edge stores time-series data in Cassandra while continuing to use PostgreSQL for primary entities such as devices, assets, dashboards, and customers. PostgreSQL InstallationTo install the PostgreSQL database, run these commands: Once PostgreSQL is installed, it is recommended to set the password for the PostgreSQL main user. The following command will switch the current user to the PostgreSQL user and set the password directly in PostgreSQL. Then, enter and confirm the password. To create a new PostgreSQL database named tb_edge, use the following command: Press “Ctrl+D” twice to quit PostgreSQL. Cassandra InstallationThe instructions listed below will help you to install Cassandra. In order to run Cassandra, install Java 11. Set Java 17 as the default version (required for ThingsBoard Edge): Edit the Cassandra configuration file: Then, restart Cassandra: ThingsBoard Edge ConfigurationEdit ThingsBoard Edge configuration file: Add the following lines to the configuration file. Don’t forget to replace “PUT_YOUR_POSTGRESQL_PASSWORD_HERE” with your real postgres user password: You can optionally add the following parameters to reconfigure your Edge instance to connect to external Cassandra nodes: |
Step 3. Select the Queue service
ThingsBoard Edge can use different messaging systems and brokers for storing messages and enabling communication between its services. Choose the appropriate queue implementation based on your specific business needs:
-
In Memory: The built-in and default queue implementation. It is useful for development or proof-of-concept (PoC) environments, but is not recommended for production or any type of clustered deployments due to limited scalability.
-
Kafka: Recommended for production deployments. This queue is used in the most of ThingsBoard production environments now.
In Memory queue is built in and enabled by default. No additional configuration is required. |
Docker installationInstall Docker for Ubuntu Don’t forget to add your linux user to the docker group. See Manage Docker as a non-root user. Kafka InstallationApache Kafka is an open source stream processing platform. To install Kafka in a Docker container, run the command below. It creates docker-compose-kafka.yml, fills it with configuration lines, and starts the container. ThingsBoard Edge ConfigurationEdit the ThingsBoard Edge configuration file (tb-edge.conf): Make sure to replace “localhost:9092” with your real Kafka bootstrap servers if necessary |
Step 4. ThingsBoard Edge Service Installation
Download the installation package.
1
wget https://dist.thingsboard.io/tb-edge-4.3.1.1pe.deb
Go to the download repository and install ThingsBoard Edge service:
1
sudo dpkg -i tb-edge-4.3.1.1pe.deb
Step 5. Configure the ThingsBoard Edge
Click on Copy Edge Key and Copy Edge Secret in the edge details section. This will copy your edge credentials to your clipboard. Be sure to store them in a secure location, as these values will be needed in the following steps.
Edit the ThingsBoard Edge configuration file.
|
|
|
- PUT_YOUR_EDGE_KEY_HERE: Replace with your actual Edge Key.
- PUT_YOUR_EDGE_SECRET_HERE: Replace with your actual Edge Secret.
- PUT_YOUR_RPC_HOST:
- Use localhost if the Edge is running on the same machine as the Server instance.
- Use an X.X.X.X IP address if the Edge is connecting to the Server instance in the same network or in a Docker container.
Configure PostgreSQL (Optional)
If you changed PostgreSQL default datasource settings, use the following command:
1
2
3
4
5
sudo sh -c 'cat <<EOL >> /etc/tb-edge/conf/tb-edge.conf
export SPRING_DATASOURCE_URL=jdbc:postgresql://localhost:5432/tb_edge
export SPRING_DATASOURCE_USERNAME=postgres
export SPRING_DATASOURCE_PASSWORD=<PUT_YOUR_POSTGRESQL_PASSWORD_HERE>
EOL'
- PUT_YOUR_POSTGRESQL_PASSWORD_HERE: Replace with your actual PostgreSQL user password.
Step 6. Run the installation script
Once ThingsBoard Edge is installed and configured please execute the following installation script:
1
sudo /usr/share/tb-edge/bin/install/install.sh
Make sure you run this script from the root. To change the current directory to the root directory, run the command cd /.
Step 7. Start the ThingsBoard Edge service
1
sudo service tb-edge start
Step 8. Open the ThingsBoard Edge UI
Once the Edge service is started, open the Edge UI at http://localhost:8080.
If the Edge HTTP bind port was changed to 18080 during Edge installation, access the ThingsBoard Edge instance at http://localhost:18080.
Please use your tenant credentials from ThingsBoard Server or ThingsBoard Cloud{: target=to log in to the ThingsBoard Edge.
Troubleshooting
The ThingsBoard Edge logs are stored in the following directory:
1
/var/log/tb-edge
To check for errors on the service side, run the following command:
1
cat /var/log/tb-edge/tb-edge.log | grep ERROR
Start the ThingsBoard Edge service:
1
sudo service tb-edge start
Stop the ThingsBoard Edge service:
1
sudo service tb-edge stop
Restart the ThingsBoard Edge service:
1
sudo service tb-edge restart
Check the status of the ThingsBoard Edge service:
1
sudo service tb-edge status
Next Steps
Congratulations! You have successfully provisioned, installed and connected ThingsBoard Edge to ThingsBoard server.
You can continue with Getting started guide to get the basic knowledge of ThingsBoard Edge or you can jump directly to more advanced topics:
-
Getting started guide - Provide quick overview of main ThingsBoard Edge features. Designed to be completed in 15-30 minutes:
-
Edge Rule Engine:
-
Rule Chain Templates - Learn how to use ThingsBoard Edge Rule Chain Templates.
-
Provision Rule Chains from cloud to edge - Learn how to provision edge rule chains from cloud to edge.
-
- Security:
- gRPC over SSL/TLS - Learn how to configure gRPC over SSL/TLS for communication between edge and cloud.
-
Features:
-
Edge Status - Learn about Edge Status page on ThingsBoard Edge.
-
Cloud Events - Learn about Cloud Events page on ThingsBoard Edge.
-
-
Use cases:
-
Manage alarms and RPC requests on edge devices - This guide will show how to generate local alarms on the edge and send RPC requests to devices connected to edge:
-
Data filtering and traffic reduce - This guide will show how to send to cloud from edge only filterd amount of device data:
-
- Roadmap - ThingsBoard Edge roadmap.