This guide describes how to install ThingsBoard Professional Edition from AWS Marketplace. Using this guide you will install BYOL version of the product. Basically, you get the license directly from ThingsBoard, Inc, but purchase corresponding server instances and infrastructure from AWS.
- Prerequisites
- Step 1. Subscribe to ThingsBoard PE BYOL and Review Terms
- Step 2. Launch ThingsBoard PE instance
- Step 3. Obtain your license secret
- Step 4. Configure your license secret
- Step 5. Launch ThingsBoard service
- Step 6. Connect to ThingsBoard UI
- Post-installation steps
- FAQ
- Next steps
Prerequisites
- Active Amazon AWS account
Step 1. Subscribe to ThingsBoard PE BYOL and Review Terms
Navigate to the ThingsBoard Professional Edition BYOL product page on AWS Marketplace and click the View purchase options button to begin the subscription process.
Before completing your subscription, please carefully review all the information provided on the subscription page, including:
-
Product details – Bring Your Own License (BYOL) model means that a valid ThingsBoard license must be purchased separately to activate and use the software.
-
Pricing details – The software subscription cost is $0.00. However, AWS infrastructure usage charges will apply. Depending on your geographic region, applicable taxes and other charges may apply.
-
Terms and conditions – By completing your subscription, you are confirming that you have read, understood, and agree to End User License Agreement (EULA) and the AWS Customer Agreement.
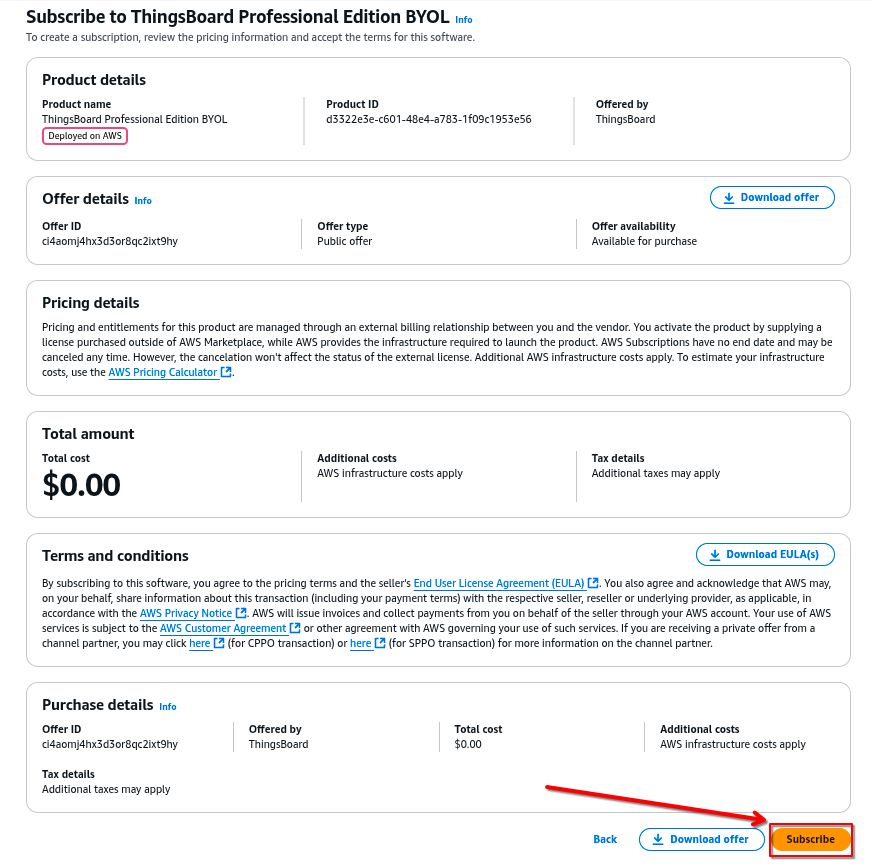
After carefully reviewing this information, click the Subscribe button to proceed with your subscription.
Step 2. Launch ThingsBoard PE instance
After completing the subscription, a confirmation message will appear at the top of the page stating: You have successfully purchased ThingsBoard Professional Edition BYOL.
Click the Launch your software button to proceed. This action will redirect you to the software configuration and deployment options for ThingsBoard Professional Edition on AWS.
Step 2.1. Setup configuration
On the configuration page, you will see a list of options, including Service, Launch method, and Region:
-
Service - Choose a service based on how you want your product installed and configured in AWS. Each service offers different advantages and disadvantages and may have different configuration options. For this instruction we will use Amazon EC2 that provides on-demand scalability and complete control over your computing resources, allowing you to quickly adjust capacity based on demand and maintain full access to the underlying operating system.
-
Launch method - Choose how to package and deploy your application. Each method offers different deployment capabilities and management options. Your selected service type determines which delivery methods are available. In this instruction we will proceed with the Launch from EC2 Console.
-
Region - Specify the AWS region where you want to deploy ThingsBoard Professional Edition.
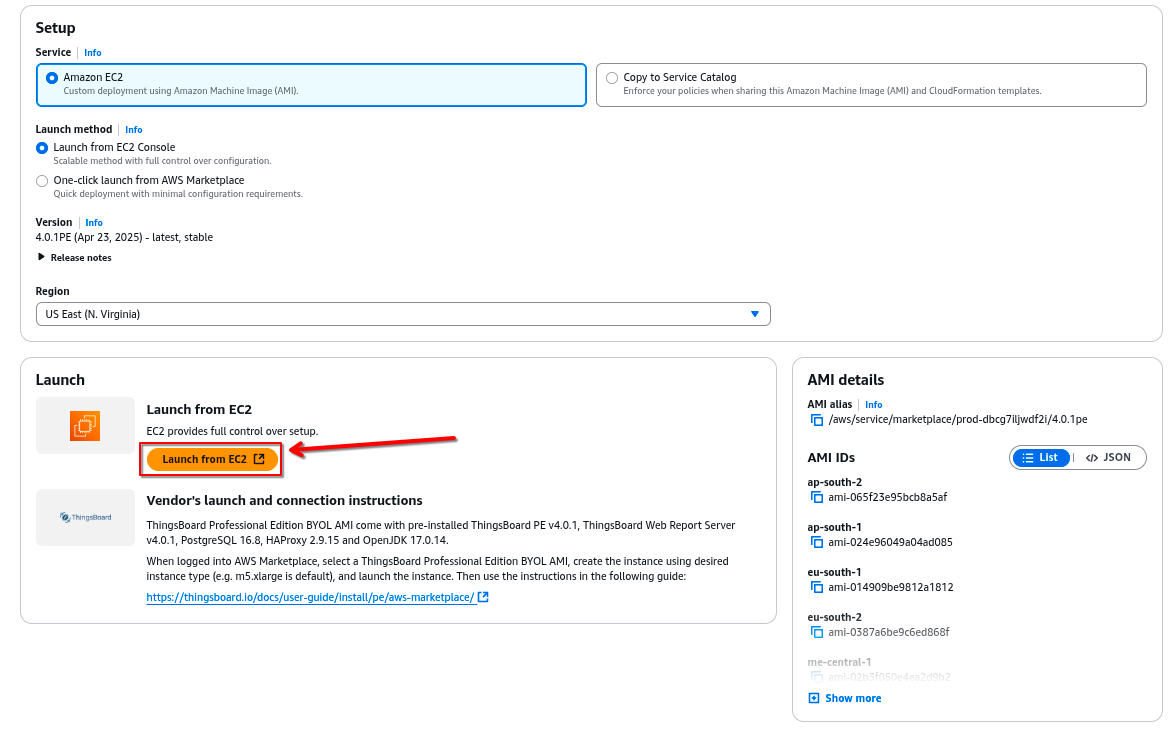
When all options are set, click Launch from EC2 to continue.
On December 31, 2025, AWS Marketplace will stop supporting the ability to copy AMIs and CloudFormation templates to Service Catalog. You can continue to deploy AMIs and CloudFormation templates through the AWS Marketplace website or EC2 console. For more information, refer to AMI-based products in AWS Marketplace.
Step 2.2. Name and AMI Information
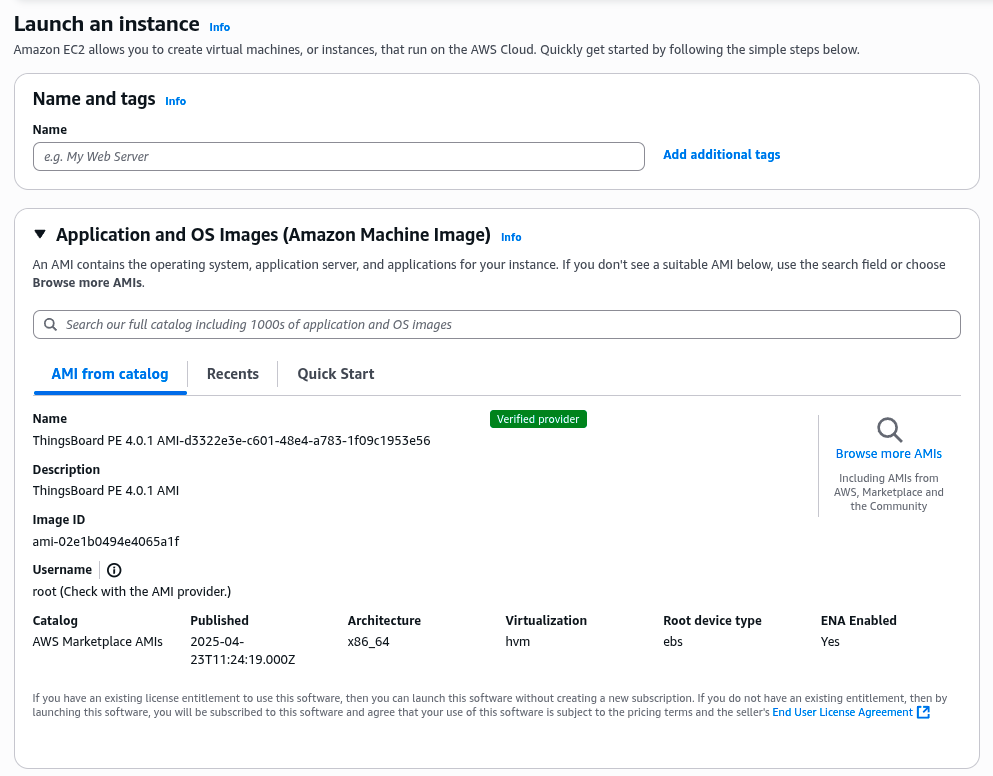
On the Launch instance page, you will see the Name and tags section, where you can assign a name to your instance. The ThingsBoard Professional Edition (BYOL) AMI details are also available here, including its name, description, and publishing information. Verify that the correct AMI is selected, and then proceed to the next step to configure your instance.
Step 2.3. Instance Type and Key Pair configuration
You can optionally change your EC2 Instance Type, VPC and Subnet. This step is usually for advanced AWS EC2 users.
ThingsBoard requires EC2 instance with at least 4GB of RAM. Consider adjusting the memory parameters to ensure stability. For optimal performance, we recommend an instance with at least 8GB of RAM and 2 vCPUs.
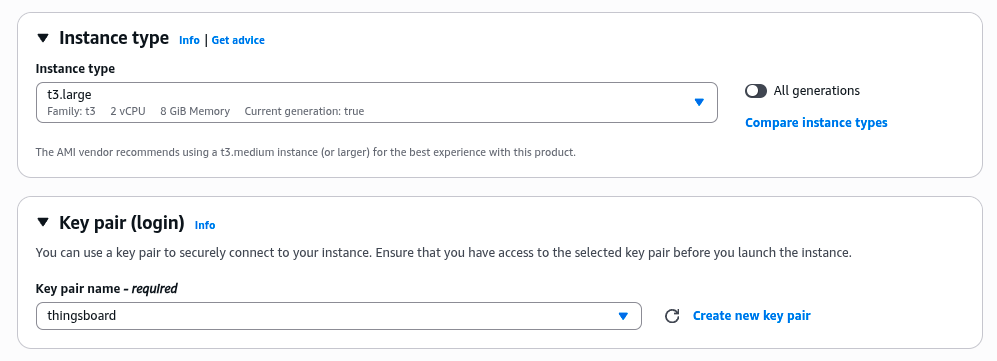
You can select existing Key Pair or create new one for your instance. Make sure you have access to the key file before you proceed. We will use the key file later in this guide.
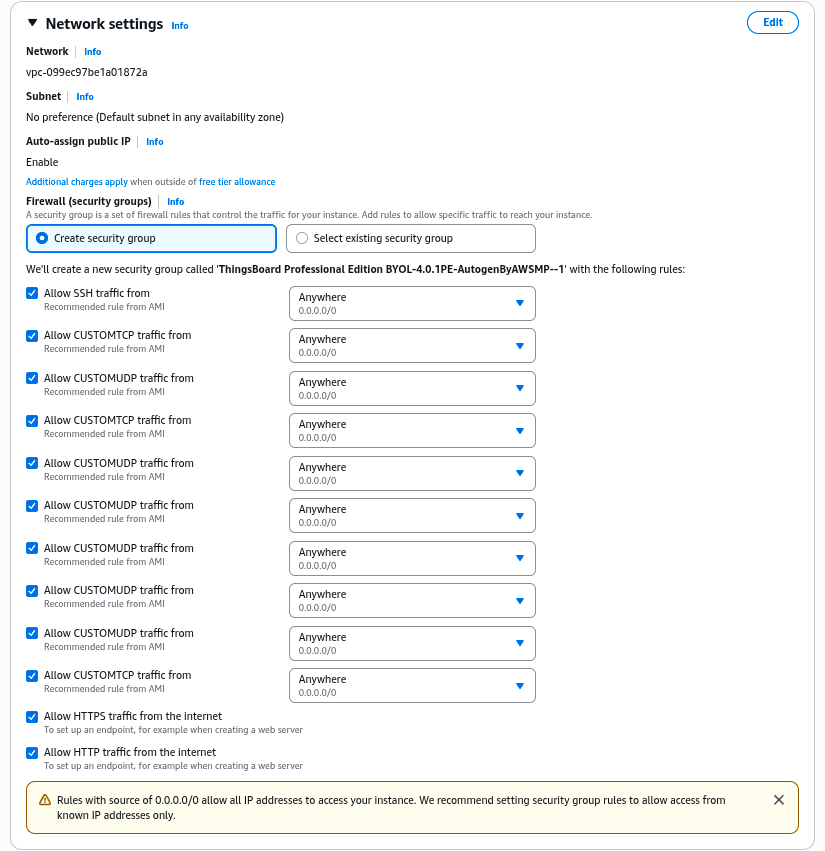
Step 2.4. Configure Security Group Settings
We recommend to use Create security group option to create predefined list of firewall rules that controls the traffic to and from your instance. If you choose Select existing security group during the instance setup, ensure that the chosen security group has inbound rules that allow traffic on the following ports required by ThingsBoard:
- 8080 (TCP) – HTTP access to the ThingsBoard web interface.
- 1883 (TCP) – MQTT protocol.
- 8883 (TCP) – MQTT over SSL.
- 7070 (TCP) – Edge RPC service.
- 9090 (TCP) – Remote Integration service.
- 5683–5688 (UDP) – CoAP and LwM2M protocols.
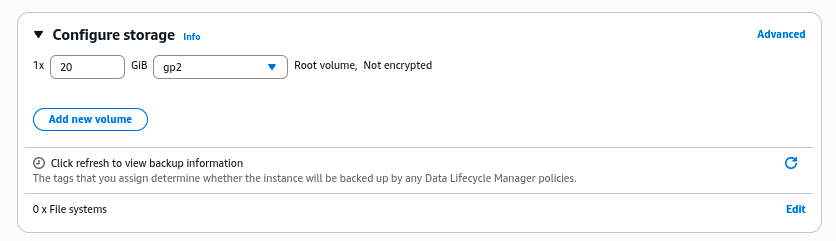
Step 2.5. Storage Configuration
Specify the storage options for the instance. For this instruction we will use the default configuration with 20 GIB of gp2 storage.
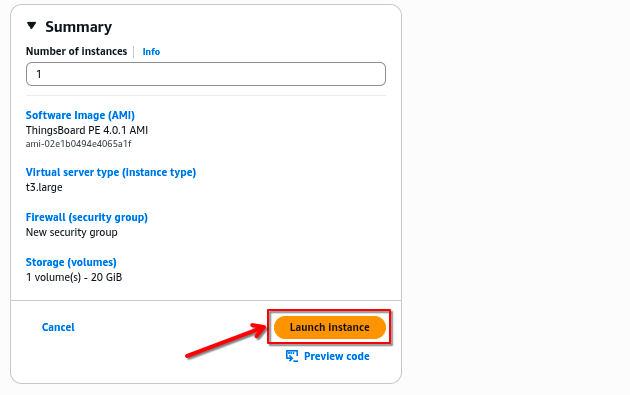
Step 2.6. Launch instance
Once all configurations are completed, open the Summary window to review your settings. After verifying that everything is correct, click the Launch instance button to start the ThingsBoard PE instance.
Step 2.7. Obtain your Public IP and EC2 Instance ID
When the instance state change to the Running and all Status checks will be finished, you can go to the EC2 Instances page and click on Instance ID to see Instance Summary.

Please save your Instance ID and Public DNS name to a safe place. We will use them later in this guide.
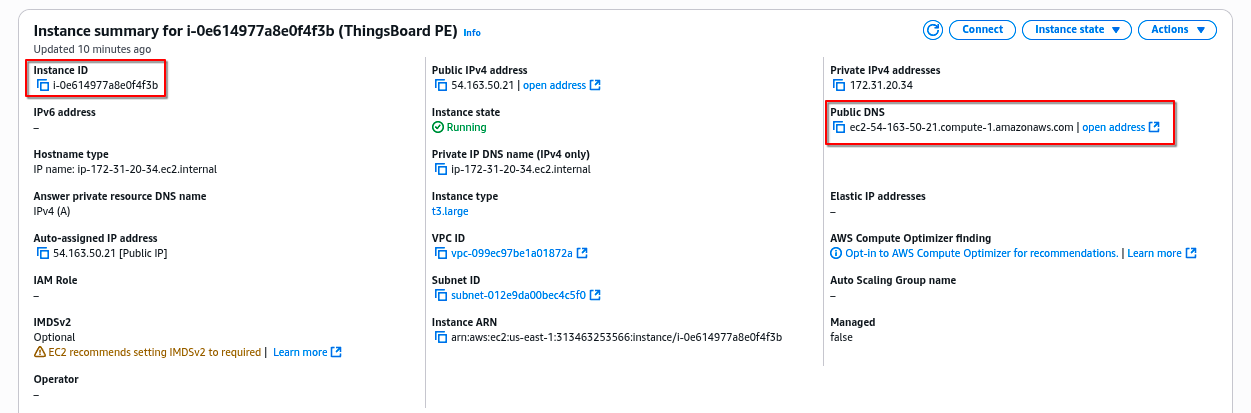
On the image above example instance has this Public DNS name:
- ec2-54-163-50-21.compute-1.amazonaws.com
Instance ID:
- i-0e614977a8e0f4f3b
Step 3. Obtain your license secret
In order to activate your ThingsBoard instance you will need to get the license secret. ThingsBoard Licenses are managed by ThingsBoard License Portal.
Please register on ThingsBoard License Portal to get your license. See How-to get pay-as-you-go subscription or How-to get perpetual license for more details.
Please save your license secret to a safe place. We will use it later in this guide.
Step 4. Configure your license secret
Once you get the license secret, you should put it to the thingsboard configuration file.
Step 4.1. Connect to your ThingsBoard Instance over SSH
Please use the official guides:
- Connecting to Your Linux Instance from Windows Using PuTTY - for Windows users.
- Connecting to Your Linux Instance Using SSH - For Linux/Mac users.
Note: You will need to use instance Public DNS name (see Step 2.7) and the key file (see Step 2.3)
Step 4.2. Put your license secret to ThingsBoard configuration file
Open the file for editing using the following command:
1
sudo nano /etc/thingsboard/conf/thingsboard.conf
Locate the following configuration block:
1
2
3
# License secret obtained from ThingsBoard License Portal (https://license.thingsboard.io)
# UNCOMMENT NEXT LINE AND PUT YOUR LICENSE SECRET:
# export TB_LICENSE_SECRET=
and put your license secret. Please don’t forget to uncomment the export statement. See example below:
1
2
3
# License secret obtained from ThingsBoard License Portal (https://license.thingsboard.io)
# UNCOMMENT NEXT LINE AND PUT YOUR LICENSE SECRET:
export TB_LICENSE_SECRET=YOUR_LICENSE_SECRET_HERE
Step 5. Launch ThingsBoard service
Execute the following command to start ThingsBoard:
1
sudo service thingsboard start
Please allow up to 120 seconds for the Web UI to start. This is applicable only for slow machines with 1-2 CPUs or 1-2 GB RAM.
Step 6. Connect to ThingsBoard UI
Now you can open this link in your browser:
- http://PUBLIC_DNS_NAME/login
In this example:
- http://ec2-54-163-50-21.compute-1.amazonaws.com/login
Use this login to connect as system Administrator:
- sysadmin@thingsboard.org
Default password for System Administrator is Instance ID (see Step 2.7). In this example:
- i-0e614977a8e0f4f3b
Now you can proceed to the next steps.
Post-installation steps
By default, AWS Marketplace instances do not assign a static public IP. This means that the public IP may change upon instance restart.
To ensure a persistent public IP, you must assign an Elastic IP to your EC2 instance. You can follow the steps in the AWS documentation.
Configure HAProxy to enable HTTPS
- Assign valid domain name system (DNS) record to your instance external IP address.
- Connect to your instance using SSH or PuTTY (see Step 4.1).
- Execute the following commands:
1
2
 sudo certbot-certonly --domain smth.yourcompany.com --email support@yourcompany.com
 sudo haproxy-refresh
where smth.yourcompany.com is your DNS name from Step 2.7 and support@yourcompany.com is your email to get notifications from certbot.
FAQ
How can I enable free trial?
Customers may still use ThingsBoard Cloud for that. 30 days of seamless experience and the newest features, except white-labeling, from the latest source code!
What is the Total Cost of Ownership (TCO) for my TB PE instance?
| Cost Component | Description |
|---|---|
| TB License fee | See pricing |
| AWS EC2 instance price | Compare instance prices at ec2instances.info |
| Additional EC2 costs | Network traffic, disk space, and optional services (e.g., CloudWatch) |
Example A: Maker Subscription (t3.medium, 20 GB disk)
| Component | Monthly Cost (USD) |
|---|---|
| ThingsBoard PE Maker subscription fee | $10.00 |
| EC2 t3.medium (1 month) | $30.368 |
| 20 GB EBS volume | $2.00 |
| Total | ≈ $42.40 |
Example B: Prototype Subscription (m5.large, 100 GB disk)
| Component | Monthly Cost (USD) |
|---|---|
| ThingsBoard PE Prototype subscription fee | $99.00 |
| EC2 m5.large (1 month) | $70.08 |
| 100 GB EBS volume | $10.00 |
| Total | ≈$179.00 |
How to enable HTTPS?
How do I configure my TB PE instance?
See official documentation page for more details.
How do I get software updates for my TB PE instance?
You will receive an email notification about new software versions once it becomes available. This email notification will contain a link to official documentation page with the upgrade instructions.
How do I backup my database?
You can follow backup instructions available with upgrade instructions. For additional guidance, you can also refer to the official PostgreSQL backup documentation.
How do I upgrade my instance type?
To upgrade your EC2 instance type, follow these steps:
-
Stop the ThingsBoard Service
Before changing the instance type, stop the ThingsBoard service to ensure a clean shutdown:
1
sudo service thingsboard stop
-
Stop the EC2 Instance
Go to the AWS EC2 Console, select your instance, and stop it:
- Navigate to EC2 Dashboard
- Select the instance you want to upgrade
- Click Instance state → Stop instance
-
Change the Instance Type
Once the instance is stopped, update its type:
- In the EC2 Console, go to Actions → Instance settings → Change instance type
- Select the desired instance type
- Click Change
-
Start the Instance
Where is my ThingsBoard instance logs?
ThingsBoard logs are stored by this path:
1
/var/log/thingsboard
For more details on managing logs and configuring log levels, refer to the Troubleshooting Guide
How do I get professional support?
Please review ThingsBoard professional support plans and contact us.
Next steps
-
Getting started guides - These guides provide quick overview of main ThingsBoard features. Designed to be completed in 15-30 minutes.
-
Connect your device - Learn how to connect devices based on your connectivity technology or solution.
-
Data visualization - These guides contain instructions on how to configure complex ThingsBoard dashboards.
-
Data processing & actions - Learn how to use ThingsBoard Rule Engine.
-
IoT Data analytics - Learn how to use rule engine to perform basic analytics tasks.
-
Advanced features - Learn about advanced ThingsBoard features.
-
Contribution and Development - Learn about contribution and development in ThingsBoard.