Propagation automatically transfers data from the current entity to one or more related entities resolved through entity relations. It can either copy values as-is or compute a new value before sending, which makes it ideal for synchronizing telemetry and attributes across entity hierarchies.
Use “Propagation” when you need to:
- Mirror device telemetry to a parent asset (e.g., battery level, signal quality, last known status)
- Push configuration attributes from an asset to child devices (e.g., HVAC mode, setpoints, operating profiles)
- Transform data before sharing it (e.g., calculate dew point on a device and store it on the greenhouse asset)
- Propagate to multiple entities (e.g., update all devices managed by a building or a group)
Configuration
Open the create calculated field dialog and specify:
- the calculated field title,
- the entity or entity profile to which the calculated field will be applied,
- Select “Propagation” as a calculated field type.
Propagation path to related entities
Relation direction
Define the path from the current entity to the entity to which the data will be propagated:
- Up to parent — data is propagated to the parent entity.
- Down to child — data is propagated to the child entity.
Propagation works only with direct (single-level) relationships — without recursion or multi-level traversal.
Relation type
Defines the relationship type between the target entity and the related entities (for example, Contains, Manages, or any other type).
If multiple entities match the selected relationship direction and relationship type, the data will be propagated to each of them.
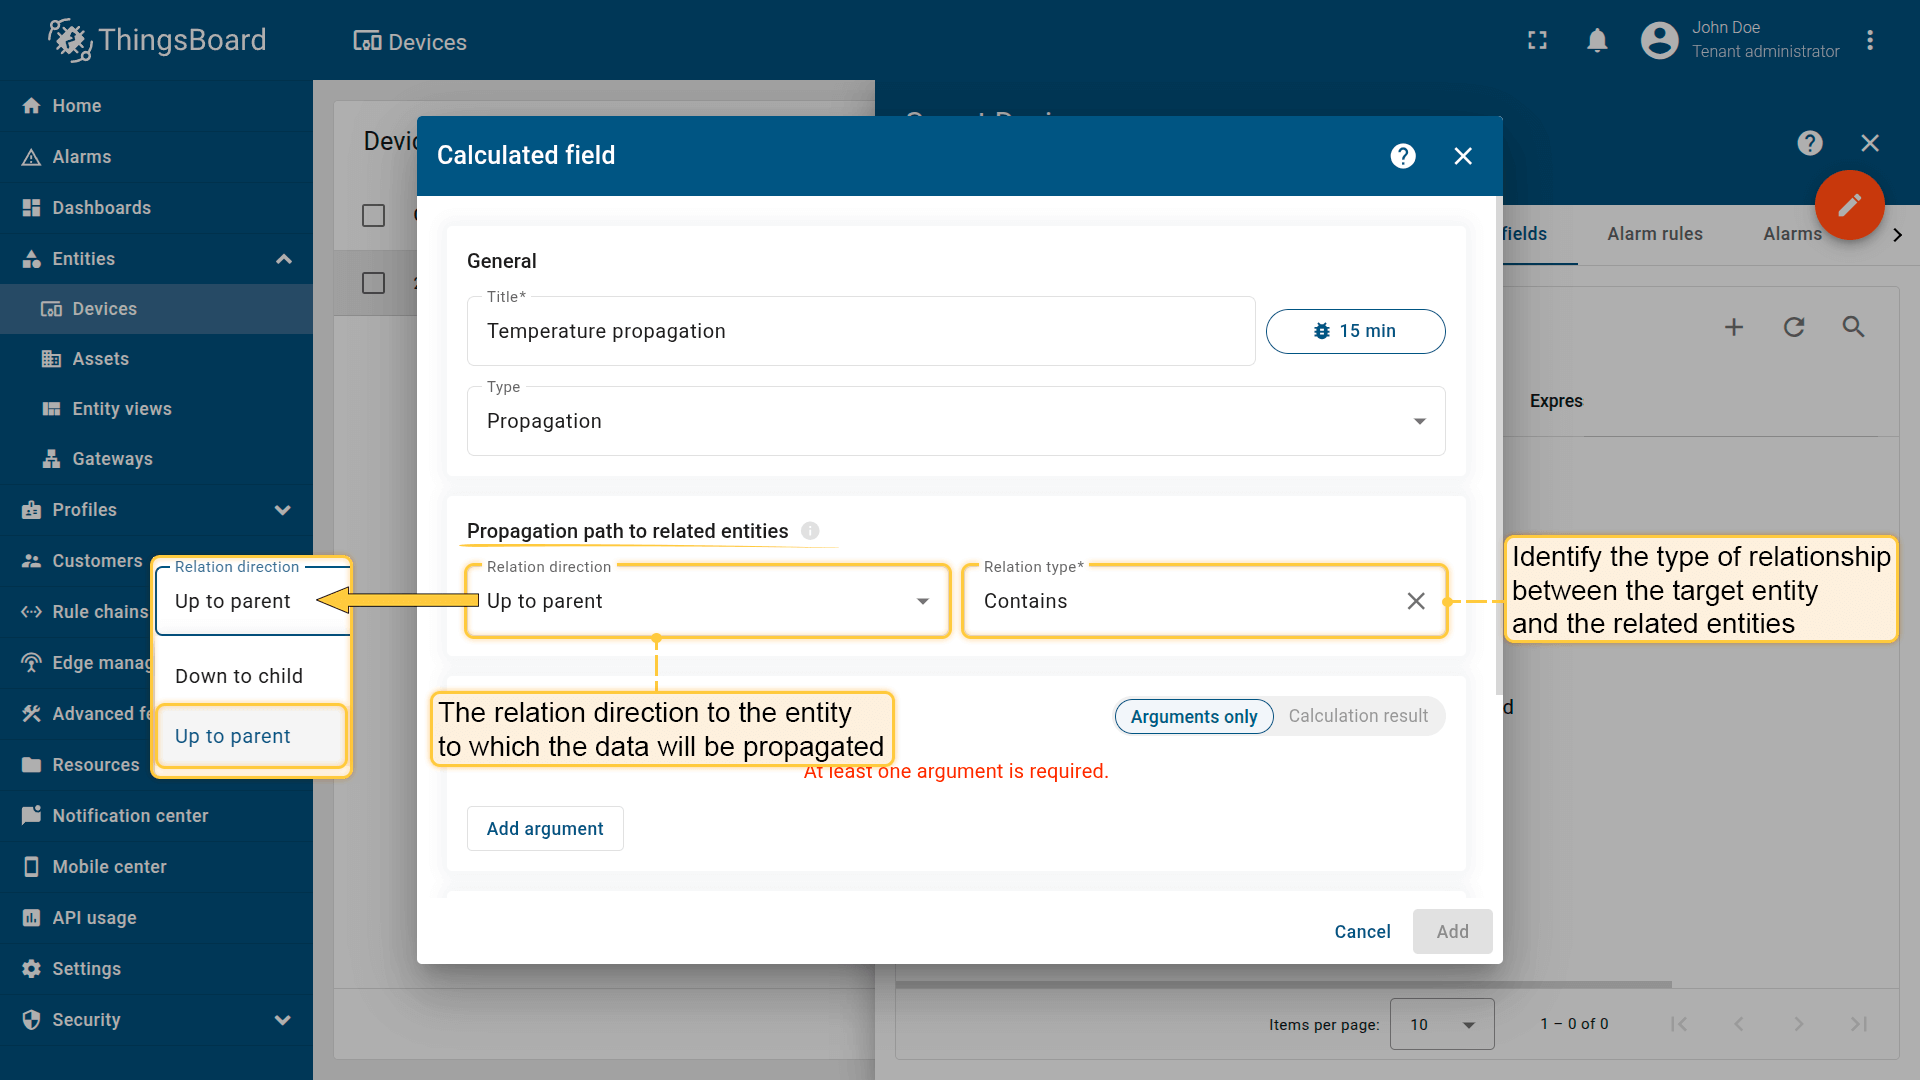
Define the path to the entity to which the data will be propagated, as well as the relationship type between the entities.
Data to propagate
Define which data will be propagated to the related entity.
The data to propagate is configured as arguments. For details on argument types and configuration, see the Arguments section.
Two modes are available:
1. Arguments only
Works as direct data copying data (attribute or latest telemetry) from the current entity to the related entity, with the option to rename the propagated key before storing it.
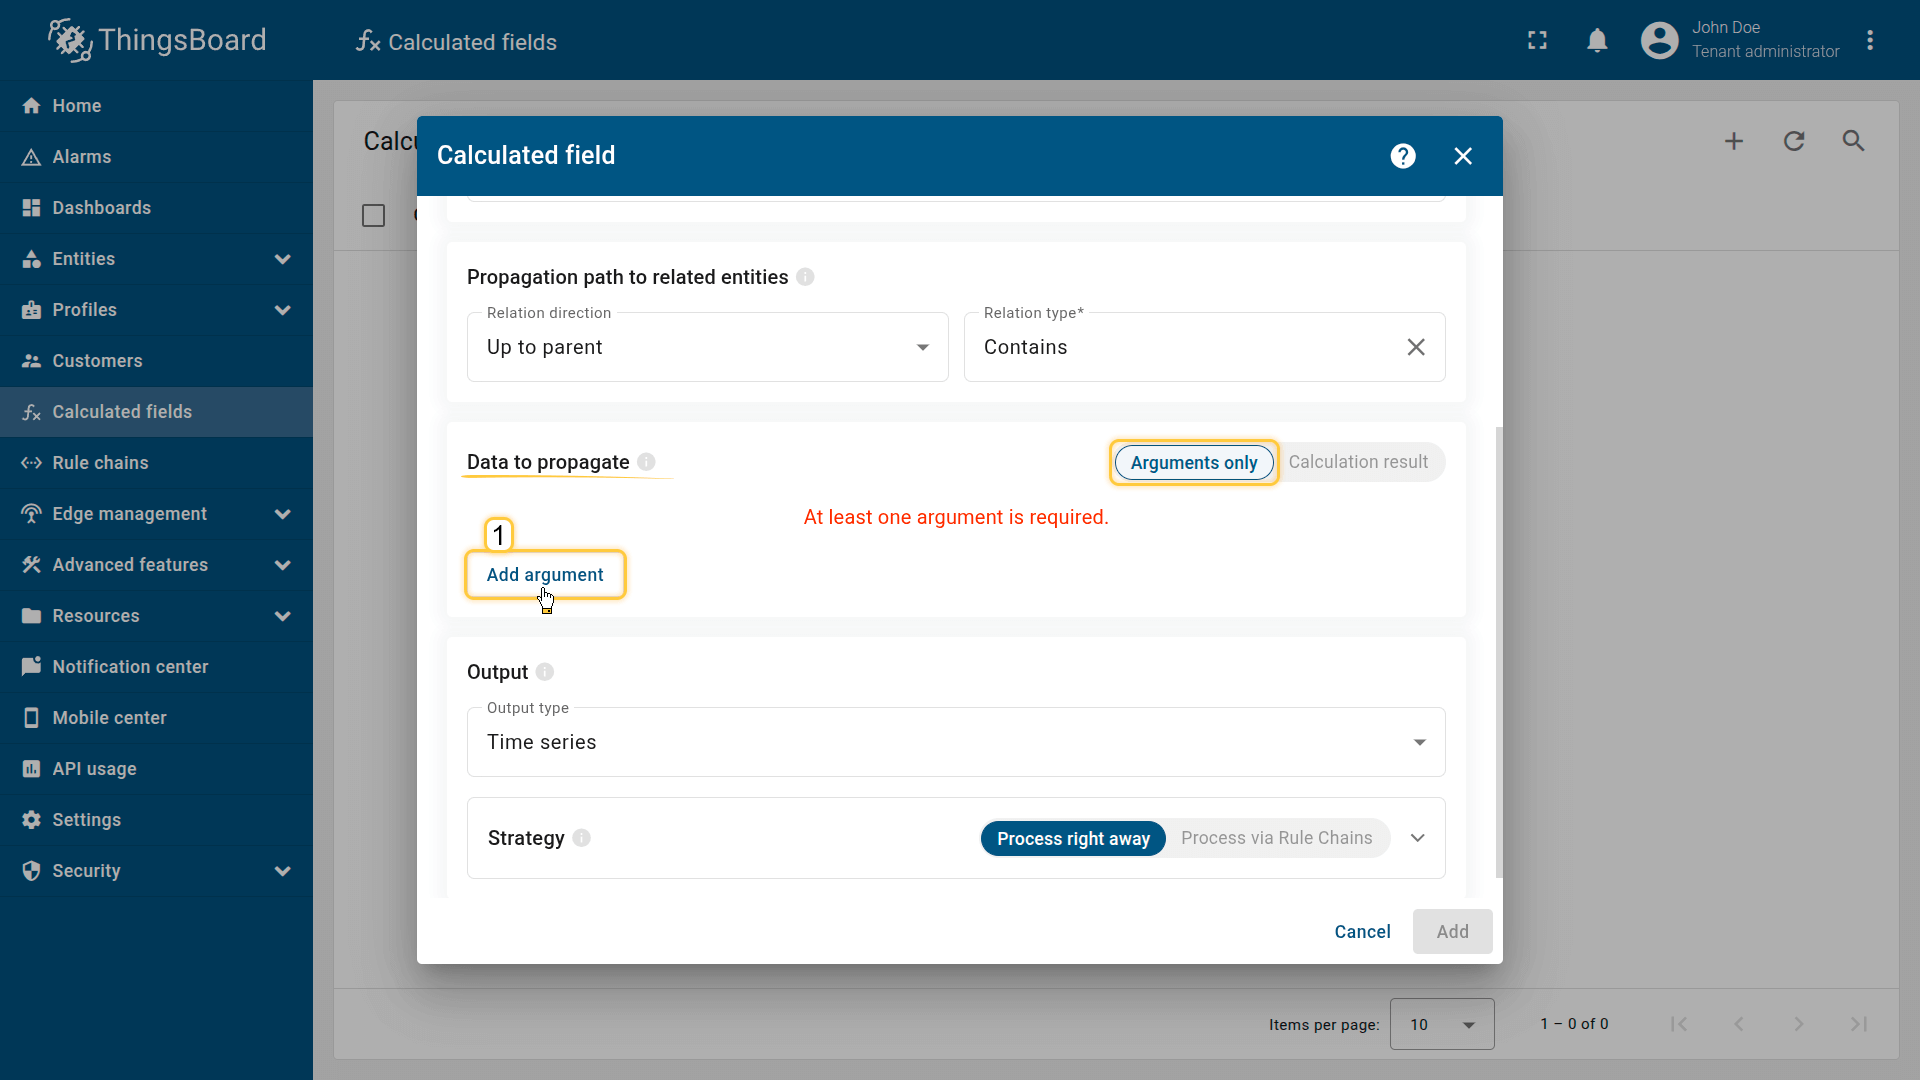
Click Add argument (1).

The data source will be the current entity to which the calculated field is applied.
Specify the argument type (2), time series key / attribute key (3), output key (4), and default value (5), then click Add (6).
2. Calculation result
Allows you to compute or transform data (attribute, latest telemetry, or time series rolling) from multiple entities (Current entity / Device / Asset / Customer / Current tenant / Current owner) before propagating it to the related entity.
The sequence of actions is as follows:
- Configure the arguments that will provide input data from the selected entity for further processing.
- Provide a TBEL script that will calculate a new value based on the defined arguments.
- The computed result is then propagated to the related entity.
The variable name that stores the computed result must be defined directly in the function body.
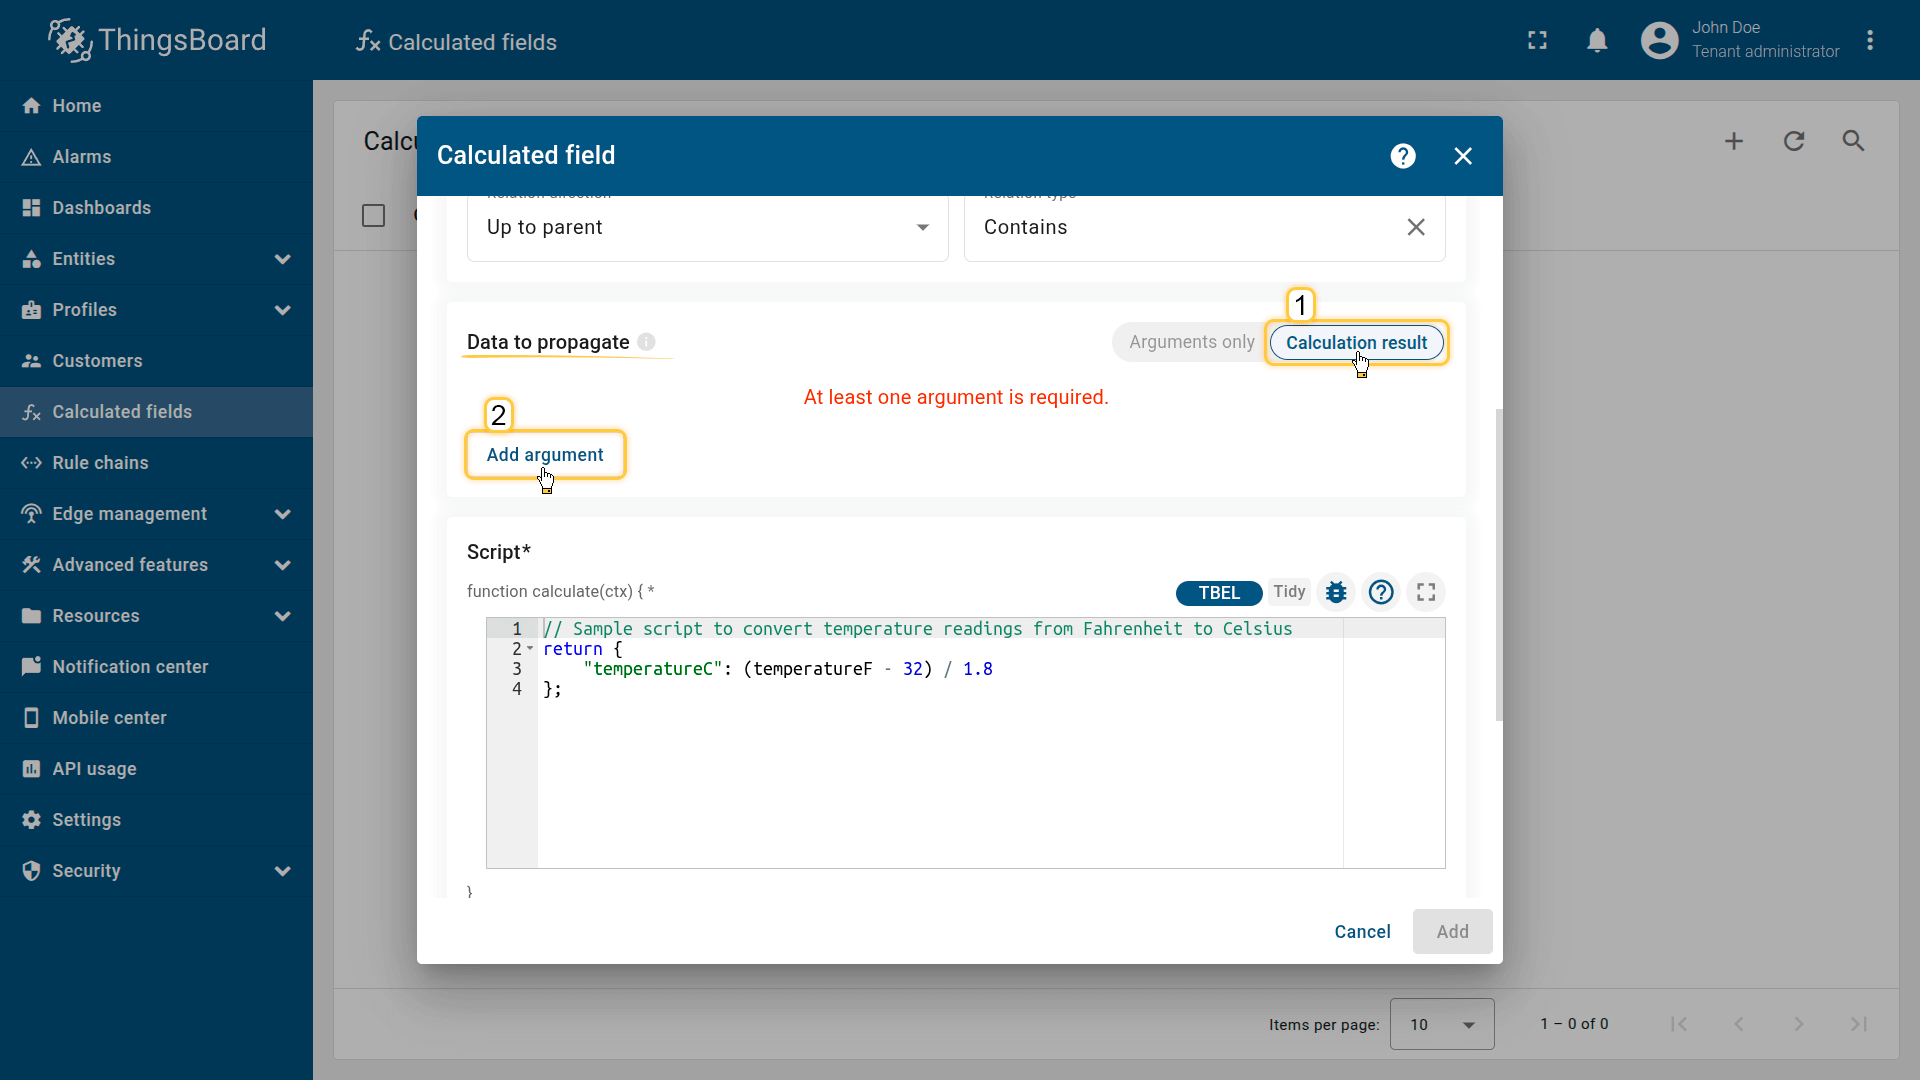
Switch to Calculation result mode (1). Click Add argument (2).
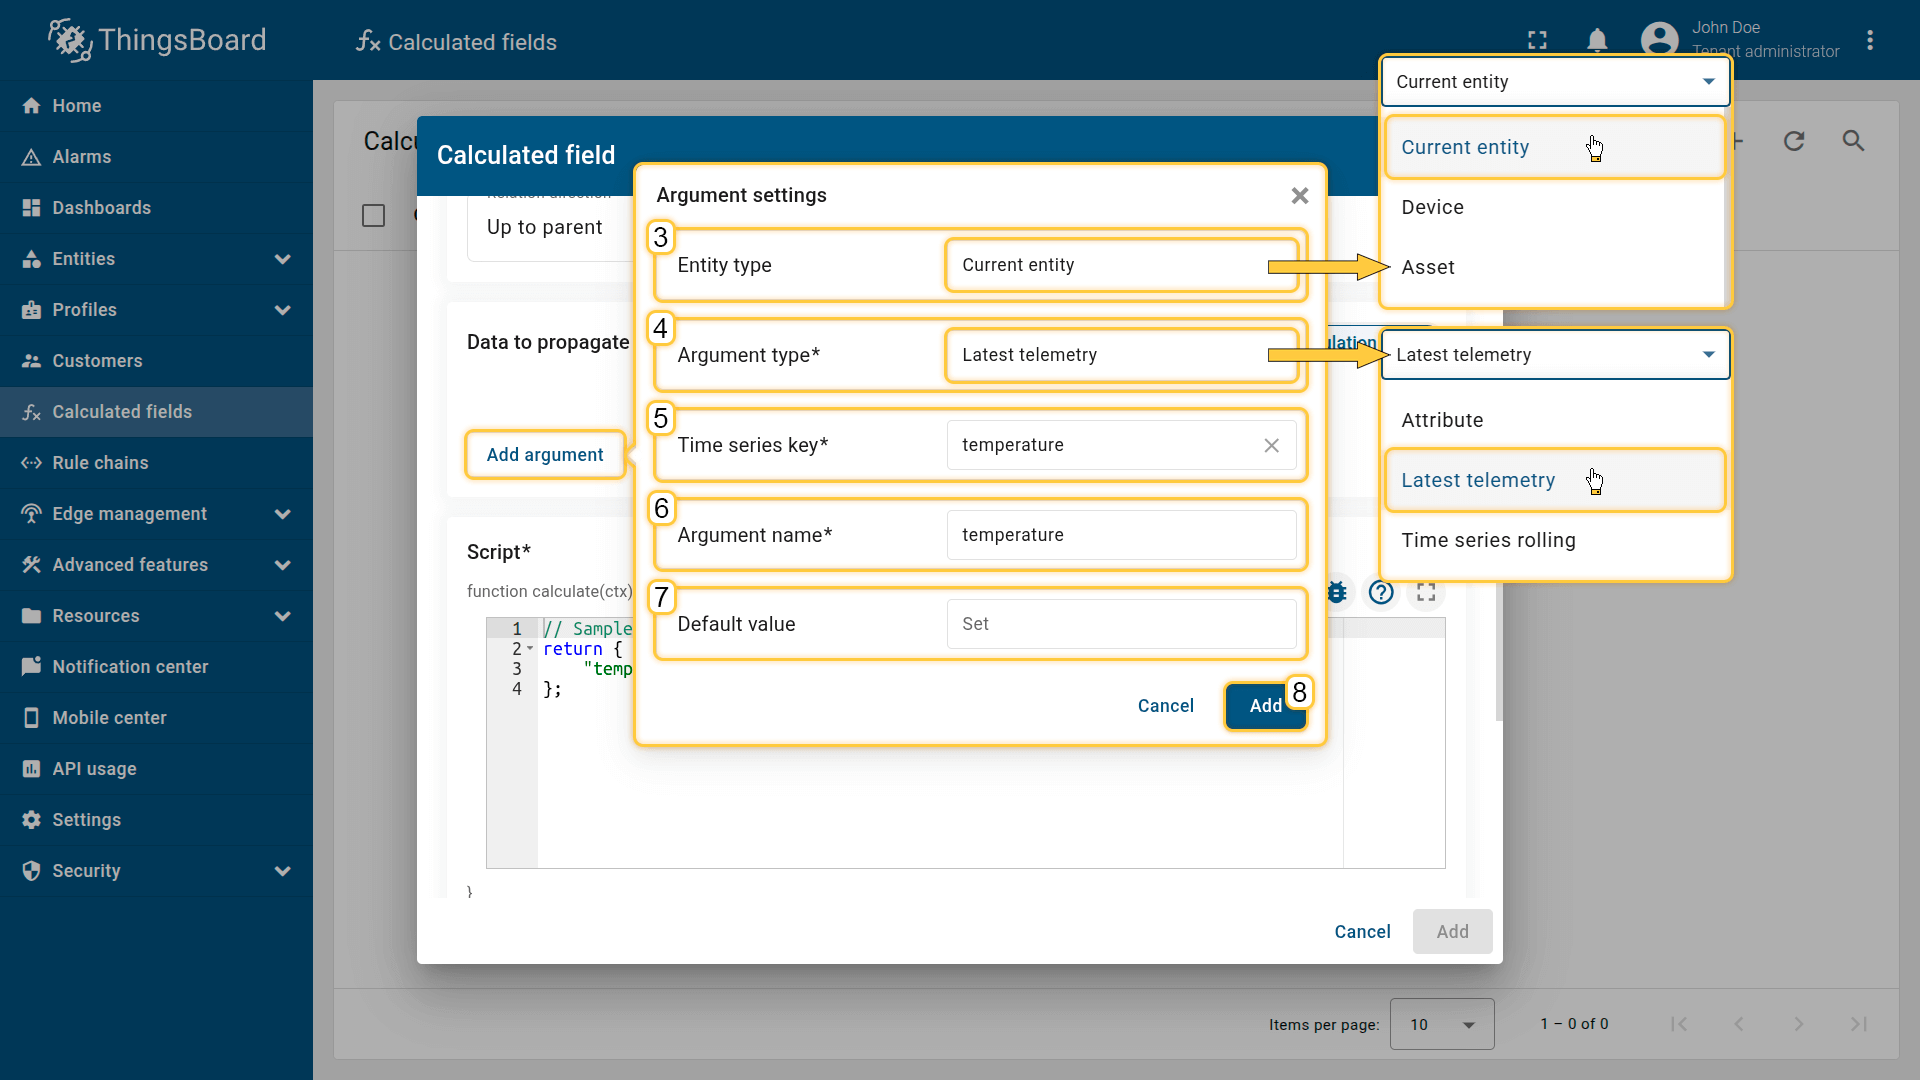
The data source will be the current entity (3) to which the calculated field is applied.
Specify the argument type (4), time series key / attribute key (5), output key (6), and default value (7), then click Add (8).
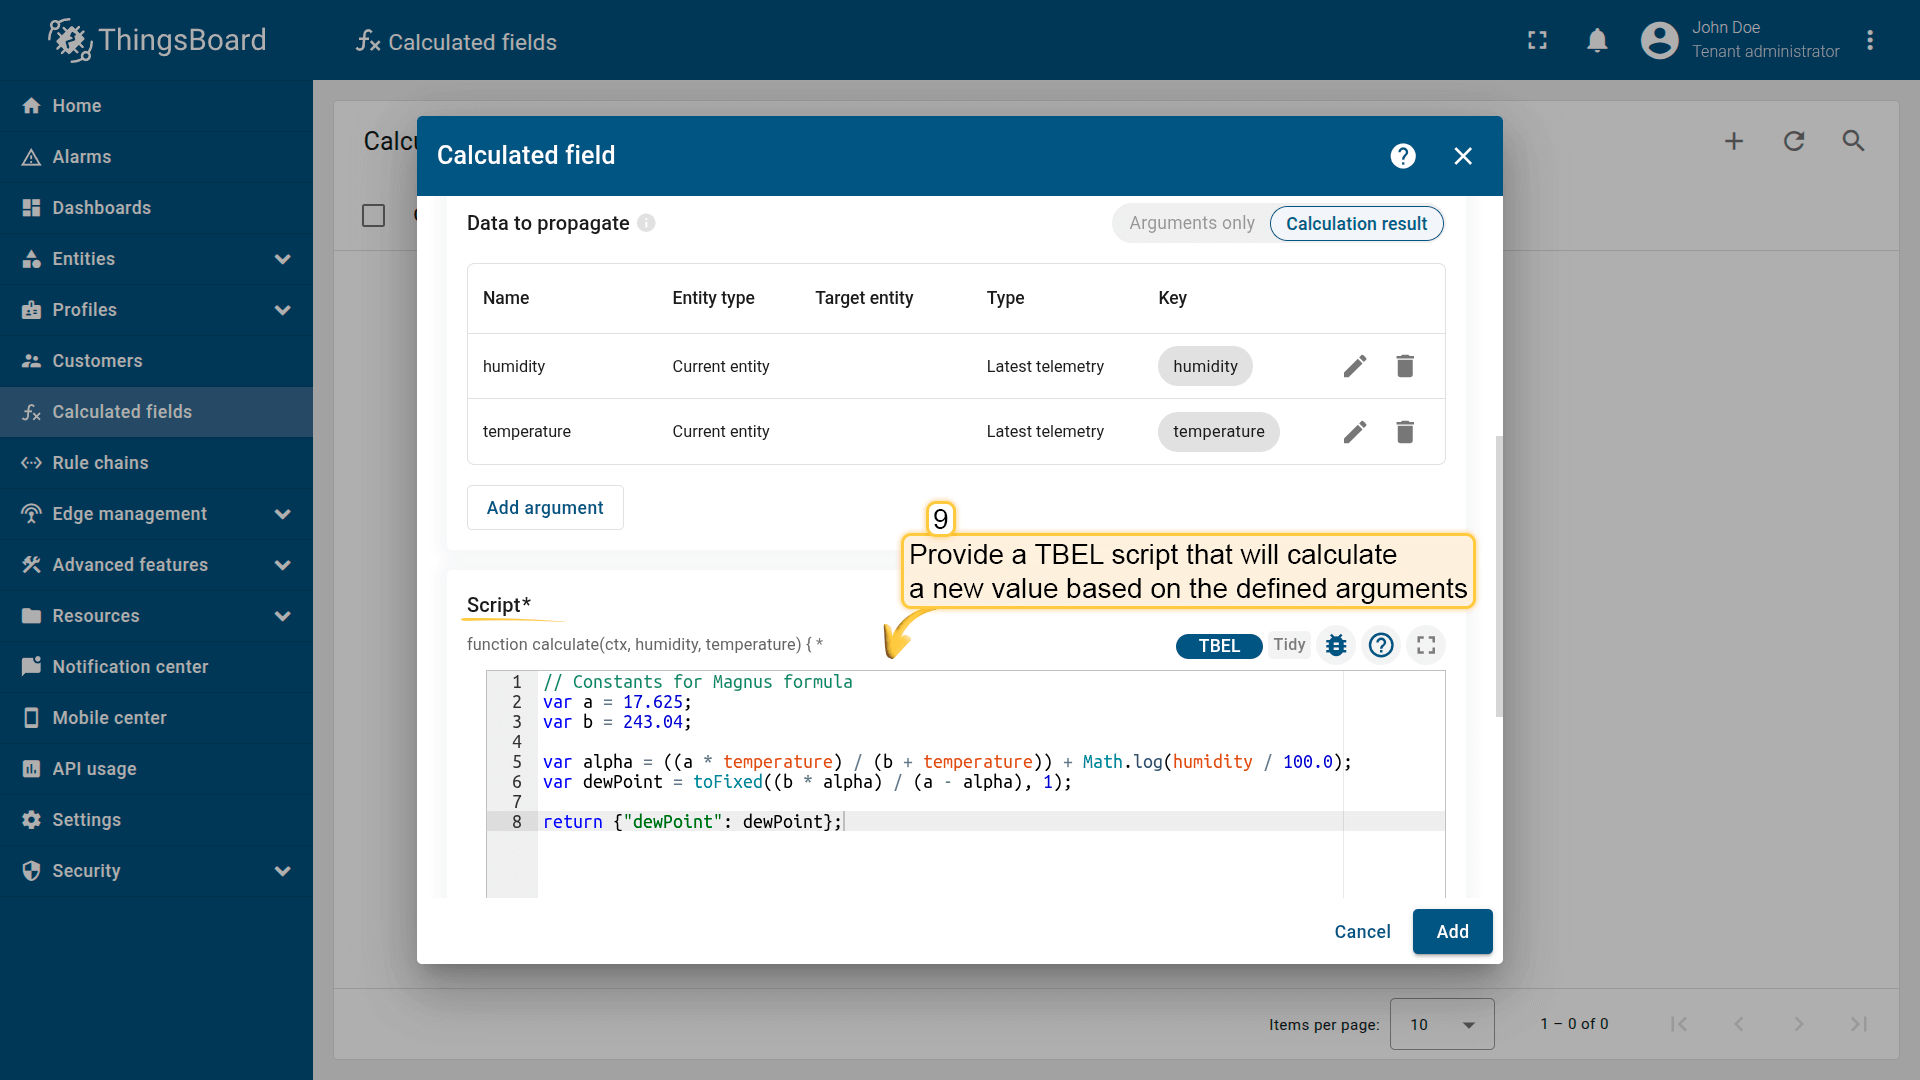
Provide a TBEL script that will calculate a new value based on the defined arguments.
Script
Define the calculation logic using a TBEL function based on the variables configured in Arguments.
Script calculated fields must implement:
1
function calculate(ctx, arg1, arg2, ...): object | object[]
The function can return a single JSON object (multiple output keys) or an array of JSON objects (multiple time series records).
The output variable names are defined directly in the returned object.
Example: Dew point calculation
1
2
3
4
5
6
7
8
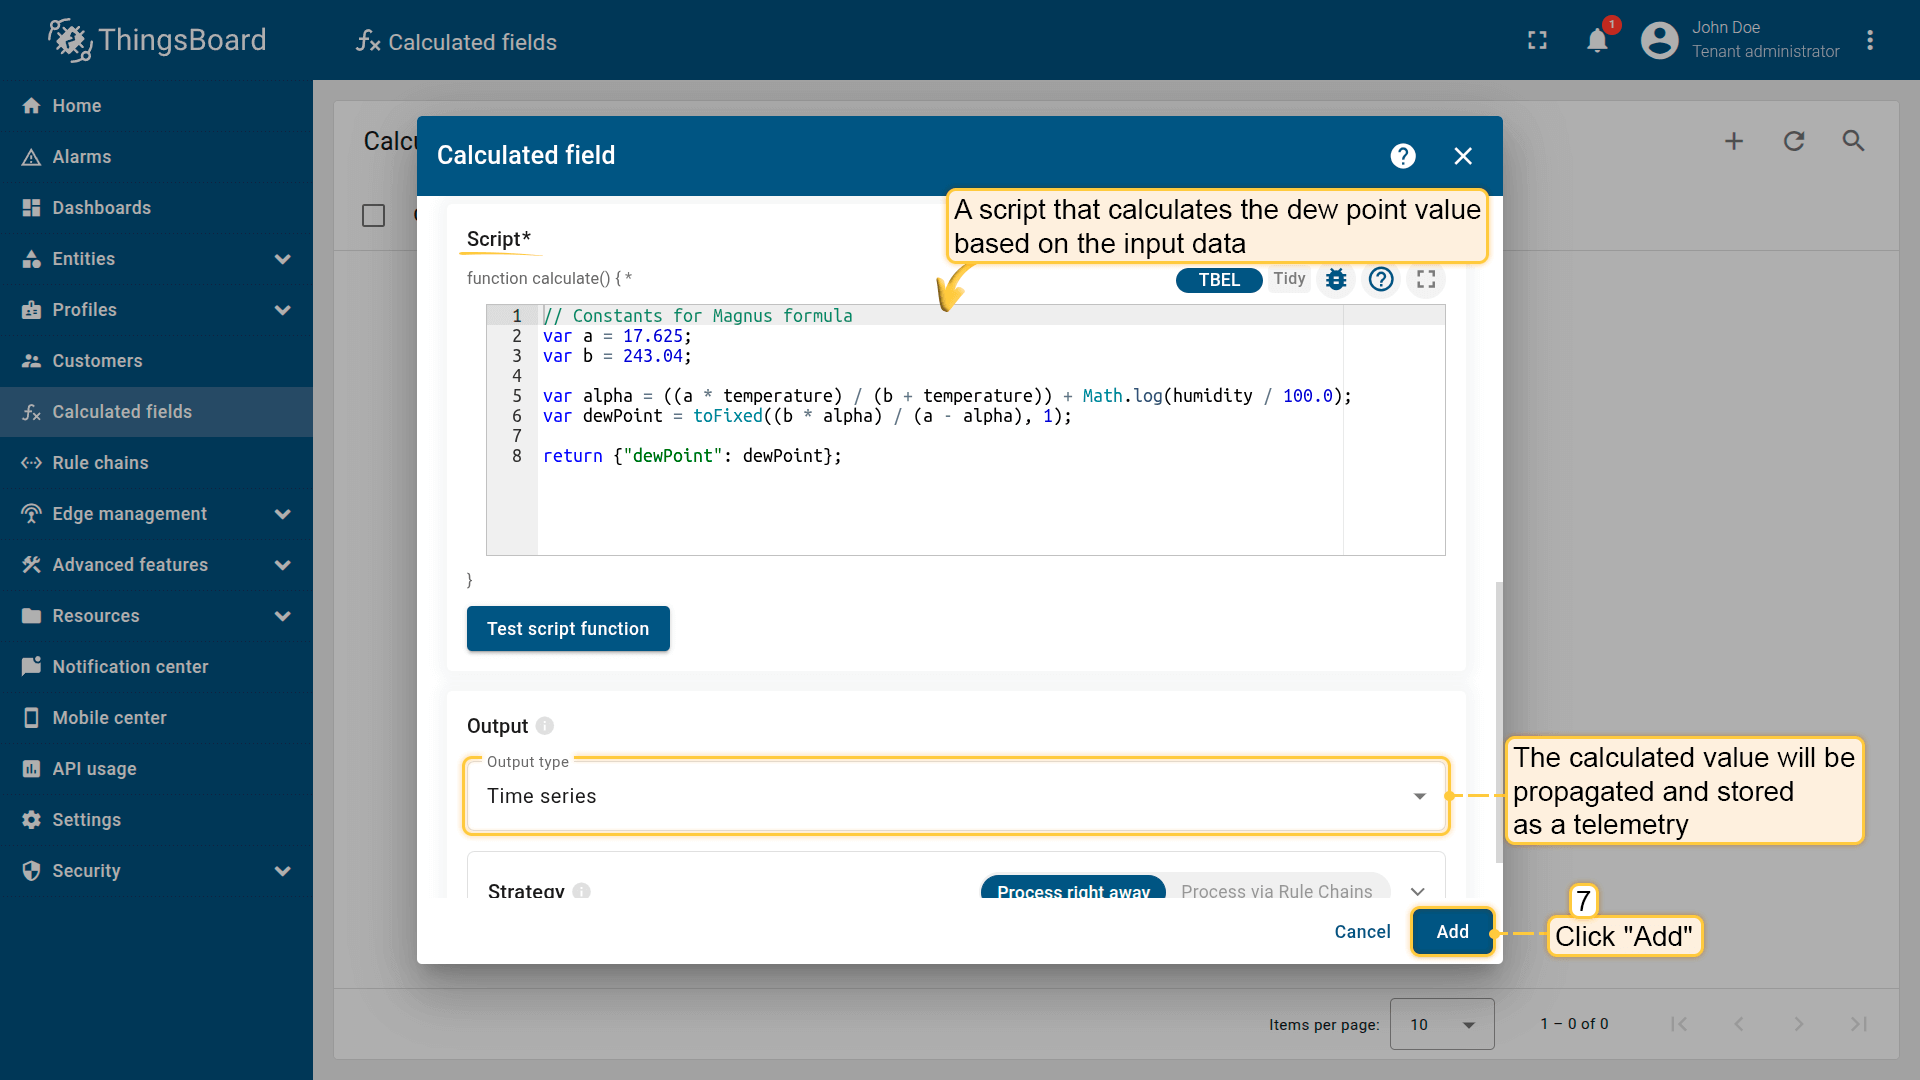
// Constants for Magnus formula
var a = 17.625;
var b = 243.04;
var alpha = ((a * temperature) / (b + temperature)) + Math.log(humidity / 100.0);
var dewPoint = toFixed((b * alpha) / (a - alpha), 1);
return {"dewPoint": dewPoint};
The function uses the temperature and humidity arguments to calculate the dew point value. The calculation result will be stored in the variable dewPoint, rounding the value to one decimal places.
Direct argument access
Arguments are also passed as function parameters (arg1, arg2, …), so you can use them directly (for example, temperature, humidity) for cleaner scripts.
Use either direct parameters or
ctx.args.<arg>depending on clarity and your preferred style.
Context object (ctx)
The ctx object provides metadata and access to argument values:
ctx.latestTs— the most recent timestamp (milliseconds) from telemetry-based arguments. Useful for storing results with the same timestamp as incoming data.ctx.args— an object containing all configured arguments, accessible via dot (.) notation:- Single-value arguments (attributes or latest telemetry)
ctx.args.<arg>.ts— timestamp of the argument.ctx.args.<arg>.value— value of the argument.
- Rolling time series arguments
ctx.args.<arg>.timeWindow— object with start and end timestamps{ startTs, endTs }.ctx.args.<arg>.values— array of{ ts, value }records representing timestamped telemetry.ctx.args.<arg>.<method>()— built-in methods such asmean(),sum(),min(),max(),first(),last(),merge(), and others.
- Single-value arguments (attributes or latest telemetry)
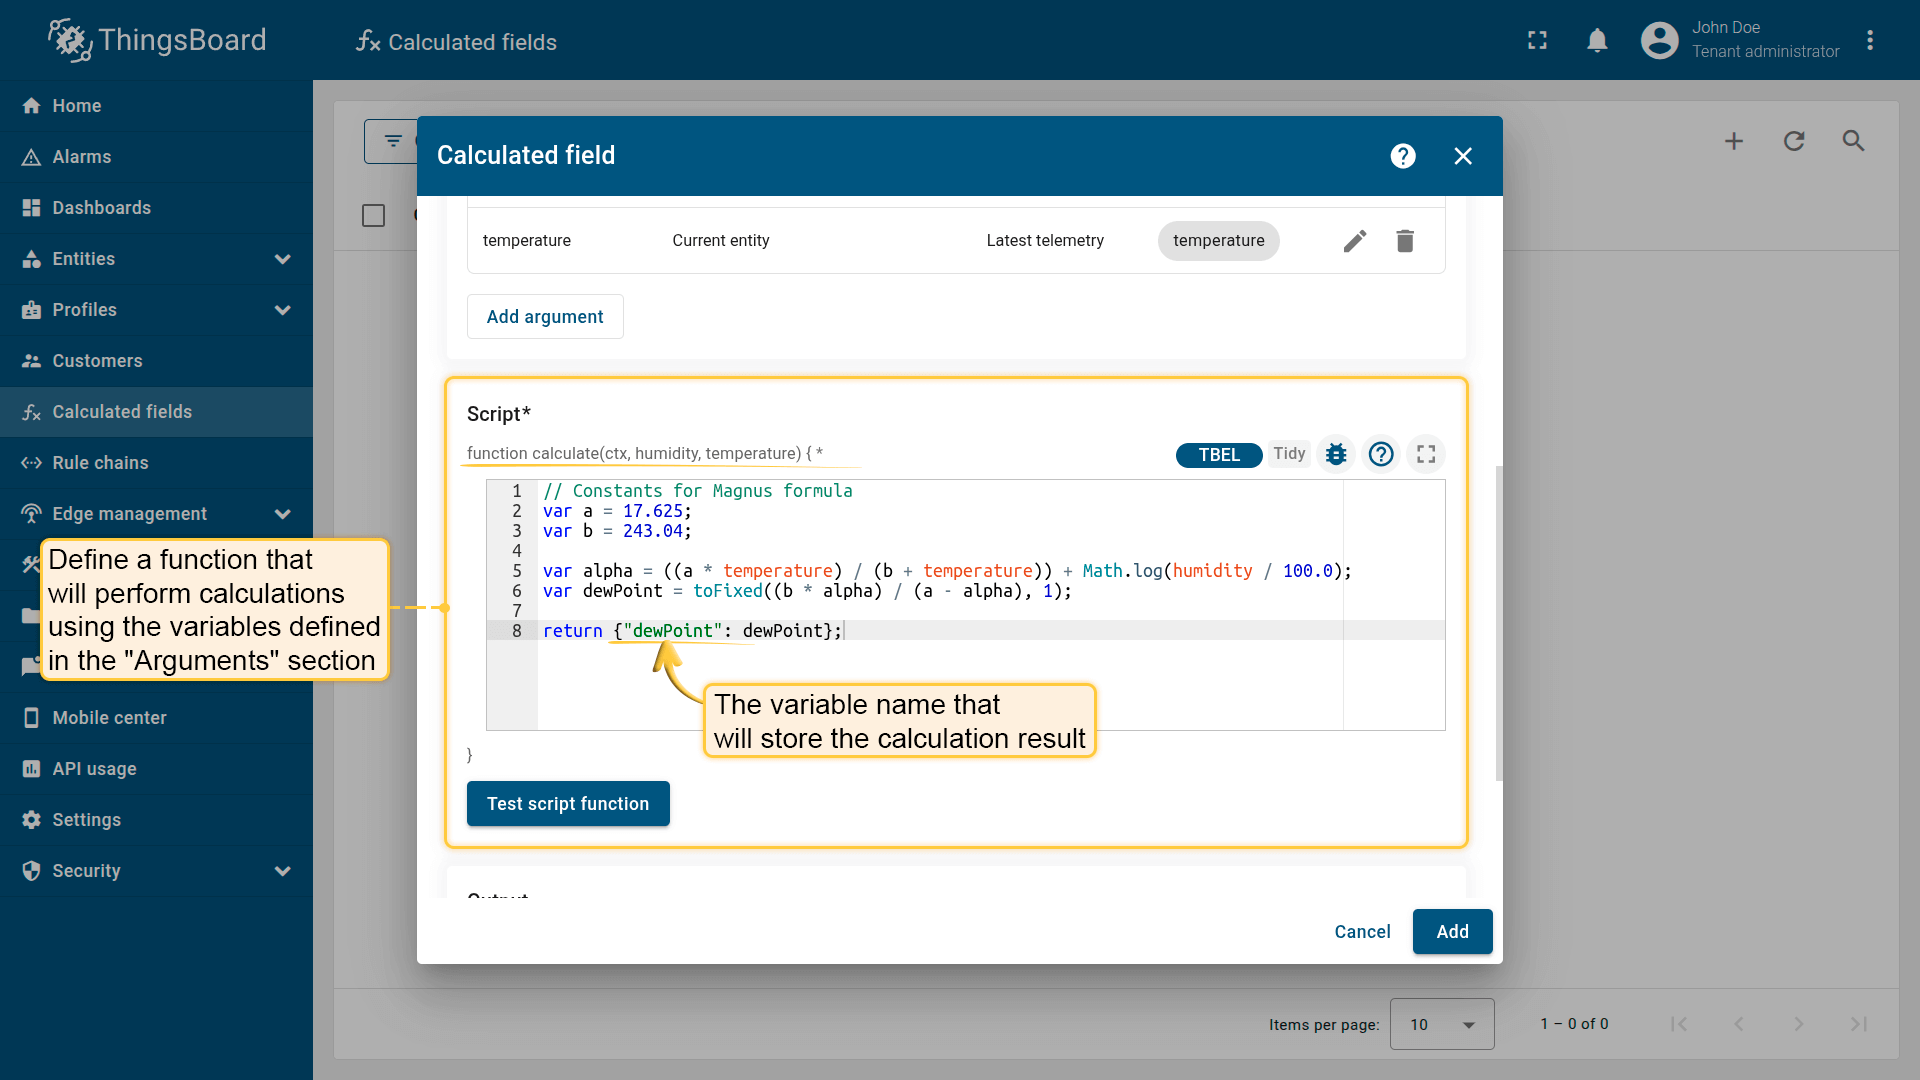
Define a function that will perform calculations using the variables defined in the “Arguments” section. The variable name that will store the calculation result is defined within the function itself.
Output
Data is propagated to each related entity and stored there as either time series or attributes.
For more details about output types and processing strategies, see the Output section.
Examples
To help you get started, here are three common configuration patterns applied to real-world scenarios.
Example 1: Propagate device battery level to the parent Asset
Use case
The Tracker A device sends its battery charge level (batteryLevel) to ThingsBoard as telemetry.
Goal
Automatically propagate the device battery level to the related Truck 1 asset and store it as a server-side attribute under a new key: deviceBatteryLevel.
Calculated field configuration
Download the “Battery level propagation” calculated field configuration (JSON).
Configuration steps
1. Import demo device
Import a device that publishes battery telemetry.
- Download the CSV file: battery-level-device-data.csv
- Go to the Devices and import the CSV file.
CSV includes:
- Name: Tracker A
- Type: tracker
- Time series: batteryLevel
Important note about the CSV: the column type for the batteryLevel key must be set to “Time series”.
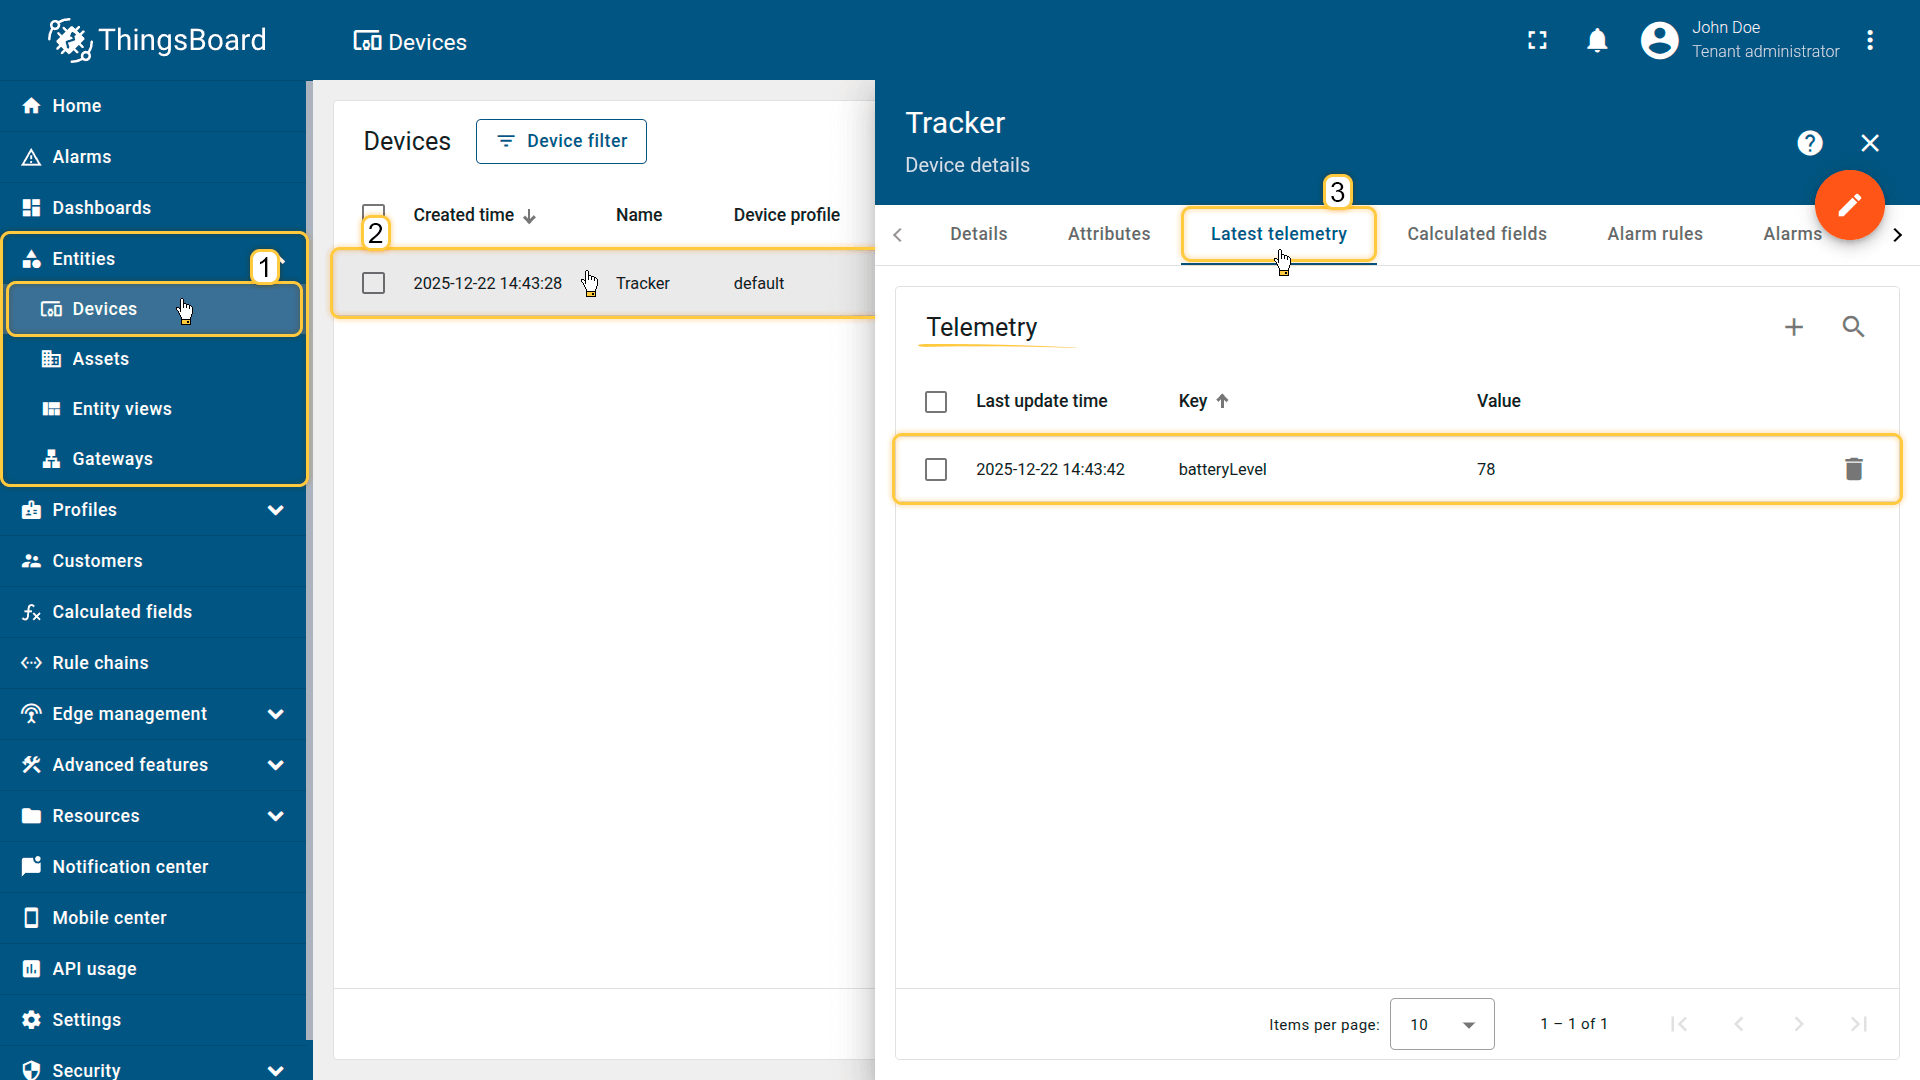
Import a device that publishes battery level telemetry.
2. Import demo asset
Import an asset that represents the tracked truck.
- Download the CSV file: battery-level-asset-data.csv
- Go to Assets and import the CSV file.
CSV includes:
- Name: Truck 1
- Type: truck
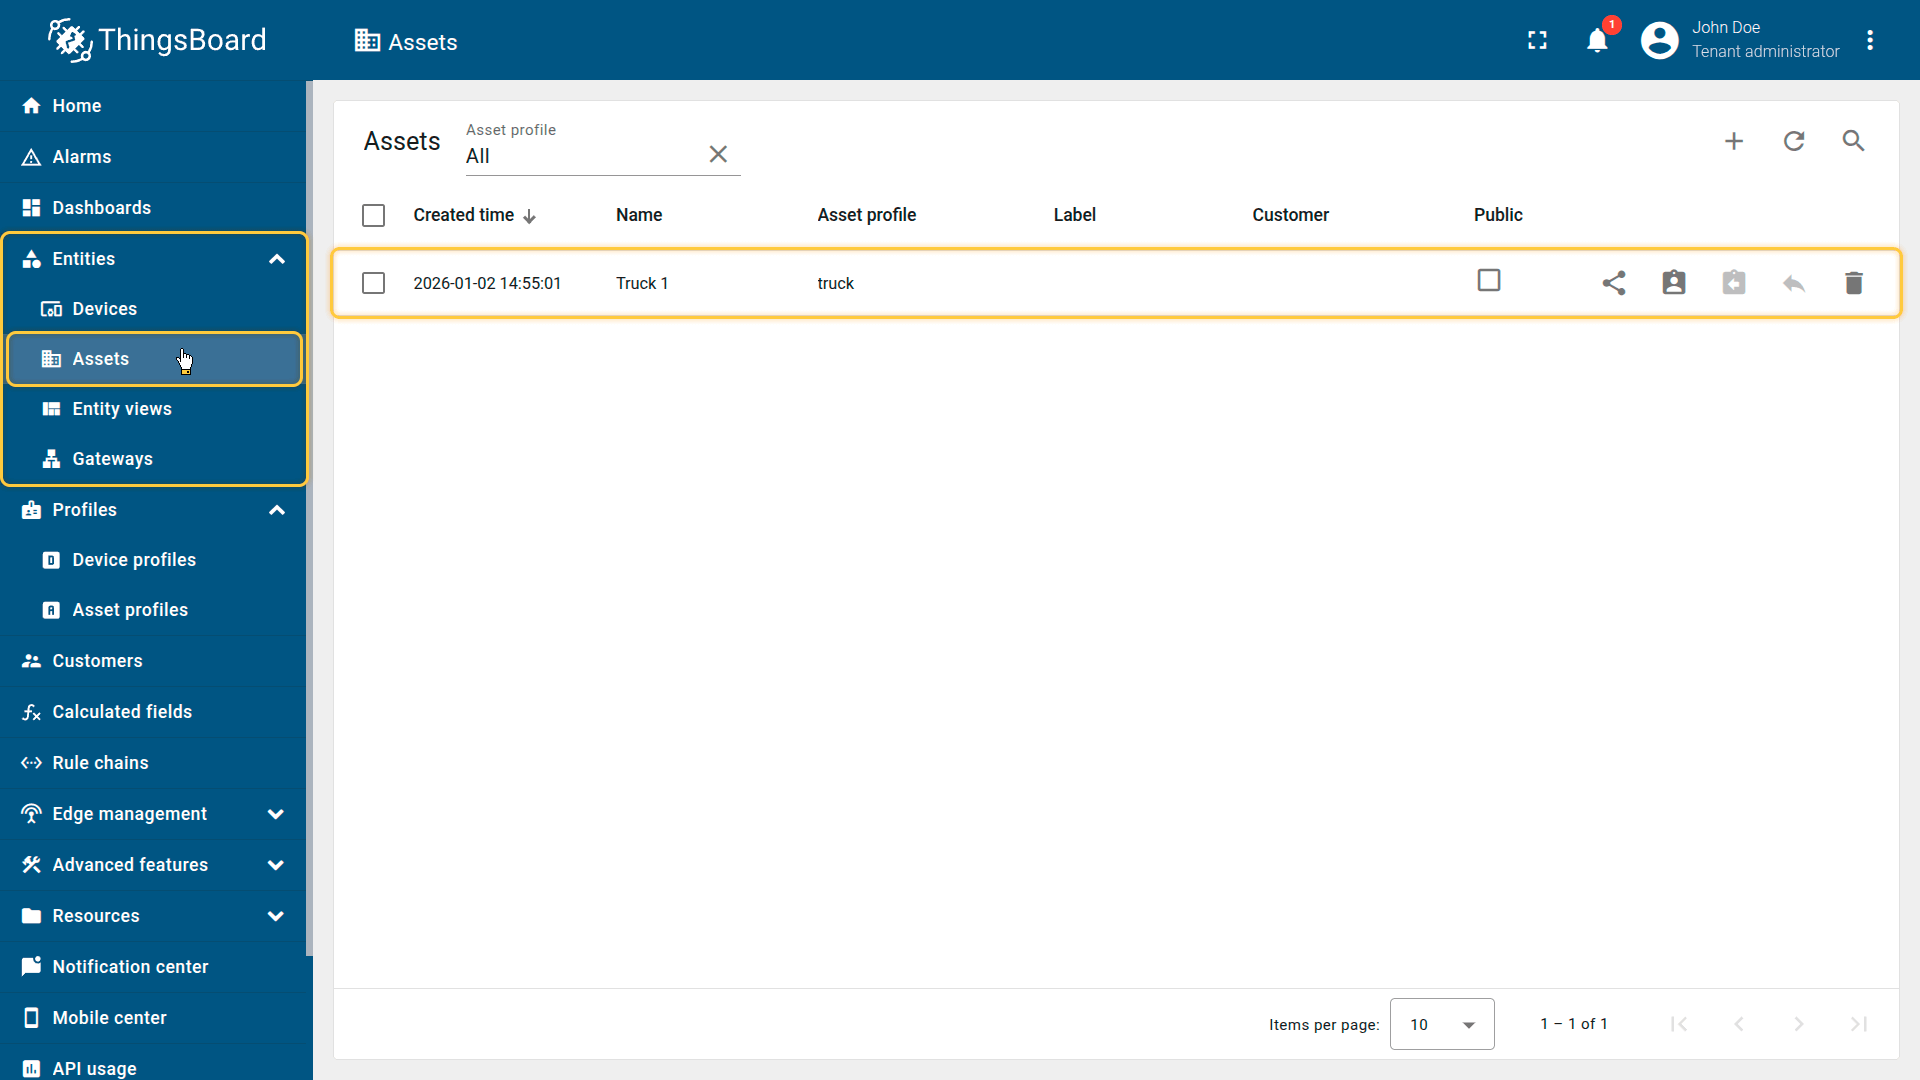
Import the demonstration asset Truck 1.
3. Create a relation between the asset and the device
Create a relation so the calculated field can resolve the target asset.
Create a relationship between the Track 1 asset and the Tracker A device:
- Relation direction: From
- Relation type: Contains
This relation is used by the propagation calculated field to locate the parent entity.

The Tracker device linked to the Track 1 asset via the Contains relation.
4. Apply the Propagation calculated field to the device profile
Configure a Propagation calculated field in the tracker device profile (automatically created during device import) so that it works for Tracker A.
- Download the calculated field configuration file.
- Go to the “Calculated fields” tab and import the configuration.
This configuration propagates the latest telemetry value of batteryLevel to the parent asset (Truck 1).

Go to the Calculated fields tab and import the calculated field configuration.
Apply the calculated field to the tracker profile so it runs for all devices using it.
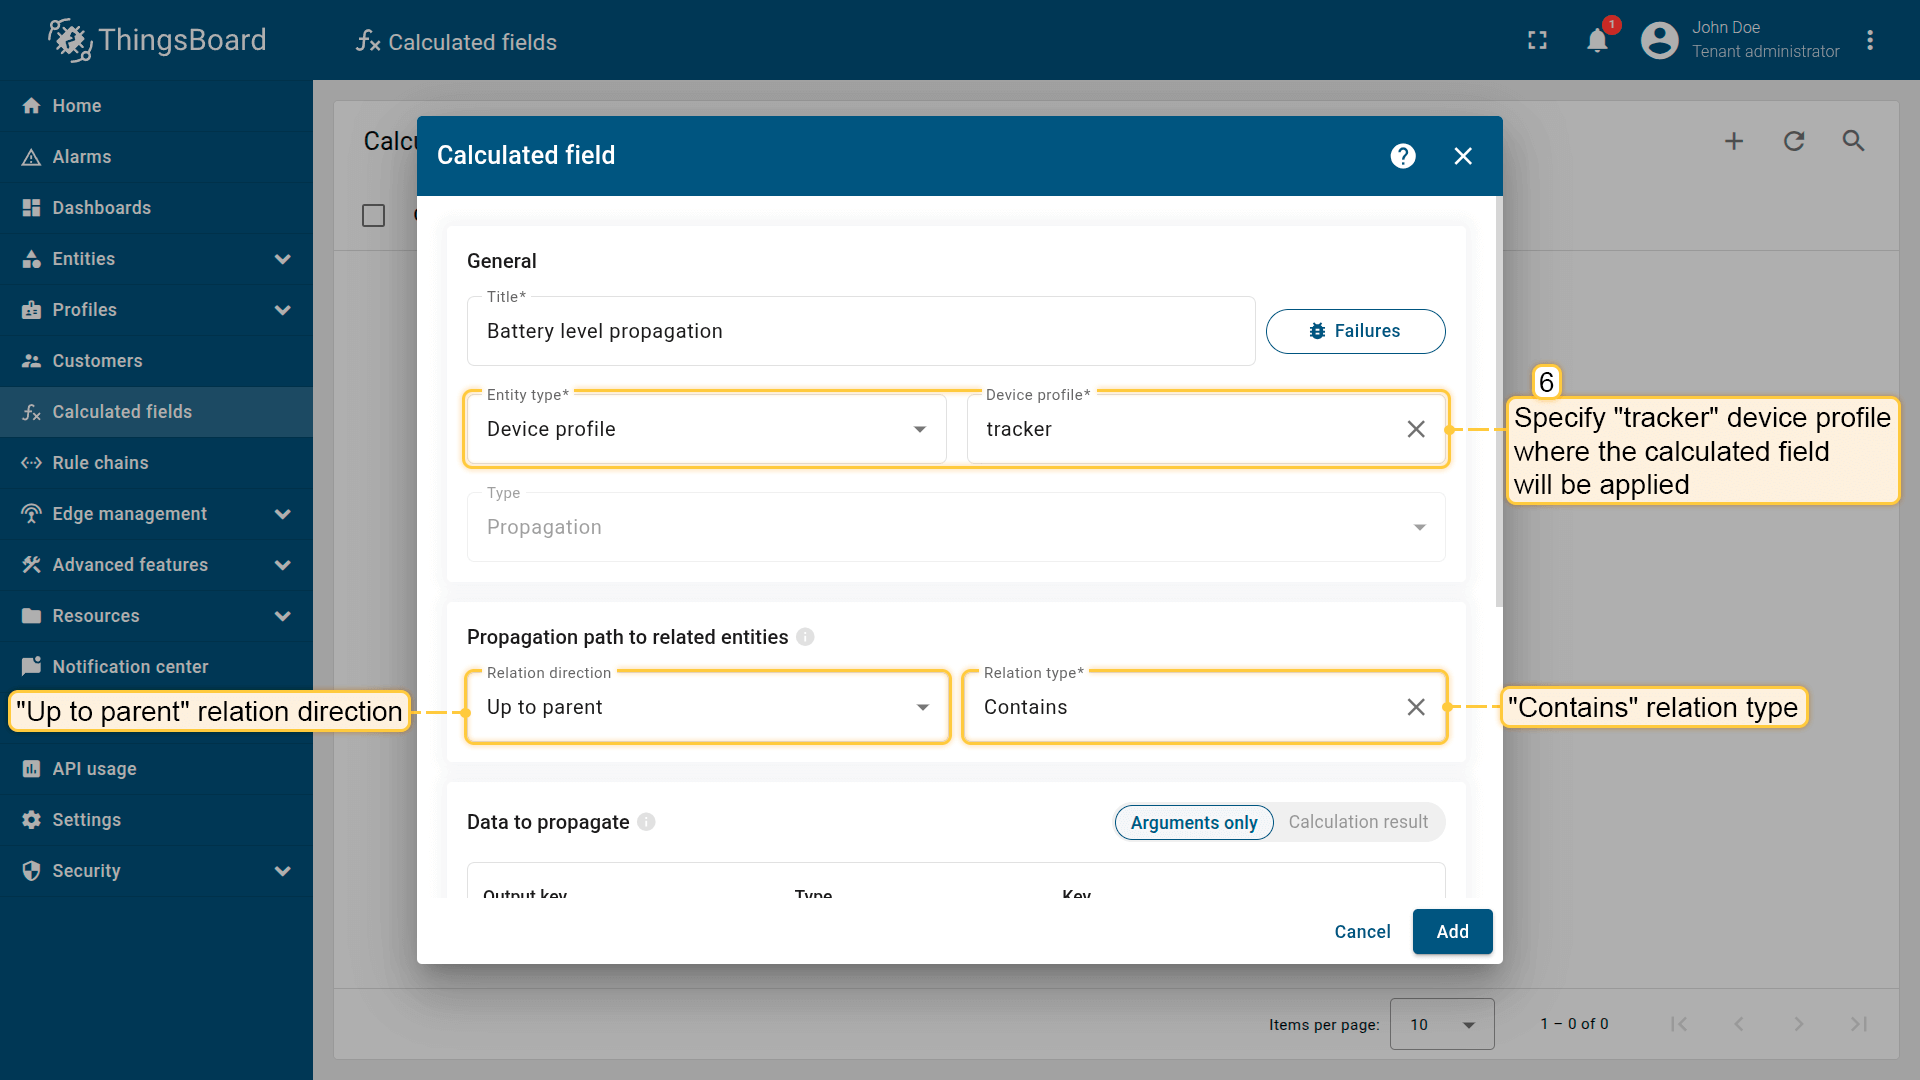
Propagation path to related entities: Relation direction: Up to parent; Relation type: Contains
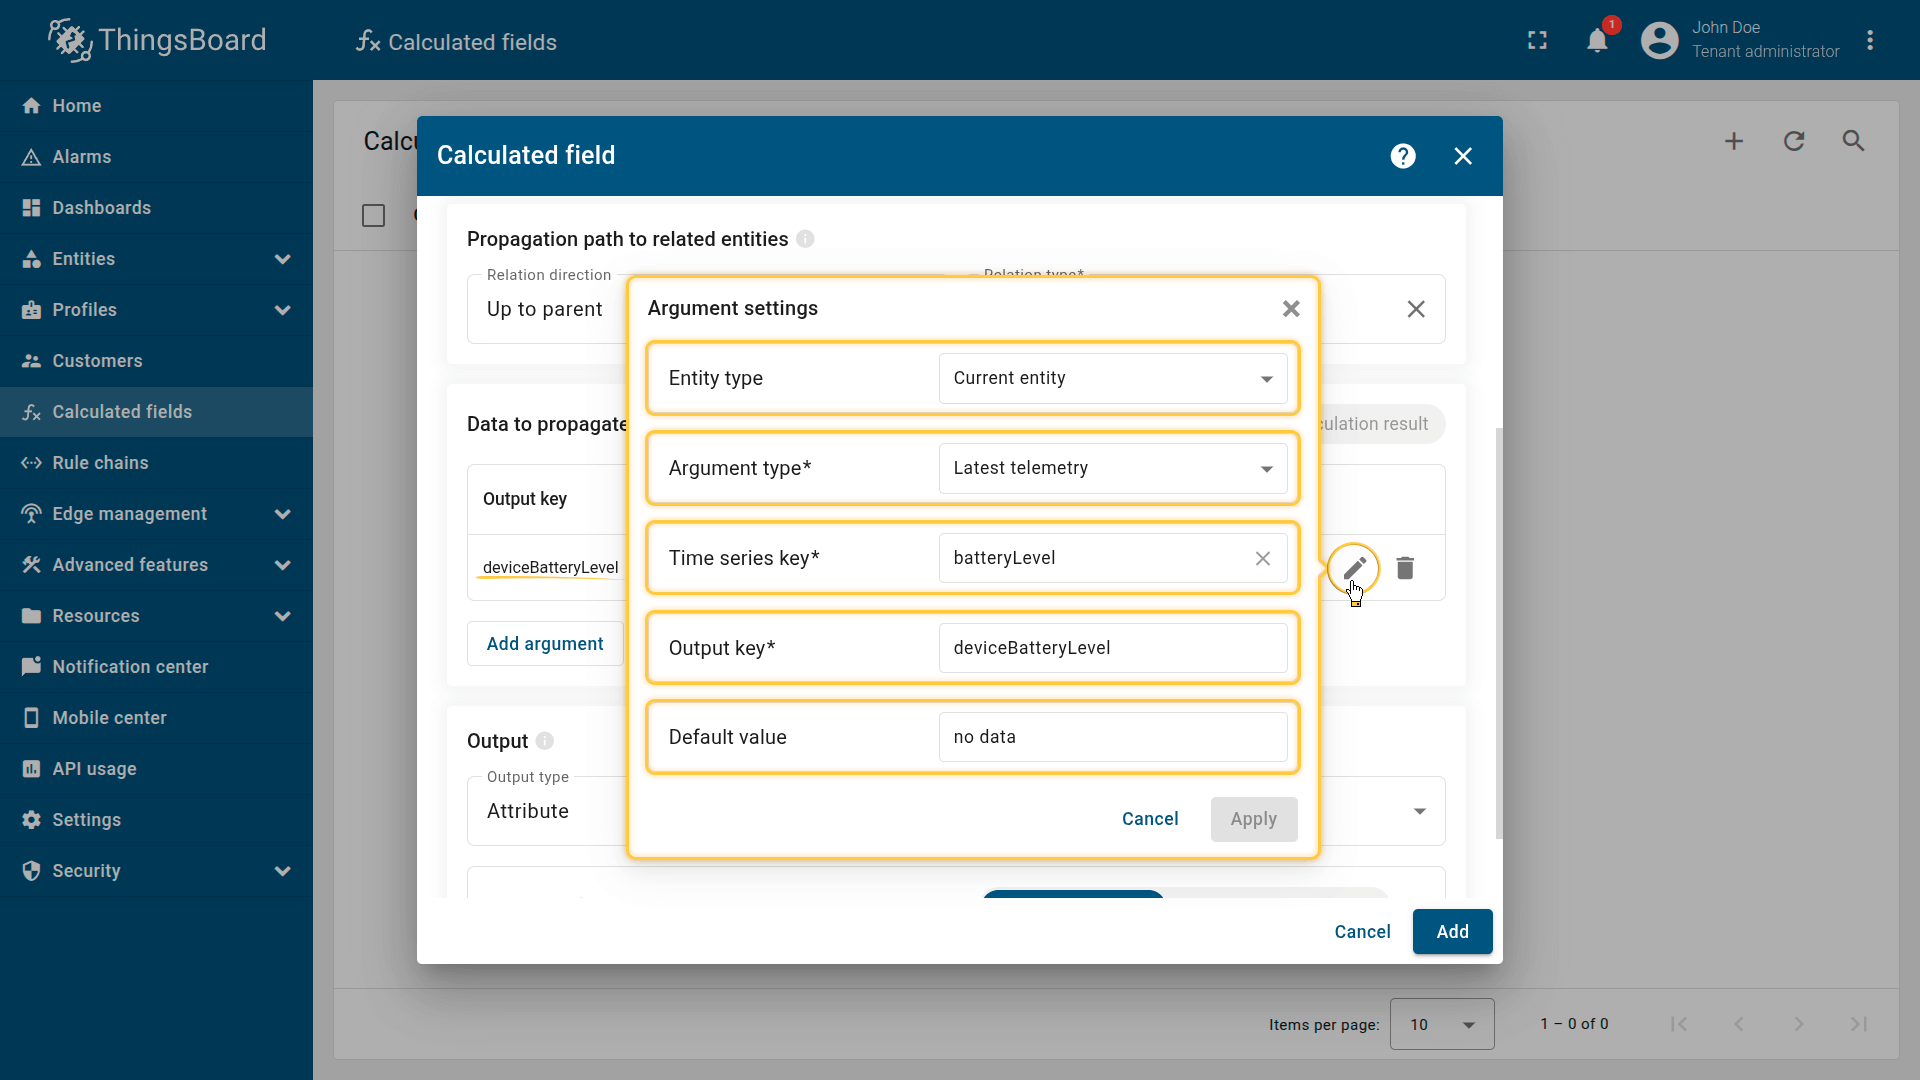
Argument settings:
- Entity type: Current entity
- Argument type: Latest telemetry
- Time series key: batteryLevel
- Output key: deviceBatteryLevel
- Default value: no data.
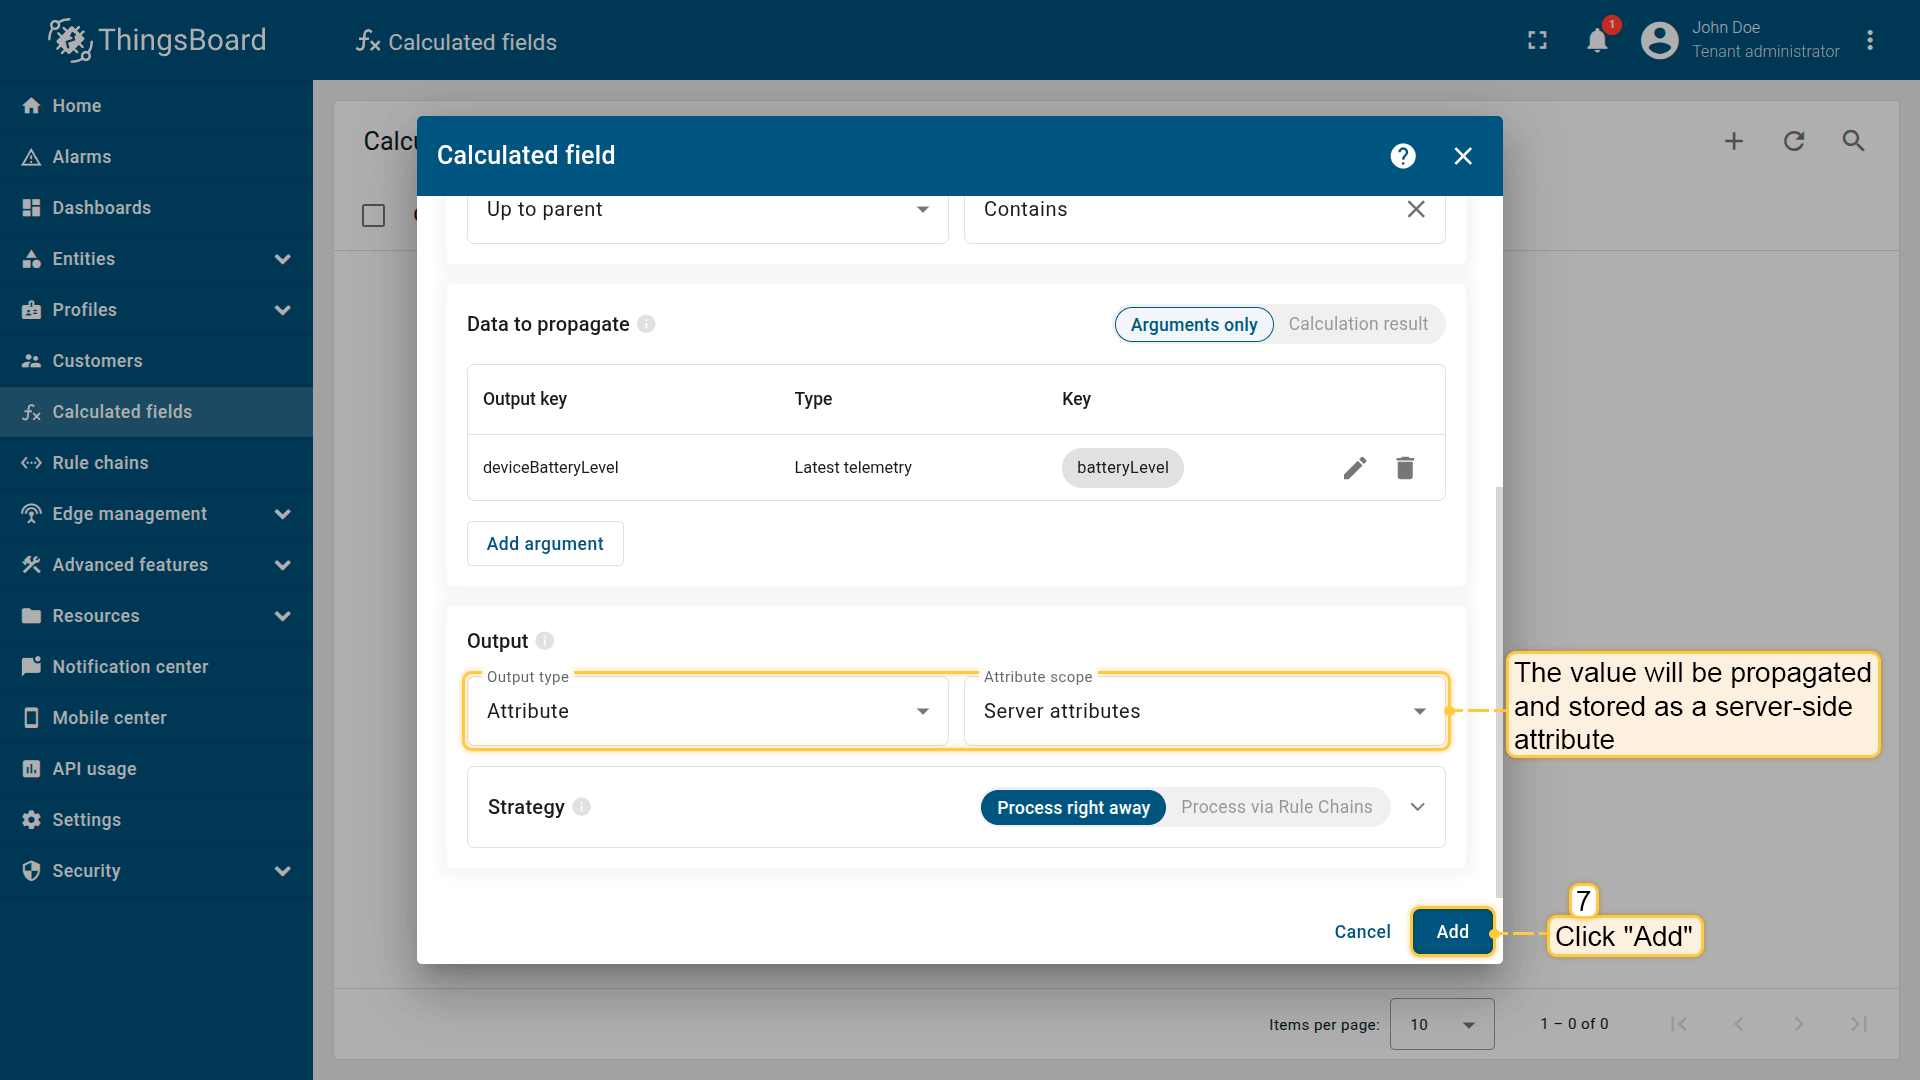
The output value will be stored as a server-side attribute.
Click Add to save the calculated field.
Result
The deviceBatteryLevel attribute is propagated and stored on the Truck 1 asset as a server-side attribute.
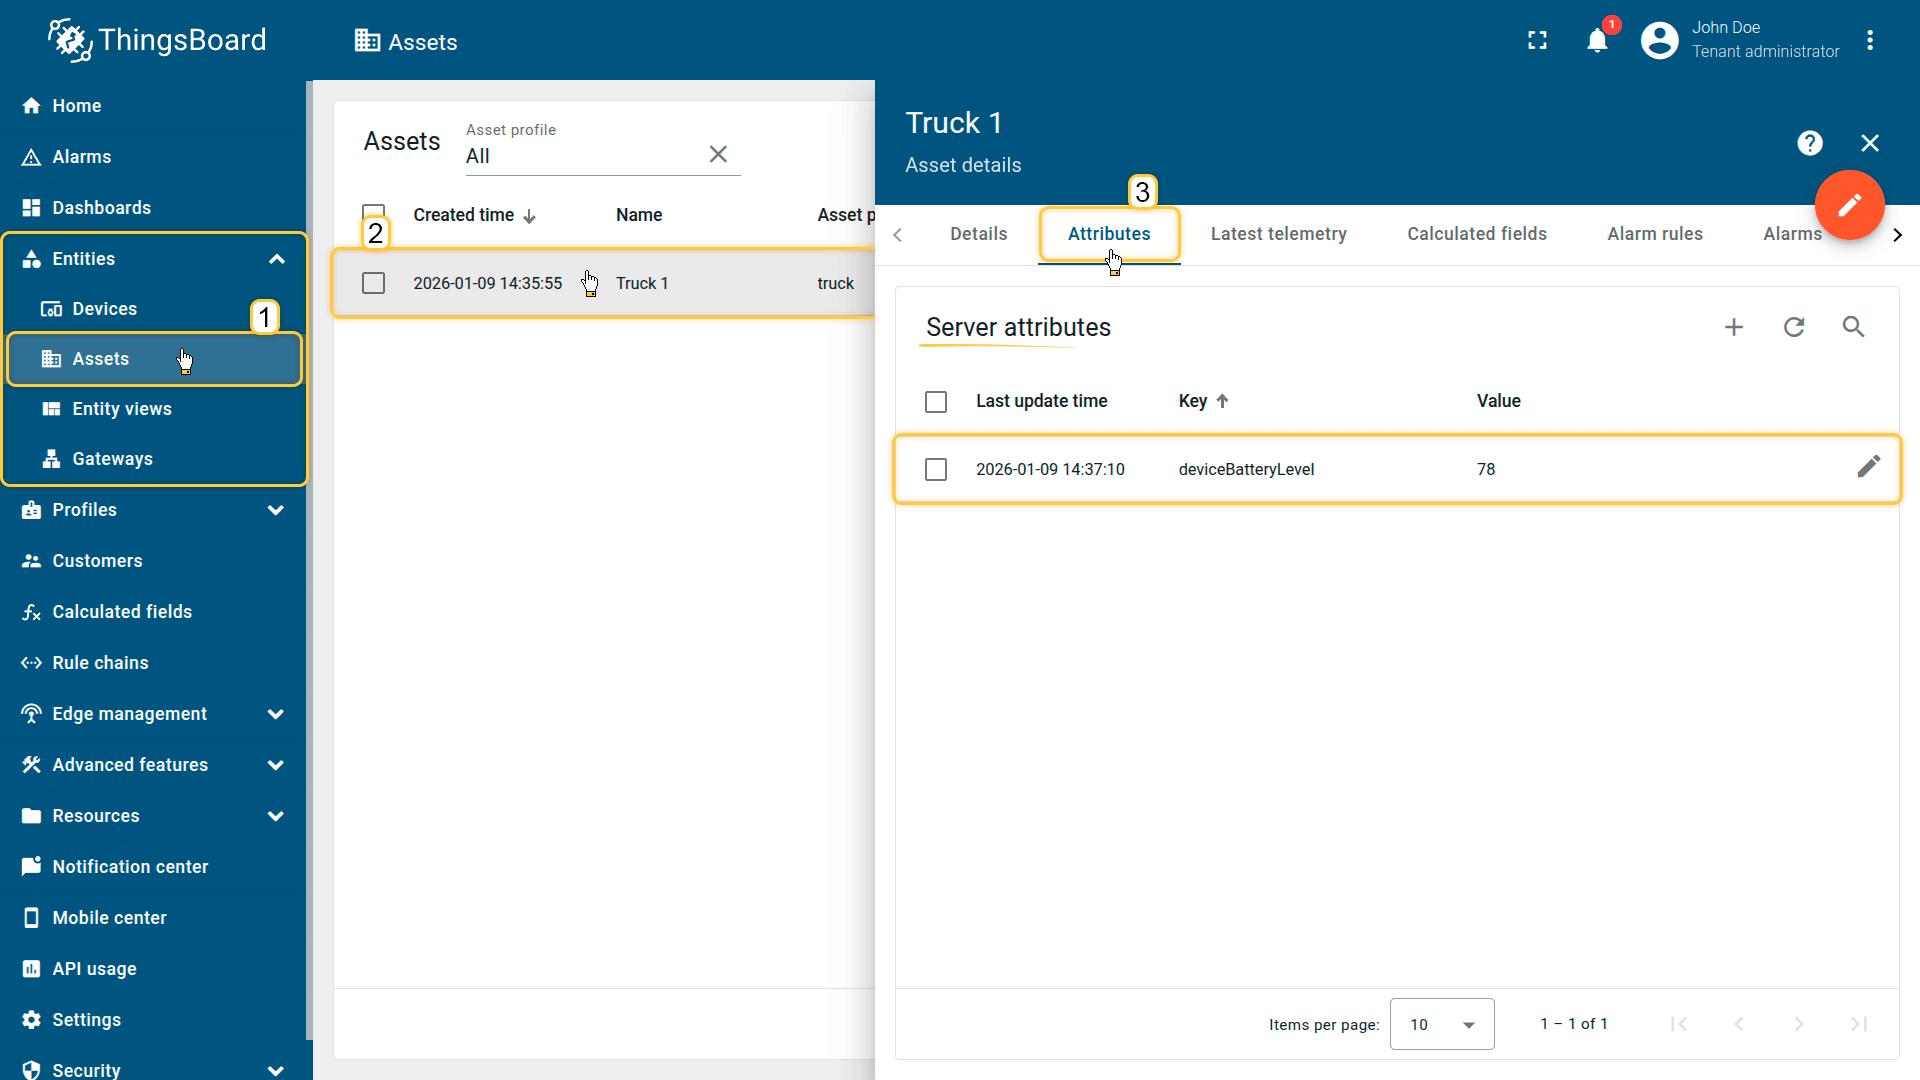
The deviceBatteryLevel attribute is propagated and stored on the Truck 1 asset as a server-side attribute.
Example 2: Dew point calculation and propagation to a parent Asset
Scenario
A Smart Device sends temperature and humidity telemetry to ThingsBoard and is linked to the Greenhouse A asset via the Contains relation.
Goal
Calculate the dew point, propagate the result to the related asset (Greenhouse A), and store it as a telemetry.
Calculated field configuration
Download the “Dew point propagation” calculated field configuration (JSON).
Configuration steps
1. Import demo device
Import a device that publishes temperature and humidity telemetry.
- Download the CSV file: dew-point-calculation-device-data.csv
- Go to the Devices and import the CSV file.
CSV includes:
- Name: Smart Device
- Type: smart-device
- Time series: humidity, temperature
Important note about the CSV: the column type for the humidity and temperature keys must be set to “Time series”.
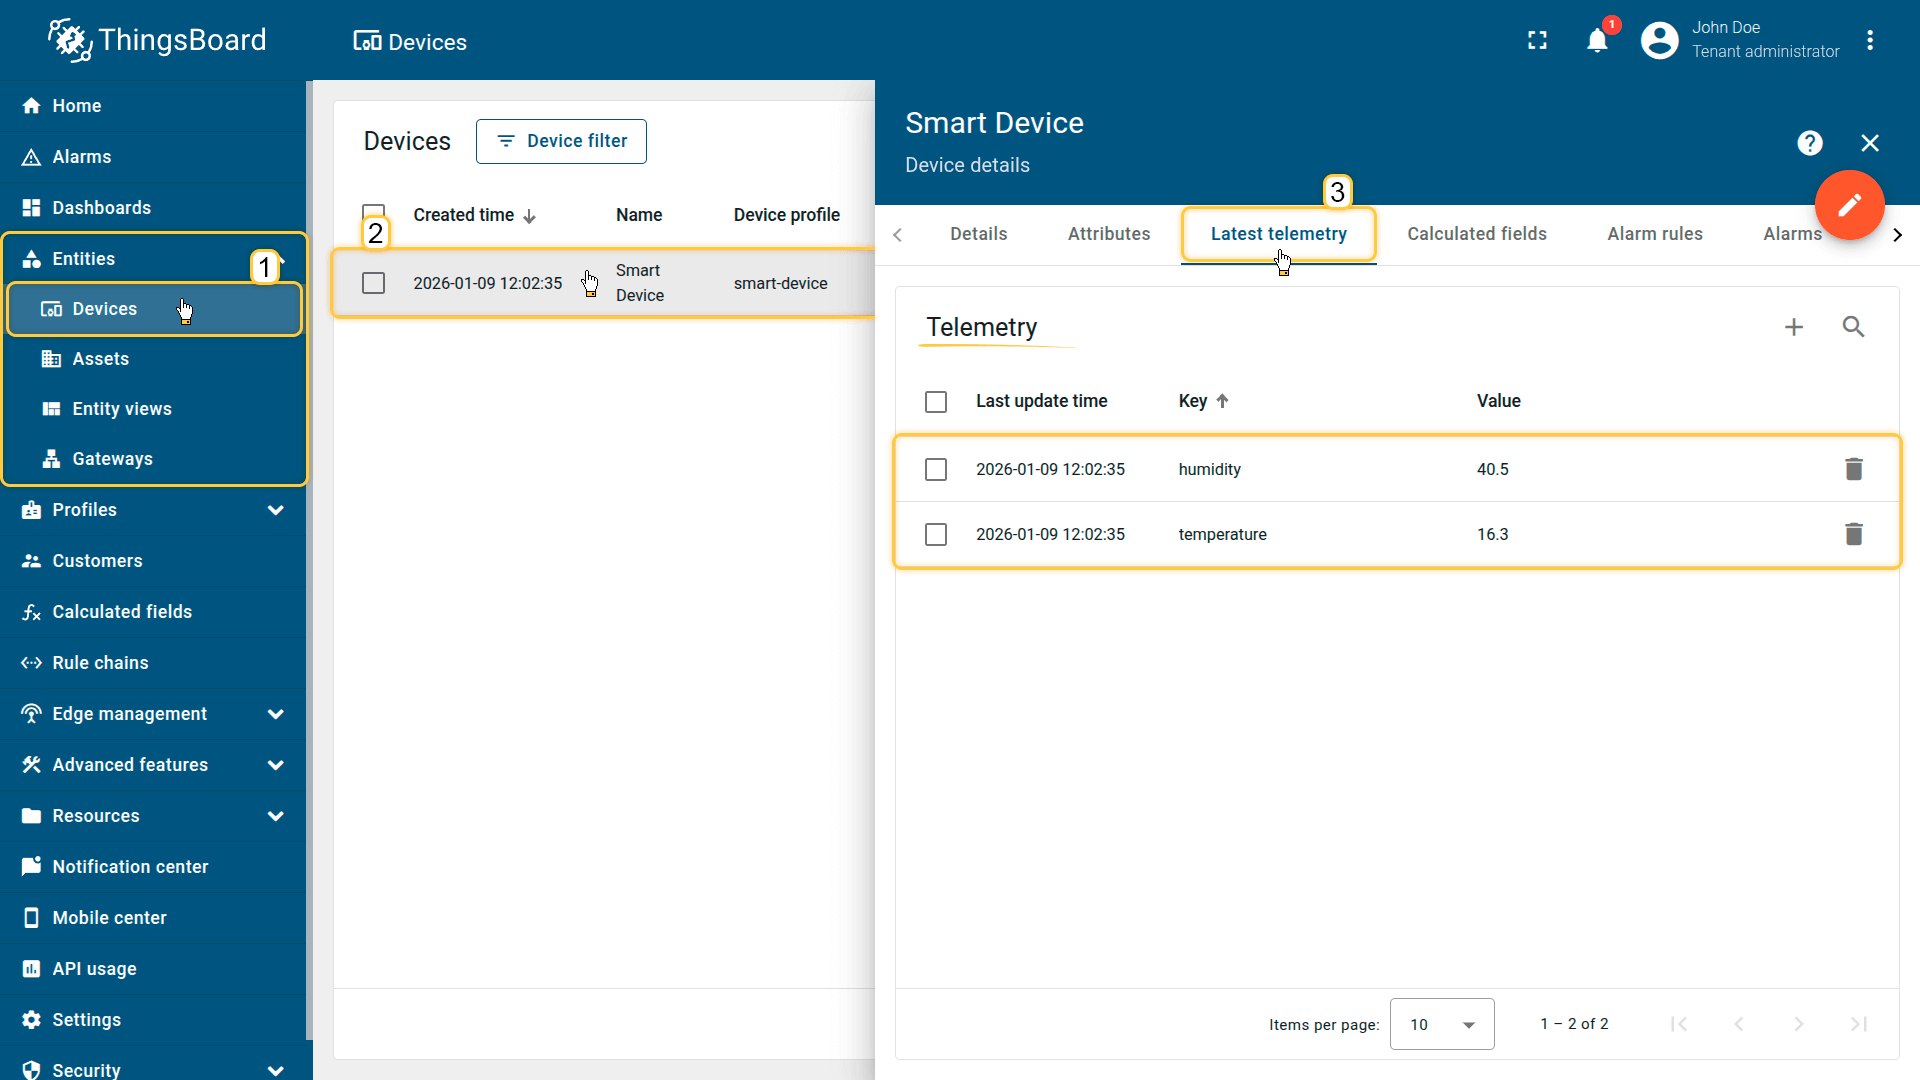
Import a device that publishes temperature and humidity telemetry.
2. Import demo asset
Import the asset that represents the greenhouse.
- Download the CSV file: dew-point-calculation-and-propagation-asset-data.csv
- Go to Assets and import the CSV file.
CSV includes:
- Name: Greenhouse A
- Type: greenhouse

Import the demonstration asset Greenhouse A.
3. Create a relation between the asset and the device
Create a relationship between the Greenhouse A asset and the Smart Device:
- Relation direction: From
- Relation type: Contains
This relation allows the calculated field to locate the parent asset when propagating output.

Create a relationship between the Greenhouse A asset and the Smart Device.
4. Apply the calculated field to the device profile
Configure the calculated field on the “smart-device” device profile (created automatically during device import), so it runs for Smart Device.
- Download the calculated field configuration file.
- Go to the “Calculated fields” tab and import the configuration.
This scenario calculates the dew point value from the specified input data. The value is propagated and stored as telemetry on the parent asset (Greenhouse A) under the dewPoint key.

Go to the Calculated fields tab and import the calculated field configuration.
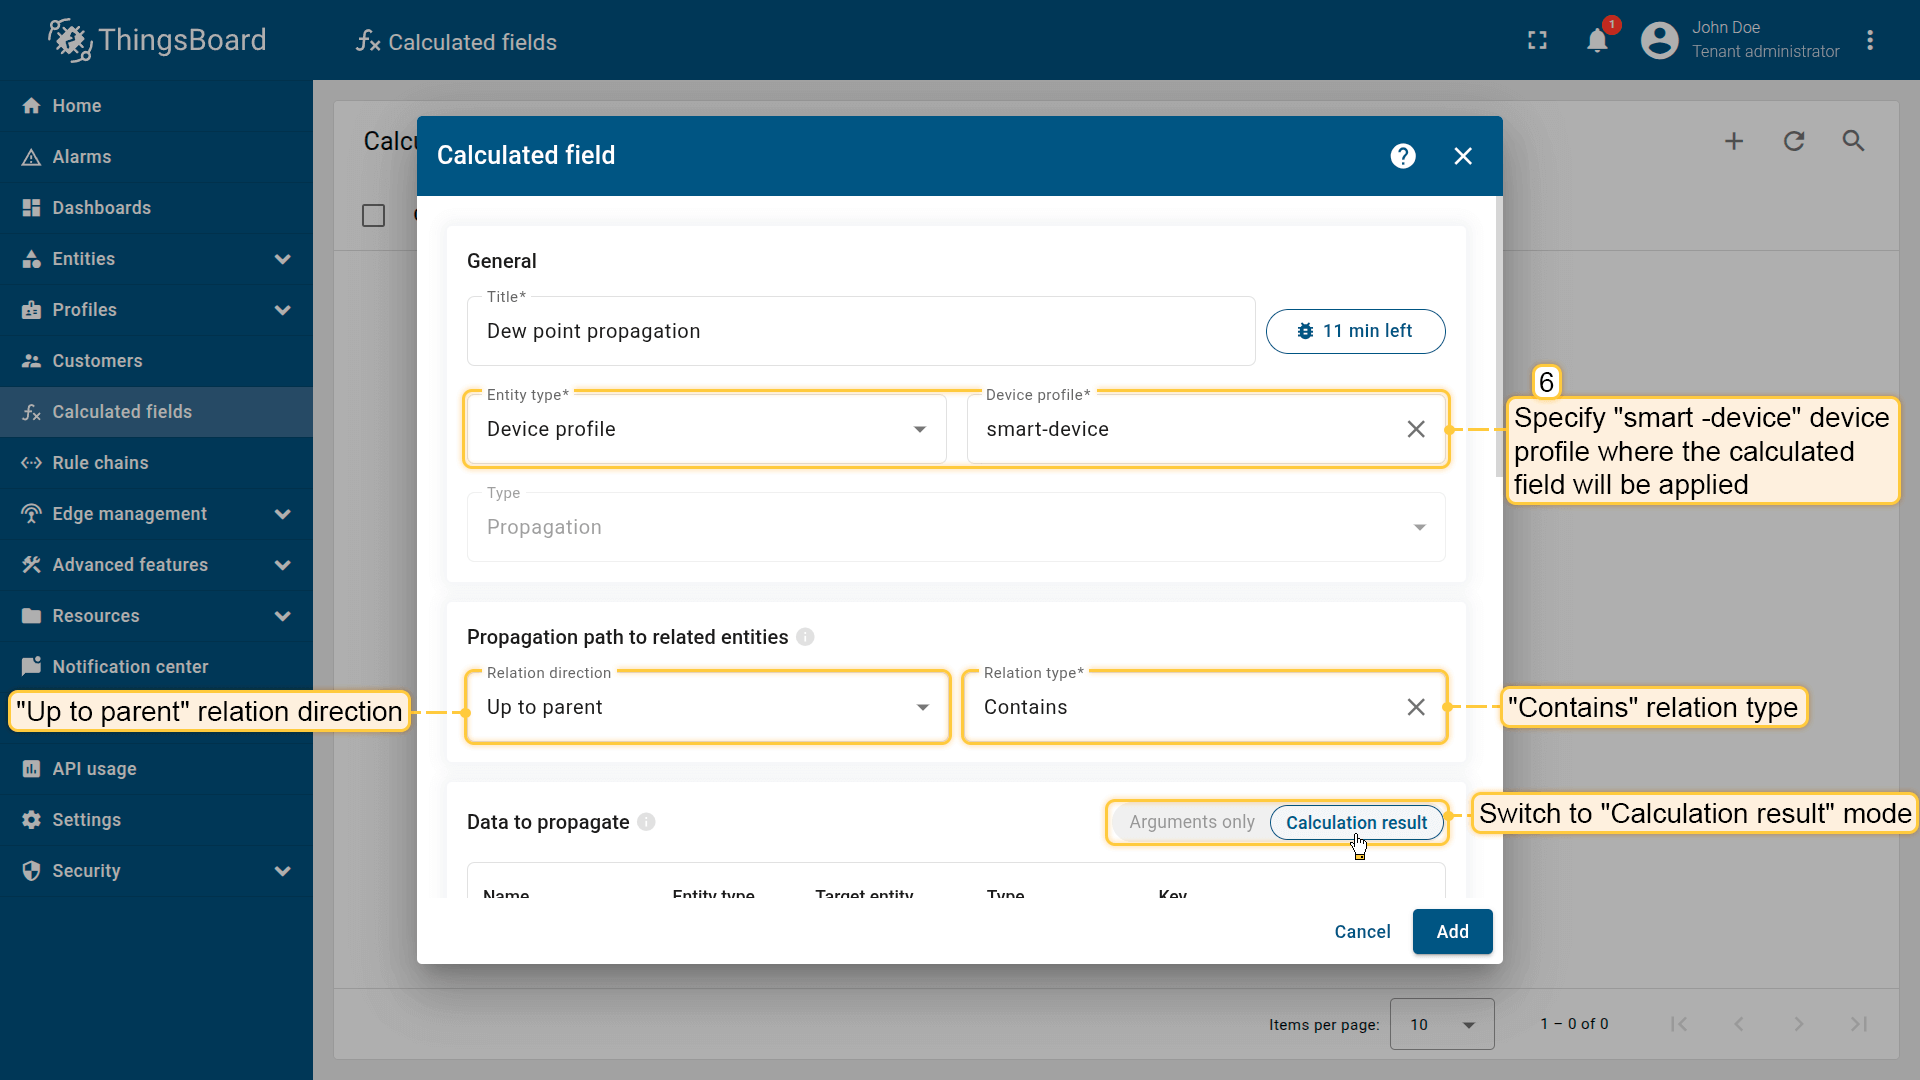
Apply the calculated field to the smart-device profile so it runs for all devices using it.
Propagation path to related entities: Relation direction: Up to parent; Relation type: Contains.
Data to propagate: switch to Calculation result mode.

First argument settings:
- Entity type: Current entity
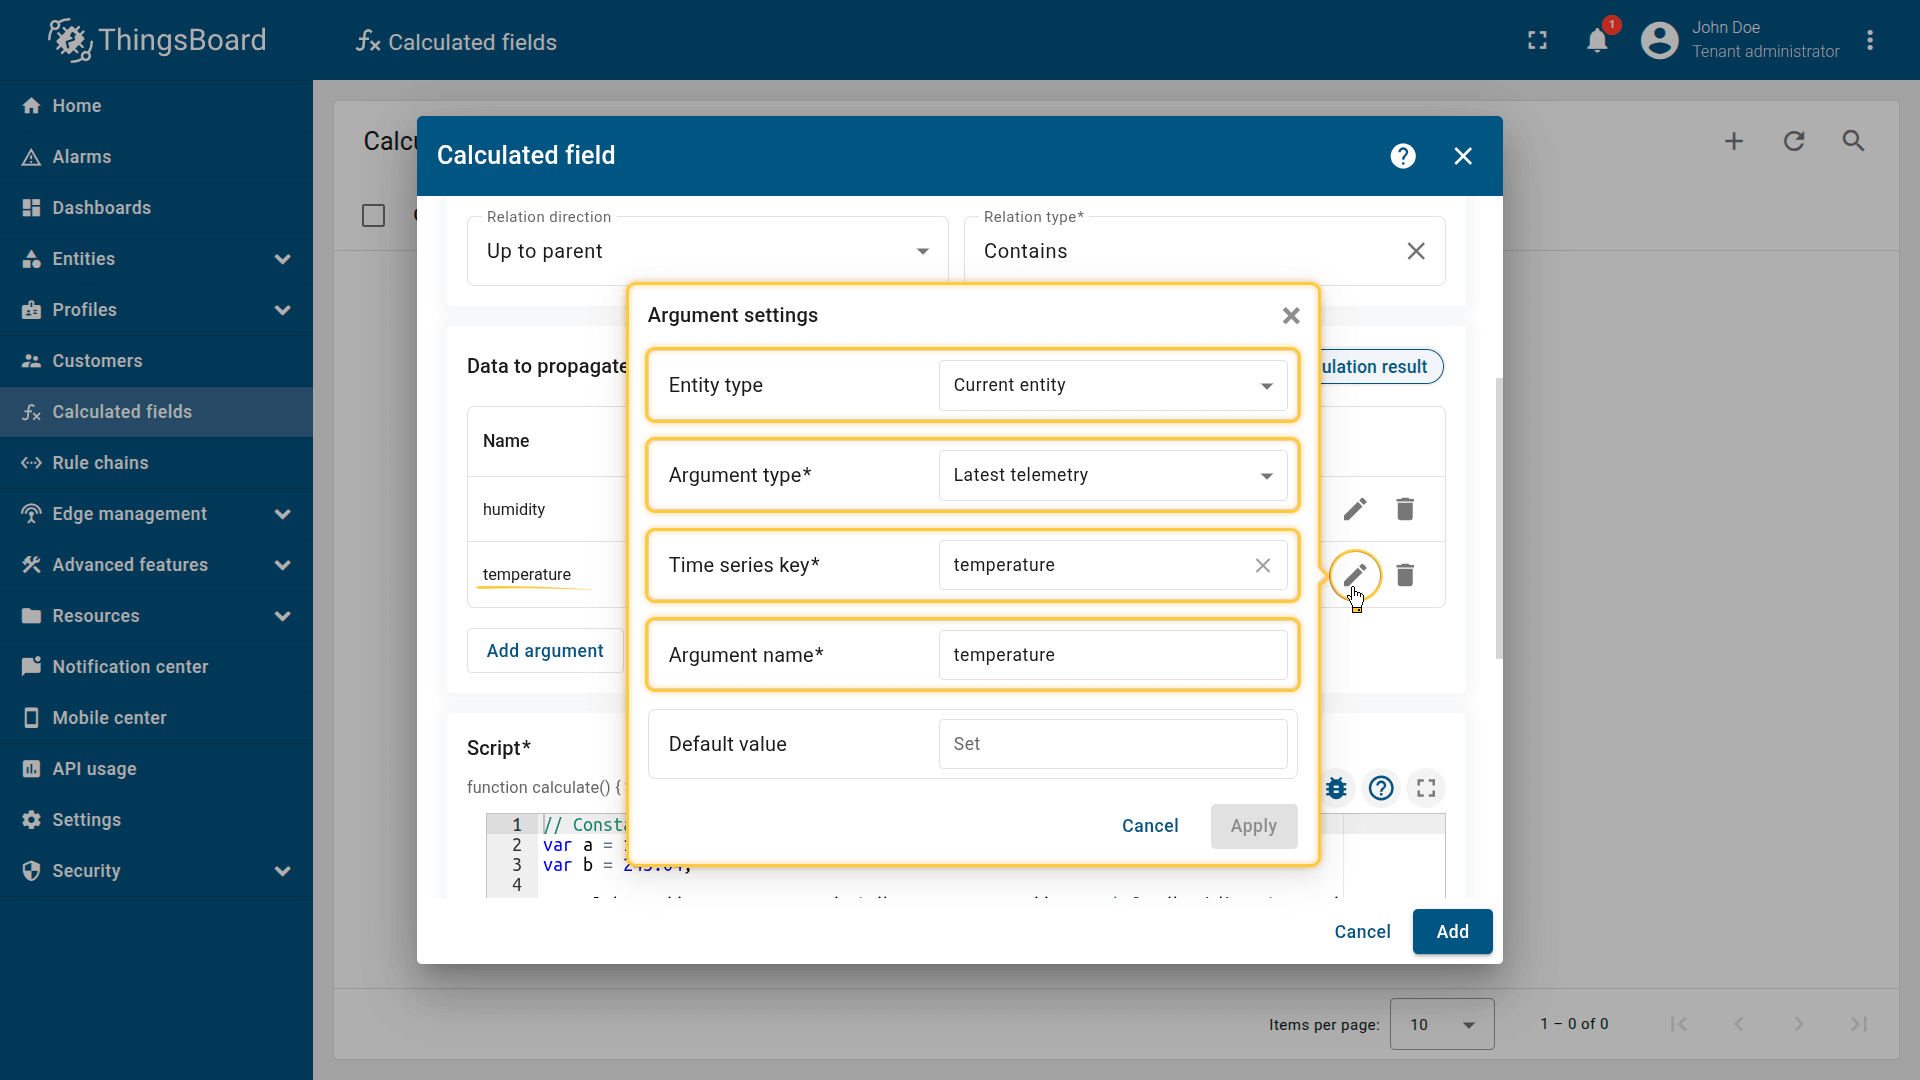
- Argument type: Latest telemetry
- Time series key: humidity
- Argument name: humidity.
Second argument settings:
- Entity type: Current entity
- Argument type: Latest telemetry
- Time series key: temperature
- Argument name: temperature.
This scenario calculates the dew point value from the specified input data. The value is propagated and stored as telemetry on the parent asset under the dewPoint key.
Click Add to save the calculated field.
Result
The calculated value is propagated to the Greenhouse A asset and stored as a telemetry under the key dewPoint.

The calculated value is propagated to the Greenhouse A asset and stored as a telemetry under the key dewPoint.
Example 3: Propagate HVAC mode to multiple child devices
Scenario
The Building A asset manages multiple child HVAC devices linked via the Manages relation. The asset-level hvacMode server attribute defines the operating mode for all devices (for example, cooling, heating, off).
Goal
Automatically propagate the hvacMode attribute from Building A to all related HVAC devices.
Calculated field configuration
Download the “Propagate HVAC mode” calculated field configuration (JSON).
Configuration steps
1. Import demo devices
- Download the CSV file: propagate-hvac-mode-device-data.csv
- Go to the Devices and import the CSV file.
CSV includes:
- Name: Room Sensor 1
- Type: sensor
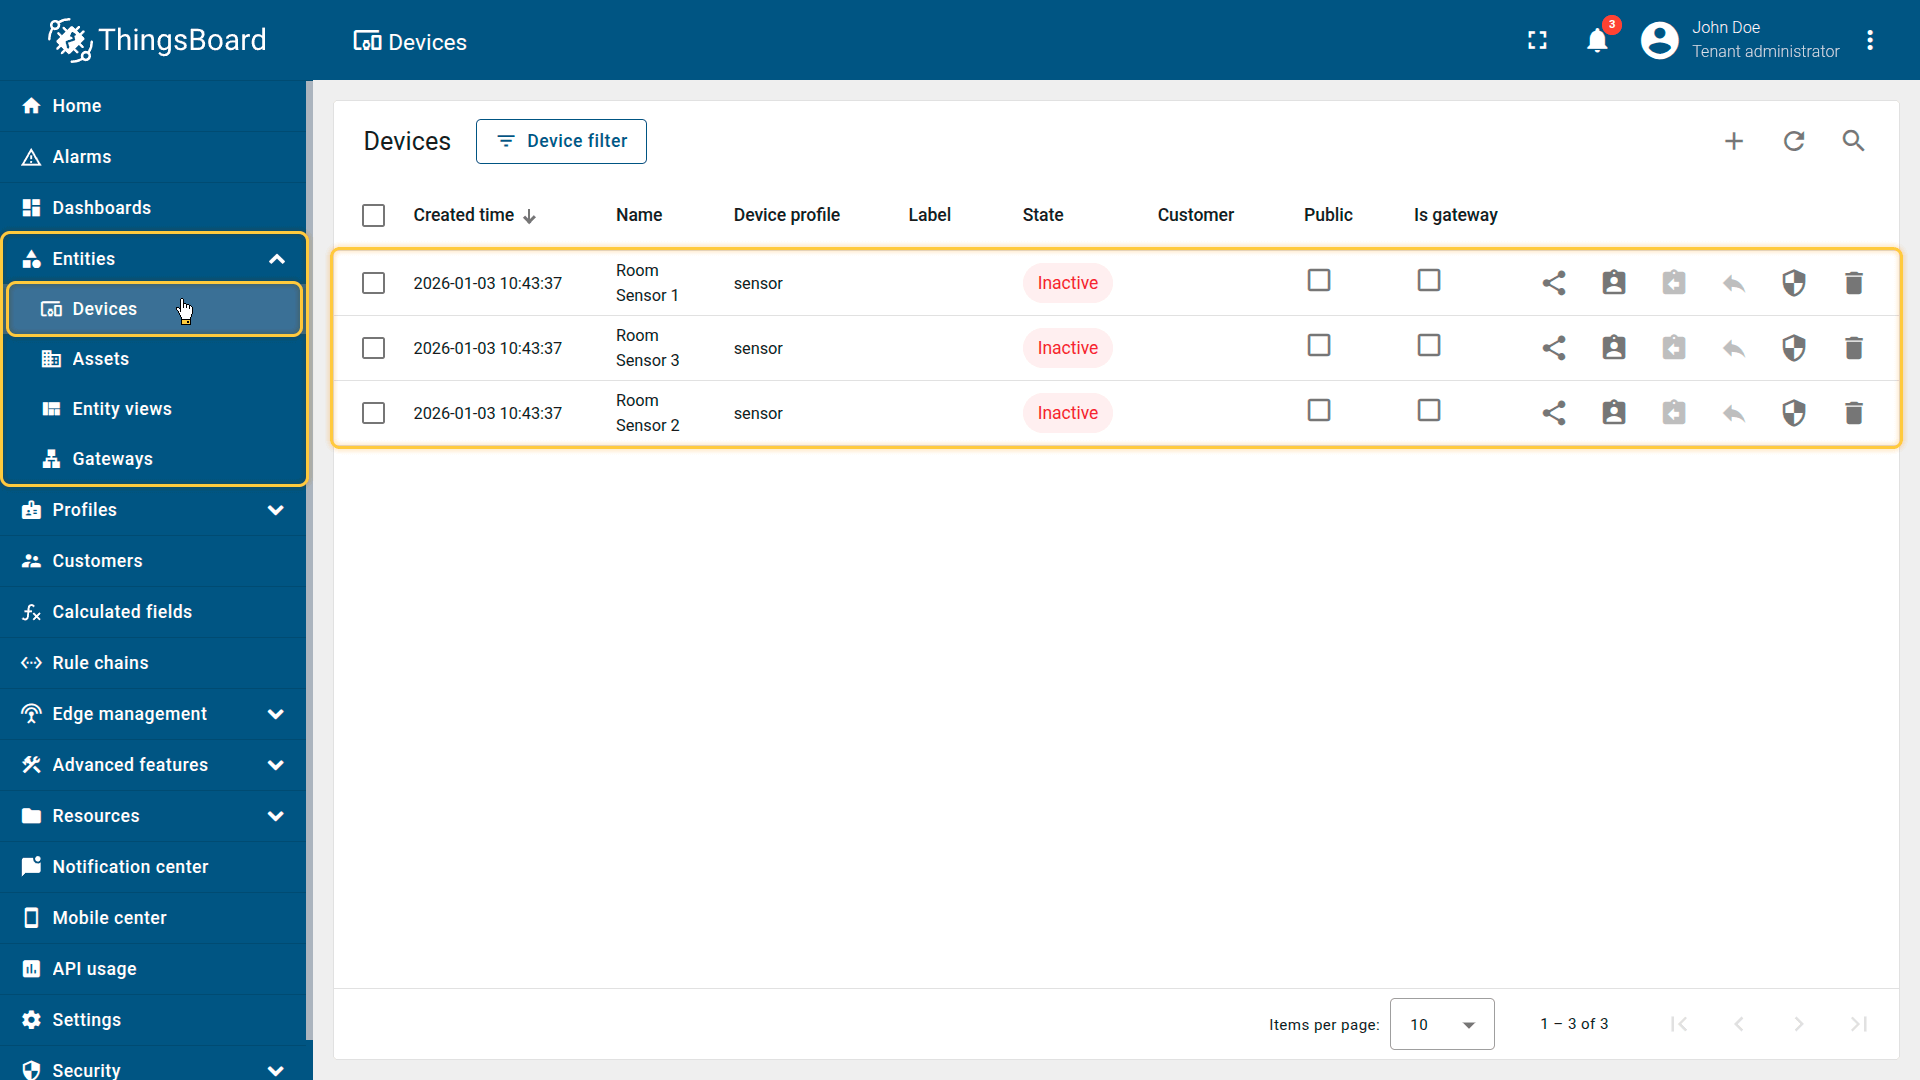
Go to the Devices and import device configurations from a CSV file.
2. Import demo asset
Import an asset that represents the building.
- Download the CSV file: propagate-hvac-mode-asset-data.csv
- Go to Assets and import the CSV file.
CSV includes:
- Name: Building A
- Type: building
- Server attributes: hvacMode
Important note about the CSV: the column type for the hvacMode keys must be set to “Server attributes”.

The imported Building A asset publishes the hvacMode value as an attribute.
3. Create a relation between the asset and the devices
Create a relationship between the Building A asset and the room devices.
- Relation direction: From
- Relation type: Manages
This relation is used by the propagation calculated field to locate the parent entity.
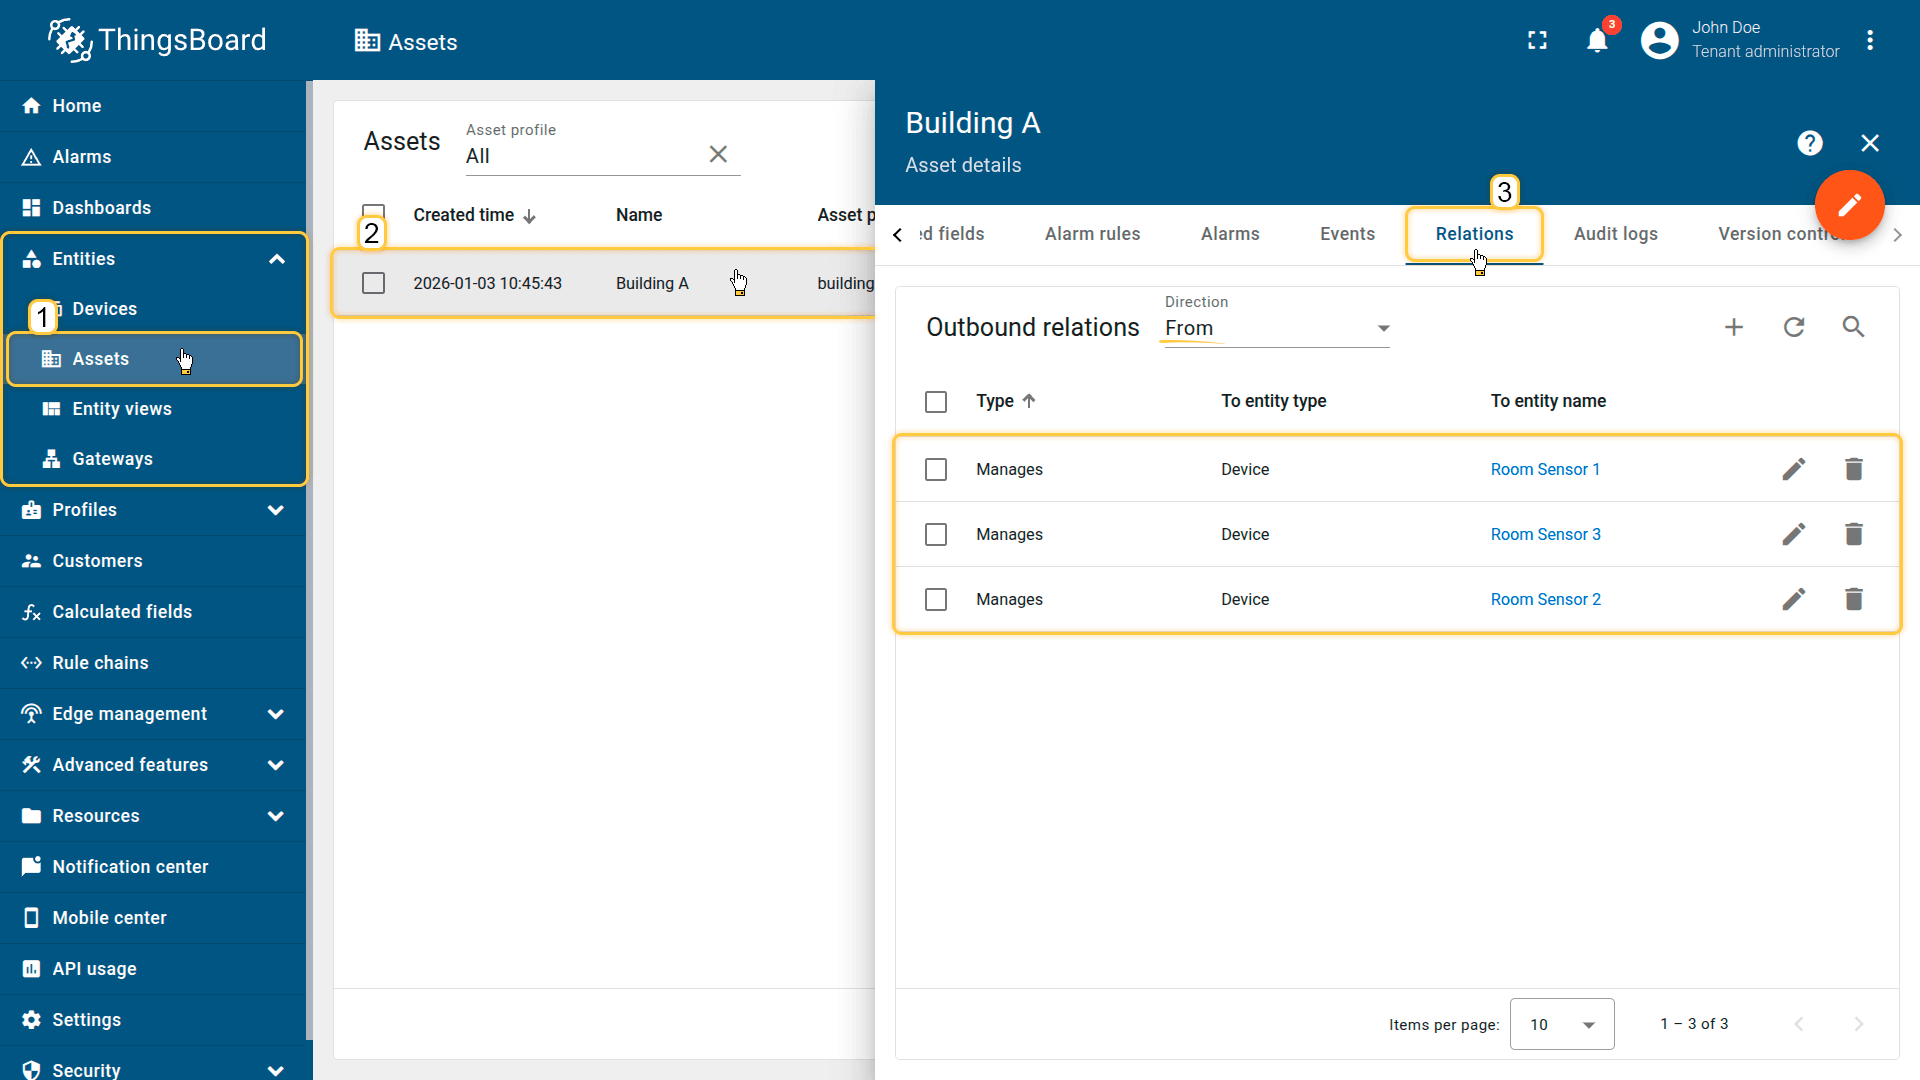
Create a relationship between the Building A asset and the room devices.
4. Apply the calculated field to the asset profile
Configure a Propagation calculated field on the “building” asset profile (created automatically during asset import), so it runs for Building A.
- Download the calculated field configuration file.
- Go to the Calculated fields tab and import the configuration.
This configuration propagates the attribute value of hvacMode to the child devices.
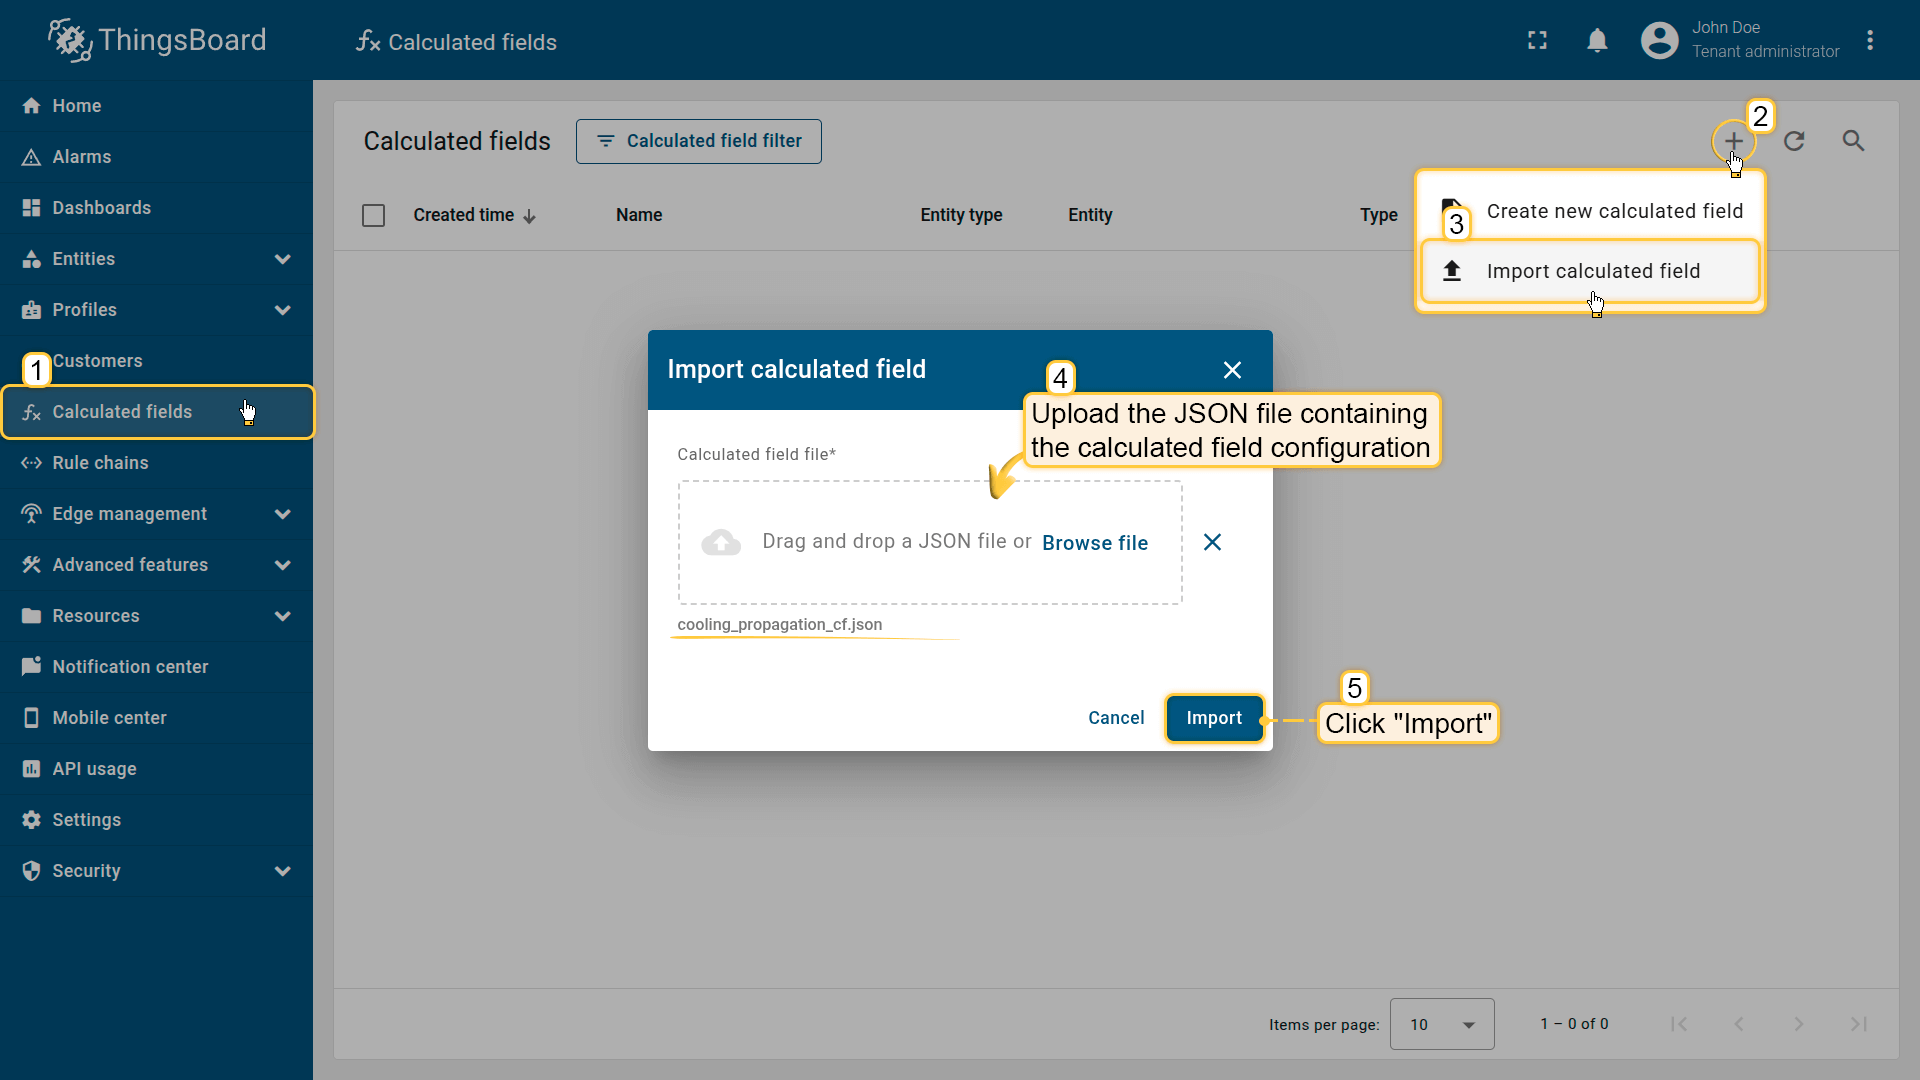
Go to the Calculated fields tab and import the calculated field configuration.

Apply the calculated field to the building profile so it runs for all asset using it.
Propagation path to related entities: Relation direction: Down to child; Relation type: Manages
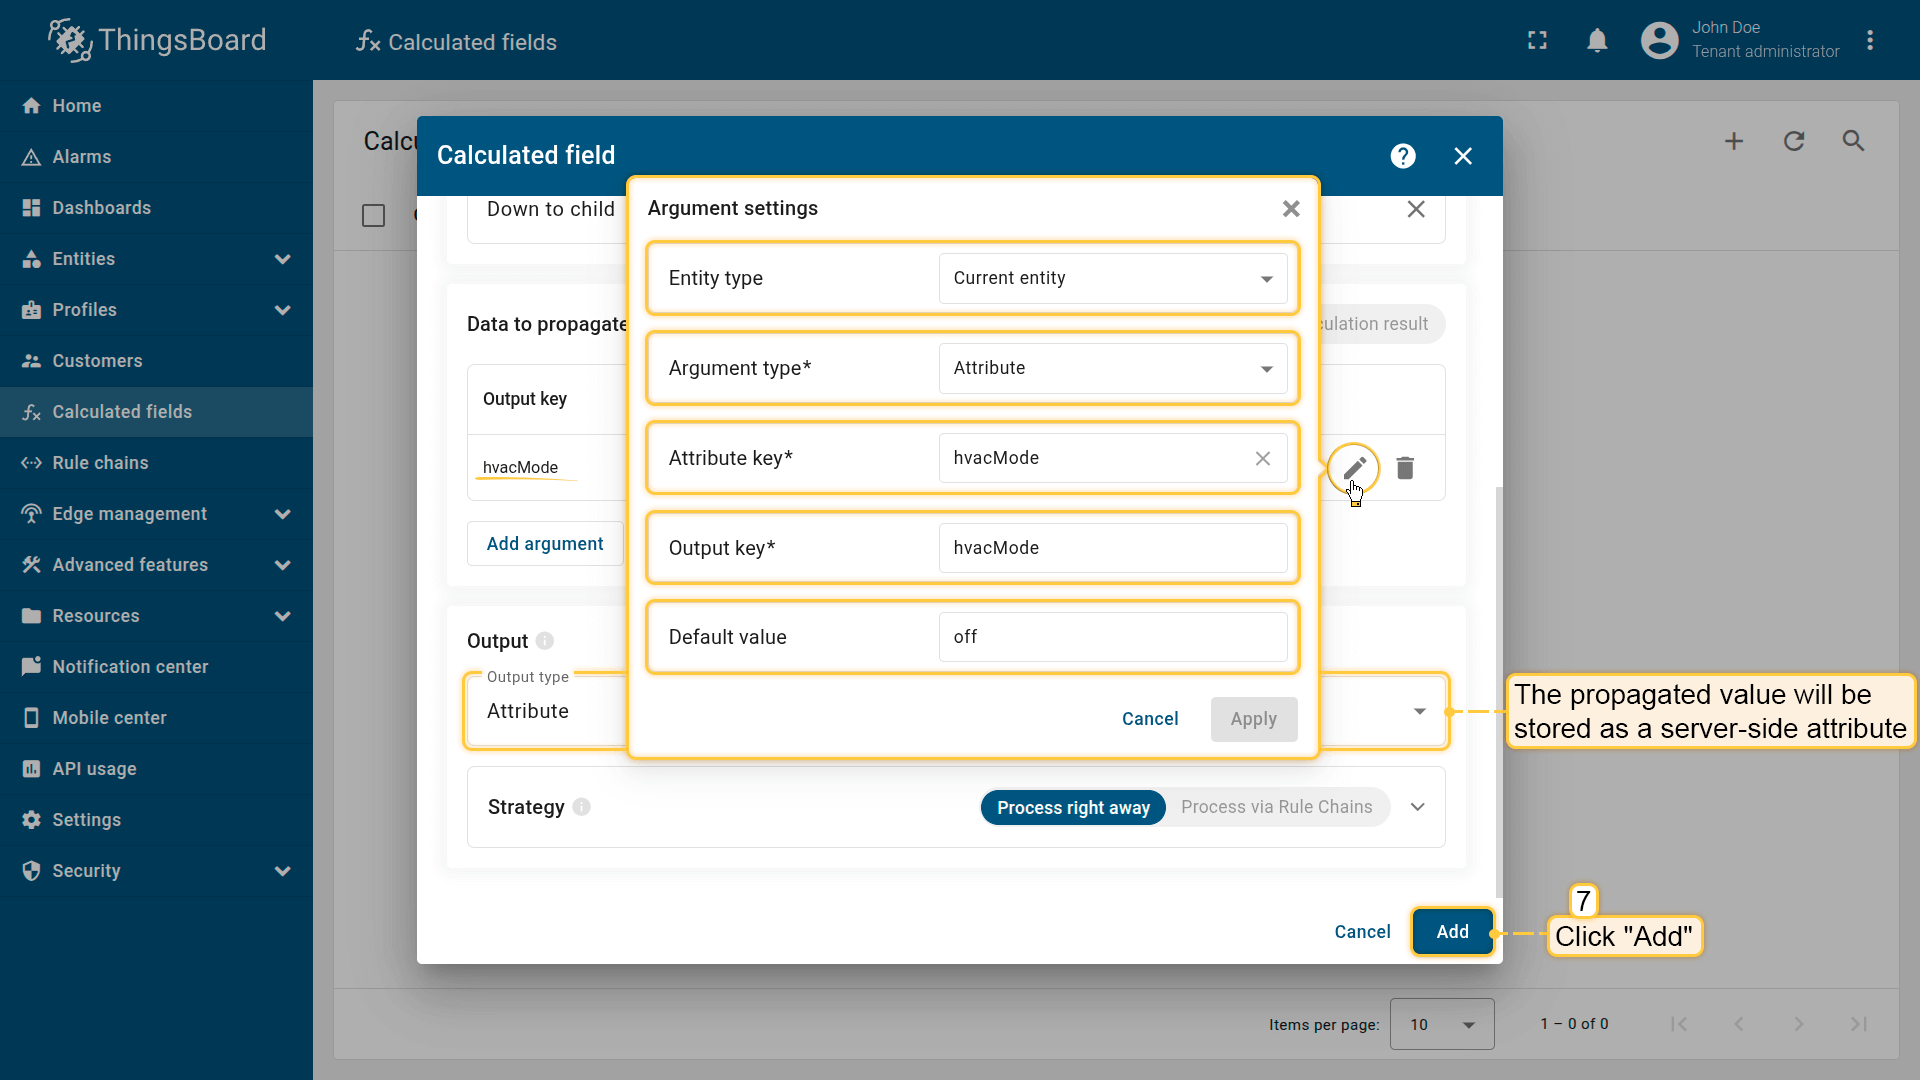
Argument settings.
The propagated value will be stored on devices as an attribute.
Click Add to save the calculated field.
Result
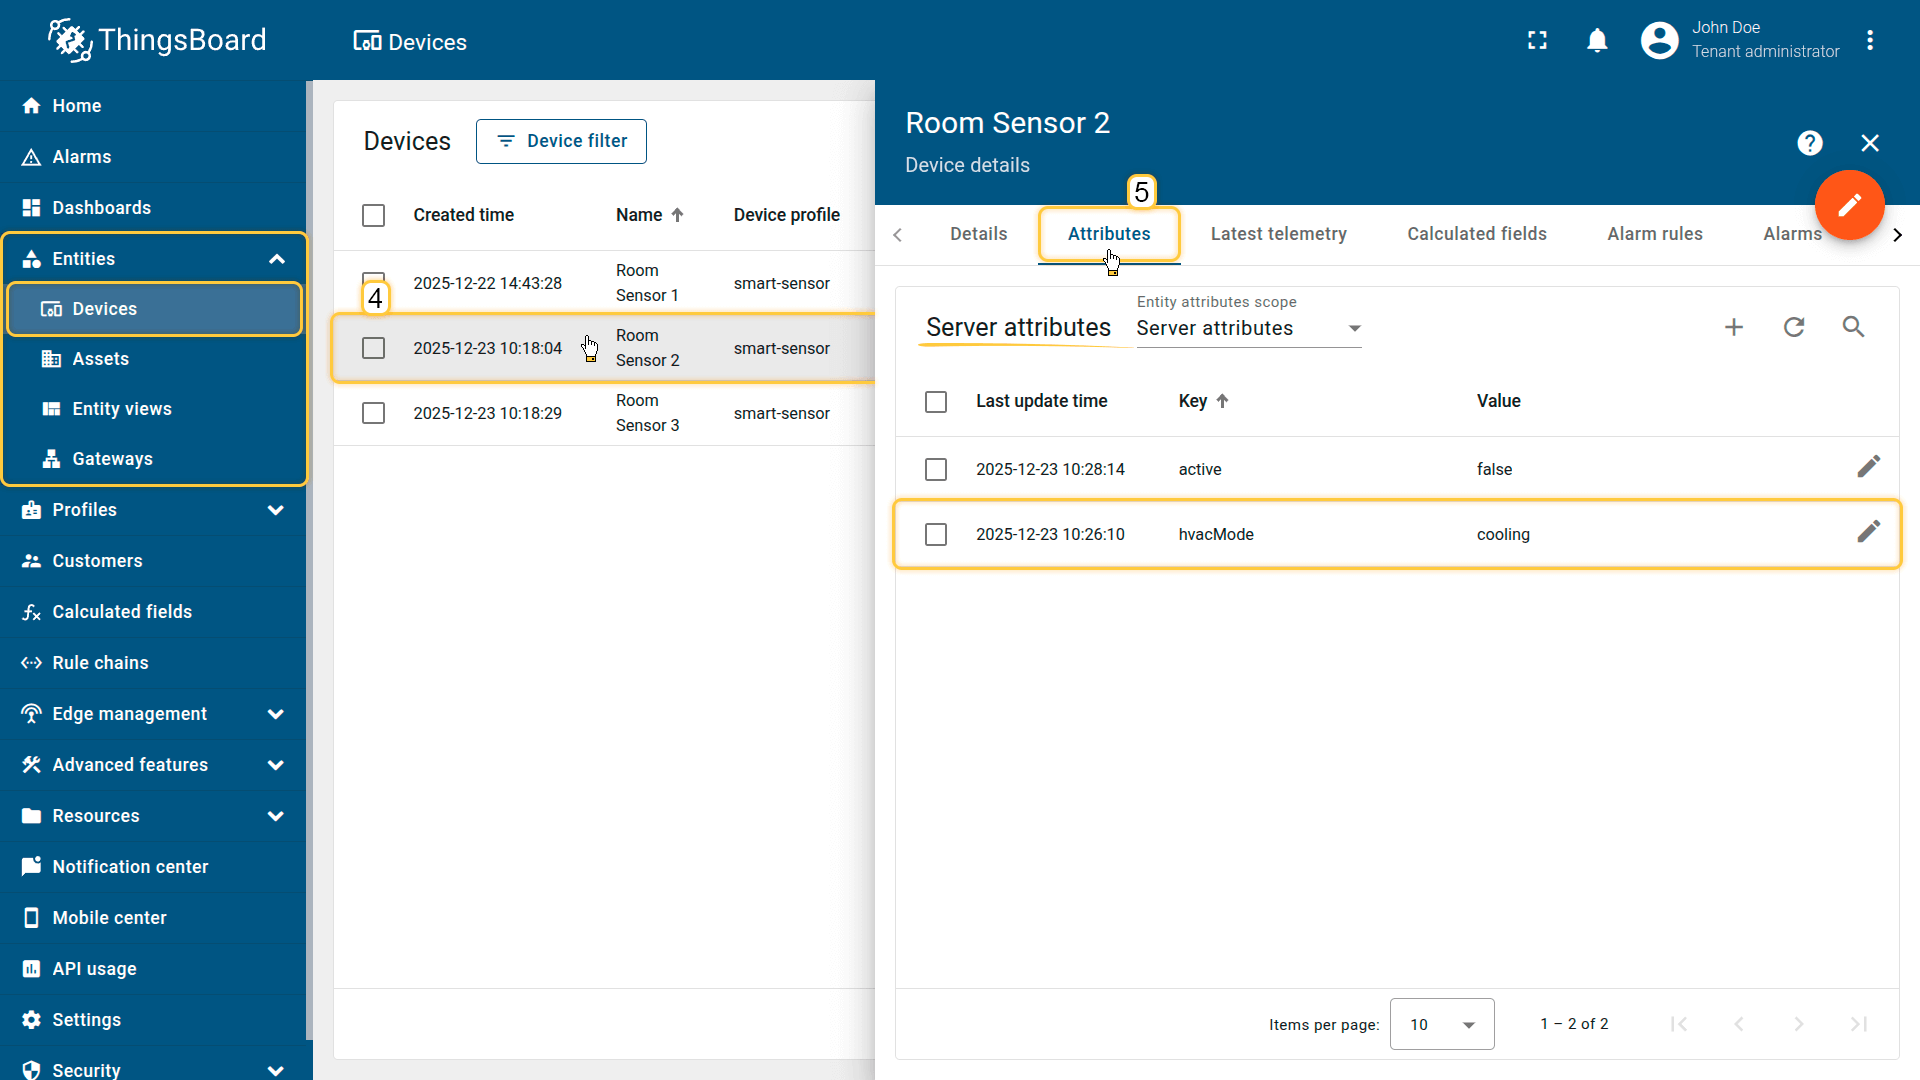
Each HVAC device received the hvacMode attribute with the value cooling.
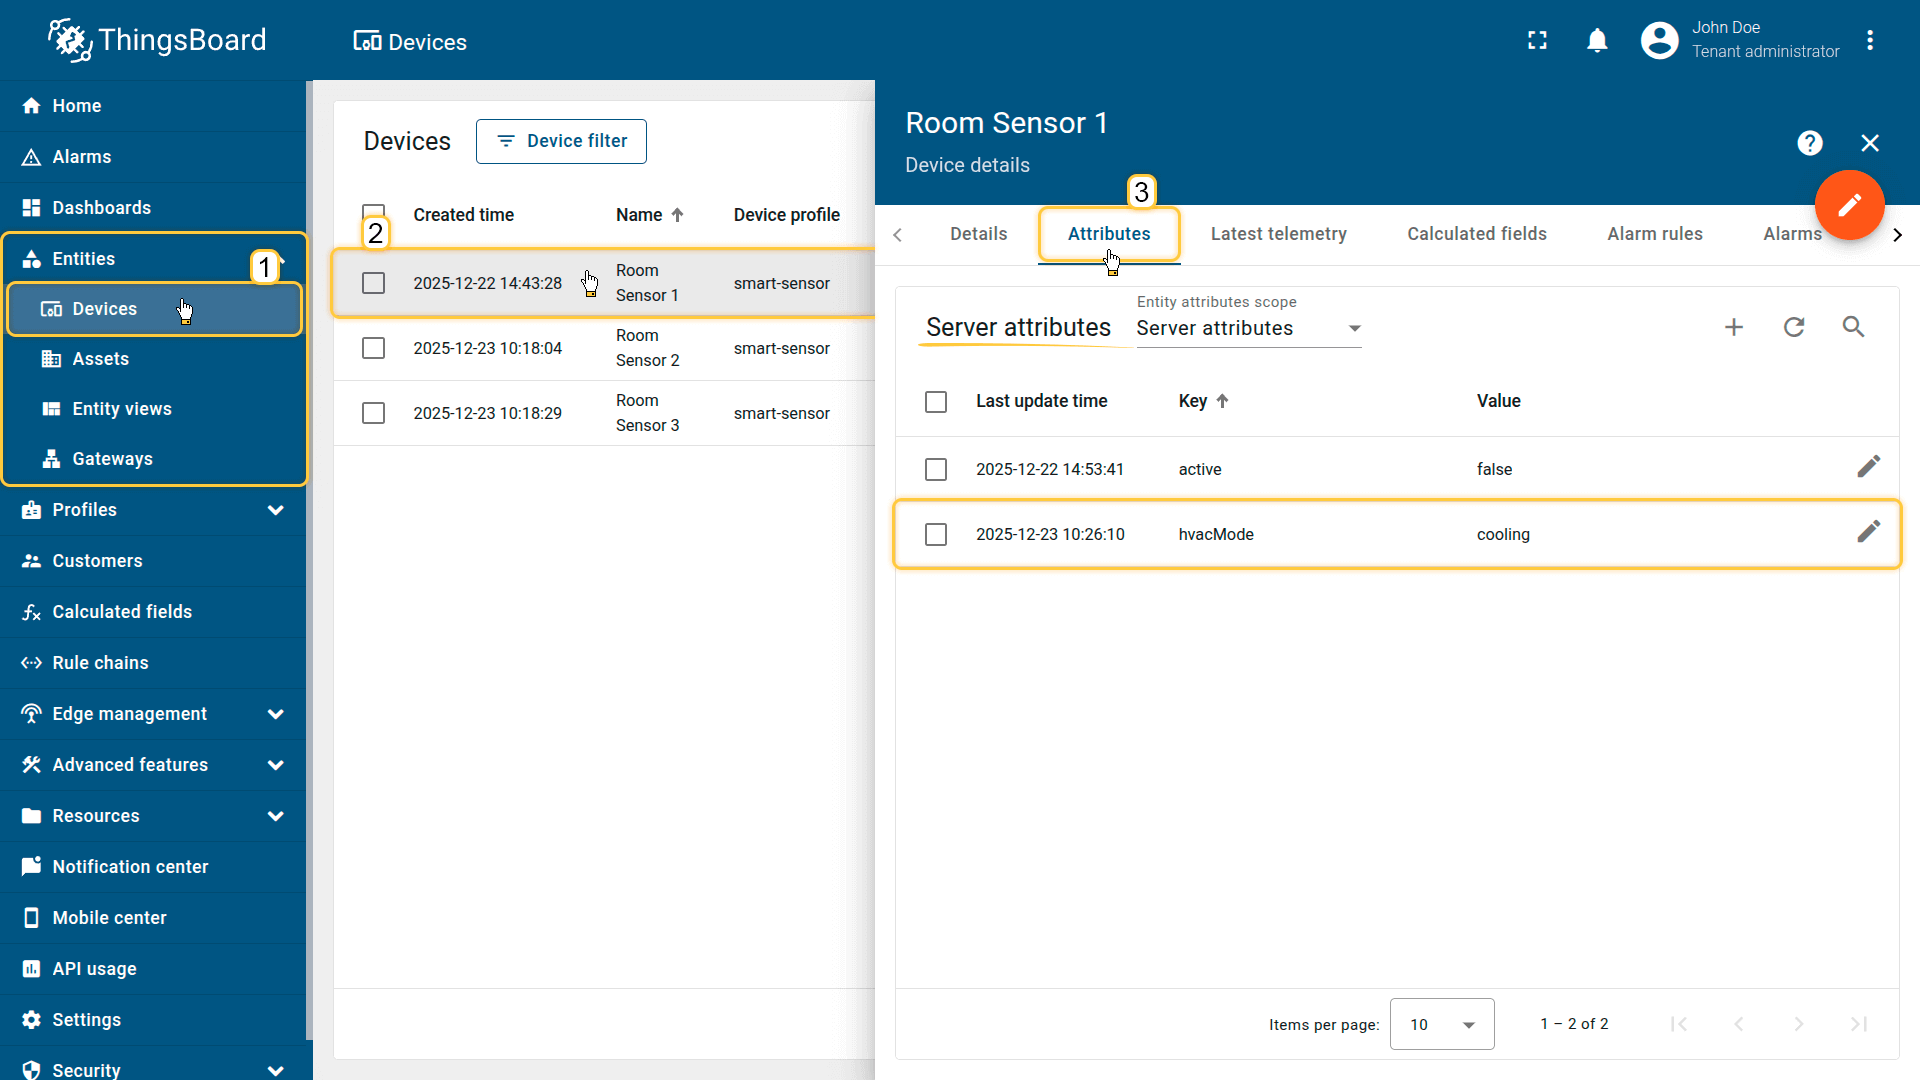
Each HVAC device received the hvacMode attribute with the value cooling.

Troubleshooting
Propagation path settings do not apply after the update
Problem: When editing an existing Calculated Field to change the Relation direction or Relation type (e.g., switching from Contains to Manages), the field ignores these changes and continues to propagate data using the originally configured path.
Cause: The Calculated Field logic caches the Propagation path to related entities defined during the initial creation. It does not correctly detect updates made specifically to the relation direction or relation type in the configuration, resulting in the field failing to re-initialize the path.
Solution: To force the Calculated Field to apply the new propagation path settings, the system requires a configuration change to the Data to propagate section. Any modification to the arguments will trigger the necessary re-initialization.
Choose one of the following safe methods:
-
Re-create the Field (Cleanest) If you must keep your current arguments exactly as they are (e.g., you cannot change default values), the only way to trigger the update is to delete the existing Calculated Field and create a new one with the correct propagation path settings.
-
Modify Default Value (Recommended Workaround) If you want to fix the issue without re-creating the field, edit an existing argument and change its Default value (e.g., set a value if it was empty, or update it).
If the source data is missing, the new default value will be used. However, if the source data is always present, this is the smartest method as it forces the update with zero impact on your data.
Your feedback
Don't hesitate to star ThingsBoard on github to help us spread the word. If you have any questions about this sample, please contact us.