- Upgrading to 1.15.0
- Step 1. Obtain Trendz Kubernetes scripts
- Step 2. Connect to your Kubernetes cluster
- Step 3. Reduce pods count
- Step 4. Create flag-file
- Step 5. Change image version
- Step 6. Apply the deployment file
- Step 7. Check the logs
- Step 8. Increase pods count
- Step 9. Check synchronization status in ThingsBoard
Upgrading to 1.15.0
These steps are applicable for 1.14.0 Trendz Analytics version.
Step 1. Obtain Trendz Kubernetes scripts
Use the Kubernetes configuration files used for installation. If you did not save the files you need to download them again by the next link and fill in by necessary data as in the installation guide:
1
git clone https://github.com/thingsboard/trendz-k8s.git --depth 1
Step 2. Connect to your Kubernetes cluster
You need to connect to the dedicated kube-config configuration Use the next commands:
1
2
kubectl config get-contexts
kubectl config use-context <your config name>
Step 3. Reduce pods count
The deployment must have only one pod for the next steps of a successful upgrade. Use this command to set the pod count:
1
kubectl scale deployment trendz-app-deployment --replicas=1
Step 4. Create flag-file
Create a file “.upgradeversion” inside the directory by calling the command that must be executed by Trendz pod. Run the command:
1
kubectl exec <POD_NAME> -- sh -c "echo '1.14.0' > /data/.upgradeversion"
You can get the pod name by the command:
1
kubectl get pods -l app=trendz-app-pod-label
Use another version instead of ‘1.14.0 if another is needed
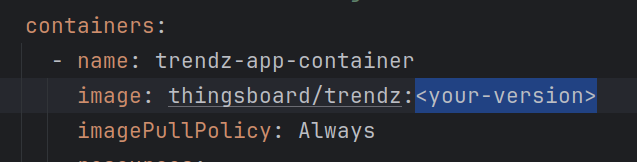
Step 5. Change image version
Open the trendz-app-deployment.yml file with the command
1
nano trendz-app-deployment.yml
and change the image version:
Step 6. Apply the deployment file
Use the command to apply the new configuration of the deployment and wait until the pods are ready:
1
kubectl apply -f trendz-app-deployment.yml
Step 7. Check the logs
Now check the logs and be sure that the instance is started successfully and the upgrade was performed. The logs can be opened by the command:
1
kubectl logs -f <trendz-pod-name>
There should be the following lines:
1
2
3
4
5
Upgrading Trendz from version …
…
Current version is …, upgrade is not needed
…
Started TrendzApplication in …
Step 8. Increase pods count
Now you can return your preferred pod count to the deployment. Use this command to set the pod count:
1
kubectl scale deployment trendz-app-deployment --replicas=<pod-count>
Step 9. Check synchronization status in ThingsBoard
After upgrade, it’s necessary to check sync status for Trendz with ThingsBoard. You can find out how to do it here.