- Adding AI models to ThingsBoard
- Provider configuration
- Model configuration
- Connectivity test
- Next steps
| Available since TB Version 4.2 |
AI models are machine learning or large language models that can process data, generate predictions, detect anomalies, or produce human-like responses. In the context of ThingsBoard, AI models are used to extend IoT data processing capabilities by enabling advanced analytics and automation.
By integrating external AI providers (such as OpenAI, Google Gemini, Azure OpenAI, Amazon Bedrock, etc.), you can:
- Predict future values (e.g., energy consumption or equipment temperature).
- Detect anomalies in real-time telemetry streams. (see industrial equipment fault detection example).
- Classify device states (e.g., OK, Warning, Fault).
- Generate responses or natural-language insights for operators and end-users.
ThingsBoard allows you to configure and connect to different AI providers, manage model settings, and use the models inside the Rule Engine for automation and decision-making.
Adding AI models to ThingsBoard
To add an AI model in ThingsBoard, follow these steps:
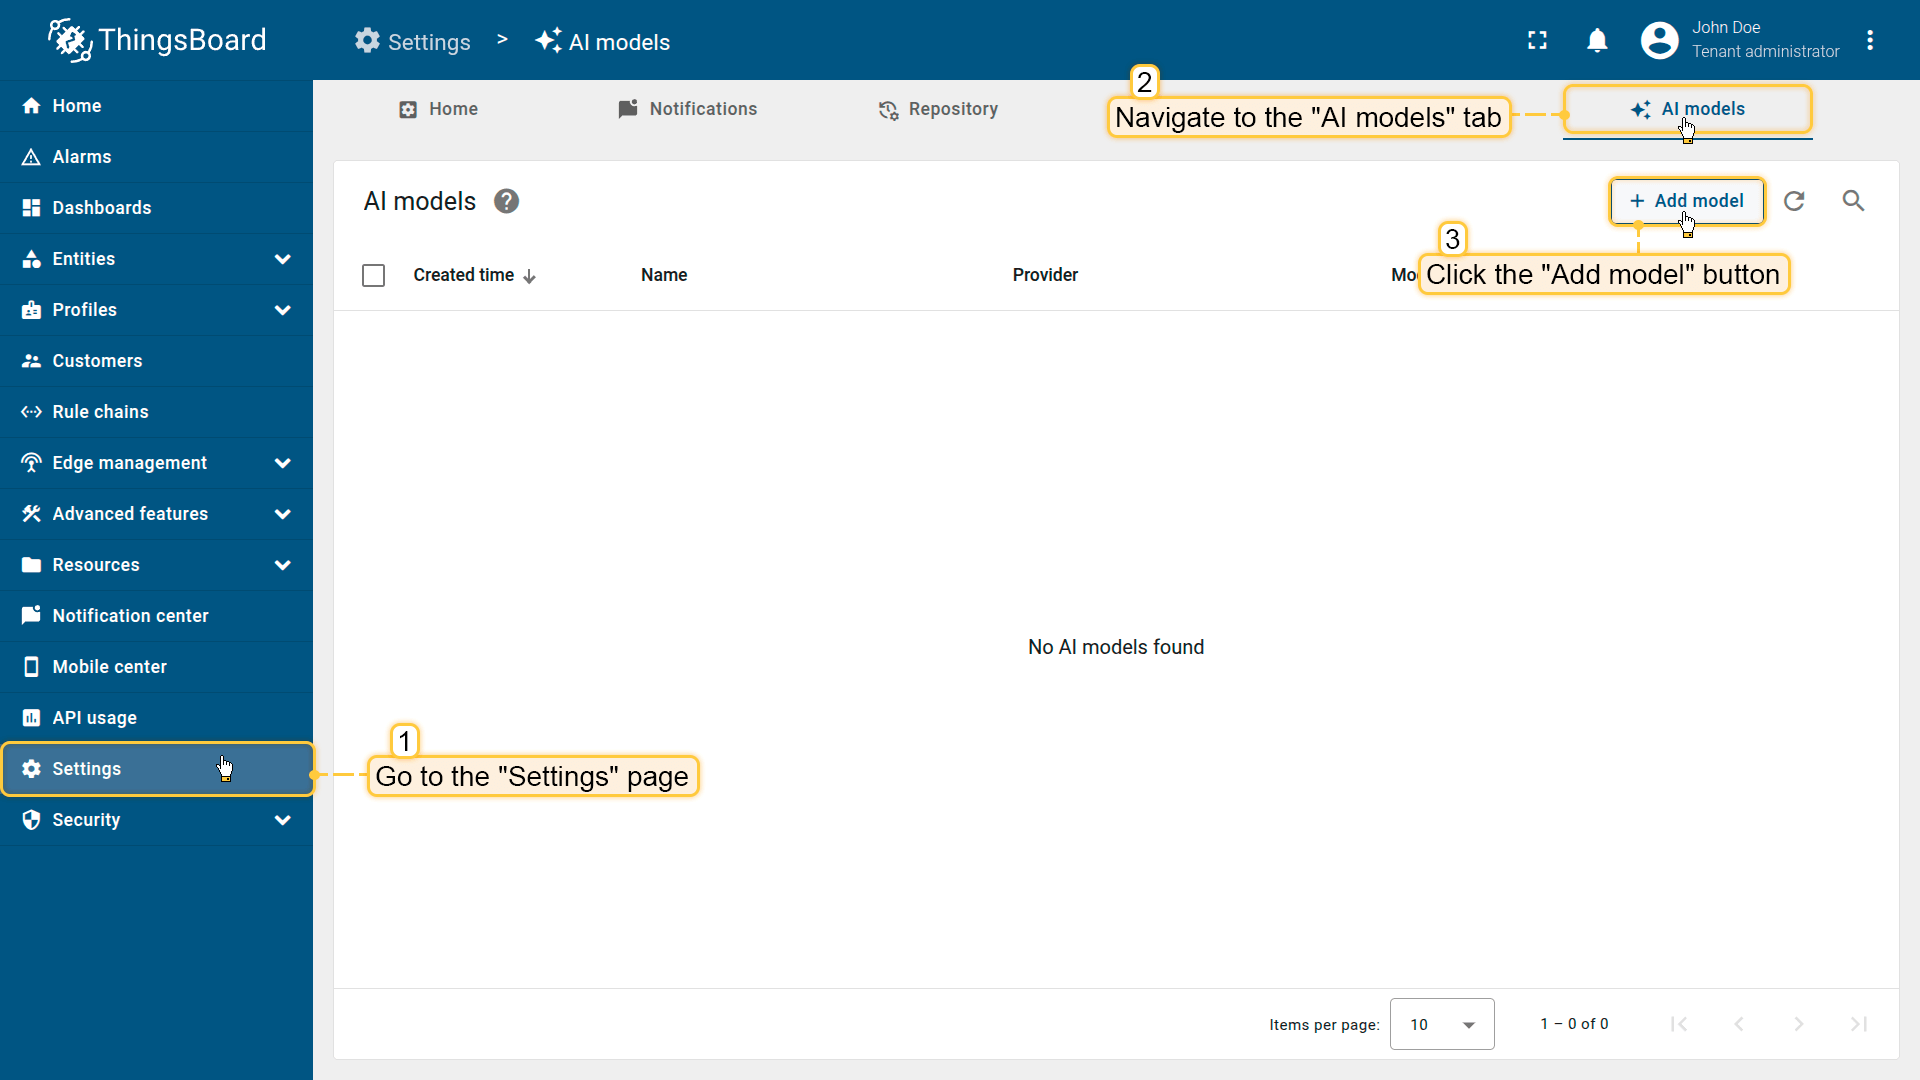
- Go to the “AI models” tab of the “Settings” page.
- Click the “Add model” button (located in the top-right corner).
- This will open a form where you can configure AI model:
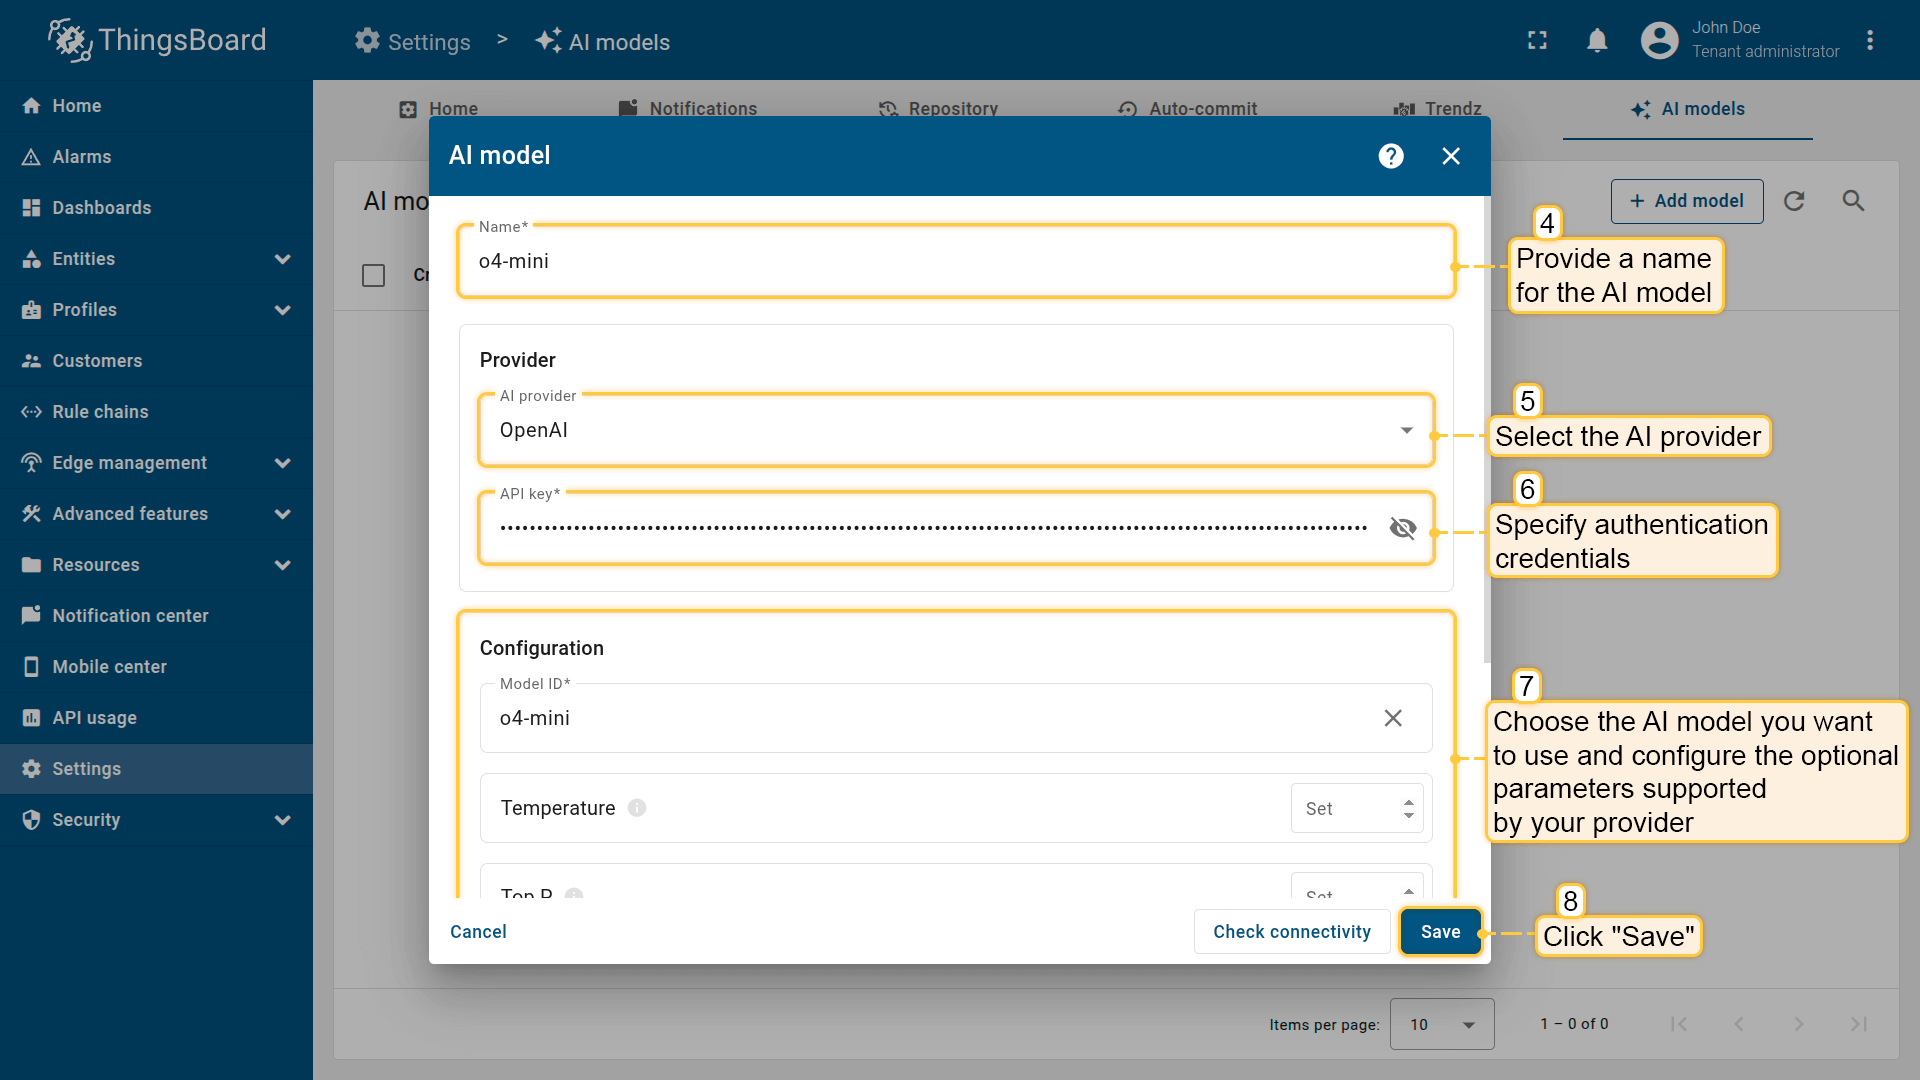
- Name - provide a meaningful name for the AI model.
- Provider — select the AI provider, specify the base URL (required only for OpenAI and Ollama), and enter the provider's authentication credentials.
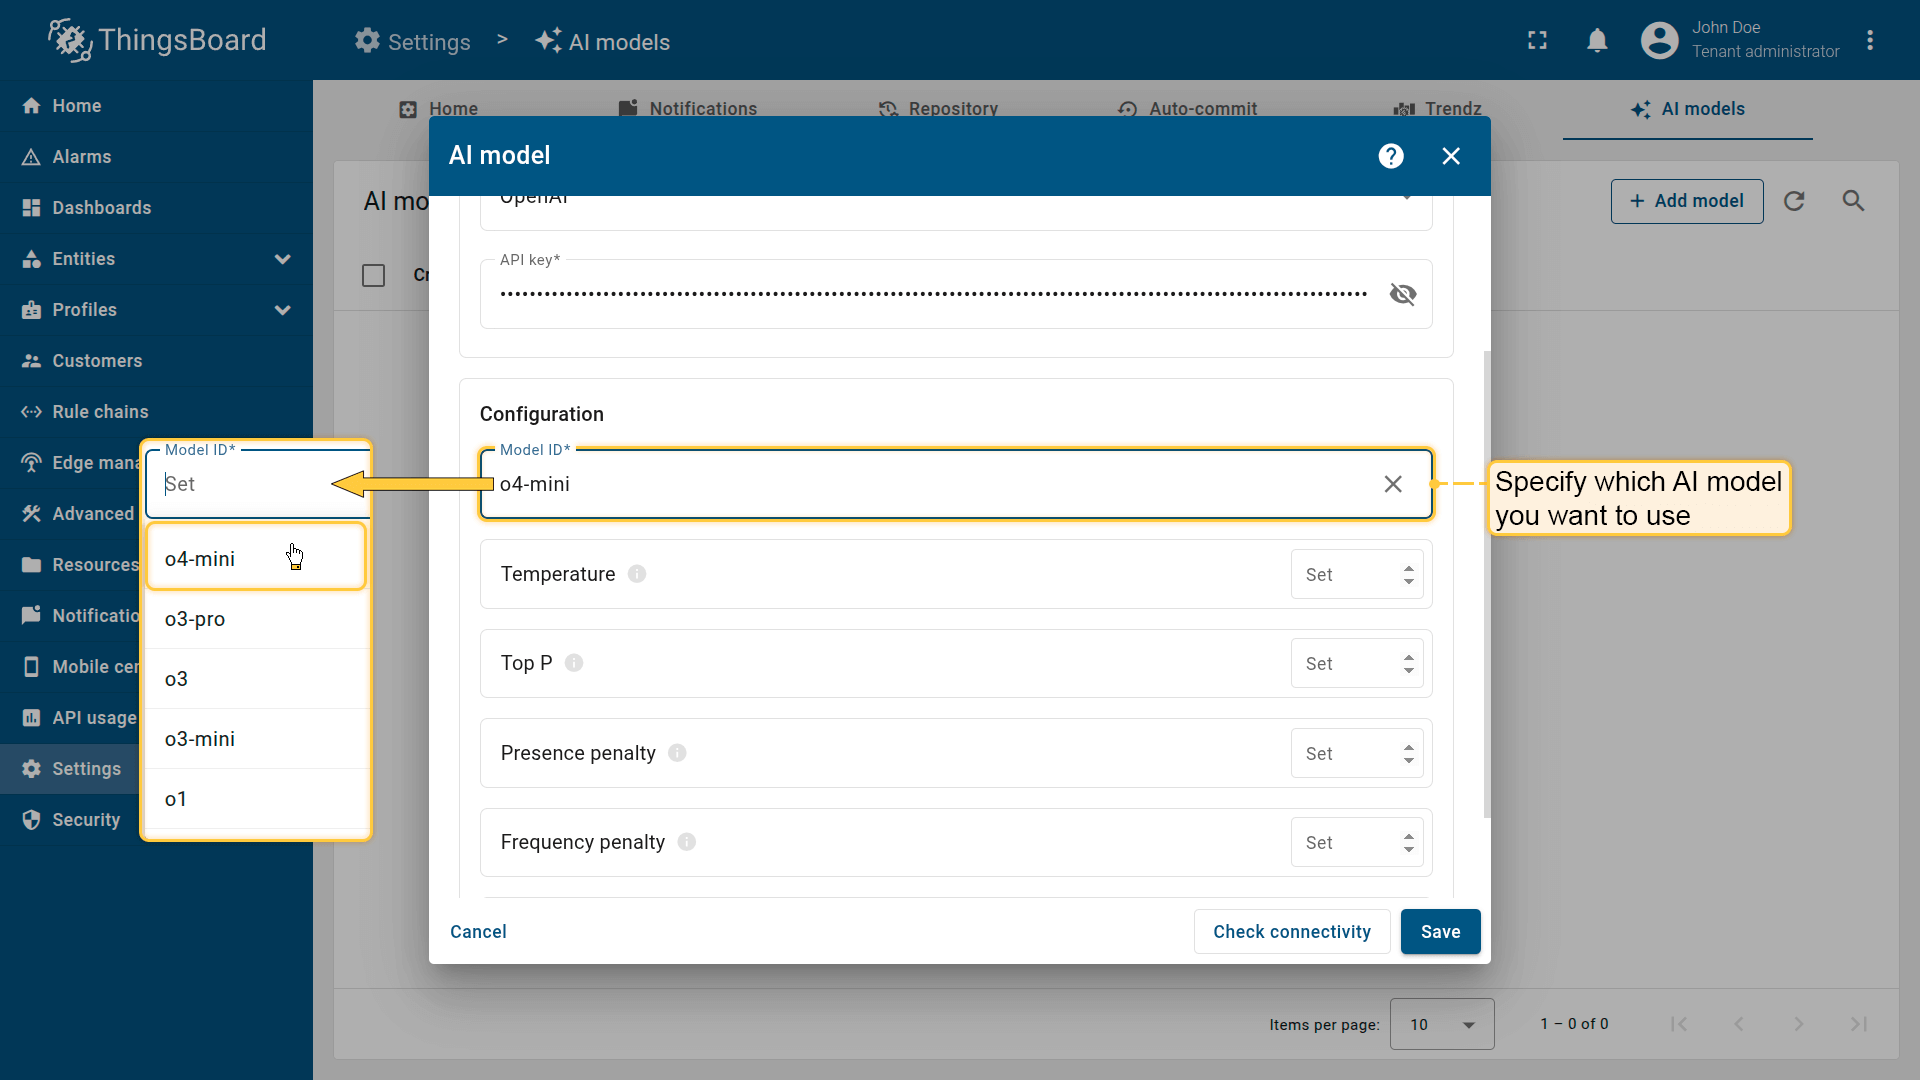
- Model ID – choose which model to use (or deployment name, in the case of Azure OpenAI).
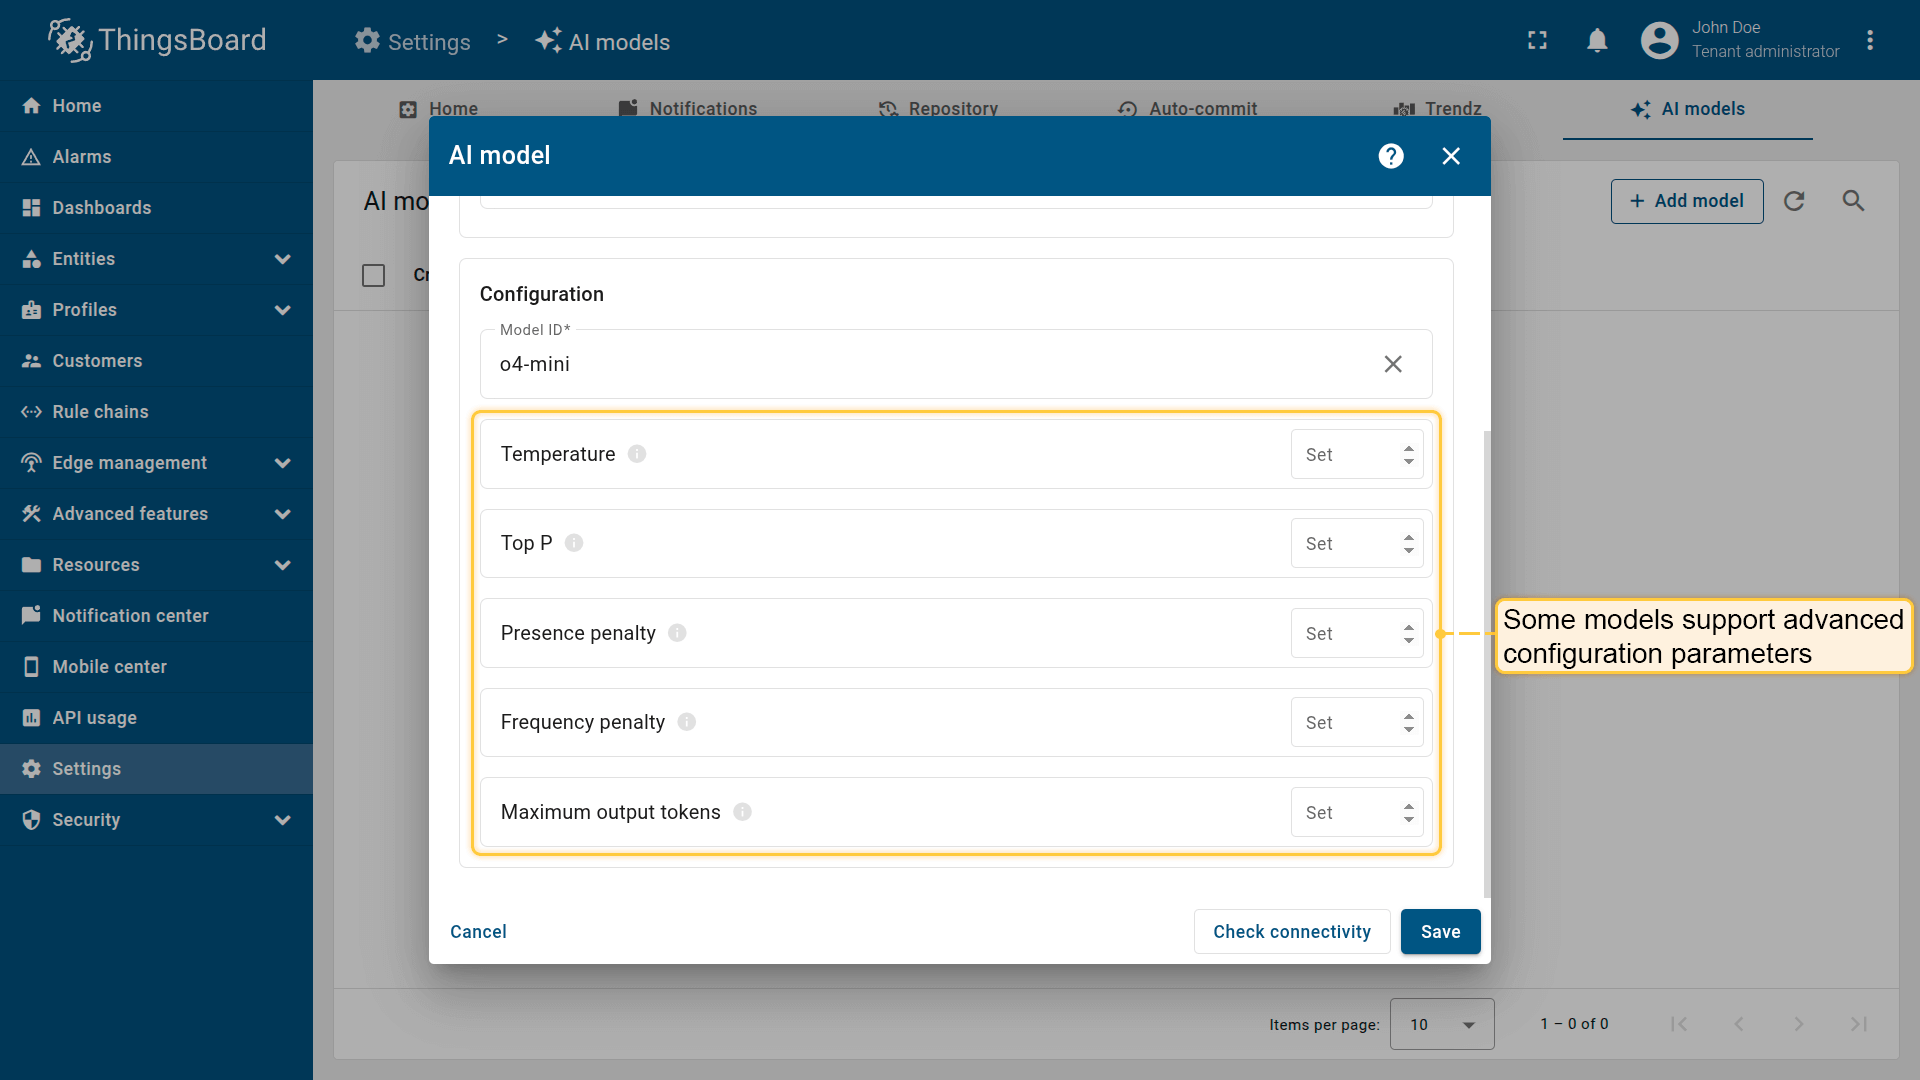
- Advanced settings – configure optional parameters (such as temperature, top P, max tokens) if supported by the provider.
- Click “Save” to complete adding the new AI model.
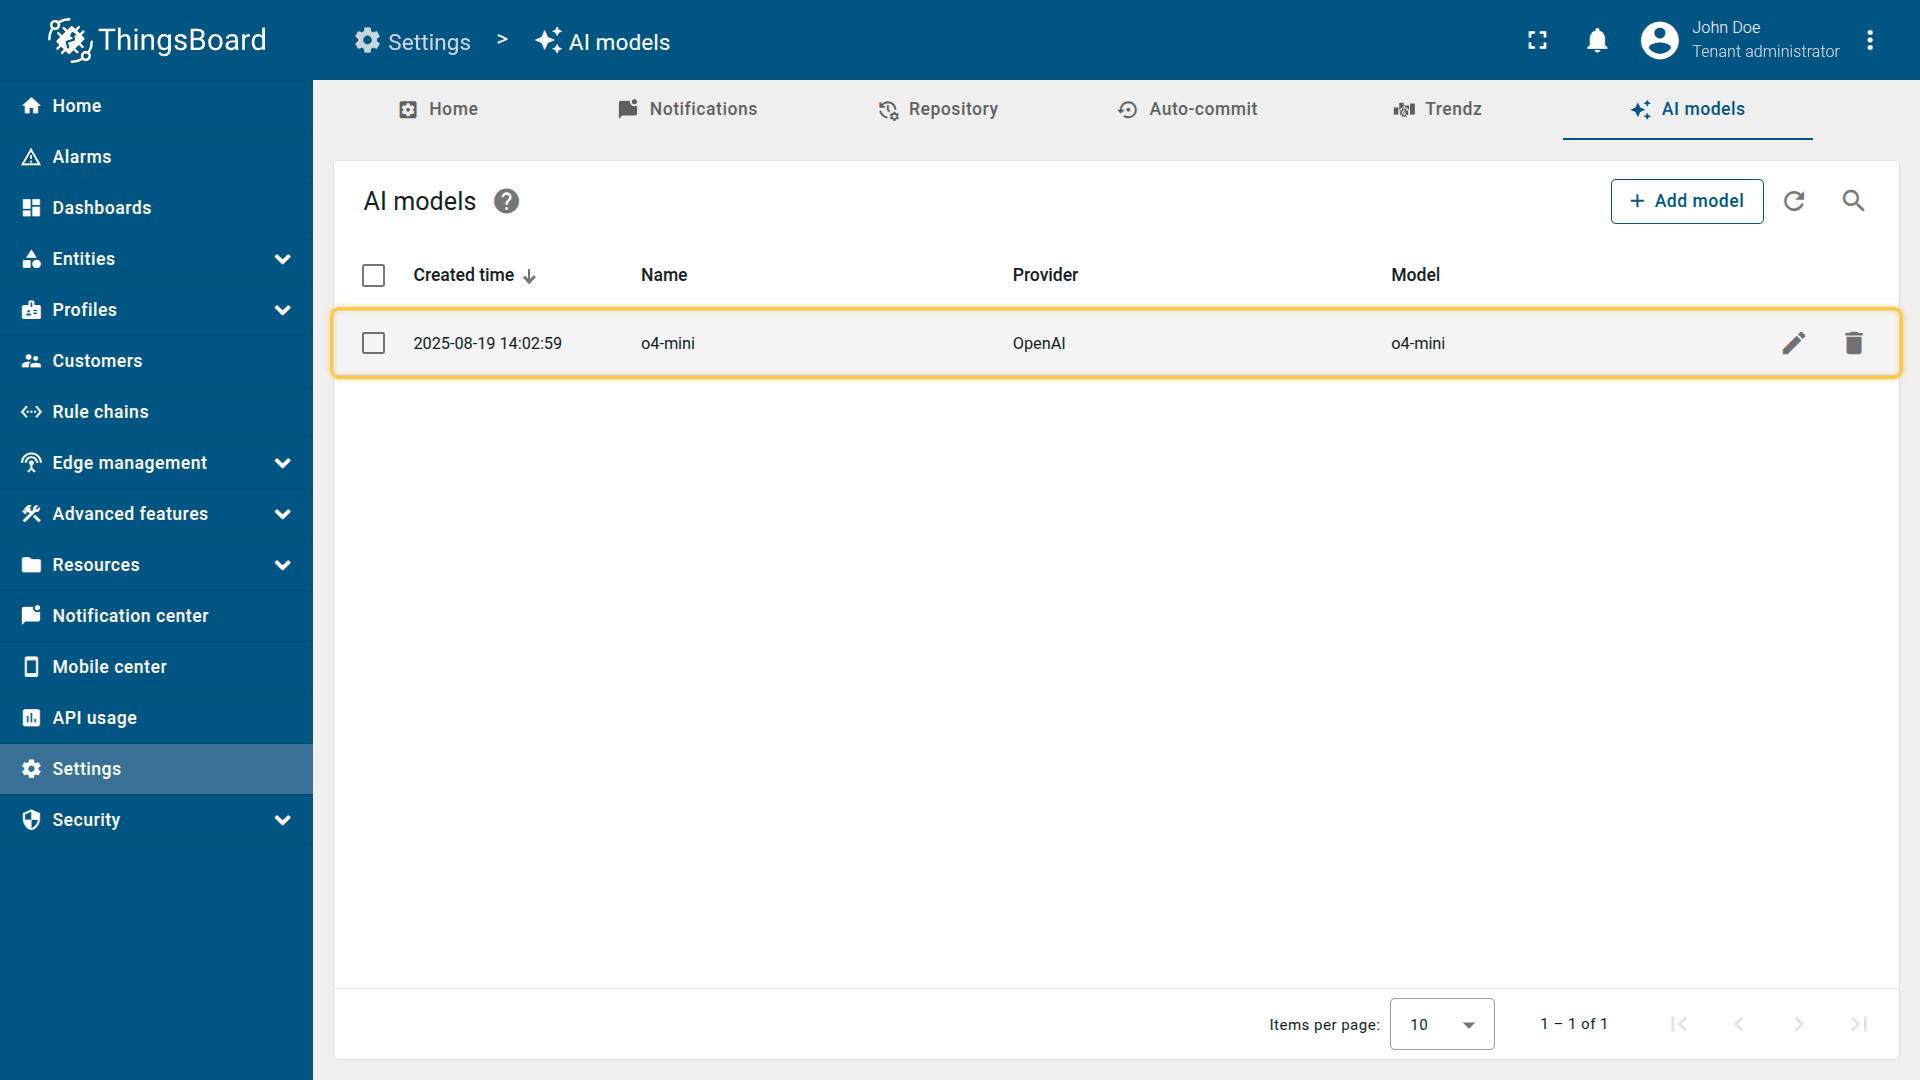
Once saved, the model becomes available for use in the AI request node of the Rule Engine.
- Name - provide a meaningful name for the AI model.
- Provider – select the AI provider and specify its authentication credentials.
- Model ID – choose which model to use (or deployment name, in the case of Azure OpenAI).
- Configure optional parameters if supported by the provider.
- Click "Save" to complete adding the new AI model.
Provider configuration
In the Provider section, select the AI provider, specify the base URL (required only for OpenAI and Ollama), and enter the authentication credentials (e.g., API key, key file, etc.).
Supported AI providers
ThingsBoard currently supports integration with the following AI providers:
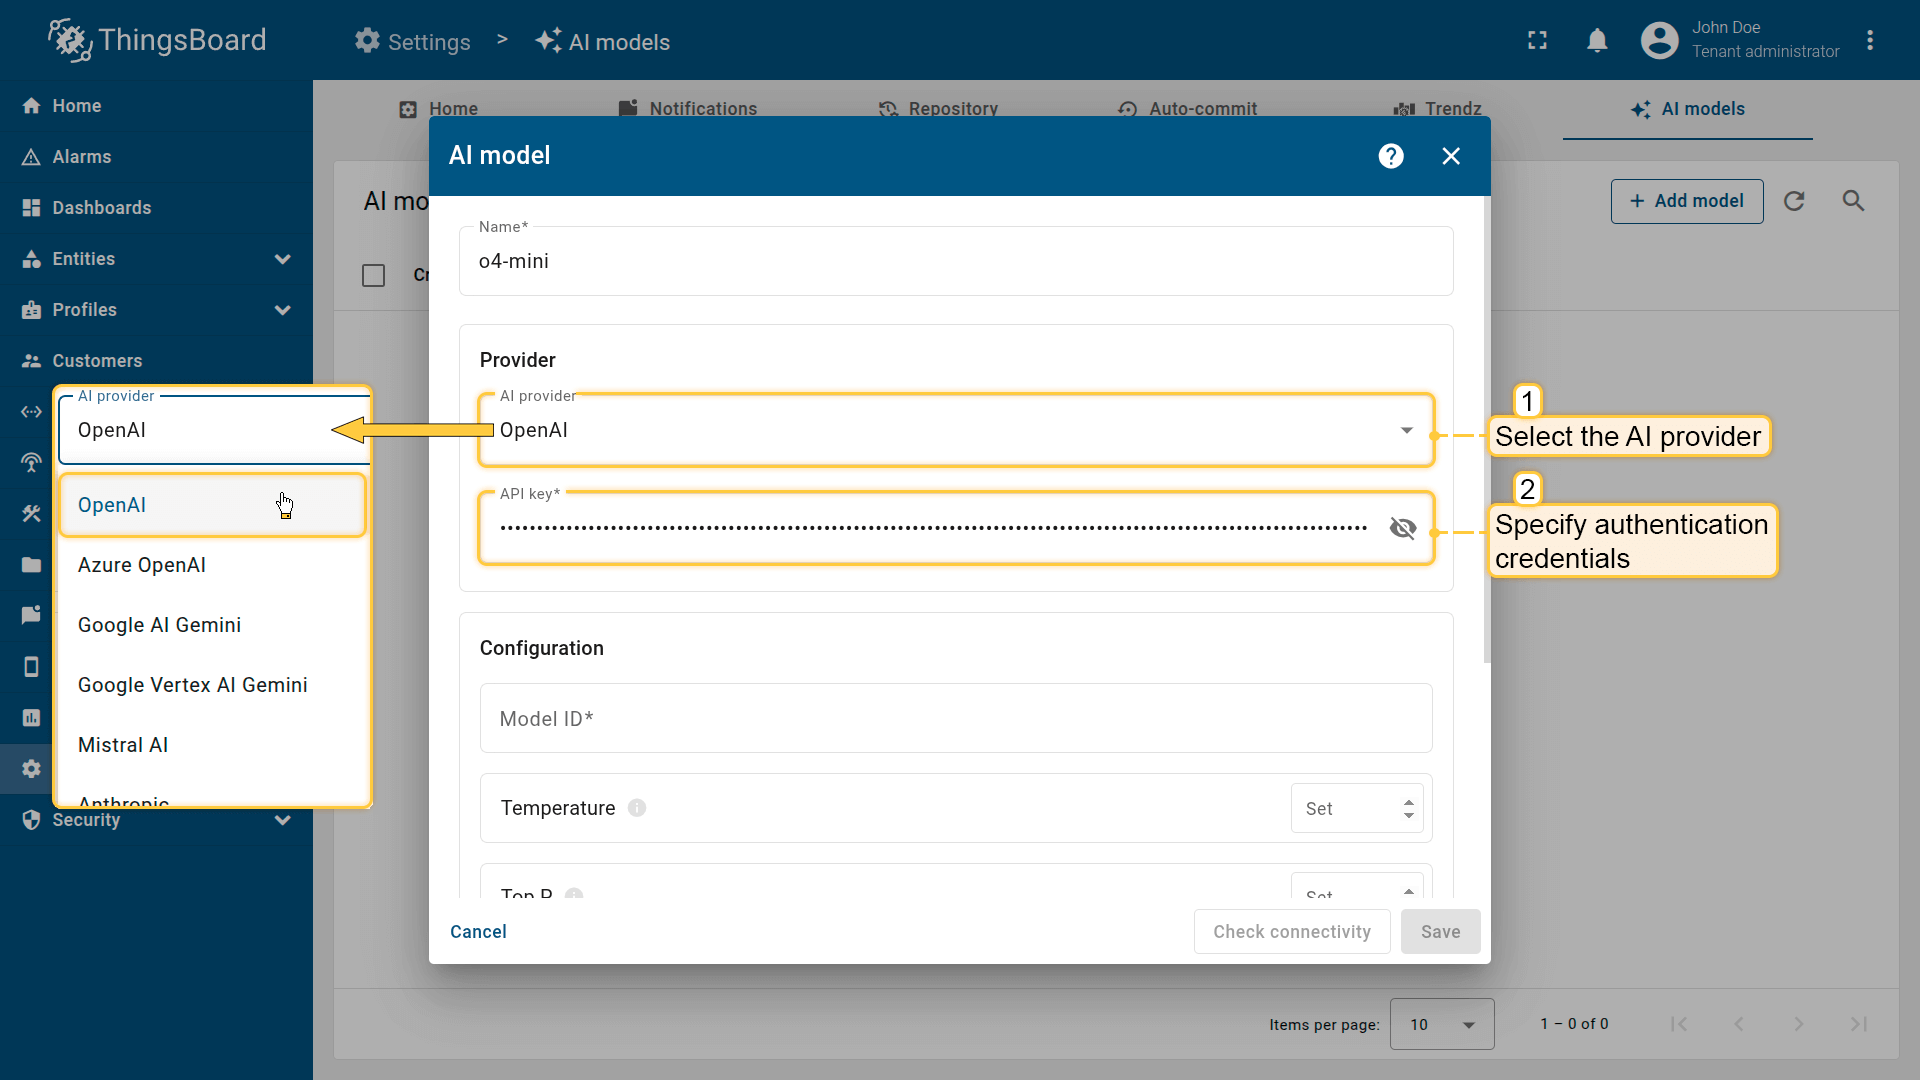
OpenAI
- Base URL: Specify the address for accessing the OpenAI API.
- Authentication: API key.
- You can obtain your API key from the OpenAI dashboard.
Using OpenAI-compatible models
| Available since TB Version 4.2.1 |
When working with models compatible with the OpenAI API, an important parameter is the base URL, which defines the address used to send requests to the API.
Official Base URL
The standard OpenAI API endpoint, preconfigured in ThingsBoard. Use this to access models hosted by OpenAI.
Custom Base URL
An alternative endpoint for providers that implement the OpenAI-compatible API protocol. Use this when there is no dedicated integration for your provider and they offer an OpenAI-compatible API (e.g., DeepSeek, Qwen, self-hosted Ollama).
When using a custom base URL, the API key becomes optional. This enables working with models that do not require authentication, such as locally hosted models. However, most cloud model providers will still require a valid API key.
Example base URLs:
| Provider | Base URL |
|---|---|
| DeepSeek | https://api.deepseek.com |
| Alibaba Qwen (Singapore) | https://dashscope-intl.aliyuncs.com/compatible-mode/v1 |
| Ollama (local) | http://localhost:11434/v1 |
Ollama is also available as a separate integration with additional configuration options.
Azure OpenAI
- Authentication: API key and endpoint.
- You need to create a deployment of the desired model in Azure AI Studio.
- Obtain the API key and endpoint URL from the deployment page.
- Optionally, you may set the service version.
Google AI Gemini
- Authentication: API key.
- You can obtain the API key from the Google AI Studio.
Google Vertex AI Gemini
- Authentication: Service account key file.
- Required parameters:
- Google Cloud Project ID.
- Location of the target model (region).
- Service account key file with correct permission to be able to interact with Vertex AI.
Mistral AI
- Authentication: API key.
- You can obtain your API key from the Mistral AI portal.
Anthropic
- Authentication: API key.
- You can obtain your API key from the Anthropic console.
Amazon Bedrock
- Authentication: AWS IAM credentials.
- Required parameters:
- Access key ID.
- Secret access key.
- AWS region (where inference will run).
Authentication with Bedrock API keys is not supported.
GitHub Models
- Authentication: Personal access token.
- Token must have the
models:readpermission. - You can create a token following this guide.
Ollama
| Available since TB Version 4.2.1 |
Ollama allows you to easily run open large language models, such as Llama 3 and Mistral, directly on your own machine. This enables local experimentation, offline usage, and greater control over your data.
To connect to your Ollama server, you need its base URL (e.g., http://localhost:11434) and an authentication method. The following options are supported:

- None
- Default method for a standard Ollama installation.
- No authentication is required, and no credentials are sent with requests.
- Basic
- Use when Ollama is secured behind a reverse proxy requiring HTTP Basic Authentication.
- The provided username and password are combined into a
username:passwordstring, Base64-encoded, and sent in the header:1
Authorization: Basic <encoded_credentials>
- Token
- Use when Ollama is secured behind a reverse proxy requiring Bearer Token Authentication.
- The provided token is sent in the header:
1
Authorization: Bearer <token>
Security Recommendation: When using Basic or Token authentication, always connect via an HTTPS URL. Using plain HTTP will transmit credentials in clear text, which is insecure.
Model configuration
After you've selected and authenticated your AI provider, you need to specify which particular AI model to use (or deployment name in the case of Azure OpenAI).
For some providers (like OpenAI), ThingsBoard offers autocomplete options with popular models. You are not limited to this list – you can specify any model ID supported by the provider, including model aliases or snapshots. For production usage, we recommend using model snapshots to ensure predictable performance (Model aliases may be updated by the provider to point to a new snapshot, which can change response quality).
Advanced model settings
Some models support advanced configuration parameters (depending on the provider), such as:
- Temperature – Adjusts the level of randomness in the model’s output. Higher values increase randomness, while lower values decrease it.
- Top P – Creates a pool of the most probable tokens for the model to choose from. Higher values create a larger and more diverse pool, while lower values create a smaller one.
- Top K - Restricts the model’s choices to a fixed set of the “K” most likely tokens.
- Presence penalty - Applies a fixed penalty to the likelihood of a token if it has already appeared in the text.
- Frequency penalty - Applies a penalty to a token’s likelihood that increases based on its frequency in the text.
- Maximum output tokens – Sets the maximum number of tokens that the model can generate in a single response.
- Context length – Defines the size of the context window in tokens. This value sets the total memory limit for the model, including both the user’s input and the generated response.
If advanced settings cause errors, try removing their values. In this case, defaults will be applied. This often resolves incompatibility issues for certain models.
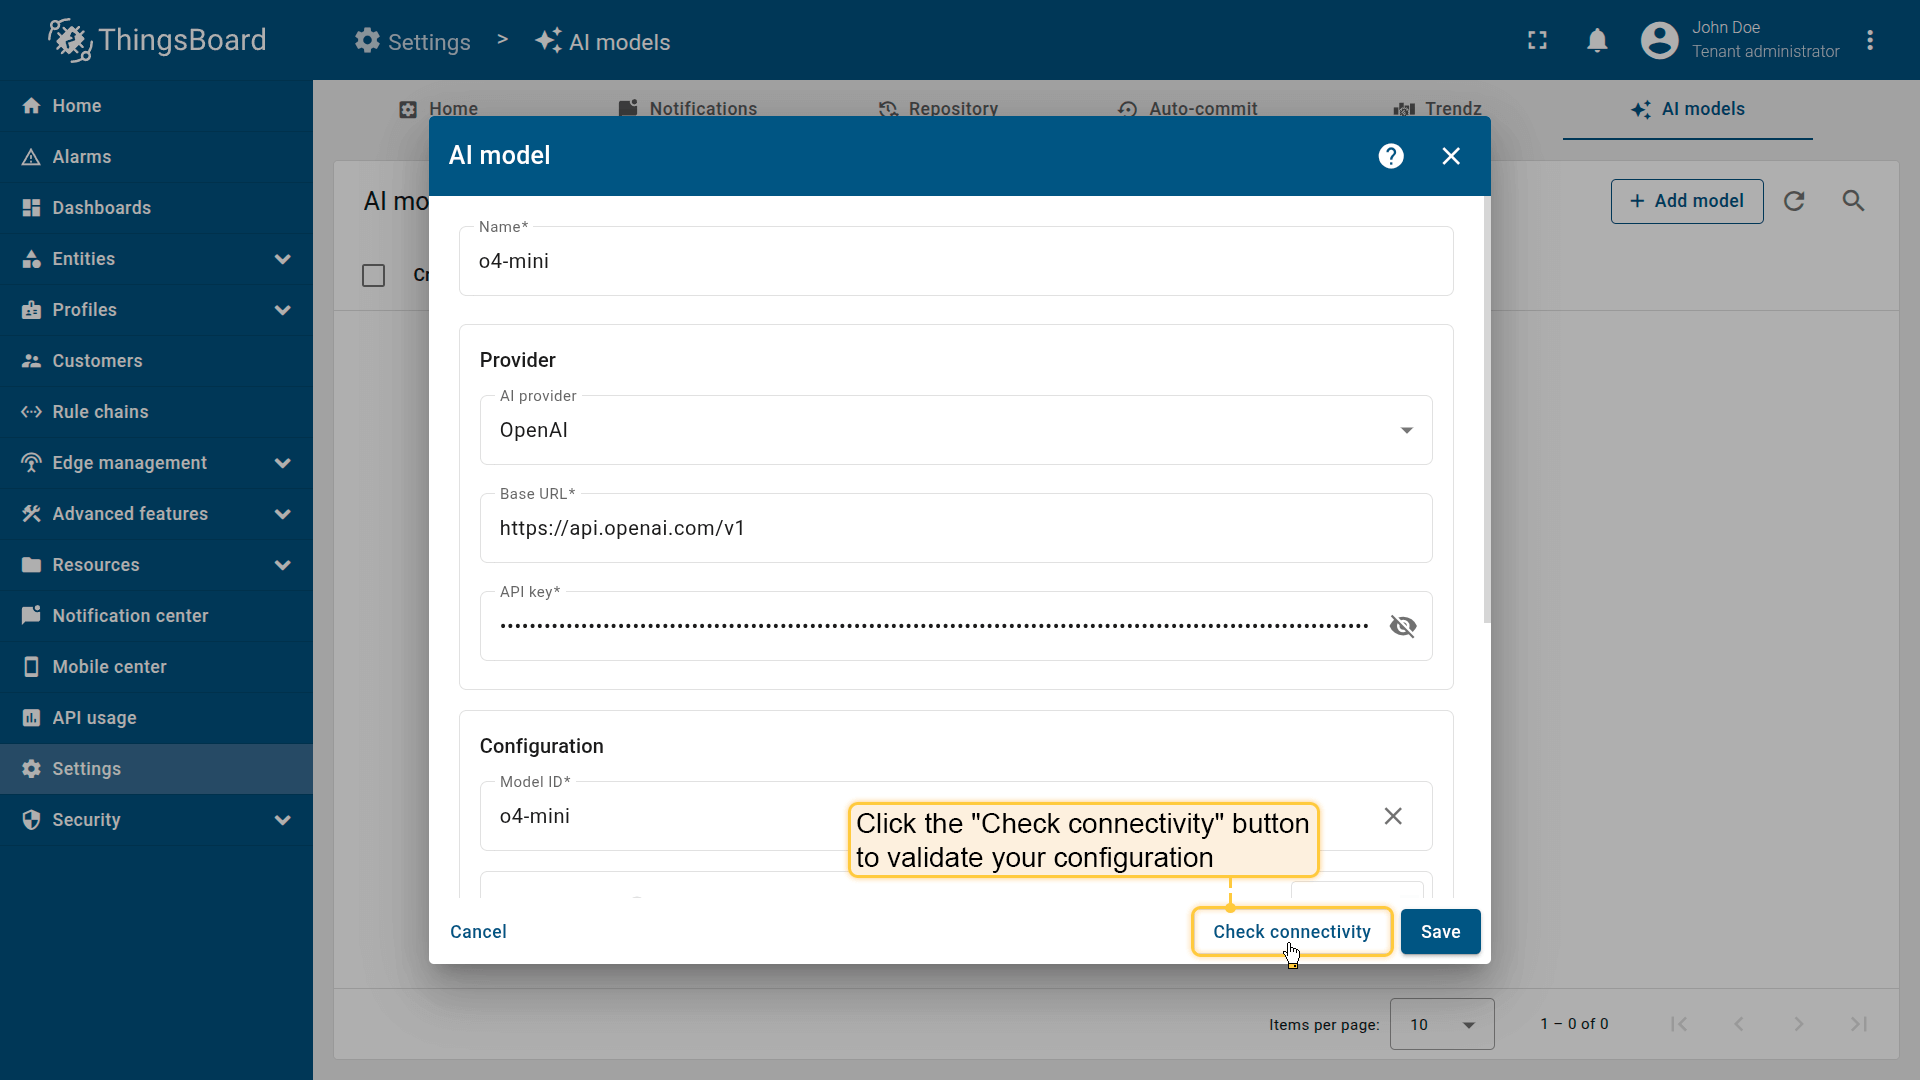
Connectivity test
Click a Check connectivity button to validate your configuration. A test request is sent to the provider API using the supplied credentials and model settings.
If the response is successful, you will see a ✅ green checkmark.
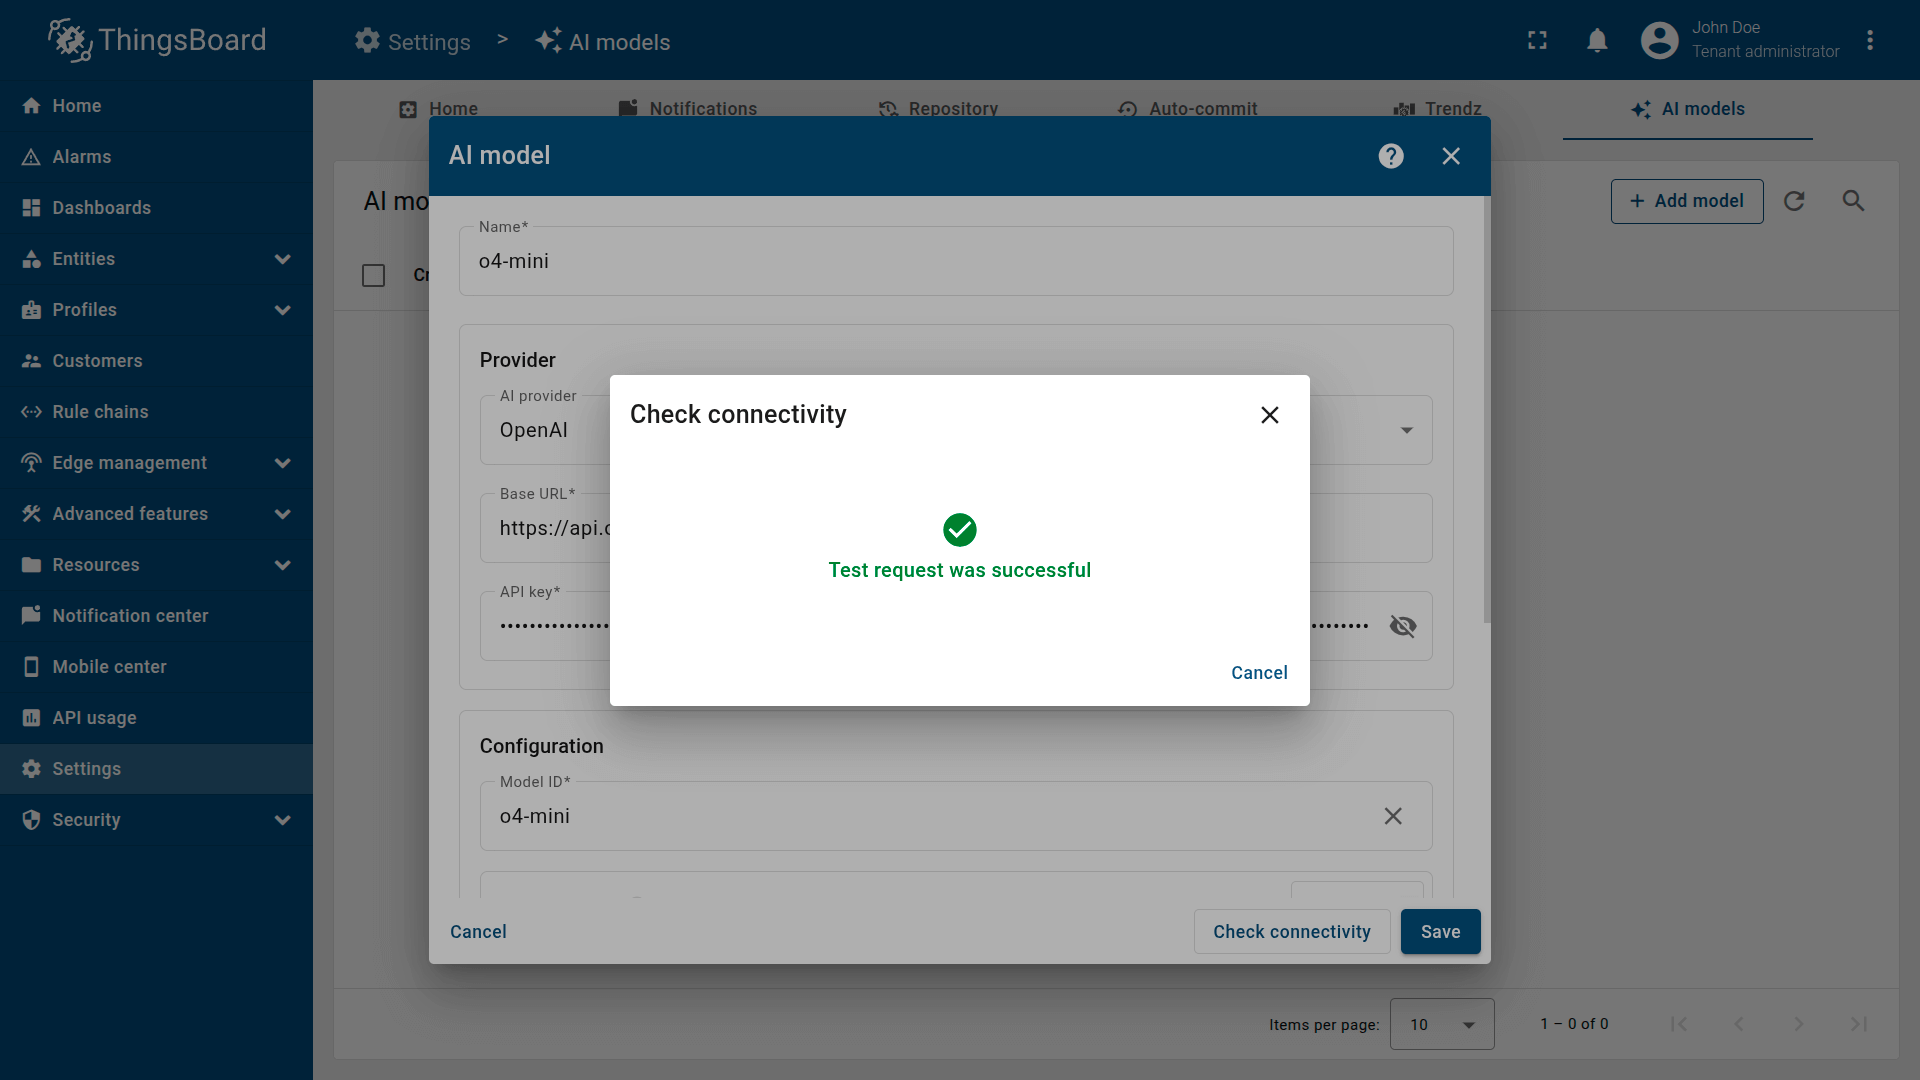
Always use the connectivity check after configuring a provider to ensure smooth runtime execution.
If an error occurs (e.g., invalid API key, non-existing model), an error message with details will be displayed ❌.
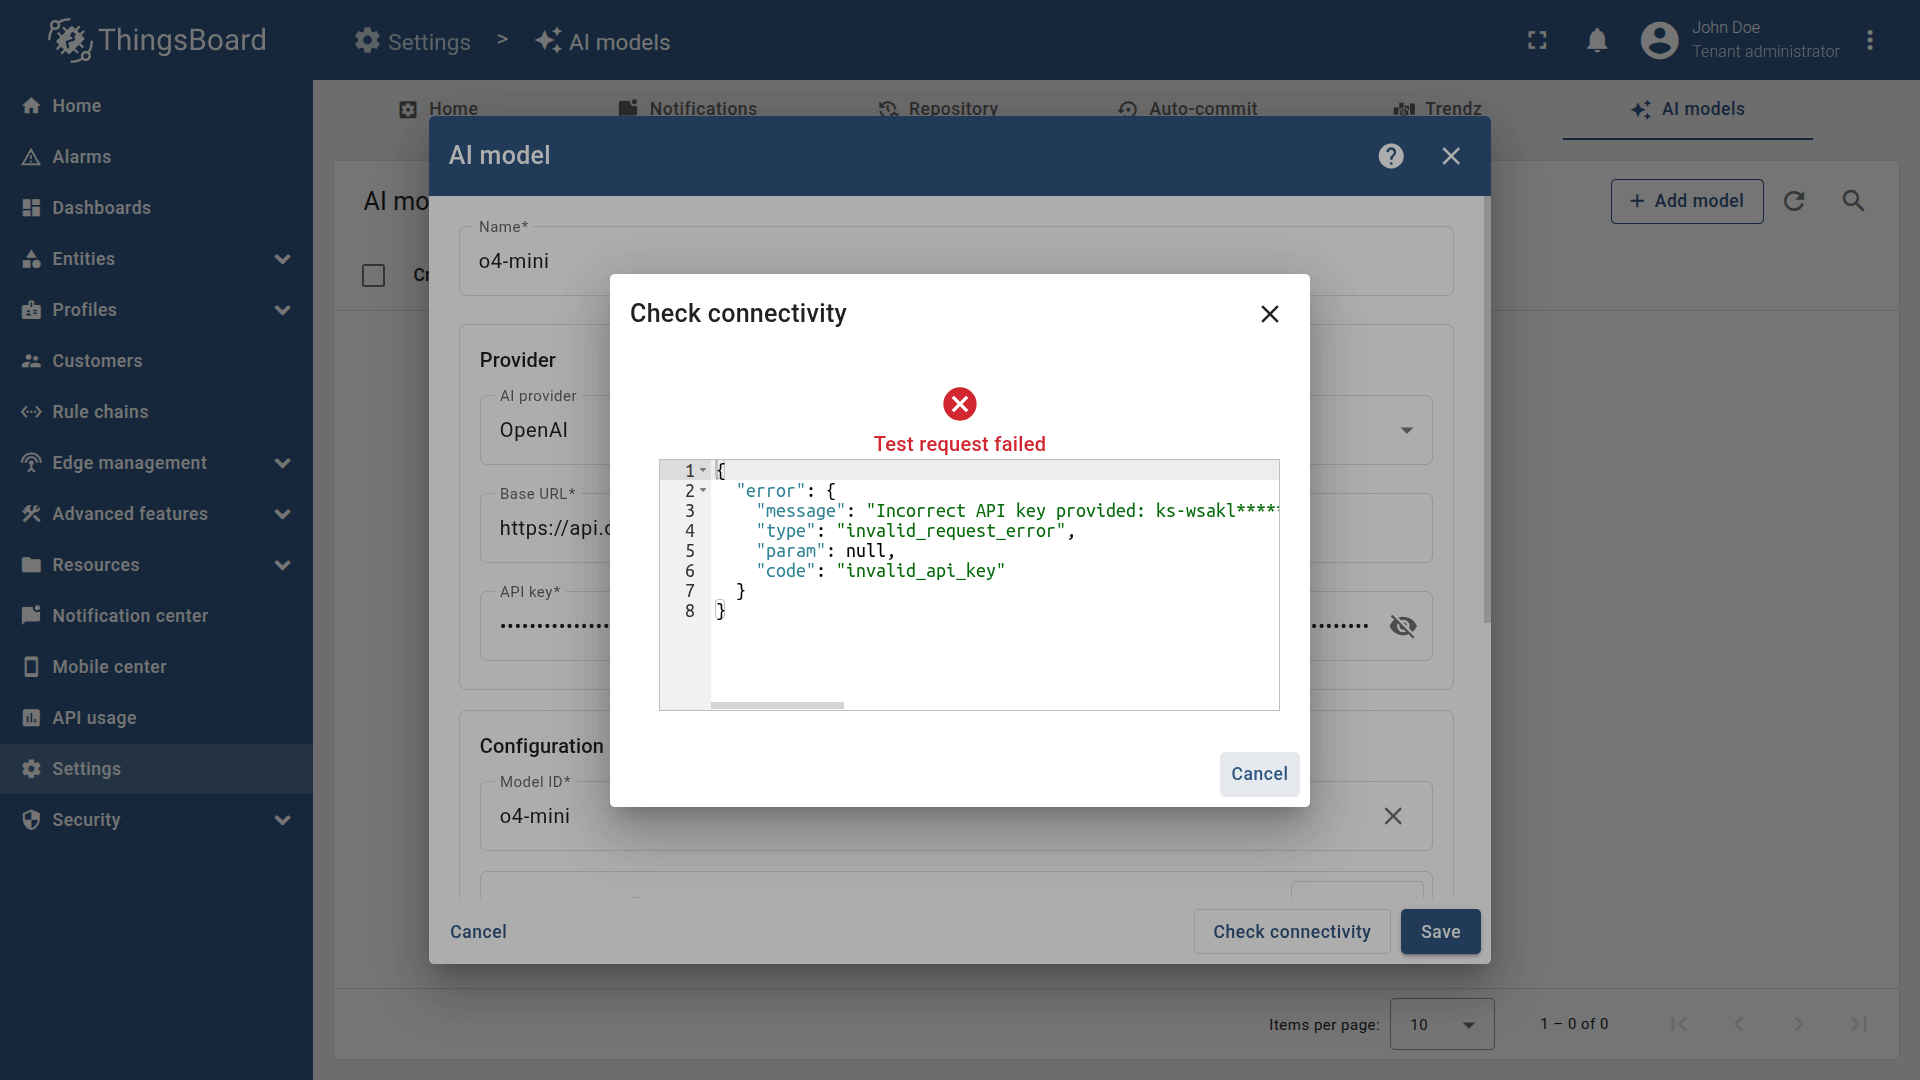
This feature ensures your configuration is valid and prevents runtime errors when models are used in production.
Even though the test request is trivial (e.g., “What is the capital of X country?”), providers usually charge for it. However, the cost is minimal.
Next steps
-
Connect your device - Learn how to connect devices based on your connectivity technology or solution.
-
Data visualization - These guides contain instructions on how to configure complex ThingsBoard dashboards.
-
Data processing & actions - Learn how to use ThingsBoard Rule Engine.
-
IoT Data analytics - Learn how to use rule engine to perform basic analytics tasks.
-
Advanced features - Learn about advanced ThingsBoard features.
-
Contribution and Development - Learn about contribution and development in ThingsBoard.