Introduction
ThingsBoard platform uses queues to guarantee the message processing, handle occasional spikes, and keep the system up and running on extreme loads. You can review the architecture to find our more about queues.
ThingsBoard supports two types of message queues: Kafka and In-Memory.
- Kafka is a widely used, distributed, and durable message queue system designed to handle large volumes of data. It is well-suited for production environments where high throughput, fault tolerance, and scalability are critical.
- In-Memory queue is a lightweight, fast, and simple message queue implementation designed for smaller-scale or development environments. It stores messages in memory rather than on disk, prioritizing speed over persistence.
With the platform’s 3.4 version, the configuration UI was introduced to simplify the setup and management process and to improve user experience. In a nutshell, the Rule Engine subscribes to queues on startup and polls new messages. There is always Main topic (queue) that is used as a default entry point for new messages. One can put messages into the other topic using the Checkpoint node. The latter automatically acknowledges corresponding messages in the targeted topic.
Queue configuration
Only a system administrator user can configure queues. After configuration, new changes will apply immediately. There are two configuration profiles for queues: a Common queue configuration and a Queue configuration for isolated tenants. To know more about isolated tenants please read a tenant profile documentation.
Common queue configuration
Out of the box, all messages (like telemetry, connectivity or lifecycle events, etc.) are pushed to Main or another topic chosen as default. ThingsBoard puts messages for all Tenants to a common topics when isolated processing is disabled (default). Pros: this approach is more cost-efficient; no need to manage extra VMs or containers. Cons: a single Rule Engine service is shared between all Tenants.
To create a new queue follow these steps:
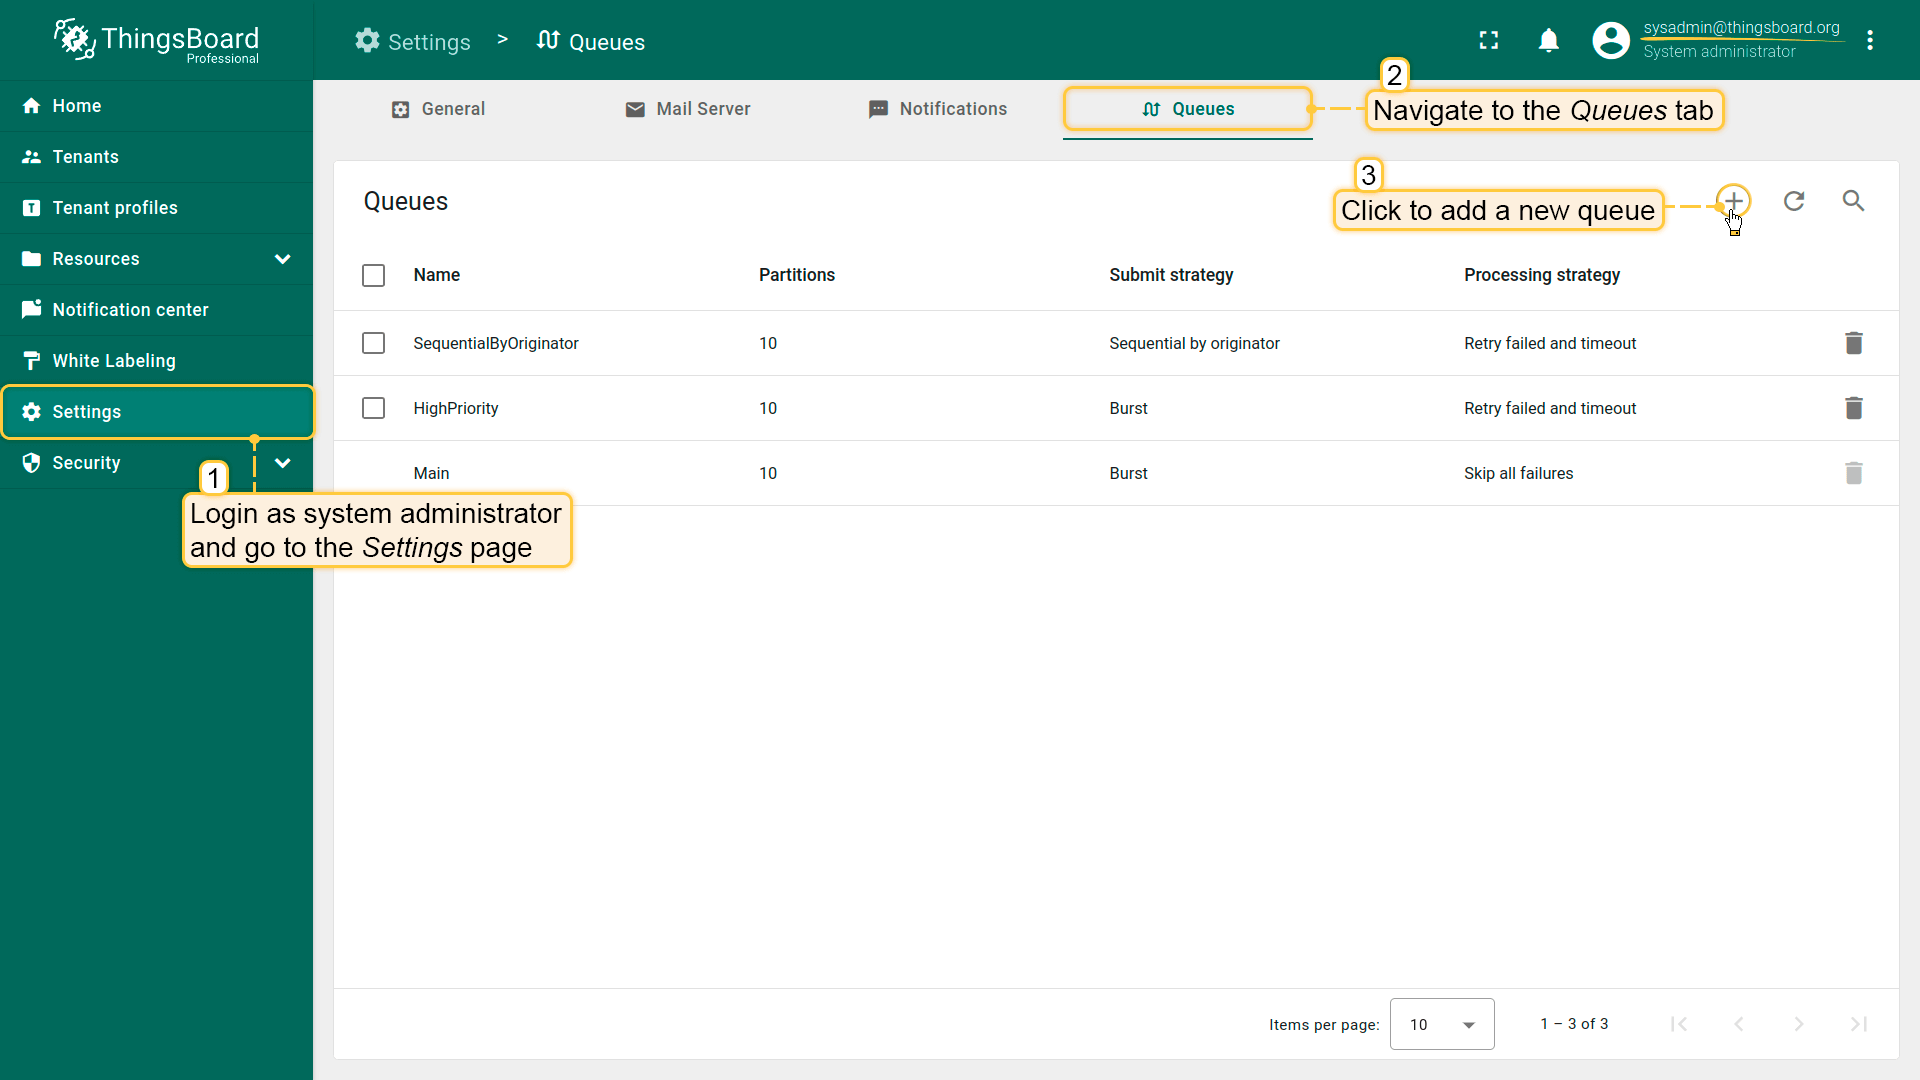
- Login as system administrator;
- Navigate to the Queues tab in the Settings page;
- Click the “plus” button to create a new queue.

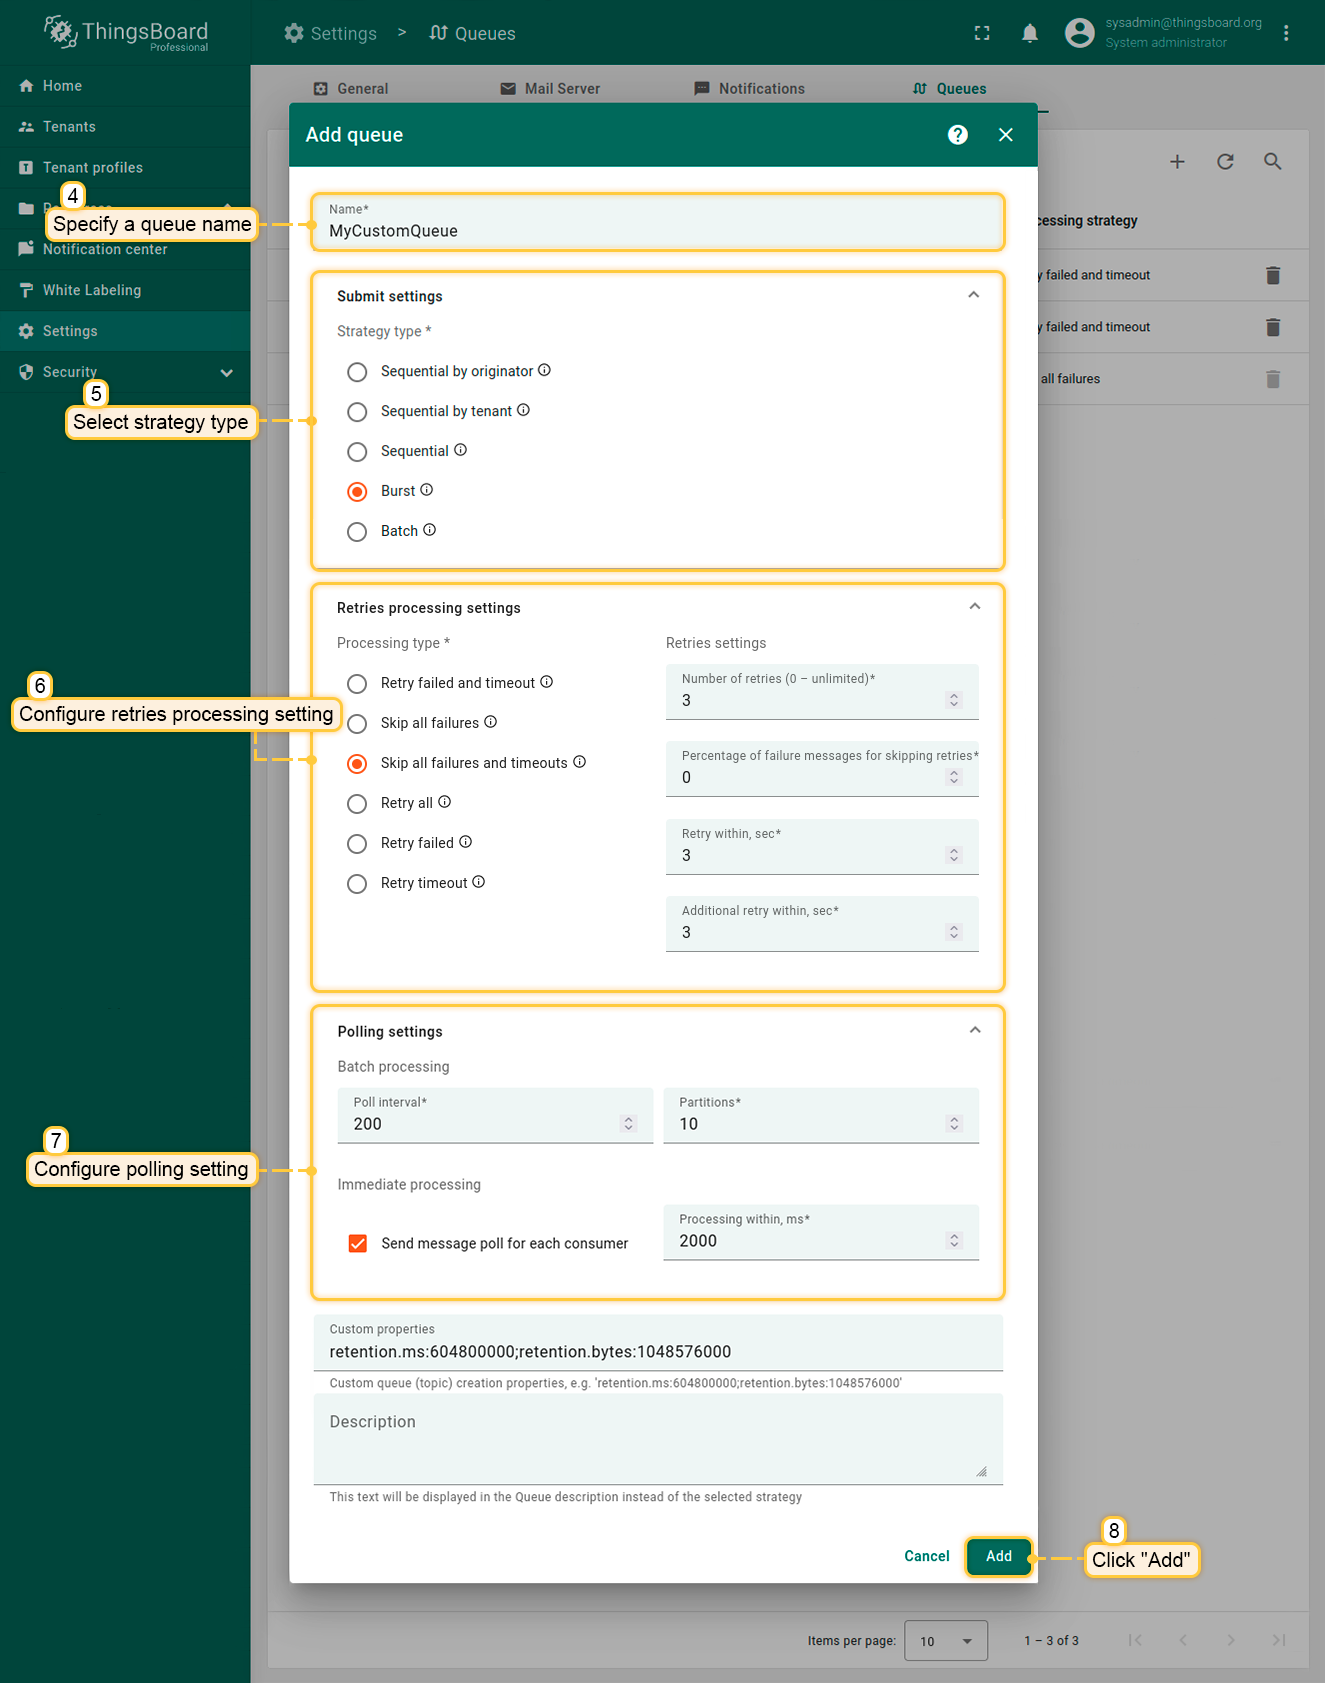
- Enter queue name. Select the strategy type and configure retries processing settings and polling settings. Click Add.

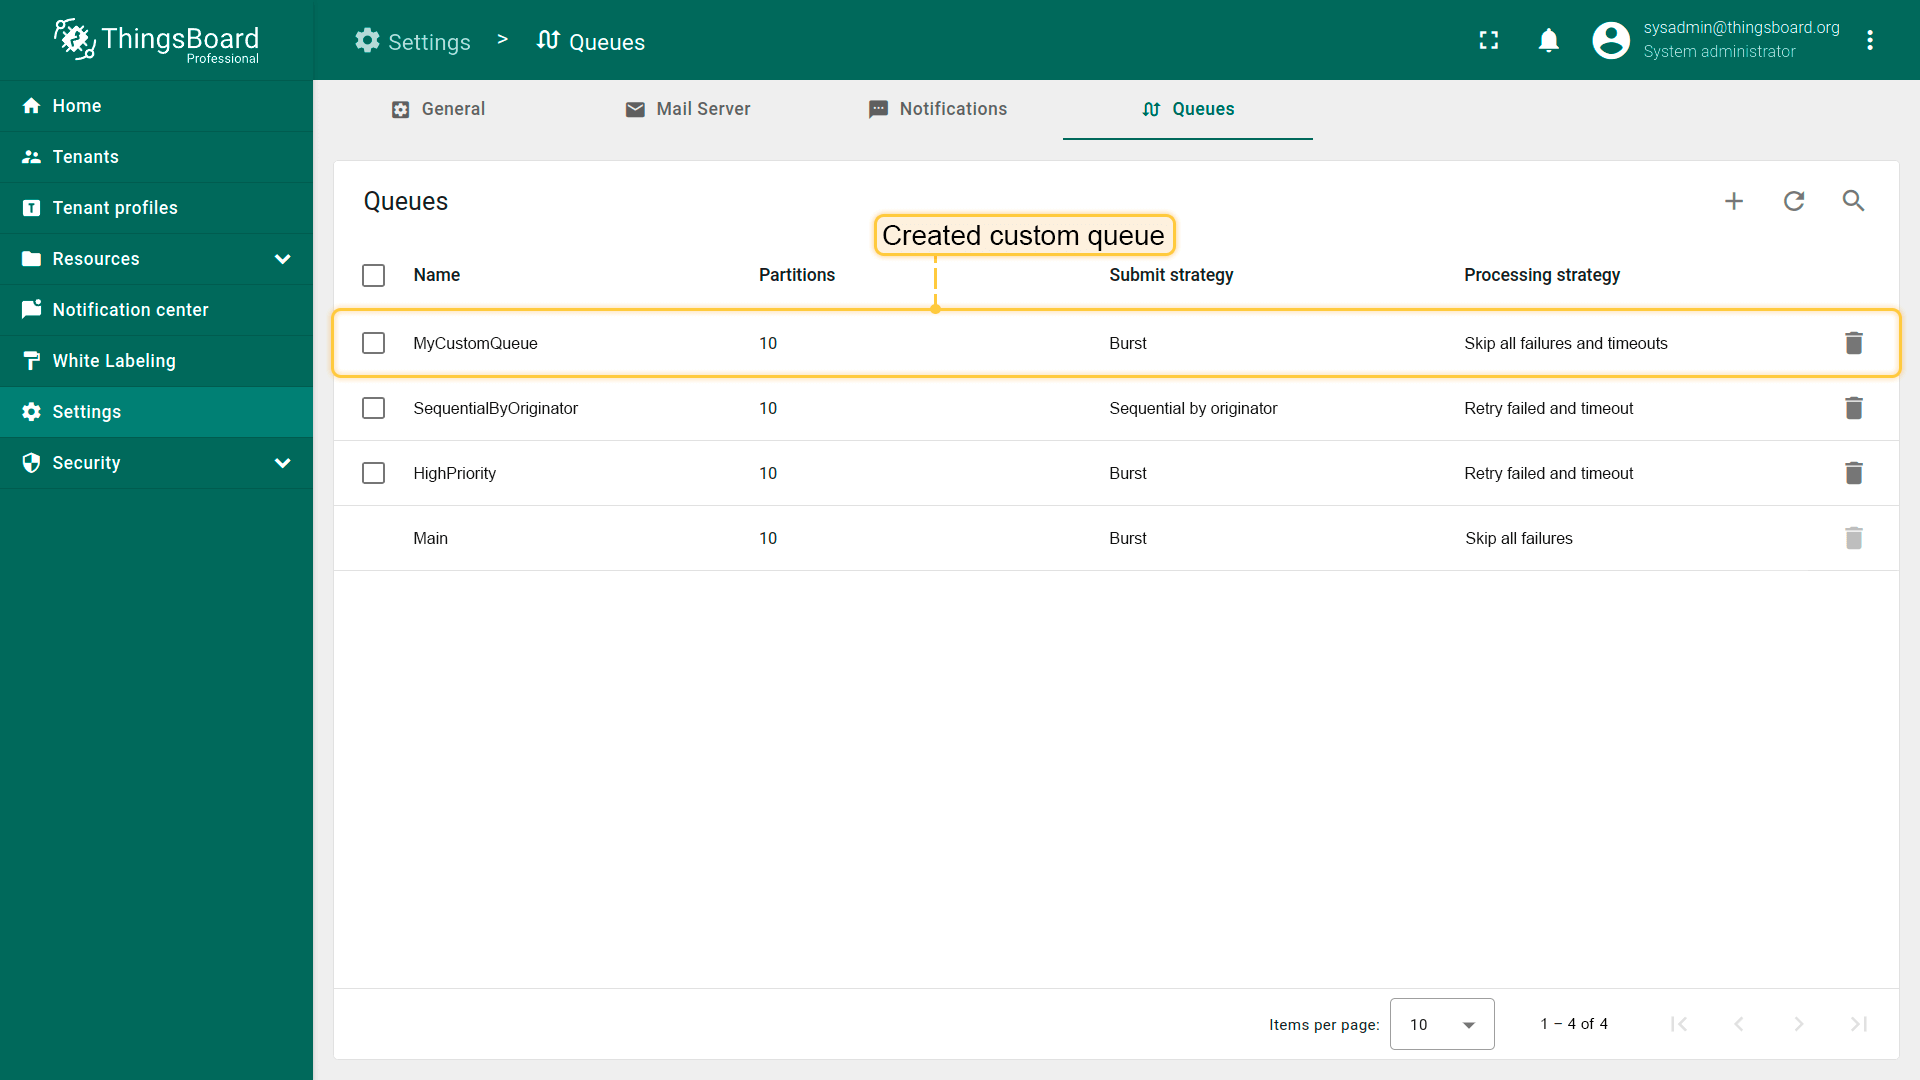
You have created a custom queue.

Queue configuration for isolated tenants
For your convenience, this configuration is placed together with the isolated tenant documentation.
Queue settings
The definition of the queue consists of the following parameters and modules:
- Name - used for statistics and logging;
- Submit settings - defines logic and order of submitting messages to rule engine;
- Retries processing settings - defines logic of acknowledgement of the messages;
- Polling settings - queue settings for batch and immediate processing.
Submit settings
Rule Engine service constantly polls messages for specific topic and once the Consumer returns a list of messages it creates the TbMsgPackProcessingContext object. Queue submit strategy controls how messages from TbMsgPackProcessingContext are delivered to rule chains. There are 5 available strategies:
- Sequential by originator - messages are submitted one by one for particular entity (originator of the message). A new message for e.g. Device A is not submitted until previous message for Device A is acknowledged.
- Sequential by tenant - messages are submitted sequentially within Tenant (owner of the originator of the message). New message for e.g Tenant A is not leaving the queue until previous message for Tenant A is acknowledged.
- Sequential - messages are submitted one after another. New message is not submitted until previous message is acknowledged. This makes processing quite slow.
- Burst - all messages are submitted to the rule chains in the order they arrive.
- Batch - messages are grouped into batches using grouping parameter “Batch size”. New batch is not submitted until previous batch is acknowledged.
See this guide as an example of submit strategy use case.
Retries processing settings
Processing Strategy controls how failed or timed out messages are re-processed. There are 5 available strategies:
- Retry failed and timeout - retry all failed and timed-out messages from processing pack.
- Skip all failures - simply ignore all failures. Will cause failed messages to be “lost”. For example, if DB is down, the messages will not be persisted but will be still marked as “acknowledged” and deleted from queue. This strategy is created mostly for backward-compatibility with previous releases and development/demo environments. The timed out messages that was already submitted to the rule chains for processing will not be canceled. This means that the rule engine will still attempt to process them despite the timeout.
- Skip all failures and timeouts - simply ignore all failures and timeouts. Will cause failed and timed out messages to be “lost”. For example, if DB is down, the messages will not be persisted but will be still marked as “acknowledged” and deleted from queue. The timed out messages that was already submitted to the rule chains for processing will be canceled. The rule nodes will not start processing of the canceled message. However, the rule node that started to process the message before the message was canceled is not interrupted.
- Retry all - retry all messages from processing pack. Let’s assume the processing pack contains 100 messages. If 1 out of 100 messages will fail, strategy will still reprocess (resubmit to Rule Engine) 100 messages. Each time the strategy resubmit the messages to the rule engine, those messages are a binary copy of original messages. All messages from a previous submission are canceled before resubmission. The rule nodes will not start processing of the canceled message. However, the rule node that started to process the message before the message was canceled is not interrupted.
- Retry failed - retry all failed messages from processing pack. Let’s assume the processing pack contains 100 messages. If 1 out of 100 messages will fail, strategy will reprocess(resubmit to Rule Engine) only 1 message. Timed-out messages will not be reprocessed. Each time the strategy resubmit the messages to the rule engine, those messages are a binary copy of original messages. All messages from a previous submission are canceled before resubmission. The rule nodes will not start processing of the canceled message. However, the rule node that started to process the message before the message was canceled is not interrupted.
- Retry timeout - retry all timed-out messages from processing pack. Let’s assume the processing pack contains 100 messages. If 1 out of 100 messages will timeout, strategy will reprocess(resubmit to Rule Engine) only 1 message. Failed messages will not be reprocessed. Each time the strategy resubmit the messages to the rule engine, those messages are a binary copy of original messages. All messages from a previous submission are canceled before resubmission. The rule nodes will not start processing of the canceled message. However, the rule node that started to process the message before the message was canceled is not interrupted.
All retry processing strategies support important configuration parameters:
- Number of retries - number of iterations, 0 is unlimited;
- Percentage of failure messages for skipping retries - skip retry if failures or timeouts are less then X percentage of messages;
- Retry within - time in seconds to wait in consumer thread before retries;
- Additional retry within - the waiting time in seconds for the second and subsequent retry attempts.
See this guide for an example of processing strategy use case.
Polling settings
Batch processing:
- Poll interval - duration in milliseconds between polling of the messages if no new messages arrive.
- Partitions - number of partitions to associate with this queue. Used for scaling the number of messages that can be processed in parallel.
Immediate processing:
- Send message poll for each consumer - the queue is composed of partitions. If the checkbox is unchecked, there is one consumer for all partitions. If checked, there will be separate consumers for each partition.
- Processing within - interval in milliseconds for processing of the particular pack of messages returned by consumer.
Custom properties
You may specify custom properties for queue (topic) creation. They are specific for a queue provider,
for example retention.ms:604800000;retention.bytes:1048576000 for Kafka,
or MaximumMessageSize:262144;MessageRetentionPeriod:604800 for AWS SQS, etc.
Note, that these properties are applied only when a queue is first created.
Default queues
There are three default queues configured: Main, HighPriority and SequentialByOriginator. They differ based on submission and processing strategy. Basically, the rule engine process messages from Main topic and may optionally put them to other topics using “Checkpoint” rule node. Main topic simply ignores failed messages by default. This is done for backward compatibility with previous releases. However, you may reconfigure this at your own risk. Note that if one message is not processed due to some failure in your rule node script, it may prevent next messages from being processed. We have designed specific dashboard to monitor Rule Engine processing and failures.
The HighPriority topic may be used for delivery of alarms or other critical processing steps. The messages in HighPriority topic are constantly reprocessed in case of failure until the message processing succeeds. This is useful if you have an outage of the SMTP server or external system. The Rule Engine will retry sending the message until it is processed.
The SequentialByOriginator topic is important if you would like to make sure that messages are processed in the correct order. Messages from the same entity will be processed with the order they arrive in the queue. Rule Engine will not submit a new message to the rule chain until the previous message for the same entity id is acknowledged.
Next steps
-
Getting started guides - These guides provide quick overview of main ThingsBoard features. Designed to be completed in 15-30 minutes.
-
Installation guides - Learn how to set up ThingsBoard on various available operating systems.
-
Connect your device - Learn how to connect devices based on your connectivity technology or solution.
-
Data visualization - These guides contain instructions on how to configure complex ThingsBoard dashboards.
-
IoT Data analytics - Learn how to use rule engine to perform basic analytics tasks.
-
Advanced features - Learn about advanced ThingsBoard features.