- OAuth 2.0 authentication flow
- Setting up authentication via an external provider
- Mapper section
- Examples
- Operations with OAuth 2.0 client
- Operations with domain
- HaProxy configuration
- Your feedback
ThingsBoard supports OAuth 2.0–based authentication to provide Single Sign-On (SSO) for your customers and integrate with external identity providers.
Using OAuth 2.0, you can allow users to log in using their existing accounts from external platforms and automatically provision tenants, customers, or sub-customers.
ThingsBoard is compatible with most OAuth 2.0 providers, including Google, Facebook, Github, Auth0, Keycloak, Okta, Azure, etc.
OAuth 2.0 authentication flow
ThingsBoard supports the Authorization Code grant type for OAuth 2.0 authentication. The authentication flow works as follows:
- A user opens the ThingsBoard login page and selects an external provider (for example, Google or Keycloak).
- The user is redirected to the provider’s login page to authenticate.
- After successful login, the provider redirects the user back to ThingsBoard using the configured redirect URI.
- ThingsBoard extracts the authorization code from the redirect URL and exchanges it for an access token.
- ThingsBoard retrieves the external user information and converts it into a ThingsBoard user using the configured mapper (Basic or Custom).
- After the mapping step is completed, the standard ThingsBoard authorization flow is applied.
This process allows ThingsBoard to automatically determine the correct tenant, customer, and user permissions based on identity provider attributes.
Setting up authentication via an external provider
To enable OAuth 2.0 authentication through an external provider, you must configure two components:
- OAuth 2.0 client – stores provider credentials, endpoints, scopes, and mapping rules.
- Domain configuration – defines which OAuth clients are available for a specific ThingsBoard domain.
The general setup process includes:
- Create an OAuth 2.0 client in the external provider and obtain the Client ID and Client Secret.
- Add a corresponding OAuth 2.0 client in ThingsBoard and configure all required endpoints, scopes, and mapper settings.
- Assign the OAuth 2.0 client to a domain in ThingsBoard.
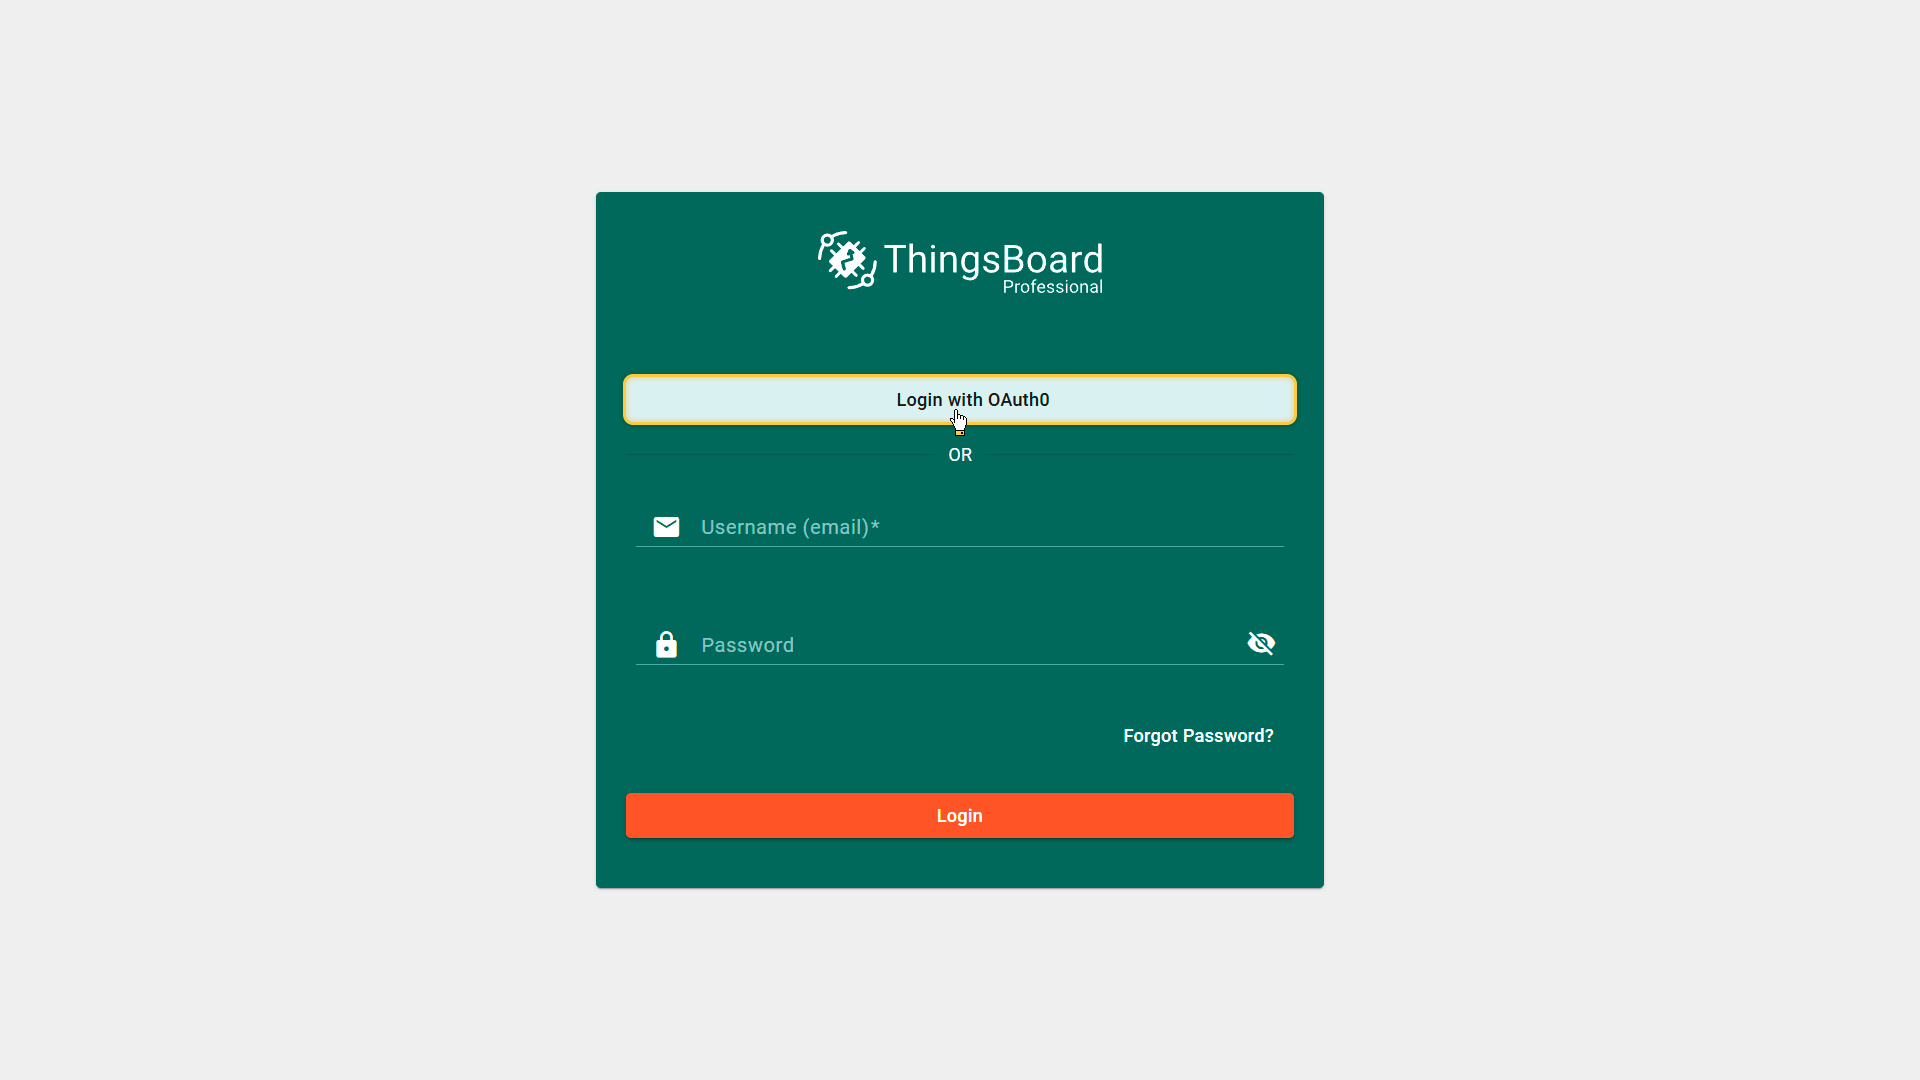
- Verify the login flow using the new Login with … option on the ThingsBoard login page.
Add OAuth 2.0 client
ThingsBoard allows you to configure OAuth 2.0 clients that can be used to authenticate users via external identity providers such as Google, GitHub, Apple, Facebook, Keycloak, Auth0, Okta, Azure AD, and others.
An OAuth 2.0 client stores all required information for authentication, including:
- client credentials (Client ID / Client Secret)
- OAuth endpoints (Authorization, Token, UserInfo, JWKS)
- required scopes
- user mapping rules (mapper configuration)
Once an OAuth 2.0 client is created, it can be assigned to one or more domains.
To add a new OAuth 2.0 client:
- Log in to ThingsBoard.
- Navigate to Security ⇾ OAuth 2.0.
- Open the OAuth 2.0 clients tab.
- Click the + (plus) icon.
This will open the Add OAuth 2.0 client dialog window.
Step 1. Configure general client information
In the upper part of the dialog, configure the basic parameters:
- Title
Enter a descriptive name for the OAuth 2.0 client (for example: Google, Auth0, Keycloak, GitHub). This field is required. - Provider
Select the authentication provider from the dropdown list. Supported providers include: Apple, Custom, Facebook, GitHub, Google.
The provider selection defines default endpoint templates and mapping behavior.Tip: Select Custom if your provider is not listed (for example, Keycloak, Okta, Azure AD, Auth0, etc.).
- Allowed platforms
Select which ThingsBoard platform is allowed to use this OAuth client. For example: Web UI only, Mobile app only, or All platforms (default).
This option is useful if you want to restrict authentication methods for specific clients. - Client ID and Client secret
Enter the OAuth 2.0 credentials obtained from your identity provider:- Client ID (required)
- Client secret (required)
Step 2. Configure Advanced settings (General)
Expand the Advanced settings section and open the General tab. This section defines the OAuth 2.0 endpoints used during authentication.
- Access token URI
Defines the provider endpoint used by ThingsBoard to exchange the authorization code for an access token. Example (Google): https://oauth2.googleapis.com/token - Authorization URI
Defines the endpoint where the user is redirected to authenticate. Example (Google): https://accounts.google.com/o/oauth2/v2/auth - JSON Web Key URI
Defines the JWKS endpoint that provides the public keys required to validate JWT tokens. Example (Google): https://www.googleapis.com/oauth2/v3/certs - User info URI
Defines the endpoint used by ThingsBoard to request user details. Example (Google): https://openidconnect.googleapis.com/v1/userinfo - Client authentication method
Defines how ThingsBoard sends client credentials (Client ID and Client Secret) when requesting an access token from the OAuth 2.0 provider (during the authorization code ⇾ access token exchange).
This parameter must match the method supported (or required) by your identity provider.
According to the UI, the following authentication methods are available:- NONE. ThingsBoard does not send client credentials when requesting the access token.
This option is rarely used and is applicable only for providers that do not require client authentication (typically public clients). - BASIC (recommended for most providers). ThingsBoard sends the client credentials using HTTP Basic Authentication header: Authorization: Basic <base64(client_id:client_secret)>
This is the most common and widely supported option (for example, Google, Keycloak, Auth0, Okta). - POST. ThingsBoard sends the client credentials in the POST request body together with the token request parameters.
This method is required by some OAuth providers depending on their configuration.Tip: If authentication fails during token exchange (for example, due to
invalid_client), verify that the selected Client authentication method matches the identity provider configuration.
- NONE. ThingsBoard does not send client credentials when requesting the access token.
- Allow user creation
If enabled, ThingsBoard will automatically create a new user account during the first login attempt (if the user does not already exist).
This option is useful for fully automated SSO onboarding. - Activate user
If enabled, ThingsBoard automatically activates the created user account.
If disabled, the user will be created but remain inactive until manually activated by an administrator. - Scope
Scopes define which information ThingsBoard requests from the identity provider. Example: email openid profile.
Scopes directly affect which attributes are available for user mapping (email, name, etc.).
Step 3. Configure Advanced settings (Mapper)
Switch to the Mapper tab. This section defines how ThingsBoard converts the external user info object into an internal ThingsBoard user and decides:
- tenant name
- customer name
- user authority (Tenant Admin / Customer User)
- optional user groups (PE only)
- default dashboard navigation settings
ThingsBoard supports different mapper types: Basic, Custom, GitHub, Apple
The mapper configuration is a critical part of OAuth setup because it controls automatic tenant/customer provisioning logic. For more details on mapping external user information to a ThingsBoard user, see here.
Step 4. Save the OAuth 2.0 client
After filling in all required fields, click Add to create the OAuth 2.0 client.
Once created, the OAuth client becomes available for domain assignment.
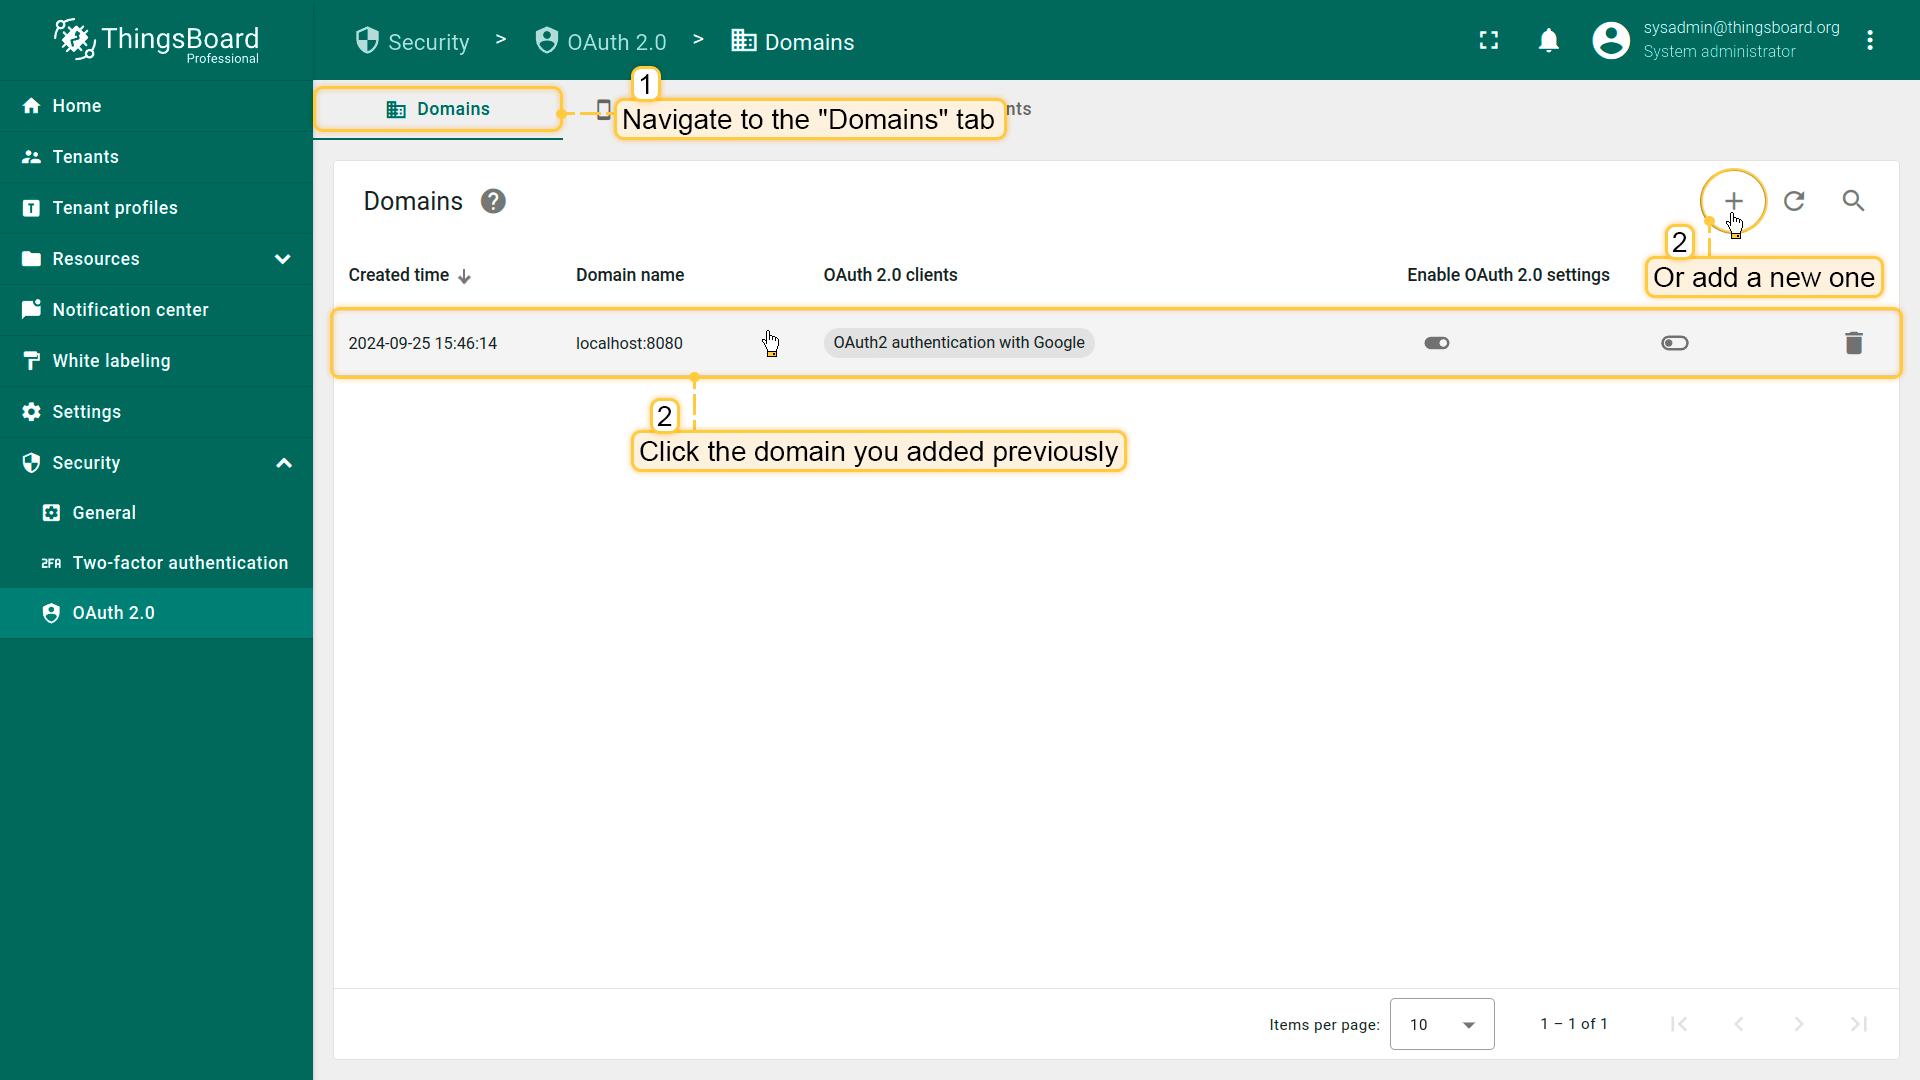
Assign OAuth 2.0 client to a domain
After creating an OAuth 2.0 client, you must assign it to a domain. This step defines which authentication providers will be available on the login page for users accessing ThingsBoard via a specific domain.
In ThingsBoard, the domain configuration acts as a routing layer: when a user opens the login page, ThingsBoard determines the domain and shows the OAuth 2.0 login options assigned to it.
Open domain configuration
To assign an OAuth 2.0 client to a domain:
- Log in to your ThingsBoard instance.
- Navigate to Security ⇾ OAuth 2.0.
- On the Domains tab, click the + (plus) icon.
This opens the Add domain dialog window.
Step 1. Configure domain name
In the Domain name field, enter the domain that users will use to access ThingsBoard. Example: my.thingsboard.instance.
This value must match the actual domain configured in your DNS and used in the browser.
Step 2. Verify Redirect URI template
ThingsBoard automatically generates the Redirect URI template based on the entered domain. Example: https://my.thingsboard.instance/login/oauth2/code/
This redirect URI must be added to your OAuth provider configuration (Google, Auth0, Keycloak, etc.) as the allowed callback/redirect URL.
To copy it quickly, click the copy icon on the right side of the field.
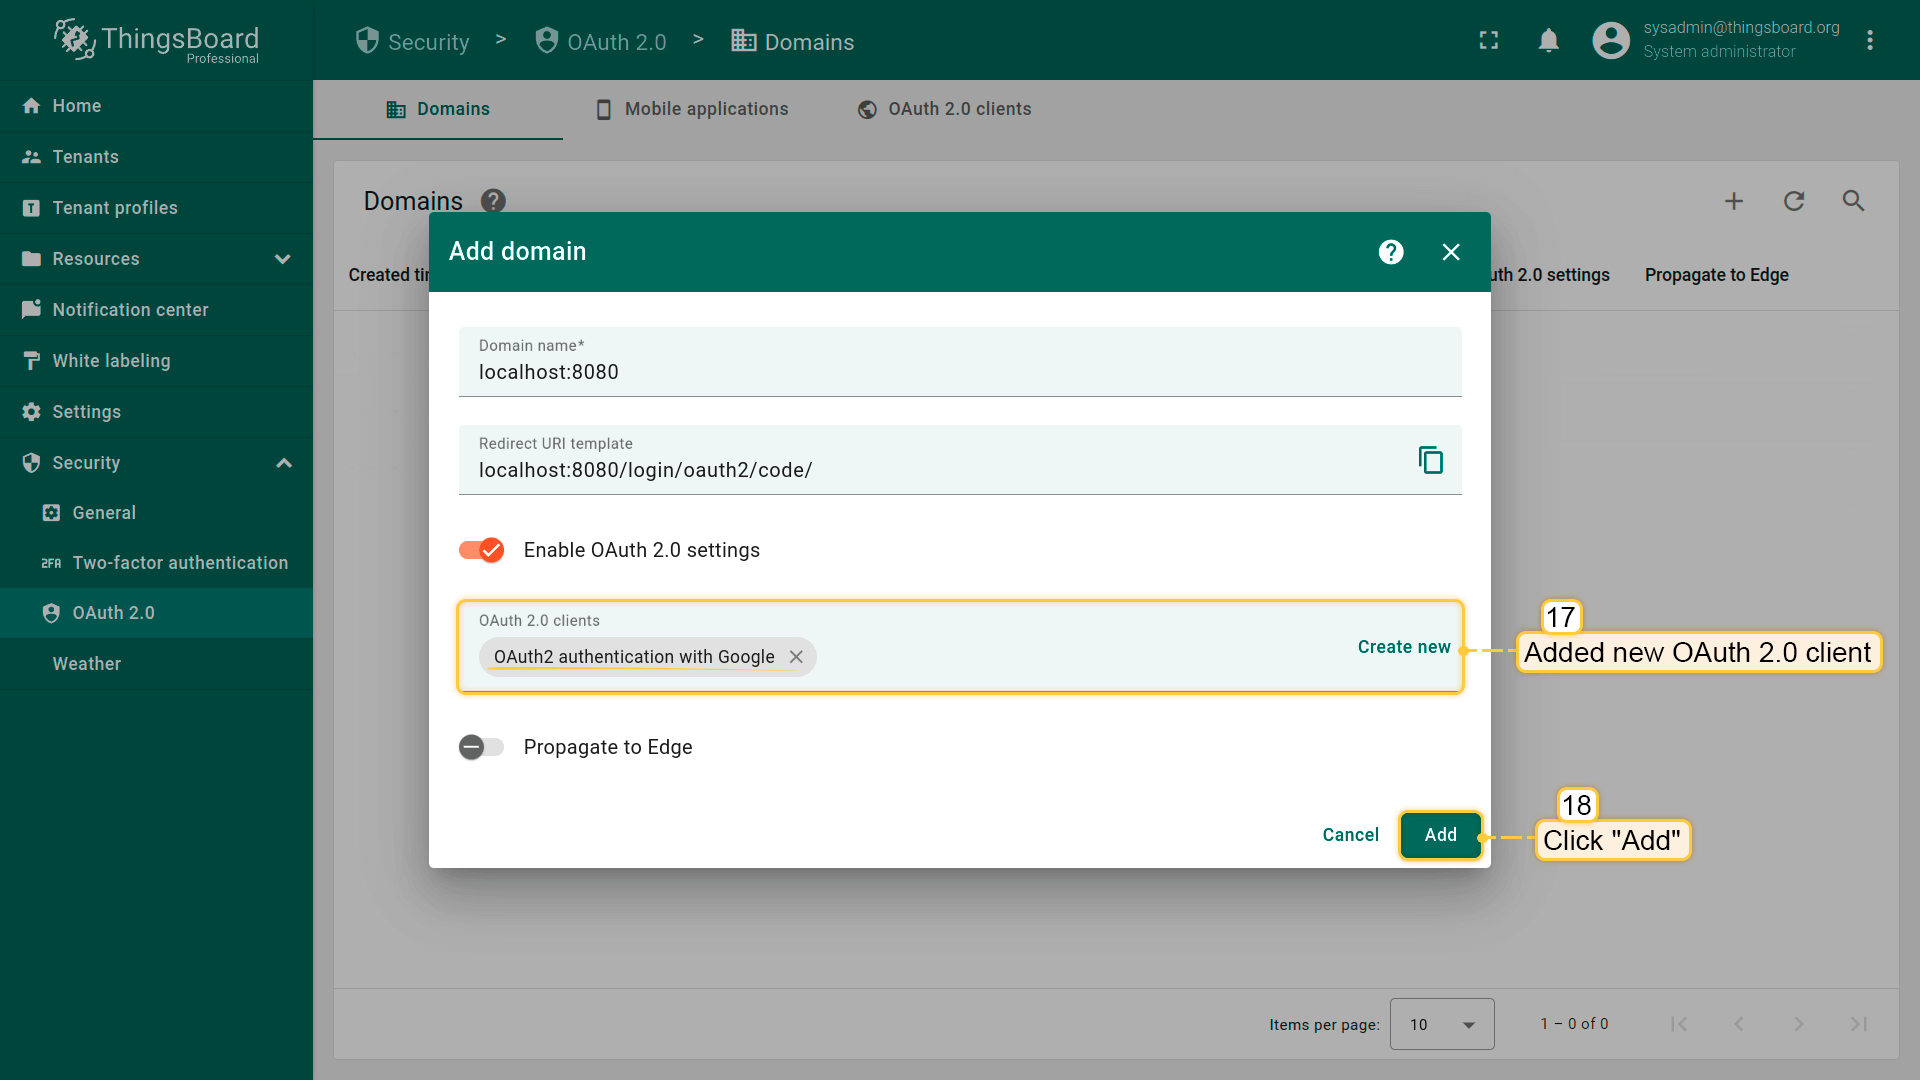
Step 3. Assign OAuth 2.0 clients
In the OAuth 2.0 clients section, select the OAuth clients that should be available for this domain.
There are two available options:
- Option A. Select an existing OAuth 2.0 client
- Click inside the OAuth 2.0 clients field.
- Select an existing client from the dropdown list.
Once selected, it will appear as a chip inside the field.
You can assign multiple OAuth clients to the same domain (for example, Google + Auth0 + Keycloak).
- Option B. Create a new OAuth 2.0 client
- If the required OAuth client does not exist yet, click Create new.
This opens the Add OAuth 2.0 client dialog, allowing you to create and configure a new OAuth client without leaving the domain setup screen.
Optional settings
- Enable OAuth 2.0.
If this option is disabled, OAuth login will not be available for this domain even if OAuth clients are assigned. - Propagate to Edge.
If you are using ThingsBoard Edge and want OAuth settings to be applied on the Edge side, enable Propagate to Edge toggle.
This allows the OAuth domain configuration to be synchronized to connected Edge instances.
Step 4. Save the domain
Click Add to create the domain configuration.
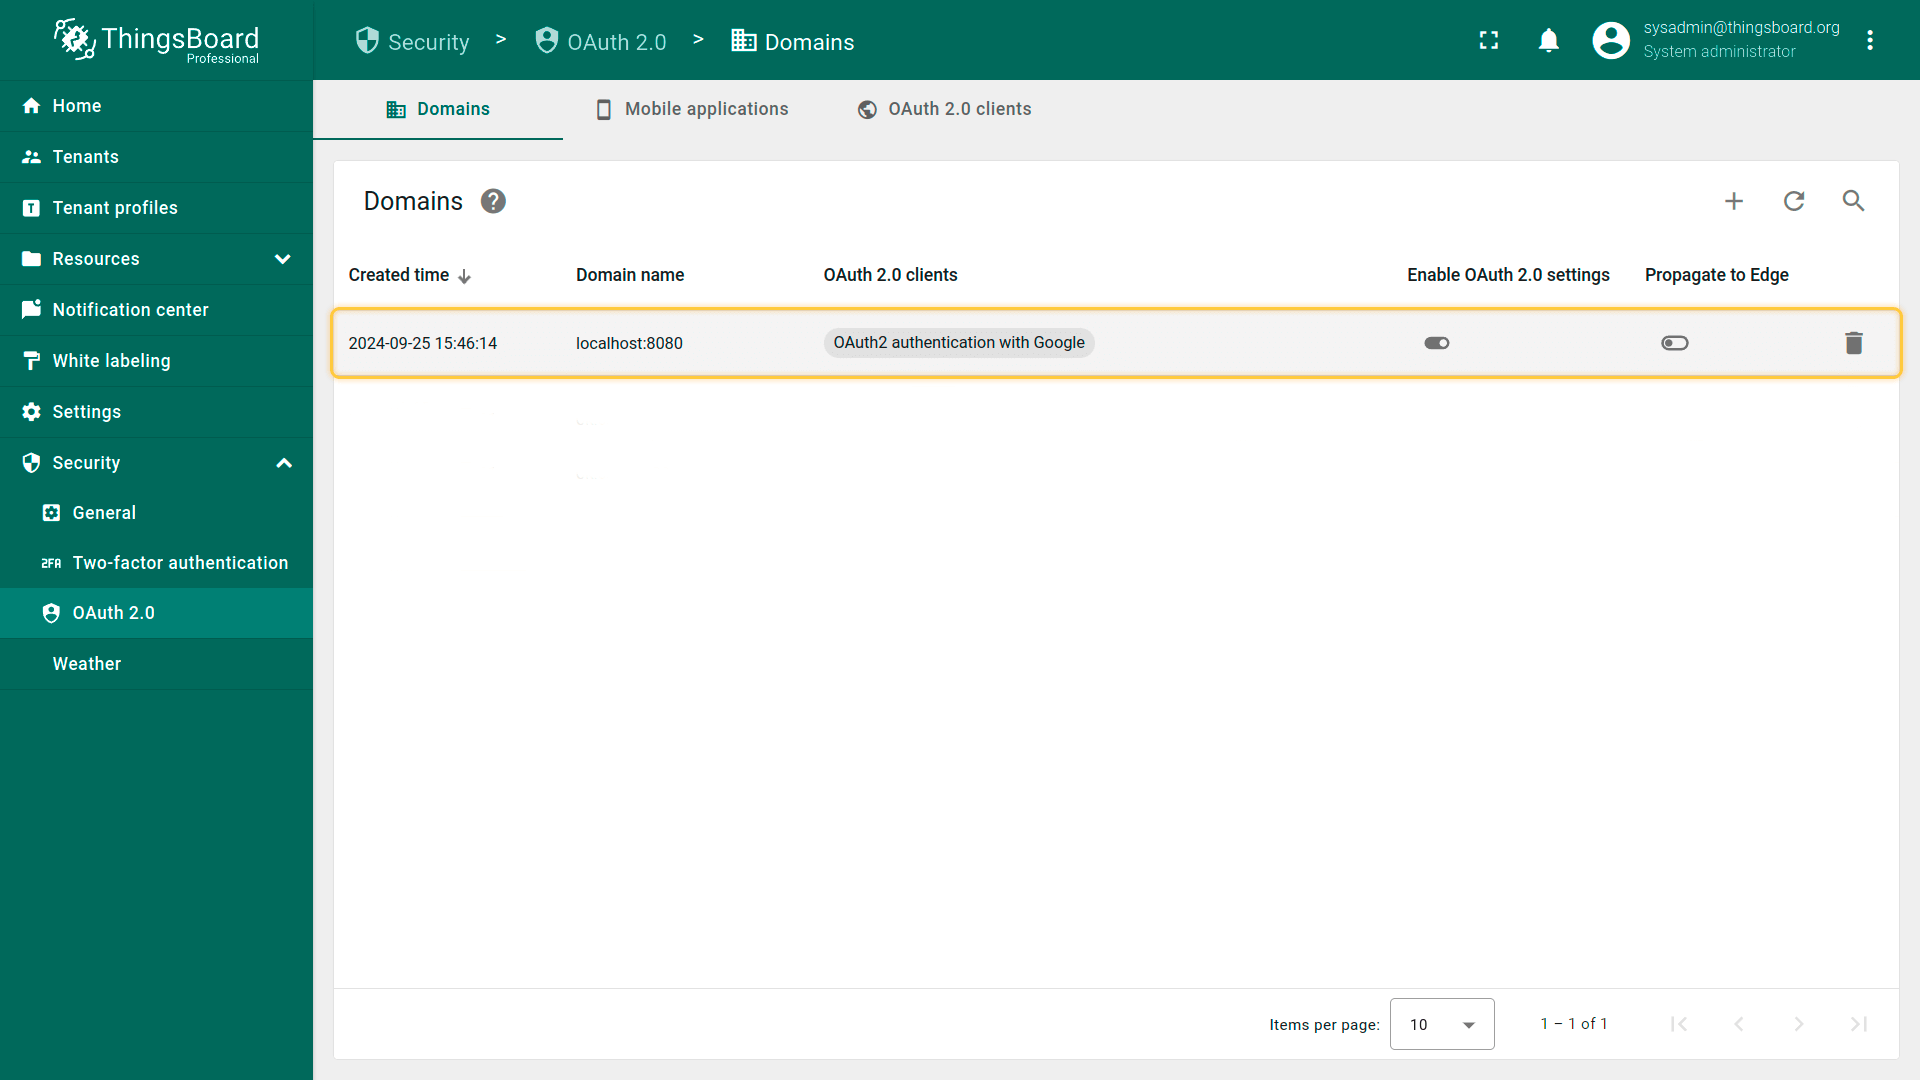
Result
Once the domain is created and OAuth 2.0 settings are enabled:
- ThingsBoard will show the assigned OAuth providers on the login page.
- Users accessing ThingsBoard via this domain will be able to authenticate using the configured OAuth 2.0 clients.
- User provisioning and role mapping will follow the mapper settings configured in the assigned OAuth client(s).
Mapper section
The Mapper section defines how ThingsBoard converts the external identity provider user information into a ThingsBoard user.
After a user successfully authenticates with an OAuth 2.0 provider, ThingsBoard receives an external user info object (or ID token claims). The mapper is responsible for extracting the required attributes (email, first name, last name) and defining the user representation in ThingsBoard.
Using mapper settings, ThingsBoard can automatically:
- create users;
- assign them to a tenant and/or customer;
- create a tenant/customer if it does not exist;
- assign default dashboards and user groups.
The mapper configuration is located in the Advanced settings → Mapper tab when creating or editing an OAuth 2.0 client.
Mapper parameters
- User name attribute key
Most OAuth providers return the email address as the most stable identifier, therefore the recommended value is: email - Mapper type
ThingsBoard supports multiple mapper types. The available options depend on the selected provider and ThingsBoard version. The following mapper types are supported: BASIC, CUSTOM, GITHUB, APPLE.
Each mapper defines a different approach for mapping external identity data into ThingsBoard entities.
Basic mapper
It is designed for standard OpenID Connect providers that return typical user attributes such as email / firstName / lastName.
This mapper supports automatic tenant/customer provisioning using configurable strategies and patterns.
What you can configure
The Basic mapper gives you a set of predictable controls:
- Email attribute key. This field is required because email is typically used as a unique identifier in ThingsBoard. Default value: email
- First name / Last name attribute keys – tells ThingsBoard which external fields to use.
- Tenant name strategy. The Tenant name strategy defines how ThingsBoard determines the tenant name for the authenticated user. Available strategies:
- DOMAIN - The tenant name is derived from the email domain. This is the best option for SaaS environments where each company uses its own email domain.
Example: If the user email is: john.doe@company.com ⇾ then the tenant name will be: company.com - EMAIL - The tenant name is equal to the full email address. This strategy is usually used for testing or cases where each user should have an isolated tenant.
Example: john.doe@company.com - CUSTOM - The tenant name is generated using a custom pattern. This is the most flexible strategy and is recommended when you want to build tenant names from user attributes.
Example: %{email}
- DOMAIN - The tenant name is derived from the email domain. This is the best option for SaaS environments where each company uses its own email domain.
-
Tenant name pattern. In case, the Tenant name strategy is Custom you can specify the name of the Tenant, where the user is going to be created with a help of a custom pattern. You can use attributes from the external user info object to put them into the Tenant’s name. Please use %{attribute_key} as placeholder for the attribute value.
Tenant pattern examples:
- Demo Tenant # Hard coded Tenant name;
- Demo Tenant %{email} # if the user’s email is “test@demo.com”, the Tenant’s name will be the “Demo Tenant test@demo.com”;
- %{givenName} # if the user’s givenName attribute is “Demo User”, the Tenant name will be “Demo User”.
-
The Customer name pattern defines the customer name that ThingsBoard should assign for the new user.
You can use attributes from the external user info object to put them into the Customer name. Please use %{attribute_key} as placeholder for the attribute value.Customer pattern examples:
- Demo Customer # Hard coded Customer name;
- Demo Customer %{email} # If the user’s “email” attribute is “test@demo.com”, the Customer name will be “Demo Customer test@demo.com”;
- %{city} # If the user’s “city” attribute is “New York”, the Customer name will be “New York”.
-
Default dashboard name. allows you to specify which dashboard should be opened after login.
If the dashboard exists and is available for the user, it will be opened automatically. -
Always full screen. If this option is enable and Default dashboard name is not empty, the User will be redirected to a specific dashboard in a fullscreen mode.
-
Parent customer name pattern allows you to automatically assign the created customer under a parent customer (sub-customer hierarchy). This is useful when you build multi-level customer structures automatically during OAuth provisioning.
Parent Customer pattern examples:
- Demo Parent Customer # Hard coded Parent Customer name;
- Demo Parent Customer %{email} # If user’s “email” attribute is “test@demo.com”, Parent Customer name is going to be “Demo Parent Customer test@demo.com”;
- %{country} # If user’s “country” attribute is “Top Customer”, Parent Customer name is going to be “Parent Customer”.
-
User groups name pattern allows ThingsBoard to automatically add the created user to one or more user groups. By default, the newly created user is assigned only to the All user's group.
You can use attributes from the external user info object to put them into user group names. Please use %{attribute_key} as placeholder for attribute value. If groups don’t exist, this group will be created automatically.User groups pattern examples:
- Tenant Administrators, Customer Users, Managers.. # Hard coded user groups
- %{job_title} # If user’s “job_title” attribute is “Manager”, user is going to be assigned into “Manager” user group
Custom mapper
The Custom mapper is used when the Basic mapper is not enough and you need advanced provisioning logic.
With the Custom mapper, ThingsBoard delegates mapping logic to an external service.
This allows you to implement:
- role mapping based on IdP groups/roles;
- complex tenant/customer creation rules;
- integration with external CRM/ERP systems;
- allow-listing, validation, or license checks.
How it works
- ThingsBoard receives the external user info object from the provider.
- ThingsBoard sends this object to your custom mapping endpoint.
- Your service returns a ThingsBoard-compatible user mapping response.
- ThingsBoard creates or updates the user according to the response.
The Custom mapper is the best choice for enterprise deployments with strict user provisioning requirements.
Examples
Login with Google
This example demonstrates how to configure OAuth 2.0 authentication using Google OpenID Connect.
After configuration:
- users can log in using their Google account;
- ThingsBoard automatically creates a tenant if it does not exist;
- the tenant name is derived from the user’s email address;
- the user is logged in as a Tenant Administrator.
User mapping is performed using the built-in Basic mapper, but a Custom mapper can be used if additional provisioning logic is required.
Step 1. Create a project in the Google API Console
To use Google OAuth 2.0 authentication, create a project in the Google API Console and generate OAuth 2.0 credentials.
Follow the official instructions on the OpenID Connect documentation page, or follow the steps below:
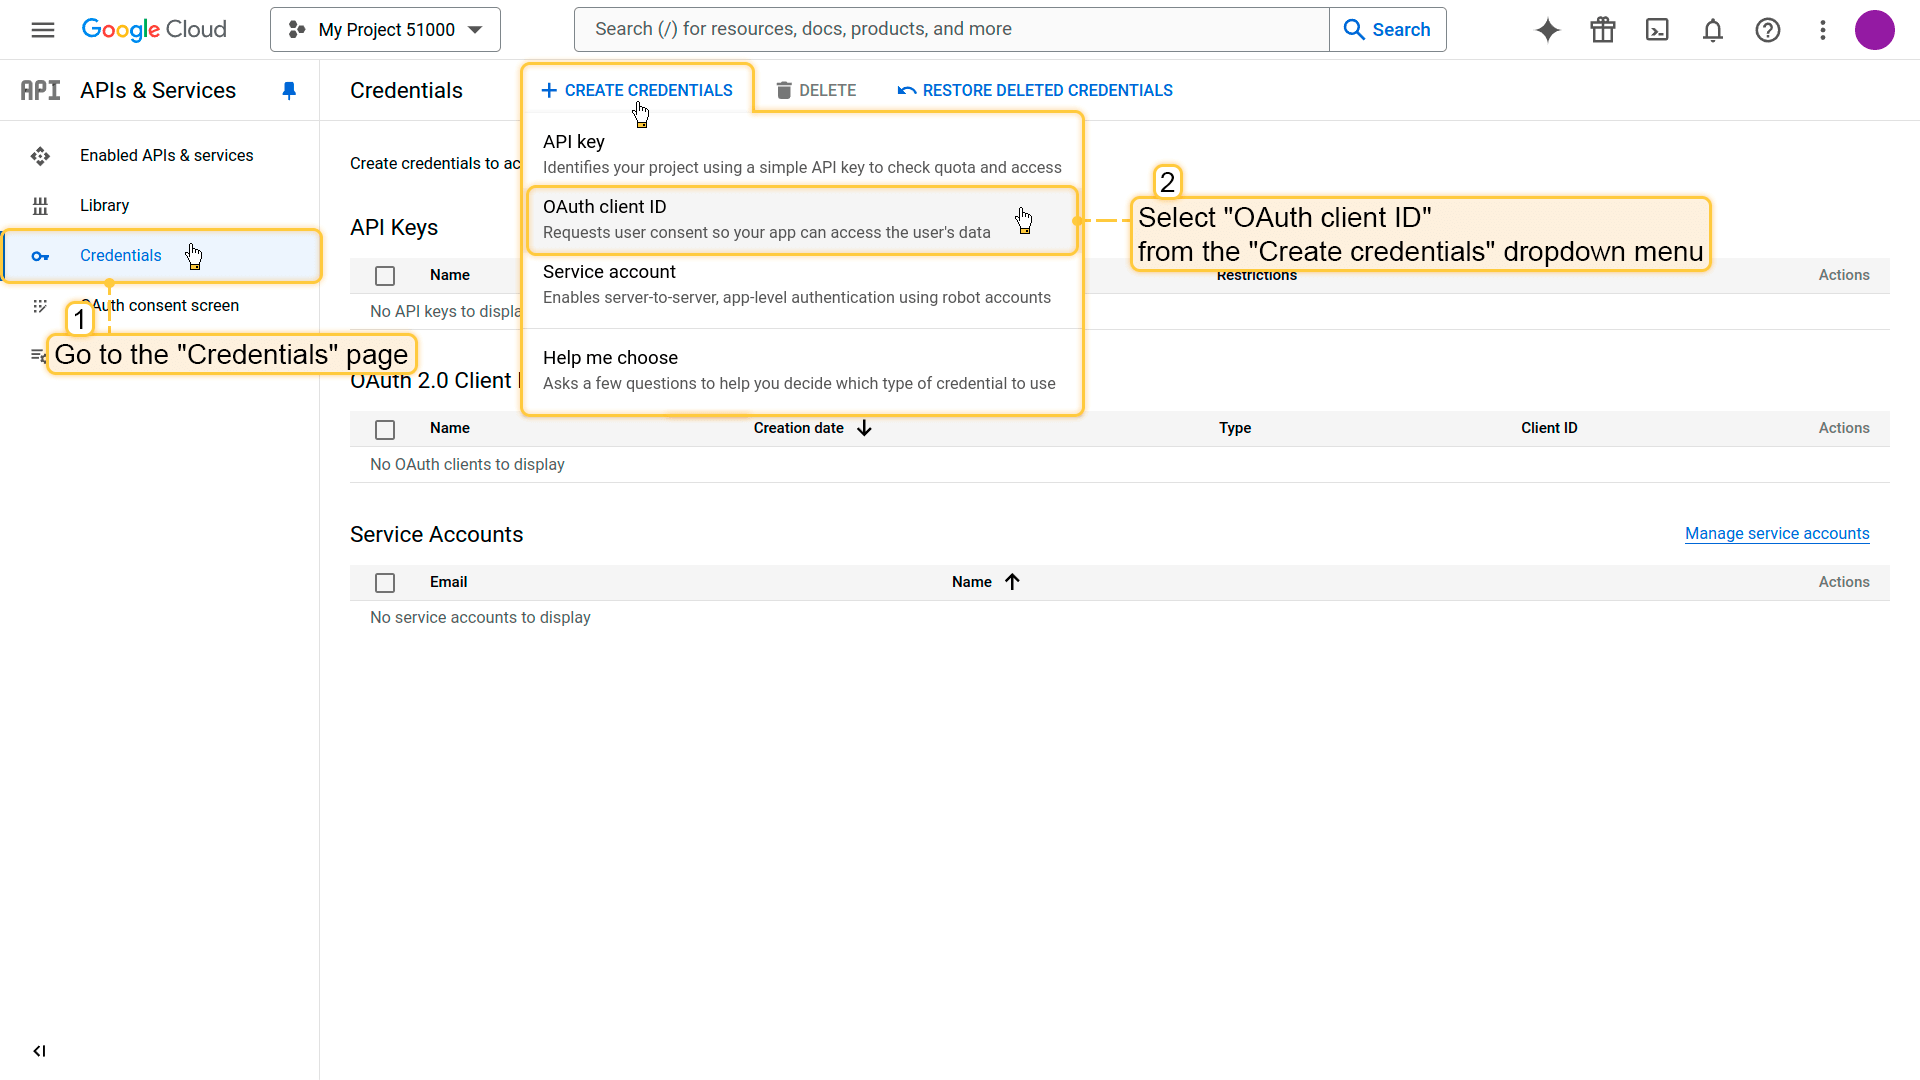
- Navigate to the Credentials.
- Click Create credentials ⇾ OAuth client ID.
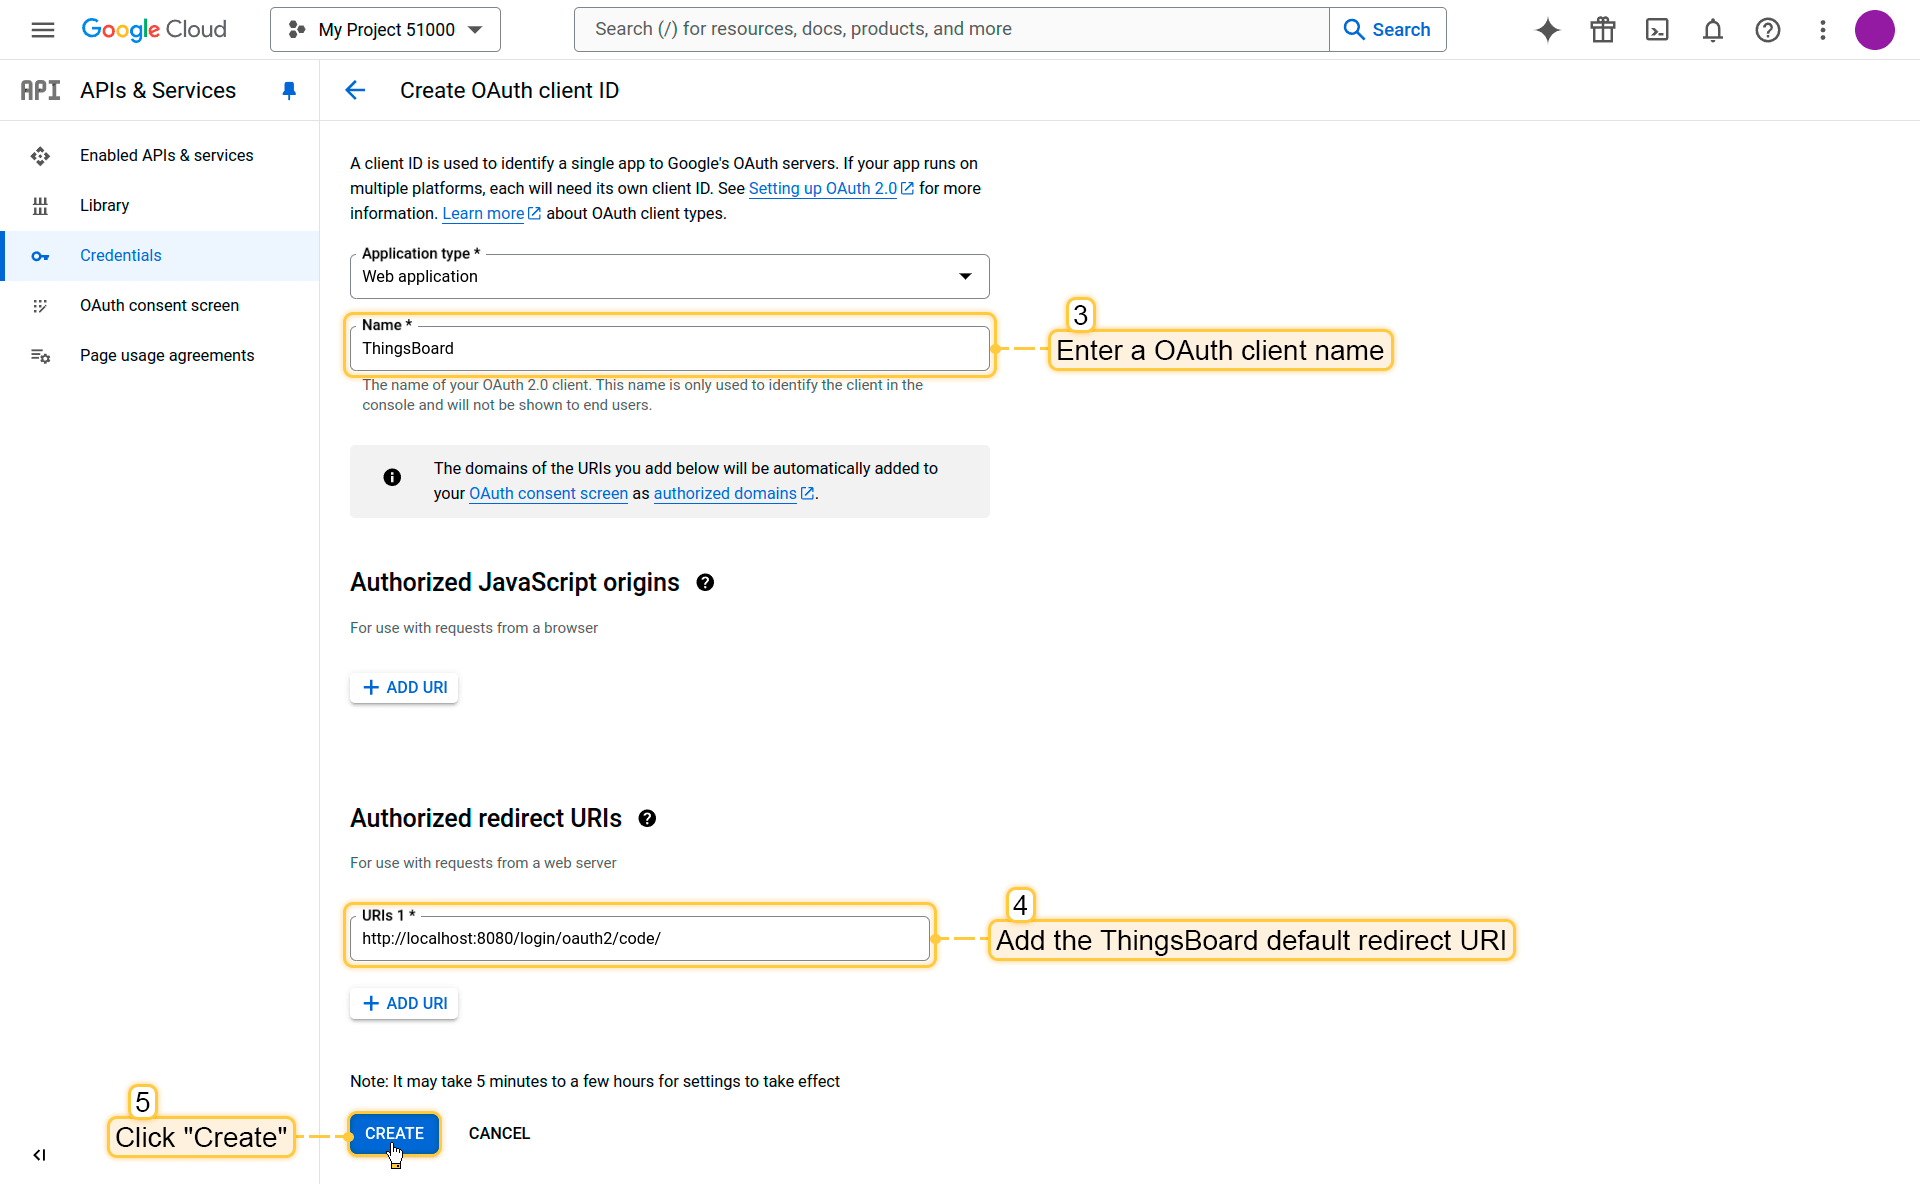
- Specify a client name (for example, ThingsBoard).
- Add the ThingsBoard redirect URI to the Authorized Redirect URIs field:
1
http(s)://$DOMAIN:$PORT/login/oauth2/code/
Where:
• $DOMAIN is the ThingsBoard hostname (or IP address)
• $PORT is the HTTP/HTTPS port of the ThingsBoard instance
Example:
1
https://my.thingsboard.instance/login/oauth2/code/
- Click Create.
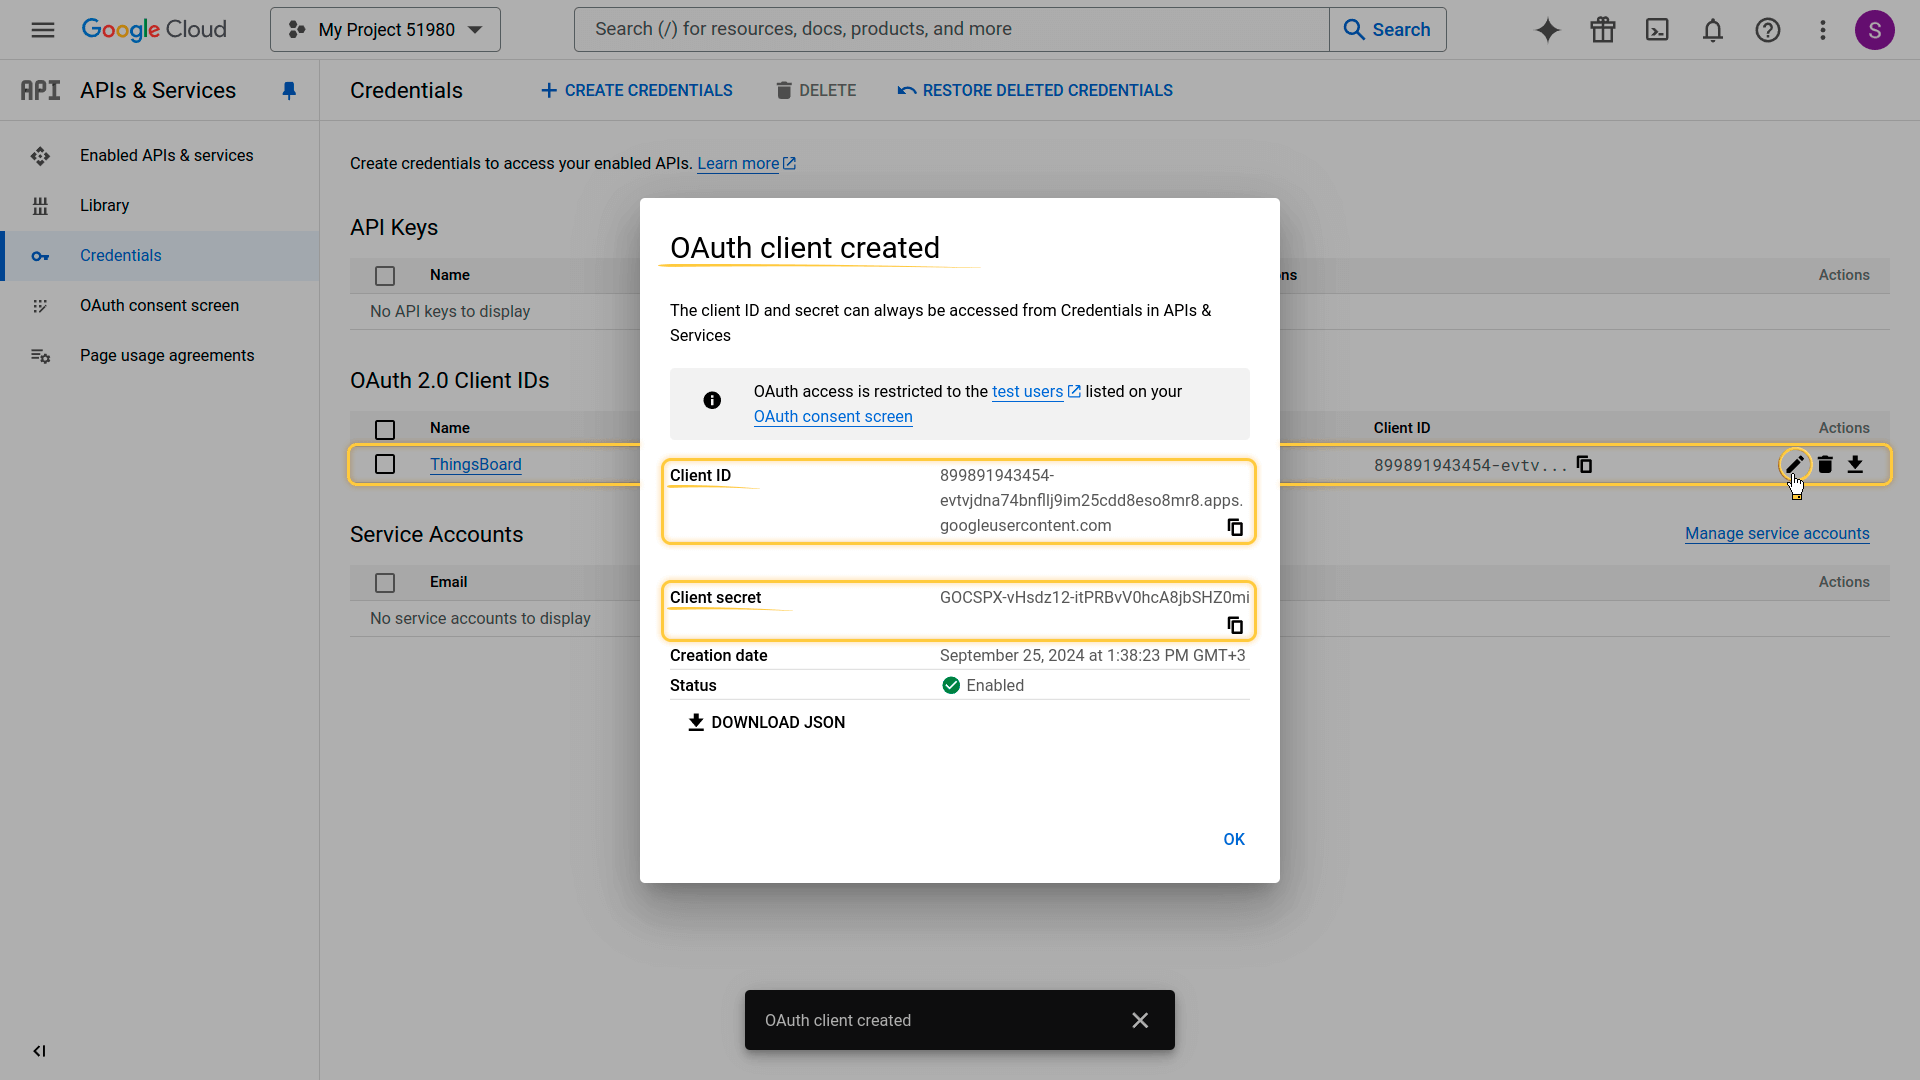
Google will generate the OAuth 2.0 credentials. Copy and save the following values:
- Client ID
- Client Secret
You will need them in the next step.
Step 2. Add an OAuth 2.0 client in ThingsBoard
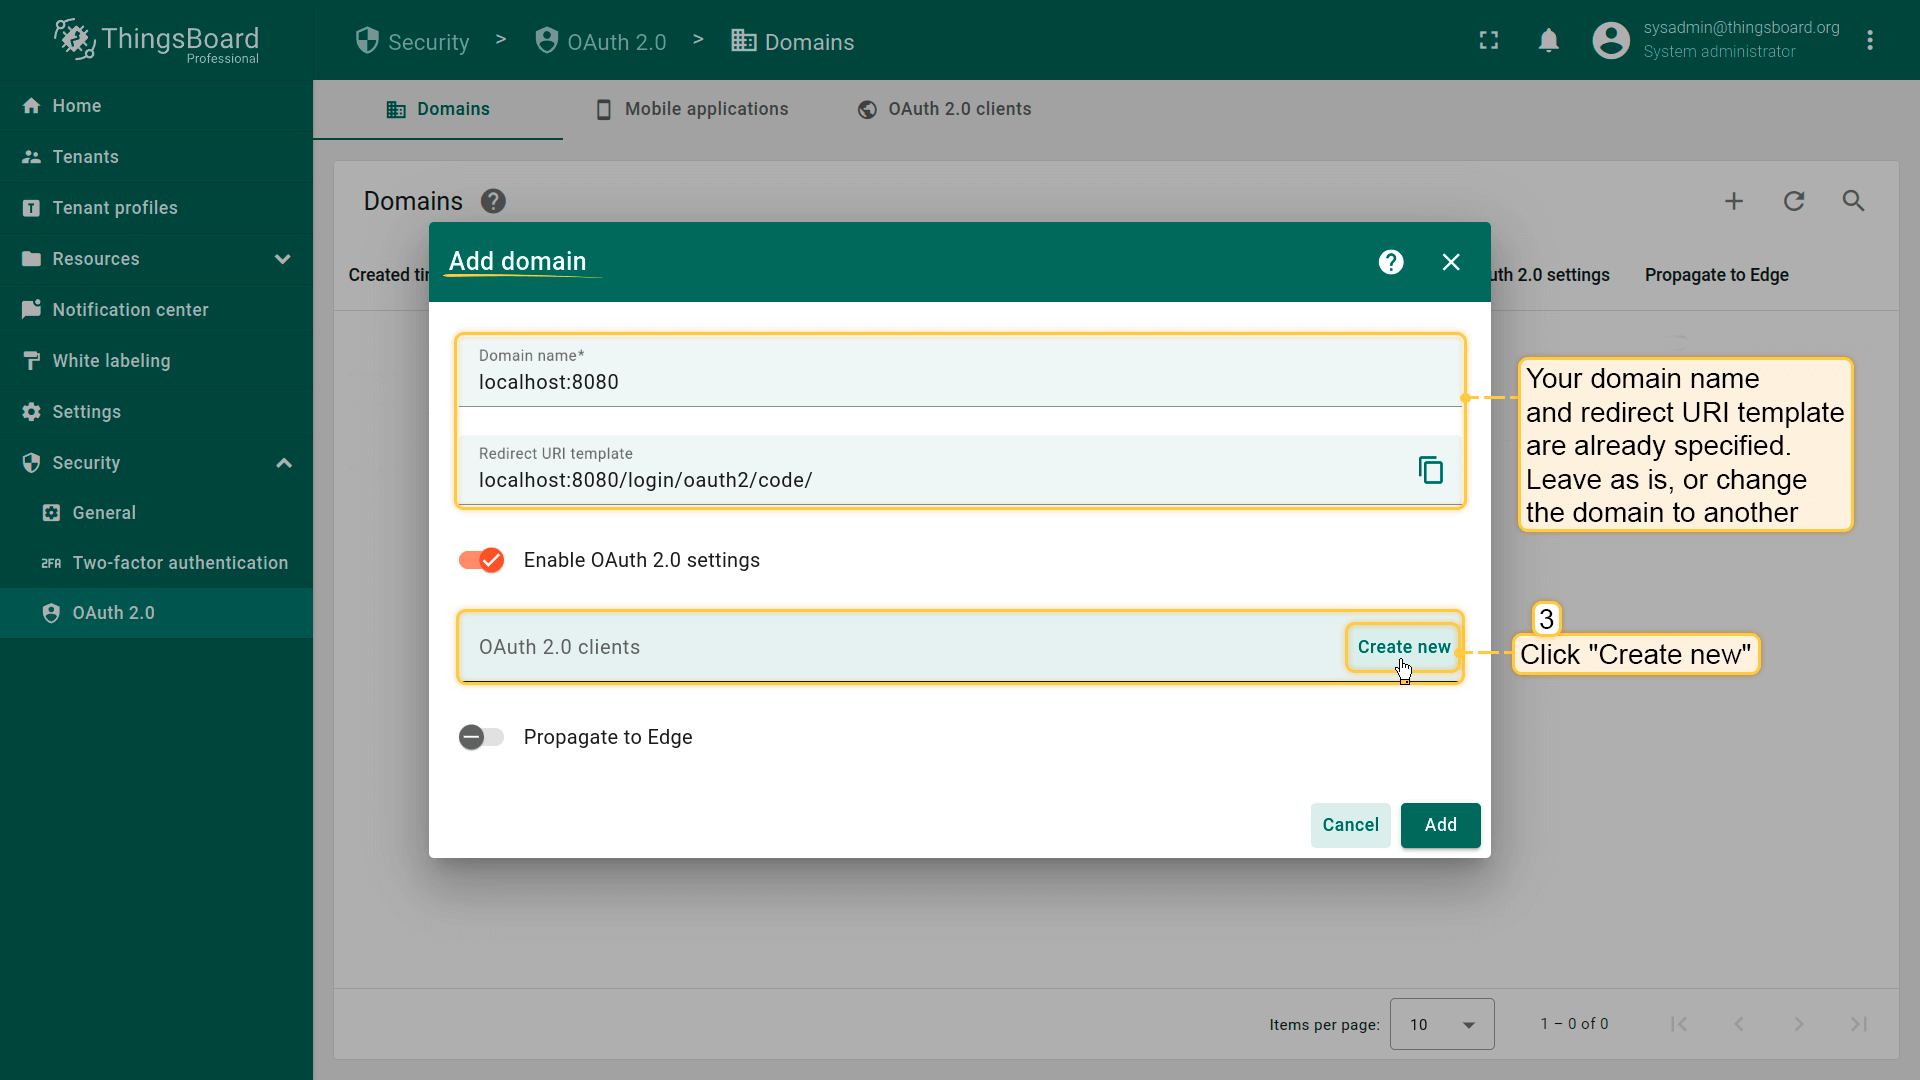
Now configure OAuth 2.0 authentication via Google in ThingsBoard:
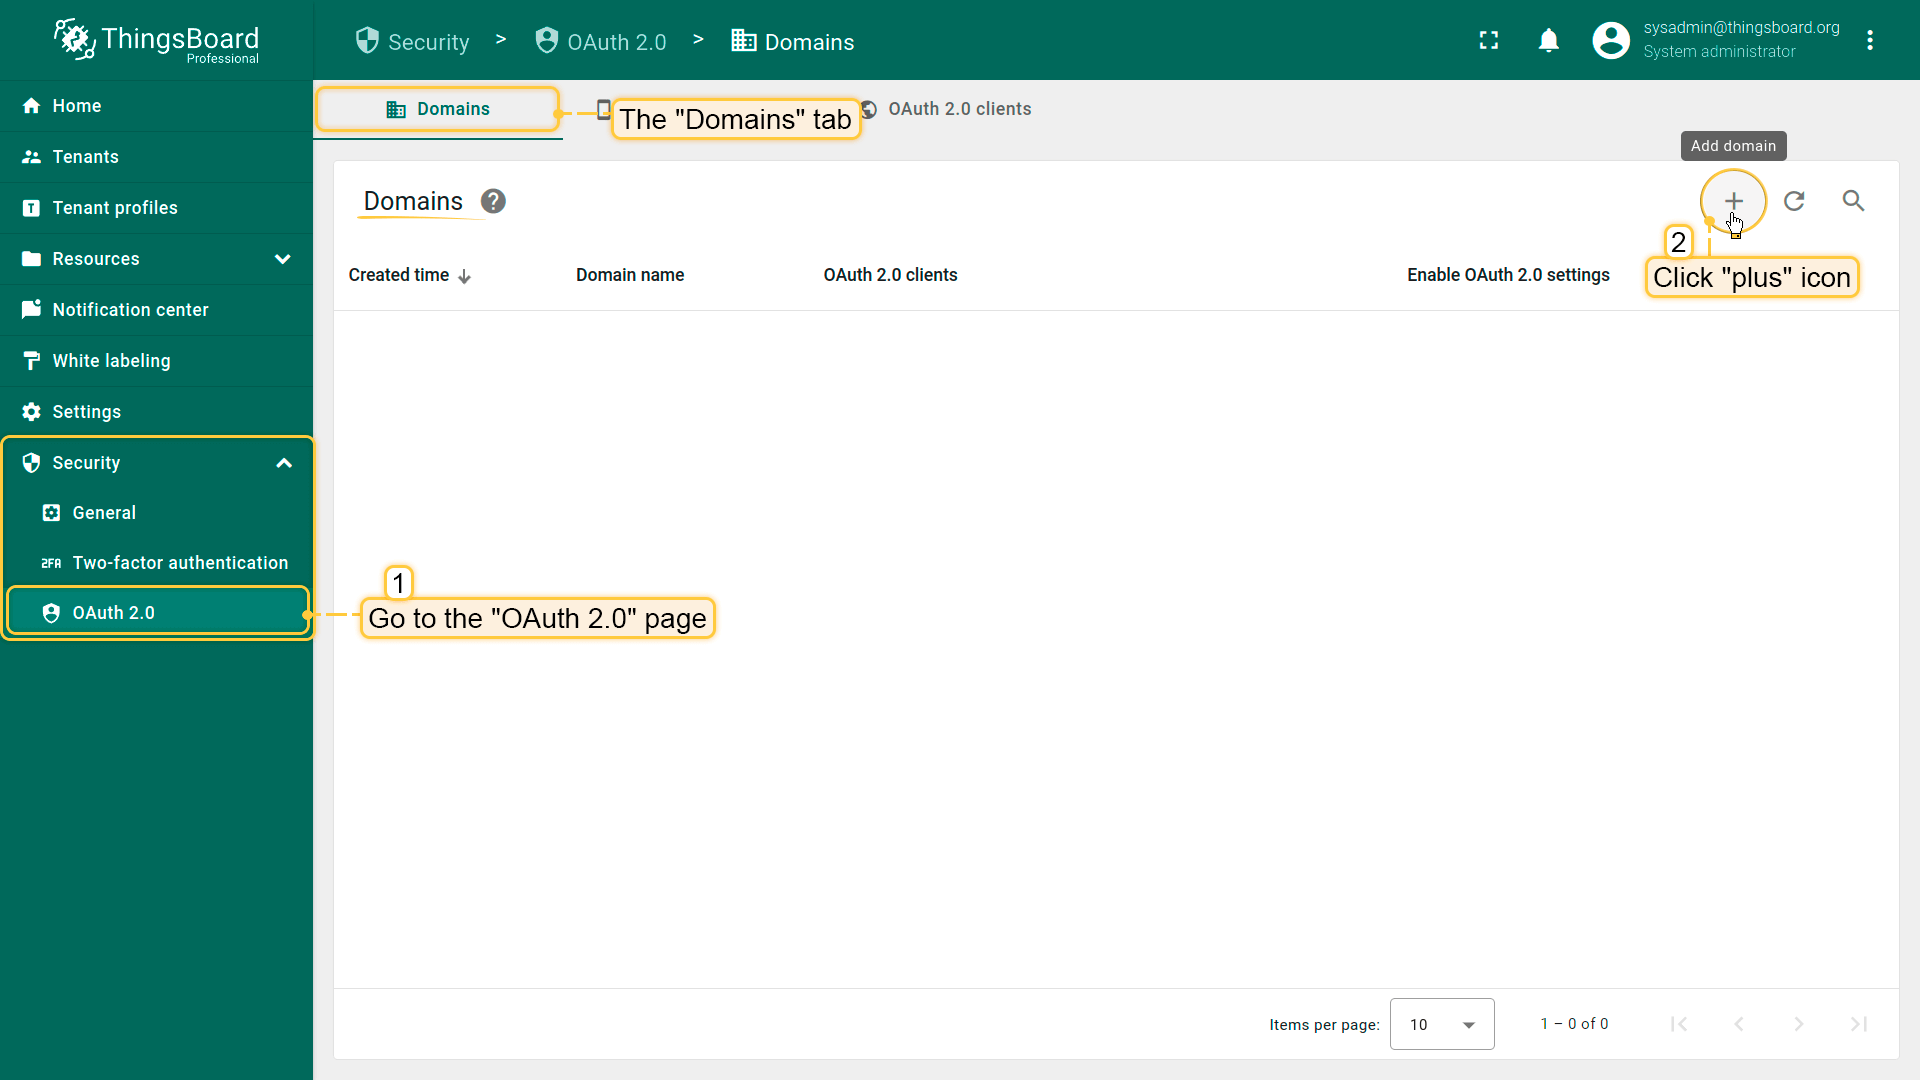
- Log in to your ThingsBoard instance.
- Navigate to Security ⇾ OAuth 2.0.
- On the Domains tab, click the + (plus) icon.
- Enter your domain name (or IP address).
- In the OAuth 2.0 clients section, click Create new.
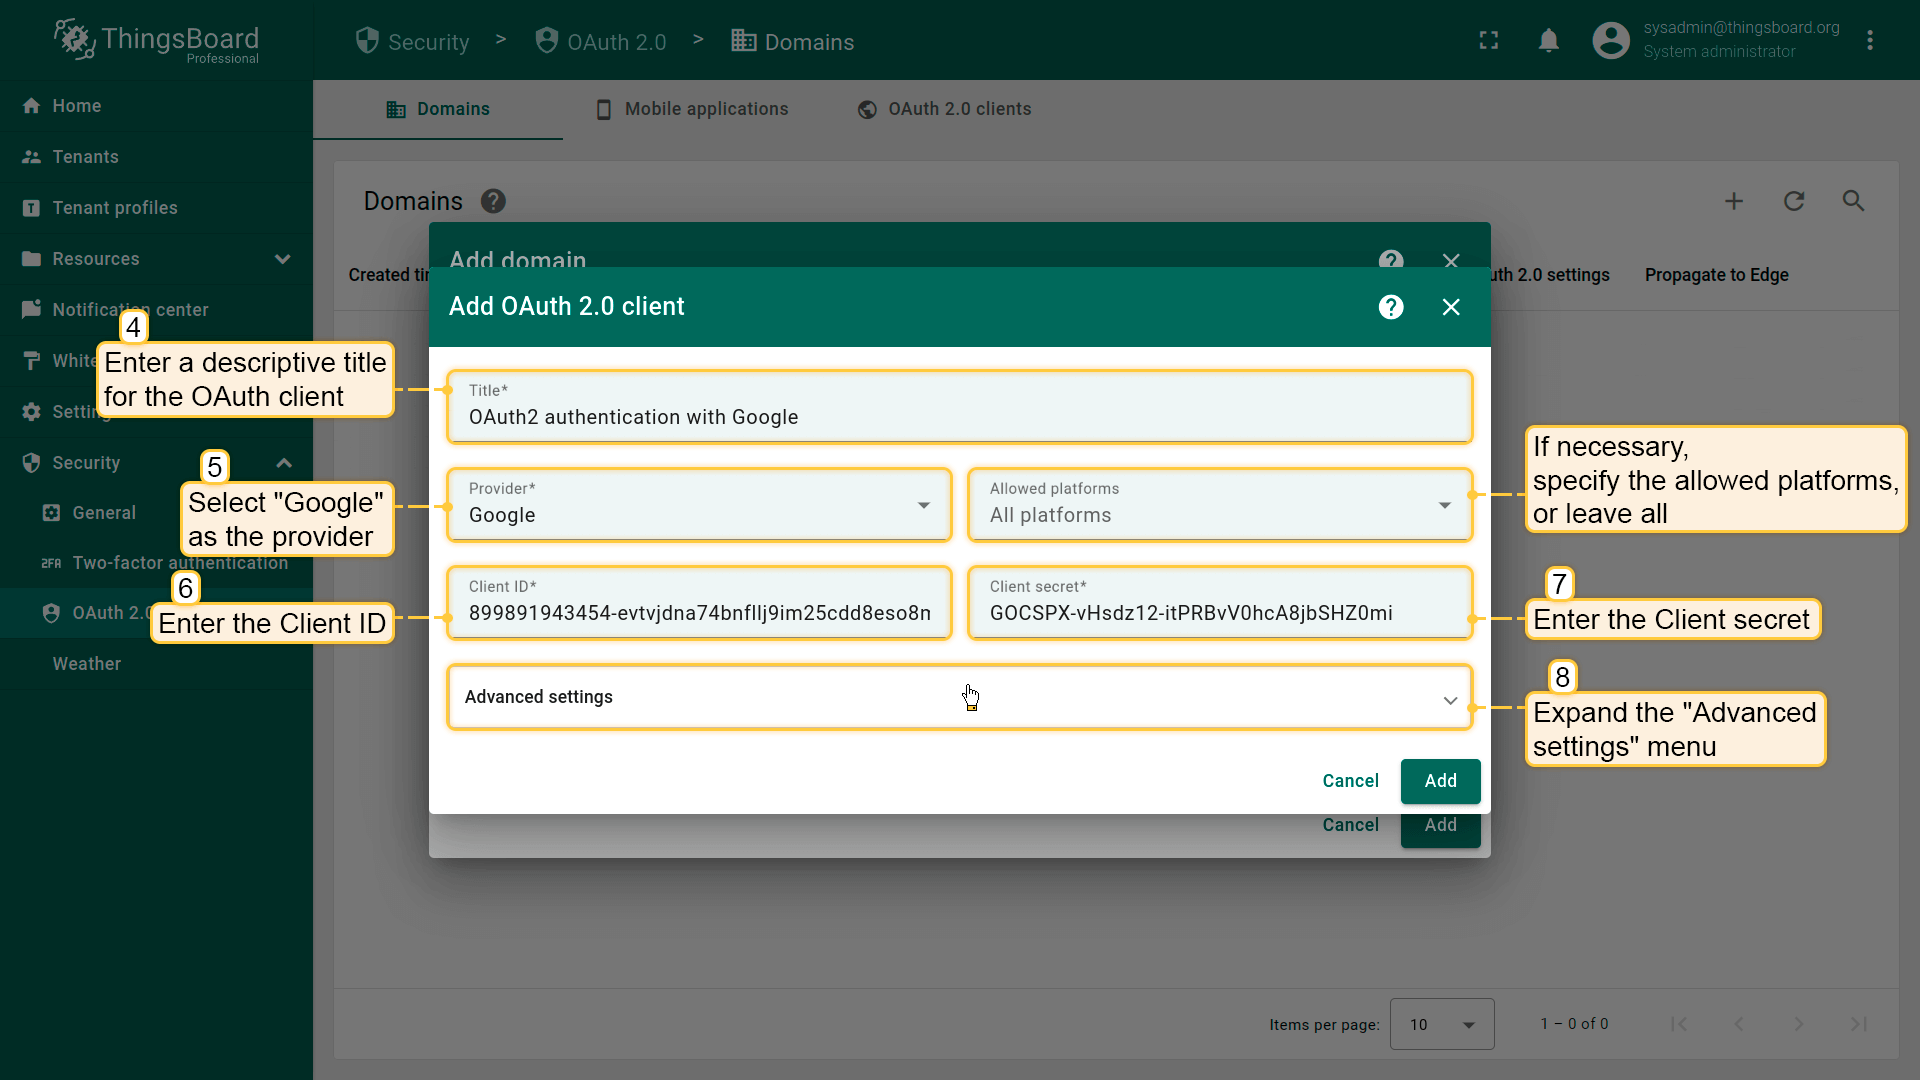
In the OAuth 2.0 client configuration window:
- Set the title to Google.
- Select Google as the provider.
- Specify allowed platforms if needed (or leave all selected).
- Enter the Client ID and Client Secret obtained from the Google Console.
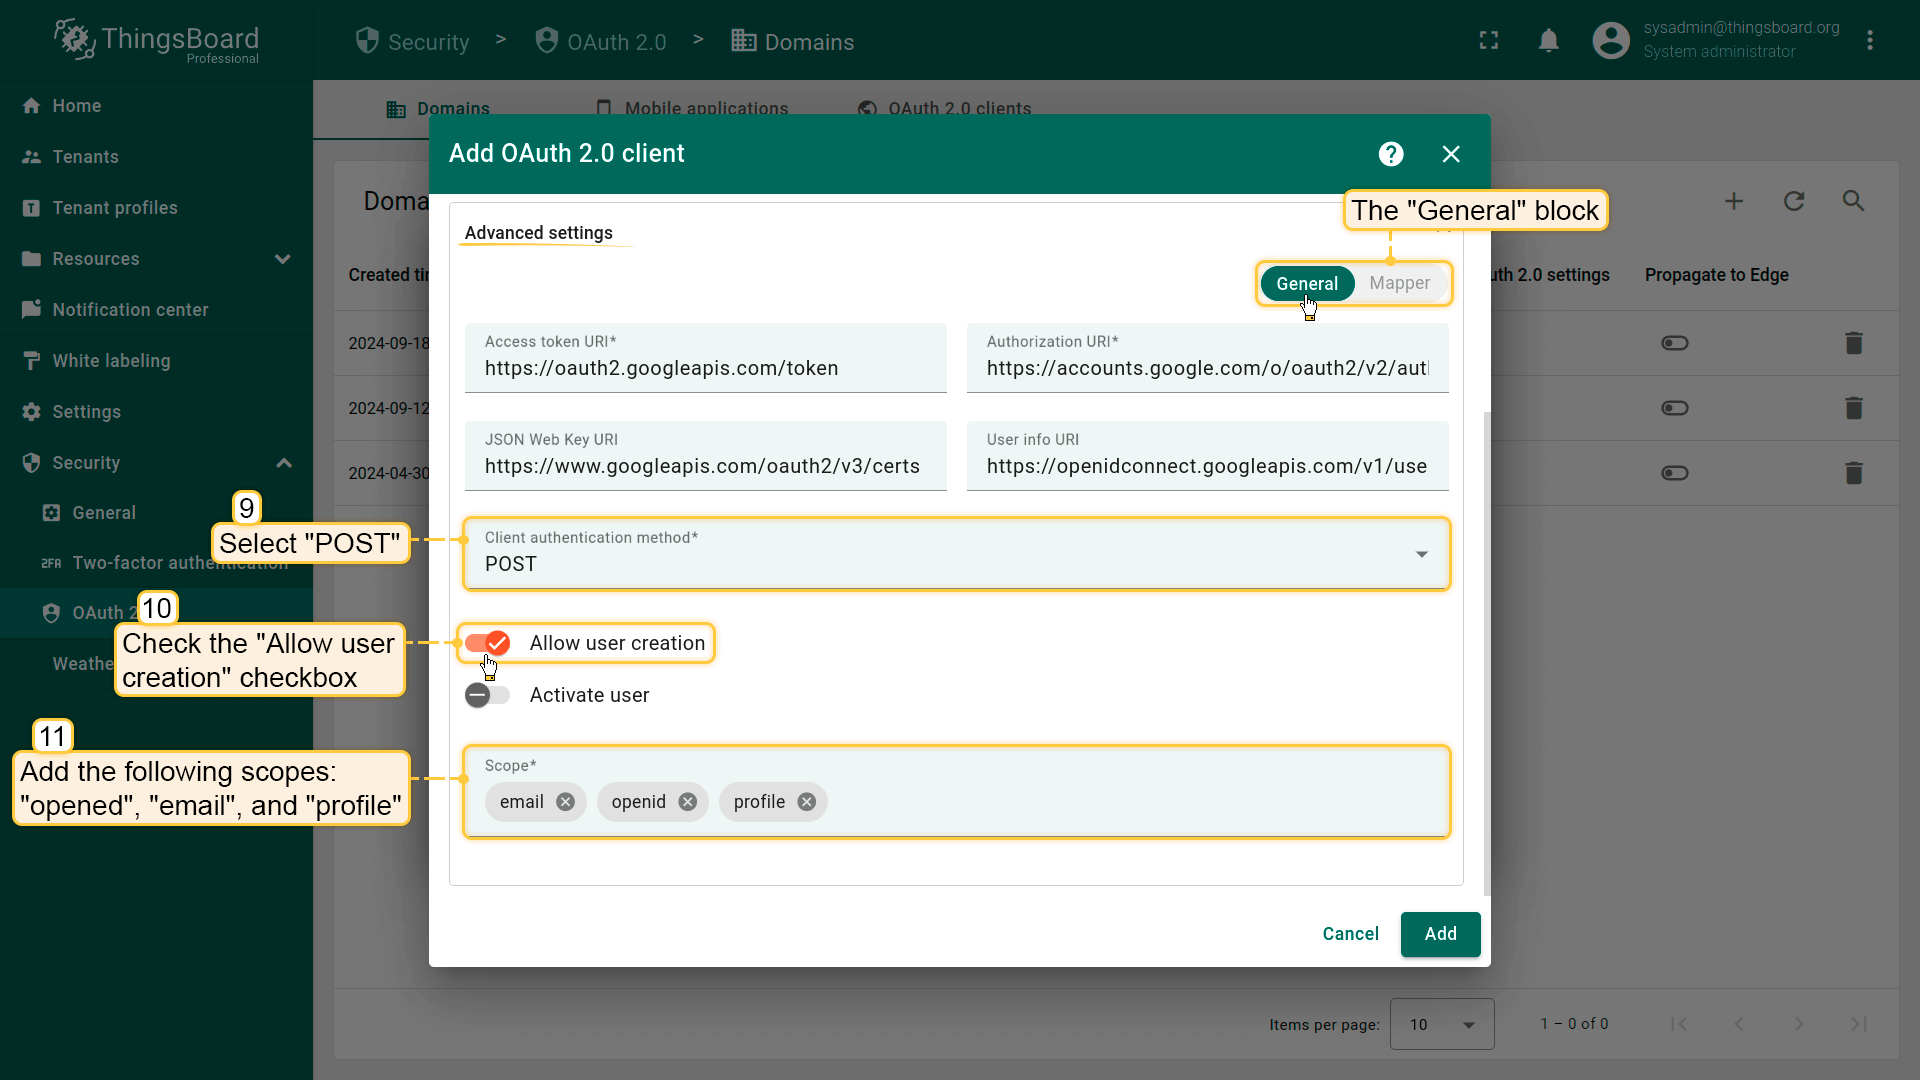
Now expand Advanced settings and configure the following parameters:
- Use the official discovery endpoint list: Google Discovery.
- Set client authentication method to POST.
- Enable Allow user creation.
- Set scope to: email openid profile.
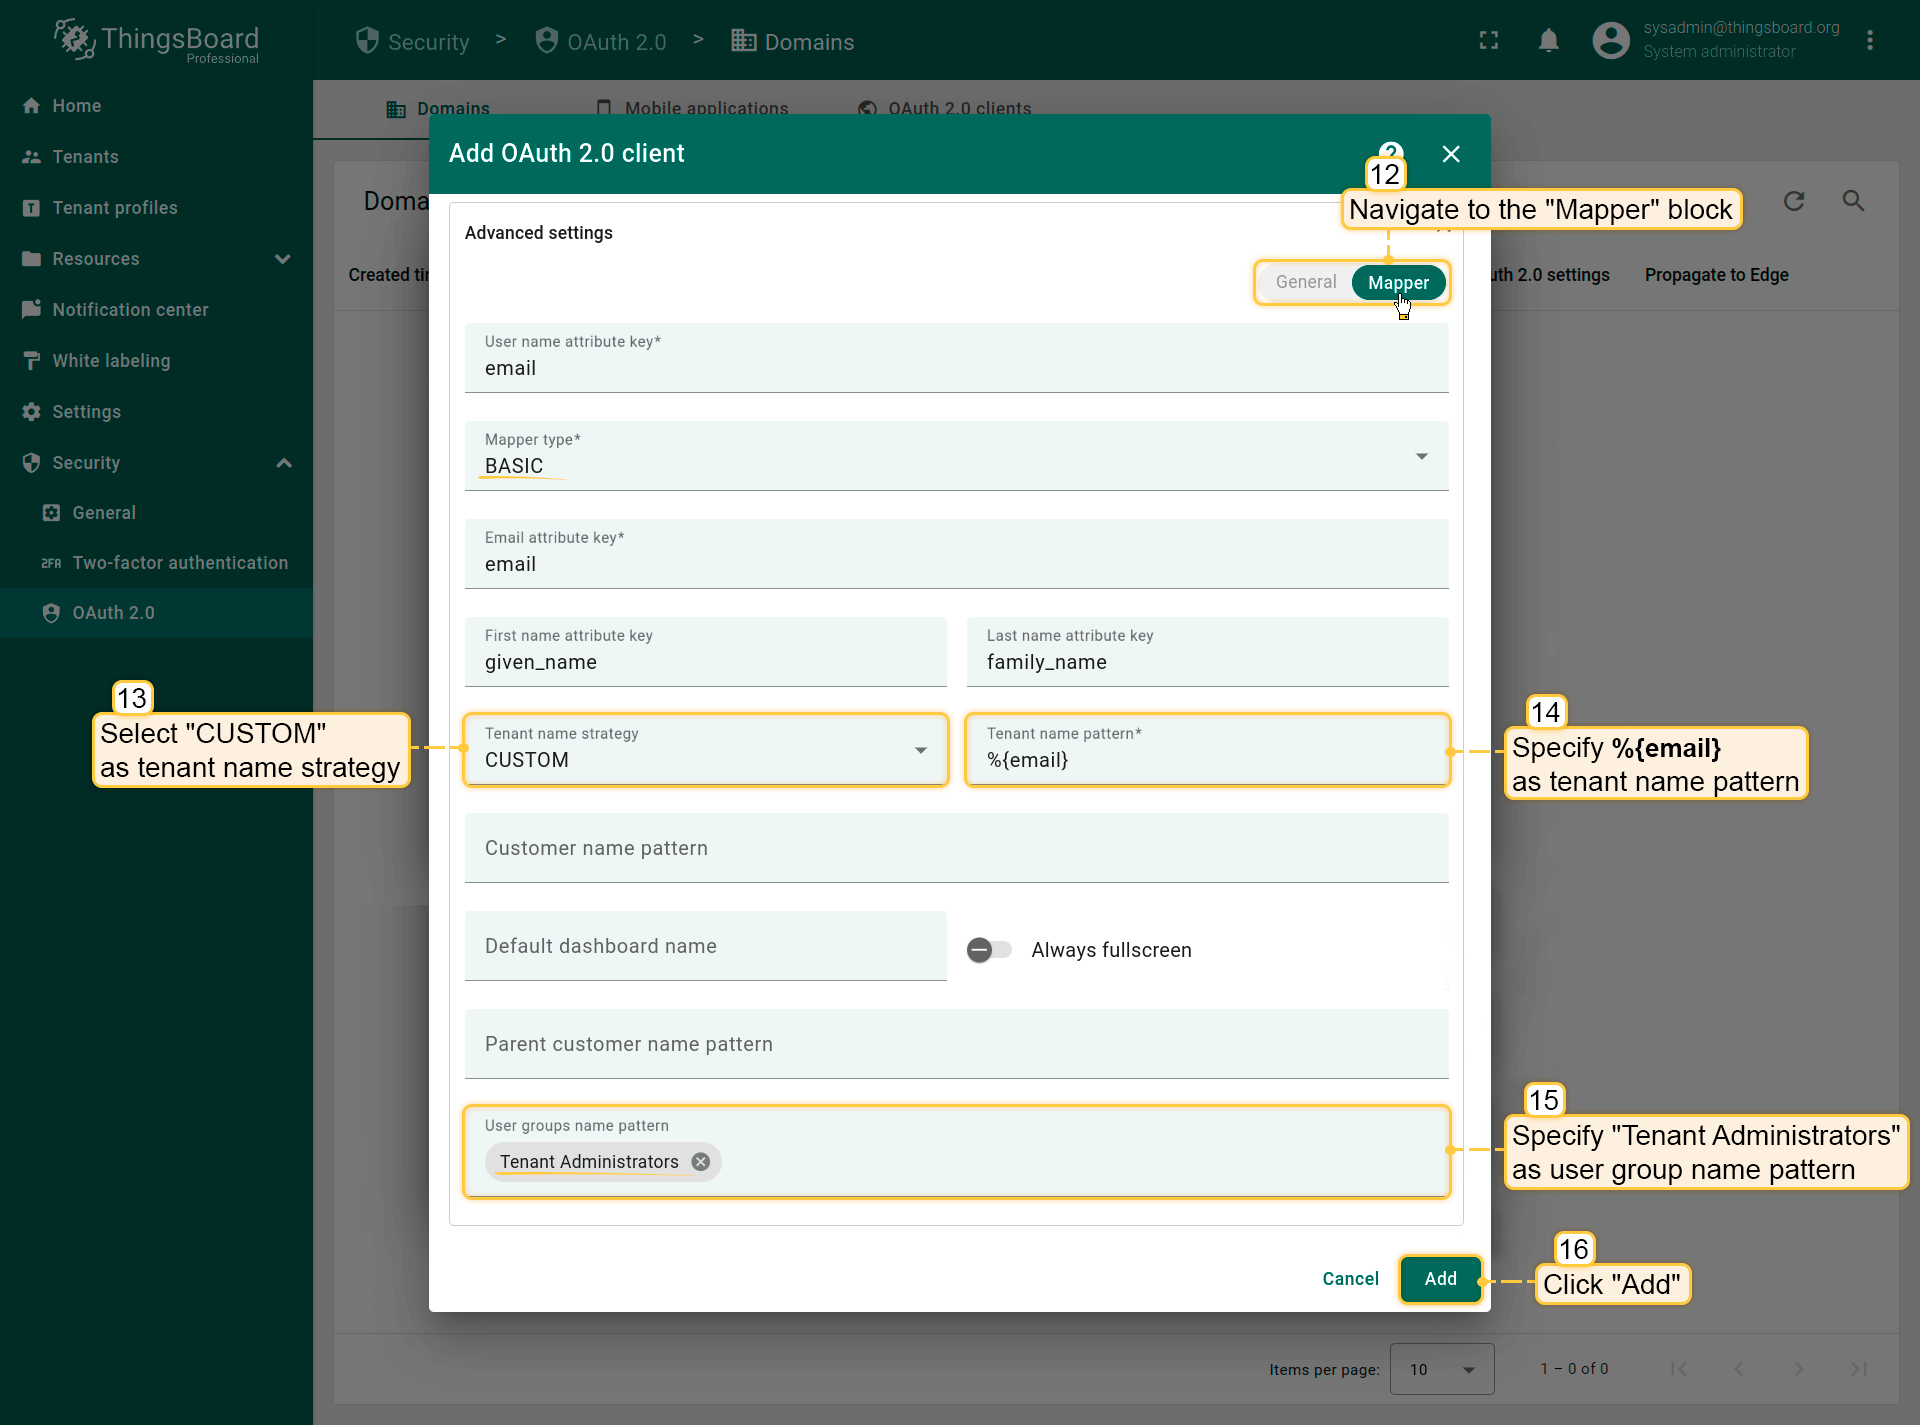
Switch to the Mapper section and configure:
- Mapper type: BASIC.
- Tenant name strategy: CUSTOM.
-
Tenant name pattern: %{email} (more details about these properties are described below in the “Basic mapper” part).
-
User groups name pattern: Tenant Administrators (to automatically assign newly created users to this group).
- Click Add to create the OAuth 2.0 client.
- Click Add again to confirm the domain creation.
Verify login
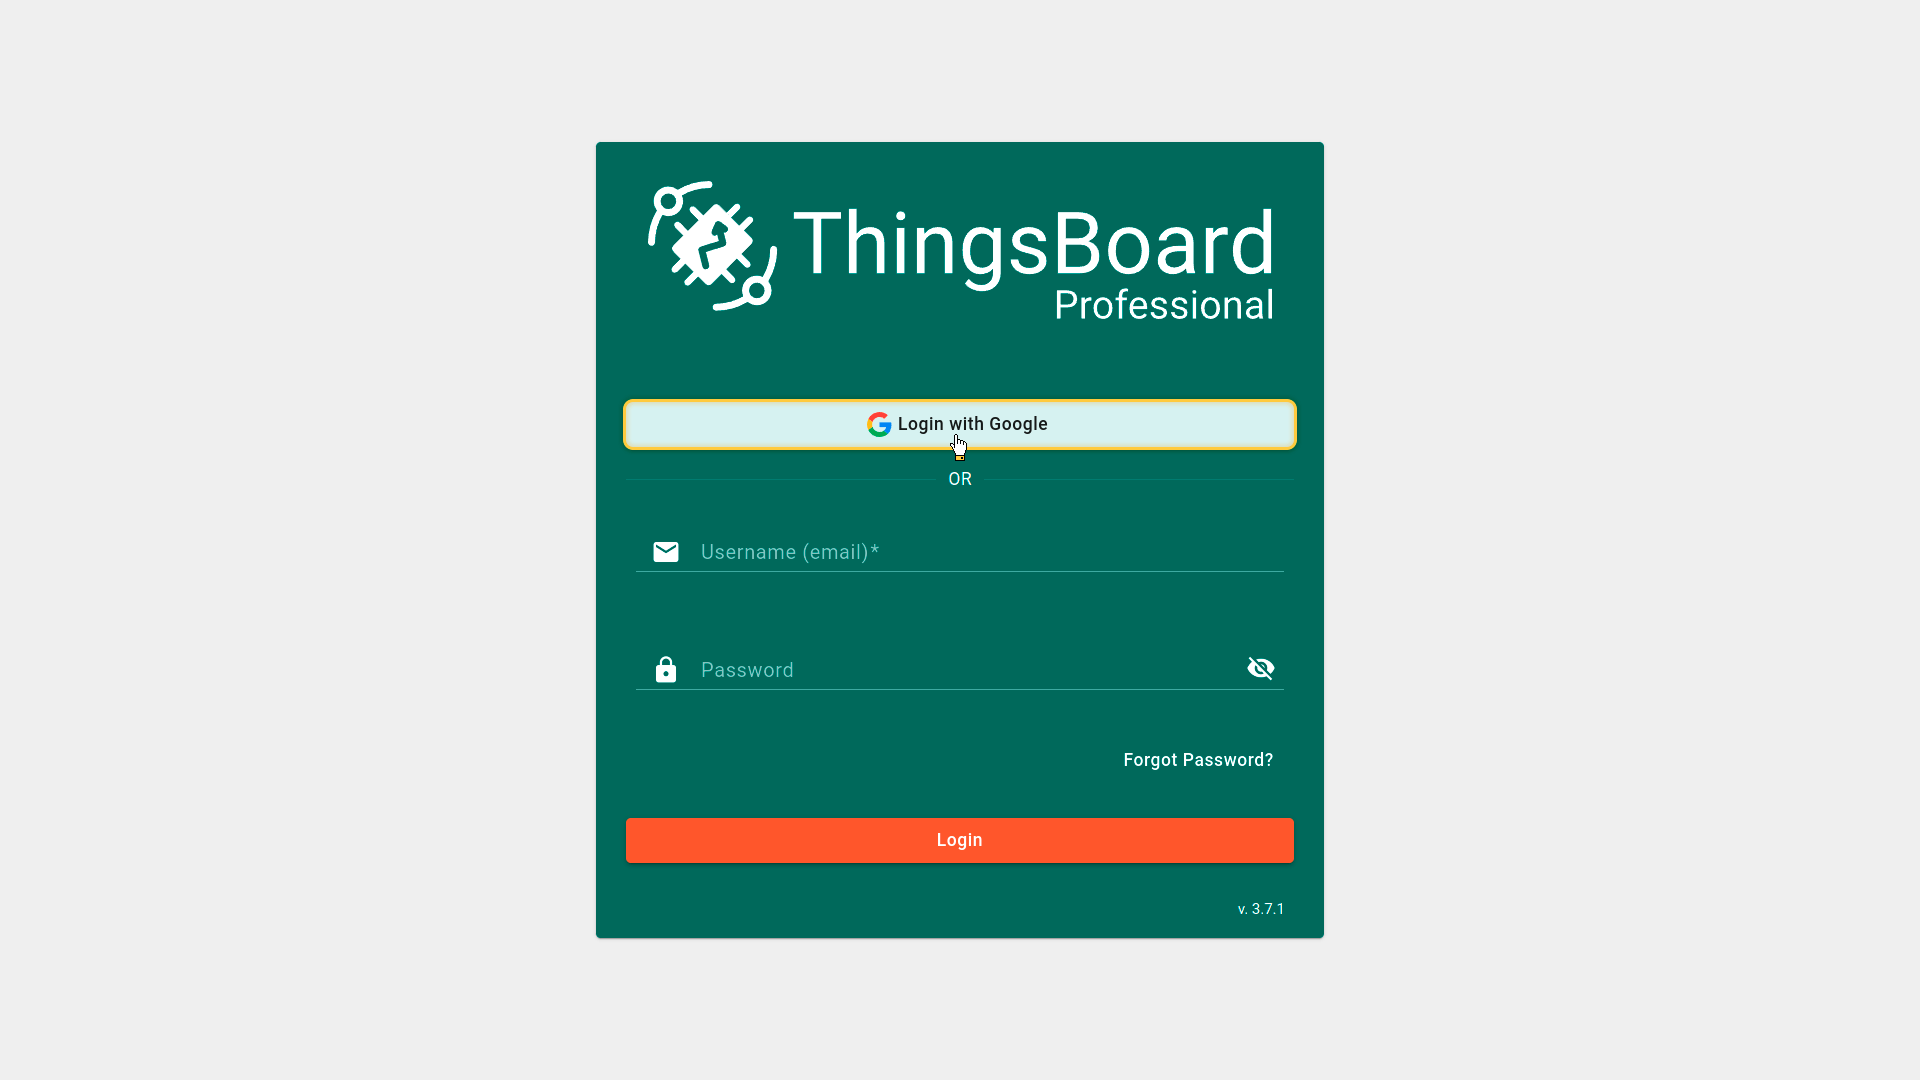
Now open the ThingsBoard login page. You will see the Login with Google button. Click it and select your Google account.
After successful authentication, you will be logged in to ThingsBoard as a Tenant Administrator.
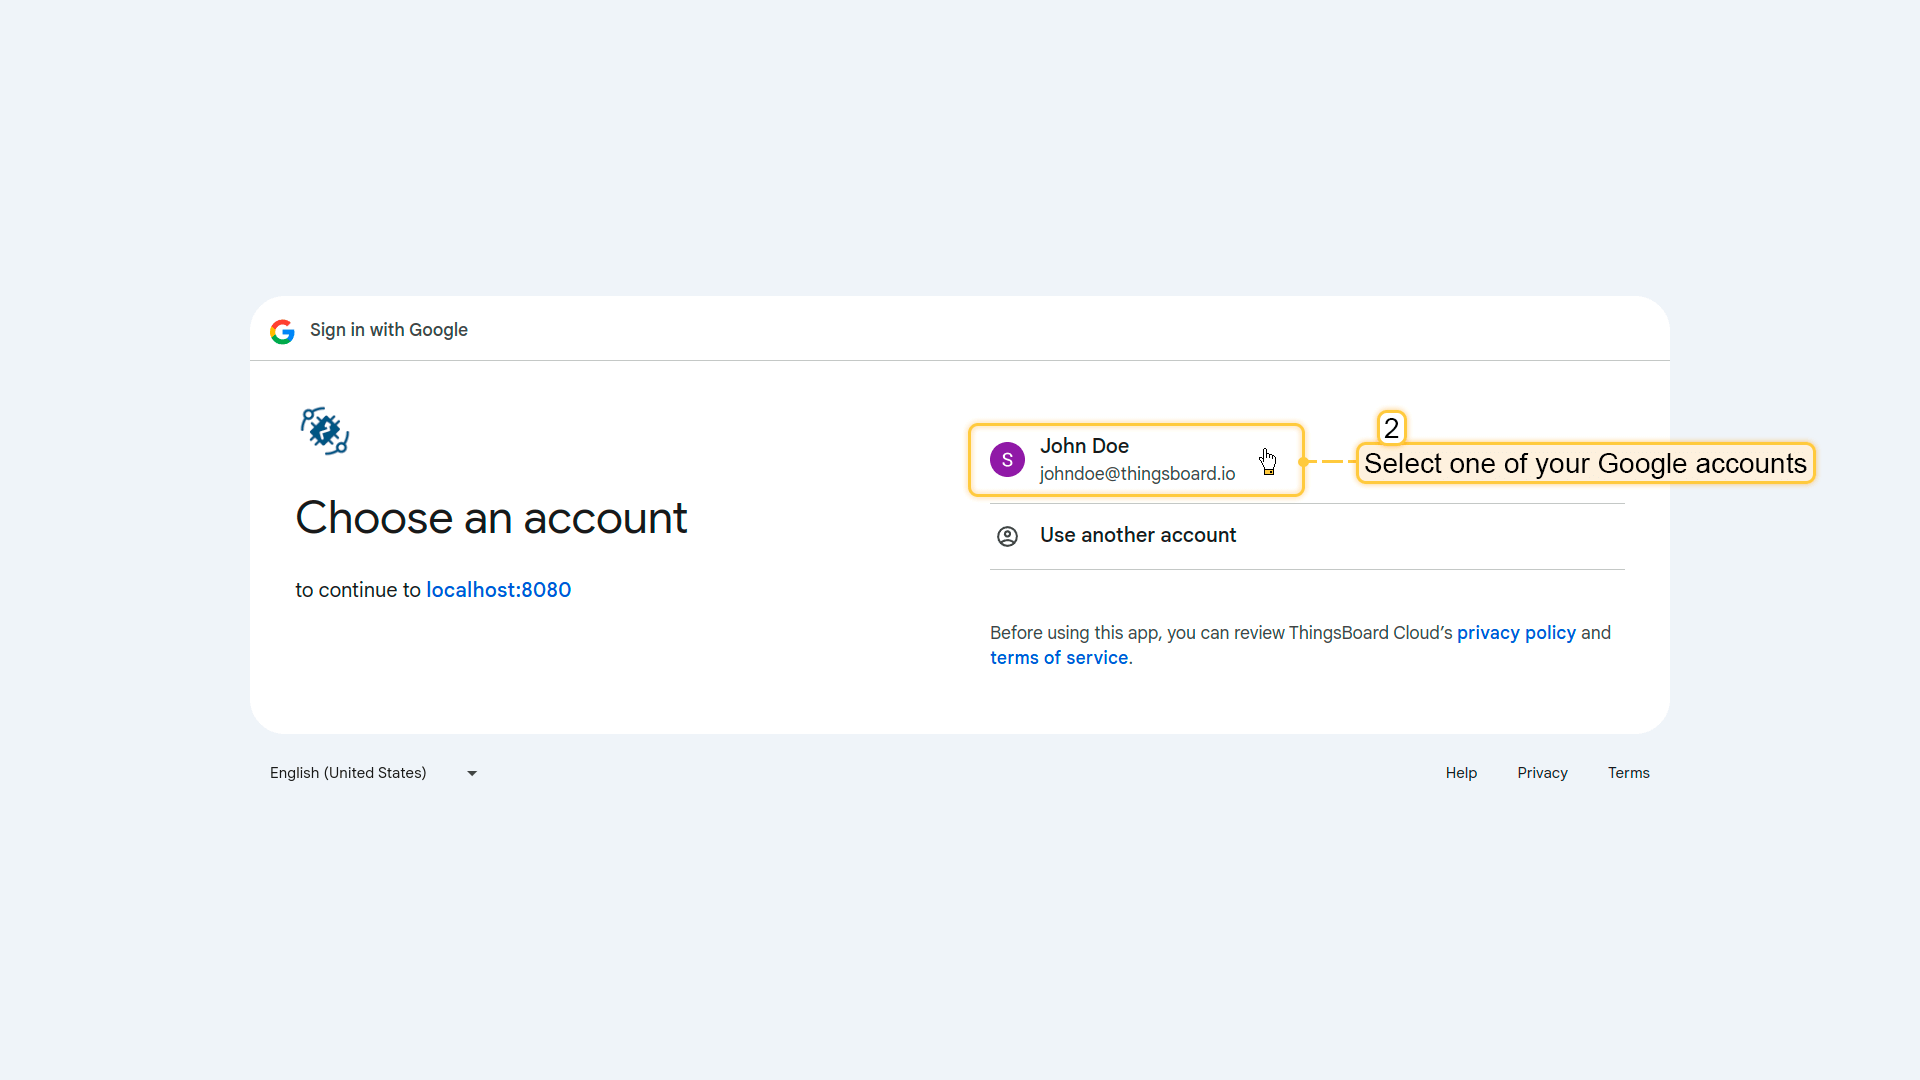
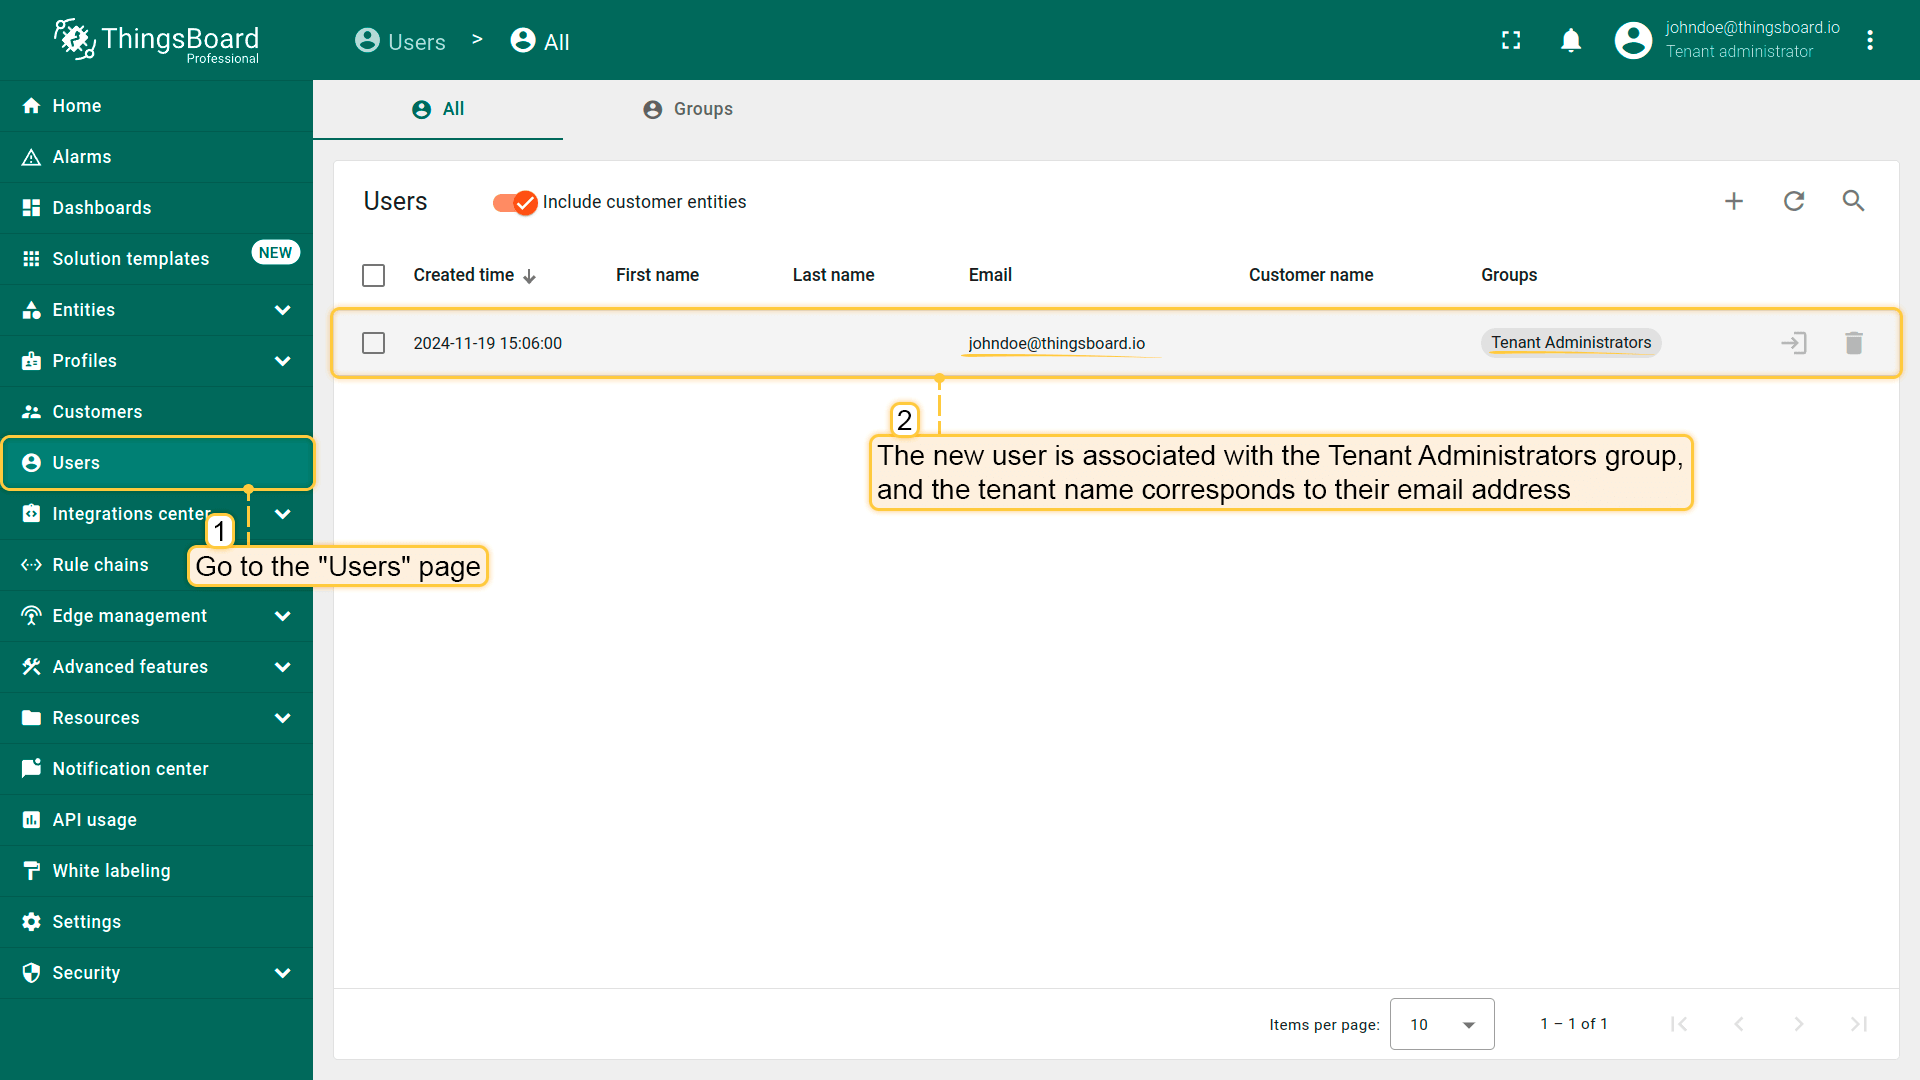
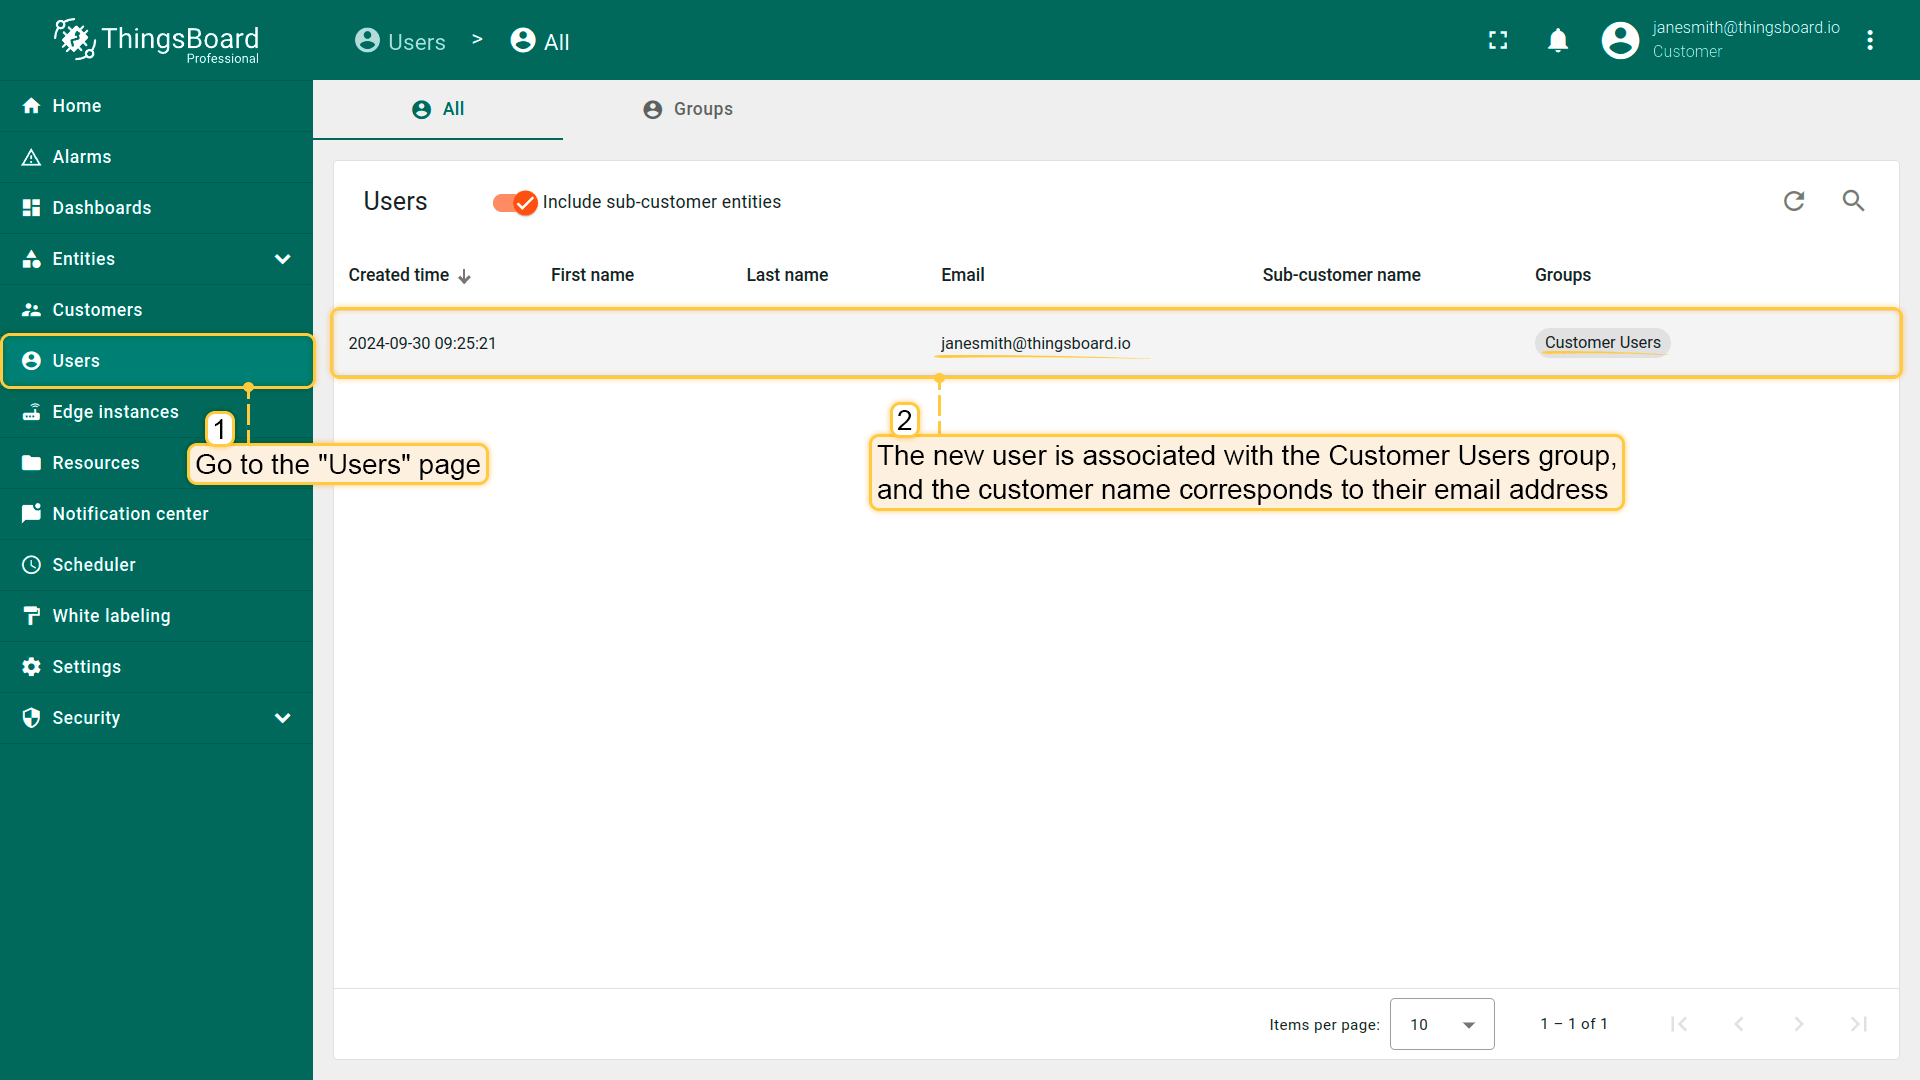
To verify the result, navigate to Users.
The created user will be assigned to the Tenant Administrators group, and the tenant name will match the user's email address.
Login with Auth0
This example demonstrates how to configure OAuth 2.0 authentication using Auth0.
After configuration:
- users can log in using their Auth0 credentials;
- ThingsBoard creates or selects a tenant based on the user’s email domain;
- for each user, ThingsBoard also creates a customer whose name matches the user’s email address;
- the user is logged in as a Customer User.
User mapping is performed using the built-in Basic mapper, but a Custom mapper can be used to implement more advanced tenant/customer provisioning rules.
Step 1. Create an Auth0 application in OAuth0 Management Console
Before configuring ThingsBoard, you need to create an Auth0 application and obtain the Client ID and Client Secret.
To do this:
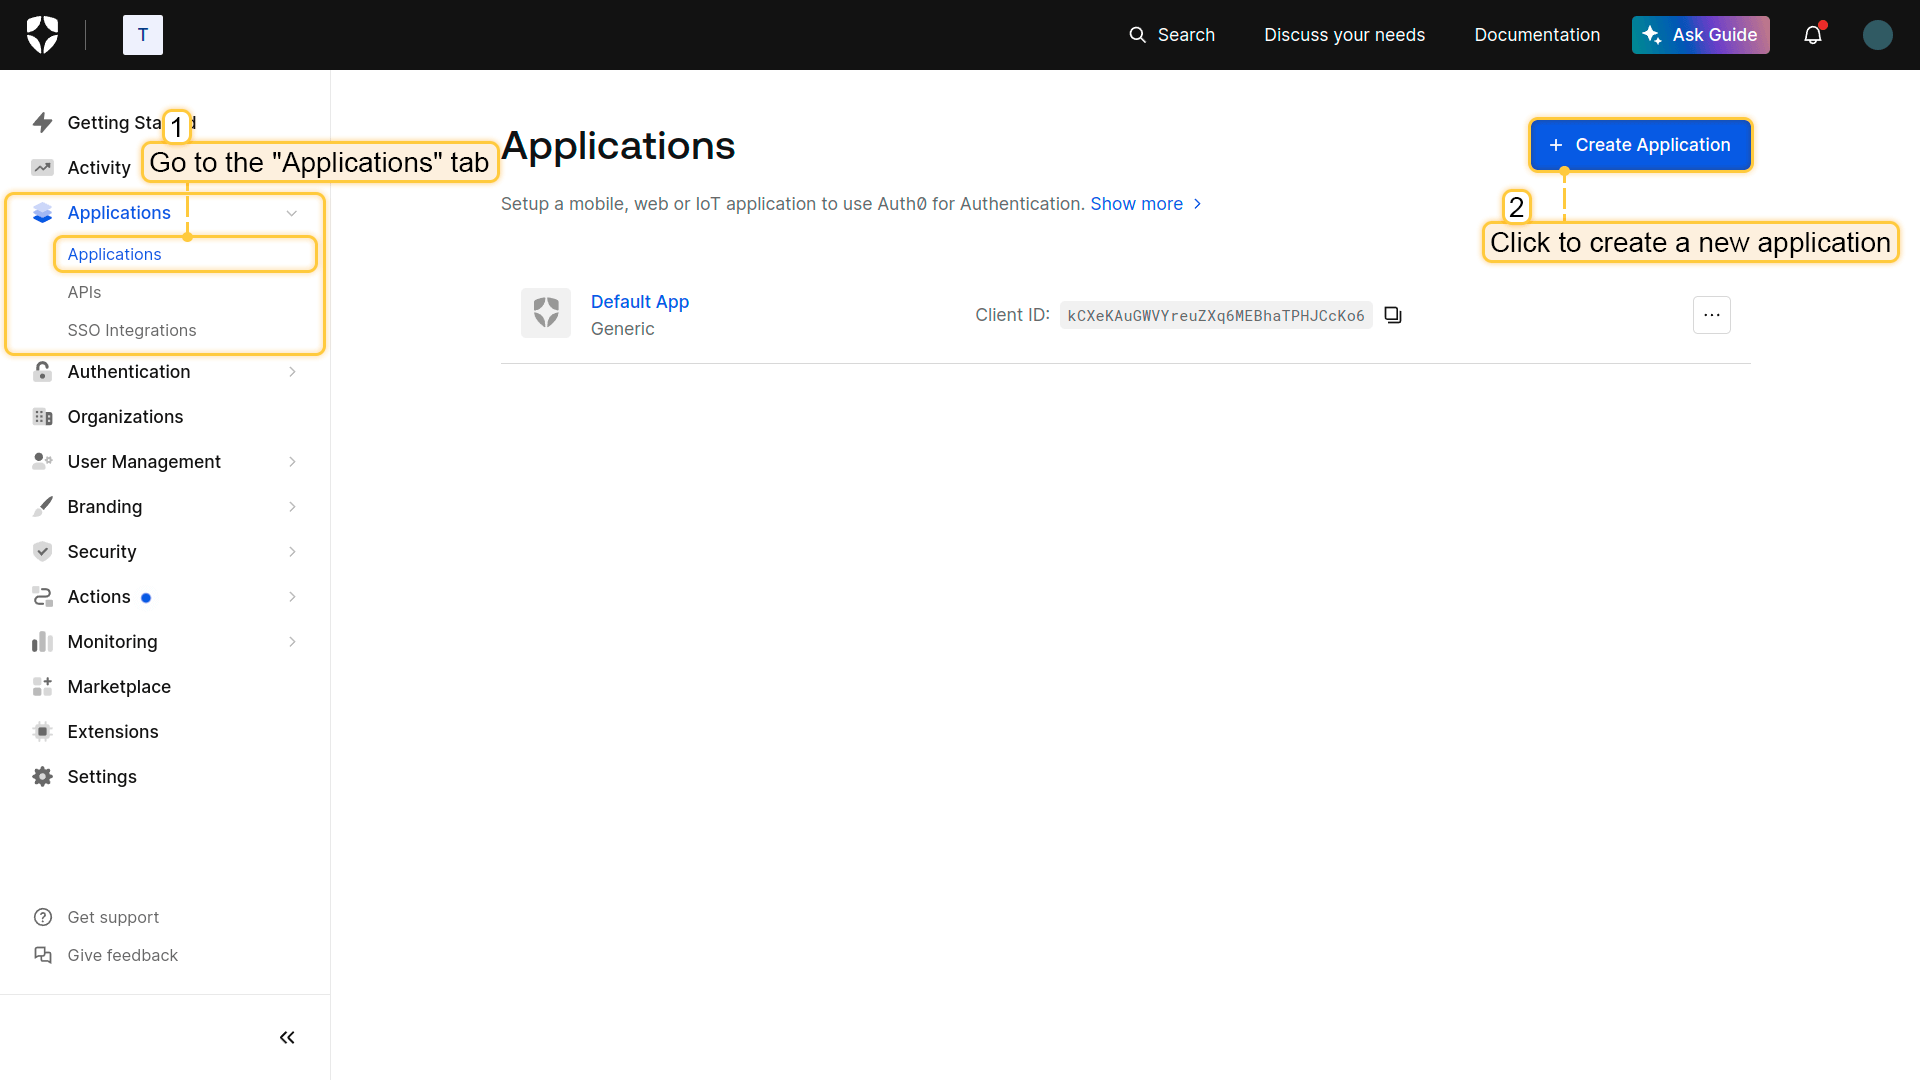
- Open the OAuth0 Management Console.
- Navigate to Applications and click Create Application.
- Name the application ThingsBoard.
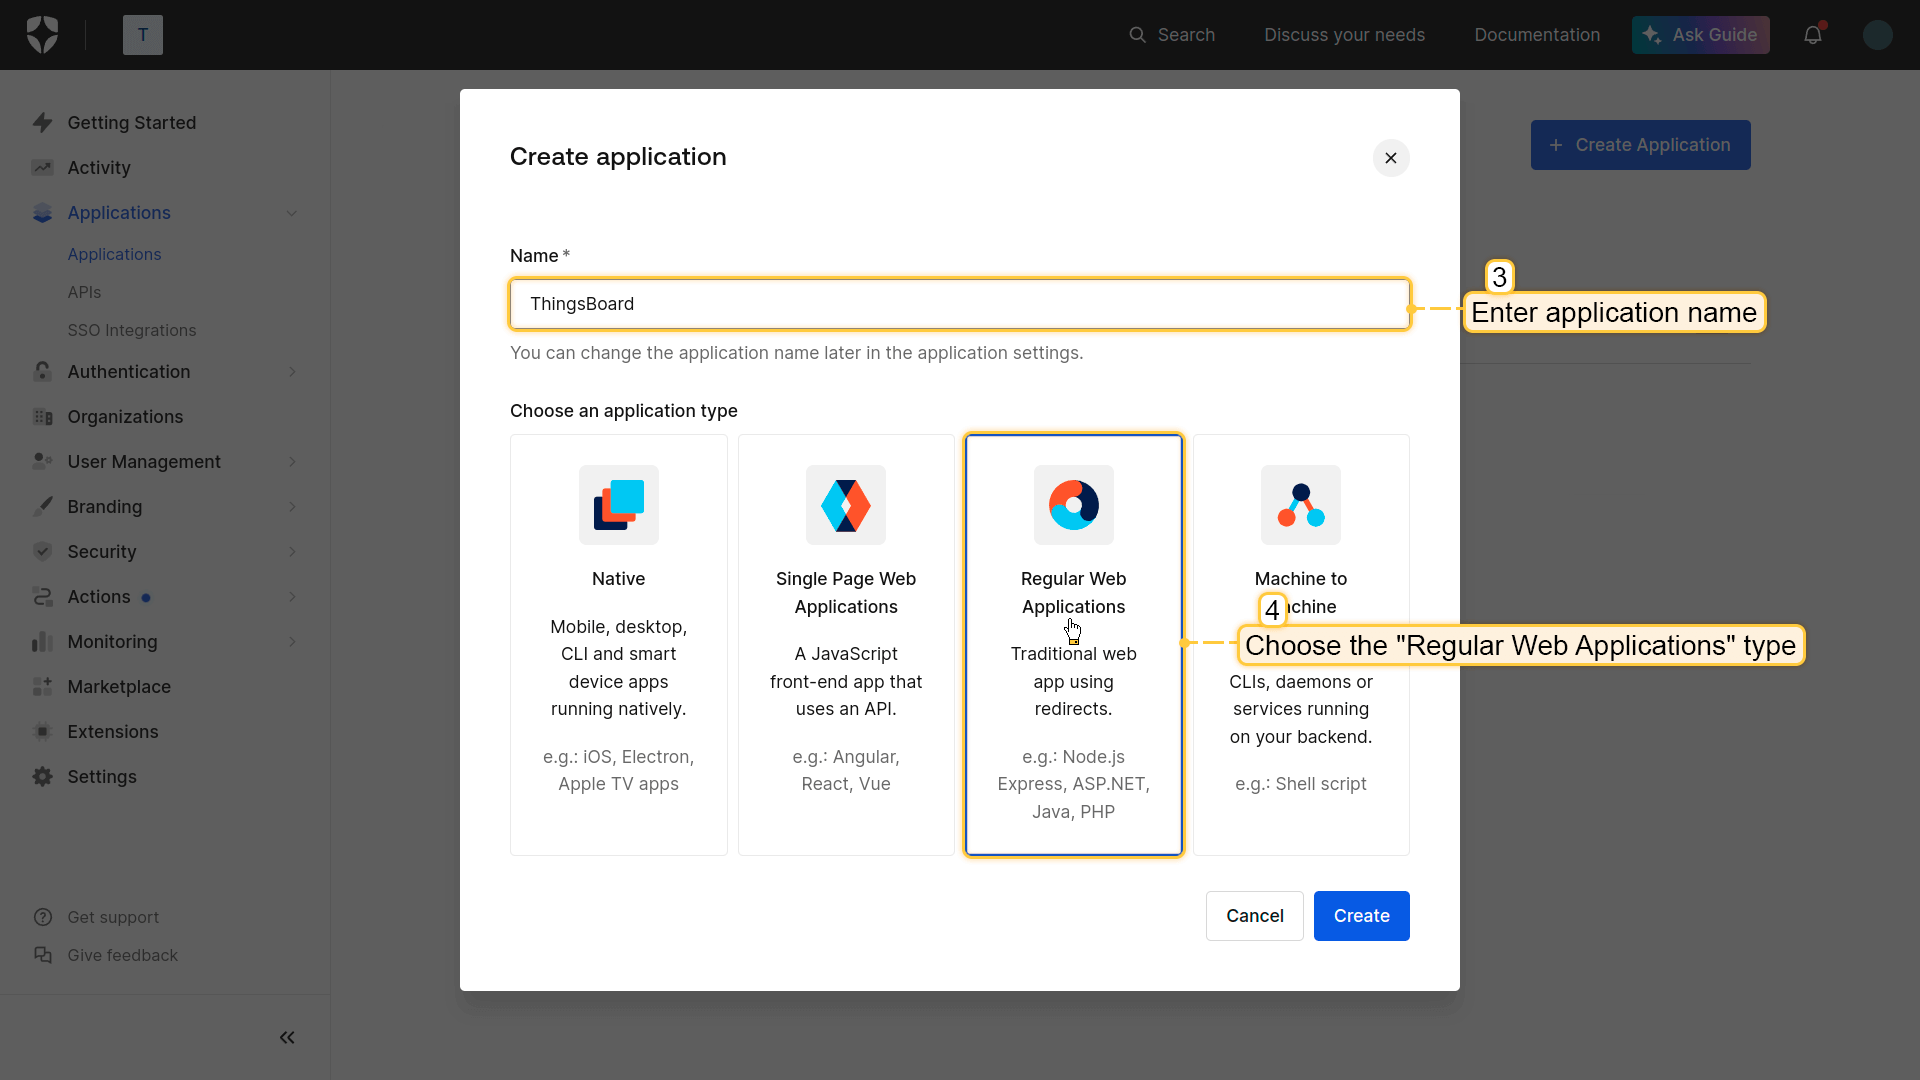
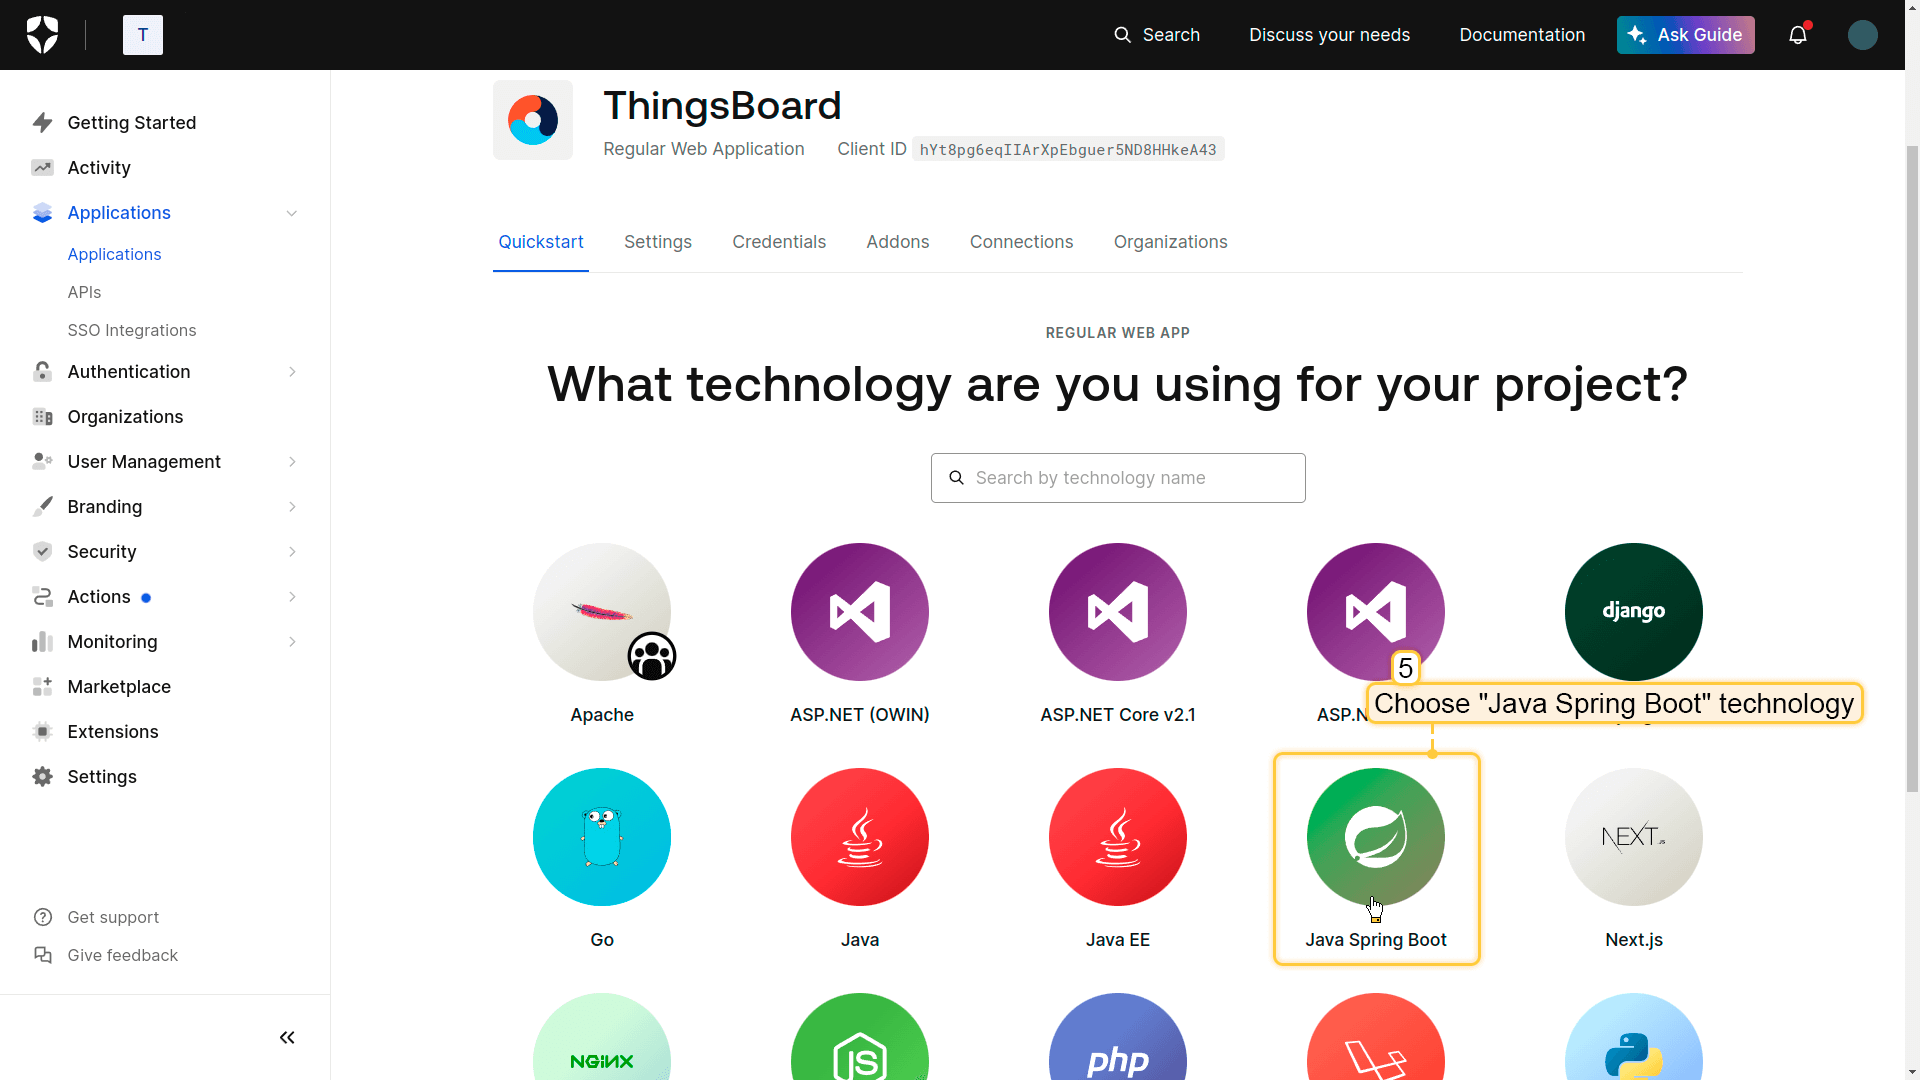
- Select Regular Web Application.
- Select the technology Java Spring Boot.
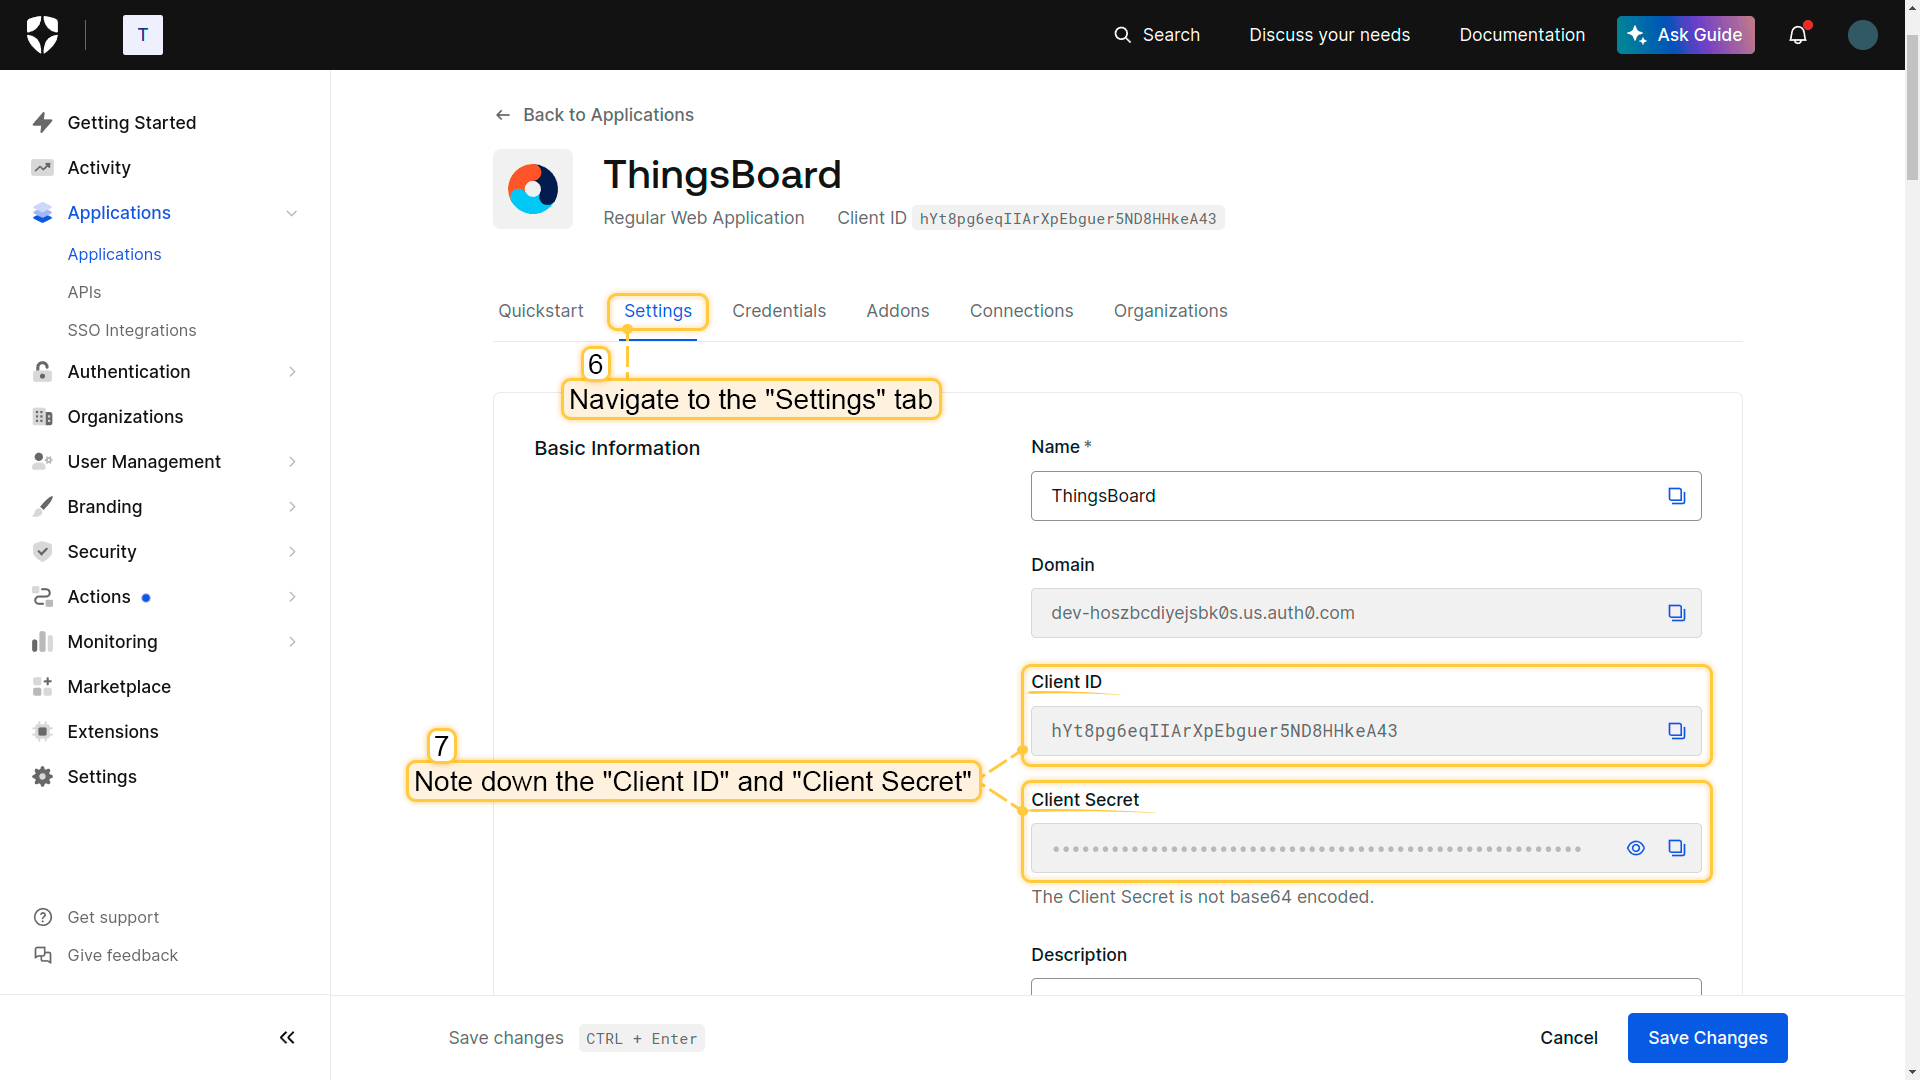
- Open the created application and navigate to the Settings tab.
- Copy the following values:
- Client ID
- Client Secret.
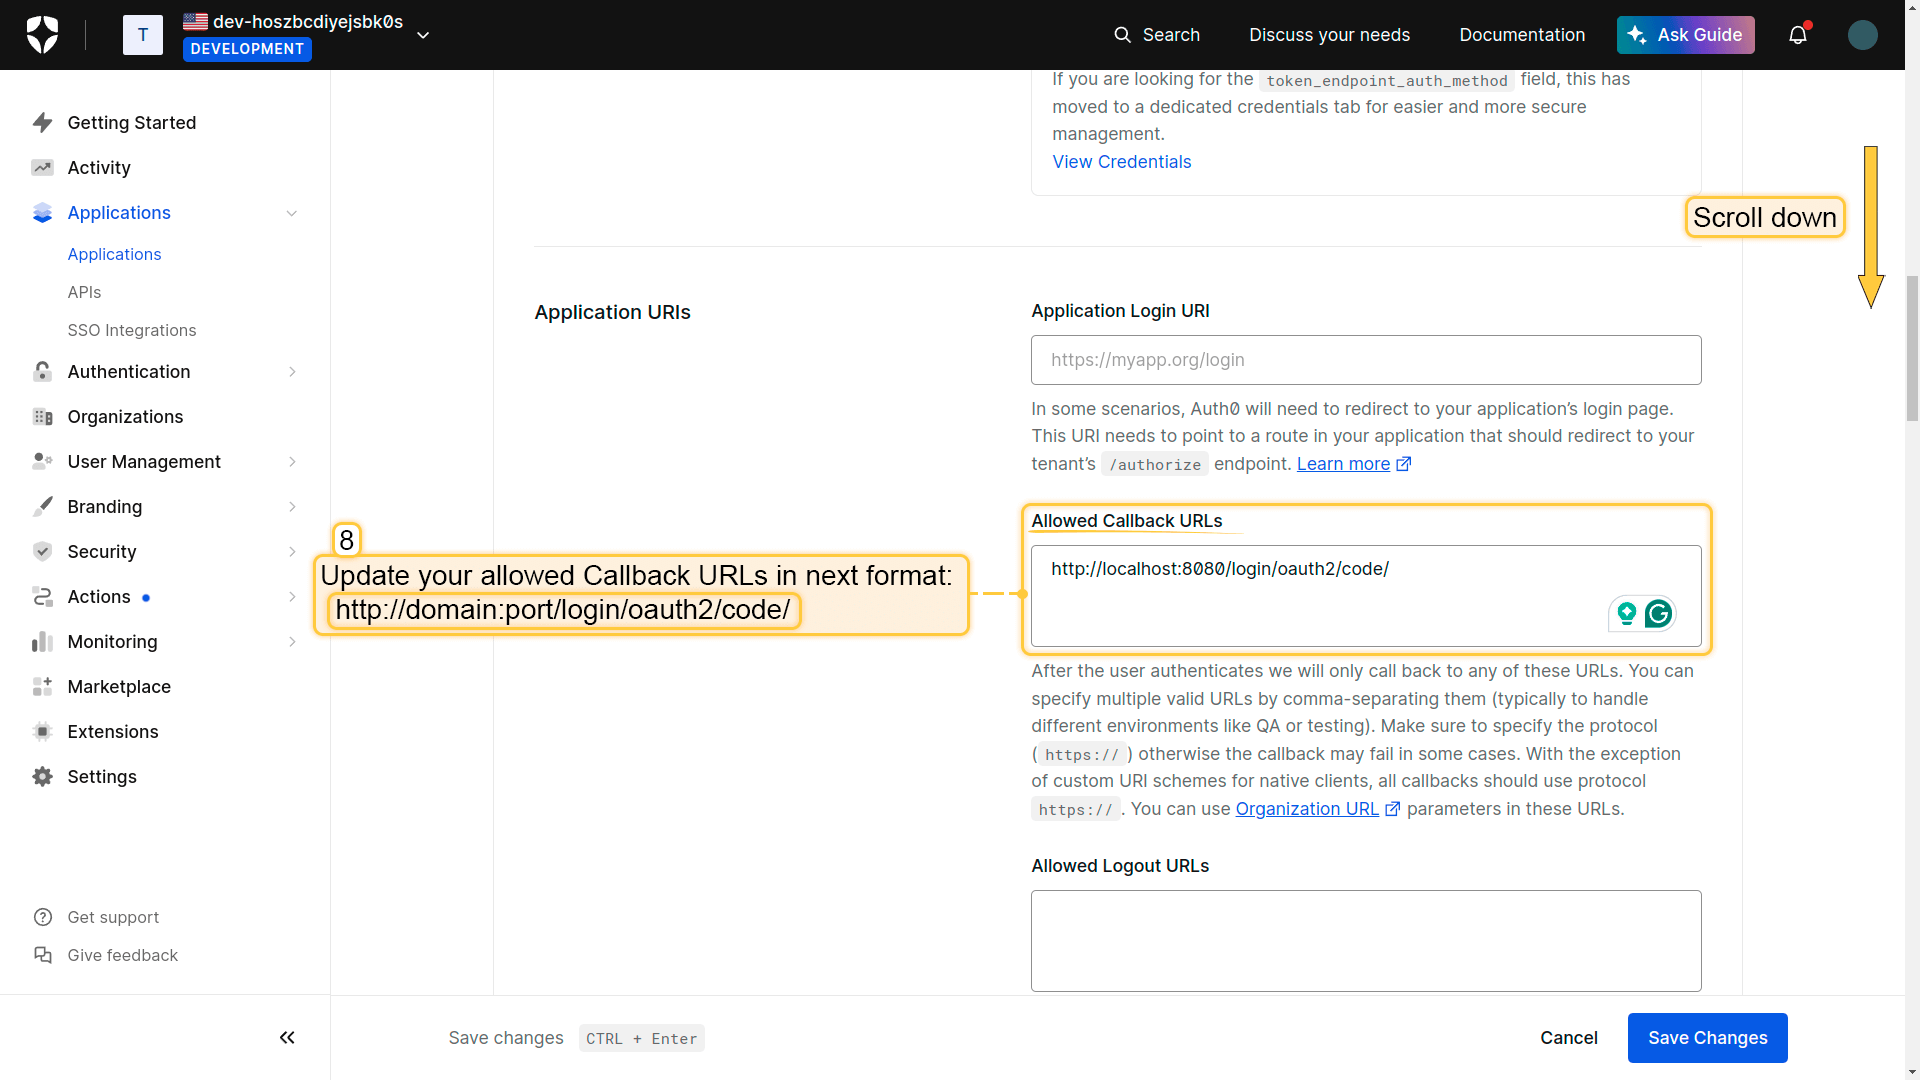
In the Allowed Callback URLs field, add the ThingsBoard redirect URI:
1
http(s)://$DOMAIN:$PORT/login/oauth2/code/
Where:
• $DOMAIN is the ThingsBoard hostname (or IP address)
• $PORT is the HTTP/HTTPS port of the ThingsBoard instance
Example:
1
https://my.thingsboard.instance/login/oauth2/code/
Please note that it is not necessary to configure the Application Login URI.
- In the Advanced Settings section, you can find the required endpoints for OAuth configuration.
- Click Save Changes.

Step 2. Add an OAuth 2.0 client in ThingsBoard
To configure OAuth 2.0 authentication via Auth0 in ThingsBoard:
- Log in to your ThingsBoard instance.
- Navigate to Security ⇾ OAuth 2.0.
- On the Domains tab, click the + (plus) icon.
- Enter your domain name (or IP address).
- Click Create new in the OAuth 2.0 clients section.
In the OAuth 2.0 client configuration window:
- Set title to Auth0.
- Select provider Custom.
- Specify allowed platforms if needed (or leave all selected).
- Enter the Client ID and Client Secret from OAuth0 console.
Now expand Advanced settings and configure:
- Fill in all required endpoints using values from Auth0 (Advanced Settings in Auth0).
- Set client authentication method to POST.
- Set provider label to Auth0.
- Set scope to: email openid profile.
Proceed to the Mapper block and configure:
- Mapper type: BASIC.
- Tenant name strategy: DOMAIN.
-
Customer name pattern: %{email} (more details about these properties are described below in the “Basic mapper” part).
-
User groups name pattern: Customer Users (to automatically assign newly created users to this group).
- Click Add to create the OAuth 2.0 client.

- Finally, click Add again to confirm domain creation.

Step 3. Verify login
Now open the ThingsBoard login page. You will see the Login with Auth0 button. Click it and authenticate using your Auth0 credentials.
After successful authentication, you will be logged in to ThingsBoard as a Customer User.
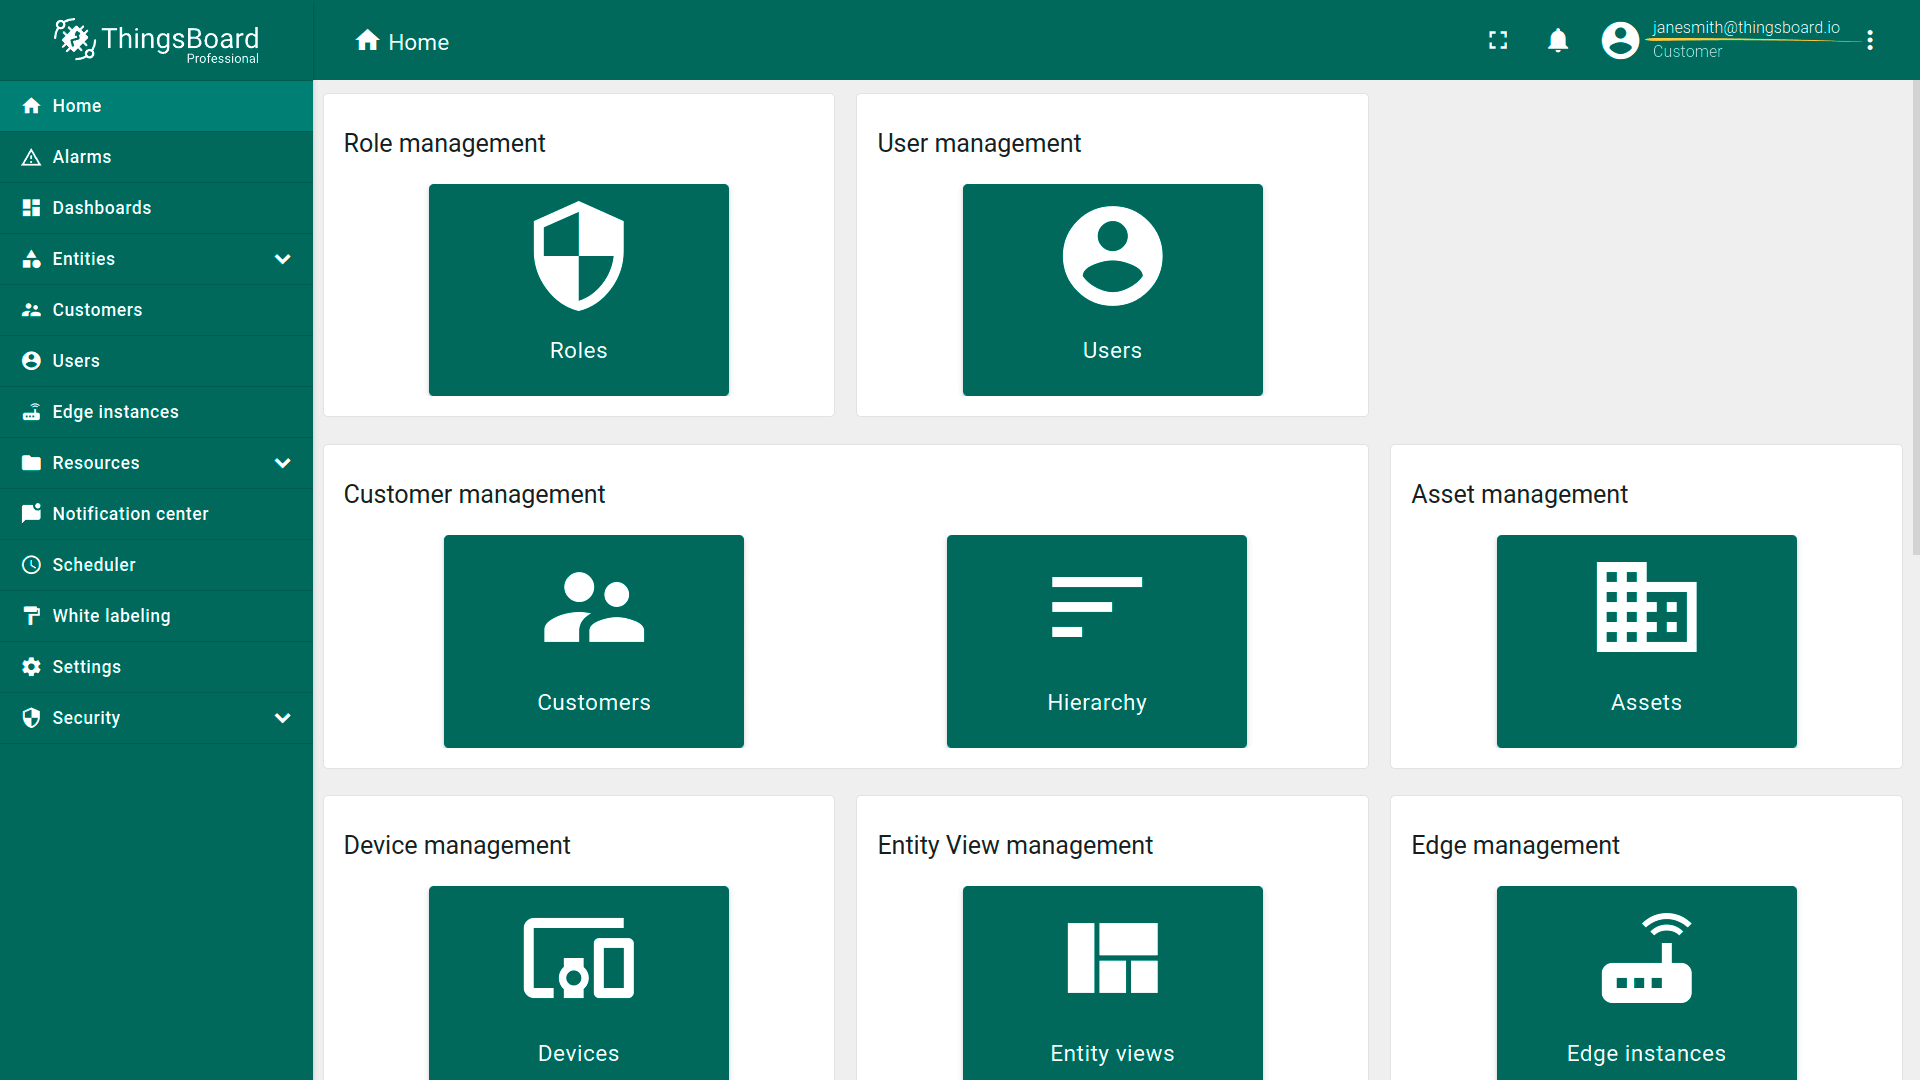
To verify the result, navigate to Users. The created user will be assigned to the Customer Users group, and the customer name will match the user’s email address.
Login with Keycloak
This example demonstrates how to configure OAuth 2.0 authentication using Keycloak (OpenID Connect).
After configuration:
- users can log in using their Keycloak credentials;
- ThingsBoard logs the user in as a Tenant Administrator;
- the tenant name is derived from the user’s email address;
- if the tenant does not exist, it can be created automatically depending on mapper settings.
User mapping is performed using the built-in Basic mapper, but a Custom mapper can be used if additional identity-to-tenant logic is required.
Step 1. Create a Keycloak realm and an OpenID Connect client
Before configuring ThingsBoard, you need to create a Keycloak realm and an OpenID Connect client, then obtain the required OAuth 2.0 credentials (Client ID and Client Secret).
You can follow the official Keycloak documentation, or use the step-by-step instructions below.
Start Keycloak
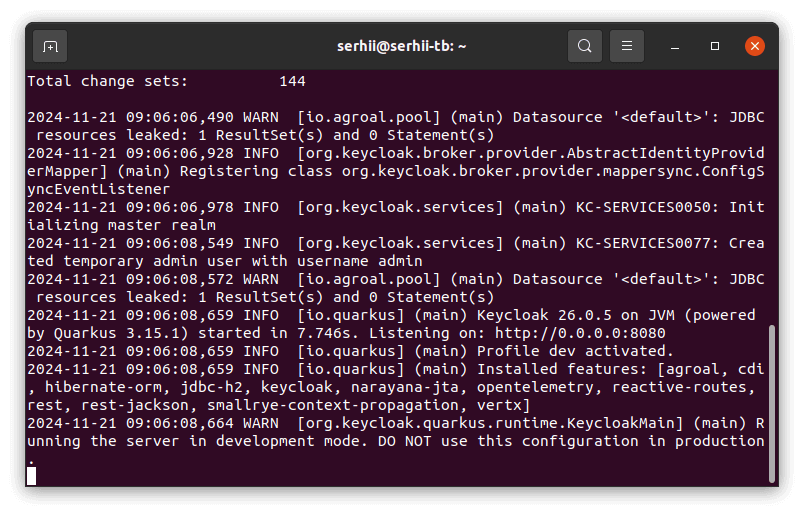
This example uses Docker to start Keycloak locally.
- Make sure Docker is installed.
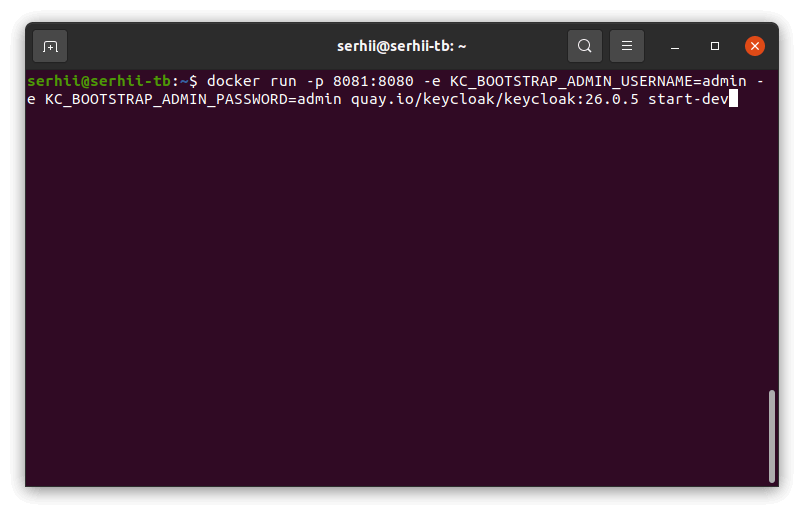
- Run the following command to start Keycloak on port 8081 and create an initial admin user (admin / admin):
1
docker run -p 8081:8080 -e KC_BOOTSTRAP_ADMIN_USERNAME=admin -e KC_BOOTSTRAP_ADMIN_PASSWORD=admin quay.io/keycloak/keycloak:26.0.5 start-dev
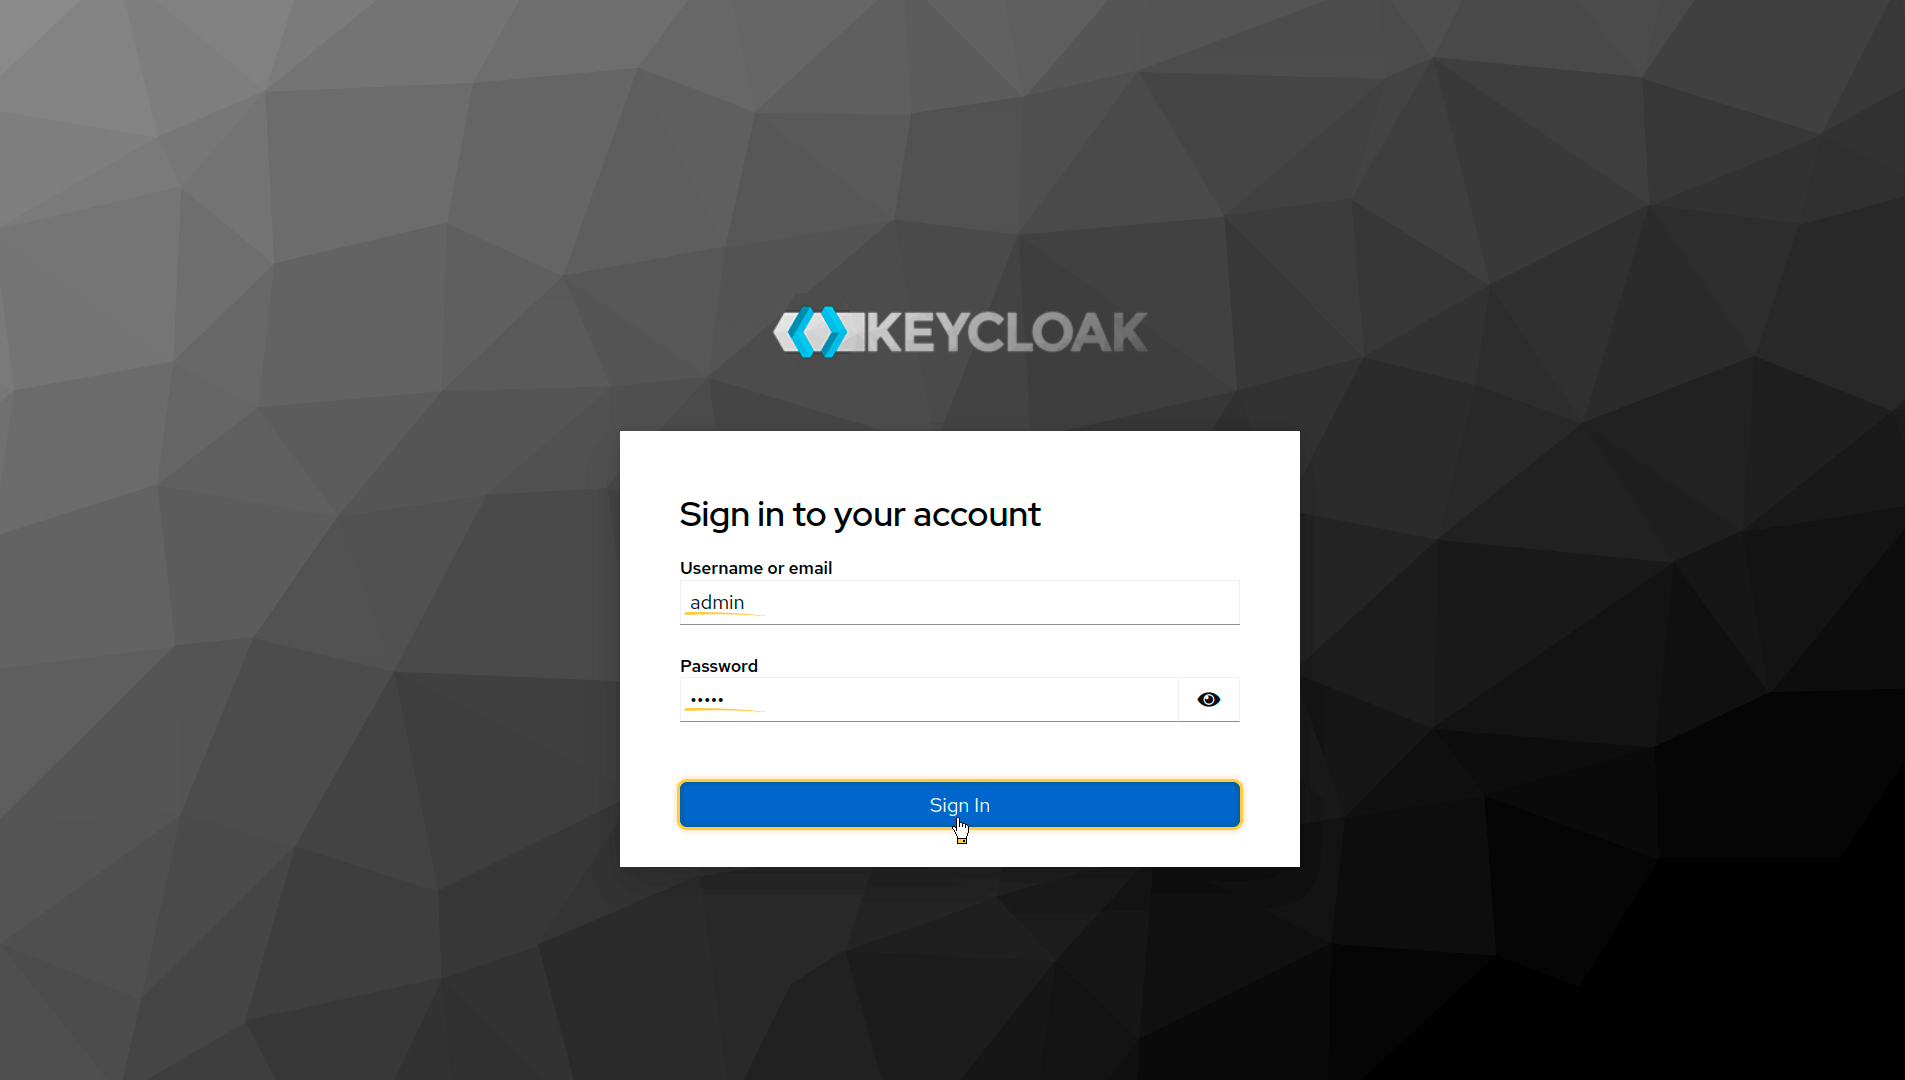
Log in to the admin console
- Open the Keycloak Admin Console.
- Log in using:
- username: admin
- password admin.
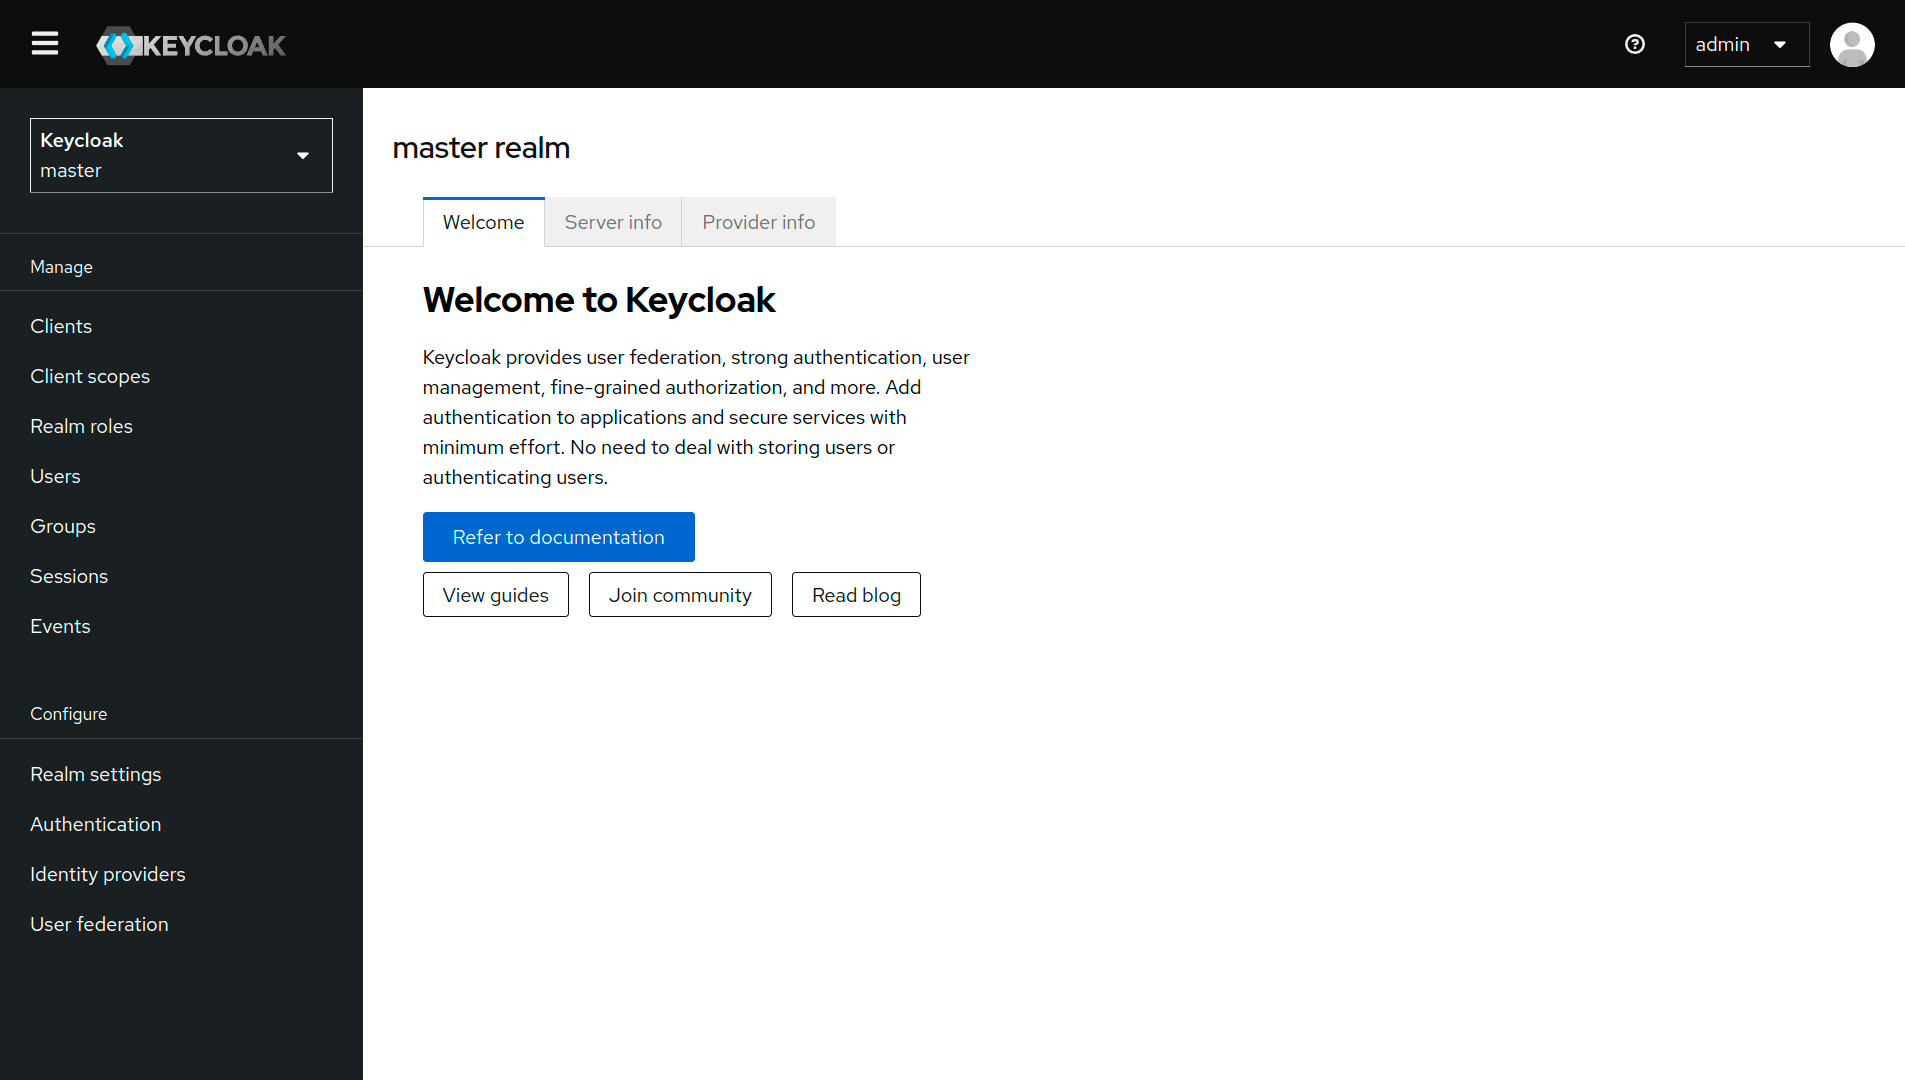
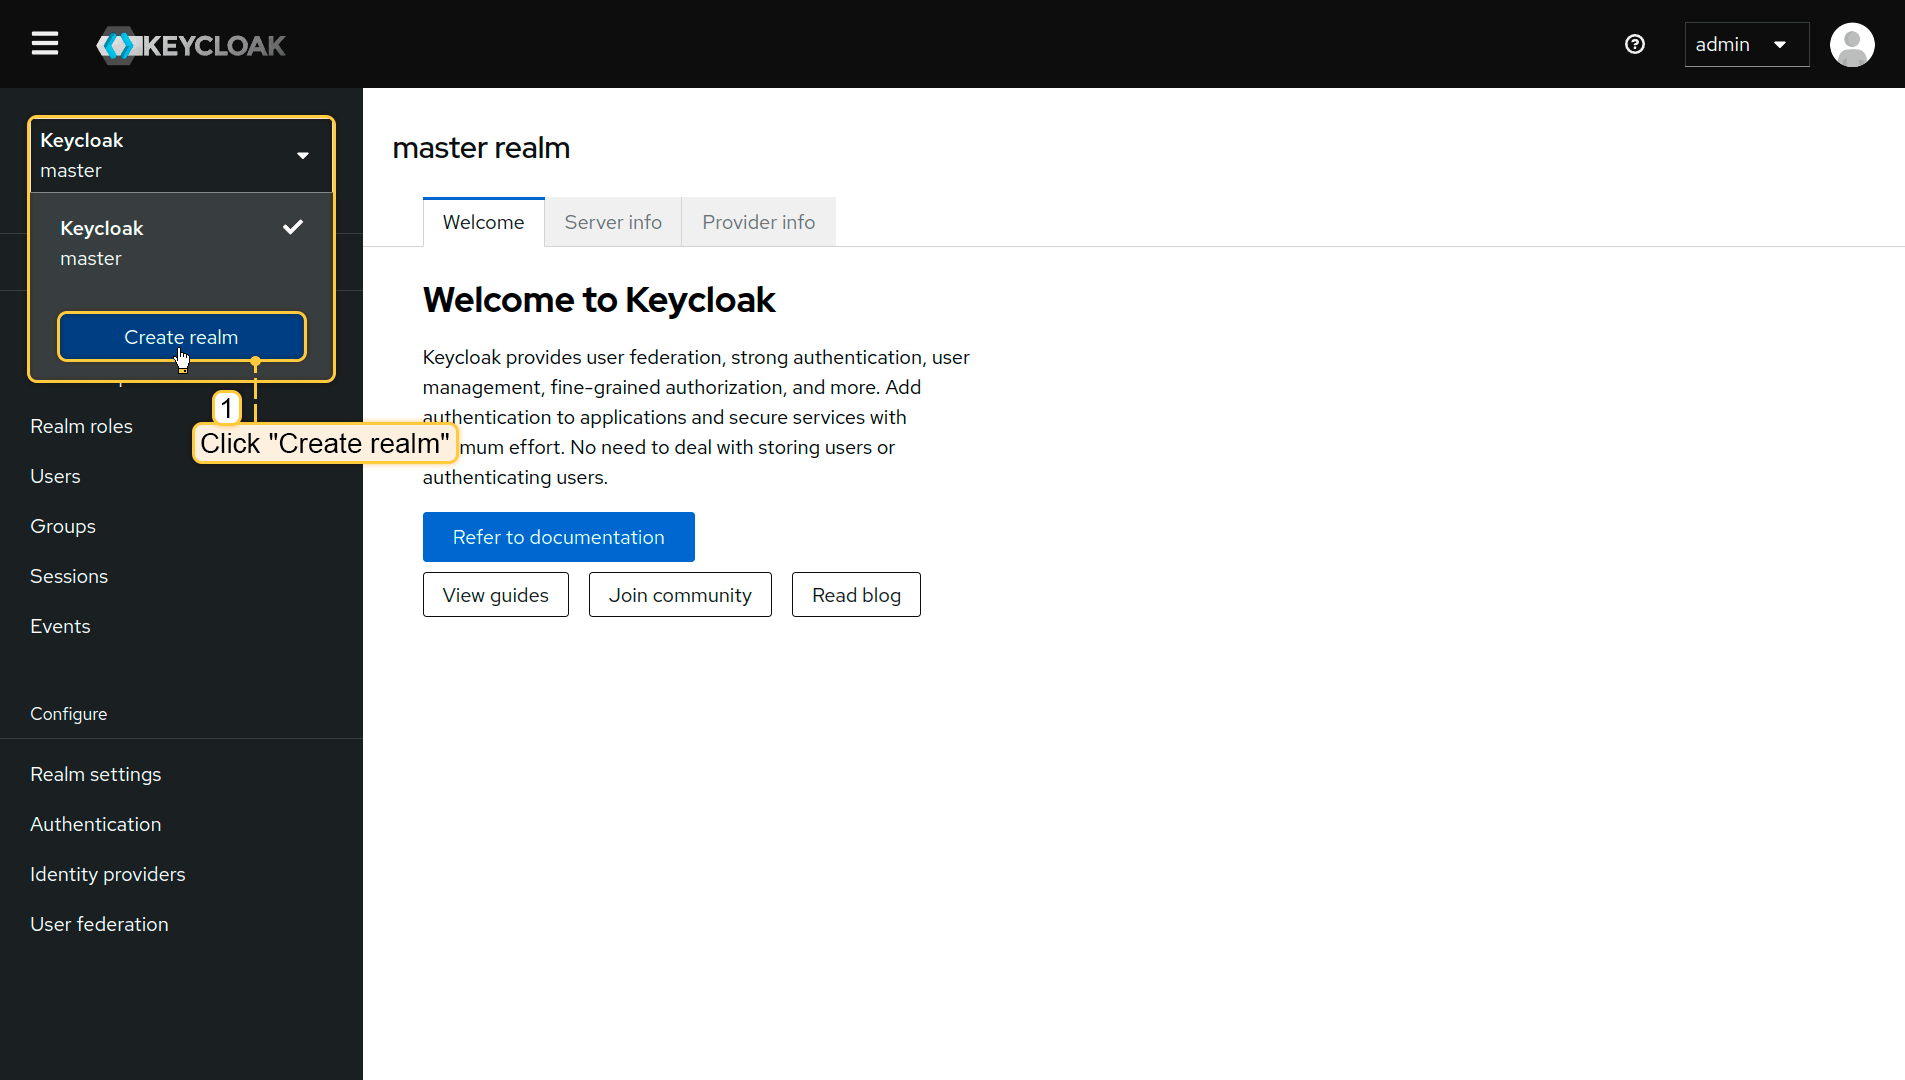
Create a realm
A realm is a Keycloak “workspace” where you manage applications and users.
- Click the realm selector (default: master).
- Click Create realm.
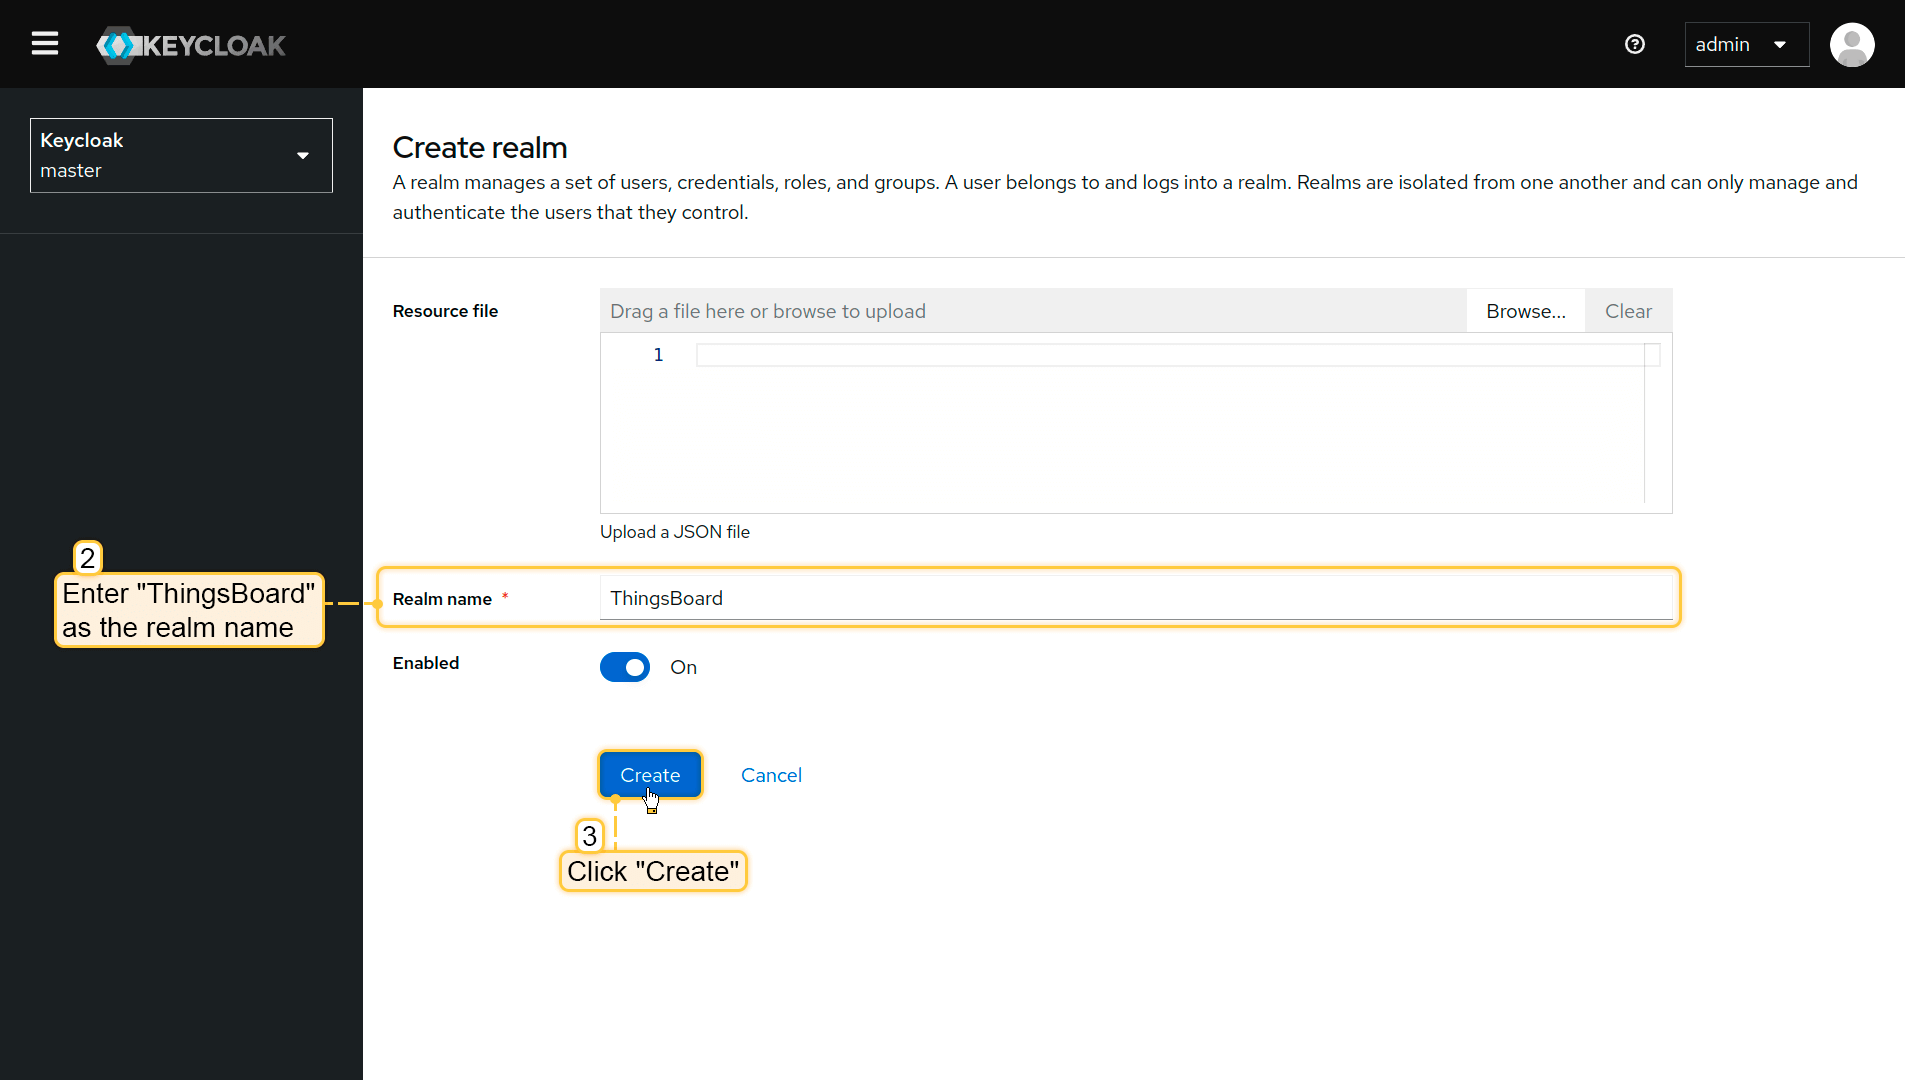
- Set realm name to ThingsBoard.
- Click Create.
Create a new client
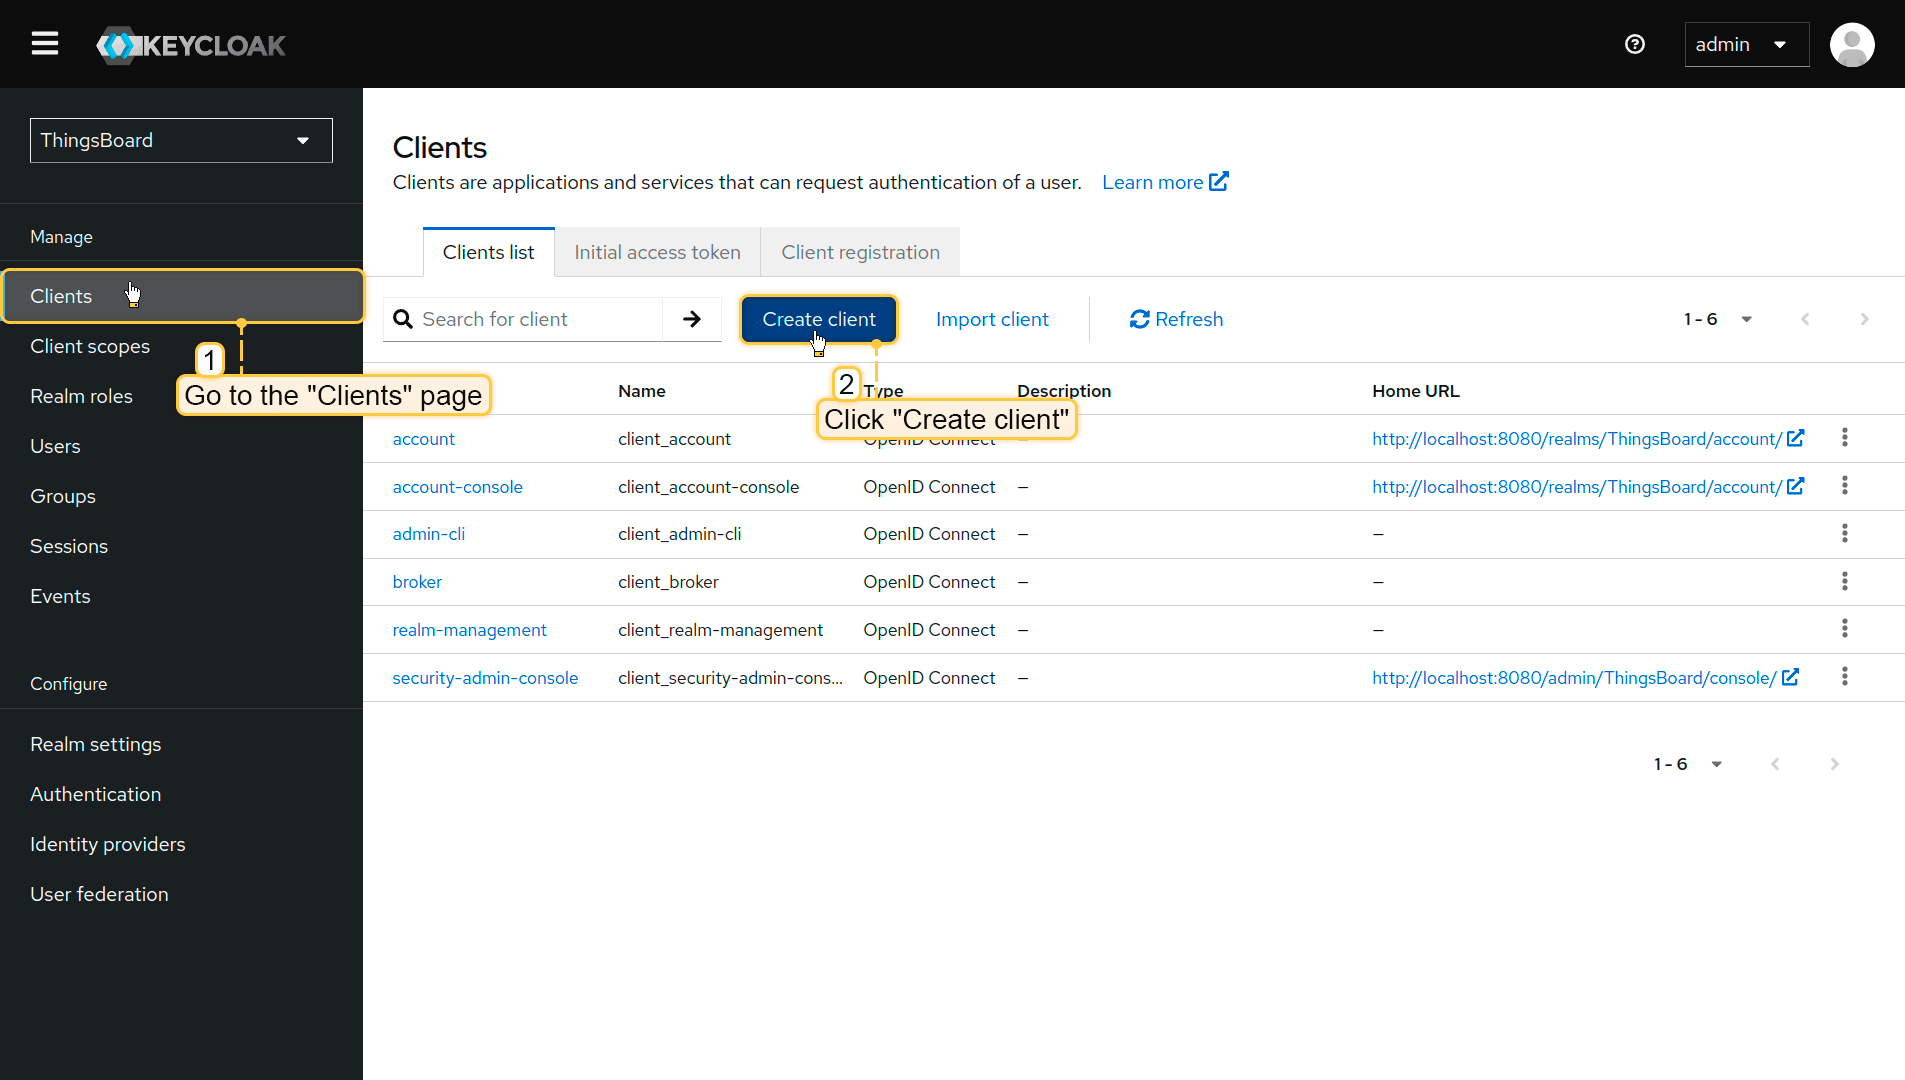
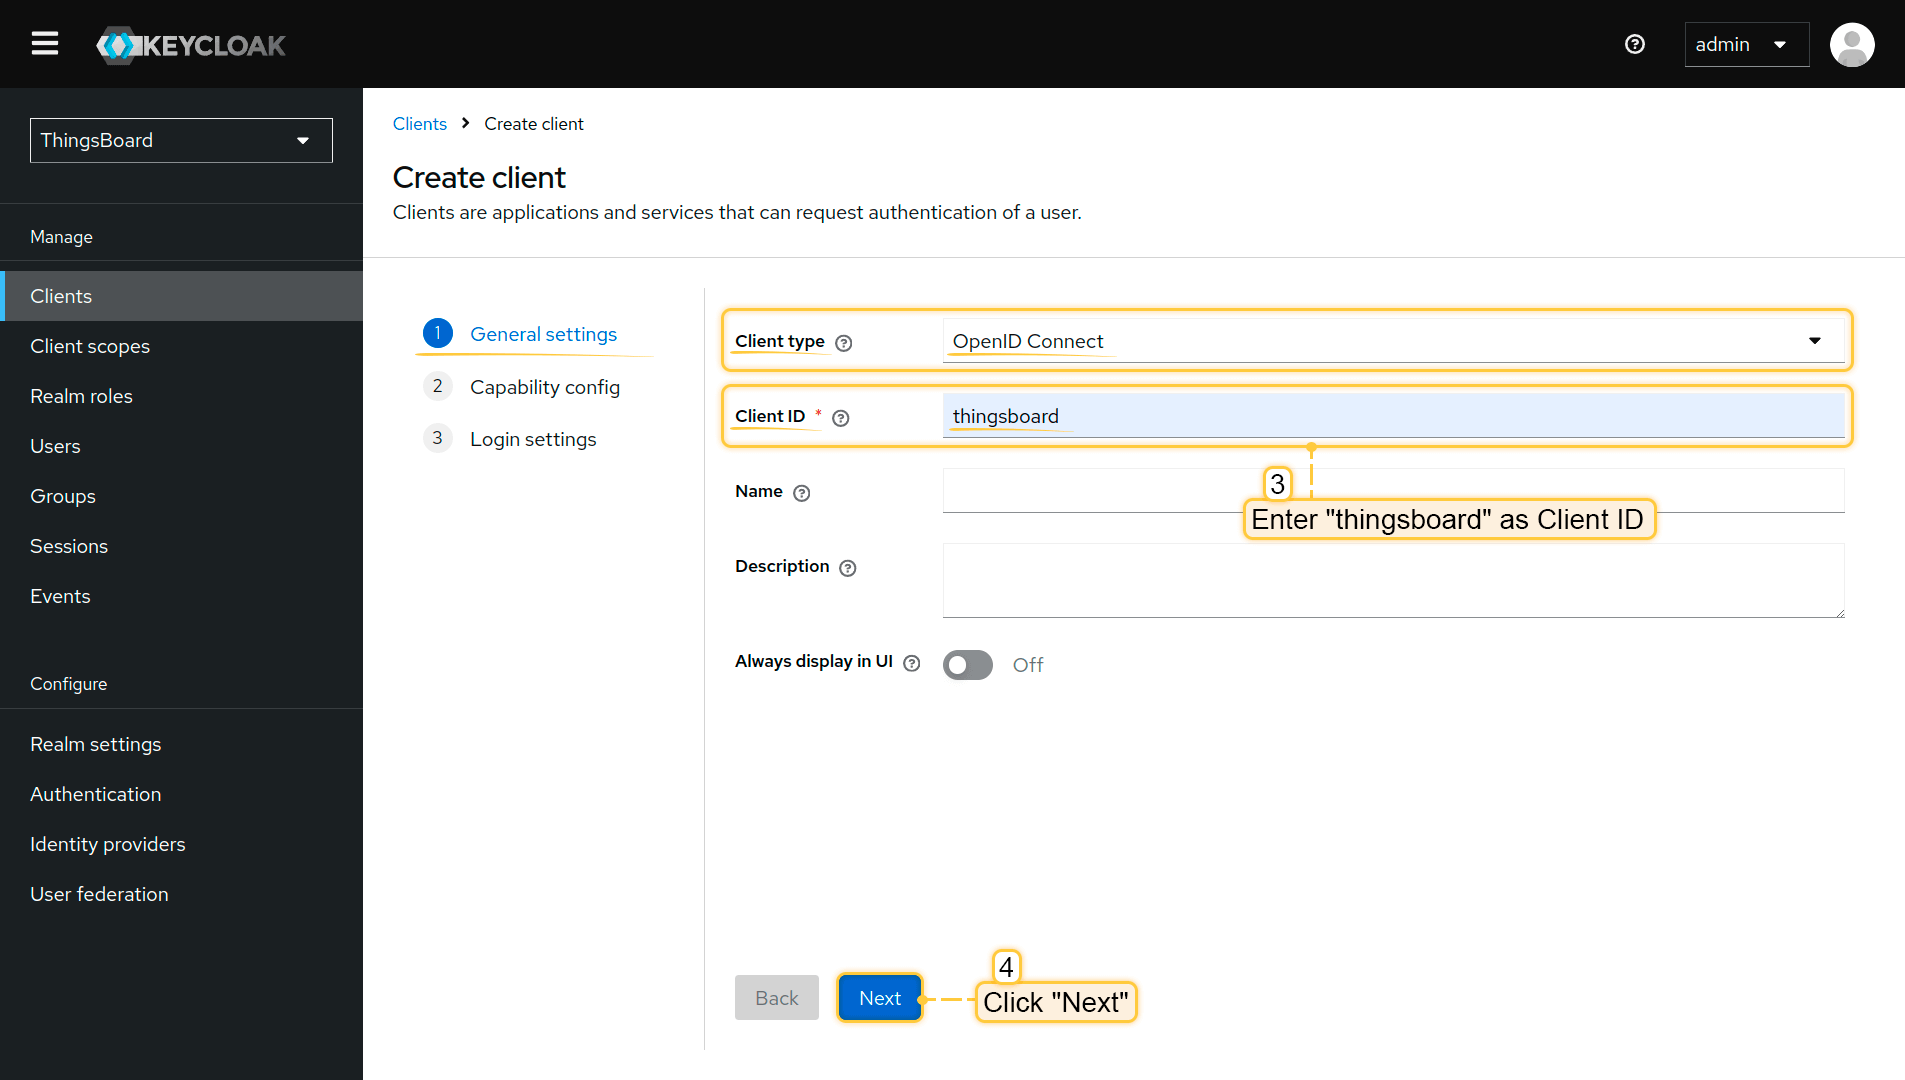
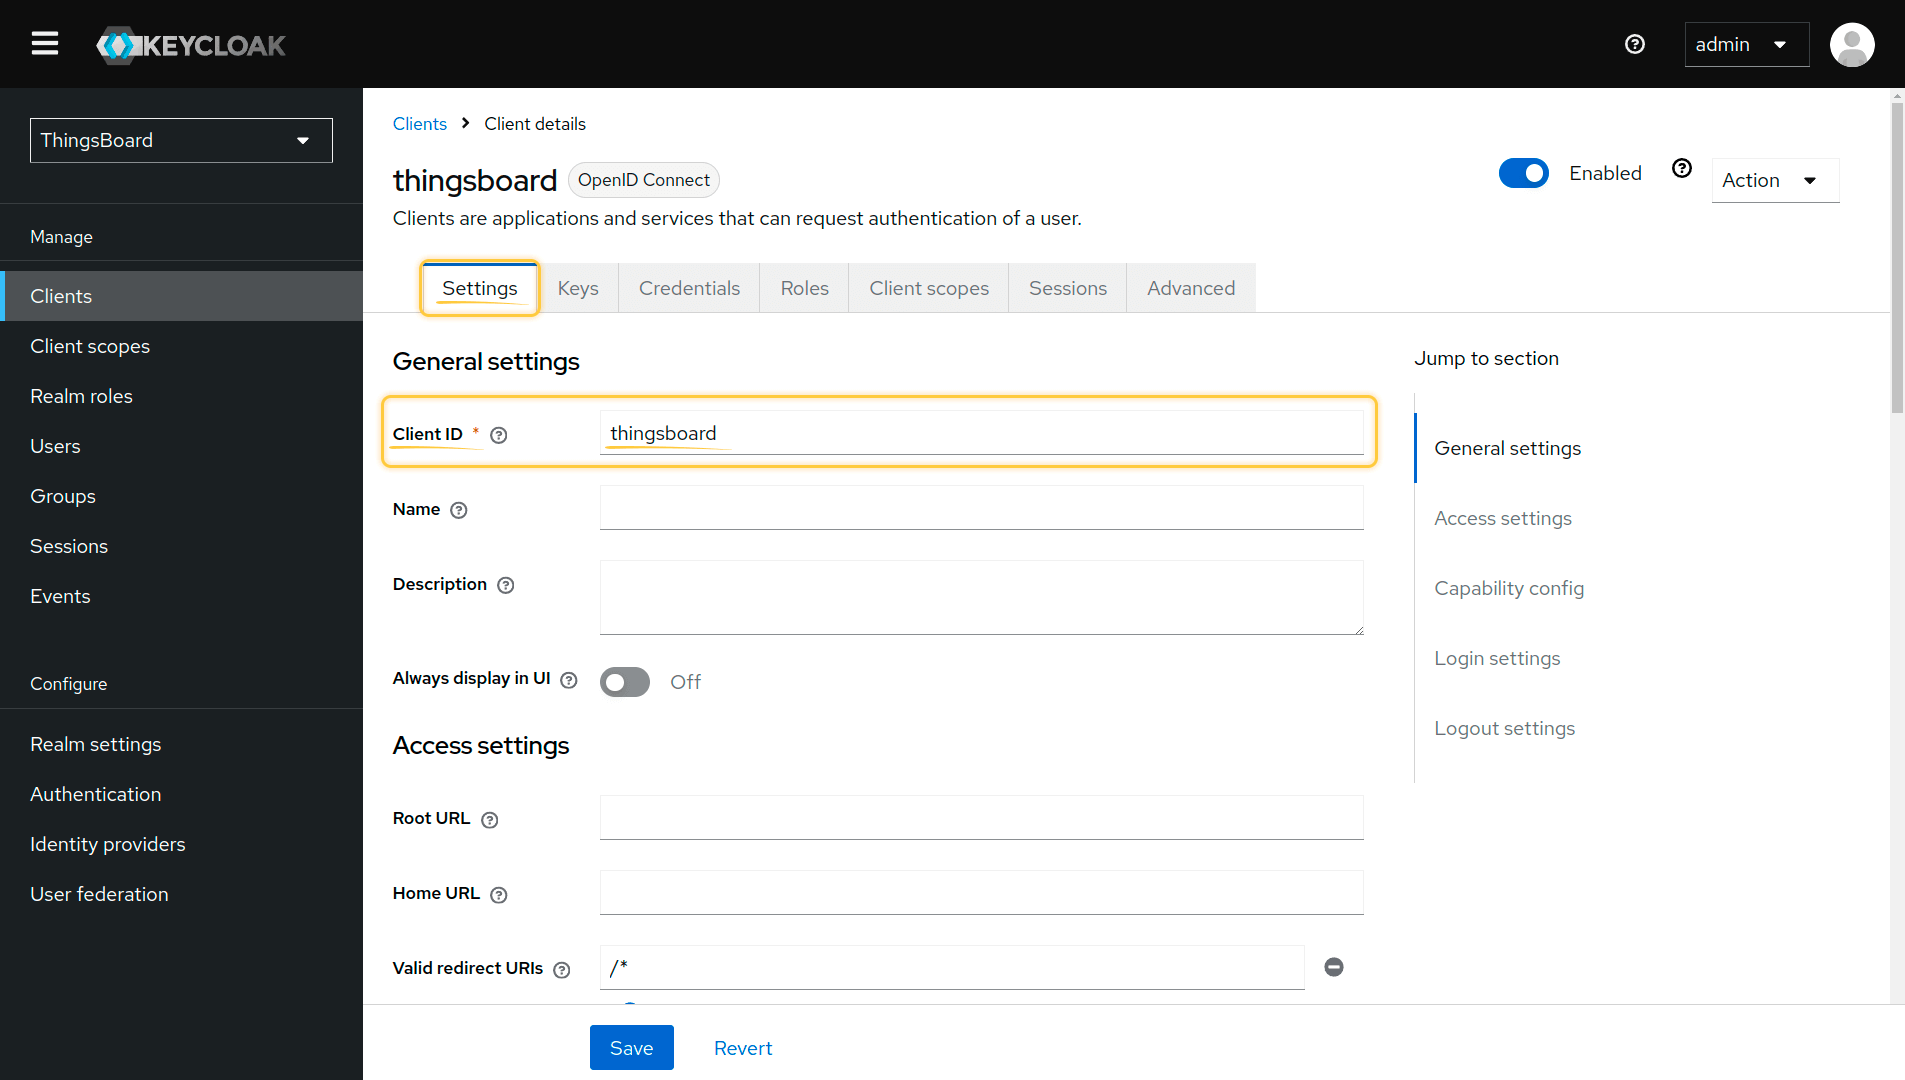
A client represents ThingsBoard as an application that uses Keycloak for authentication.
- Navigate to Clients and click Create client.
- Set client ID to thingsboard.
- Client type: OpenID Connect.
- Click Next.
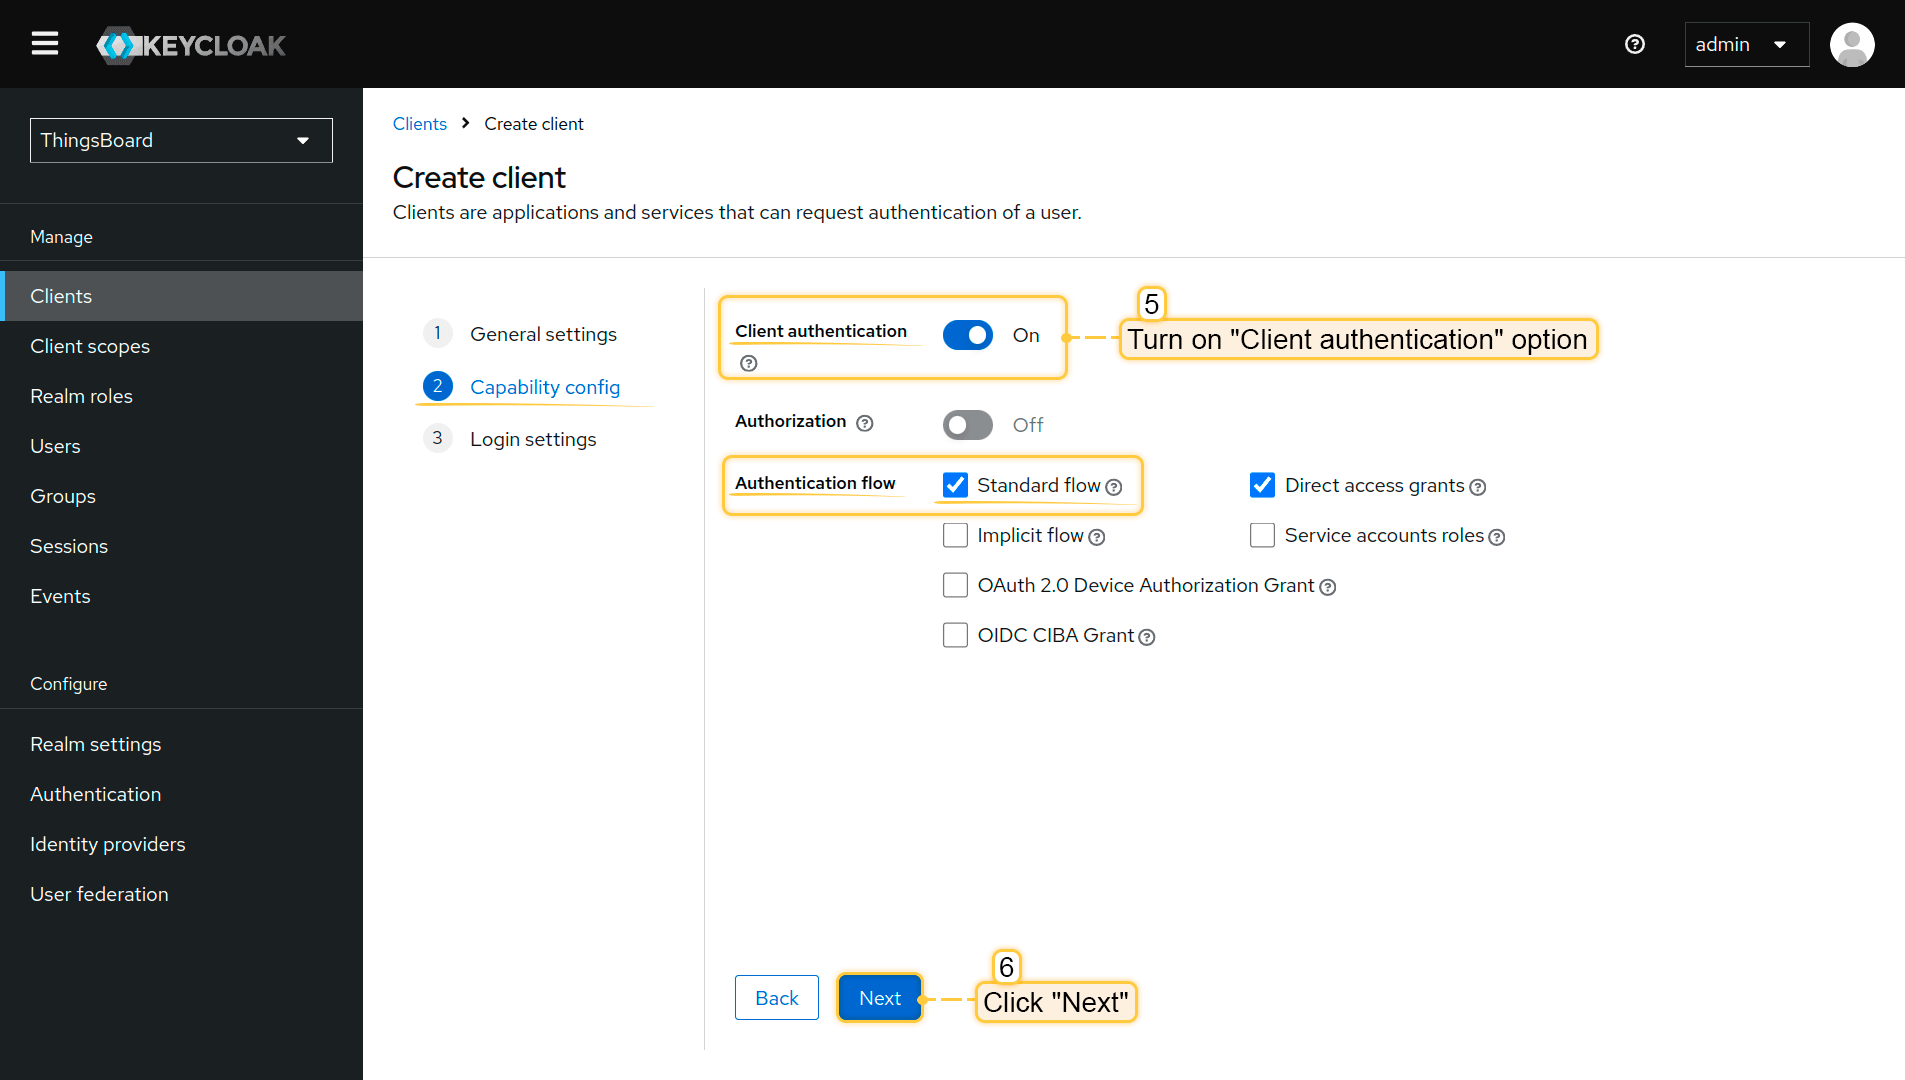
- Enable Client authentication.
- Ensure Standard flow is enabled.
- Click Next.
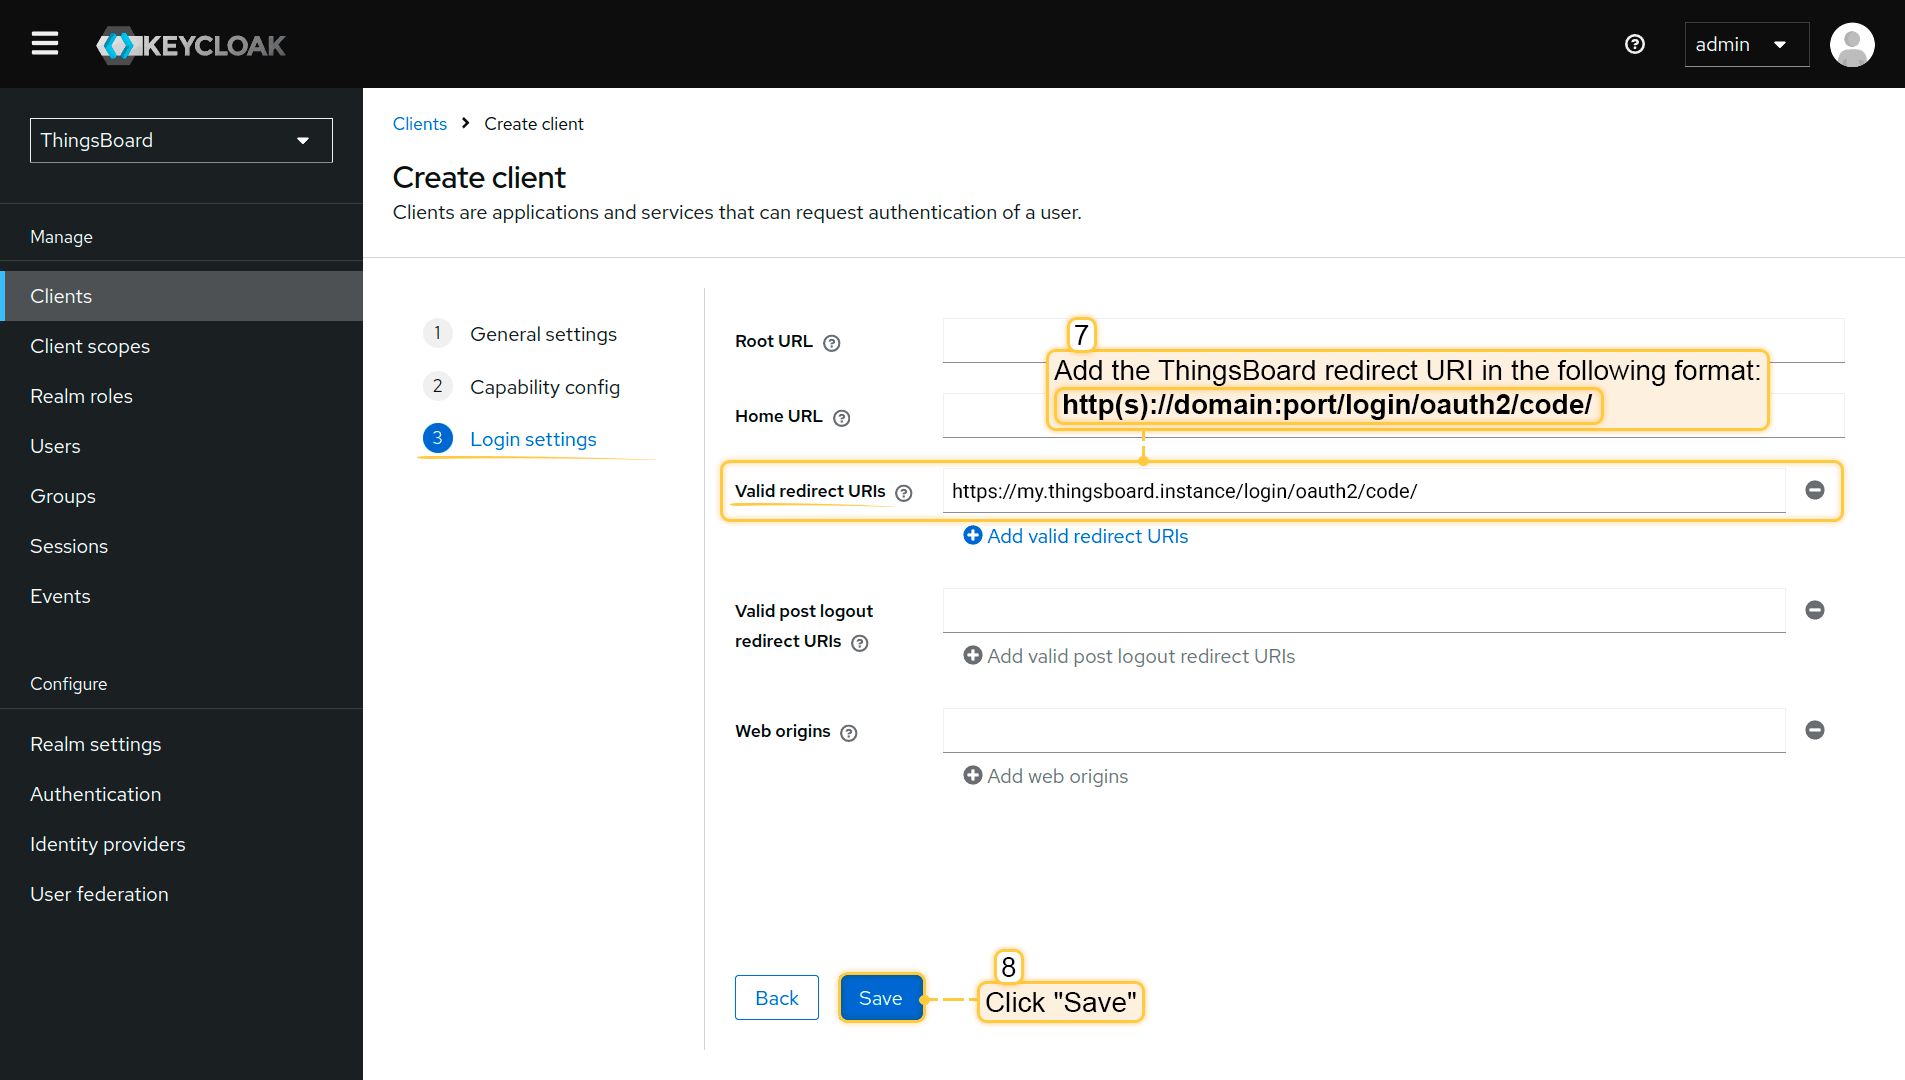
- In Login settings, add the ThingsBoard redirect URI:
1
http(s)://$DOMAIN:$PORT/login/oauth2/code/
Where:
• $DOMAIN is the ThingsBoard hostname (or IP address)
• $PORT is the HTTP/HTTPS port of the ThingsBoard instance
Example:
1
https://my.thingsboard.instance/login/oauth2/code/
- Click Save.
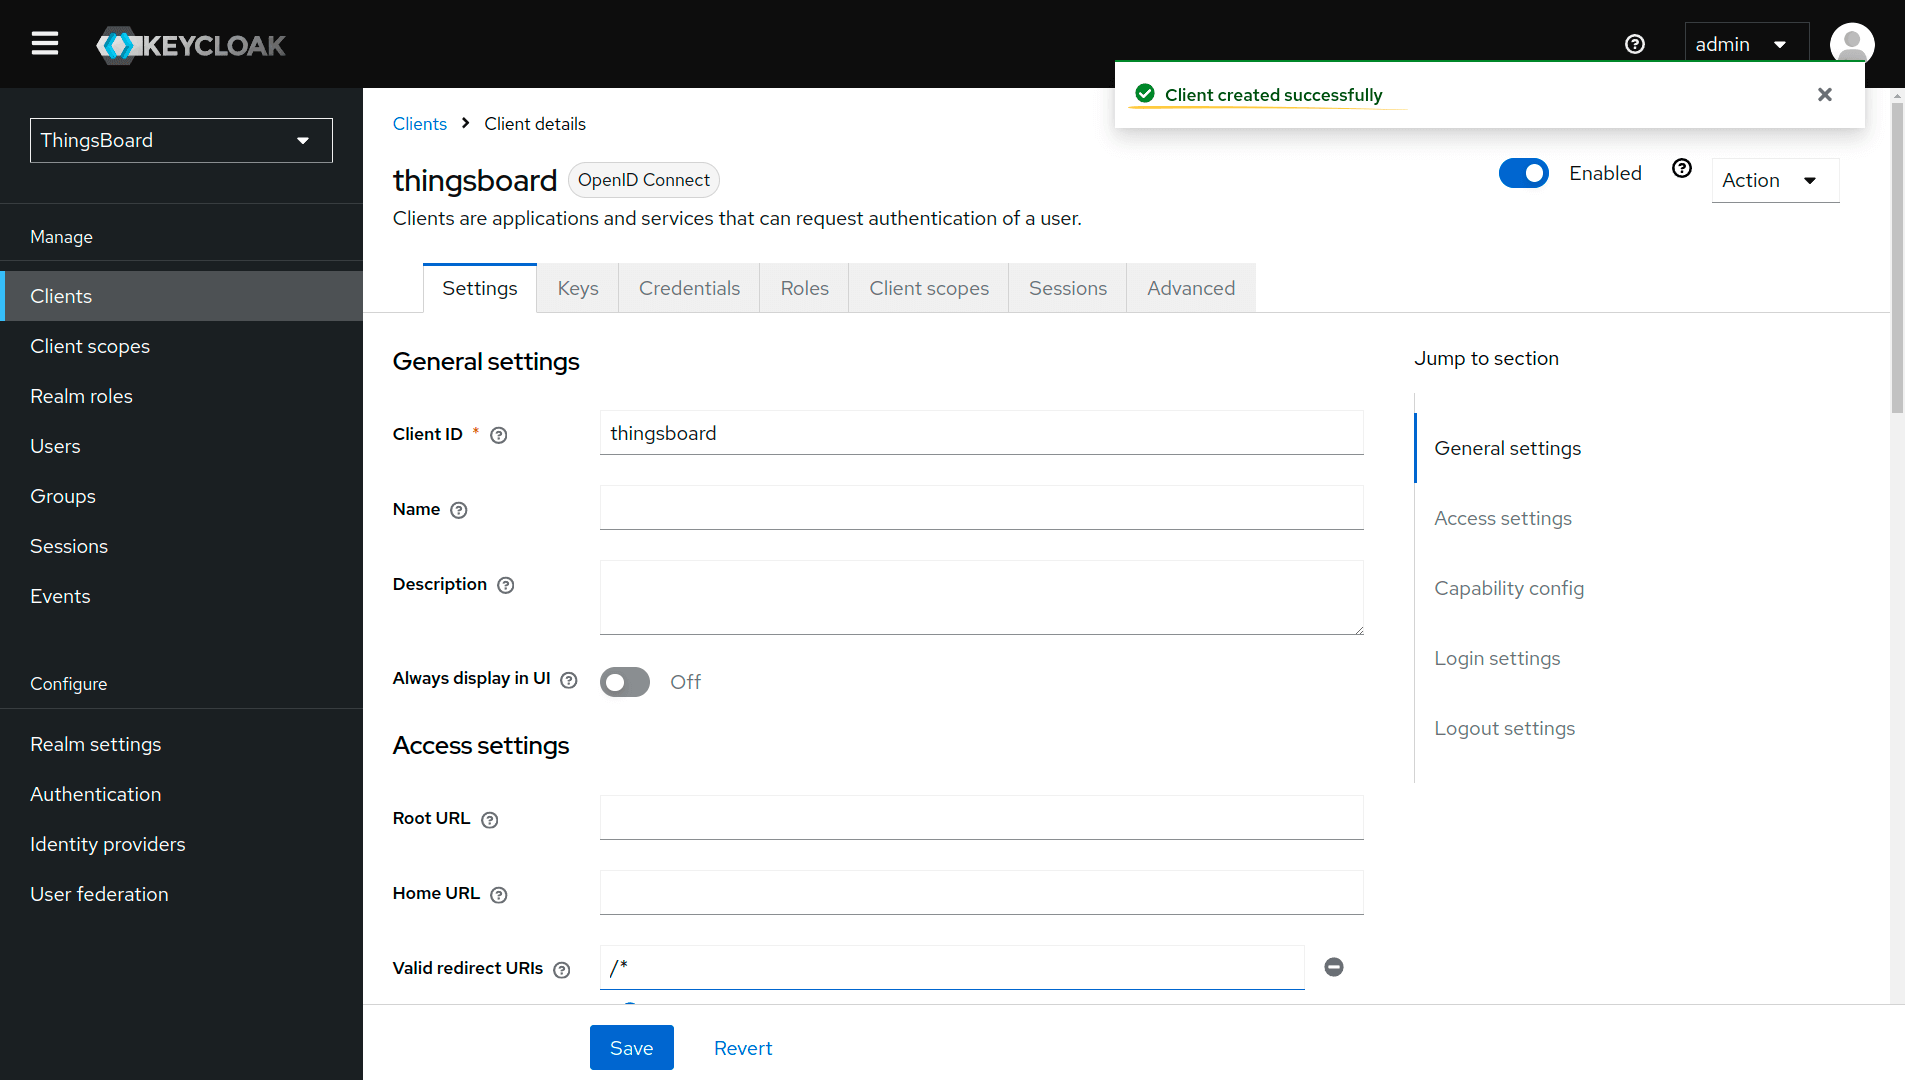
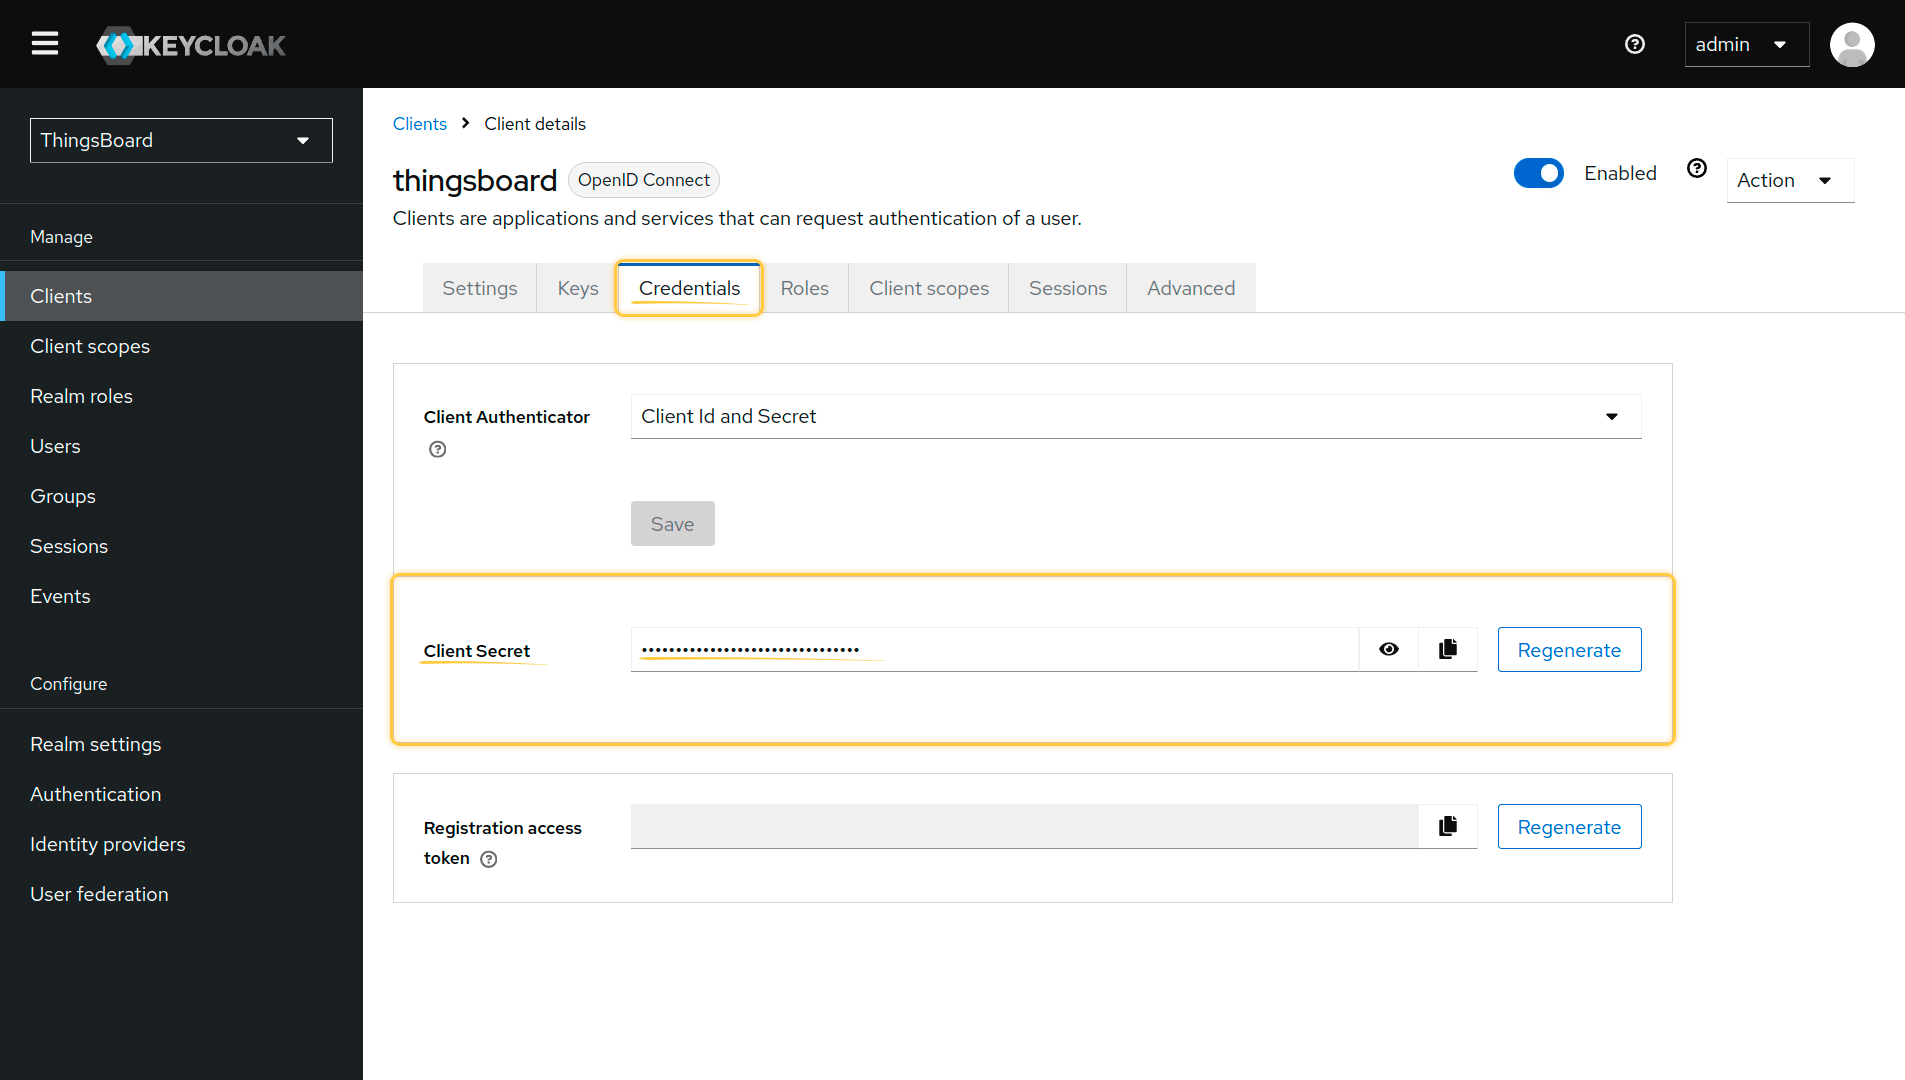
After the client is created, copy the credentials:
- Client ID: available on the Settings tab
- Client Secret: available on the Credentials tab
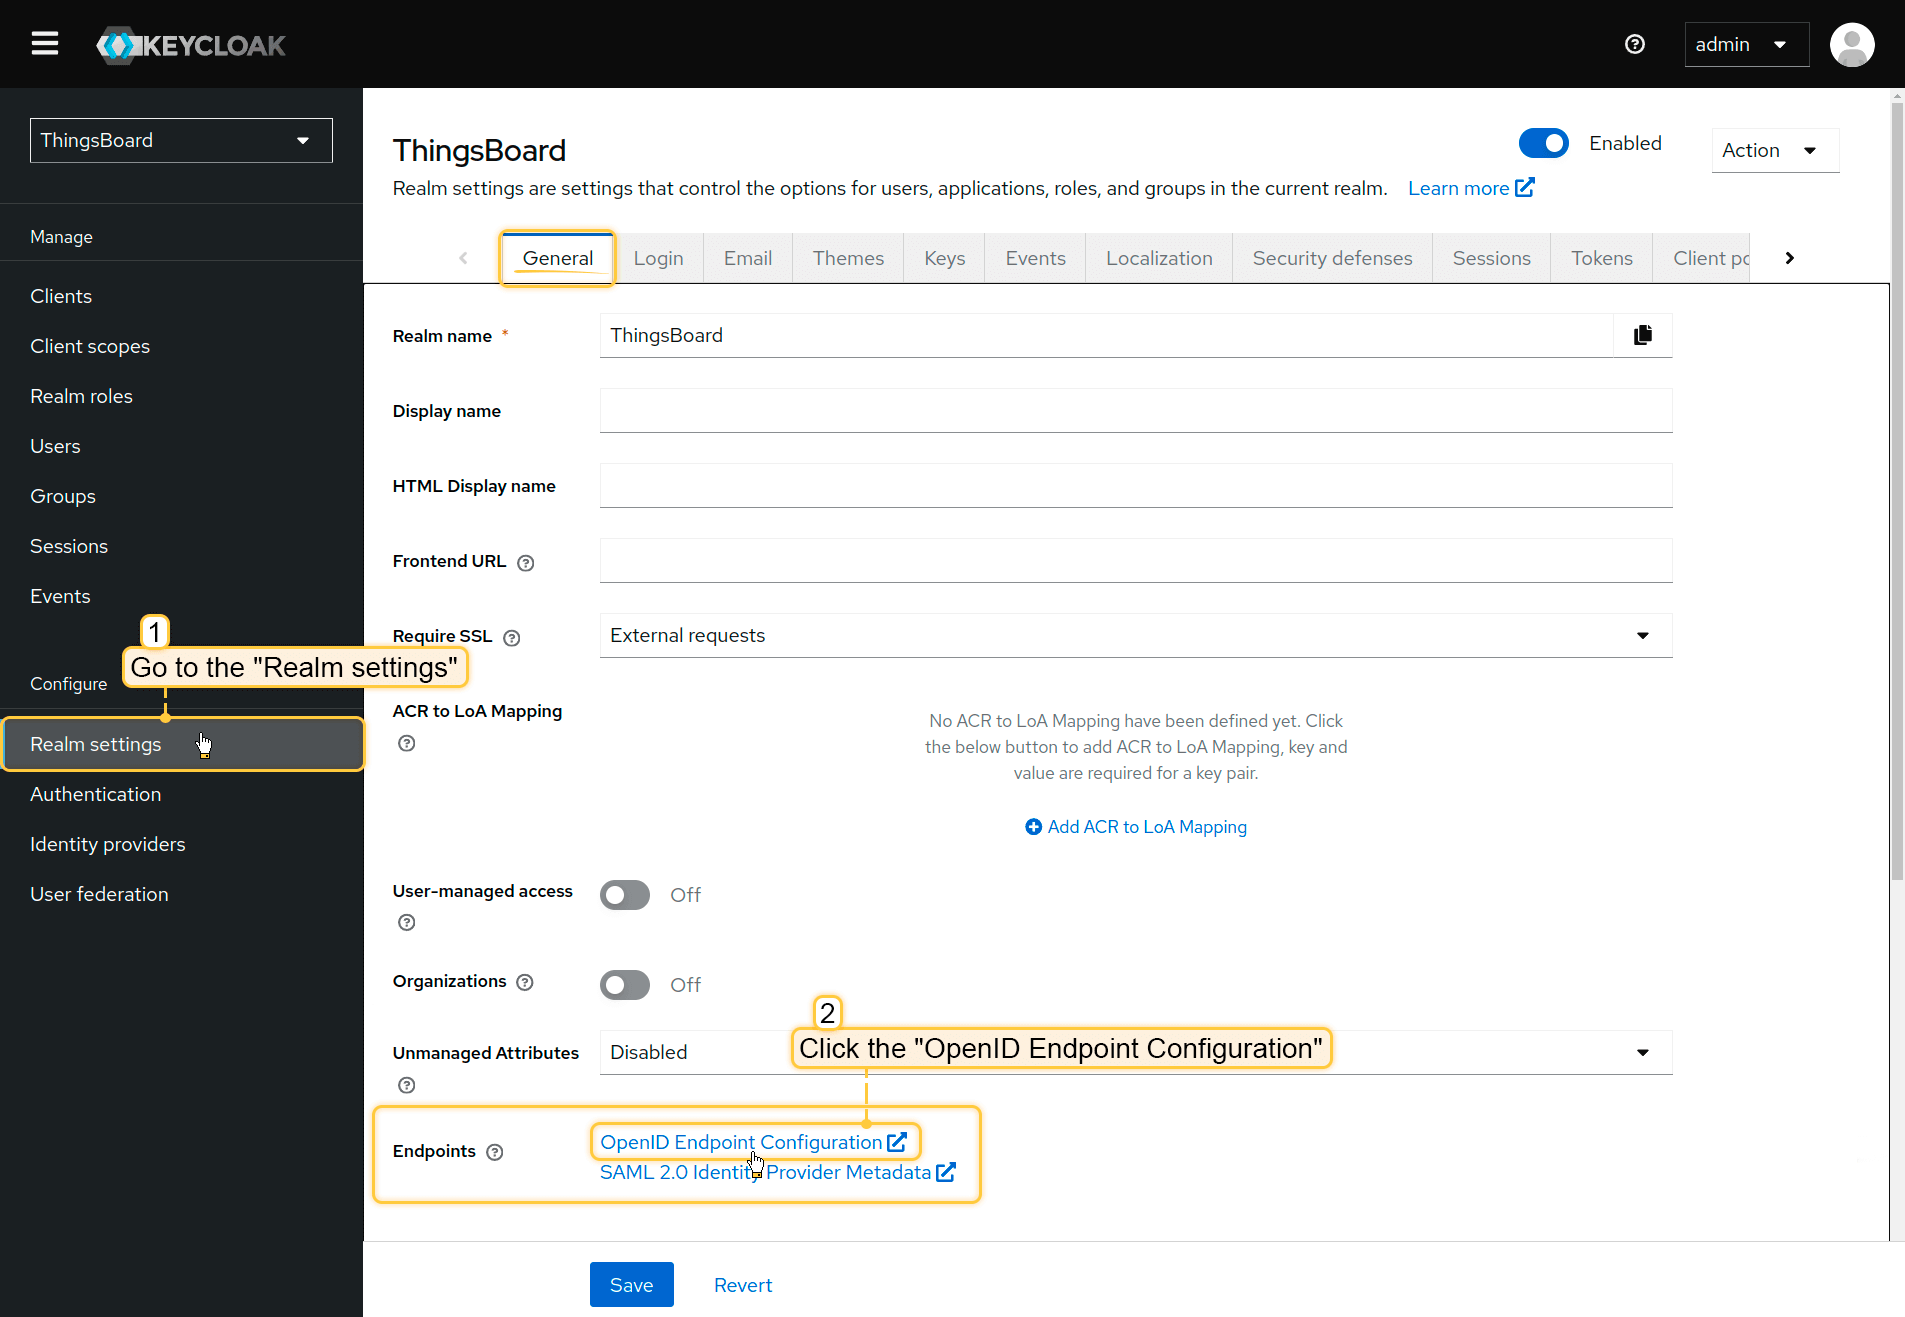
Endpoints
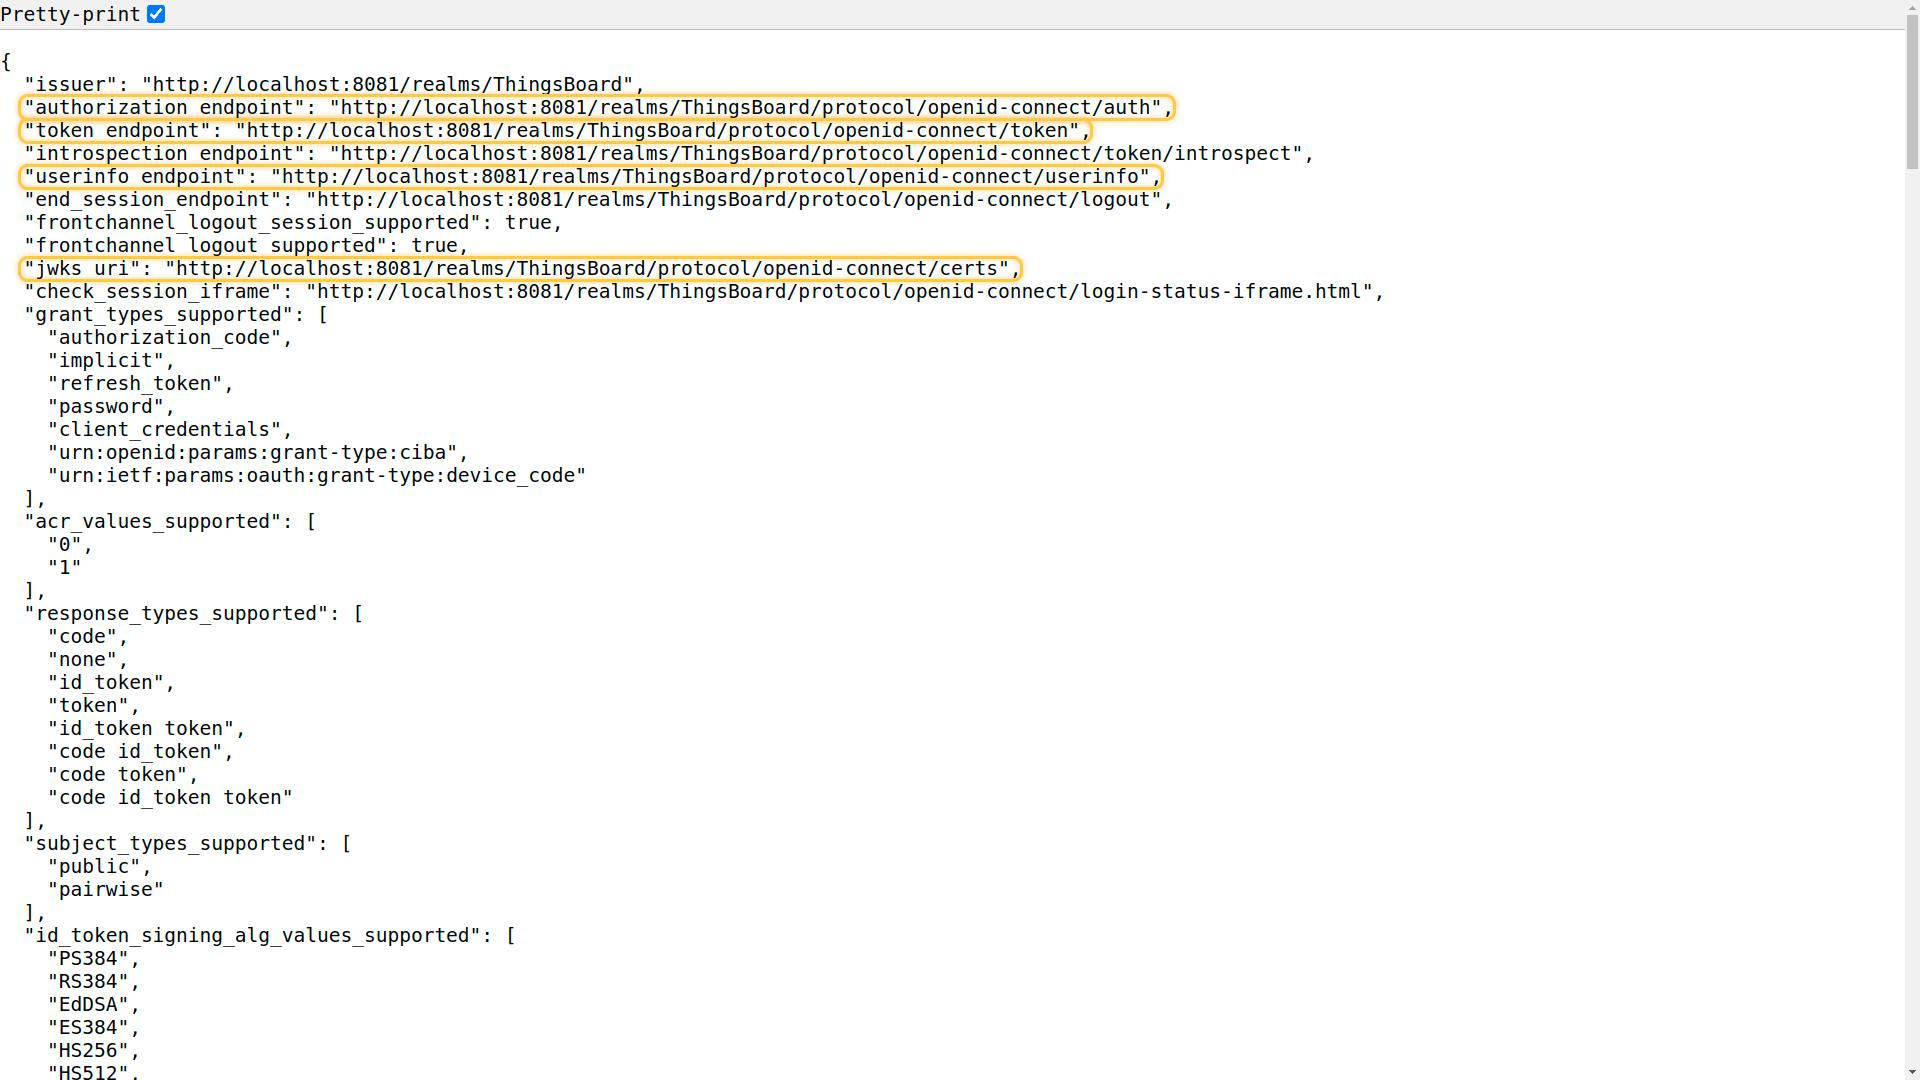
ThingsBoard requires Keycloak endpoints for the OAuth 2.0 client configuration. The easiest way to obtain them is from the OpenID Connect discovery document.
- Navigate to Realm settings.
- Find and open OpenID Endpoint Configuration.
- Enable Pretty-print for better readability.
From this document, copy the following endpoints:
- Authorization endpoint
- Token endpoint
- UserInfo endpoint
- JWKS endpoint
For details about the available endpoints, refer to the Keycloak documentation: OIDC layers.
Create a user
Only users created in Keycloak can authenticate via Keycloak.
To create a user:
- Navigate to Users.
- Click Create new user.
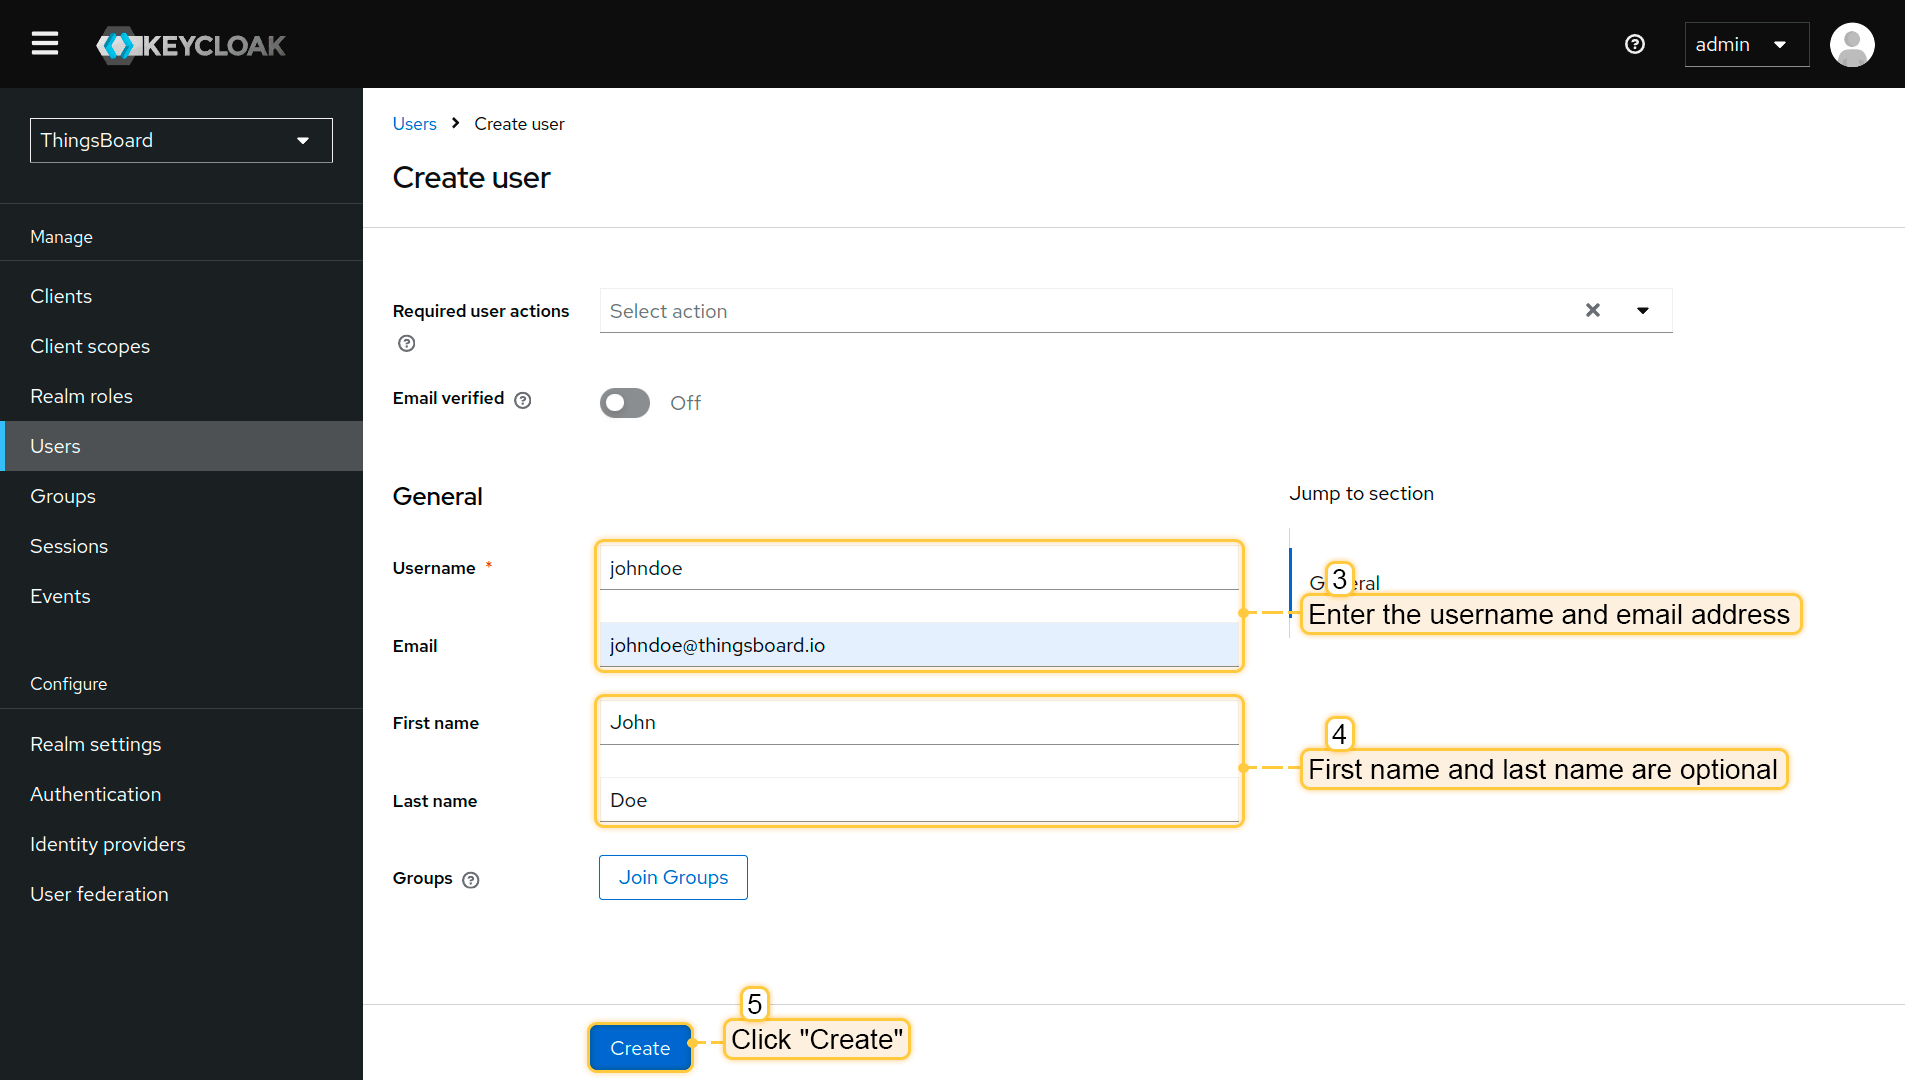
- Fill in username and email (first and last name are optional).
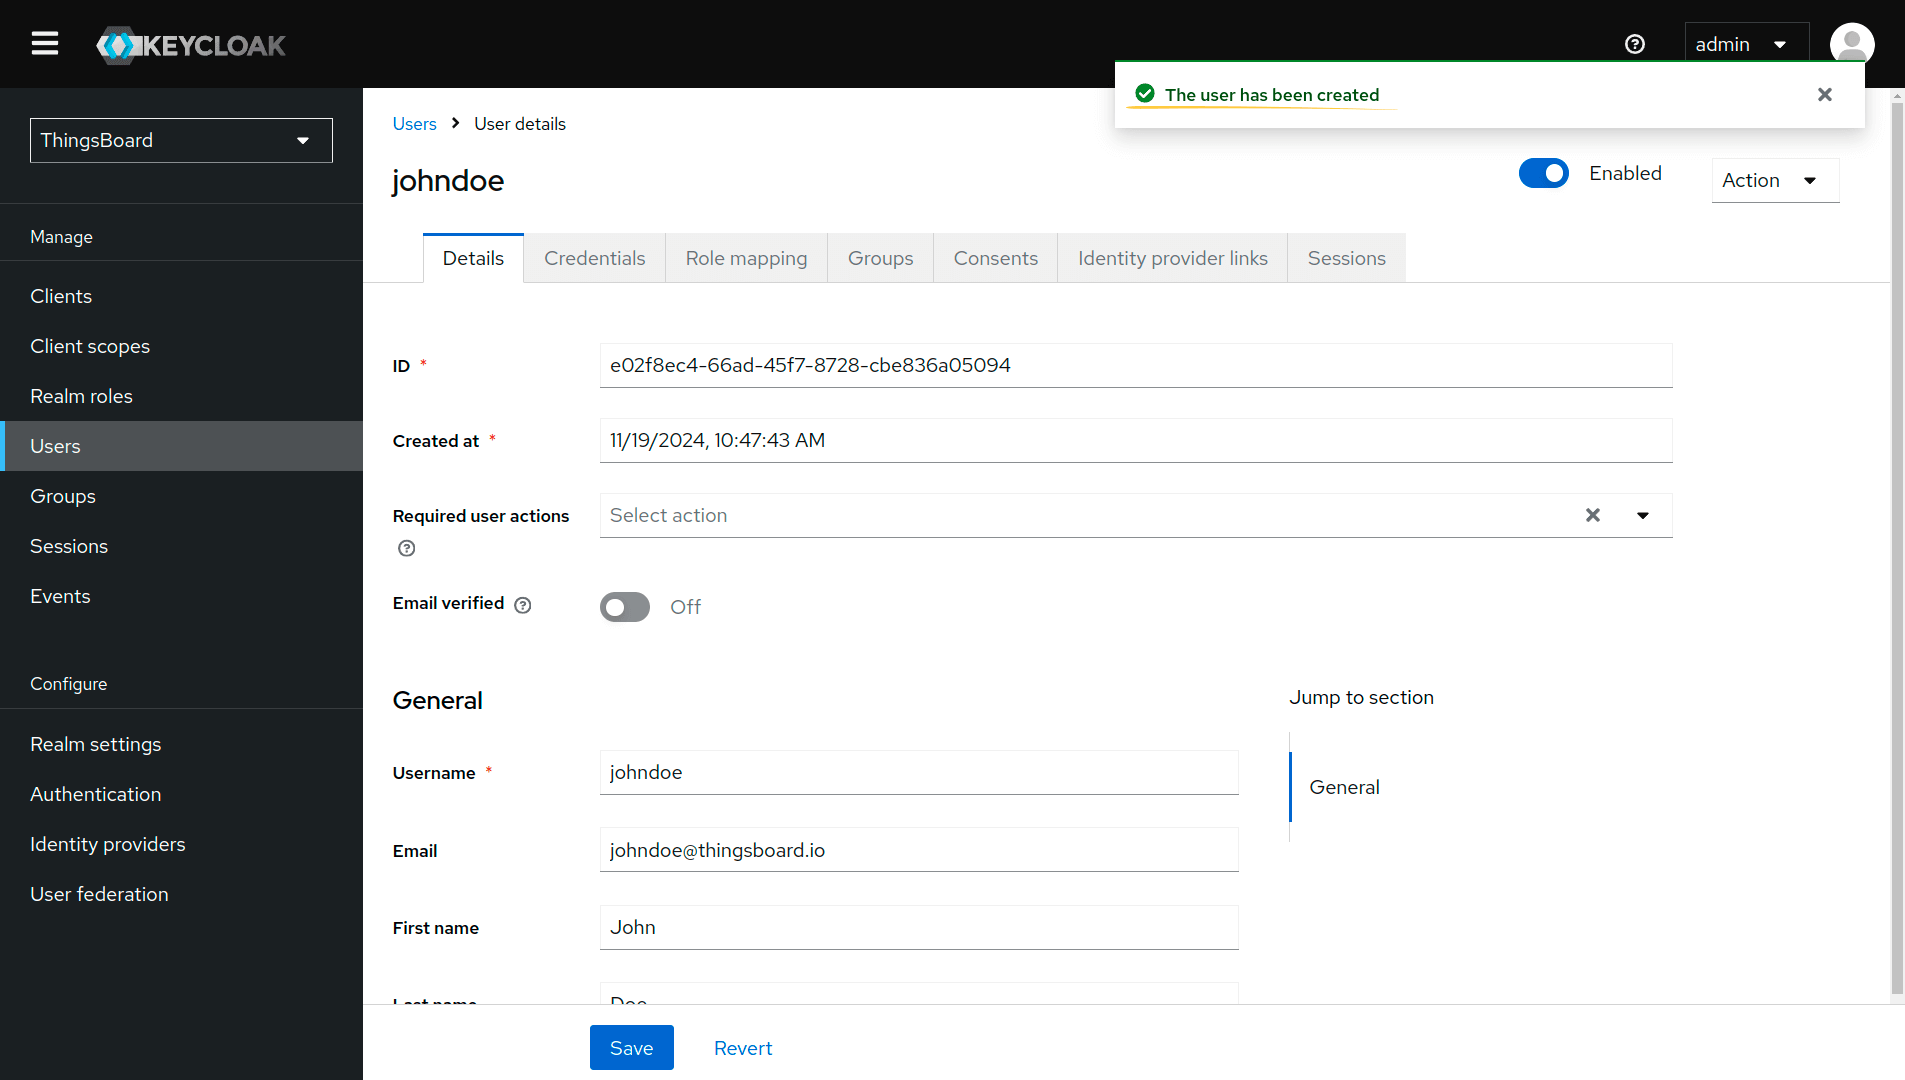
- Click Create

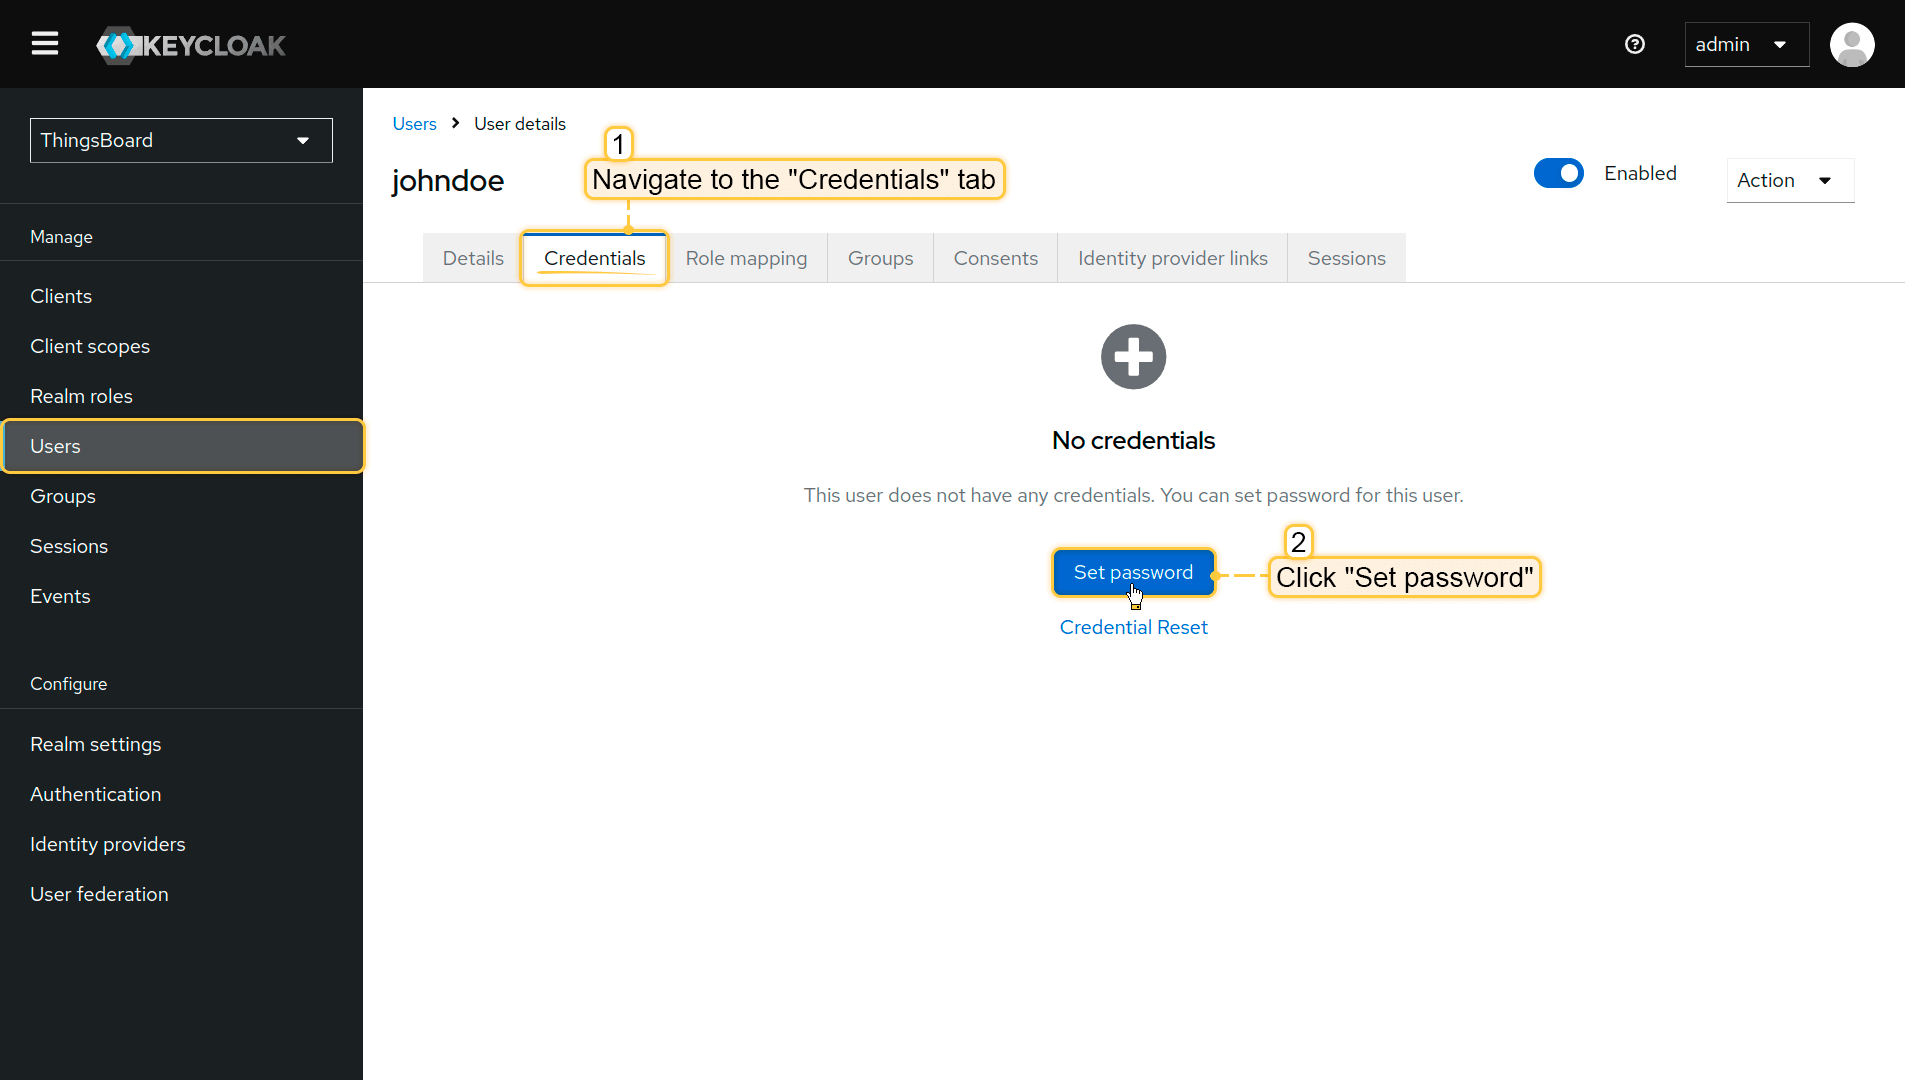
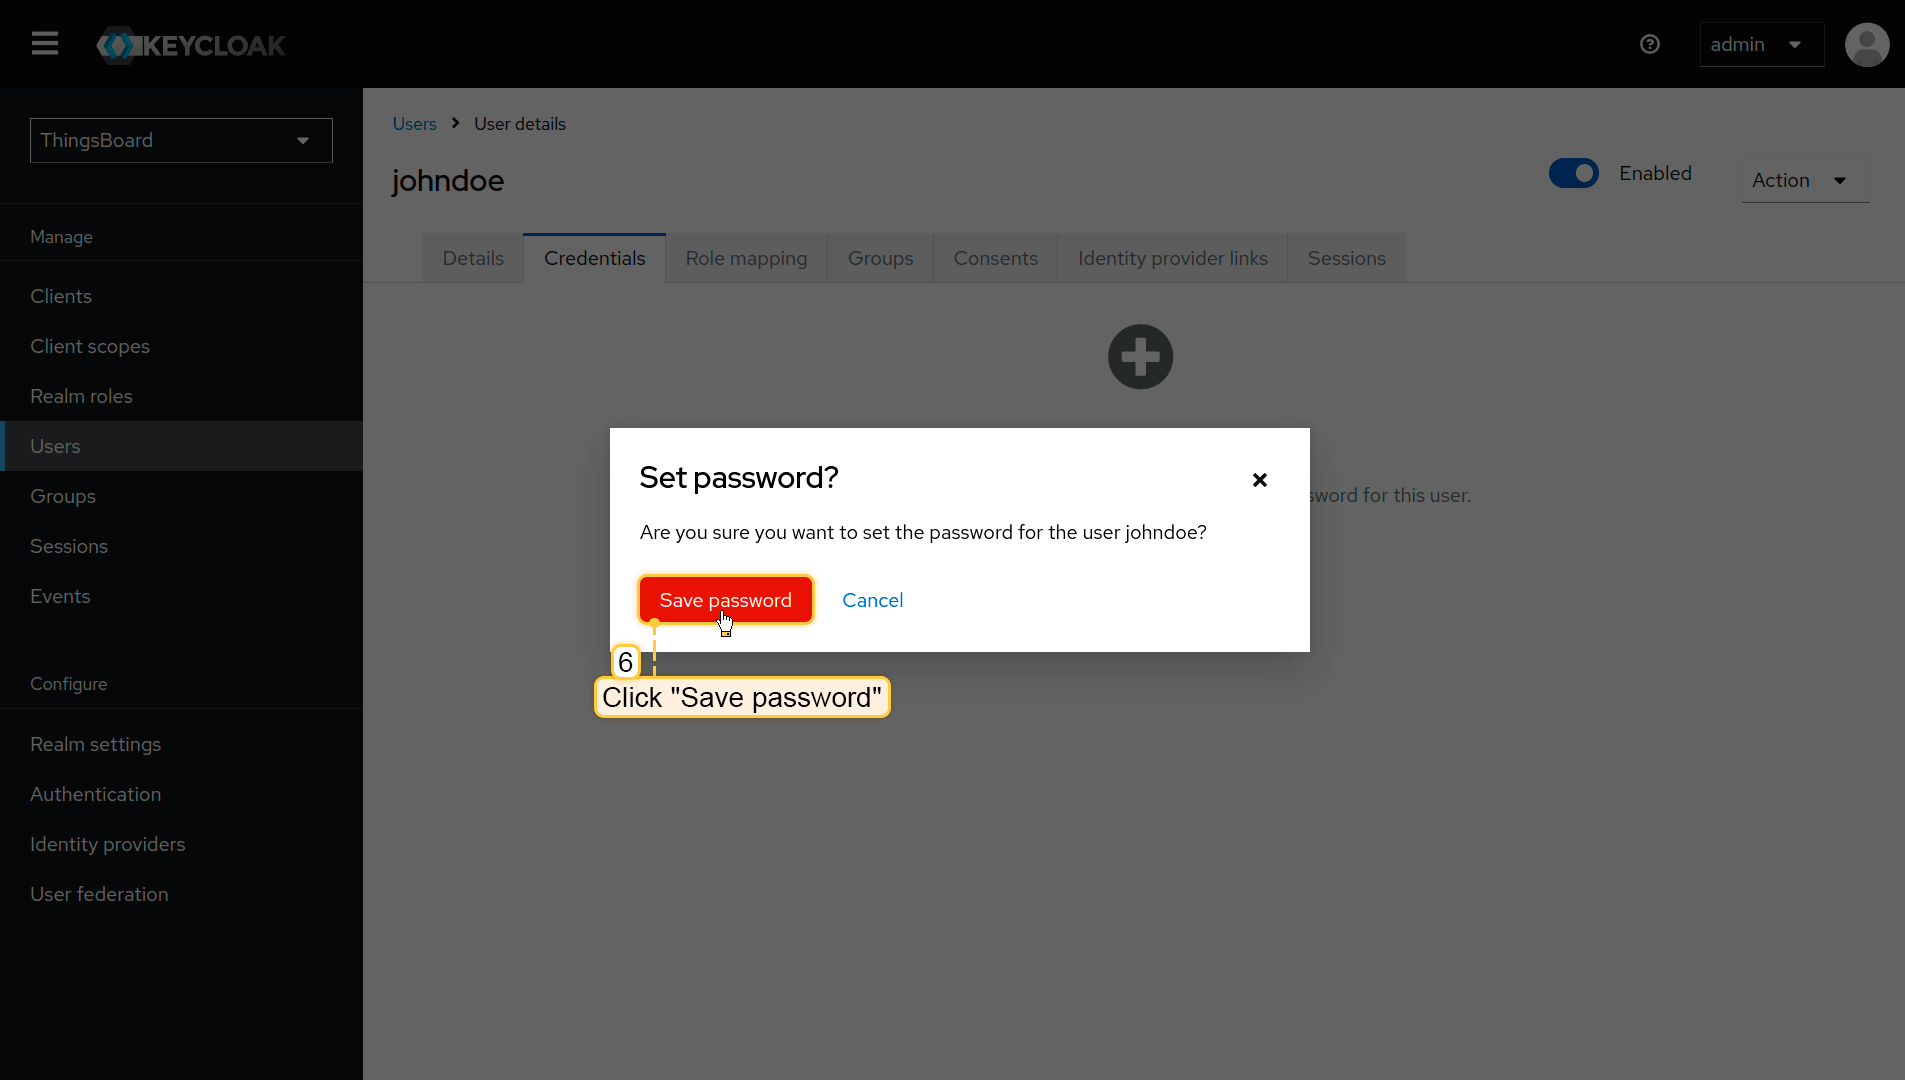
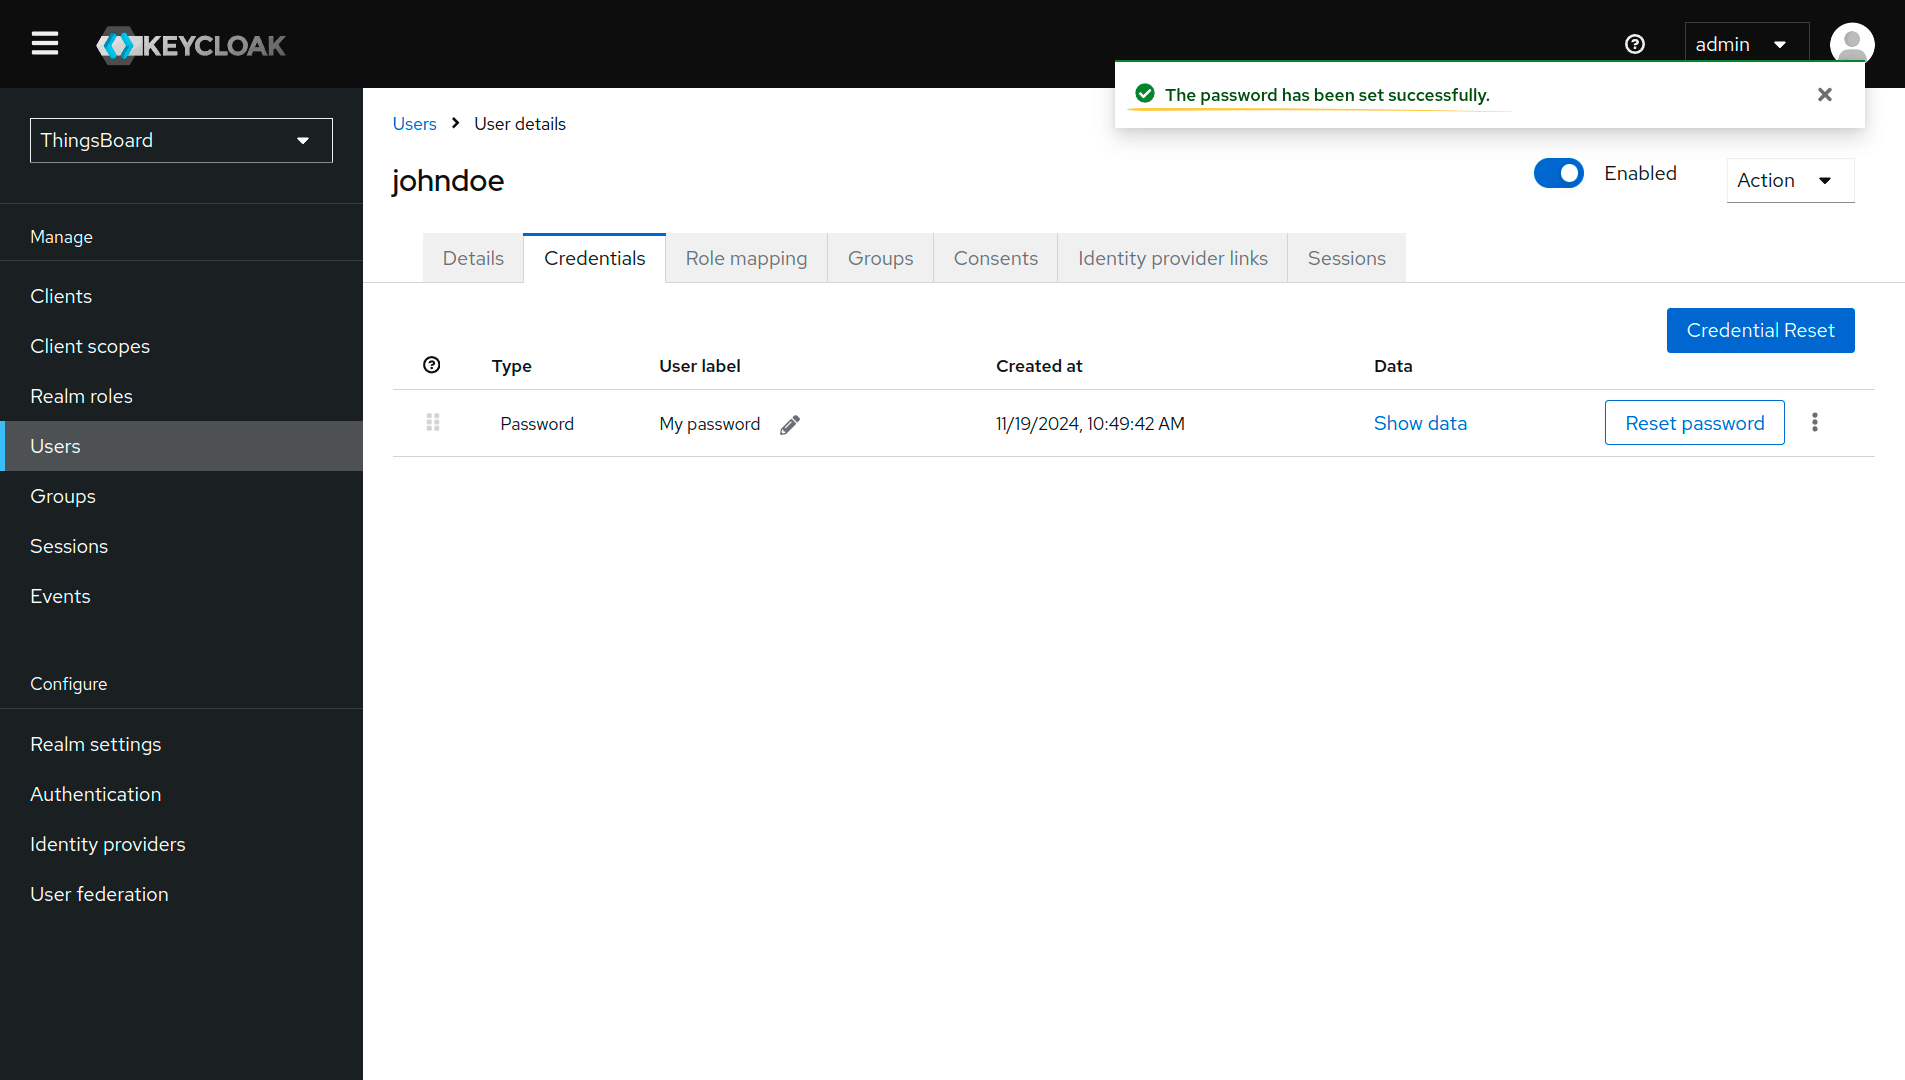
Set a password:
- Open the Credentials tab.
- Click Set password.
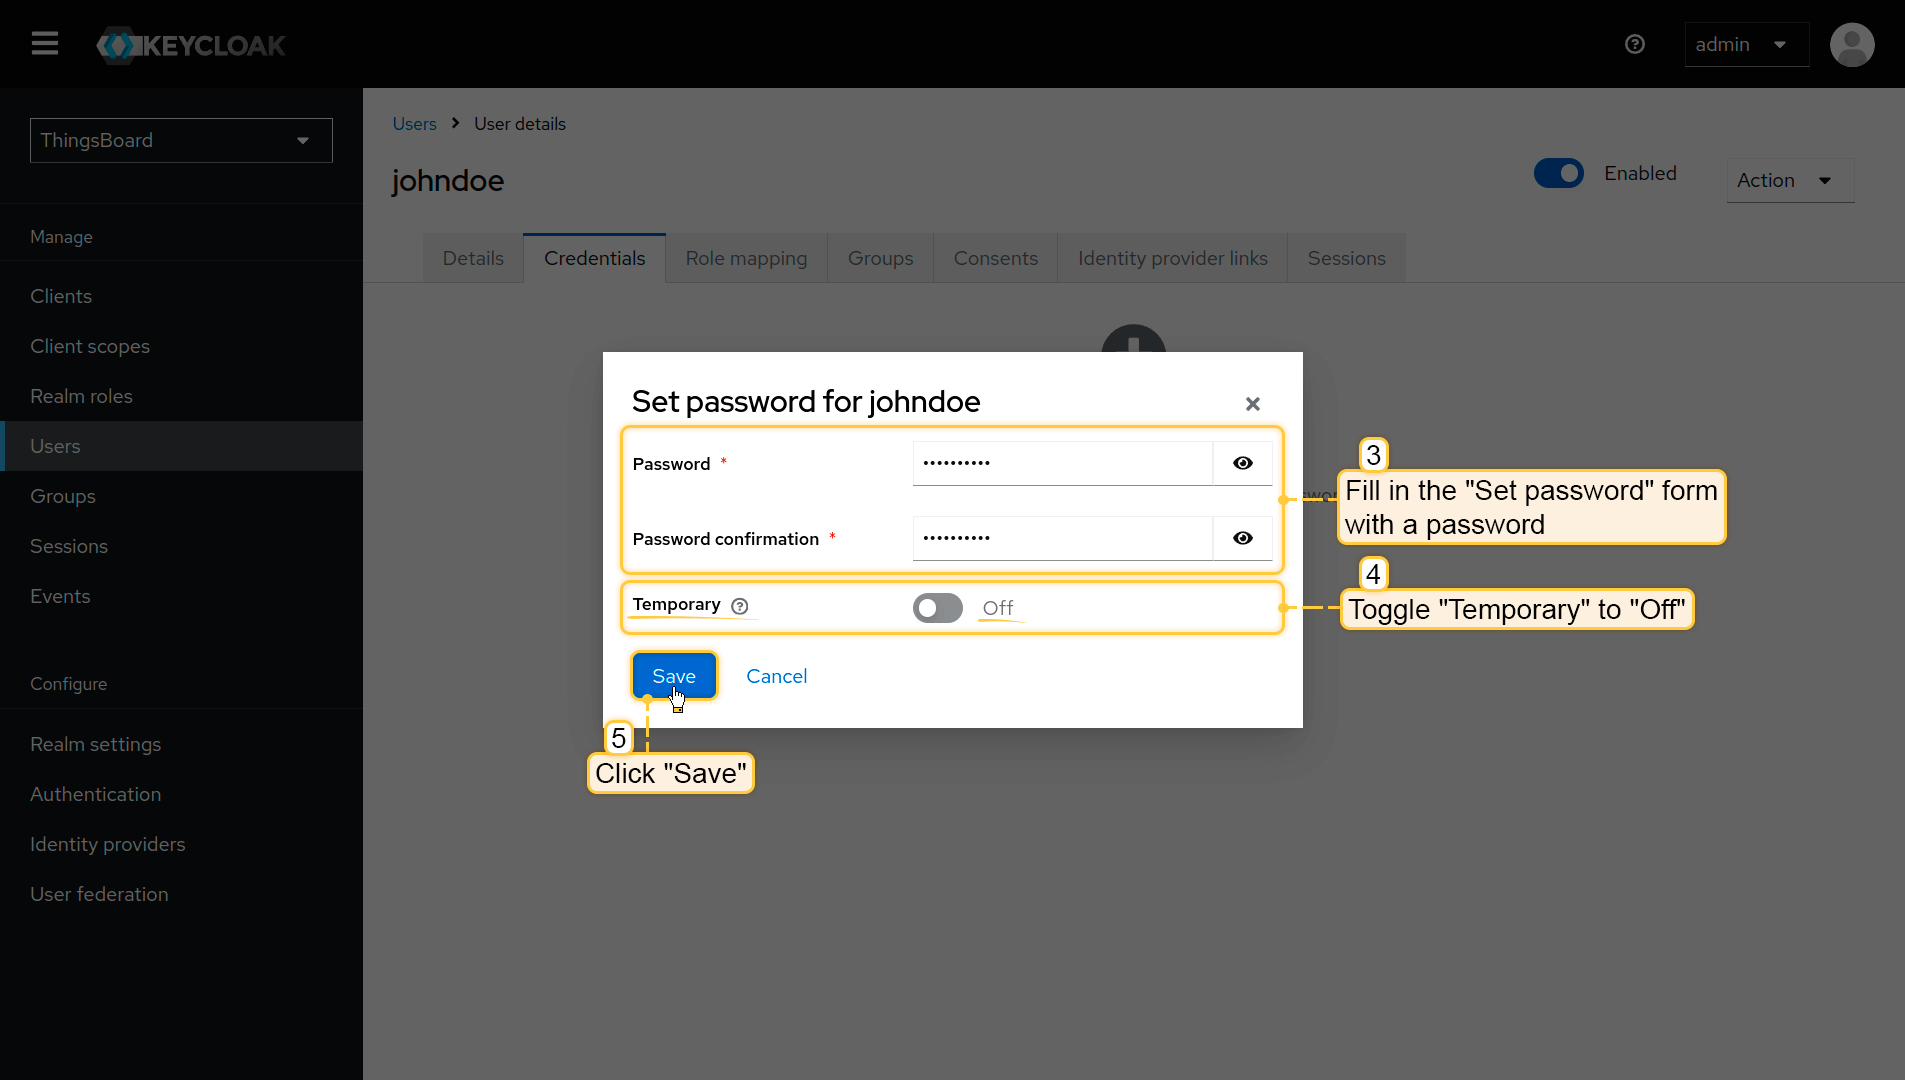
- Enter the password.
- Disable Temporary (so the user is not forced to change password on first login).
- Click Save
Step 3. Assign the OAuth 2.0 client to a domain
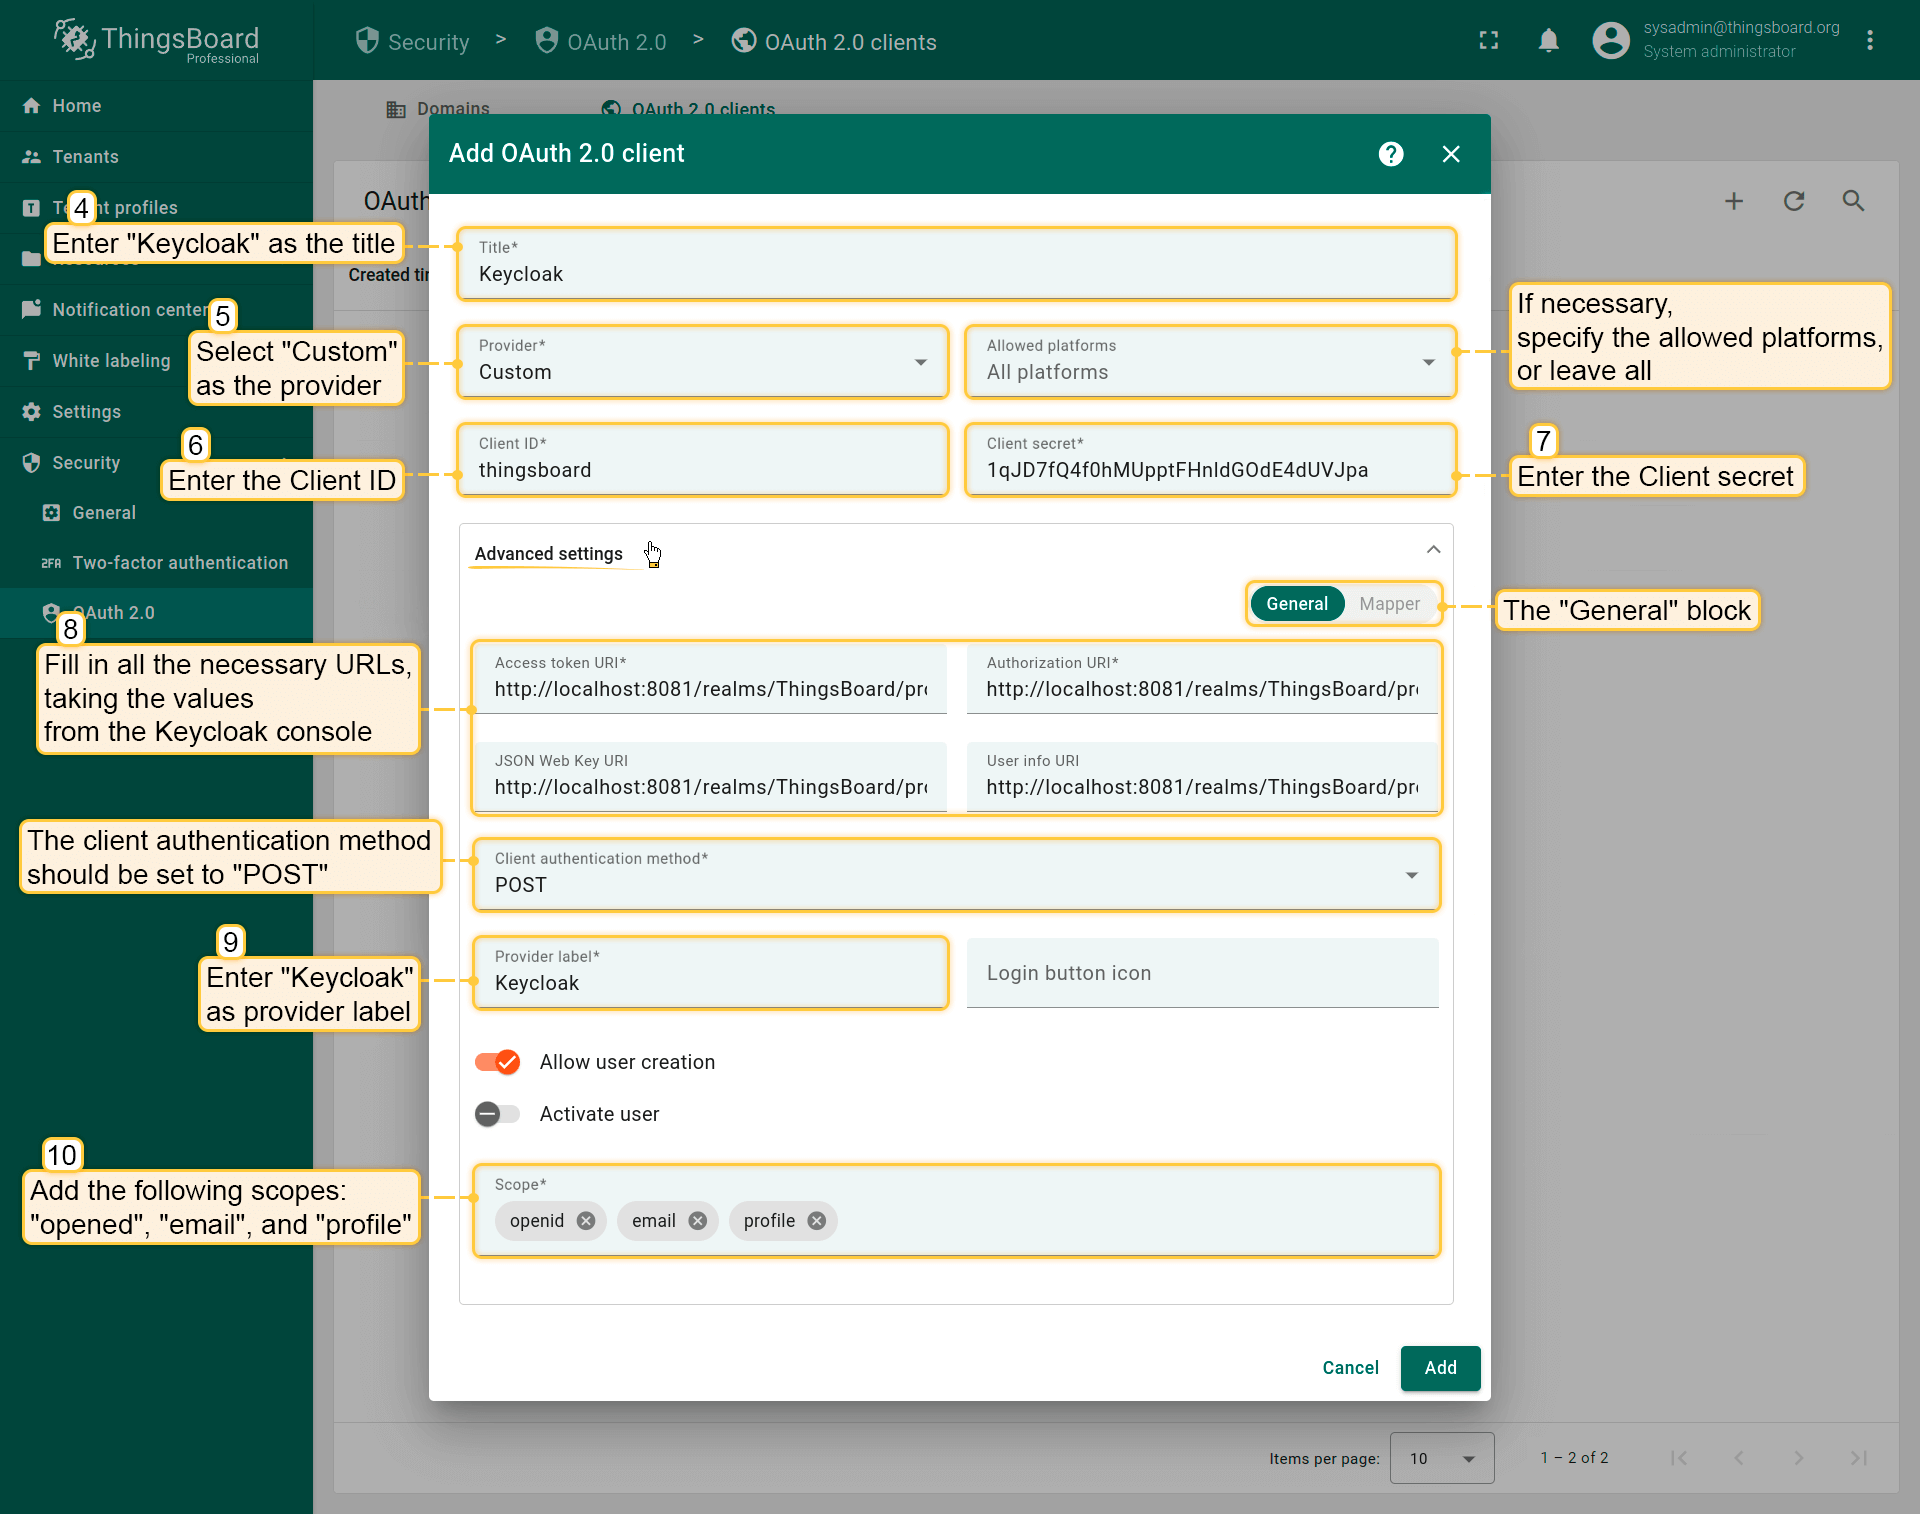
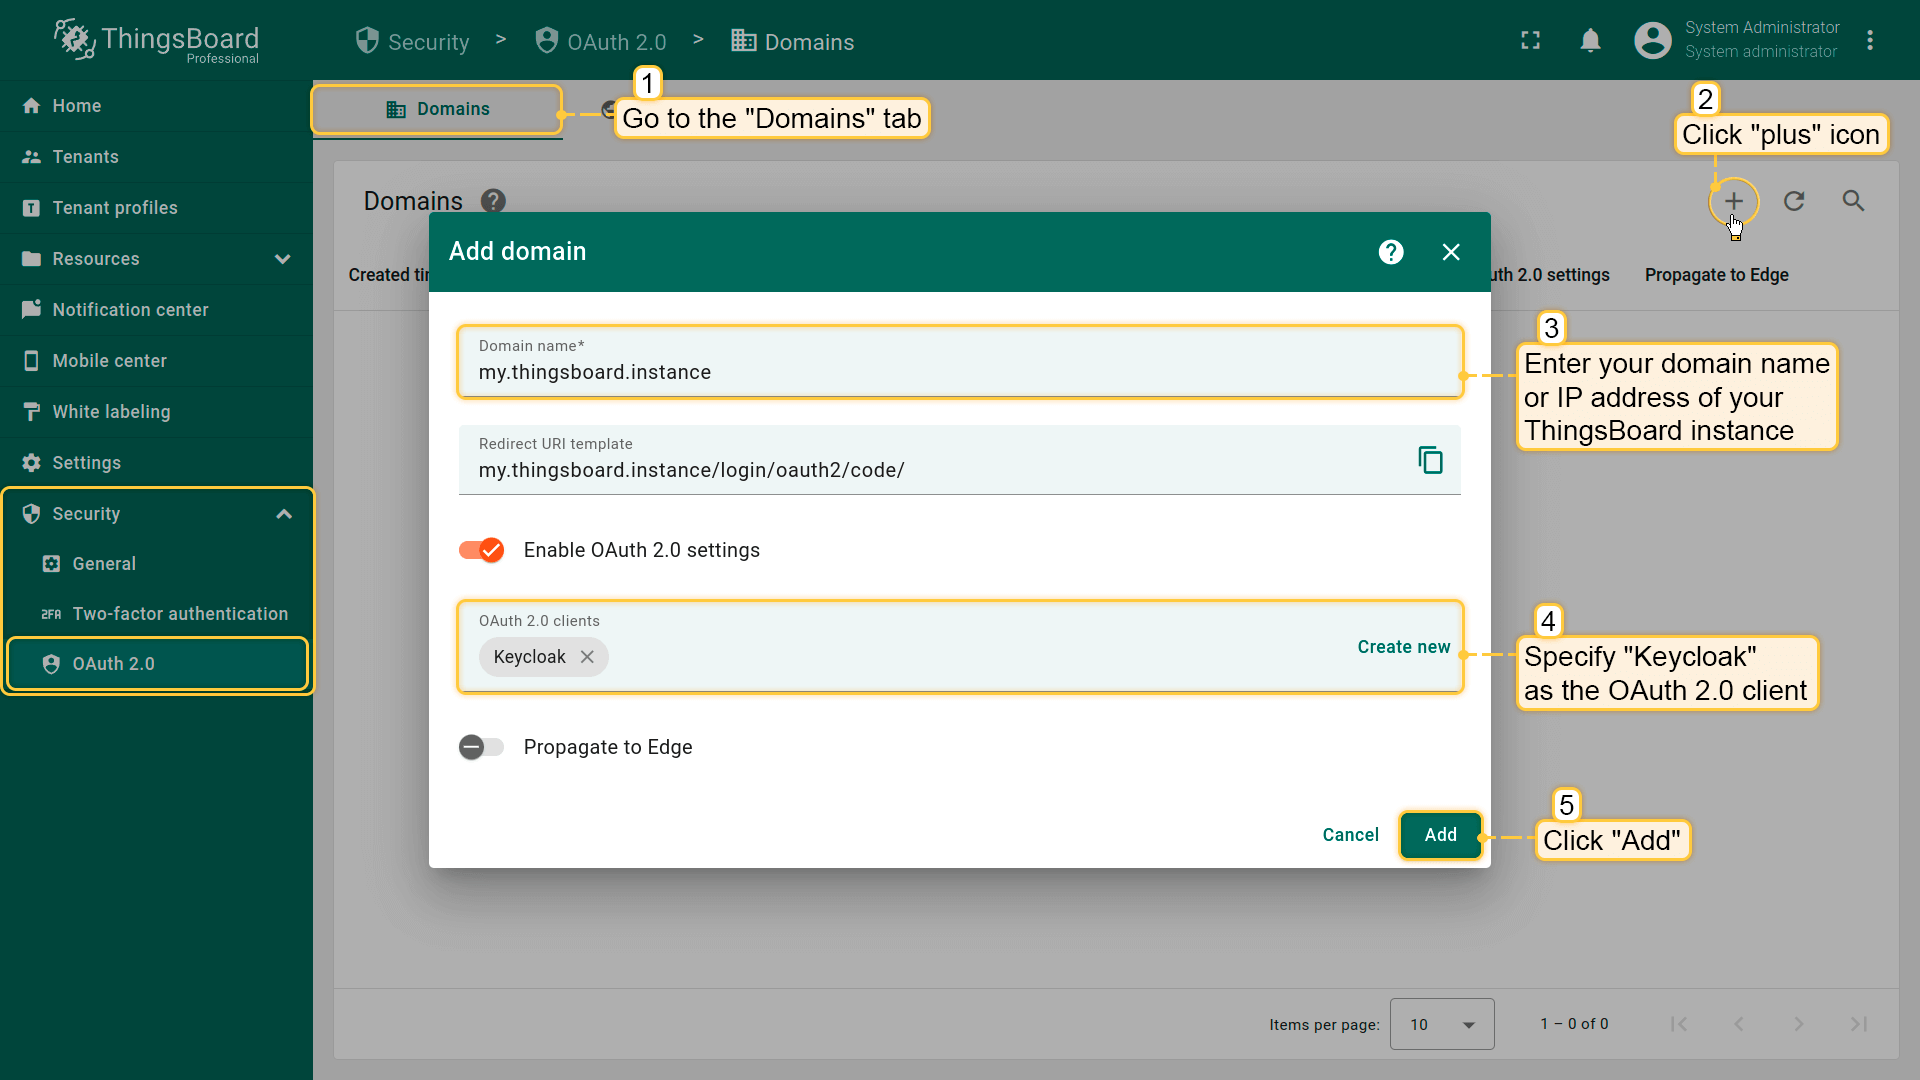
Now configure Keycloak in ThingsBoard:
- Log in to ThingsBoard.
- Navigate to Security ⇾ OAuth 2.0.
- Open the OAuth 2.0 clients tab and click + (plus) icon.
- Set title to Keycloak.
- Select provider Custom.
- Specify allowed platforms if needed (or leave all selected).
- Enter the Client ID and Client Secret from the Keycloak Admin Console
Expand Advanced settings and configure:
- Use the OpenID Connect discovery document to fill in: Access Token URI, Authorization URI, JSON Web Key URI, User Info URI.
- Set:
- client authentication method: POST
- provider label: Keycloak
- scope: email openid profile.

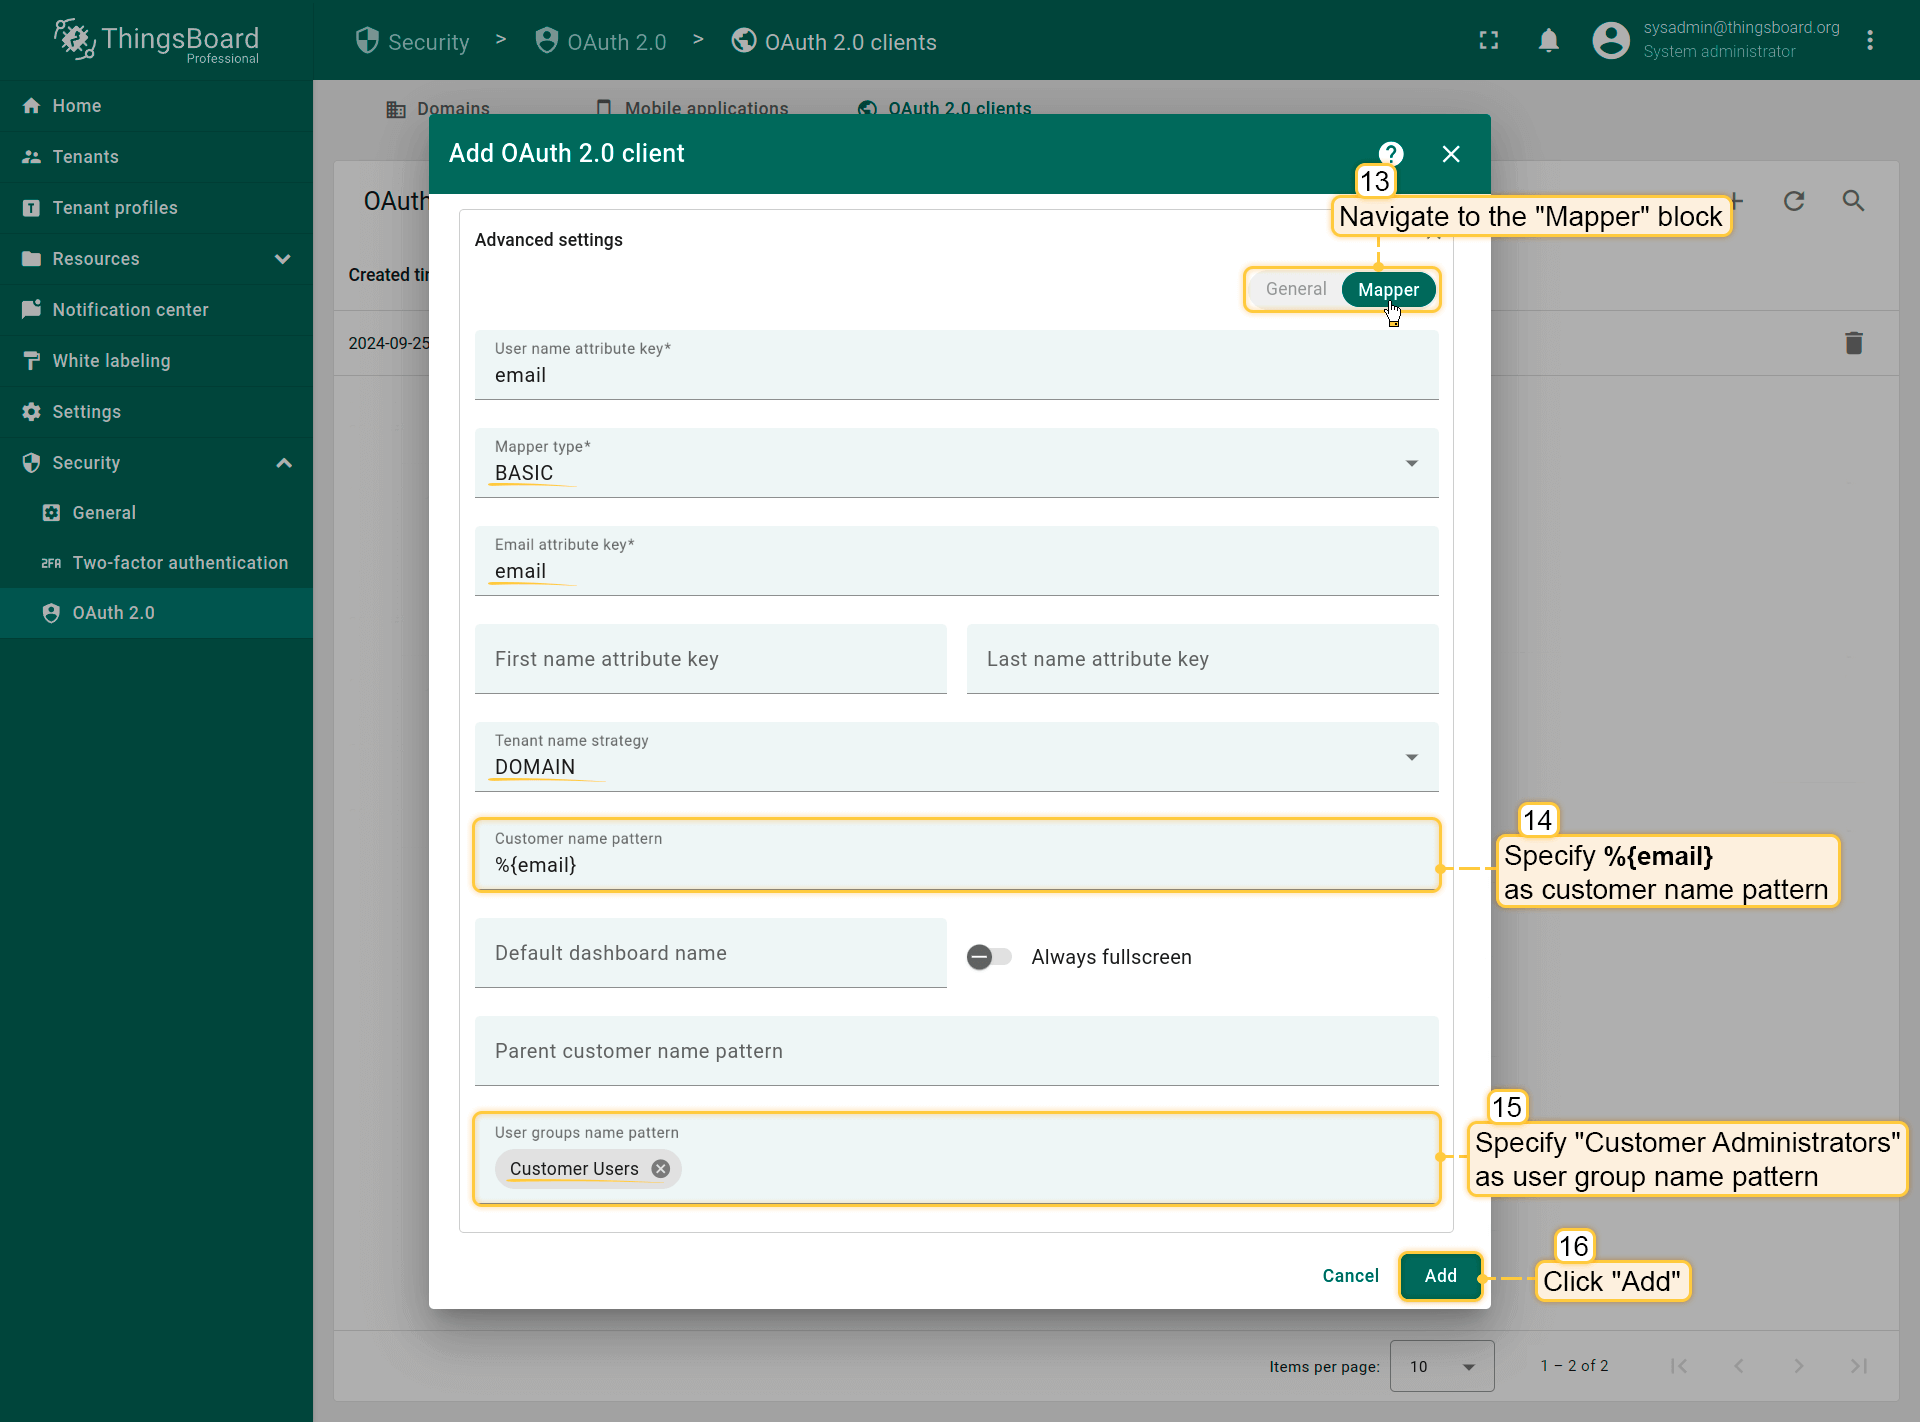
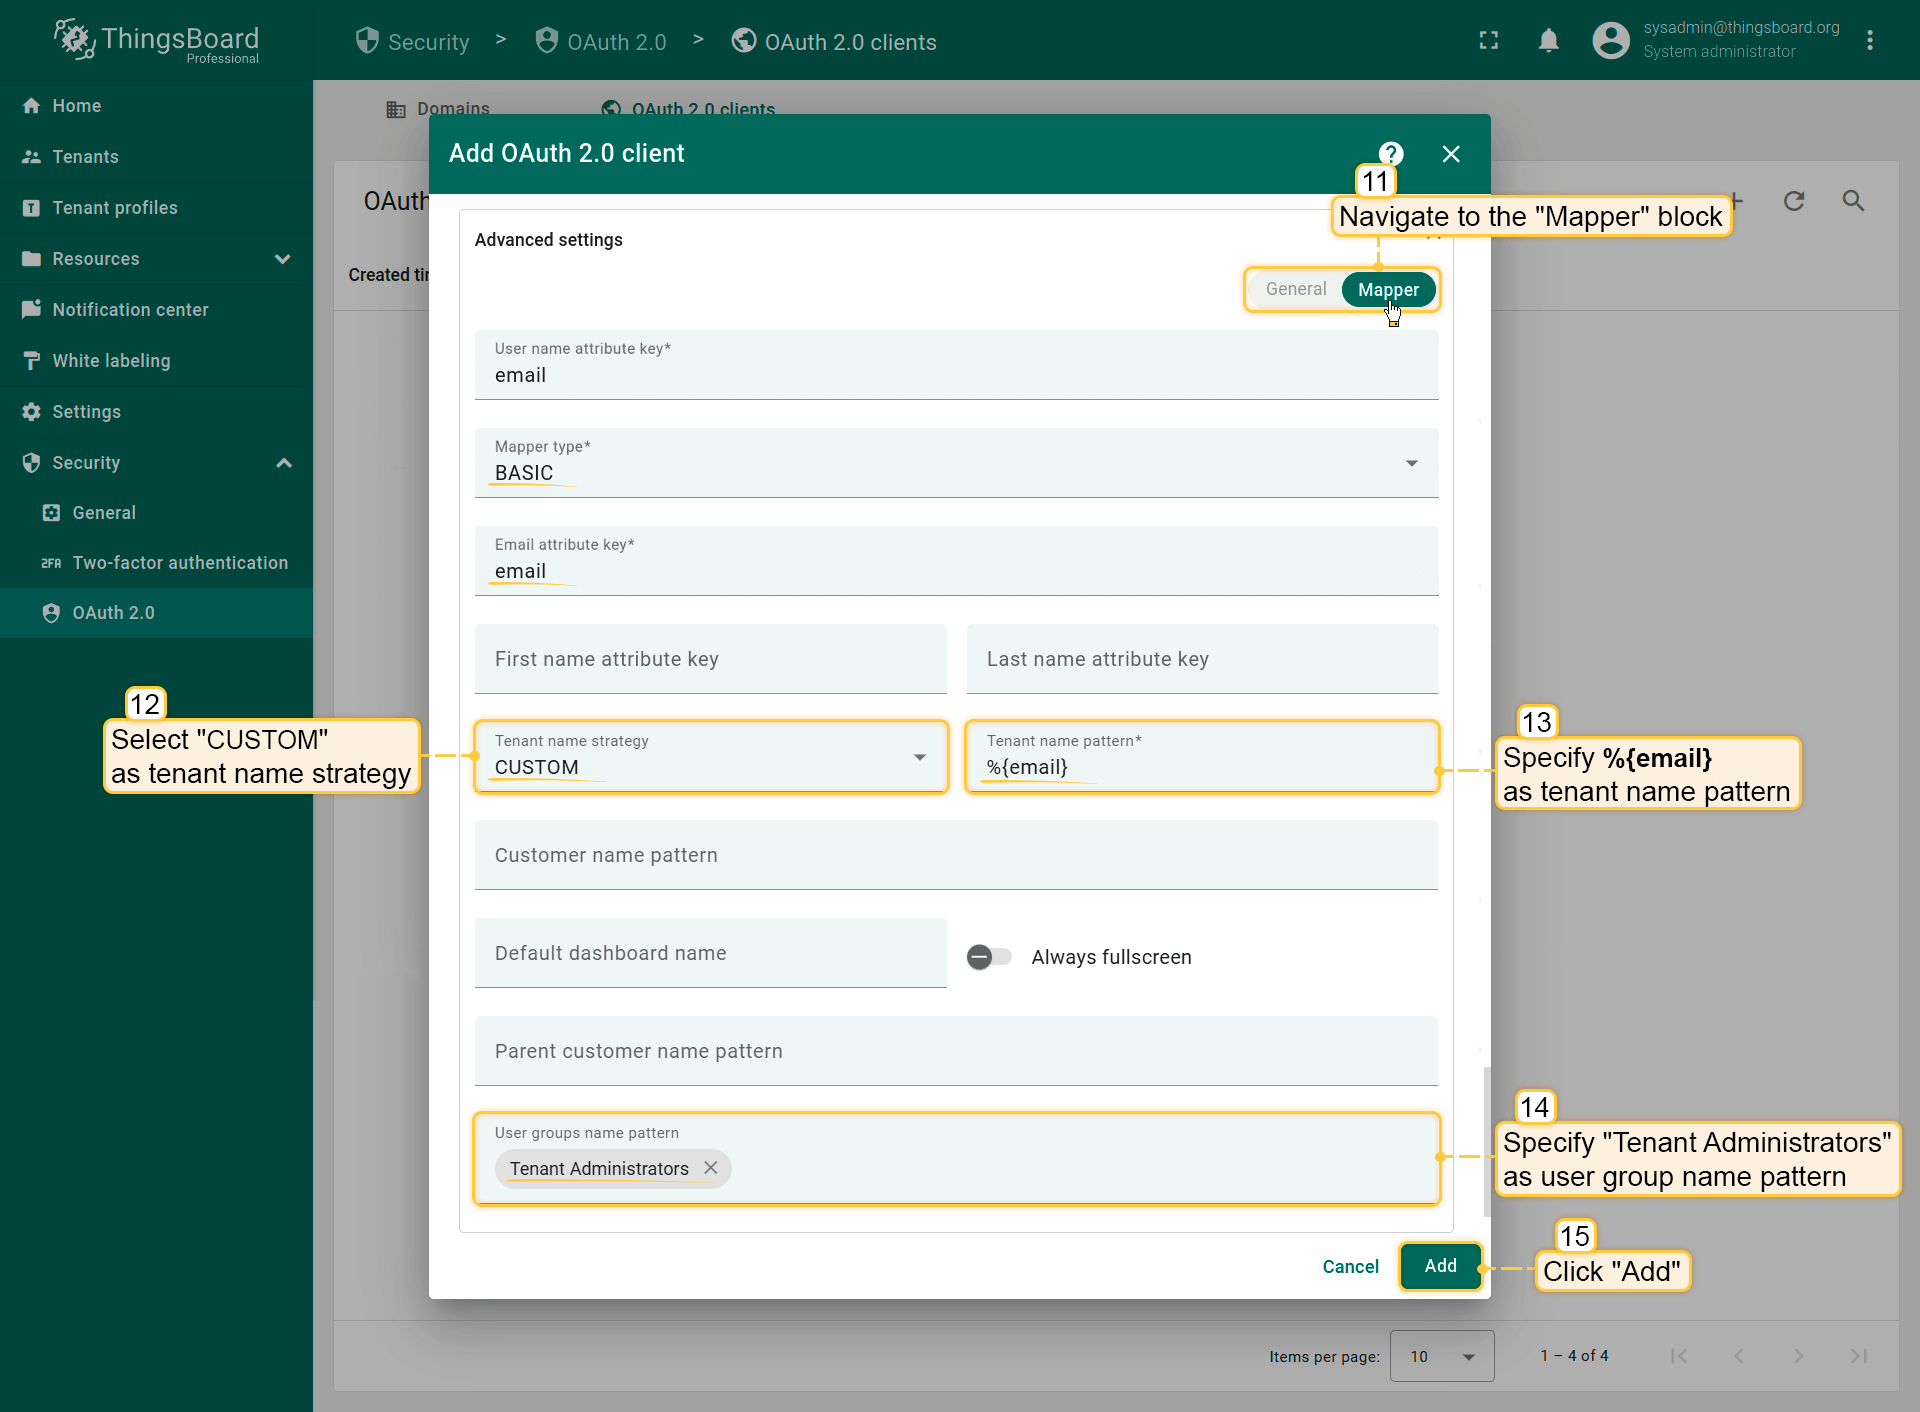
Configure the mapper:
- Mapper type: BASIC.
- Tenant name strategy: CUSTOM.
-
Tenant name pattern: %{email} (more details about these properties are described below in the “Basic mapper” part).
-
User groups name pattern: Tenant Administrators
- Click Add to create the OAuth 2.0 client.
Add a domain: Finally, bind the domain to the created OAuth 2.0 client:
- Open the Domains tab and click + (plus) icon.
- Enter the domain name (or IP address).
- Select Keycloak as the OAuth 2.0 client.
- Click Add.
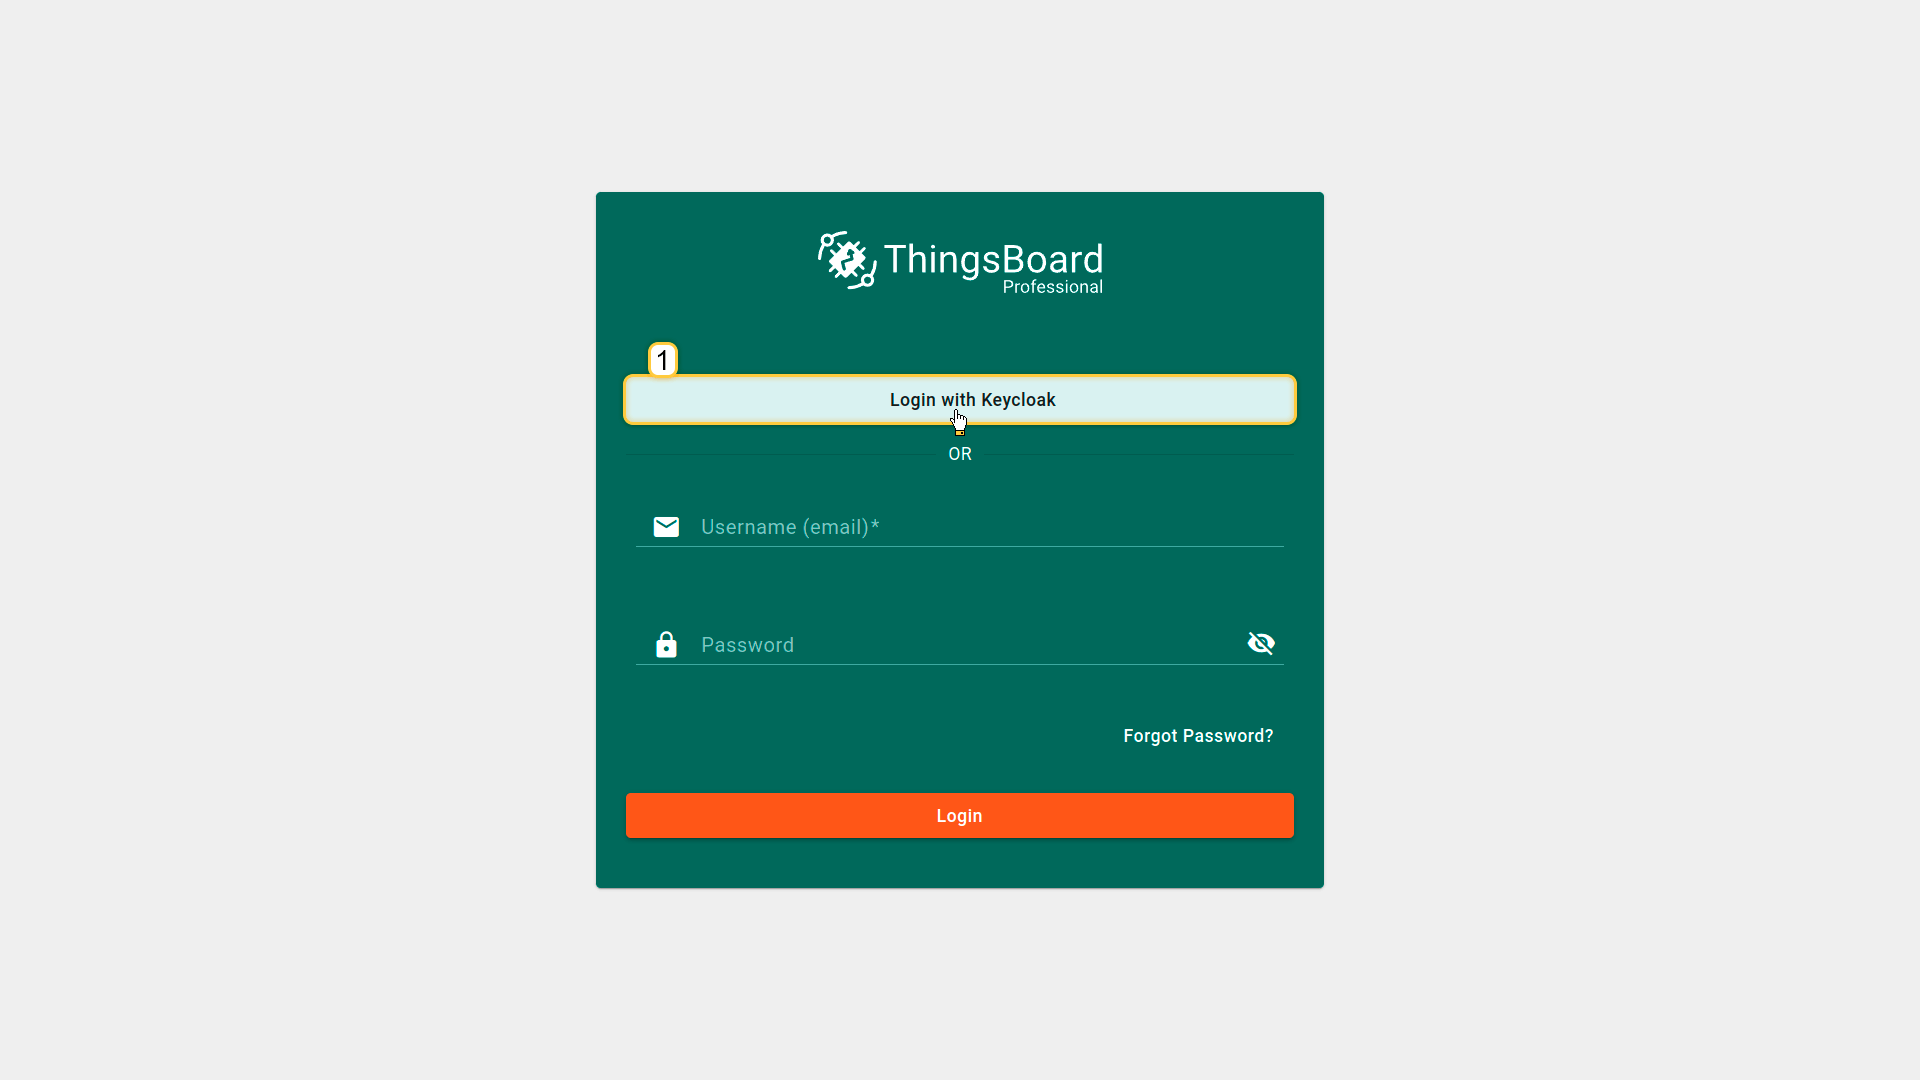
Step 4. Verify login
Open the ThingsBoard login page. You will see the Login with Keycloak button. Click it and authenticate using your Keycloak credentials.
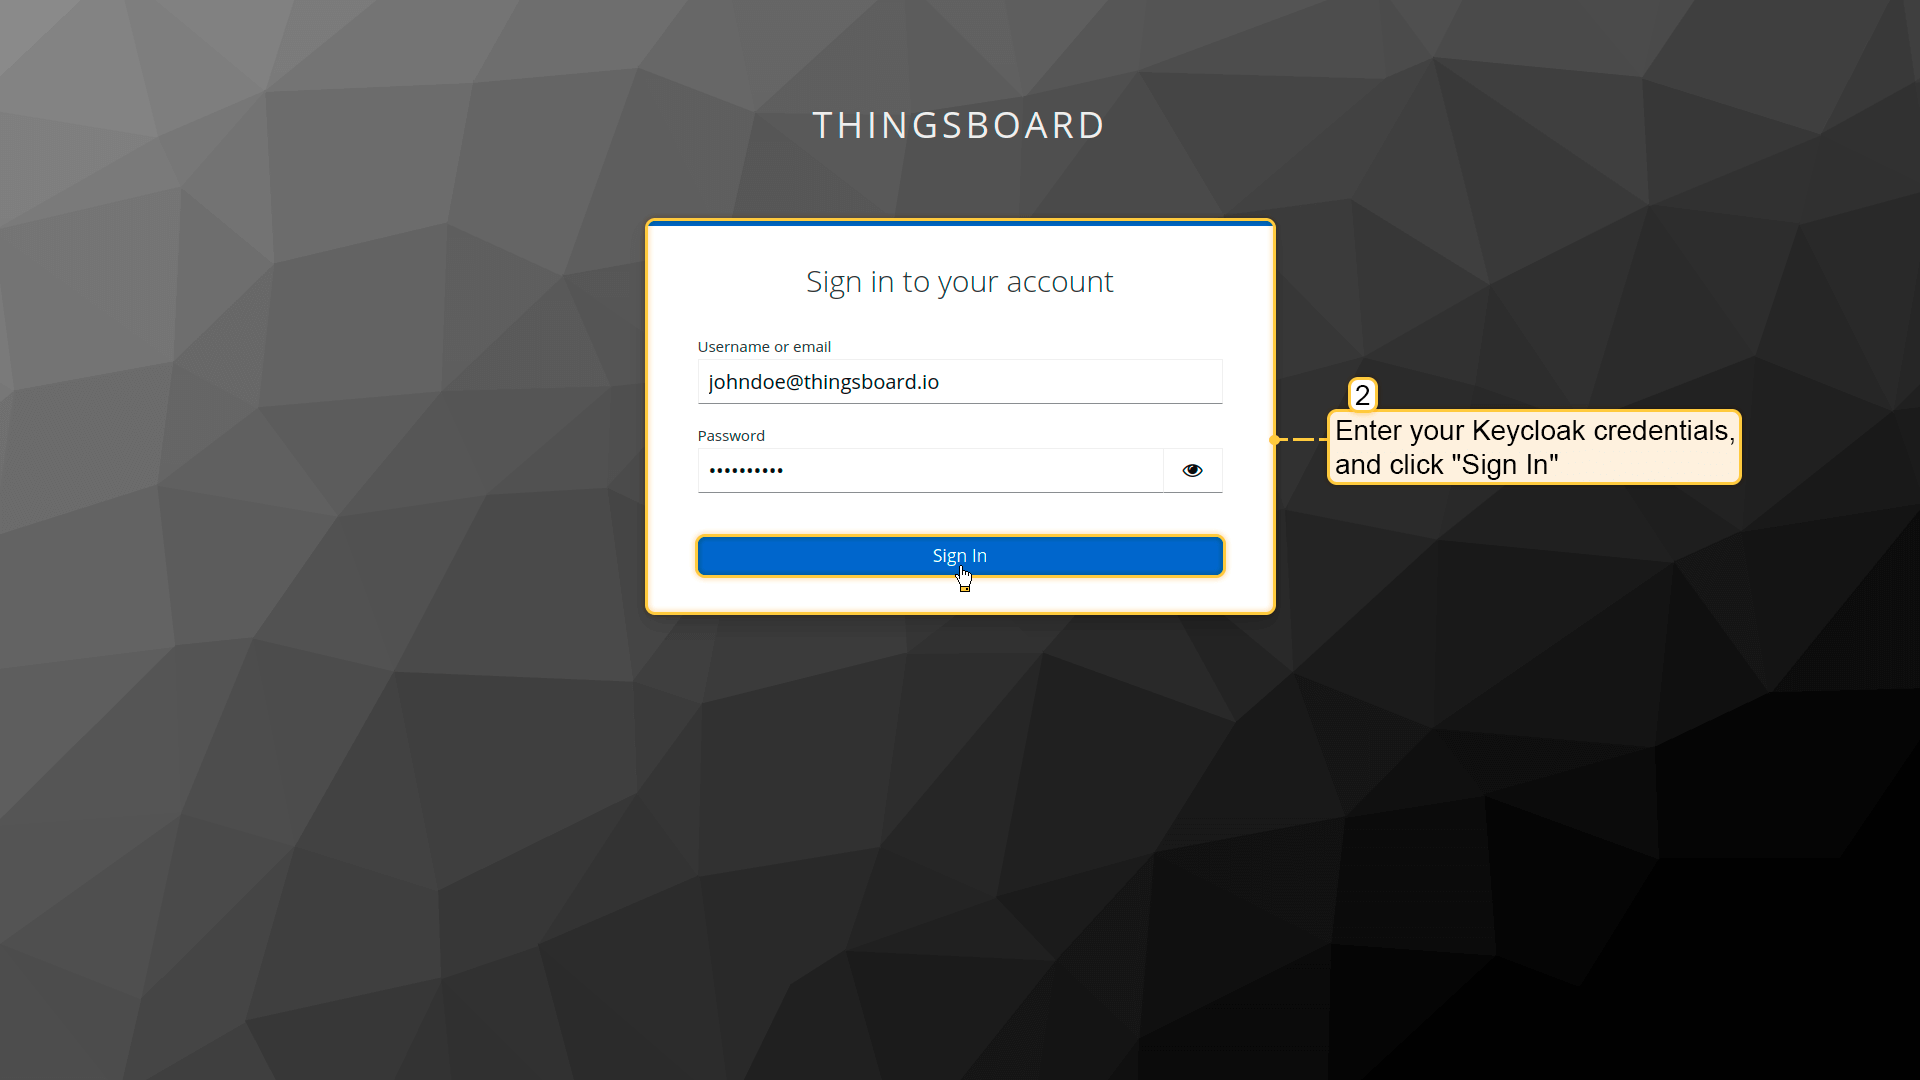
To verify the result, navigate to Users. The created user will be assigned to the Tenant Administrators group, and the tenant name will match the user’s email address.
Login with Okta
This guide explains how to configure OAuth 2.0 authentication in ThingsBoard using Okta.
After configuration:
- users will be able to log in to ThingsBoard using their Okta account;
- the user will be logged in as a Tenant Administrator;
- the tenant name will be equal to the user’s email address;
- if the tenant does not exist, ThingsBoard will automatically create it (depending on mapper configuration).
User mapping is performed using the built-in Basic mapper, but a Custom mapper can be used if additional provisioning logic is required.
Step 1. Create an OAuth 2.0 client in Okta
First, you need to create an OAuth 2.0 application in Okta and obtain the Client ID and Client Secret.
To do this:
- Open the Okta Developer Console.
- Navigate to Applications.
- Click + Create Application.
- Provide the application name (for example, ThingsBoard).
- Choose an application type: Regular Web Application
- Click Create.
- In the Application Login URIs settings, specify the ThingsBoard redirect URI:
1
http(s)://$DOMAIN:$PORT/login/oauth2/code/
Where:
• $DOMAIN is the ThingsBoard hostname (or IP address)
• $PORT is the HTTP/HTTPS port of the ThingsBoard instance
Example:
1
https://my.thingsboard.instance/login/oauth2/code/
Click Create.
After saving the application, copy the generated values:
- Client ID
- Client Secret
These values will be required when configuring ThingsBoard.
Step 2. Add an OAuth 2.0 client in ThingsBoard
Now configure Okta as an OAuth 2.0 client in ThingsBoard.
- Log in to your ThingsBoard instance.
- Navigate to Security ⇾ OAuth 2.0.
- Open the OAuth 2.0 clients tab.
- Click the + (plus) icon.
In the OAuth 2.0 client configuration window:
- Set the title to Okta.
- Select Custom as the provider.
- Specify allowed platforms if needed (or leave All platforms).
- Enter the Client ID and Client Secret obtained from Okta.
Now expand Advanced settings and configure the following parameters:
- Access token URI. (Example: https://dev-example.okta.auth0.com/oauth/token)
- Authorization URI. (Example: https://dev-example.okta.auth0.com/authorize)
- JSON Web Key URI. (Example: https://dev-example.okta.auth0.com/.well-known/jwks.json)
- User info URI. (Example: https://dev-example.okta.auth0.com/userinfo)
Okta provides the required OAuth endpoints. You can find them in Okta:
• Open your application (ThingsBoard) in the Okta Developer Console.
• Navigate to Advanced settings ⇾ Endpoints. Here you can find the required endpoint values.
Configure additional parameters:
- Client authentication method: POST or BASIC (Okta usually works with POST).
- Enable Allow user creation.
- Enable Activate user if you want ThingsBoard to activate the user automatically.
- Set scope to: email openid profile.
Switch to the Mapper section and configure:
- Mapper type: BASIC.
- Tenant name strategy: CUSTOM.
-
Tenant name pattern: %{email} (more details about these properties are described below in the “Basic mapper” part).
- User groups name pattern: Tenant Administrators (to automatically create a new tenant when a new user logs in).
- Click Add to create the OAuth 2.0 client.
Step 3. Assign the OAuth 2.0 client to a domain
After the OAuth 2.0 client is created, you must assign it to a domain.
- Navigate to Security → OAuth 2.0.
- On the Domains tab edit existing or add new domain.
- In the OAuth 2.0 clients field, specify Okta.
- Click Add (Save) to save the domain configuration.
Step 4. Verify login
Open the ThingsBoard login page using the configured domain. You should now see the Login with Okta button.
Click it and authenticate using your Okta credentials.
After successful authentication:
- ThingsBoard will create the tenant if it does not exist;
- the user will be logged in as a Tenant Administrator;
- the tenant name will match the user’s email address.
Login with Azure
This guide explains how to configure OAuth 2.0 authentication in ThingsBoard using Azure Active Directory (Microsoft Entra ID).
After configuration:
- users will be able to authenticate using their Azure AD accounts;
- the user will be logged in as a Tenant Administrator;
- the tenant name will be equal to the user’s email address;
- if the tenant does not exist, ThingsBoard will create it automatically (depending on mapper settings).
User mapping is performed using the built-in Basic mapper, but a Custom mapper can be used if additional identity-to-tenant logic is required.
For advanced identity customization, refer to the official Microsoft documentation: Microsoft identity platform and OpenID Connect protocol.
Step 1. Create an OAuth 2.0 client in Azure
First, you must register an application in Azure Active Directory.
To create an application:
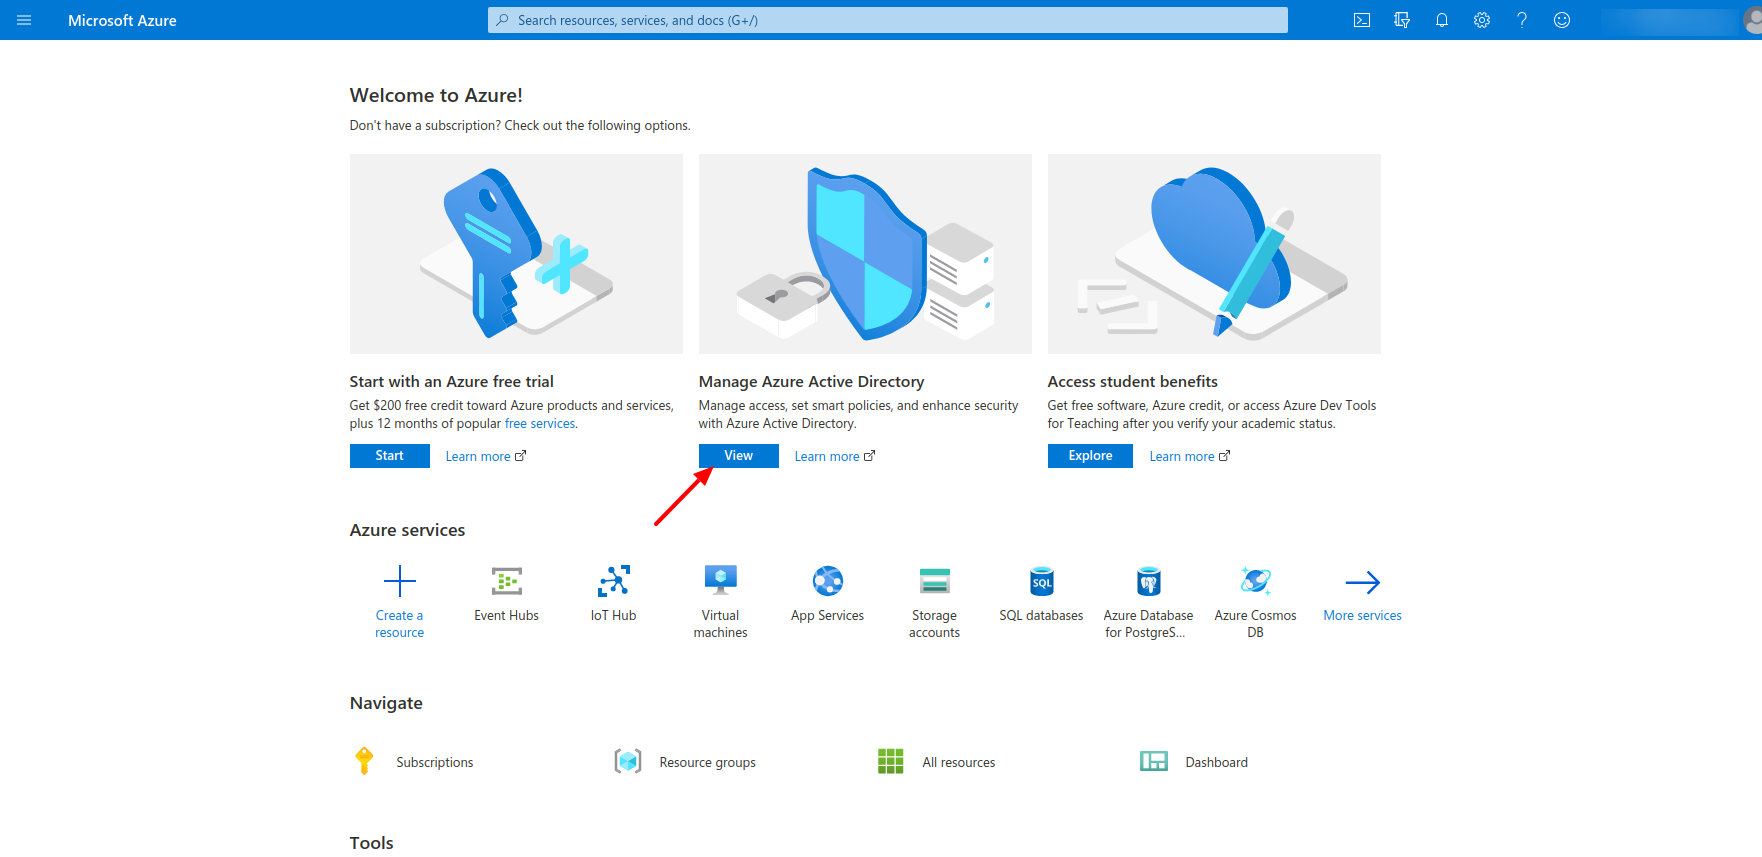
- Open the Azure Portal.
- Navigate to Azure Active Directory.
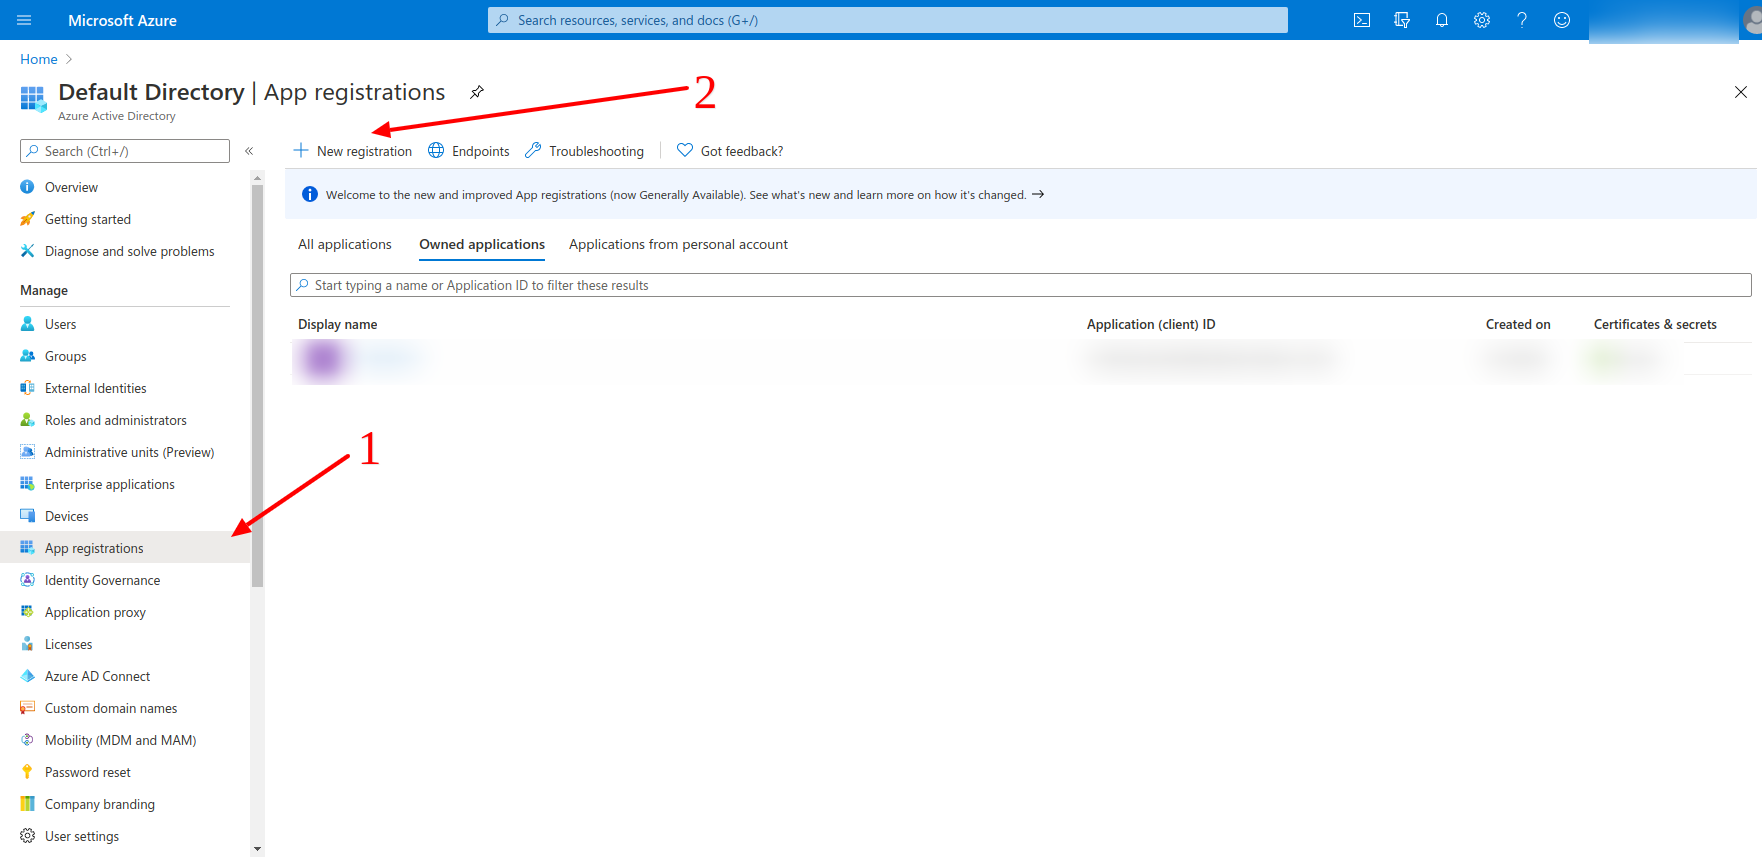
- Open App registrations.
- Click New registration.
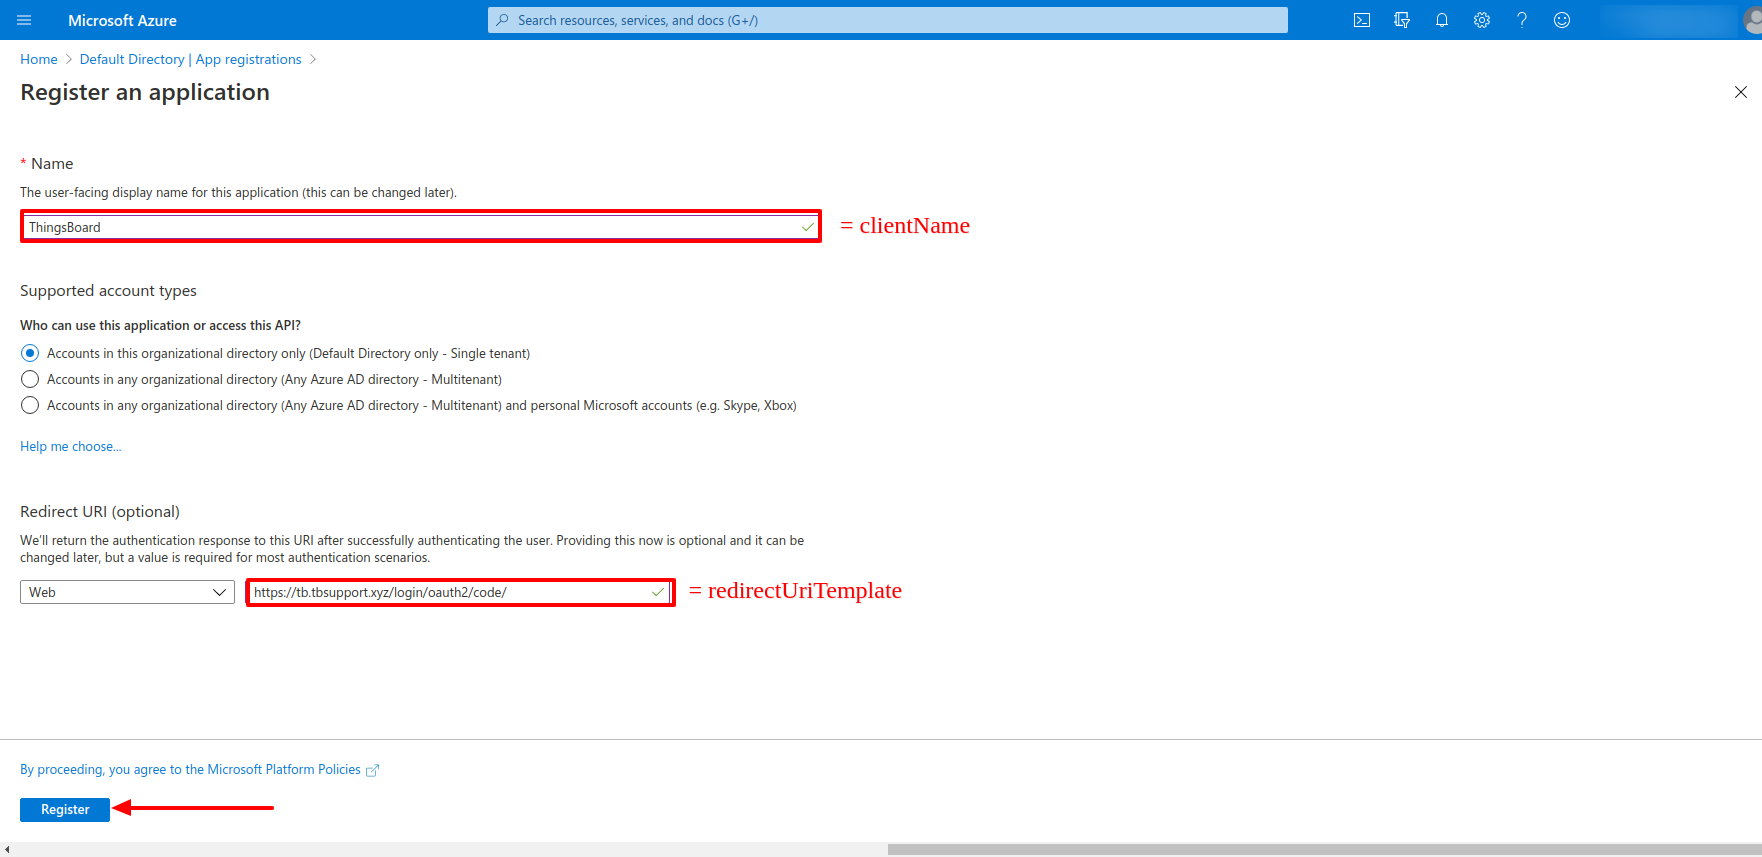
Configure the application:
- Name: ThingsBoard (or any descriptive name)
- Supported account types: select according to your organization requirements
- Redirect URI:
- Platform: Web
- URL:
1
http(s)://$DOMAIN:$PORT/login/oauth2/code/
Where:
• $DOMAIN is the ThingsBoard hostname (or IP address)
• $PORT is the HTTP/HTTPS port of the ThingsBoard instance
Example:
1
https://my.thingsboard.instance/login/oauth2/code/
- Click Register.
Create Client Secret
Now we are on the Overview page, where we can find the Application (client) ID and the Client name that we specified earlier.
Next, open the Authentication tab. Make sure to enable authorization on the access token-based. Save changes.
Finally, open the Certificates & secrets tab, and click + New client secret. Save created key value (Client Secret).
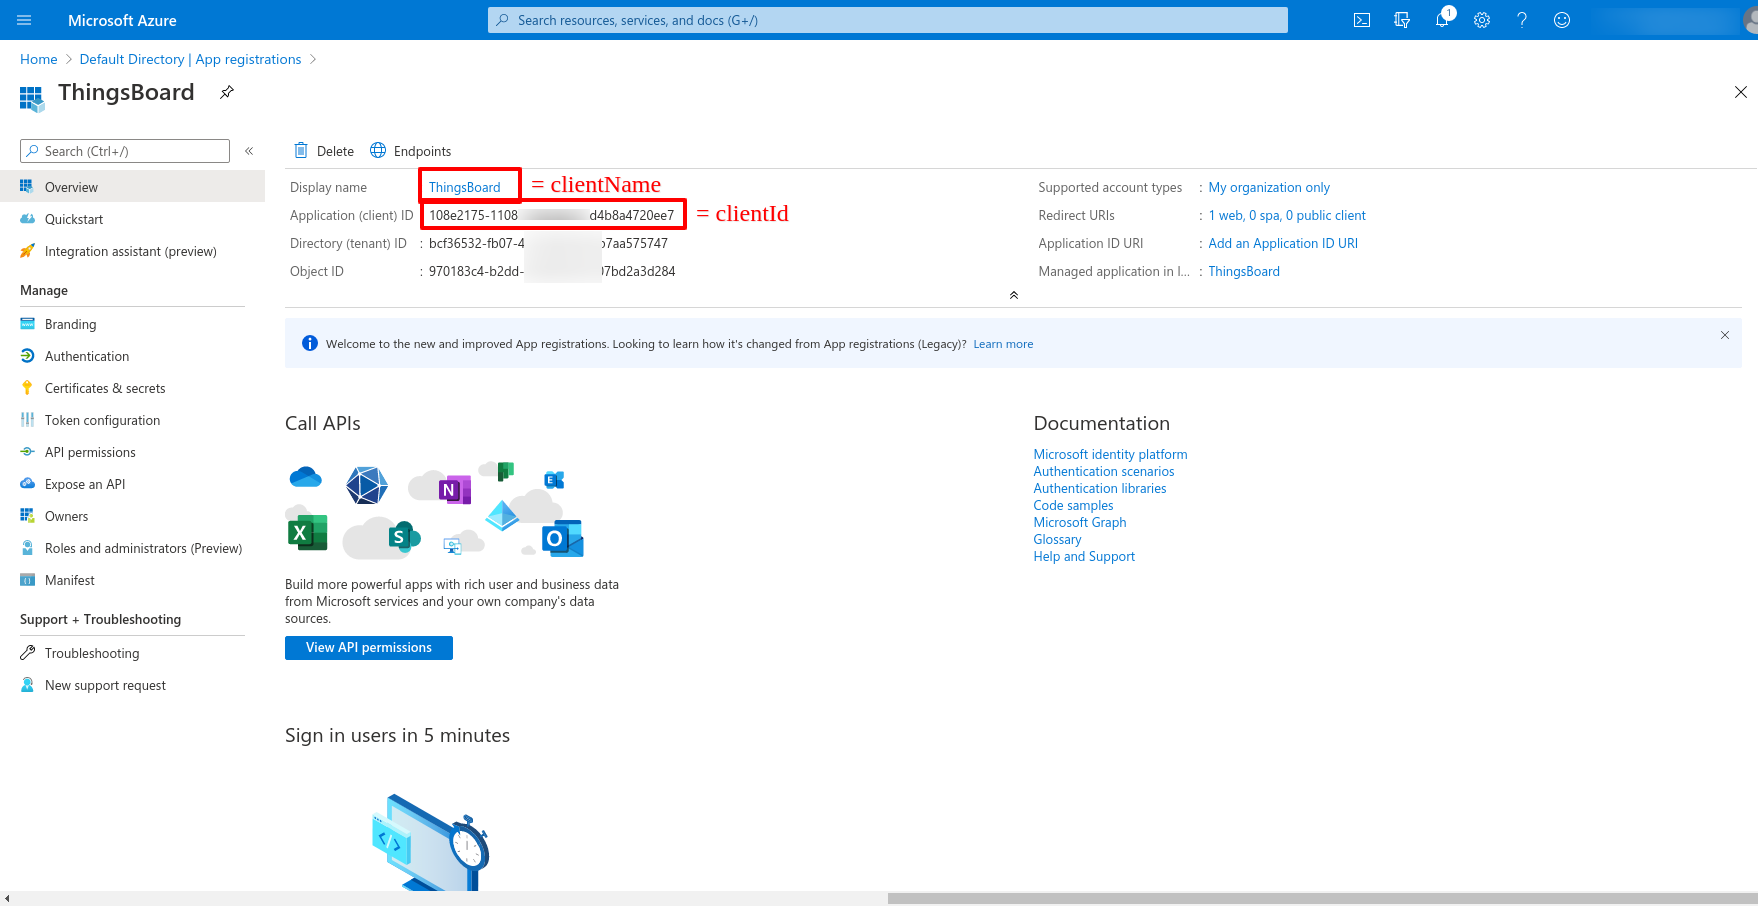
Now we are on the Overview page, where we can find the Application (client) ID and the Client name that we specified earlier.
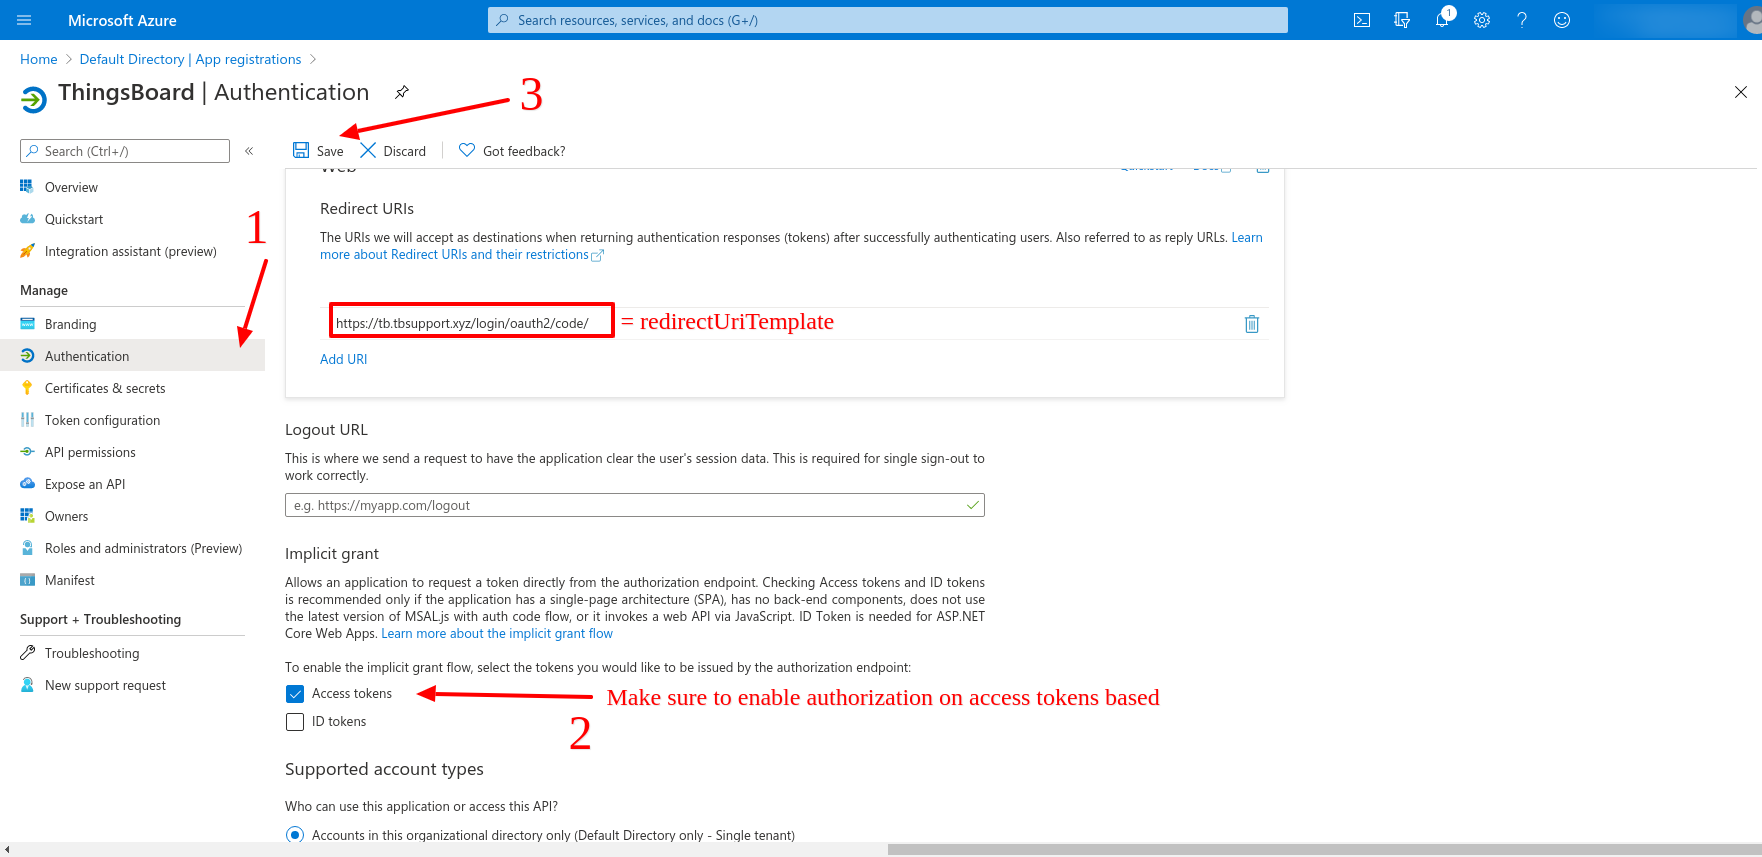
Next, open the Authentication tab. Make sure to enable authorization on the access token-based. Save changes.
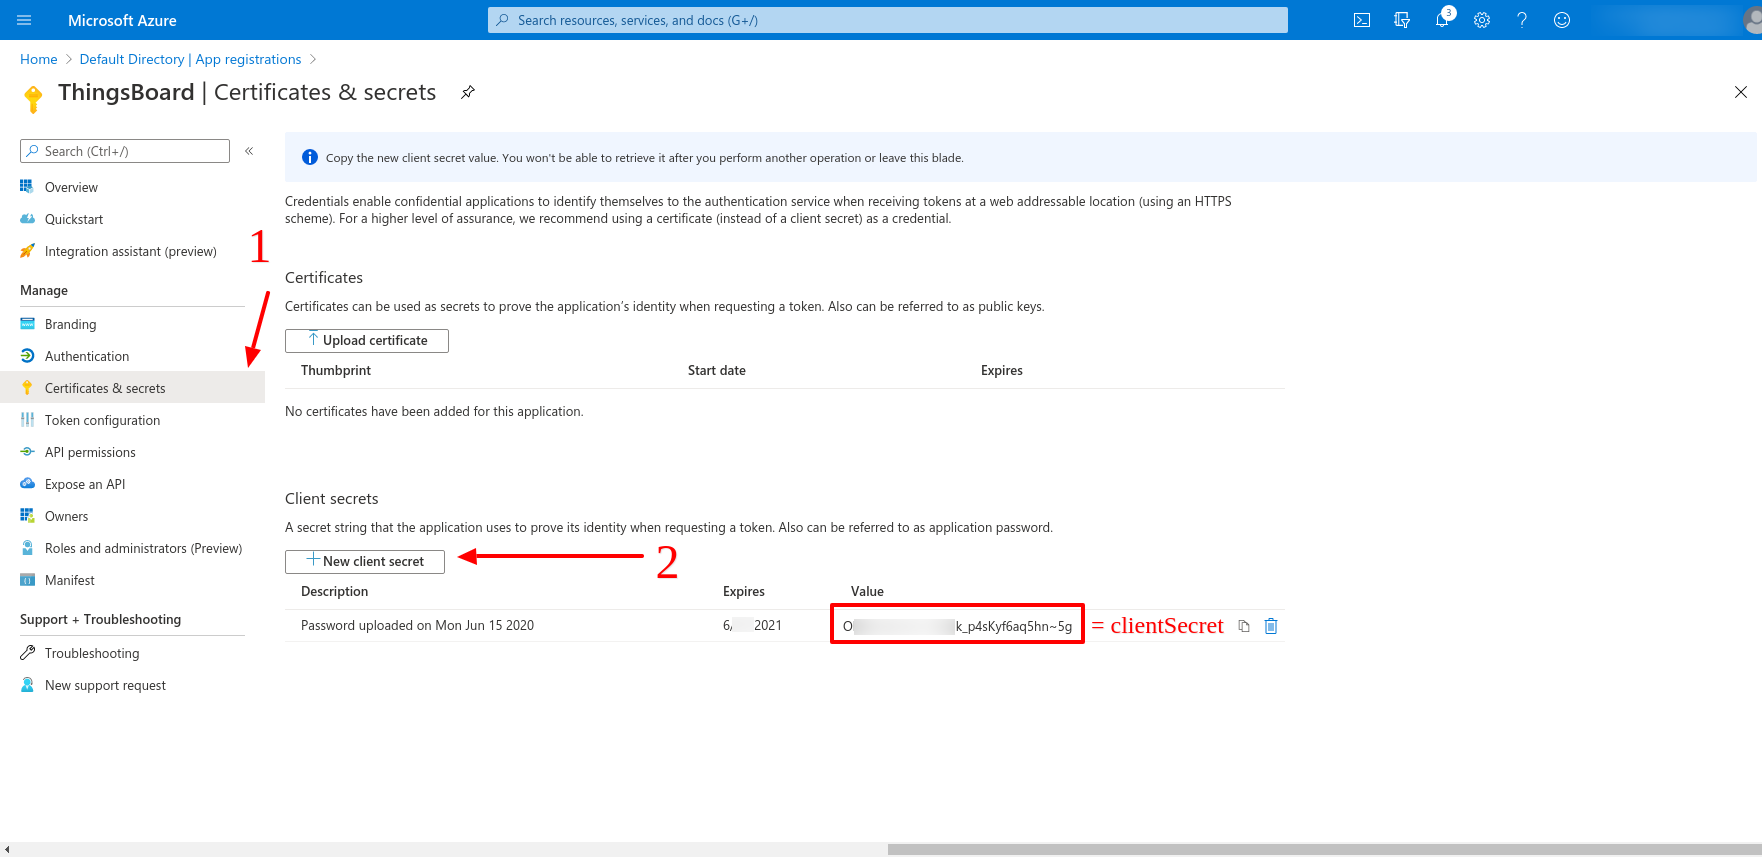
Finally, open the Certificates & secrets tab, and click + New client secret. Save created key value (Client Secret).
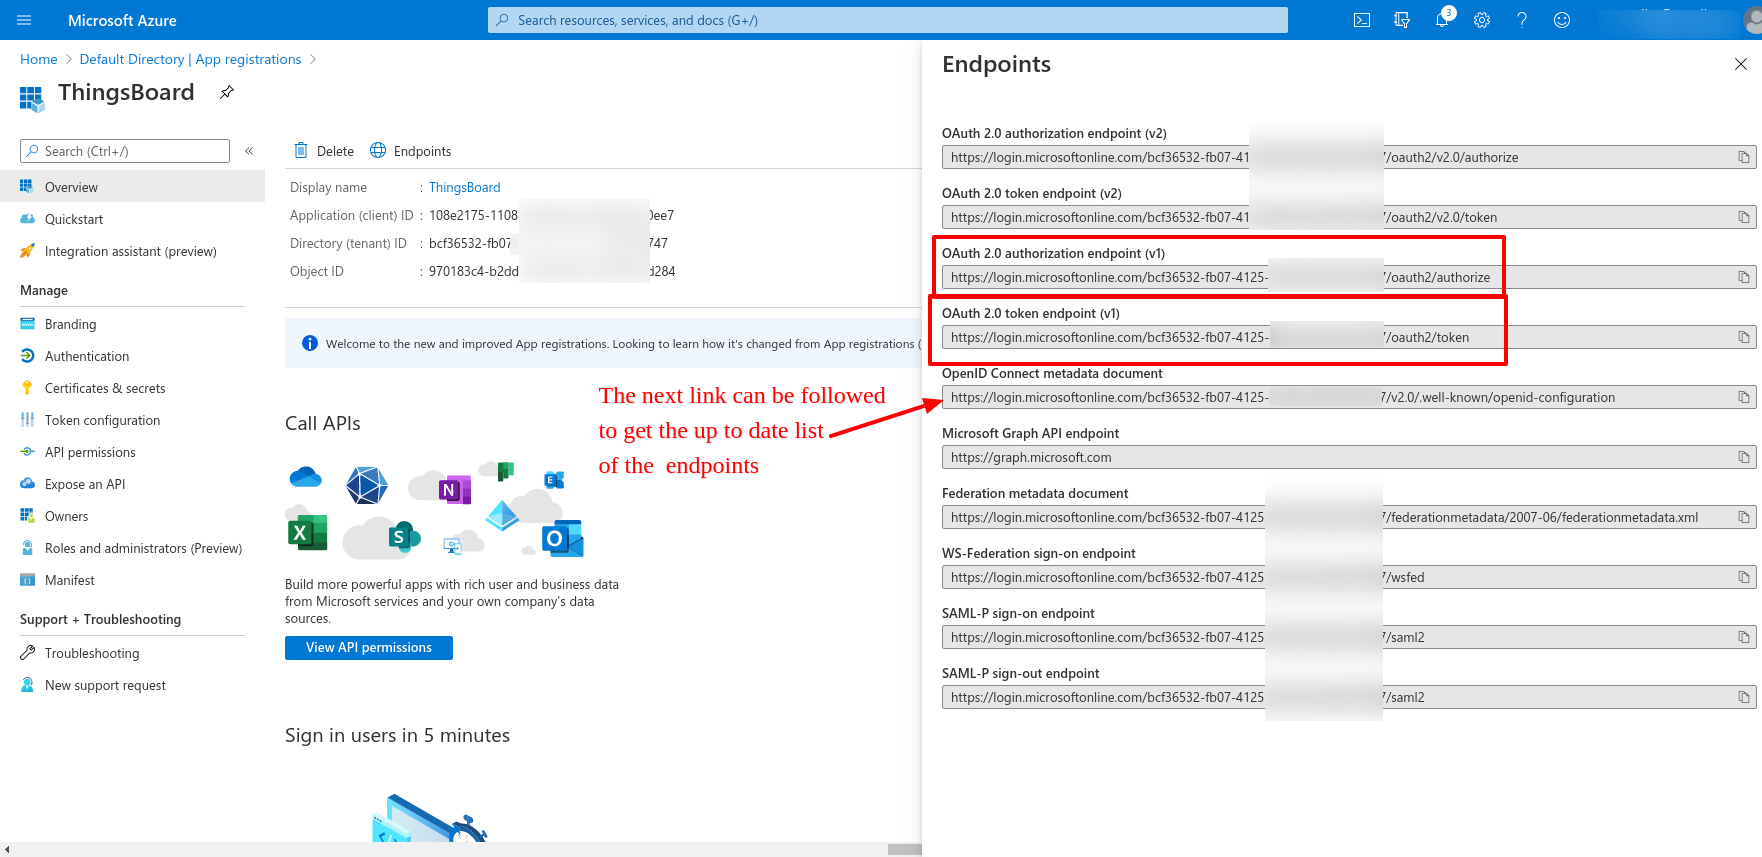
Get OAuth endpoints (OpenID configuration)
ThingsBoard requires OAuth endpoints for token exchange and user validation.
Azure provides these endpoints via the OpenID Connect metadata document:
1
https://login.microsoftonline.com/<TENANT_ID>/v2.0/.well-known/openid-configuration
From this document, you will need the following endpoints:
- Authorization endpoint
- Token endpoint
- JWKS URI
- UserInfo endpoint (optional)
Step 2. Add an OAuth 2.0 client in ThingsBoard
Now you must create a corresponding OAuth client in ThingsBoard.
- Log in to ThingsBoard.
- Navigate to Security ⇾ OAuth 2.0.
- Open the OAuth 2.0 clients tab.
- Click the + (plus) icon.
Configure general client settings
In the OAuth 2.0 client configuration window:
- Title: Azure Active Directory
- Provider: Custom
- Allowed platforms: All platforms (or select required platforms)
- Client ID: paste the Azure Application (client) ID
- Client secret: paste the Azure Client Secret
Configure Advanced settings ⇾ General
Expand Advanced settings and configure the following parameters:
Fill the following fields:
- Authorization URI
- Access token URI
- JSON Web Key URI
- User info URI (optional, depending on configuration)
Configure additional settings:
- Client authentication method: POST (recommended for Azure)
- Enable Allow user creation.
- Enable Activate user if you want ThingsBoard to activate the user automatically.
- Scope: email openid profile.
Configure Advanced settings ⇾ Mapper
Switch to the Mapper tab.
Recommended Basic mapper configuration:
- User name attribute key: email
- Mapper type: BASIC
- Email attribute key: email
Set tenant provisioning strategy:
- Tenant name strategy: CUSTOM
- Tenant name pattern:
1
%{email}
This configuration ensures:
- each user will be logged in under a tenant with the same name as the user email;
- the tenant will be created automatically if it does not exist.
Click Add to create the OAuth 2.0 client.
Step 3. Assign the OAuth 2.0 client to a domain
After creating the OAuth client, you must assign it to a domain.
- Navigate to Security ⇾ OAuth 2.0
- On the Domains tab, click the + (plus) icon.
In the Add domain dialog:
- Enter your domain name (or IP address).
- In the OAuth 2.0 clients section, select your Azure OAuth client.
- Click Add.
Step 4. Verify the login flow
Open the ThingsBoard login page using your configured domain. You should see the Login with Azure option.
Click the button and authenticate using your Azure AD credentials.
After successful authentication:
- the user will be created automatically (if enabled);
- the tenant will be created automatically (if missing);
- the user will be logged in as a Tenant Administrator.
Operations with OAuth 2.0 client
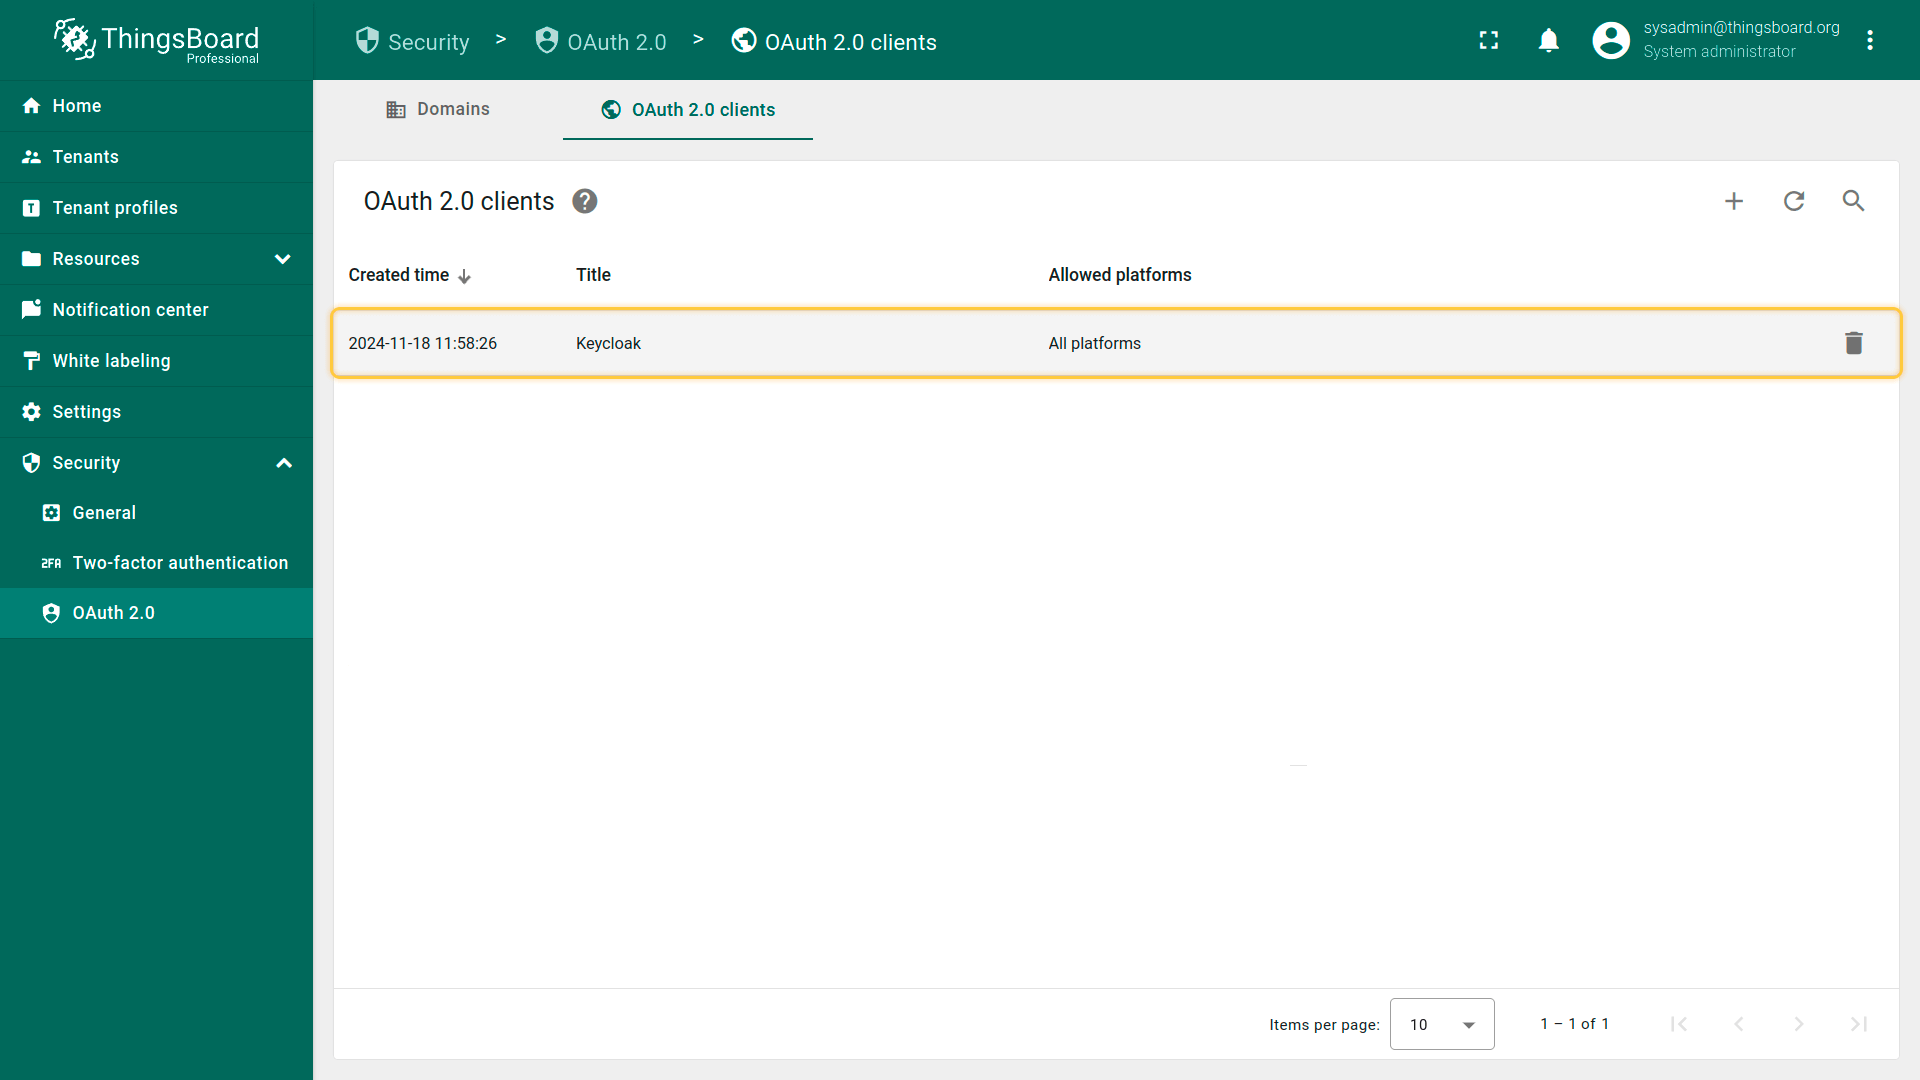
ThingsBoard allows you to manage OAuth 2.0 clients from the OAuth 2.0 clients tab.
- Add OAuth 2.0 client: click the + (plus) icon, enter the client title, select the provider and allowed platforms, specify the Client ID and Client Secret, configure advanced settings if needed, and click Add.
- Edit OAuth 2.0 client: open the client details, click the orange Edit button, update the configuration, and click orange Apply changes.
- Delete OAuth 2.0 client: click the trash icon in the client row and confirm deletion.
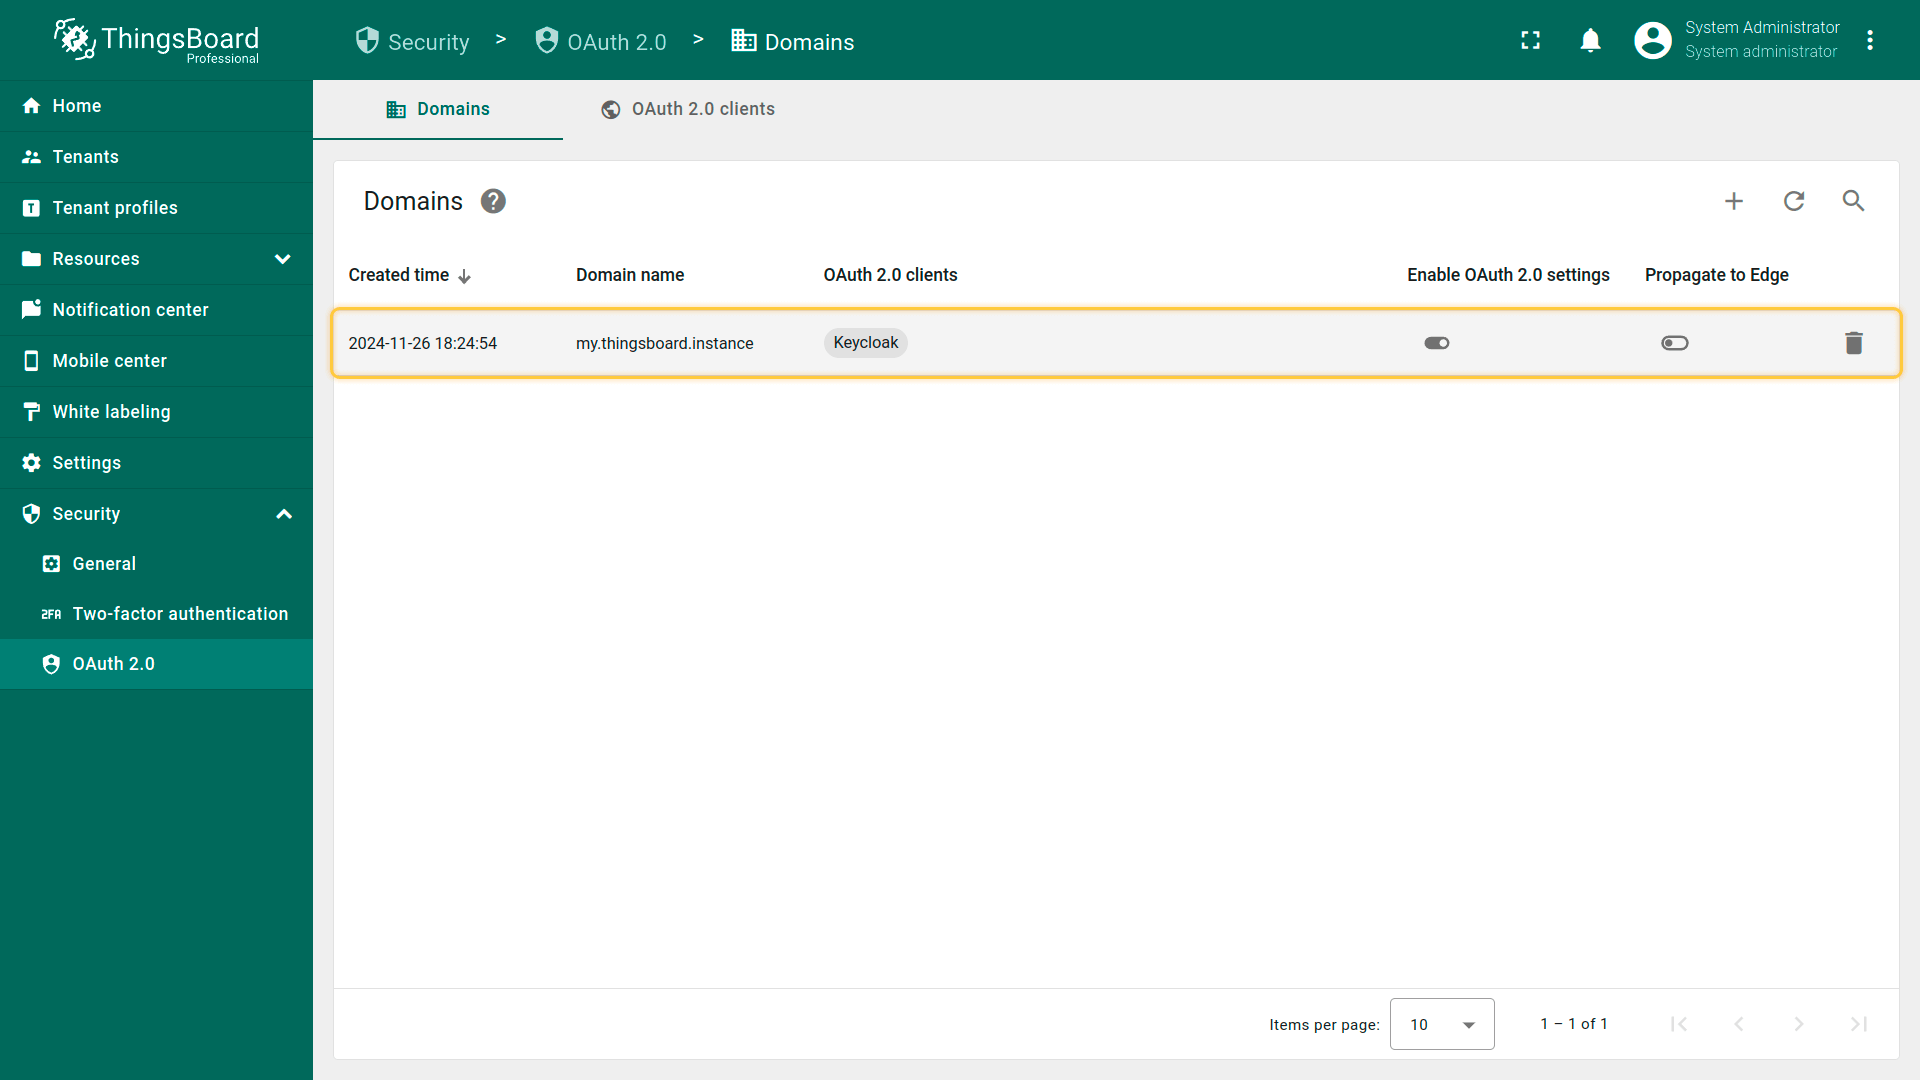
Operations with domain
ThingsBoard allows you to manage OAuth 2.0 domain mappings from the Domains tab.
- Add domain: click the + (plus) icon, enter the domain name, select one or more OAuth 2.0 clients, and click Add.
- Edit domain: open the domain details, click the orange Edit button, update the configuration, and click orange Apply changes.
- Delete domain: click the trash icon in the domain row and confirm deletion.
HaProxy configuration
If ThingsBoard is deployed behind a load balancer such as HAProxy, configure session stickiness to ensure the OAuth flow is handled consistently by the same node.
Example backend configuration:
1
2
3
4
backend tb-api-backend
  ...
  balance source # balance must be set to 'source'
  ...
Also ensure OAuth-related paths are included in the ACL mapping for both HTTP:
1
2
3
4
frontend http-in
  ...
  acl tb_api_acl path_beg /api/ /swagger /webjars /v2/ /static/rulenode/ /oauth2/ /login/oauth2/ # '/oauth2/ /login/oauth2/' added
  ...
and HTTPS frontends:
1
2
3
4
frontend https_in
  ...
  acl tb_api_acl path_beg /api/ /swagger /webjars /v2/ /static/rulenode/ /oauth2/ /login/oauth2/ # '/oauth2/ /login/oauth2/' added
  ...
Your feedback
If you have any questions about this sample, please contact us.