- Prerequisites
- Step 1. Connecting Device and Sending Telemetry Data
- Step 2. Creating Dashboard and Configuring Widgets
- Step 3. Pushing Data From Edge to Cloud
- Step 4. Provisioning Entities From Edge to Server
- Step 5. Provisioning Entities From Server to Edge
- Your Feedback
- Next steps
This tutorial will guide you through the fundamentals of the ThingsBoard Edge platform and introduce you to the most widely used features. From this tutorial, you will learn how to:
- Install and run ThingsBoard Edge on your machine.
- Connect local devices, such as temperature sensors.
- Transmit data from the device to the Edge and then from the Edge to the ThingsBoard Cloud.
- Create and configure real-time dashboards.
To keep it simple, we will skip over lengthy descriptions. However, if you need more detailed information, check out the “What is ThingsBoard Edge” article and explore our other documentation.
Prerequisites
To start running ThingsBoard Professional Edition Edge, you will need an active ThingsBoard Professional Edition account that supports Edge functionality.
Sign up for a ThingsBoard Cloud account, which is the easiest way to get started. Throughout the rest of this tutorial, this URL will be referred to as SERVER_URL Log in using your ThingsBoard Cloud tenant credentials. |
|
You can install the ThingsBoard Professional Edition local server. For this, please refer to the ThingsBoard installation guide. The local server can be accessed via http://localhost:8080. Throughout this tutorial, we will refer to this URL as SERVER_URL. Log in with:
|
Edge Hardware Requirements
The hardware requirements for ThingsBoard Edge are determined by the number of connected devices and the intensity of interactions with the platform interface. To ensure optimal performance, we recommend the following:
- At least 1GB of RAM (Light workload): It is suitable for minimal interactions with the platform interface, such as dashboards and device management, and fewer than 100 connected devices.
- At least 4GB of RAM (Heavy workload): This configuration is suitable for intense platform interactions and 100+ devices connected to a single machine.
Deploying a New Edge Instance
To create a new Edge:
-
Sign in to your ThingsBoard PE instance and navigate to the Edge Management > Instances section. Click the ”+” icon in the top right corner and select the “Add new edge” option.
-
Enter a name for the Edge you are creating. For example, “My New Edge”. If needed, update the cloud endpoint.
- If the Edge runs in a Docker container, do not use “localhost” as the endpoint. Instead, use the IP address of the machine where ThingsBoard PE is hosted and accessible by the Edge container. For example, http://10.7.2.143:8080.
- If you are using the ThingsBoard Cloud, there’s no need to change this setting — keep it as is.
- Click the “Add” button to confirm the addition of the Edge instance.
-
Your new Edge is created and will appear at the top of the list, as entries are sorted by creation time by default.
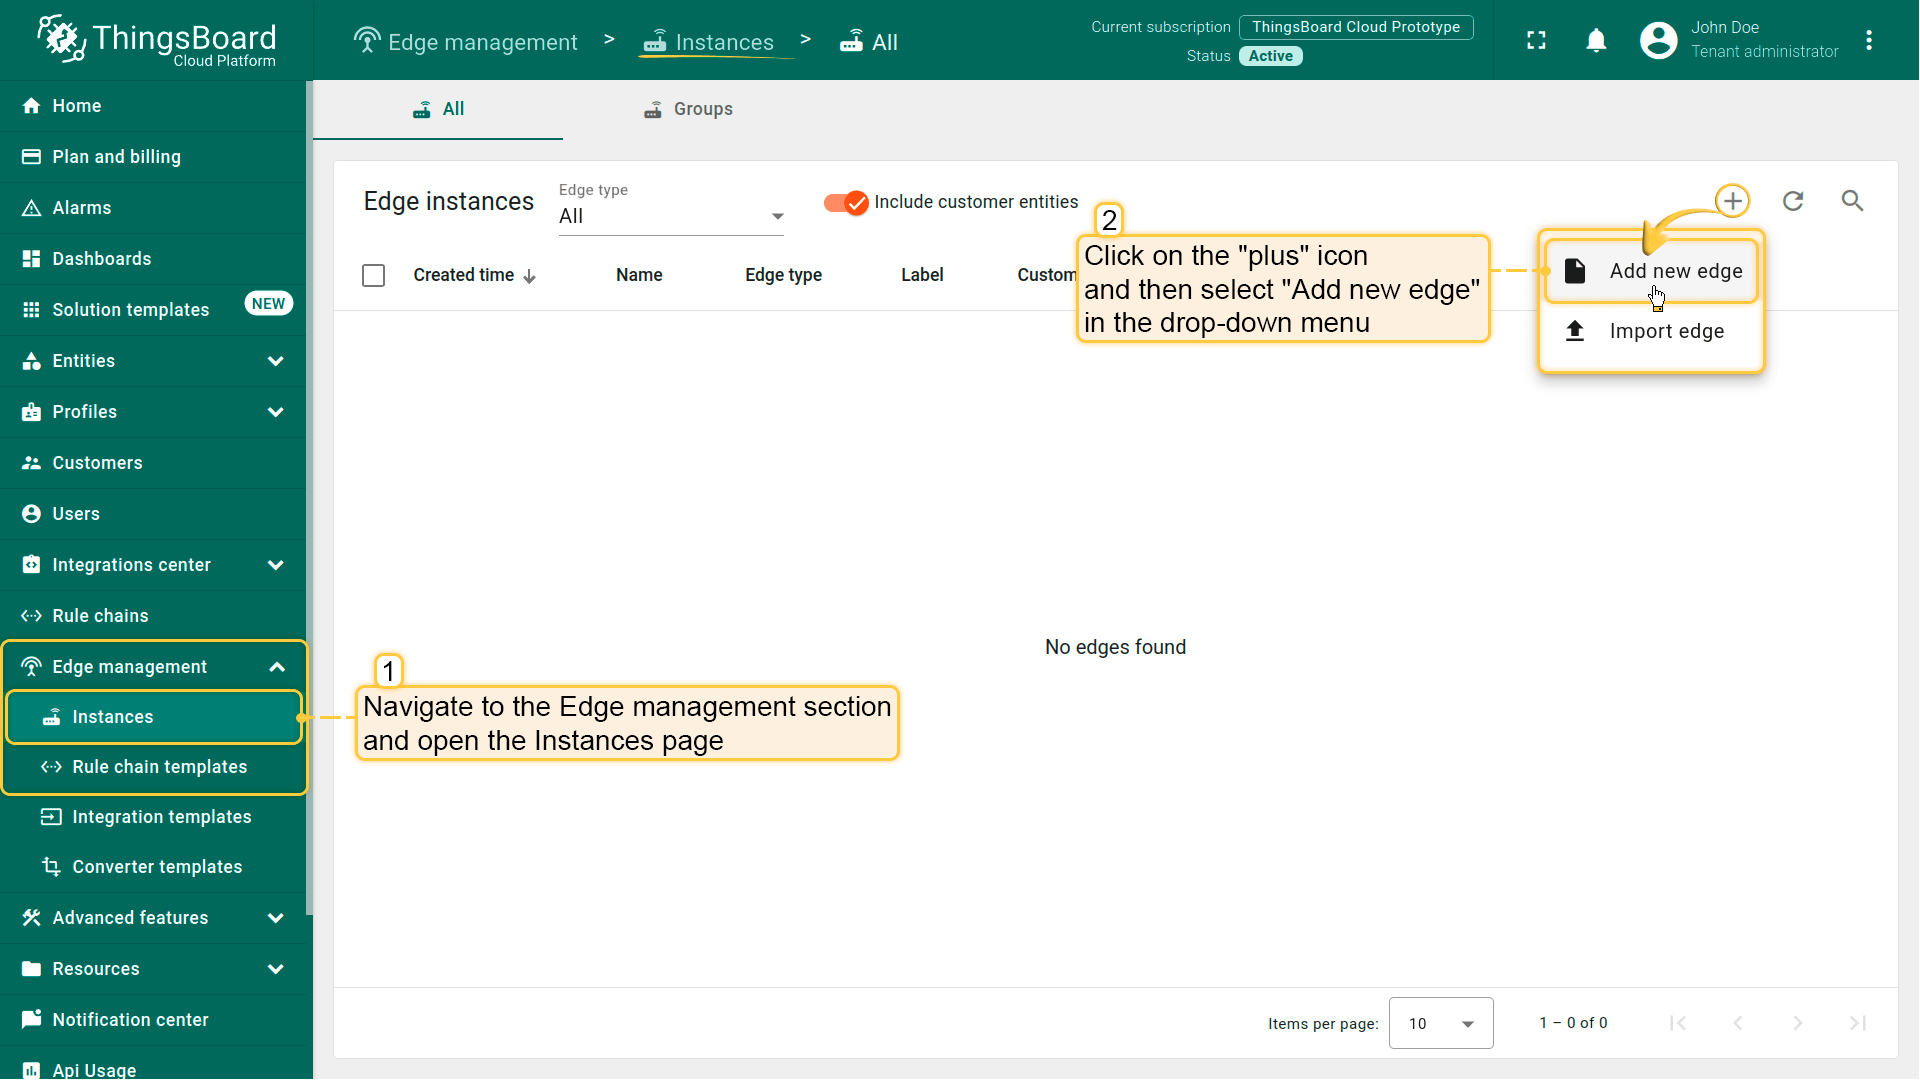
Sign in to your ThingsBoard PE instance and navigate to the Edge Management > Instances section. Click the ”+” icon in the top right corner and select the “Add new edge” option.
{:target="_blank"}, do not use “localhost” as the endpoint. Instead, use the IP address of the machine where ThingsBoard PE is hosted and accessible by the Edge container. For example, http://10.7.2.143:8080.
If you are using the ThingsBoard Cloud, there’s no need to change this setting — keep it as is.
Click the "Add" button to confirm the addition of the Edge instance.](/images/pe/edge/installation-add-edge-item-2.png)
Enter a name for the Edge you are creating. For example, “My New Edge”. If needed, update the cloud endpoint.
- If the Edge runs in a Docker container, do not use “localhost” as the endpoint. Instead, use the IP address of the machine where ThingsBoard PE is hosted and accessible by the Edge container. For example, http://10.7.2.143:8080.
- If you are using the ThingsBoard Cloud, there’s no need to change this setting — keep it as is.
- Click the “Add” button to confirm the addition of the Edge instance.
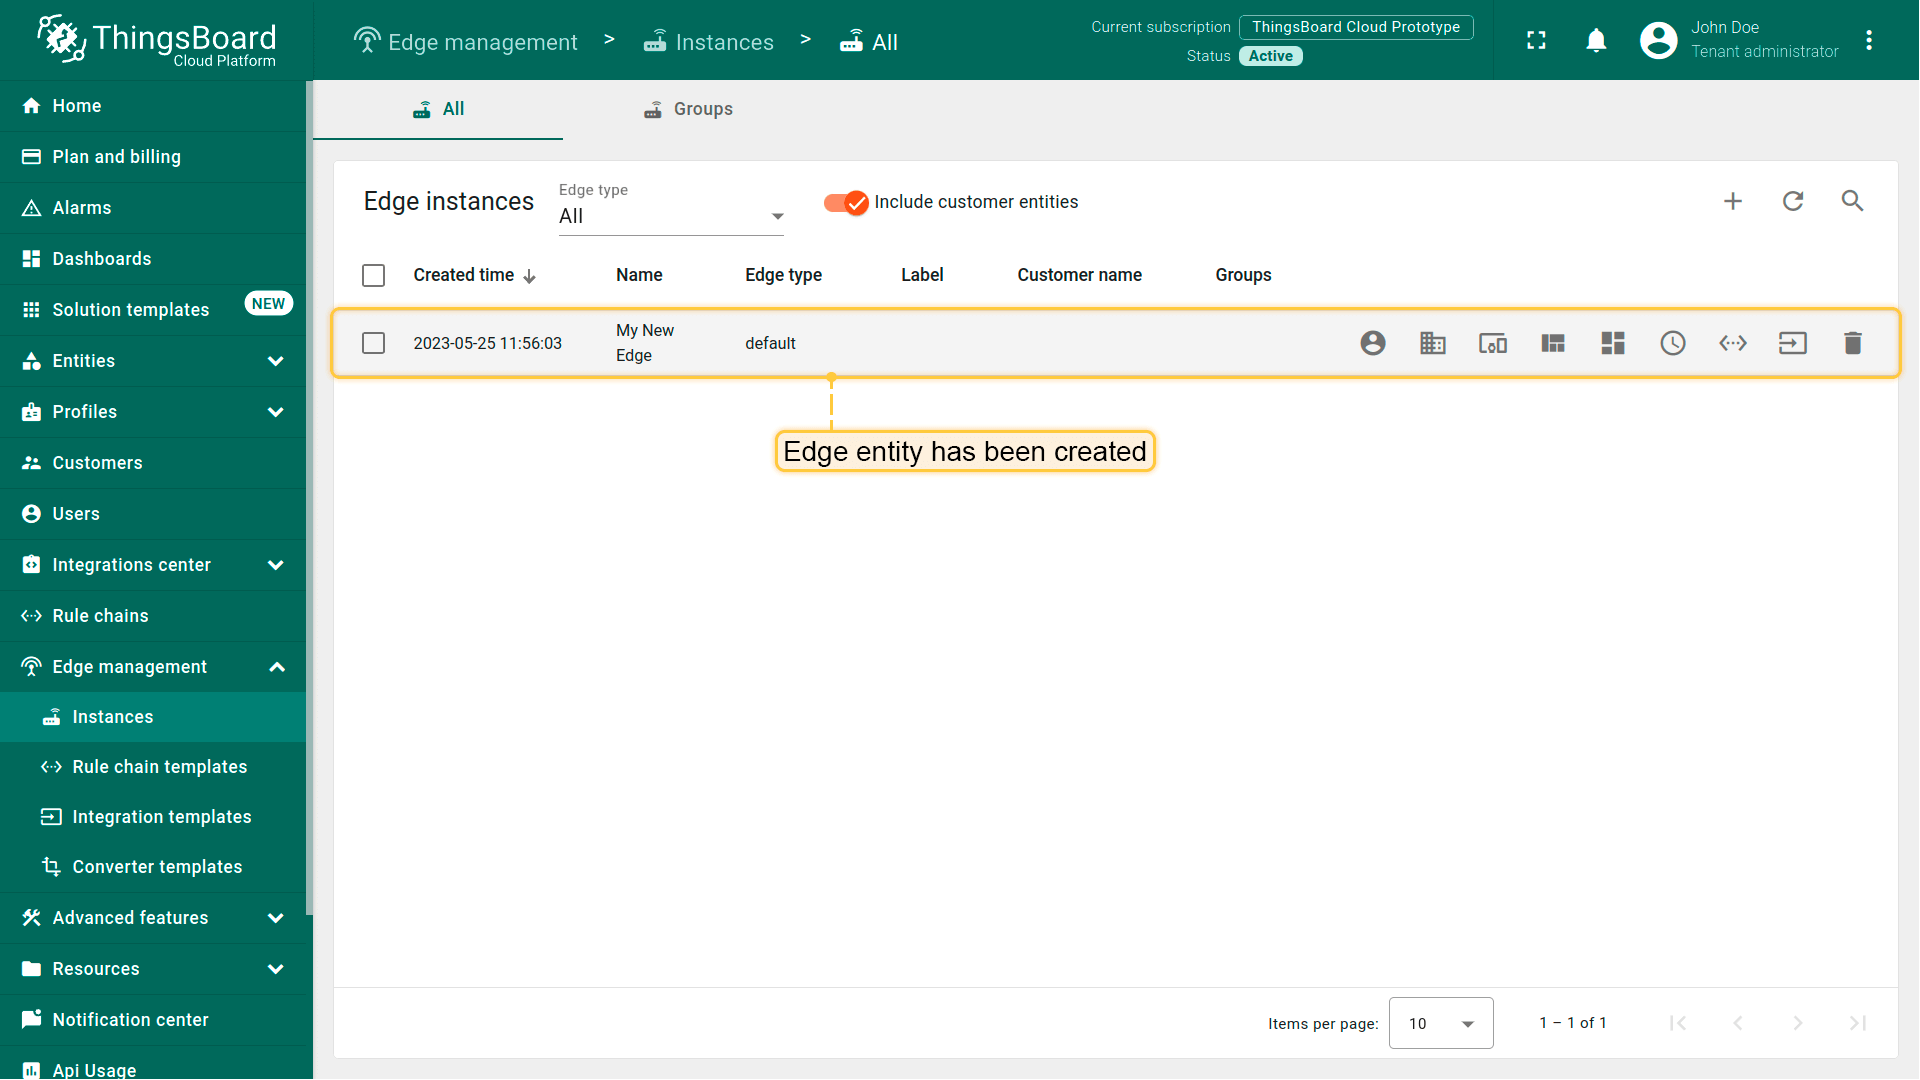
Your new Edge is created and will appear at the top of the list, as entries are sorted by creation time by default.
Edge Installation and Configuration
Guided Installation with ThingsBoard Server Pre-configured Instructions
Once the Edge instance has been created, the installation instructions will be available for use. Each Edge has preset configurations that contain important credentials, such as Edge Secret, Edge Key, etc. To access these configurations:
-
Click on the Edge entity to open its details.
-
Click the “Install & Connection Instructions” button.
-
Follow the instructions to install Edge and connect it to the server.
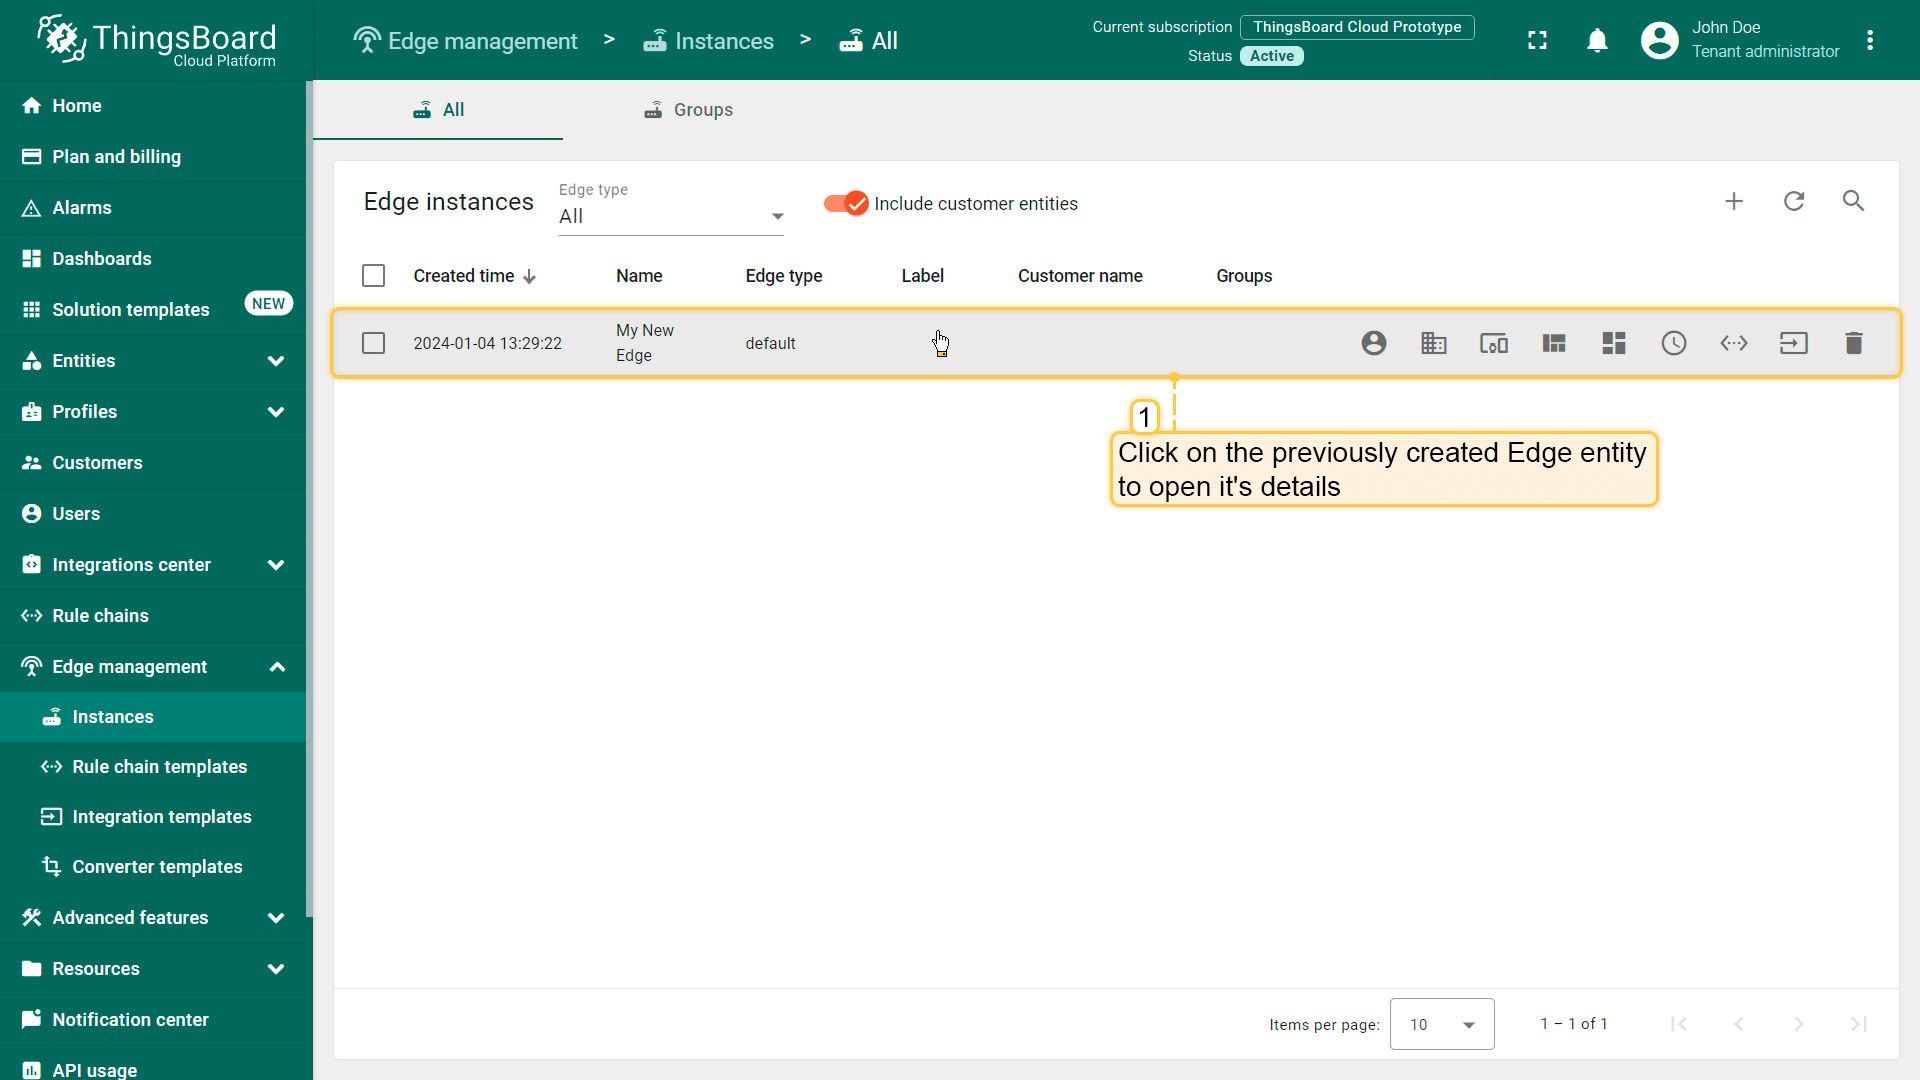
Click on the Edge entity to open its details.
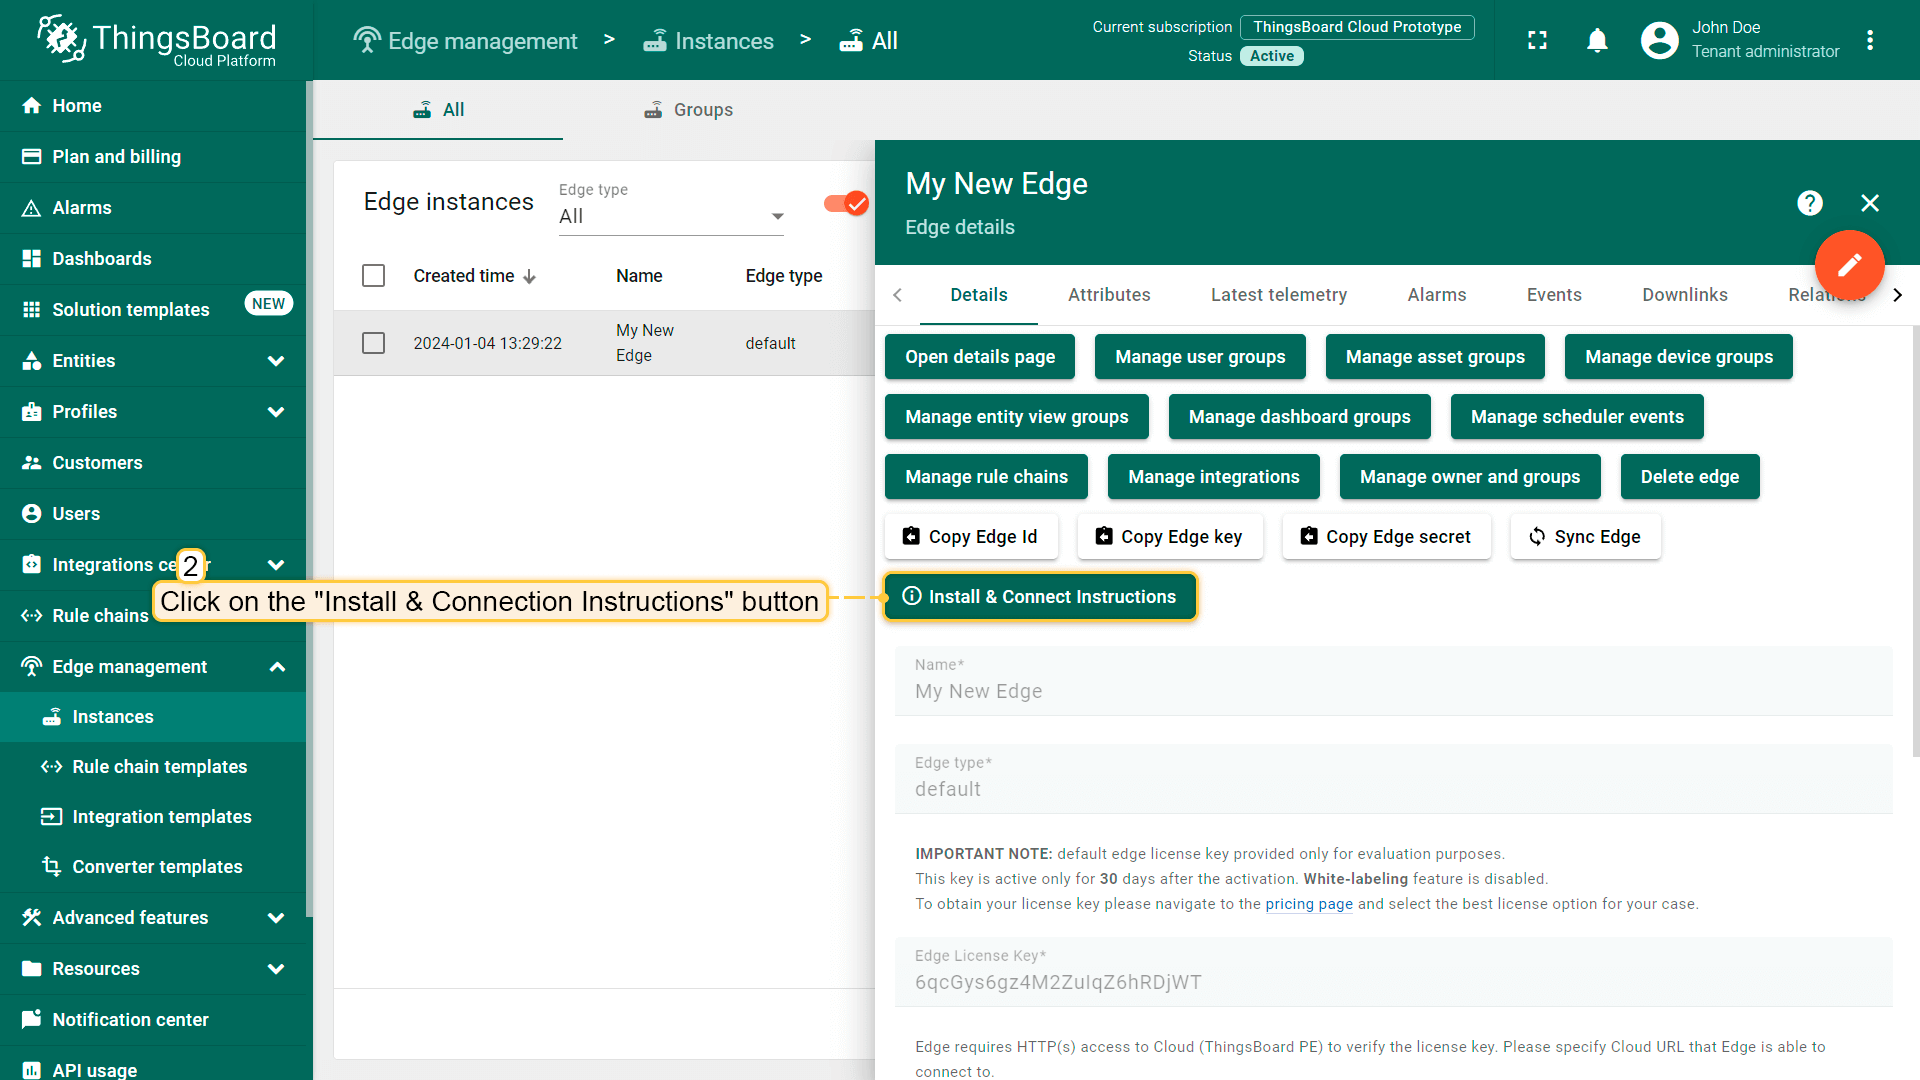
Click the “Install & Connection Instructions” button.
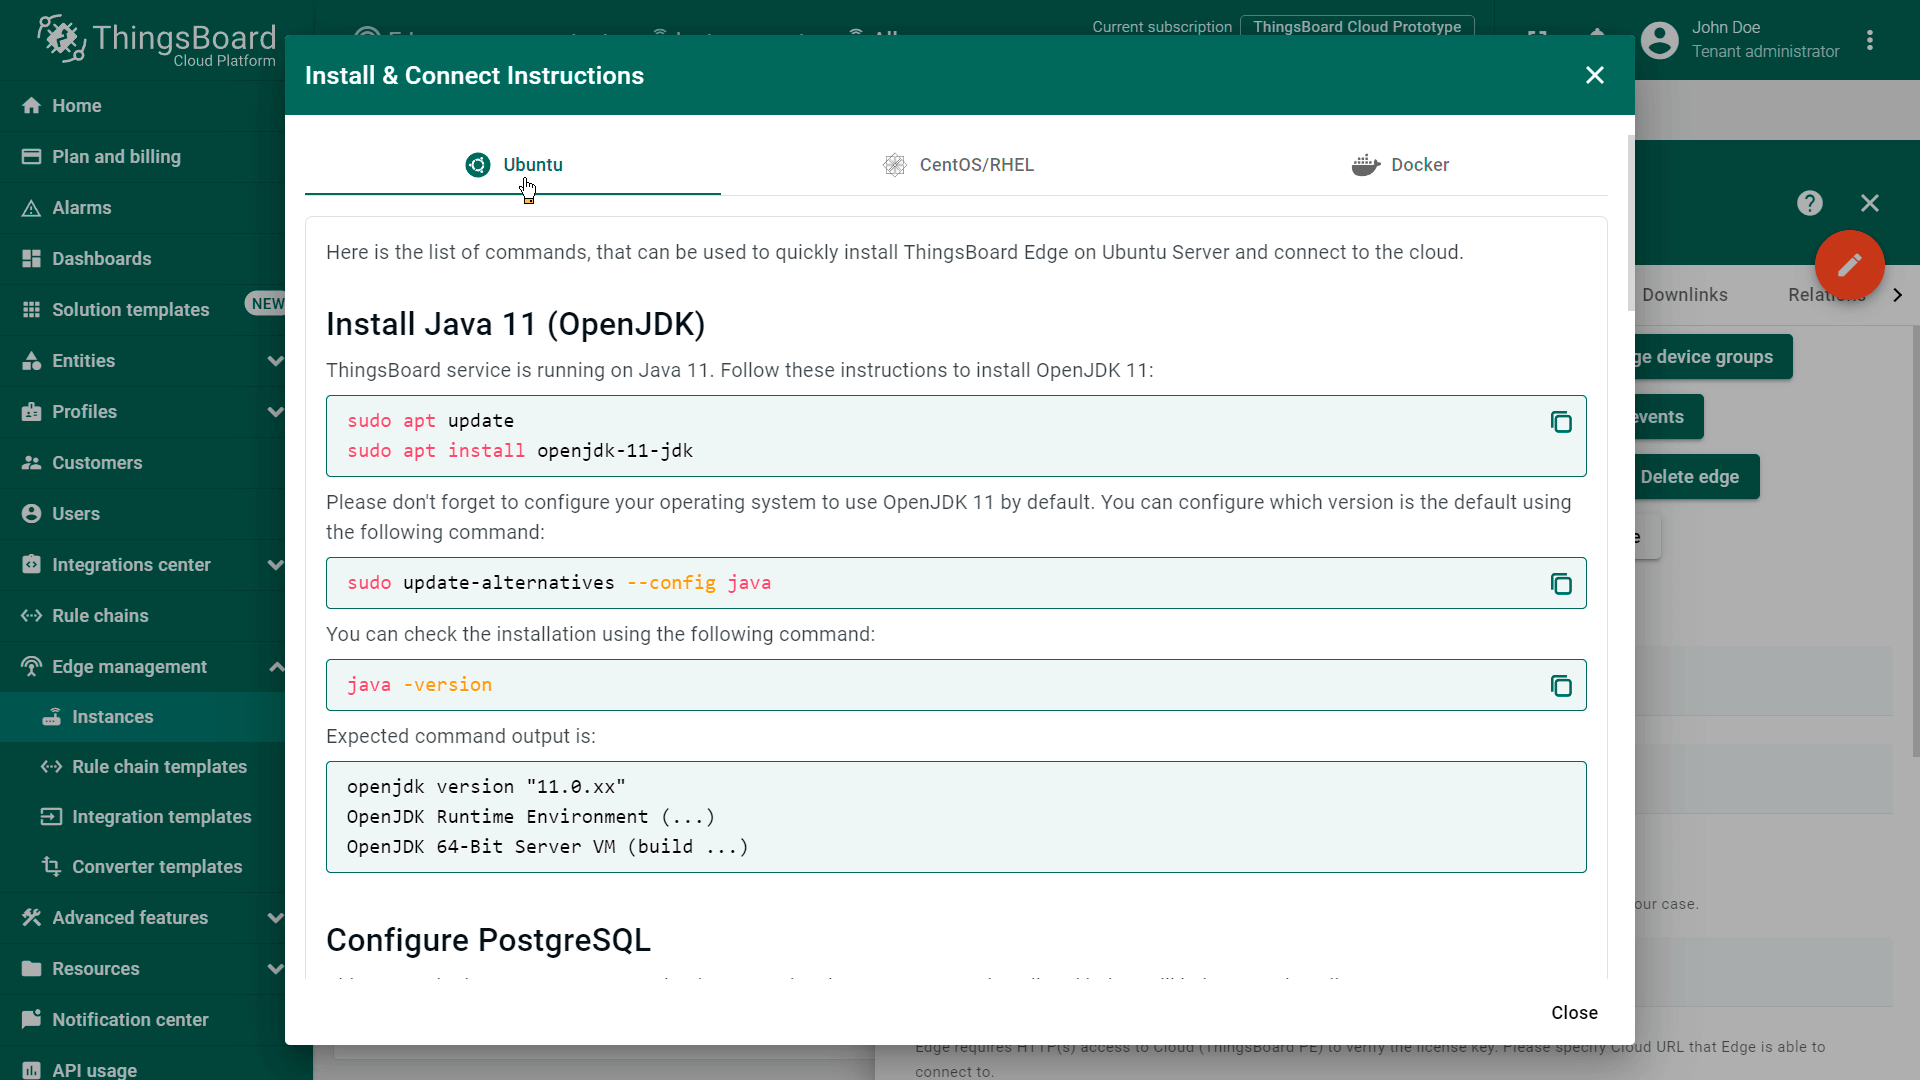
Follow the instructions to install Edge and connect it to the server.
If for any reason you are unable to access and/or use Edge preset configurations, please refer to the manual installation instructions.
Accessing User Interfaces: URLs and Credentials
Once Edge is installed, you’ll be able to access the interface via http://localhost:8080. Throughout the rest of this tutorial, this URL will be referred to as EDGE_URL Please log in using your ThingsBoard Cloud tenant credentials. |
Once Edge is installed, you’ll be able to access the interface via http://localhost:18080. This URL will be referred to as EDGE_URL throughout the rest of this tutorial. To log in, use the same credentials as SERVER_URL:
|
Currently, Edge does not support OAuth 2.0 for login purposes. If you wish to access Edge using your OAuth 2.0 user credentials, it is necessary to assign a password for this user on the ThingsBoard server.
If the Edge HTTP bind port was changed to 18080 during Edge installation, access the ThingsBoard Edge instance at http://localhost:18080.
Step 1. Connecting Device and Sending Telemetry Data
In ThingsBoard, the device is the key entity that generates telemetry data, which is stored and processed for dashboards and analytics. ThingsBoard also provides a virtual device shell for sending telemetry on behalf of the physical device for testing purposes.
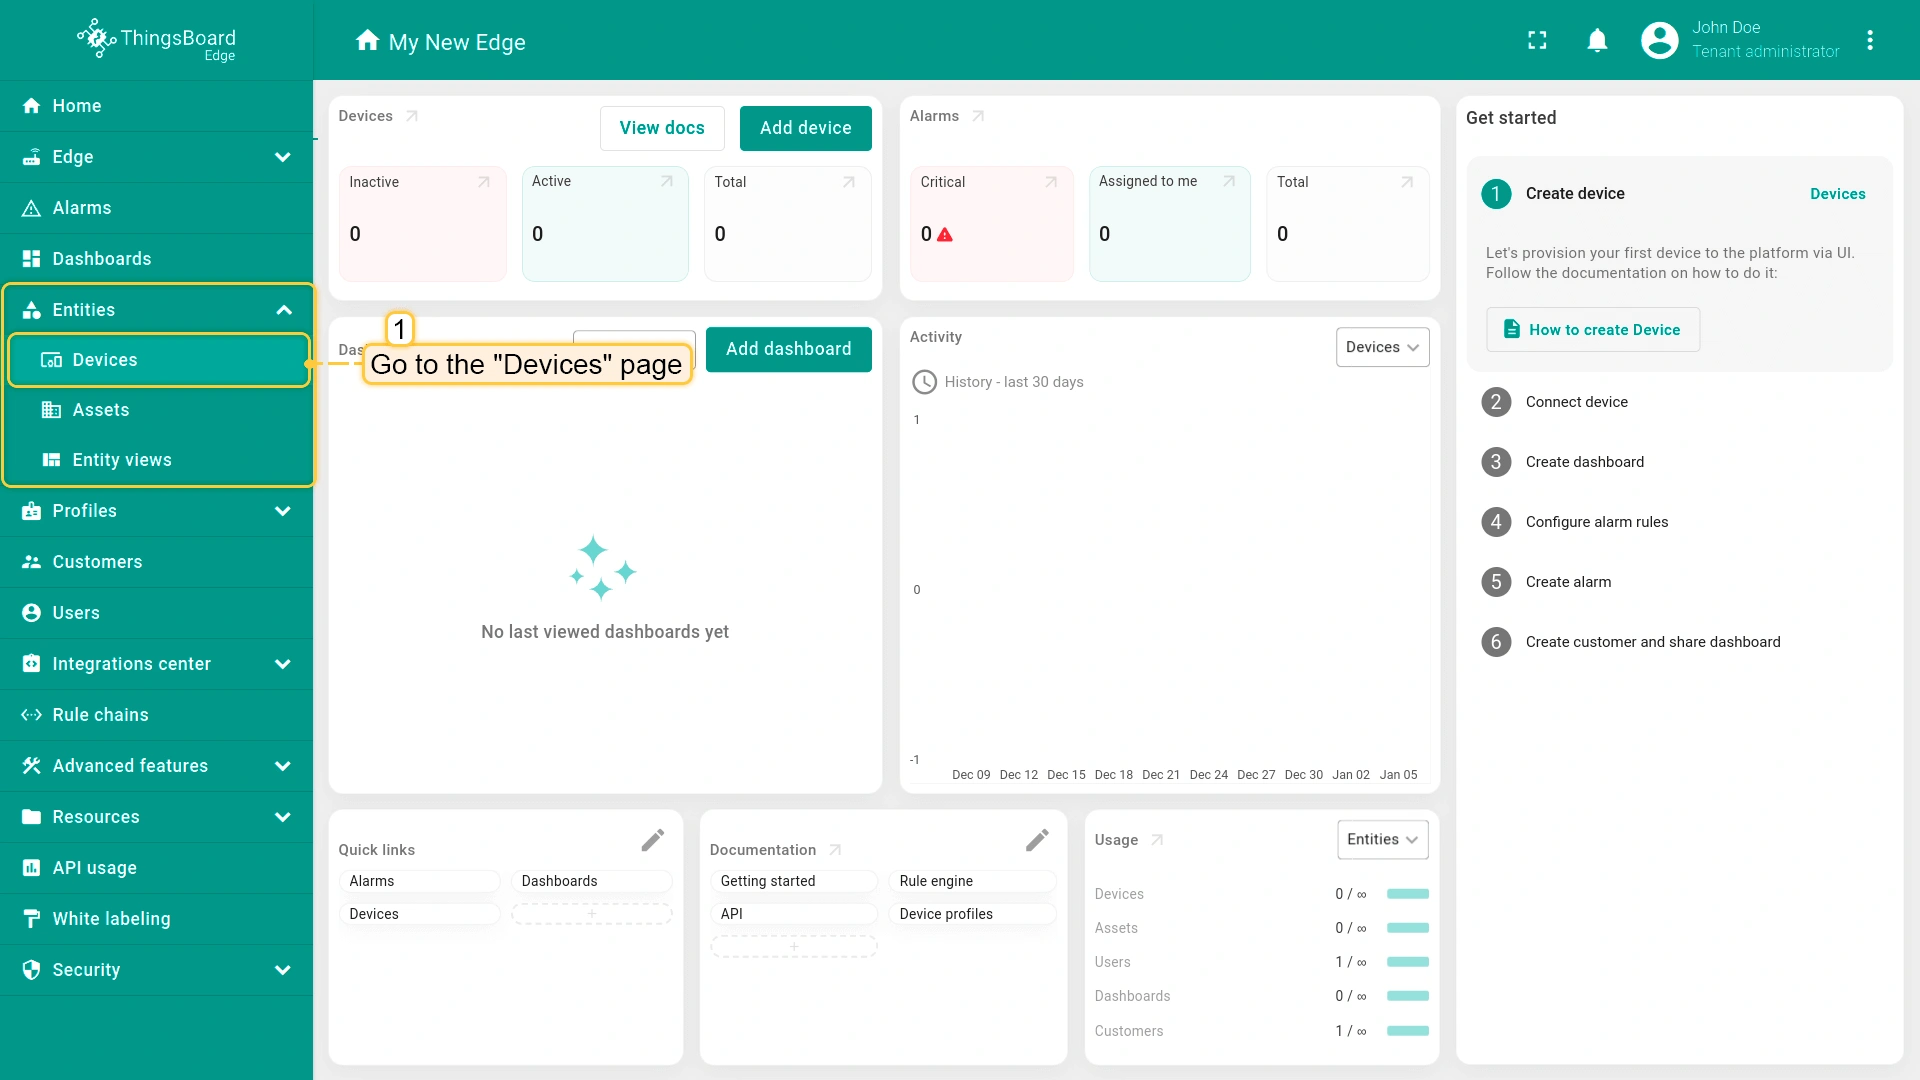
To add a new device on the Edge, log in to your ThingsBoard Edge instance at EDGE_URL and follow these steps:
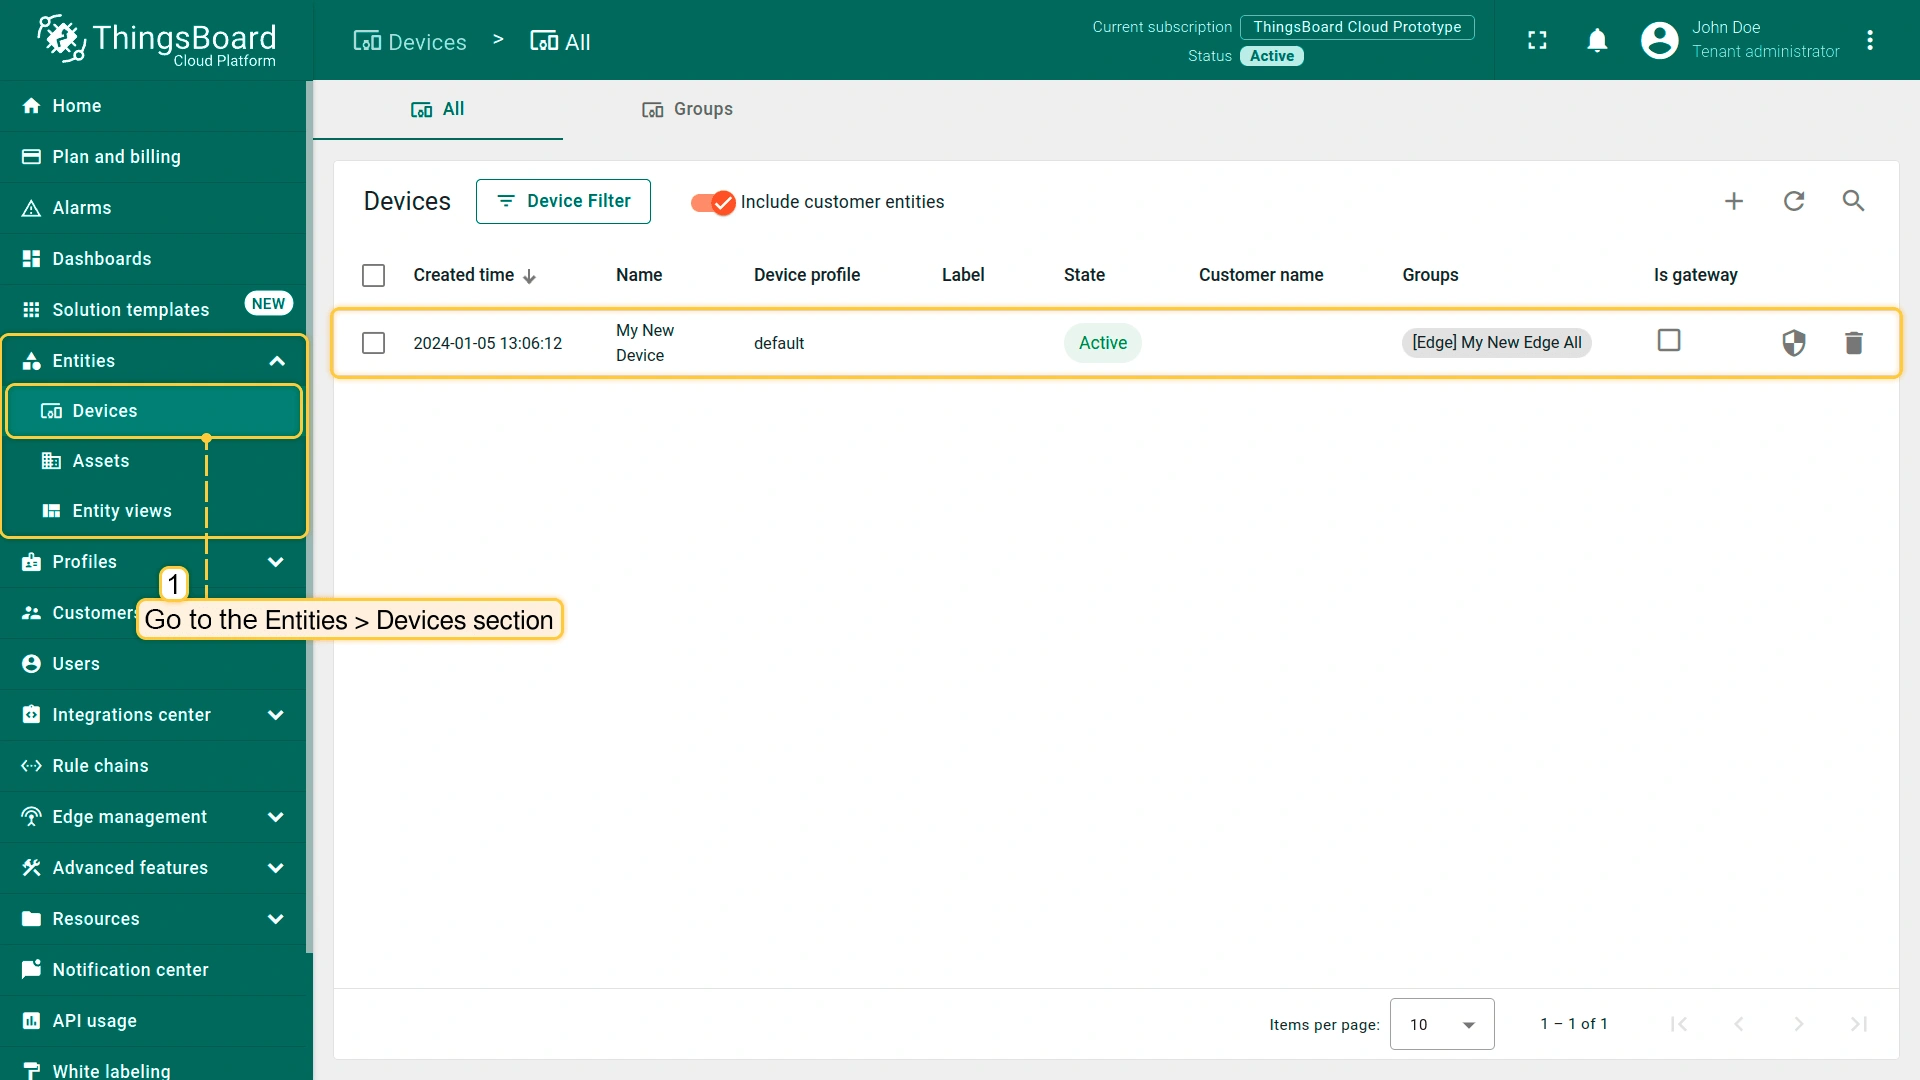
- Go to the Entities > Devices section.
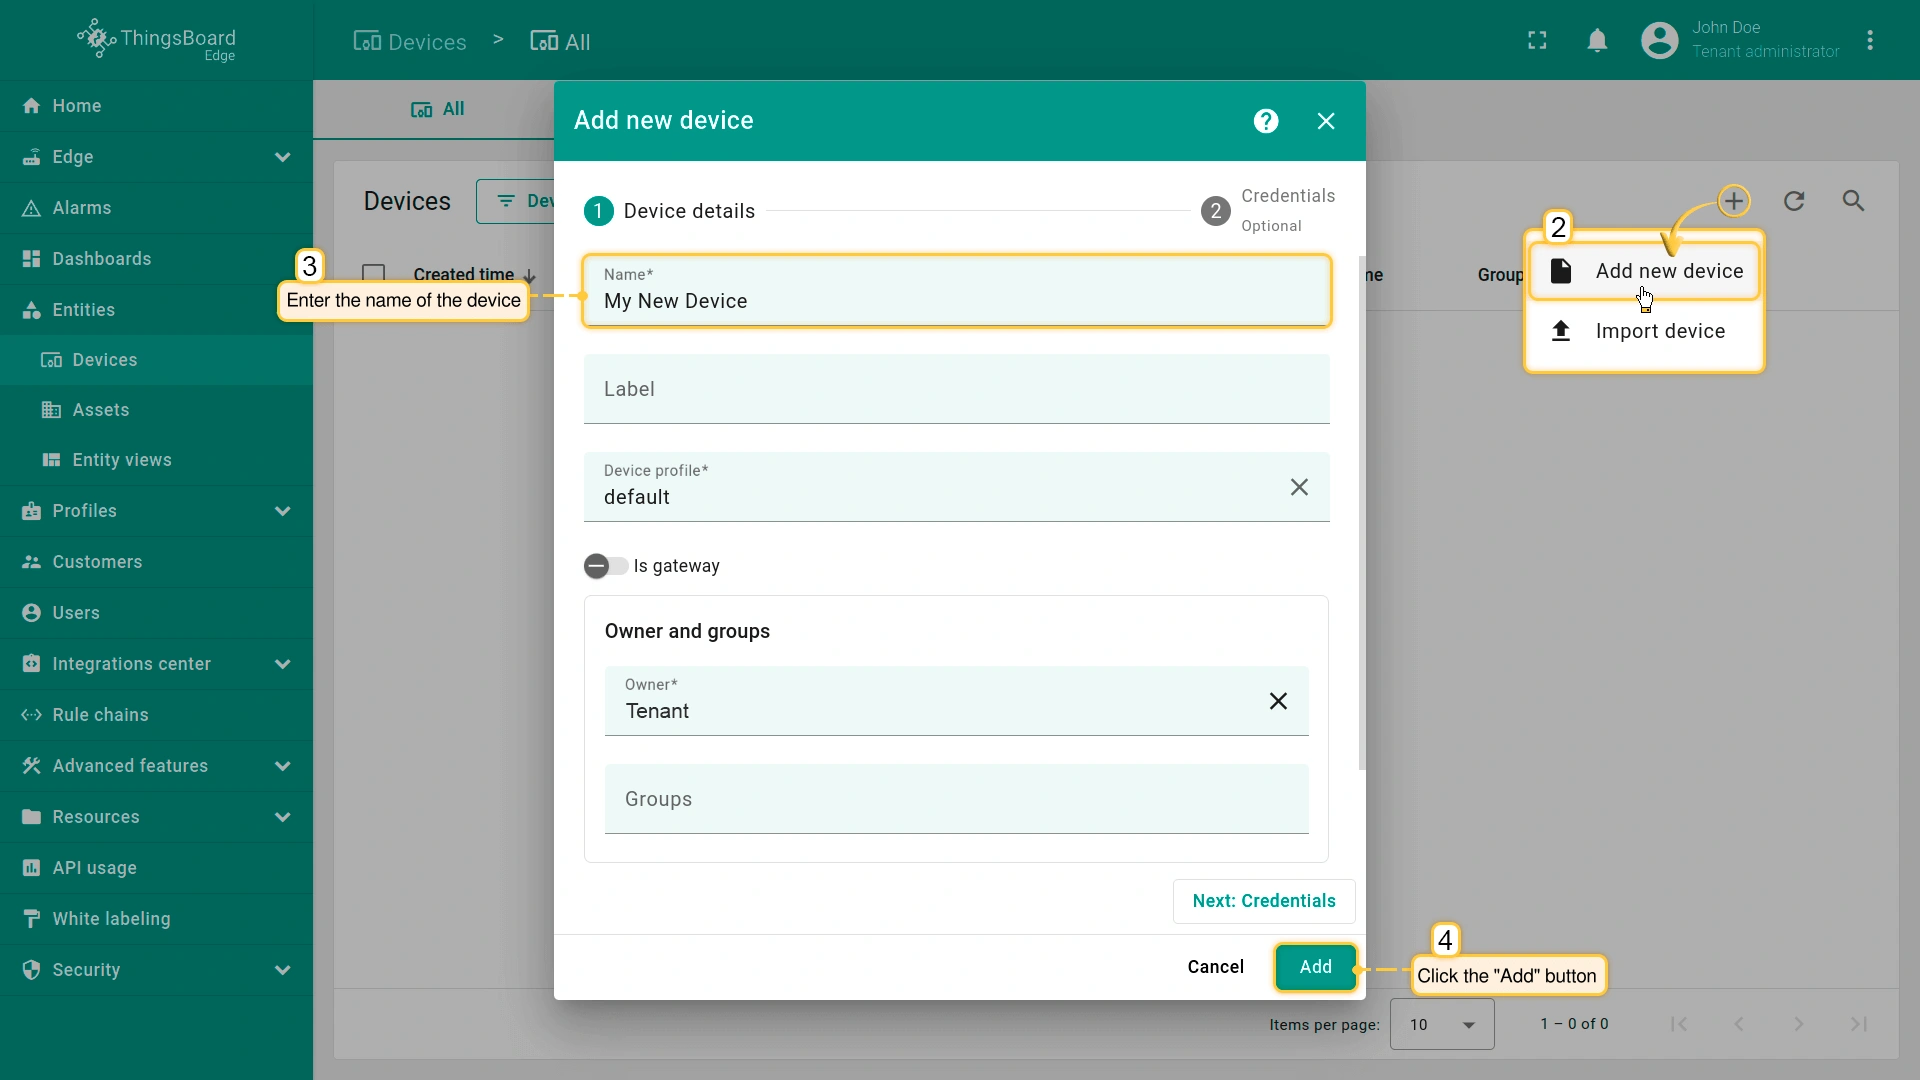
- Click the "+" icon and select the "Add new device" option. Enter a name for the device, for example, "My New Device". No other changes are required. Click the "Add" button to create the device.
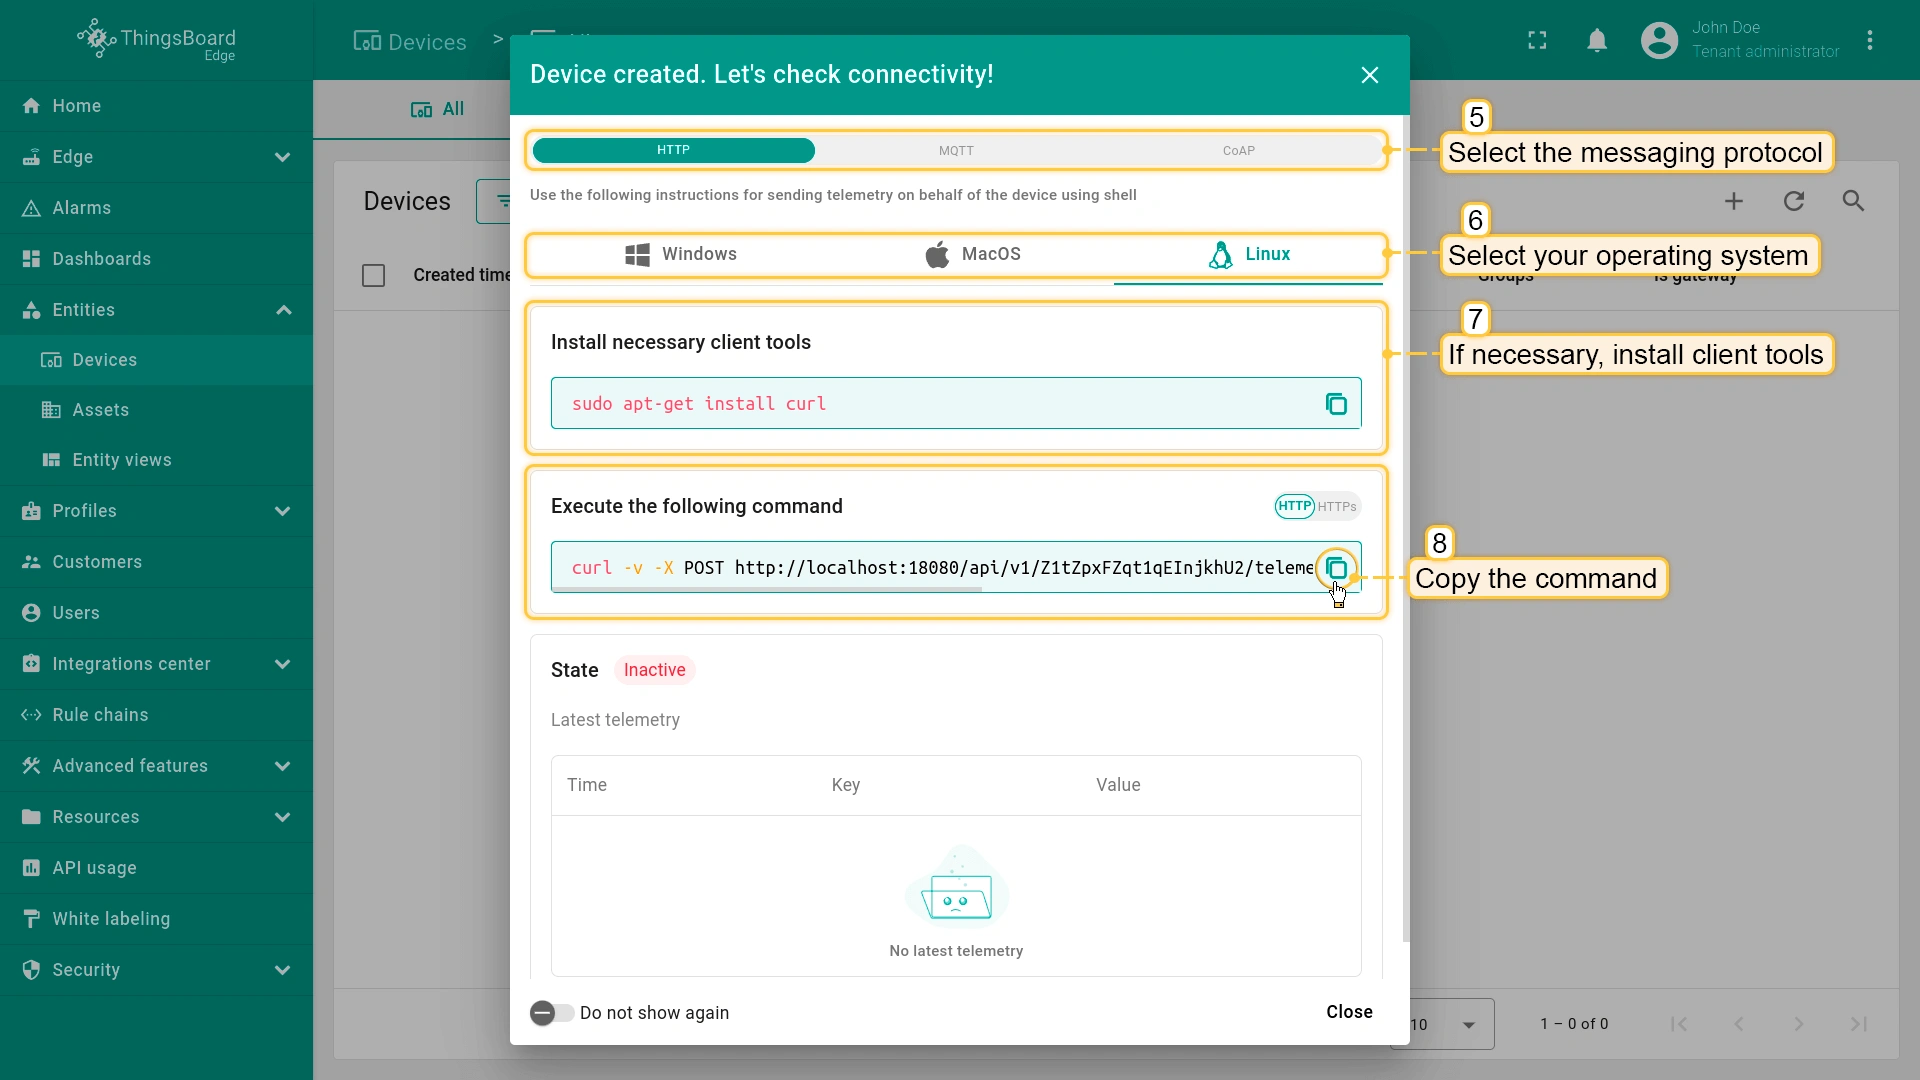
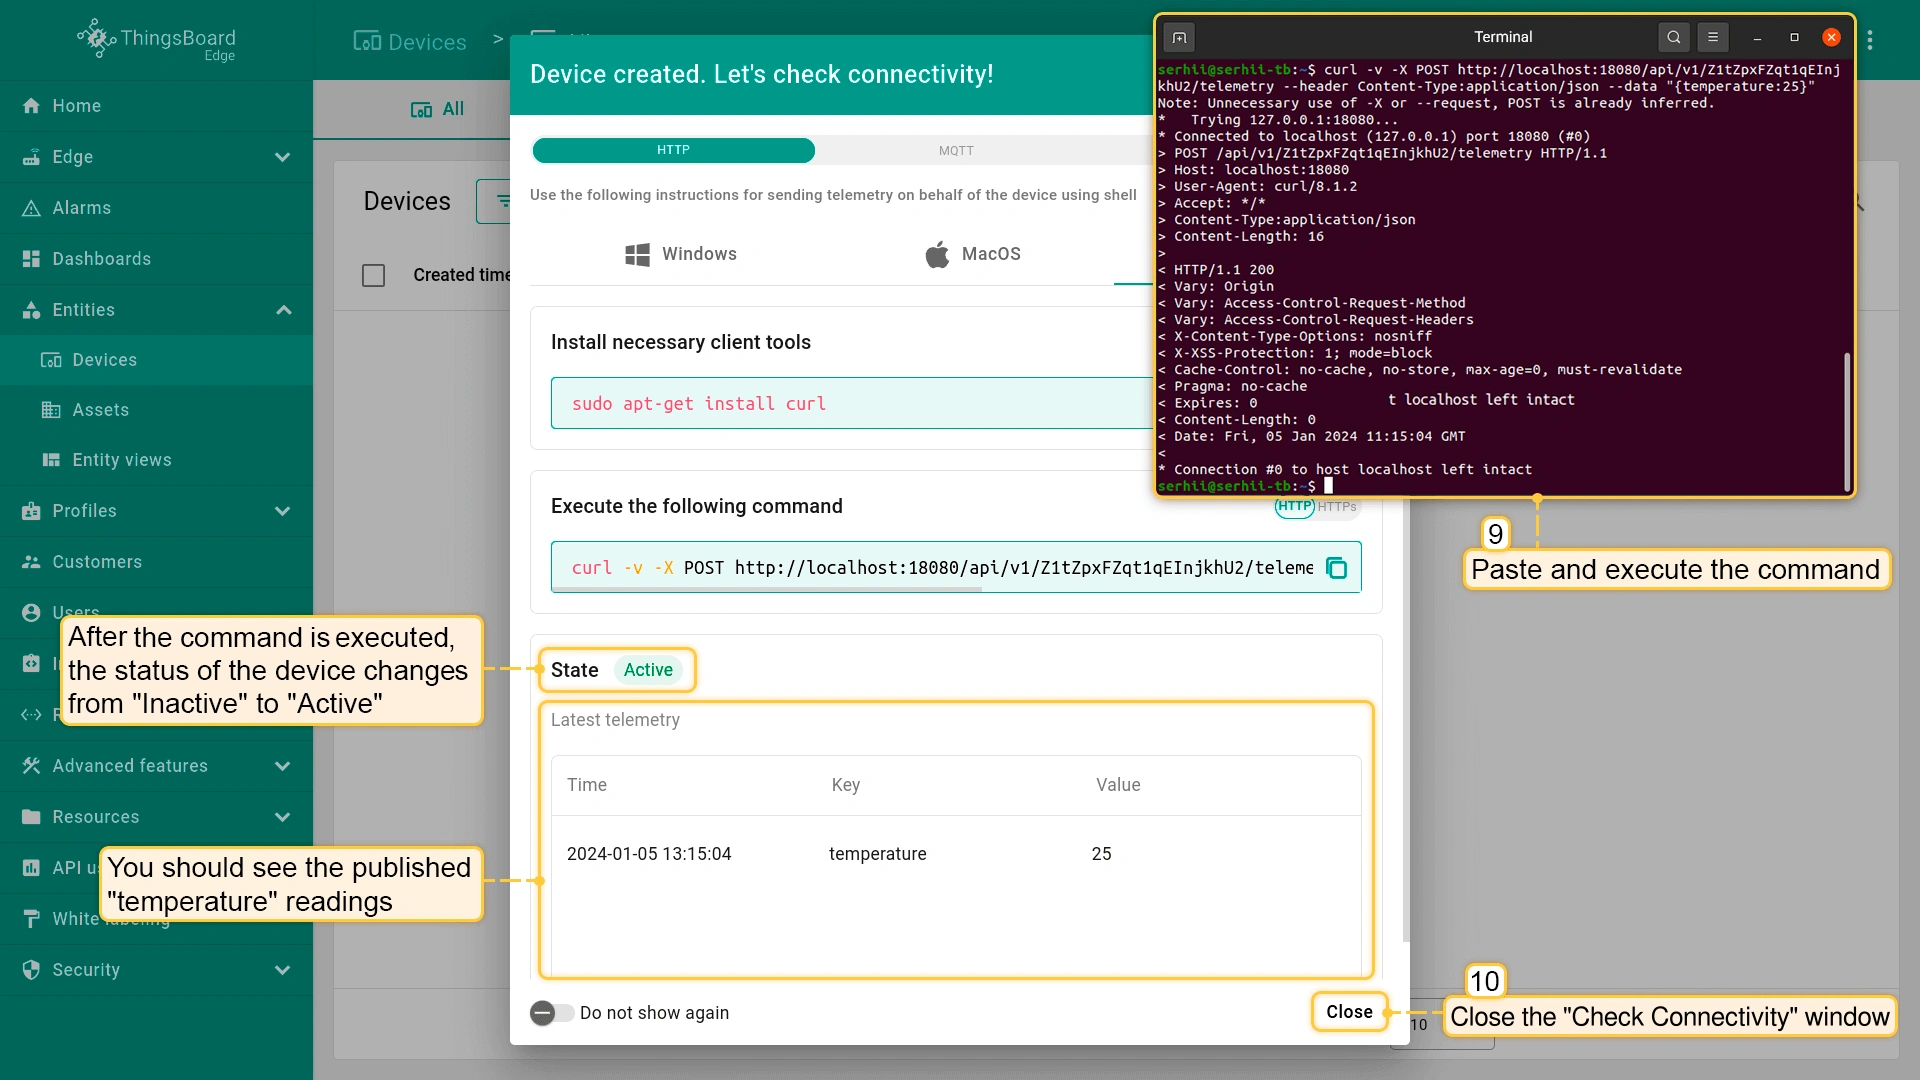
- After the device is created, instructions on how to check its connectivity will be provided. Select the messaging protocol and your operating system. Install the required client tools, then copy the provided command.
- Run the previously copied command. Once the "temperature" readings are published, the device state will change from "Inactive" to "Active", and you will see the published "temperature" readings. Finally, close the connectivity window.
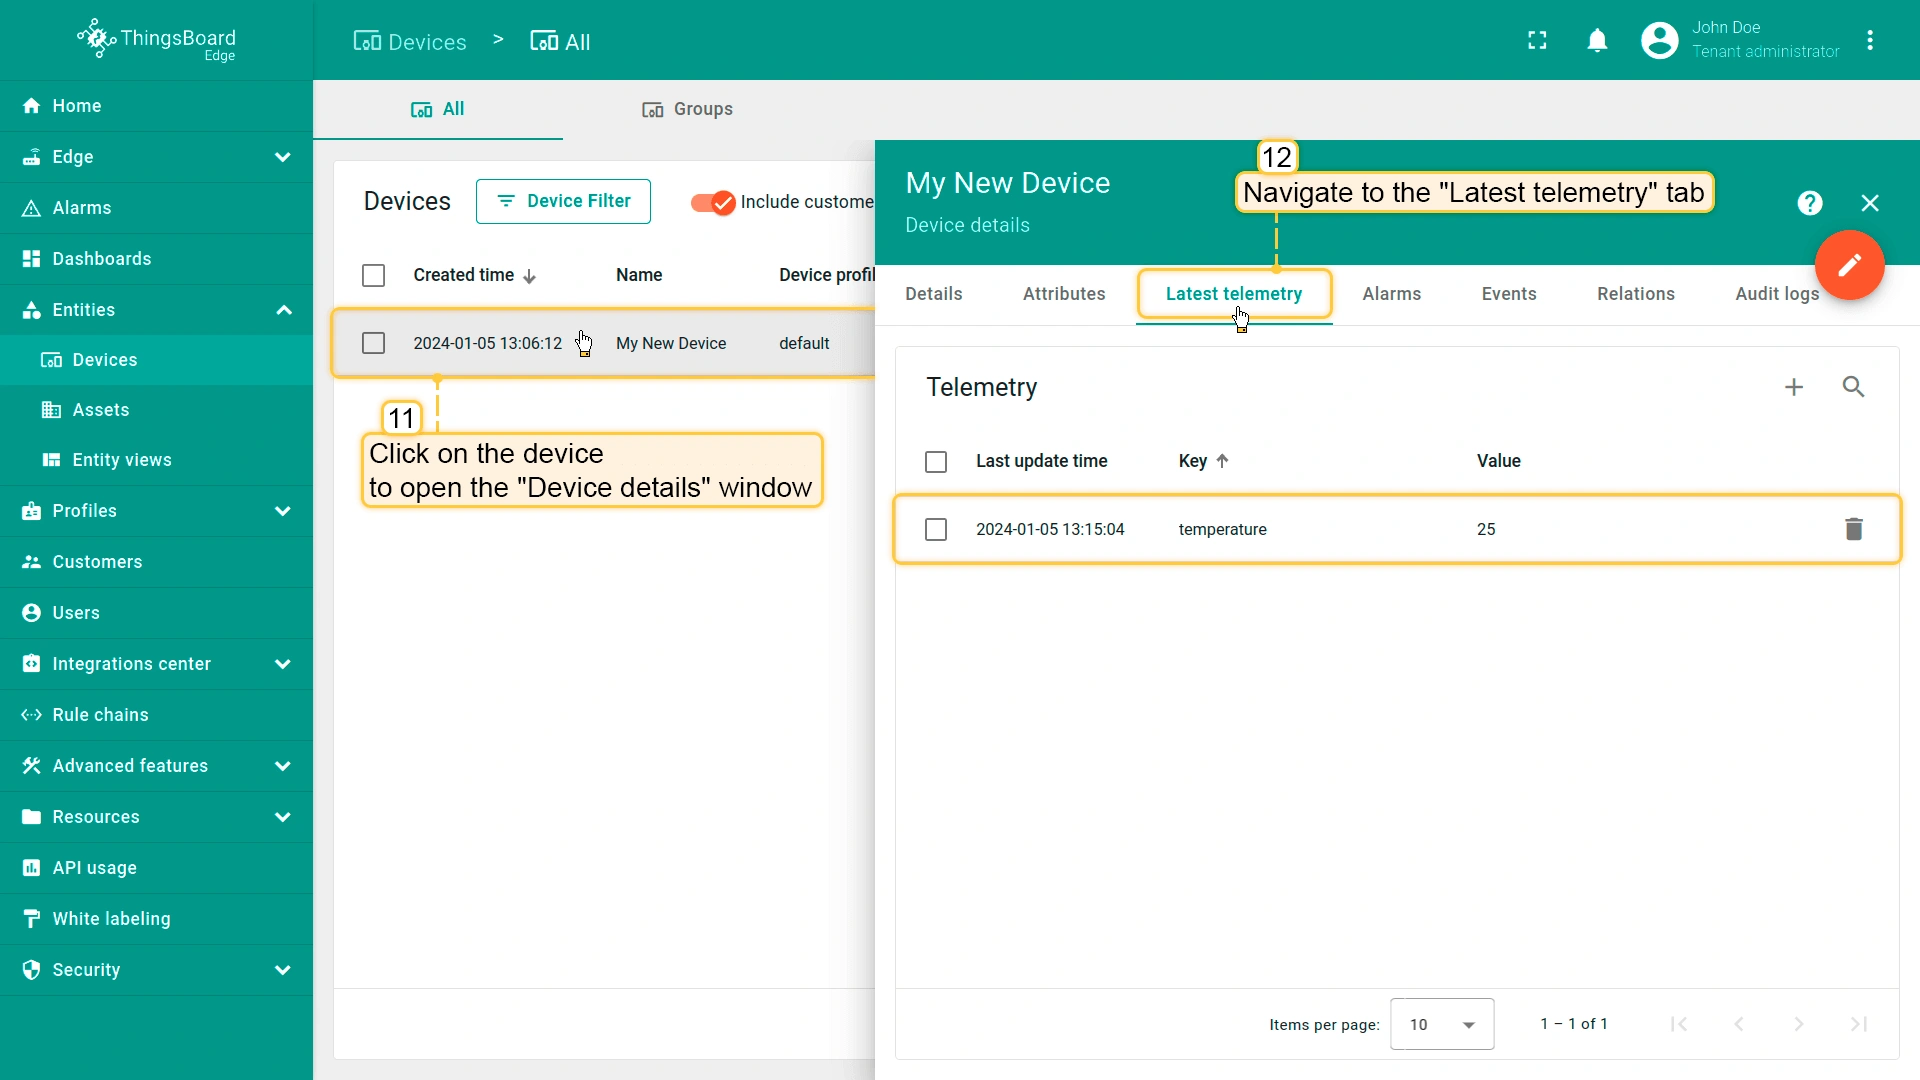
- To verify the received telemetry, click on the device entity and open the "Latest Telemetry" tab.
In addition, the following may be used:
- Bulk provisioning: Use to deploy multiple devices from a CSV file via user interface.
- REST API: Use to add devices and other entities programmatically.
Once a device is created on the Edge, it will be automatically provisioned to the ThingsBoard server. To view the Edge device on the Server, visit the SERVER_URL and navigate to the Entities > Devices section.
Step 2. Creating Dashboard and Configuring Widgets
A Dashboard is another key entity within ThingsBoard. It allows you to visualize IoT data and control devices through the user interface.
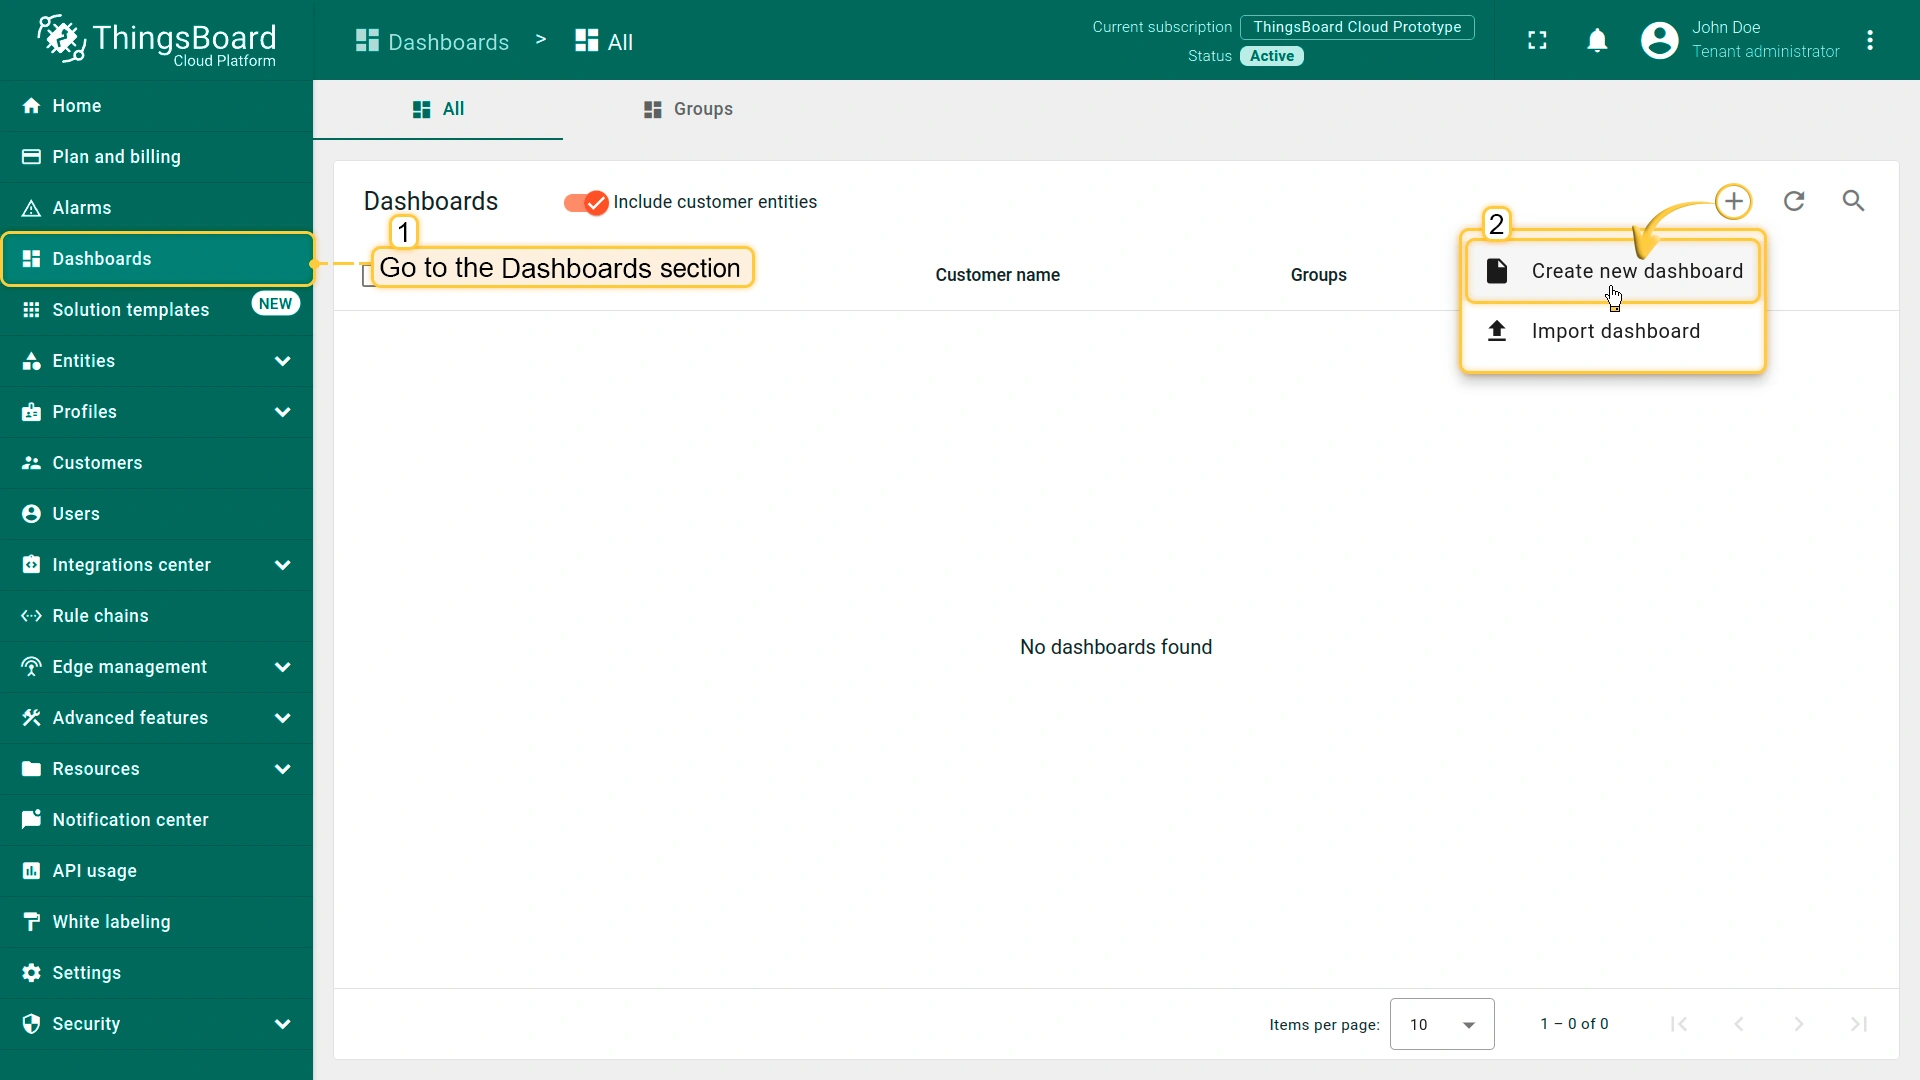
To create a dashboard, login to your ThingsBoard Edge instance and navigate to the Dashboard section. Then, follow these steps:
- Click the "+" icon and select the "Create new dashboard" option from the drop-down menu.
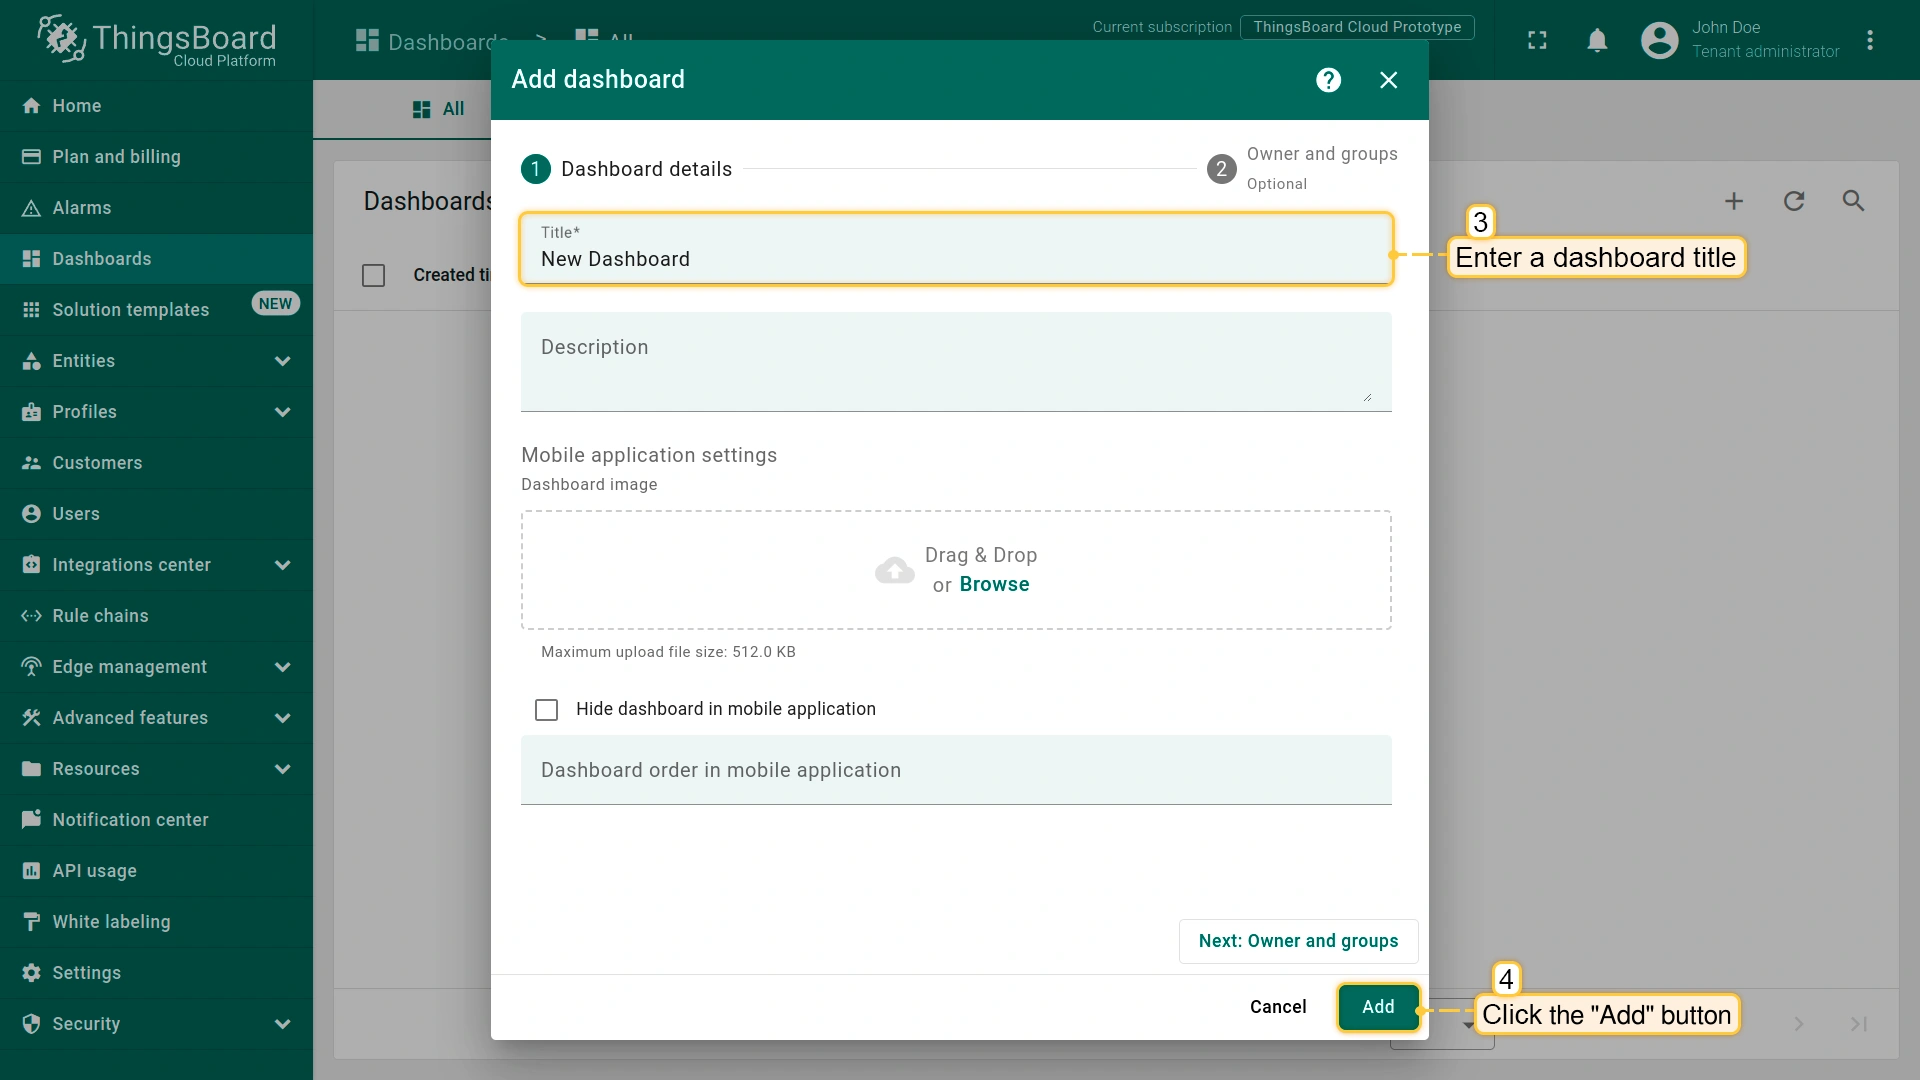
- Enter the dashboard name, for example, "New Dashboard", and click the "Add" button to create the dashboard.
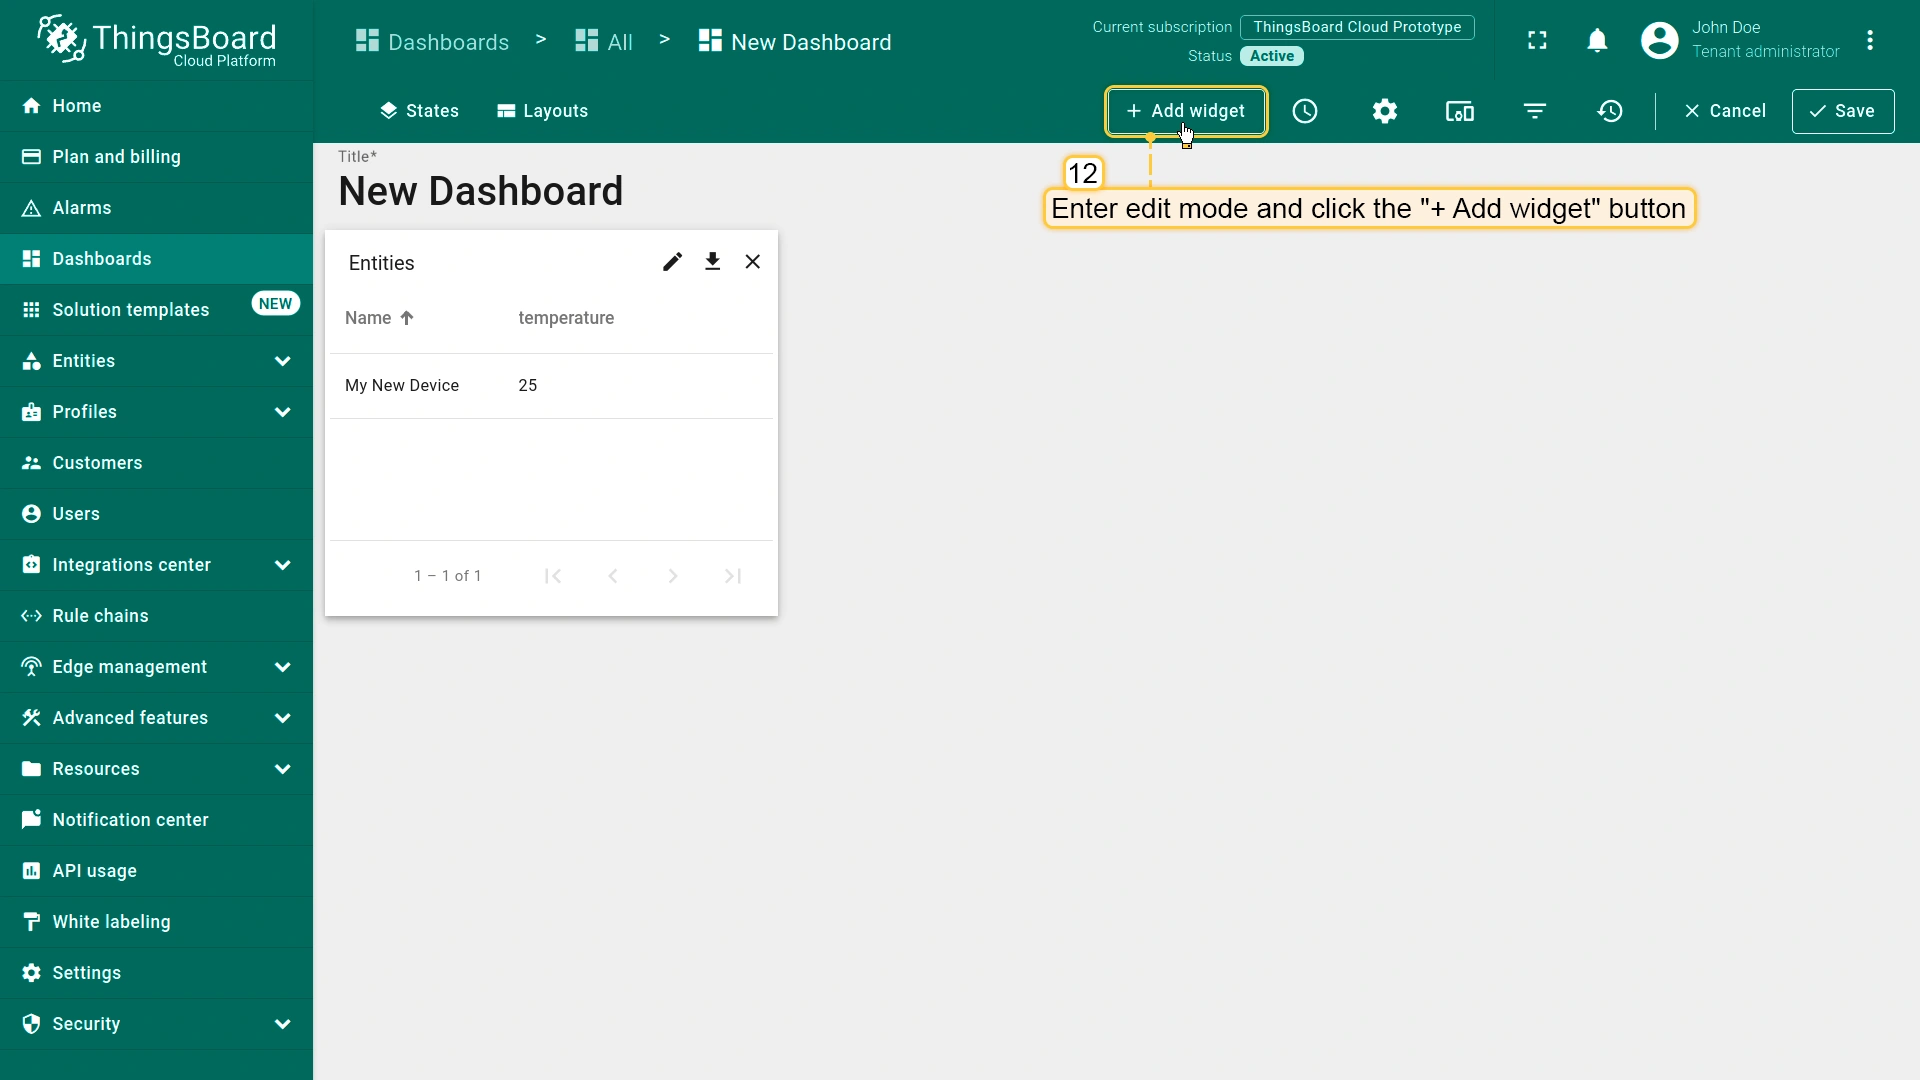
Once the dashboard is created, the system will automatically redirect you to the Edit mode page. To add a widget, select one from the widget library, where widgets are grouped into bundles. Each widget is linked to a data source, which defines the data it will display.
For example, let’s add and configure the Entities table and Time series chart widgets:
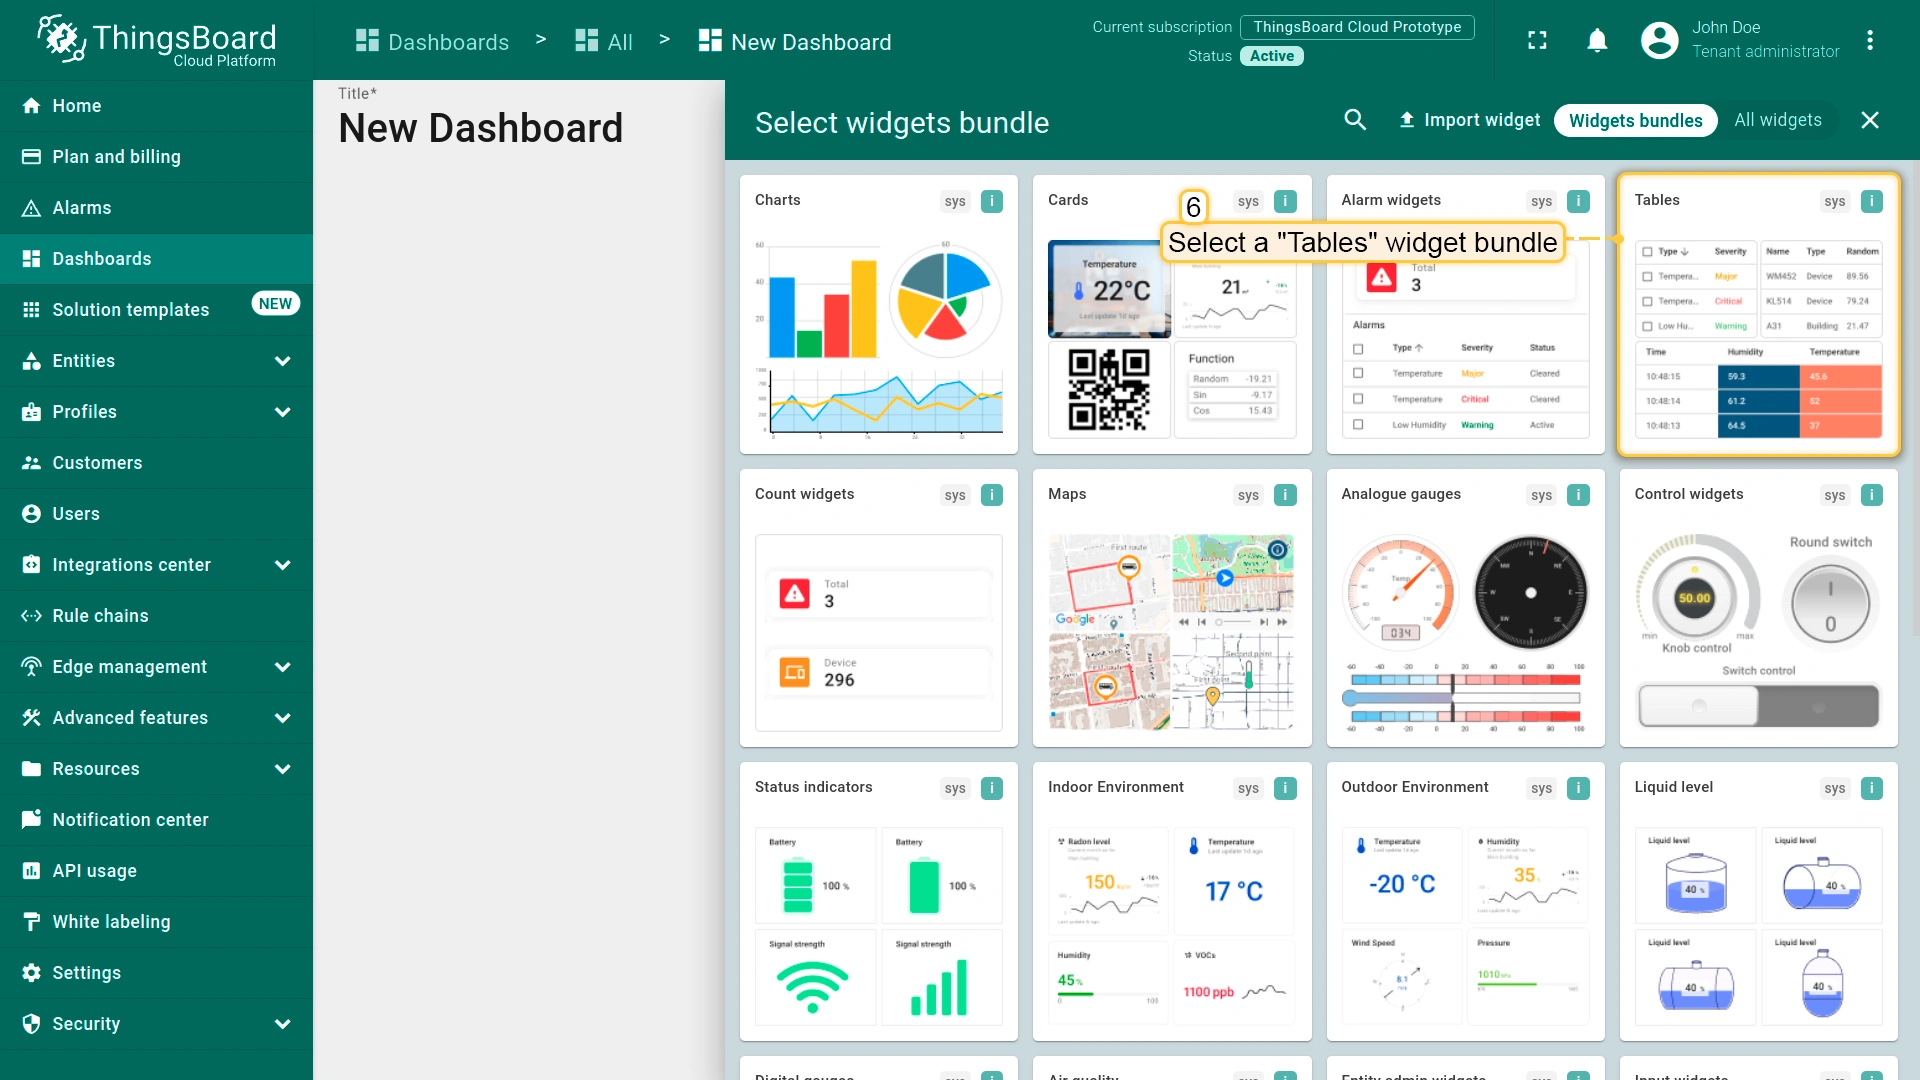
- Click the "Add widget" button.
- Locate the "Tables" bundle and click on it.
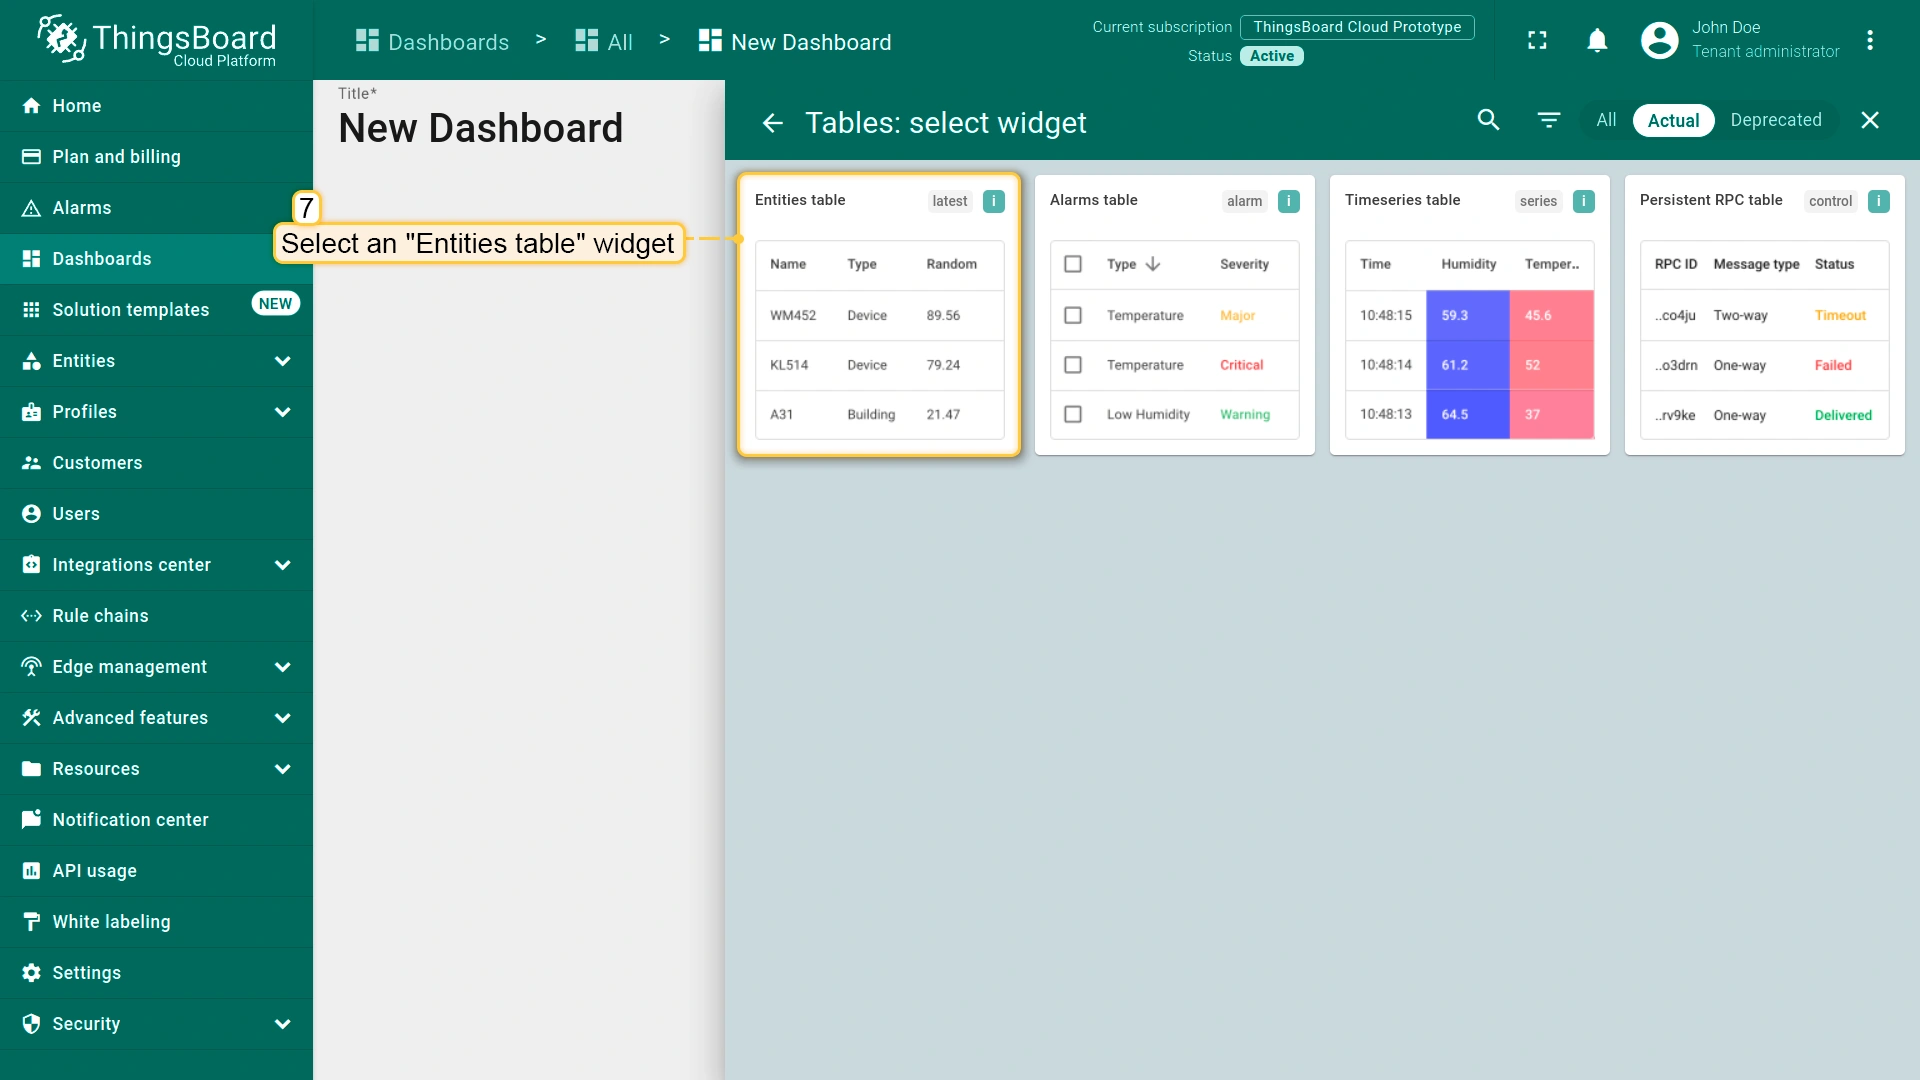
- Select the "Entities table" widget.
- In the "Add Widget" pop-up window, select the previously created device, "My New Device", in the "Device" field.
- The “name” key has already been added to the “Columns” section. It will display the column with the device name.
- To add another column with different key value, click the "Add column" button.
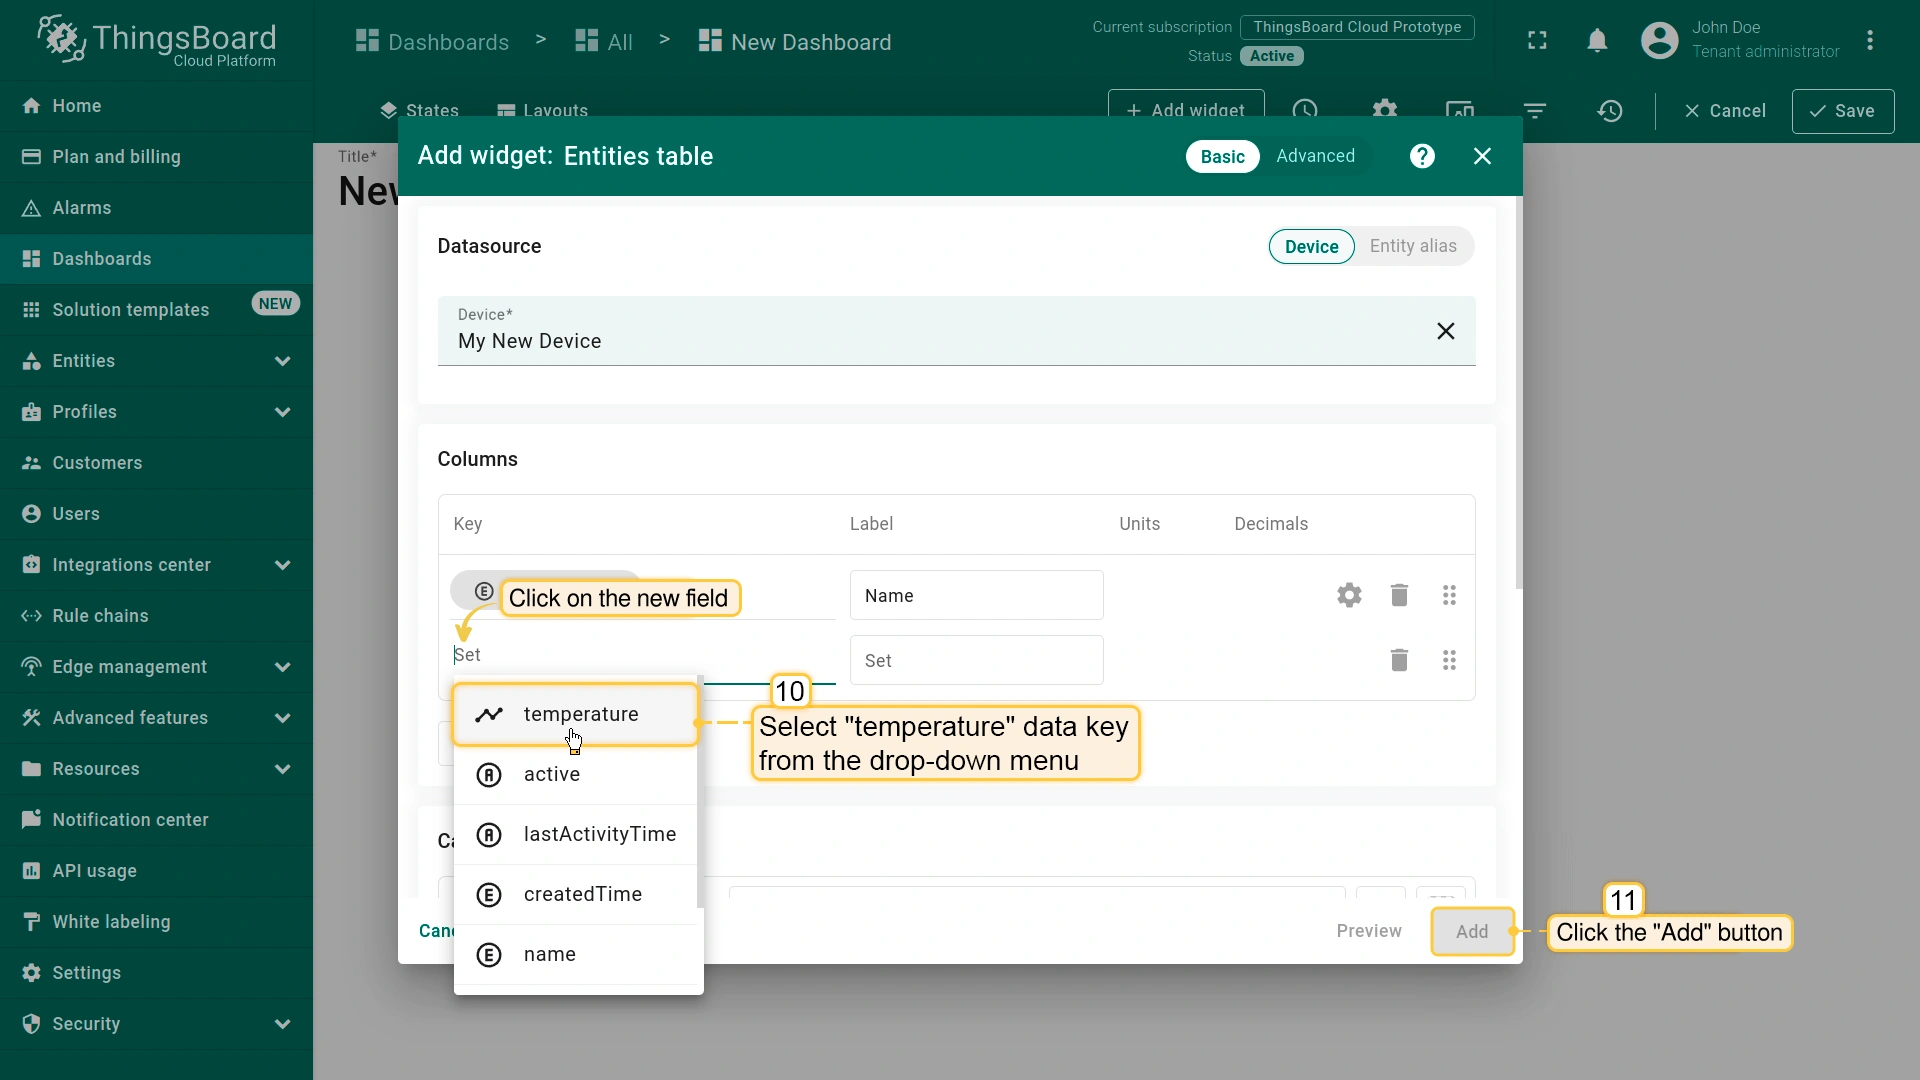
- To select an additional data key to display, click on the newly appeared field. In the drop-down menu, you will see the list of the available data keys. Select the "temperature" data key. Click the "Add" button.
- The "Entities table" widget has been added, and "My New Device" is now displayed in the list. To add another widget, click the "Add widget" button.
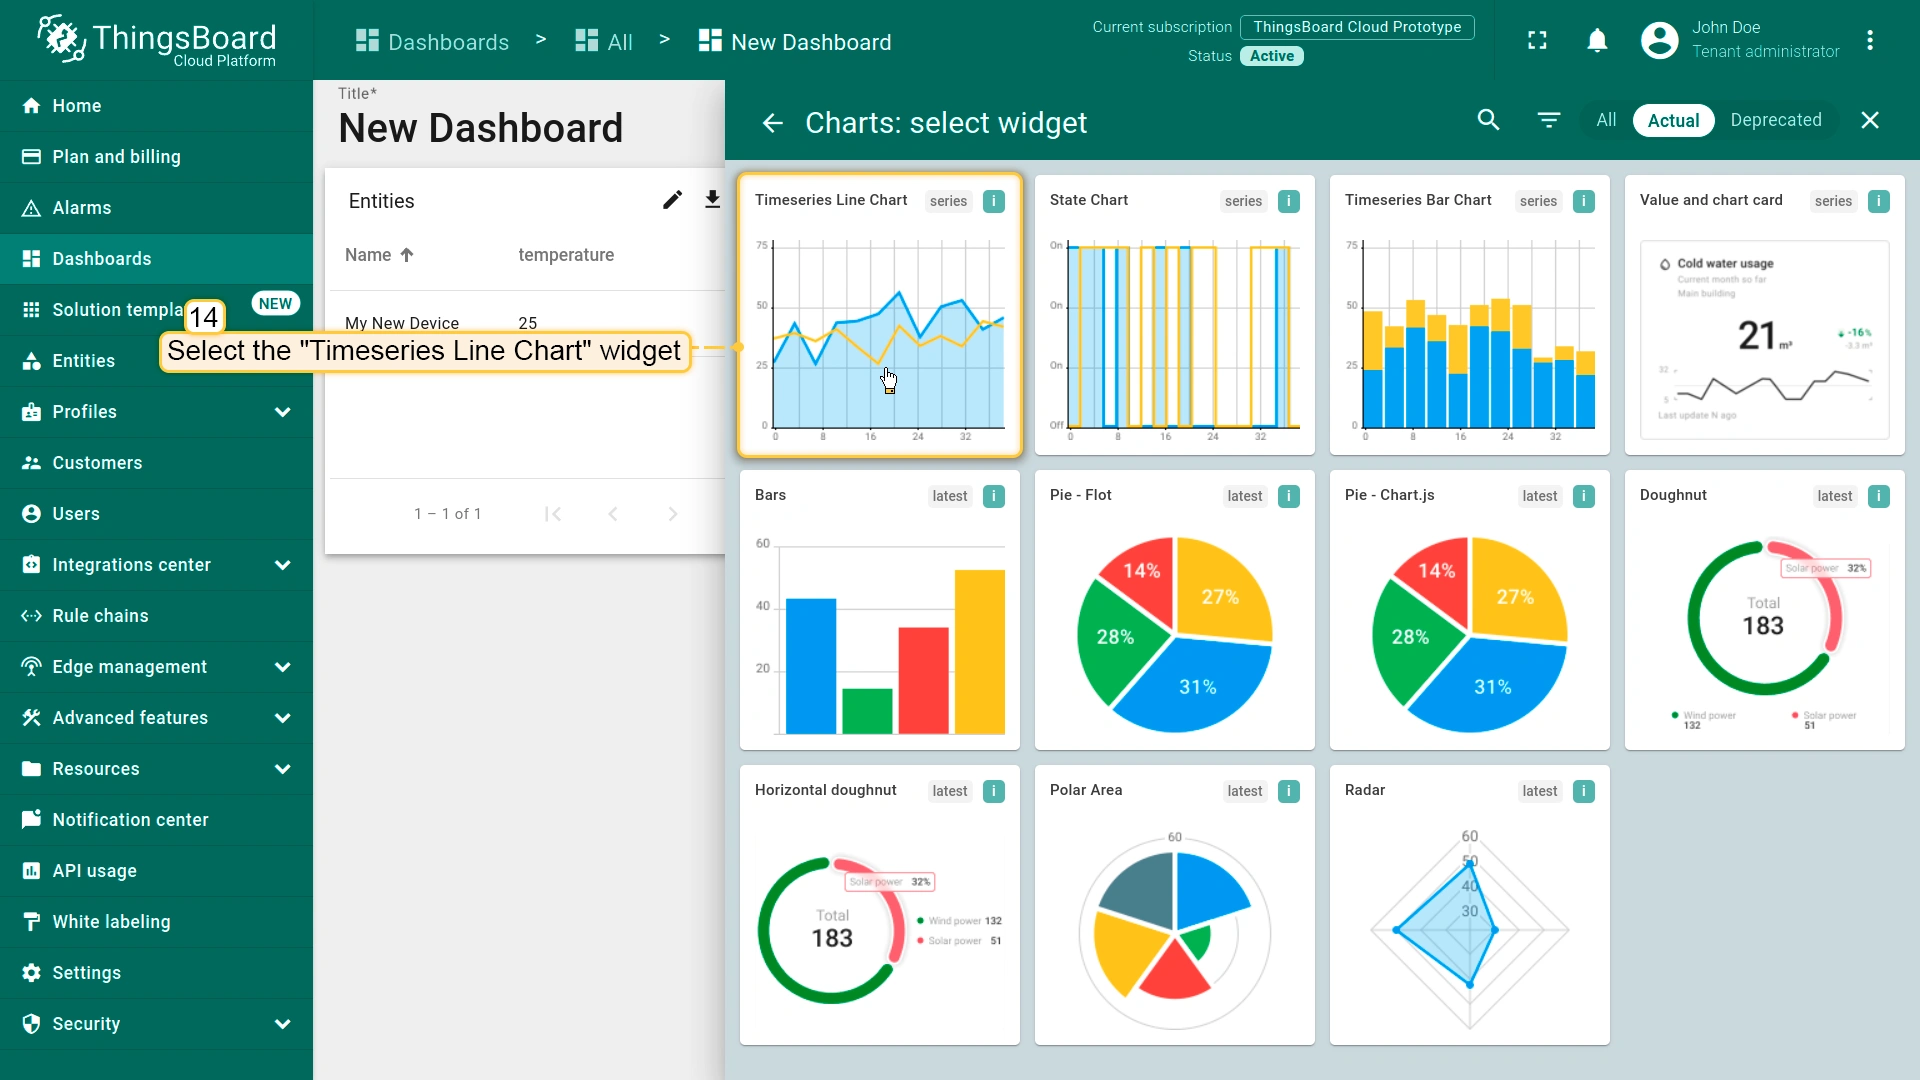
- Locate the "Charts" widgets bundle and click on it.
- Select the "Time series chart" widget.
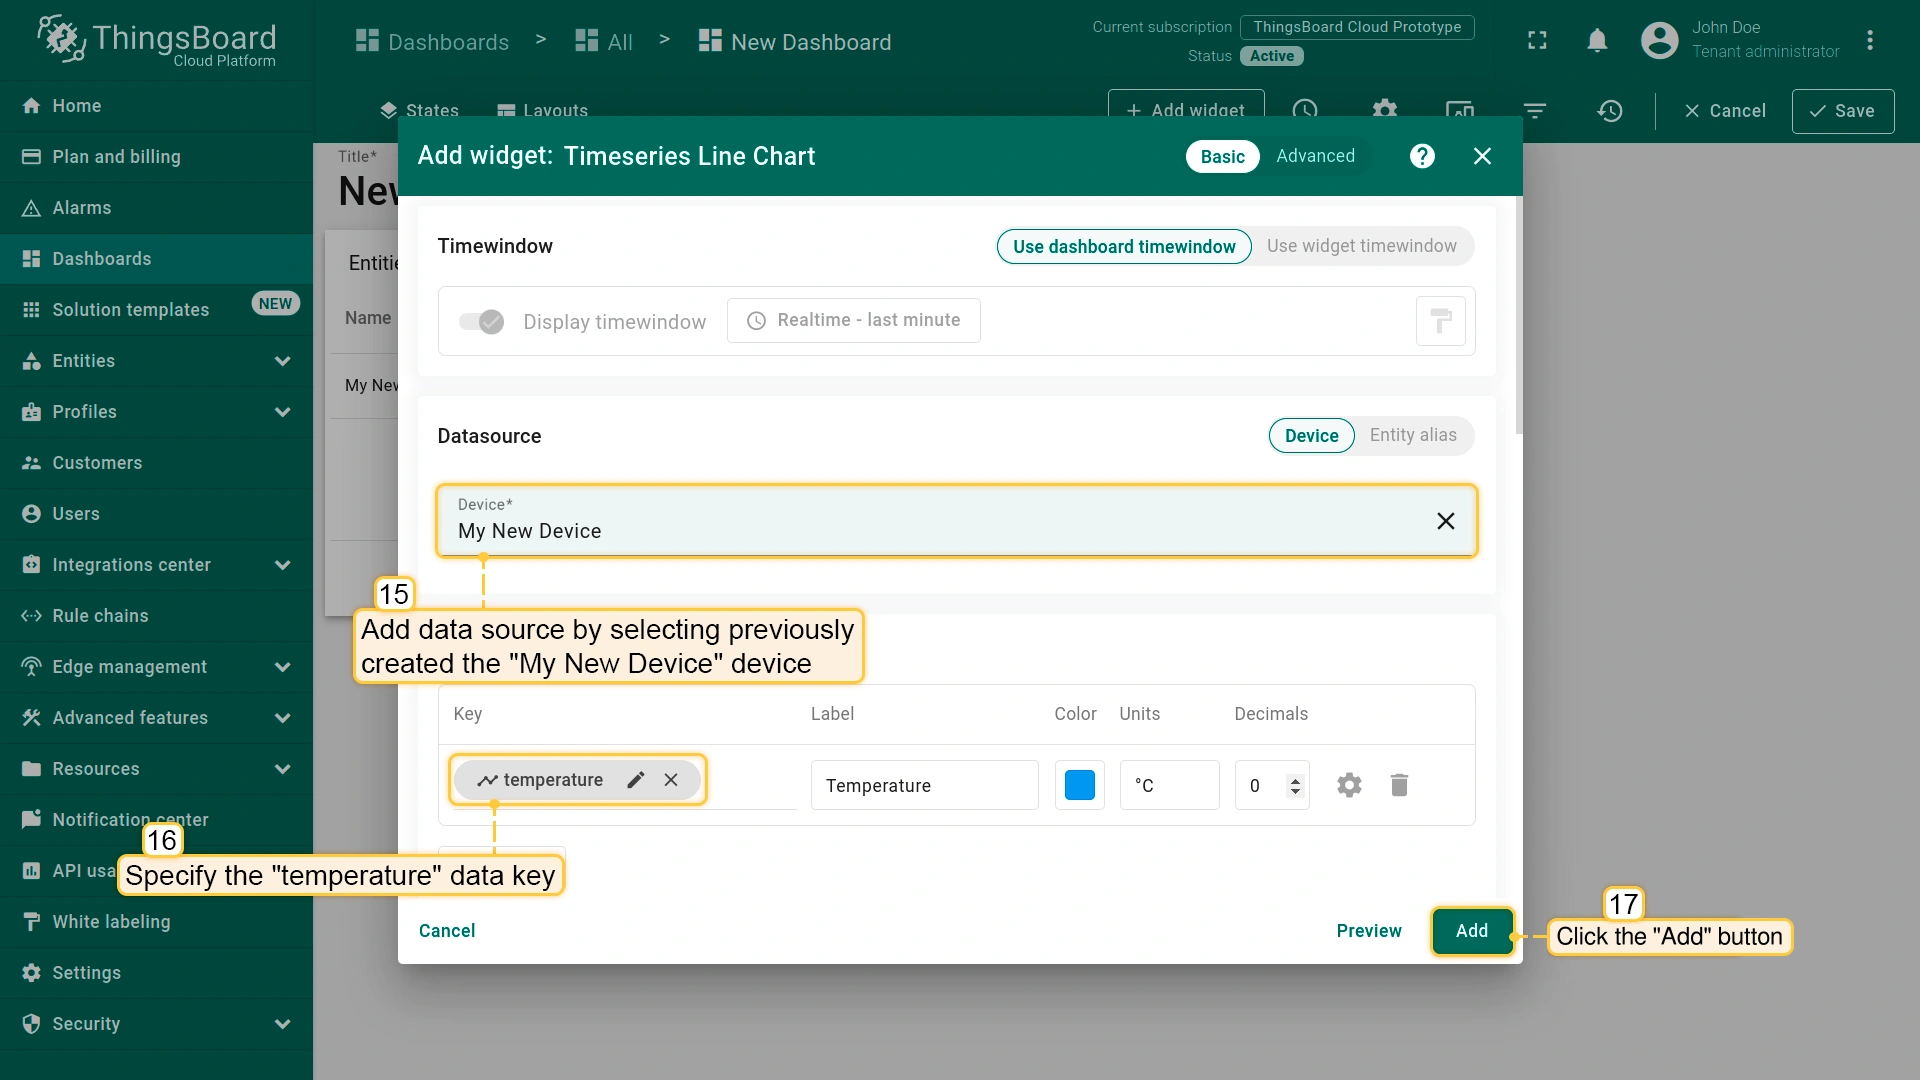
- Select the previously created device, "My New Device", as the data source, and click the "Add" button. The "Time series chart" widget has been successfully added to the dashboard.
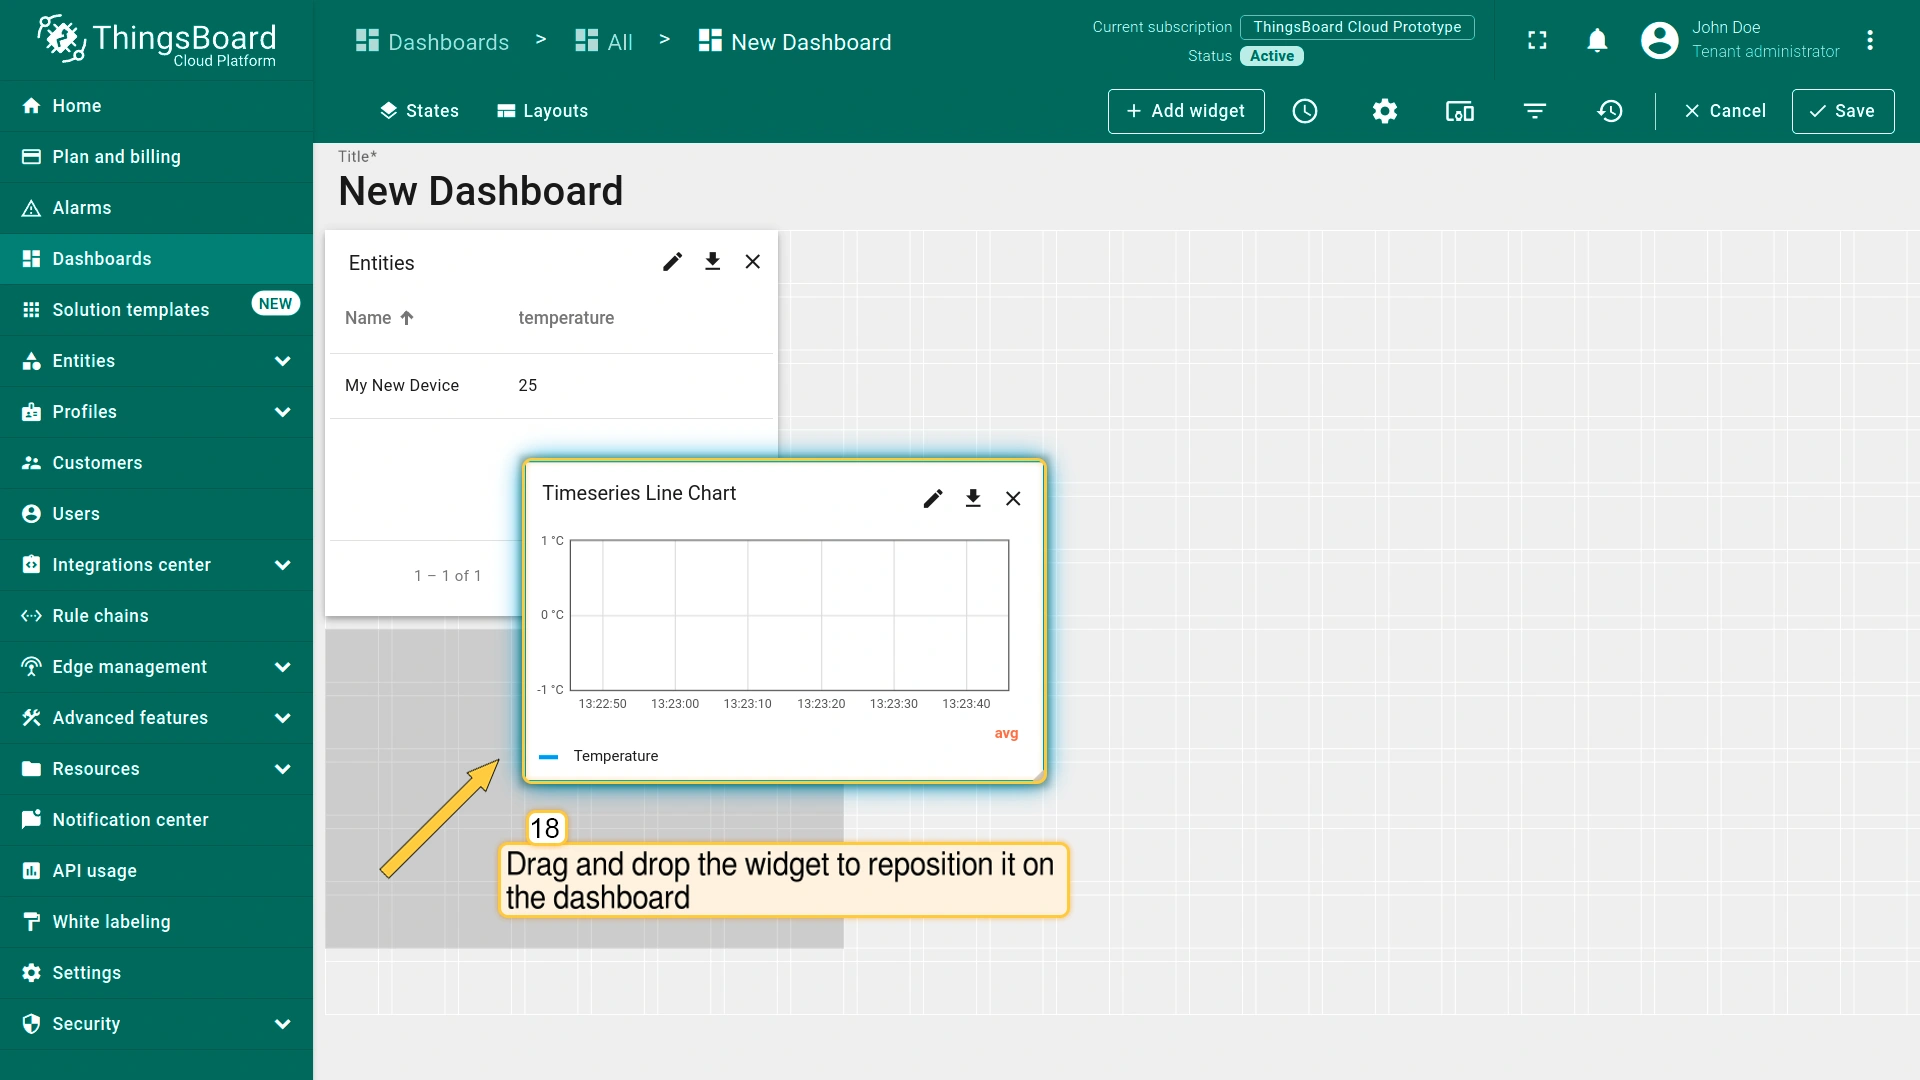
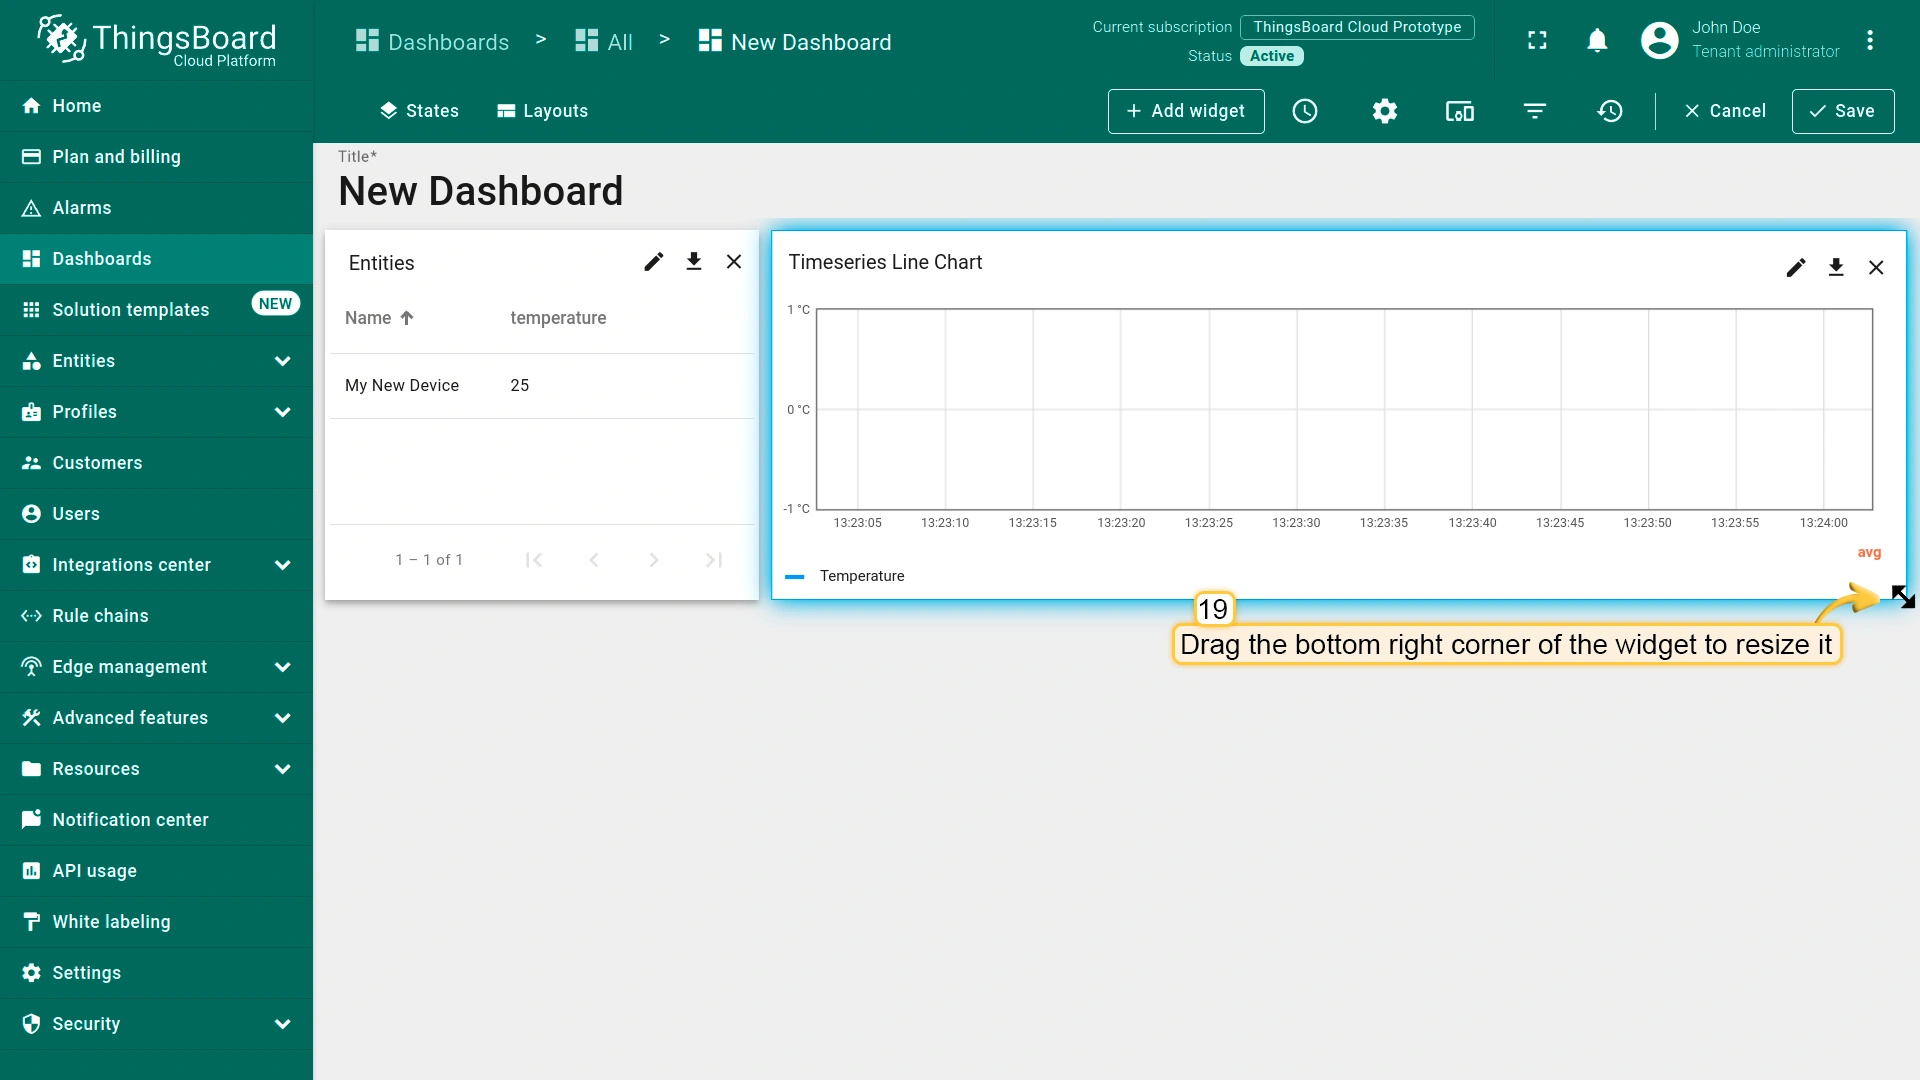
- After configuring all the desired widgets, you can adjust their size and placement on the dashboard as needed. Drag and drop the widget to reposition it on the dashboard.
- To resize the widget, drag its bottom-right corner.
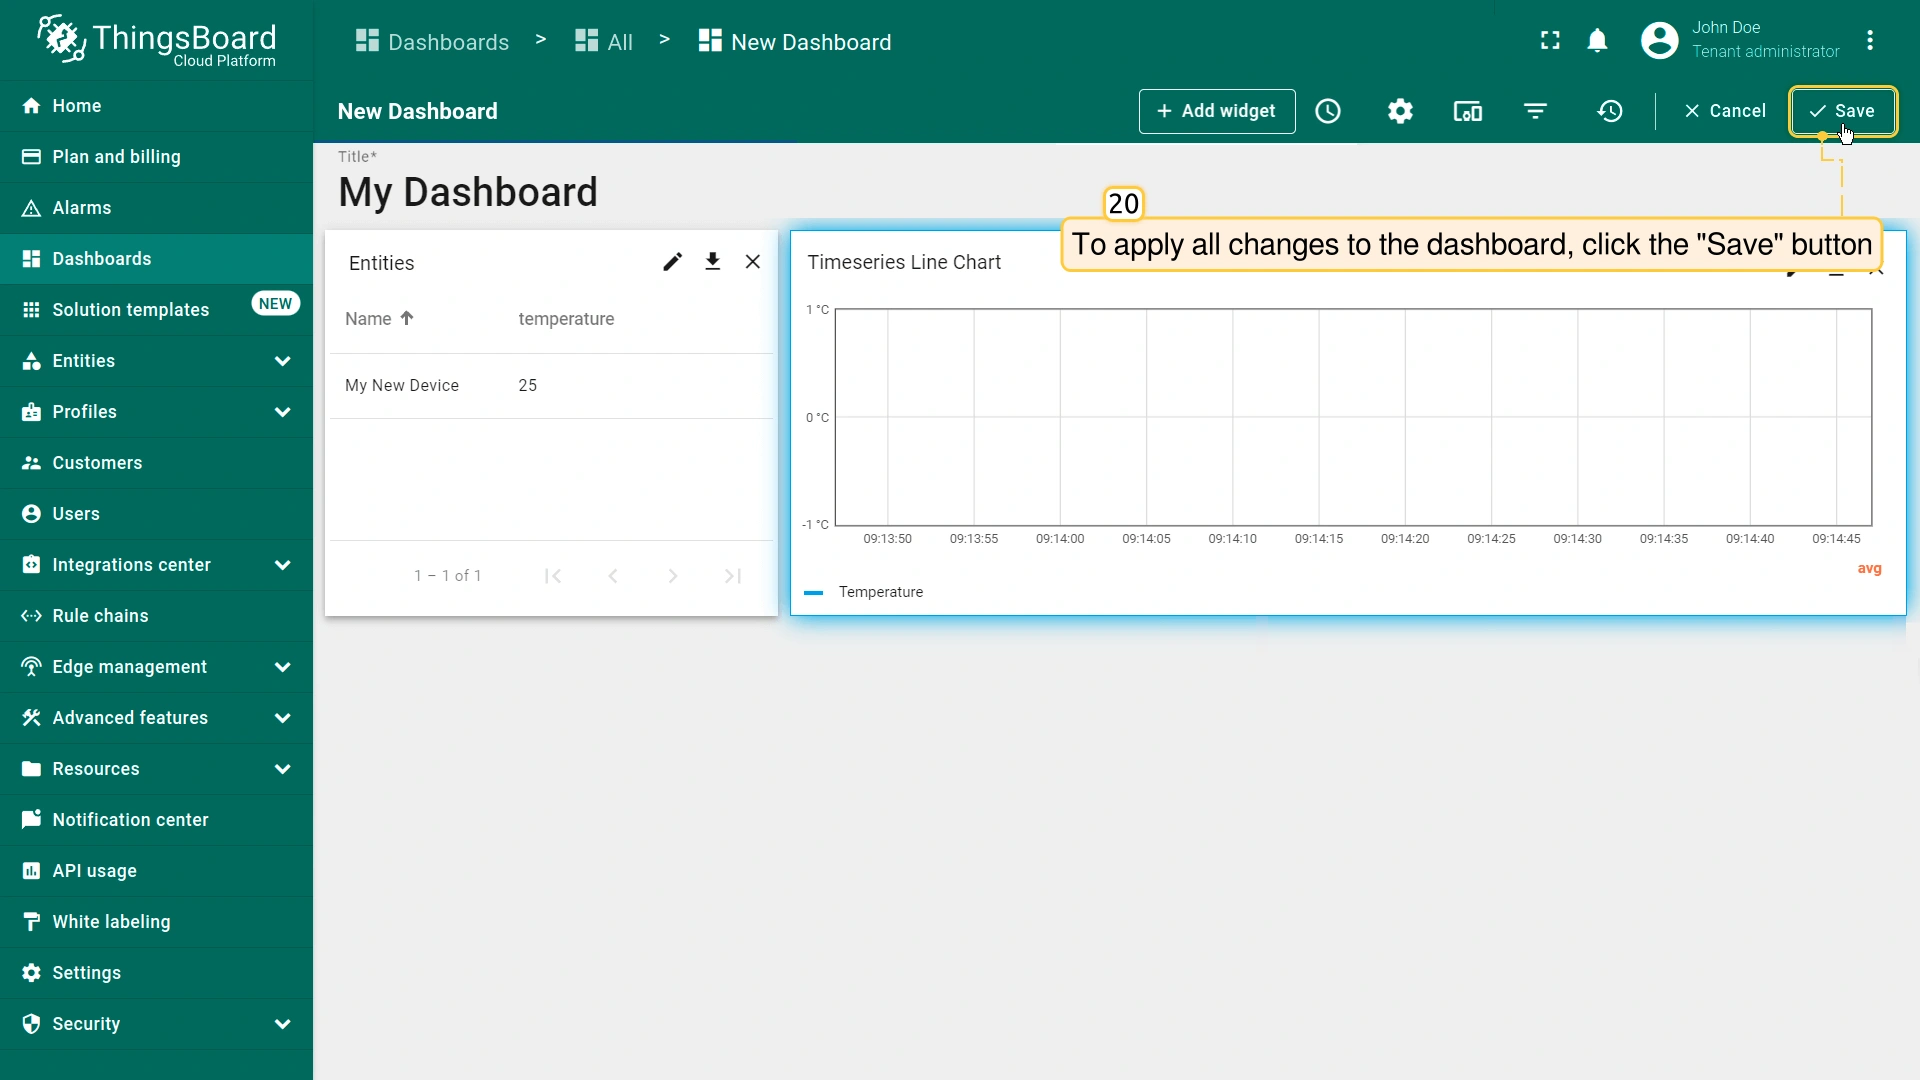
- To apply all changes to the dashboard, click the "Save" button in the upper-right corner of the screen.
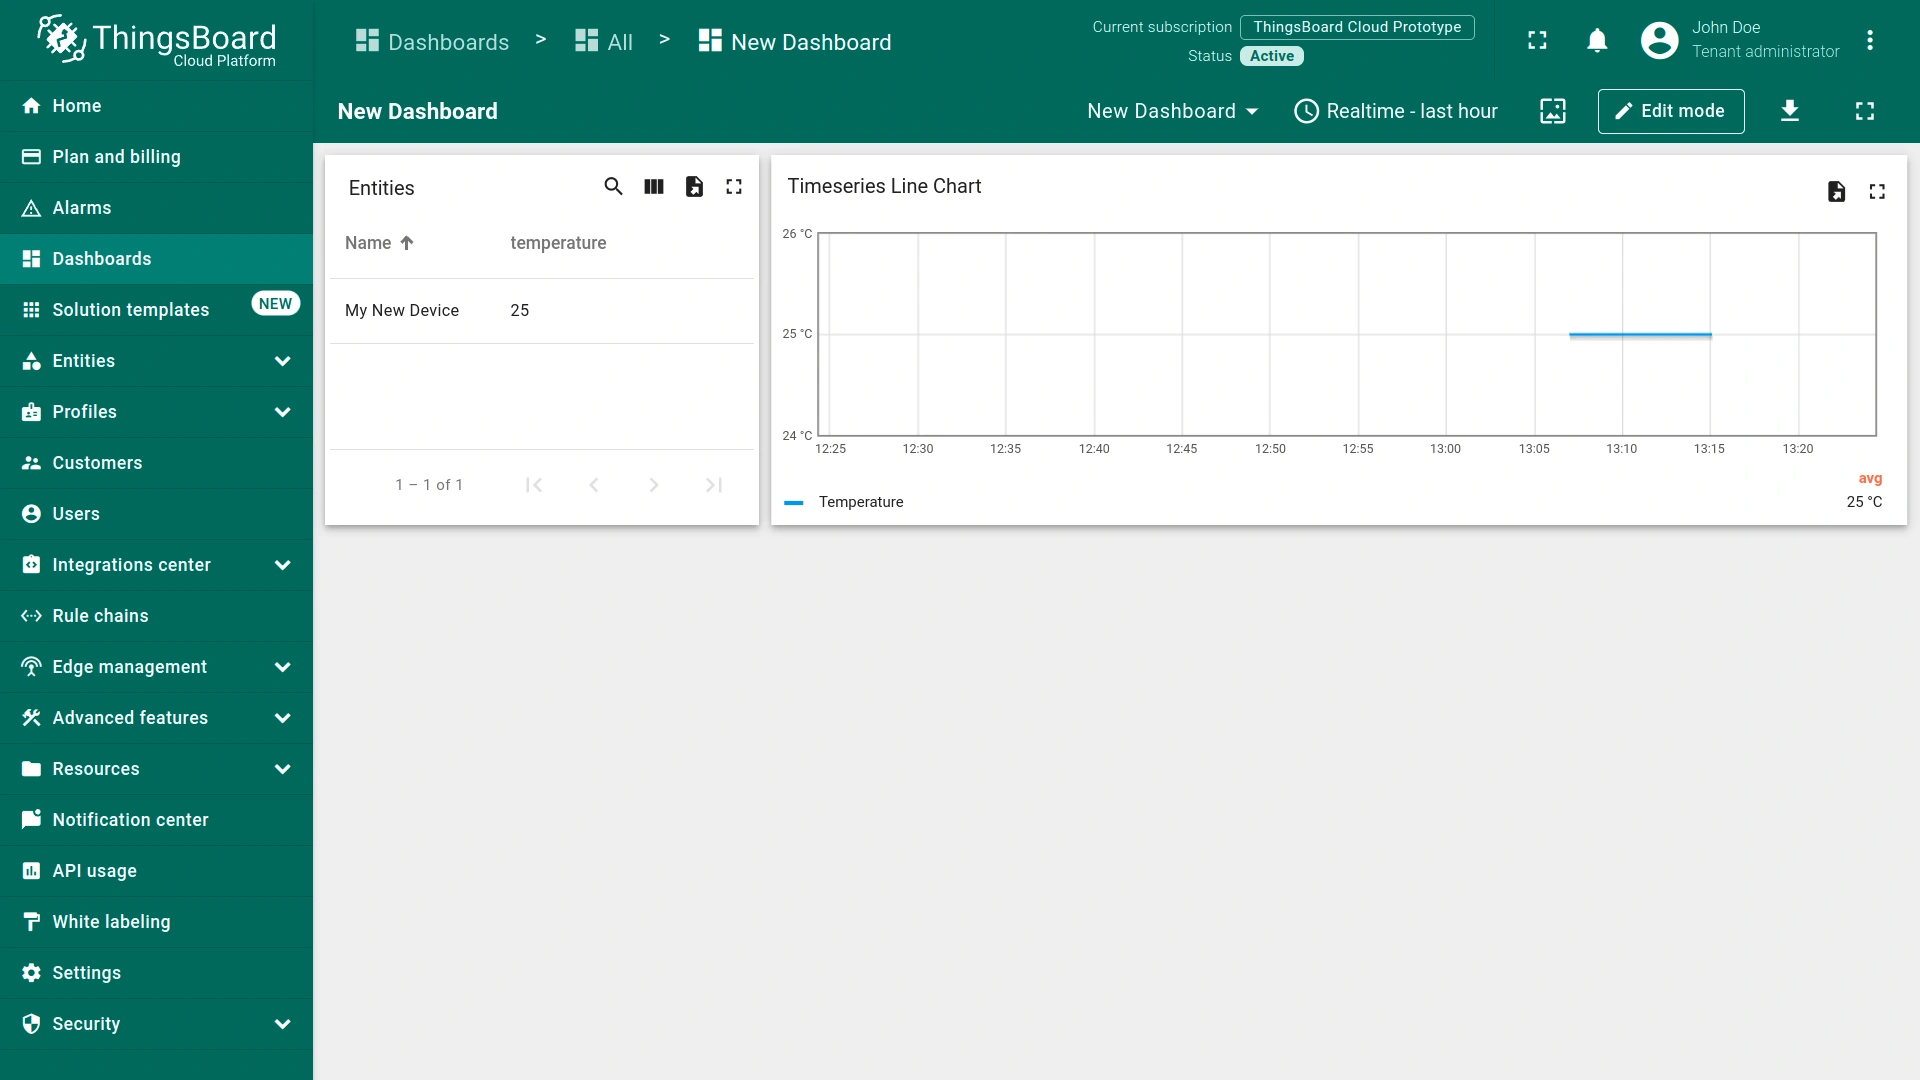
- Congratulations! You have successfully configured the dashboard. Now, all new telemetry readings will instantly appear on the dashboard widgets.

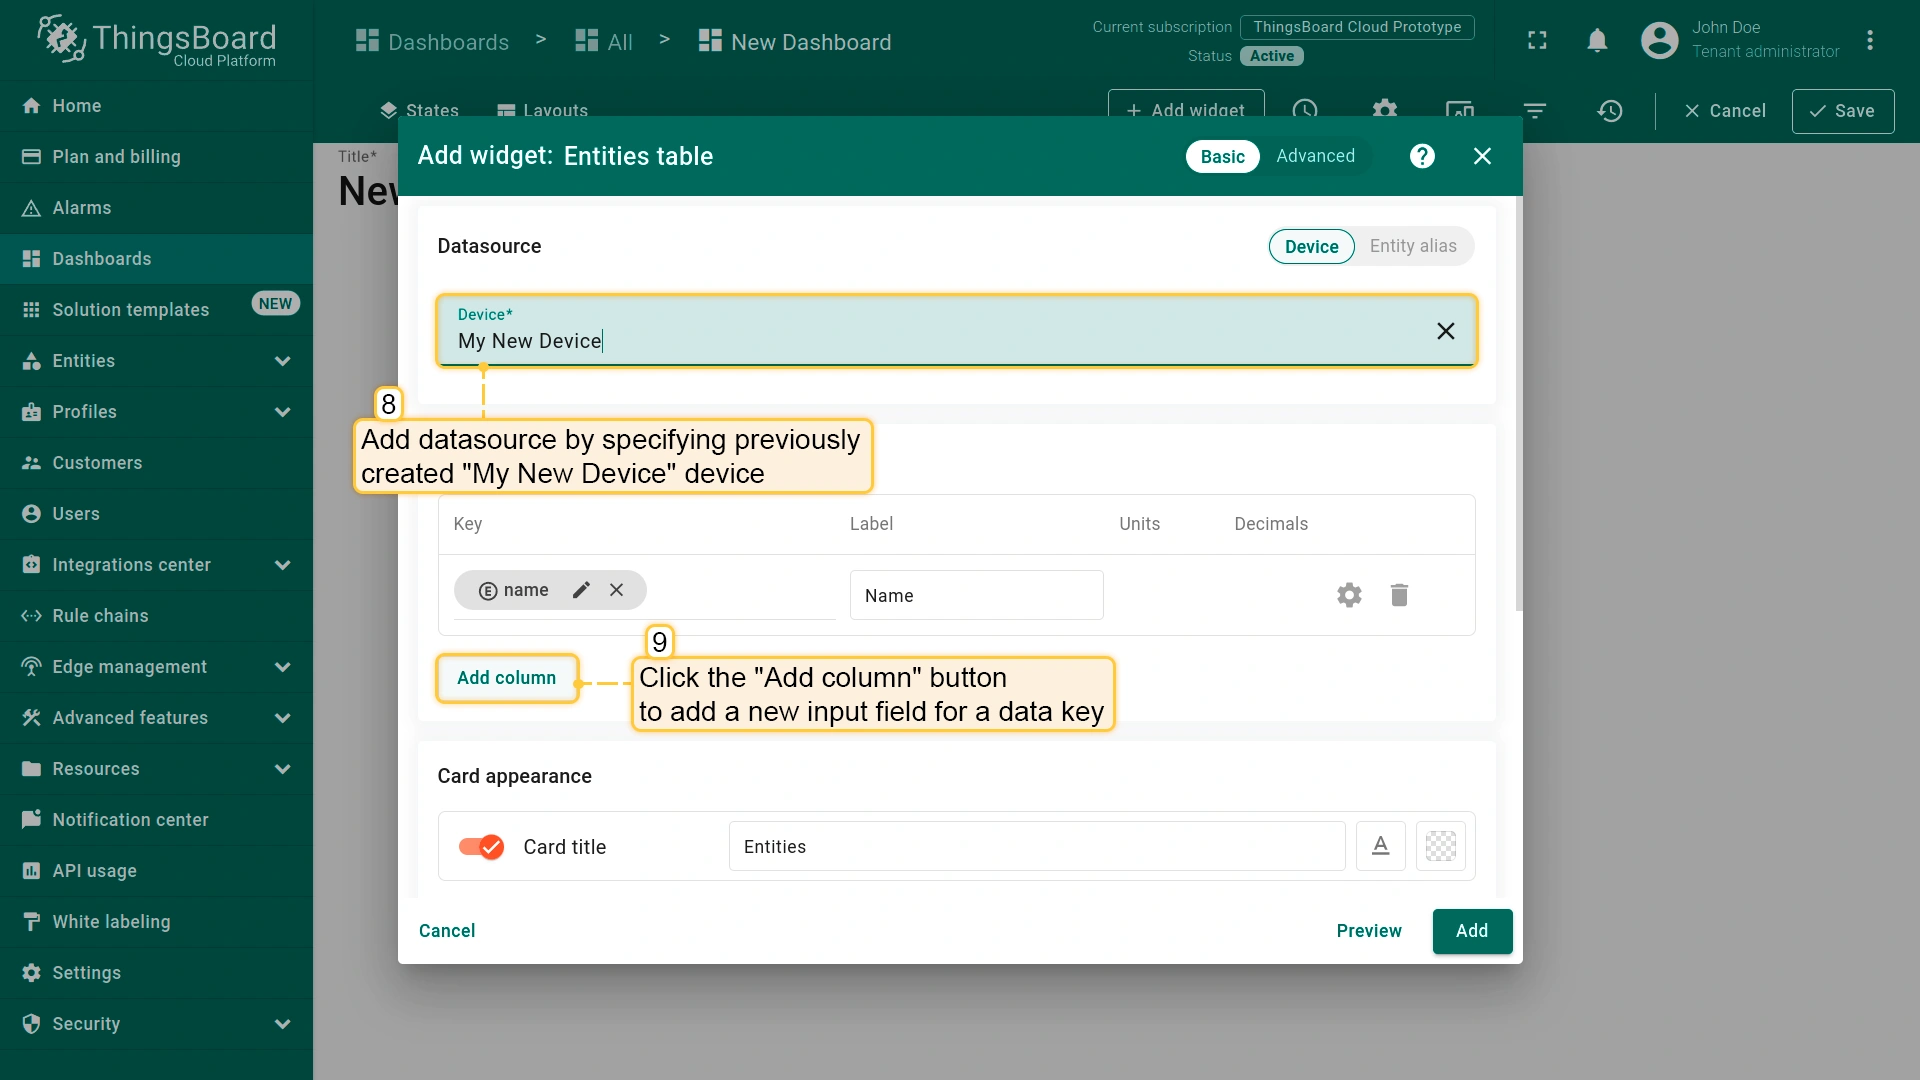
- The “name” key has already been added to the “Columns” section. It will display the column with the device name.
- To add another column with different key value, click the "Add column" button.

Step 3. Pushing Data From Edge to Cloud
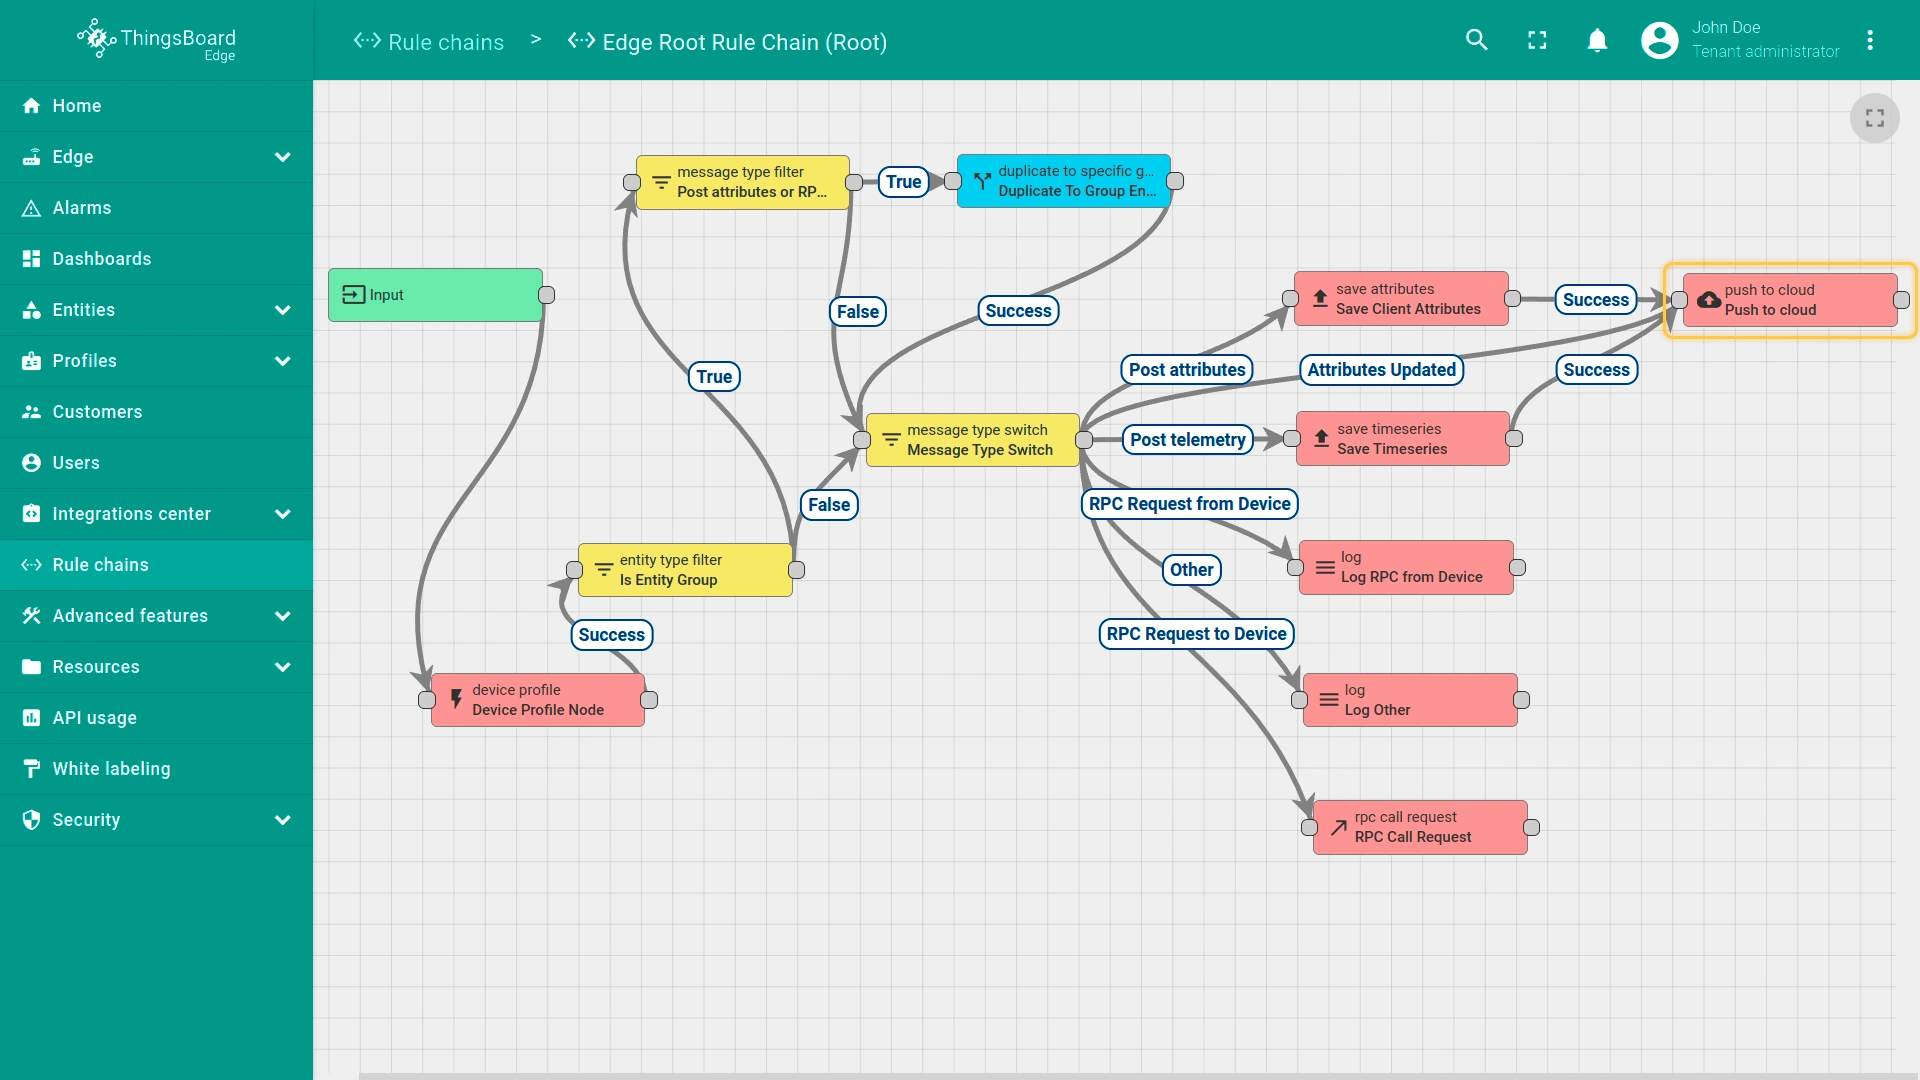
To process data on site, and communicate with local and cloud-side services, the Edge Rule Chain Template is used.
In essence, the Edge Root Rule Chain refers to the Rule Chain within the ThingsBoard Edge that processes incoming data and can trigger specific actions based on certain conditions.
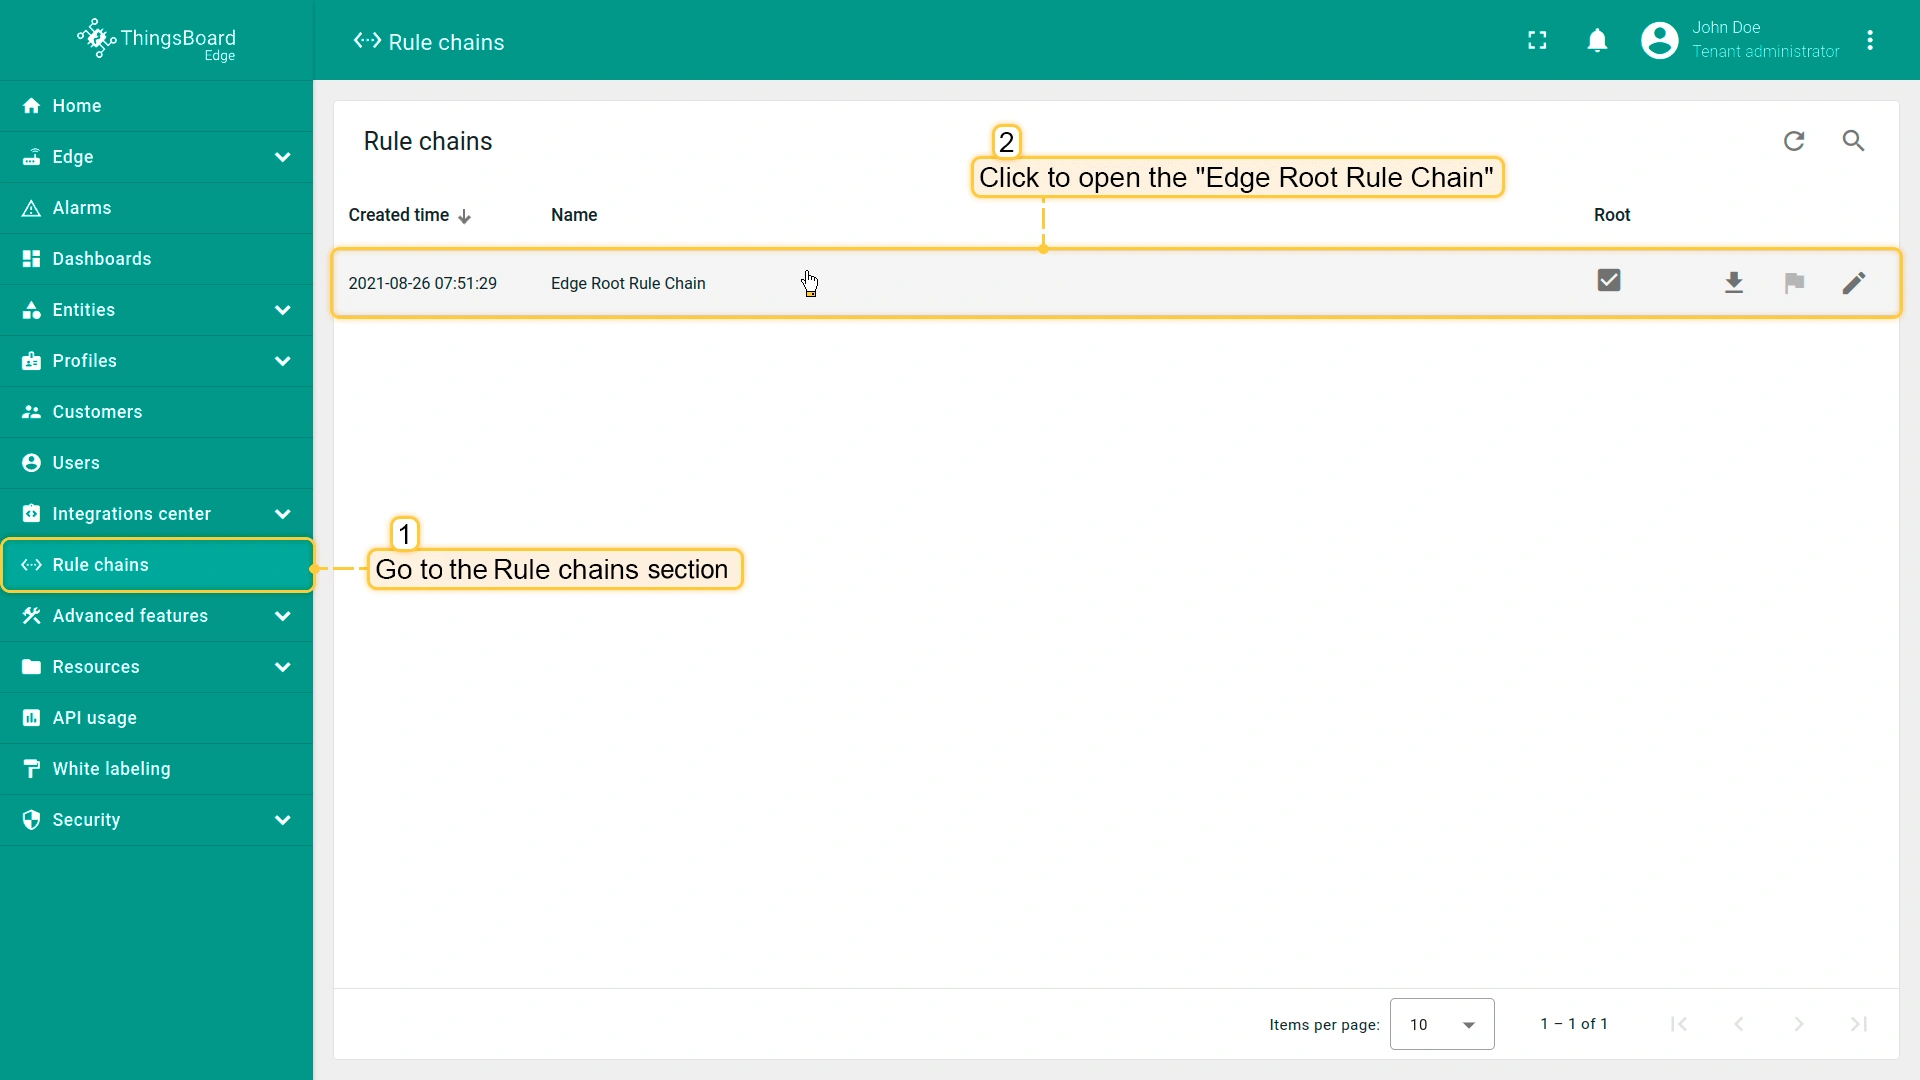
To understand how the telemetry data is transmitted from the Edge to the Cloud, let’s review the default Edge Root Rule Chain:
- Within your Edge instance, go to the Rule Chains section and open the "Edge Root Rule Chain".
- The Push to Cloud rule node is used to transmit messages from edge to cloud after they have been stored in the local database.
To edit the Edge Rule Chain Template or create a new one, log in to your ThingsBoard Server instance at SERVER_URL and navigate to the Edge management > Rule chain templates section and follow these instructions.
Step 4. Provisioning Entities From Edge to Server
Any real-world assets, devices, sensors or other logical components are represented within ThingsBoard as corresponding entities. Most of the entities can be created on the Edge instance. Once an entity is created on the Edge instance, it will be automatically published to the ThingsBoard Server, requiring no additional actions.
To view the published entity (e.g., device), log in to the ThingsBoard Professional Edition at SERVER_URL:
- Navigate to the Devices section to confirm that the newly created device, "My New Device", has been published to the ThingsBoard Server (Cloud).
- Click on the "My New Device" to open the "Device details" page and select the "Relations" tab. Switch the direction from "From" to "To" to view the relation to the Edge that provisioned this device.

Step 5. Provisioning Entities From Server to Edge
The entities can also be created on the Server and then assigned to the Edge instance. This approach simplifies the management of entities across multiple Edge instances.
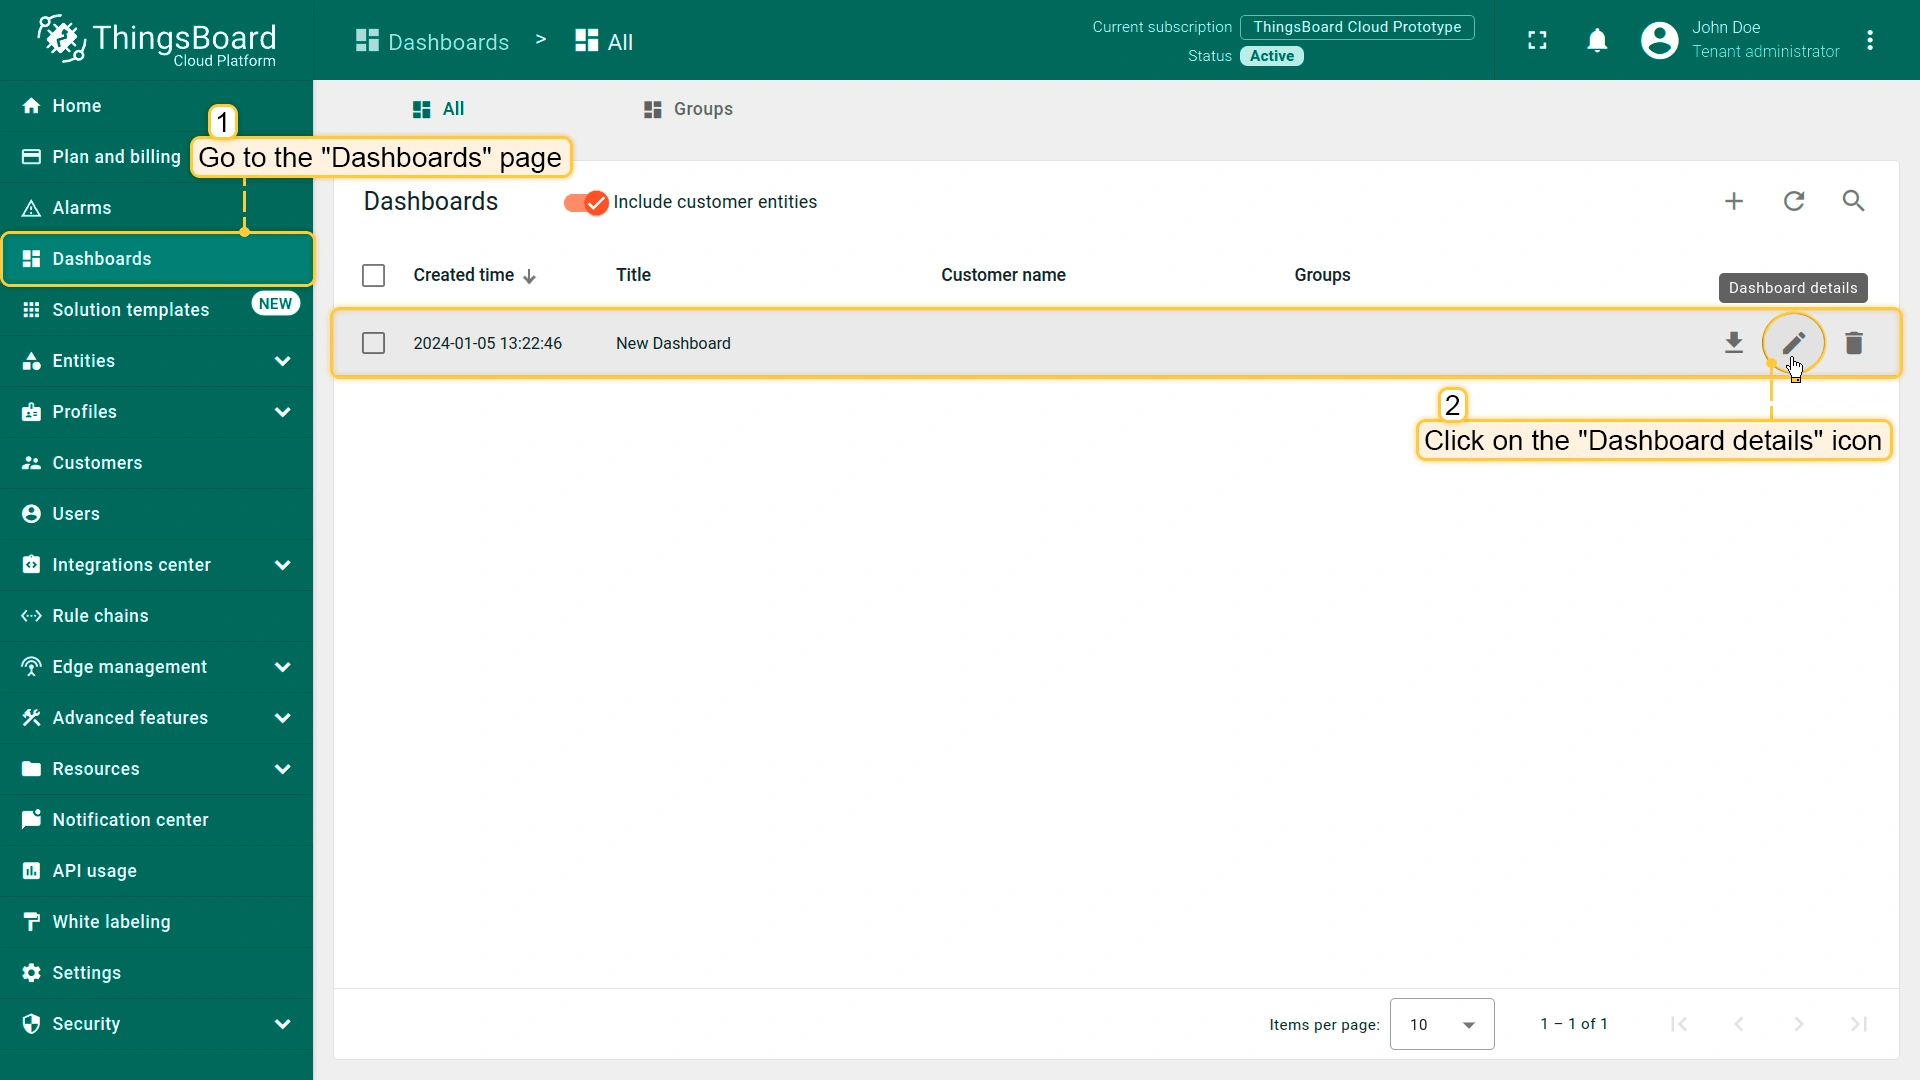
To assign entities to the Edge, log in to your ThingsBoard Professional Edition Server at SERVER_URL and create an entity, for example, a dashboard.
- Create a new dashboard on the ThingsBoard Server. Click the "Dashboard details" icon to view details;
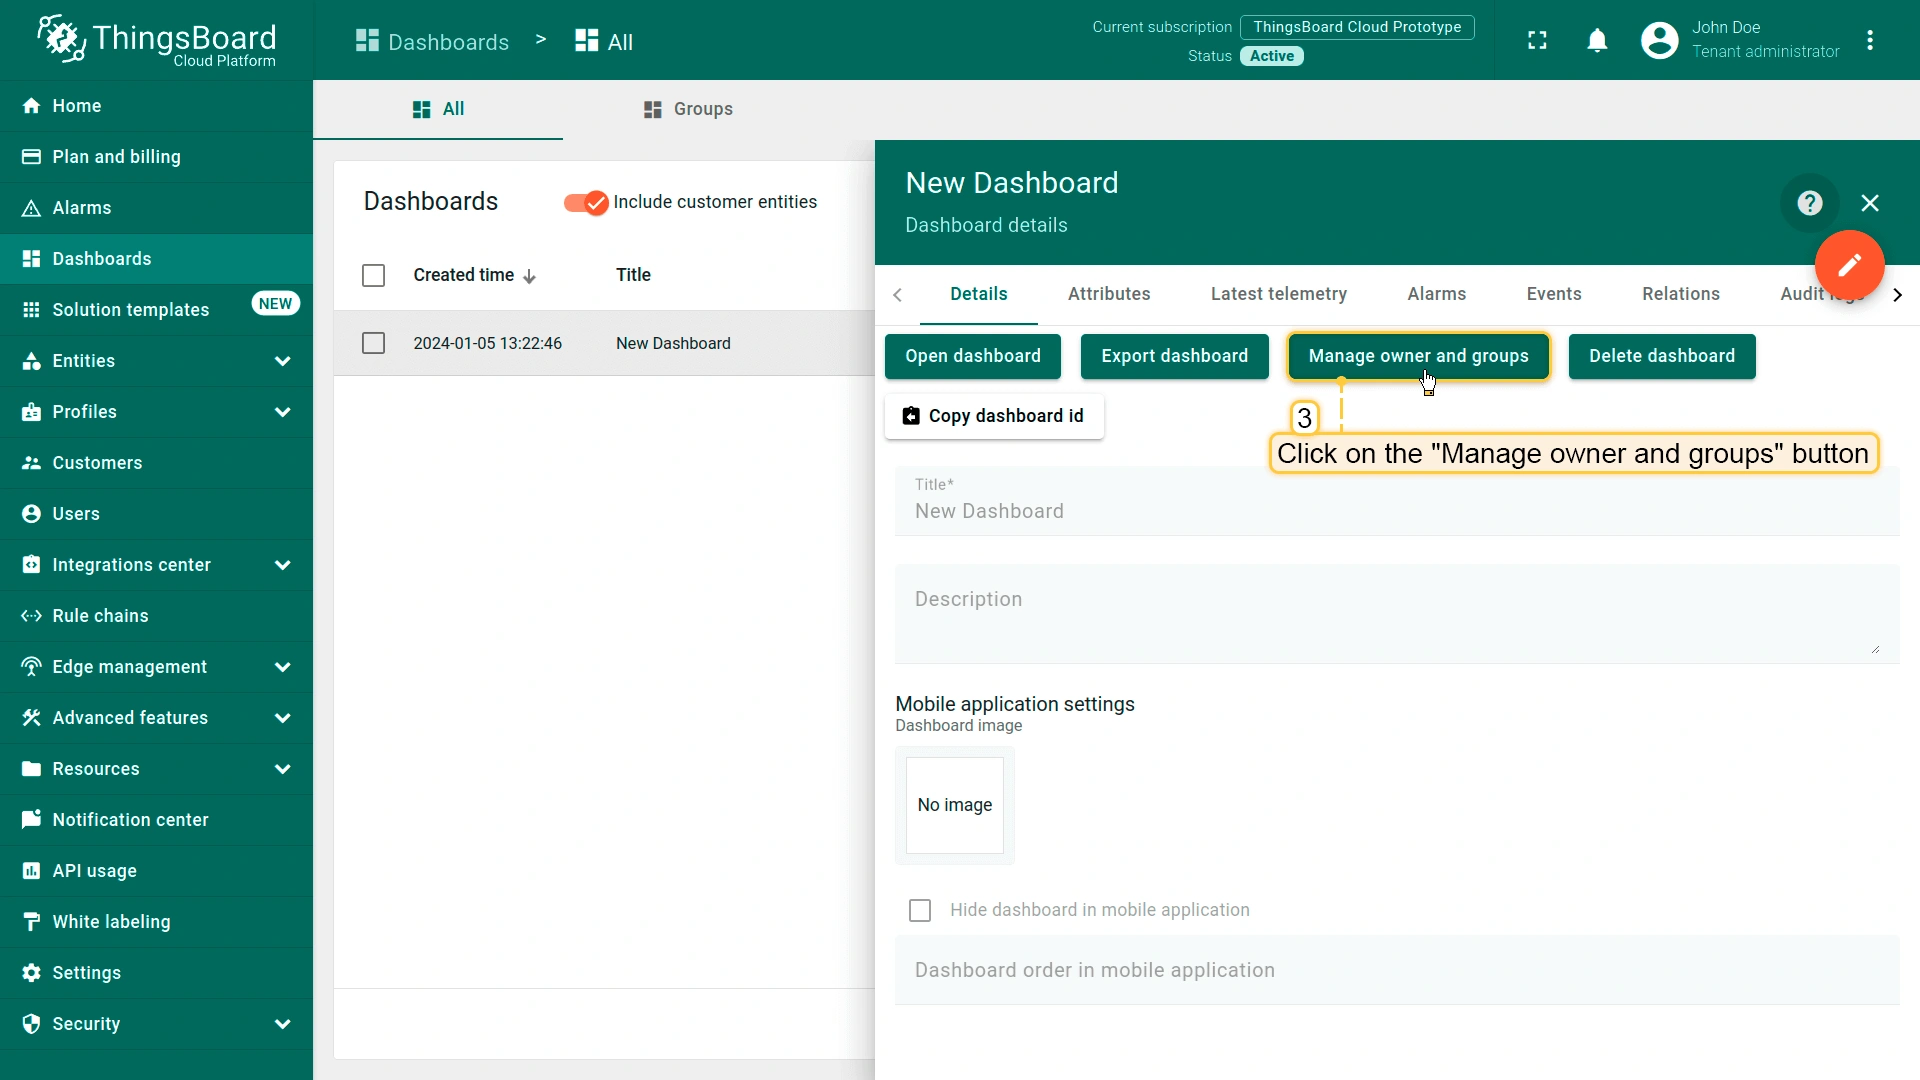
- Click the "Manage owner and groups" button;
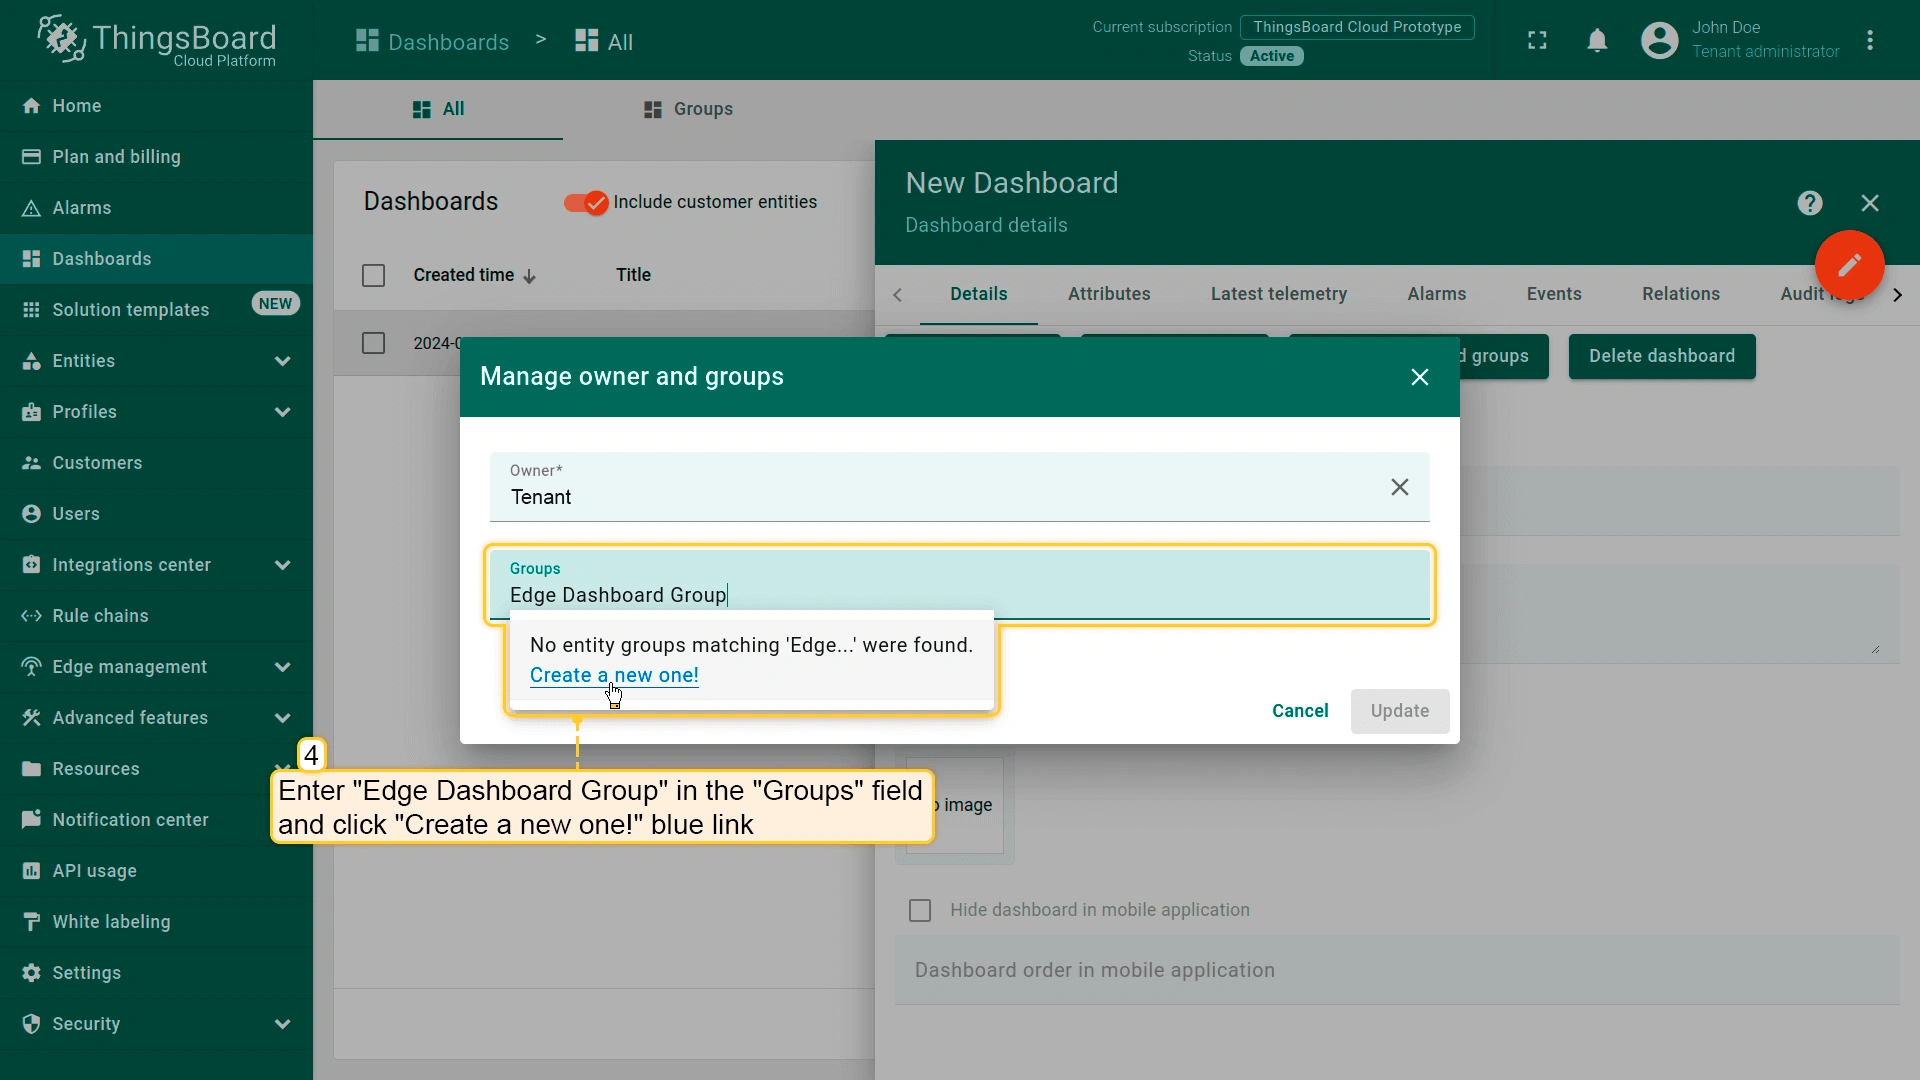
- Now, create a new dashboard group and add the previously created dashboard to it. Enter a name for the new dashboard group (for example, "Edge Dashboard Group") in the "Groups" field, and click the "Create a new one!" link.
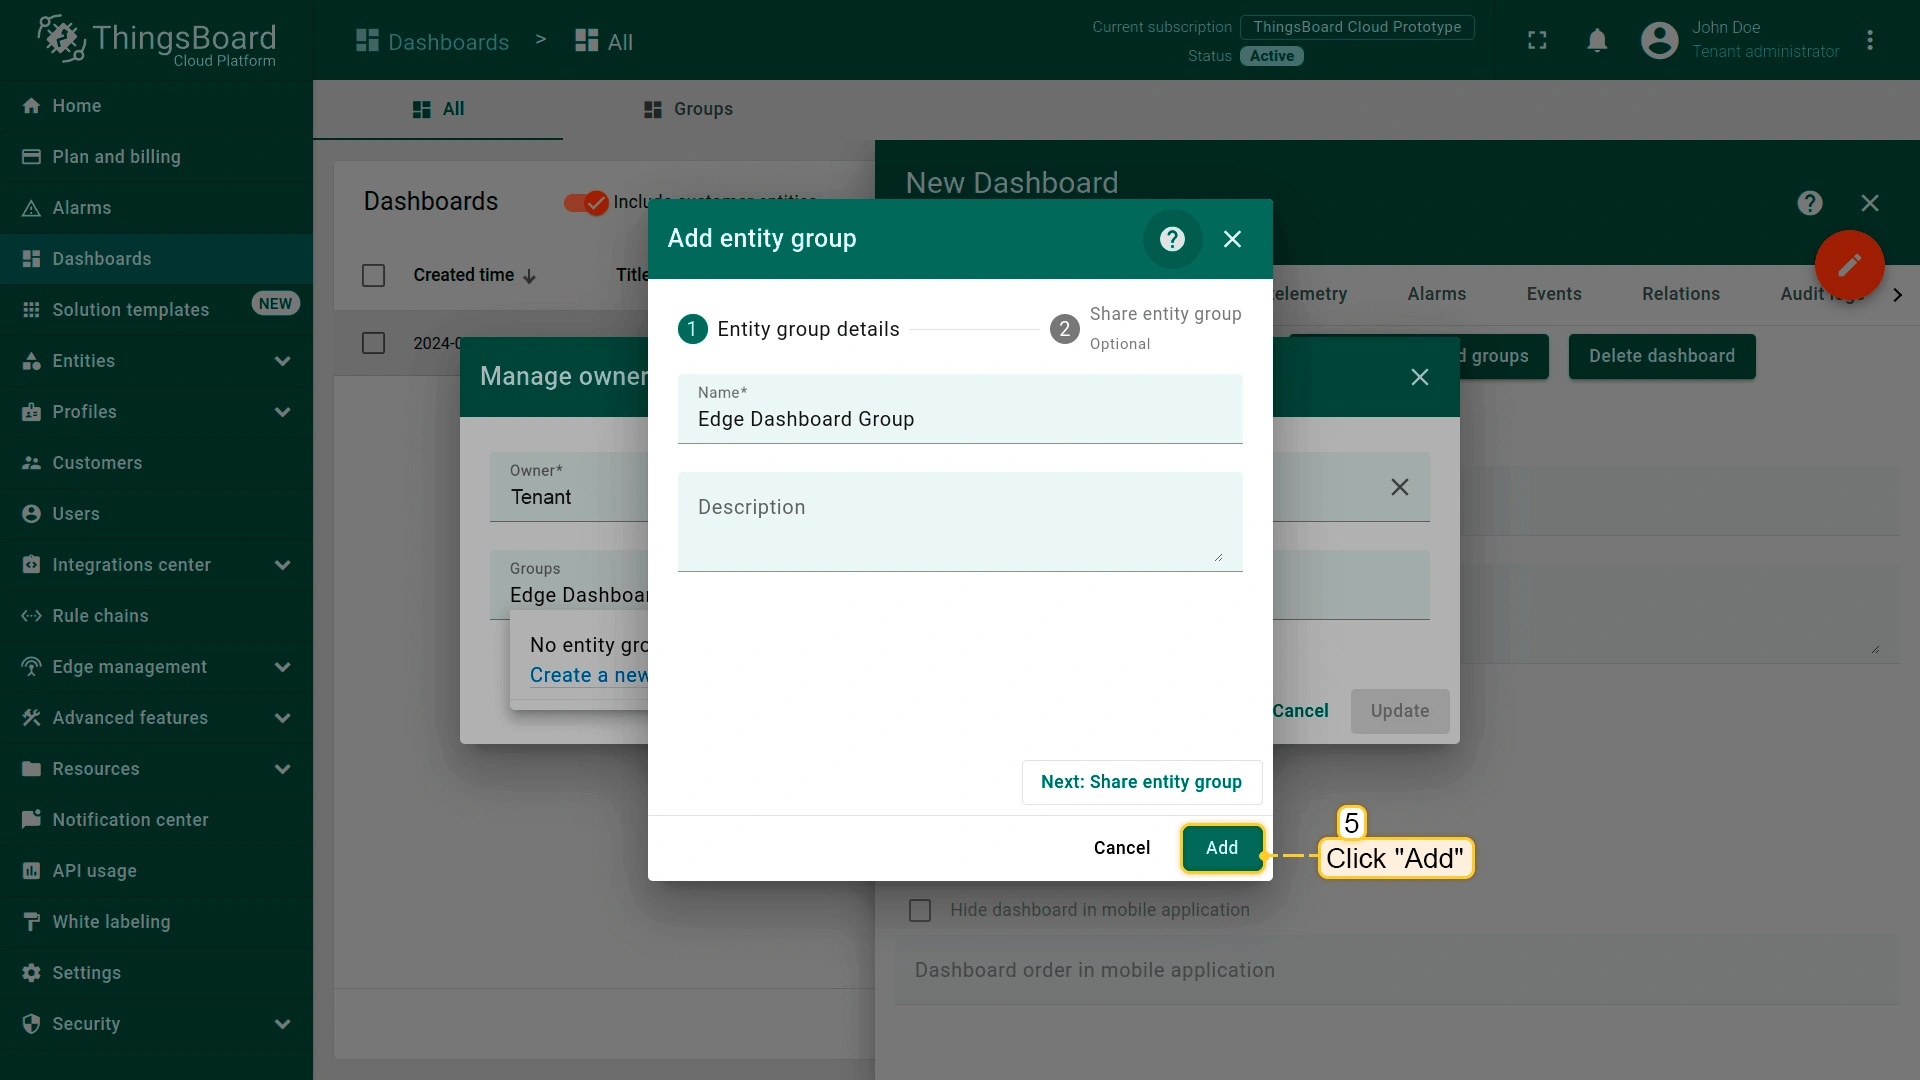
- In the "Add entity group" pop-up window, click the "Add" button.
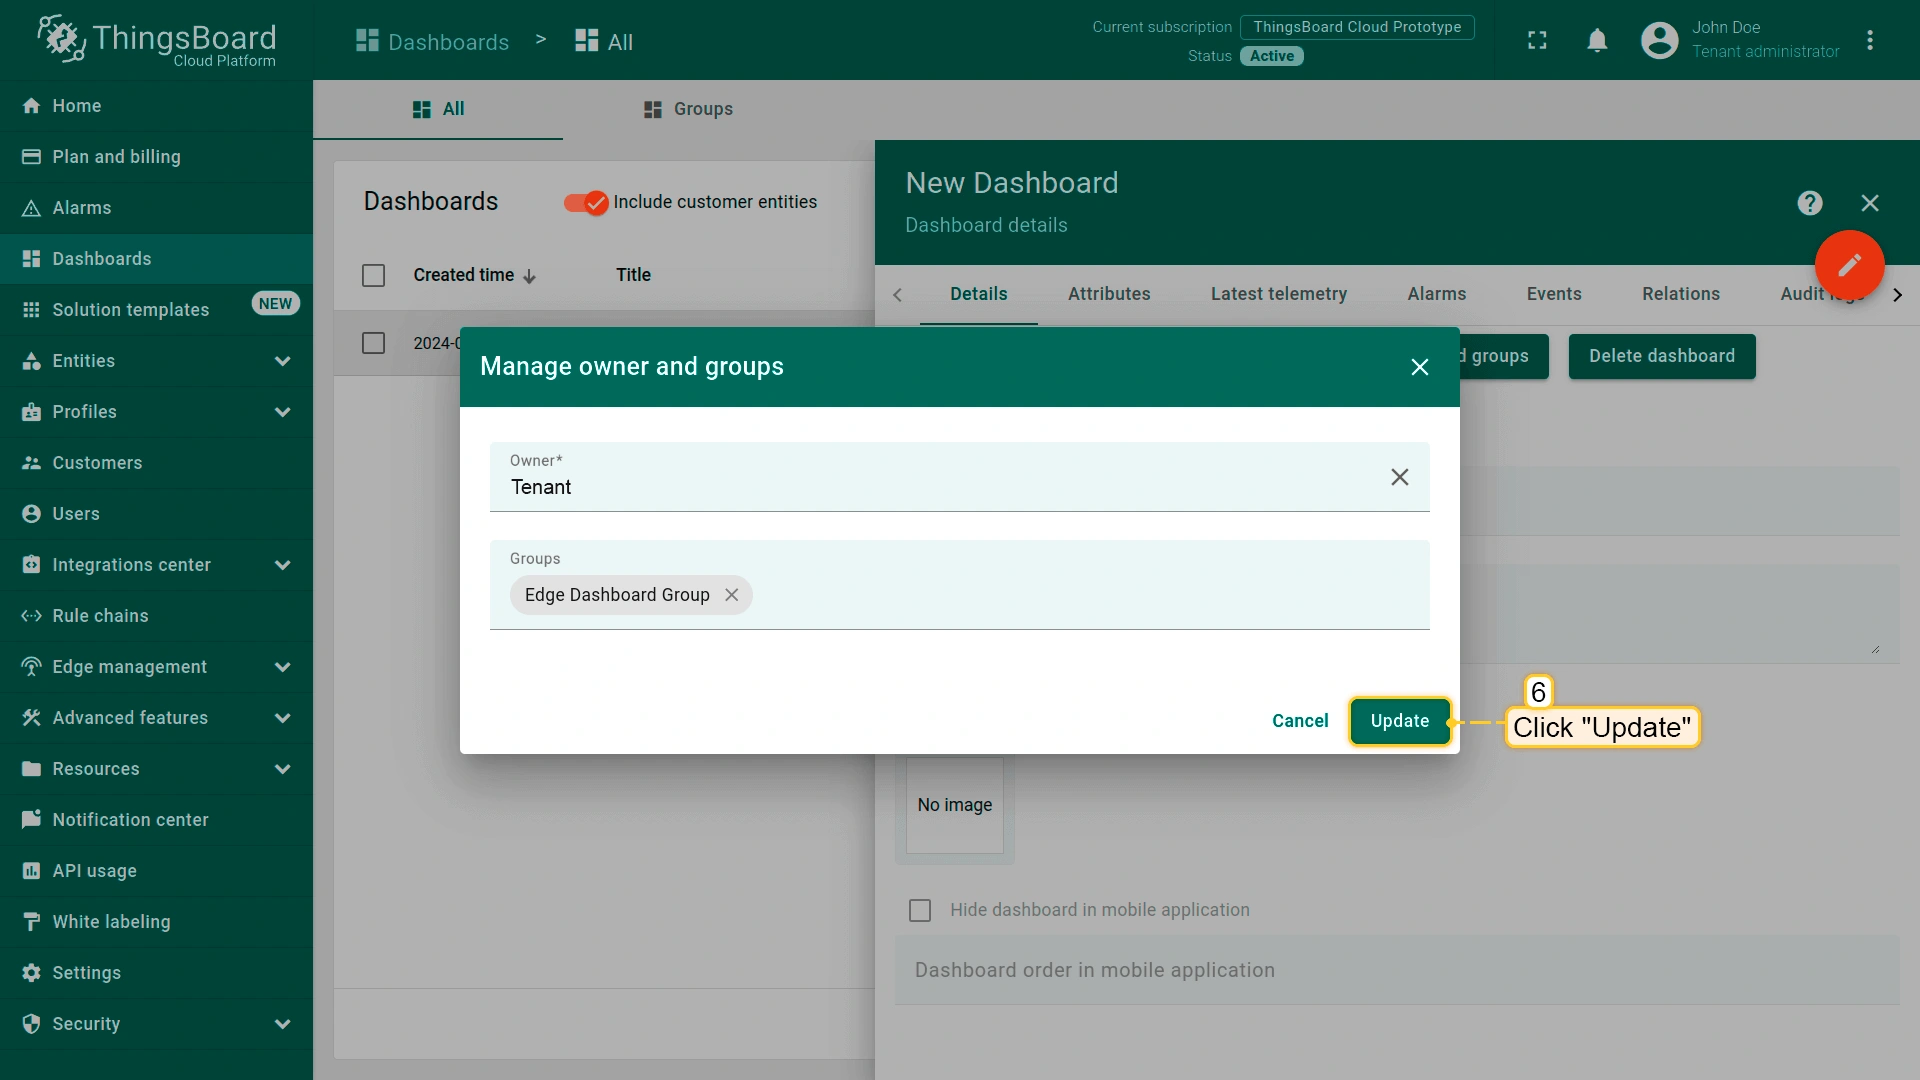
- The "Edge Dashboard Group" appears in the "Groups" field. Click the "Update" button.
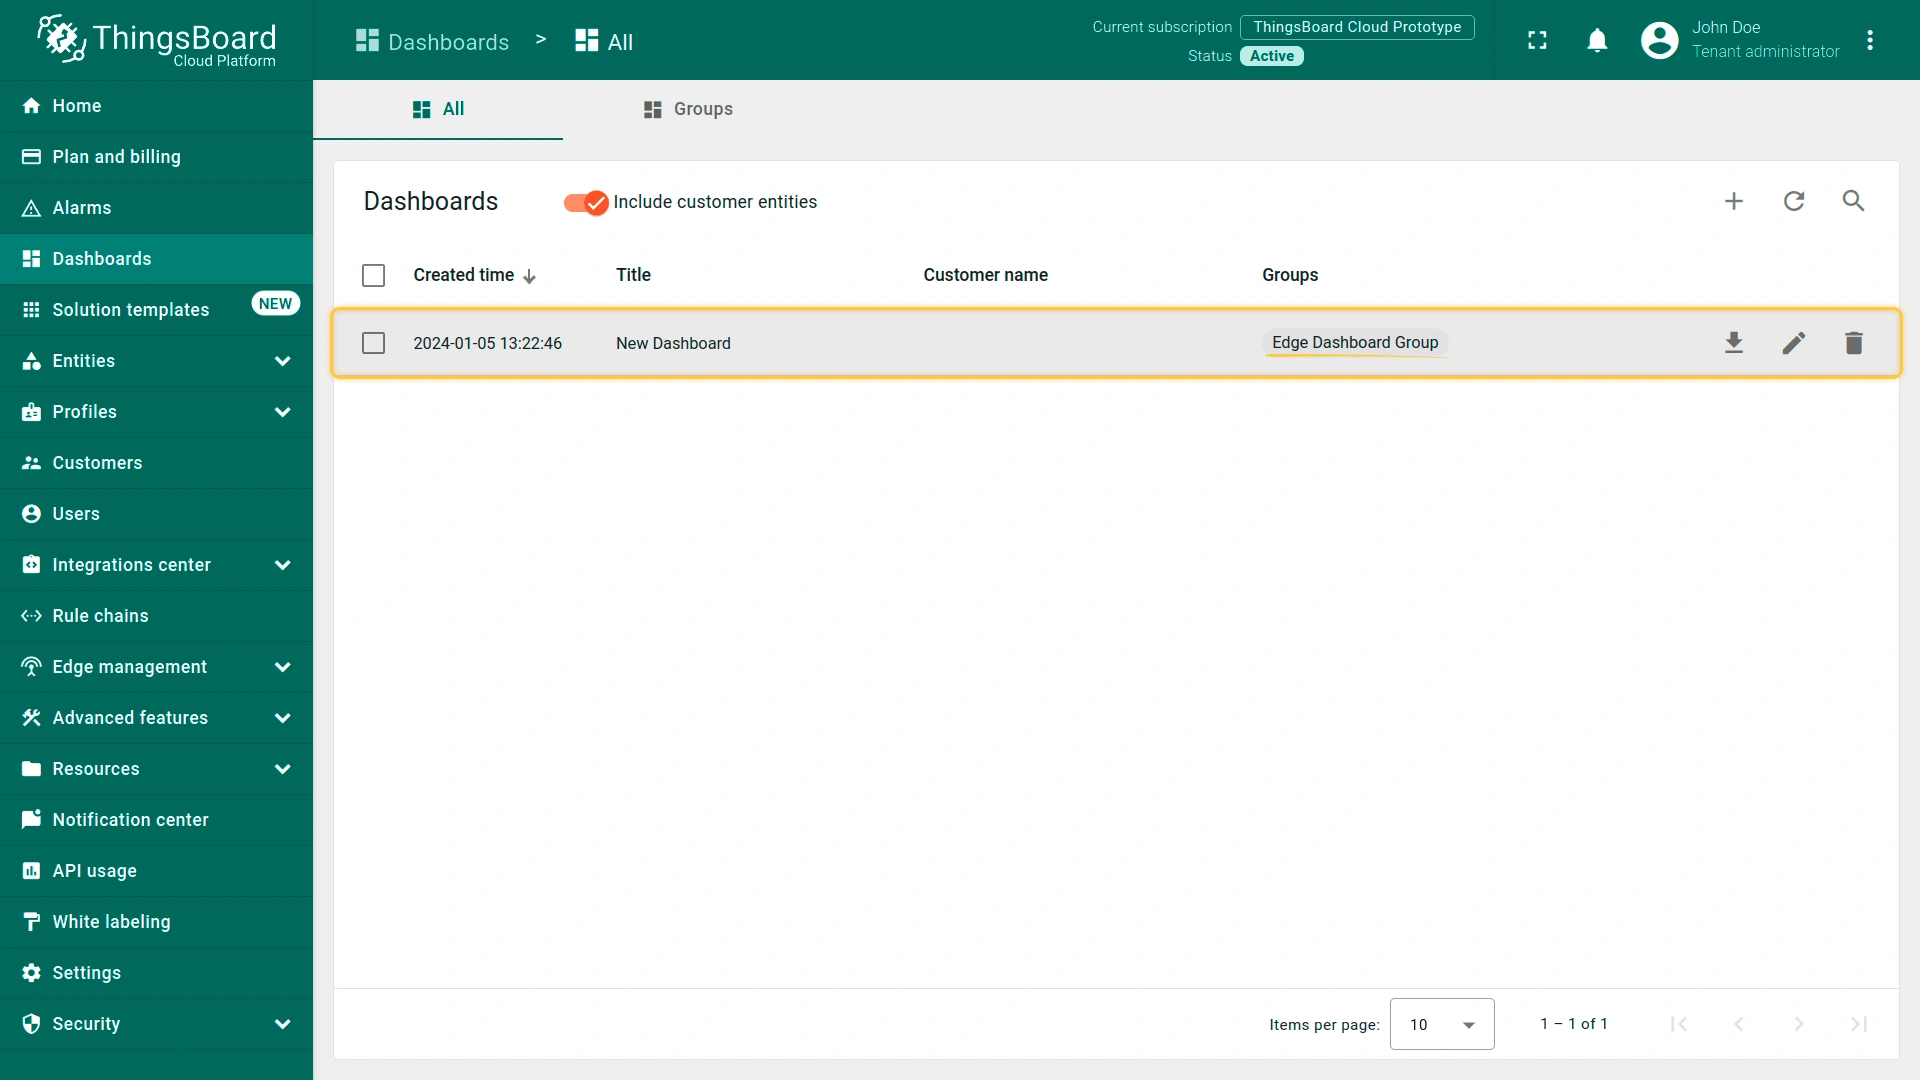
- The newly created group is now available in the "Groups" column.
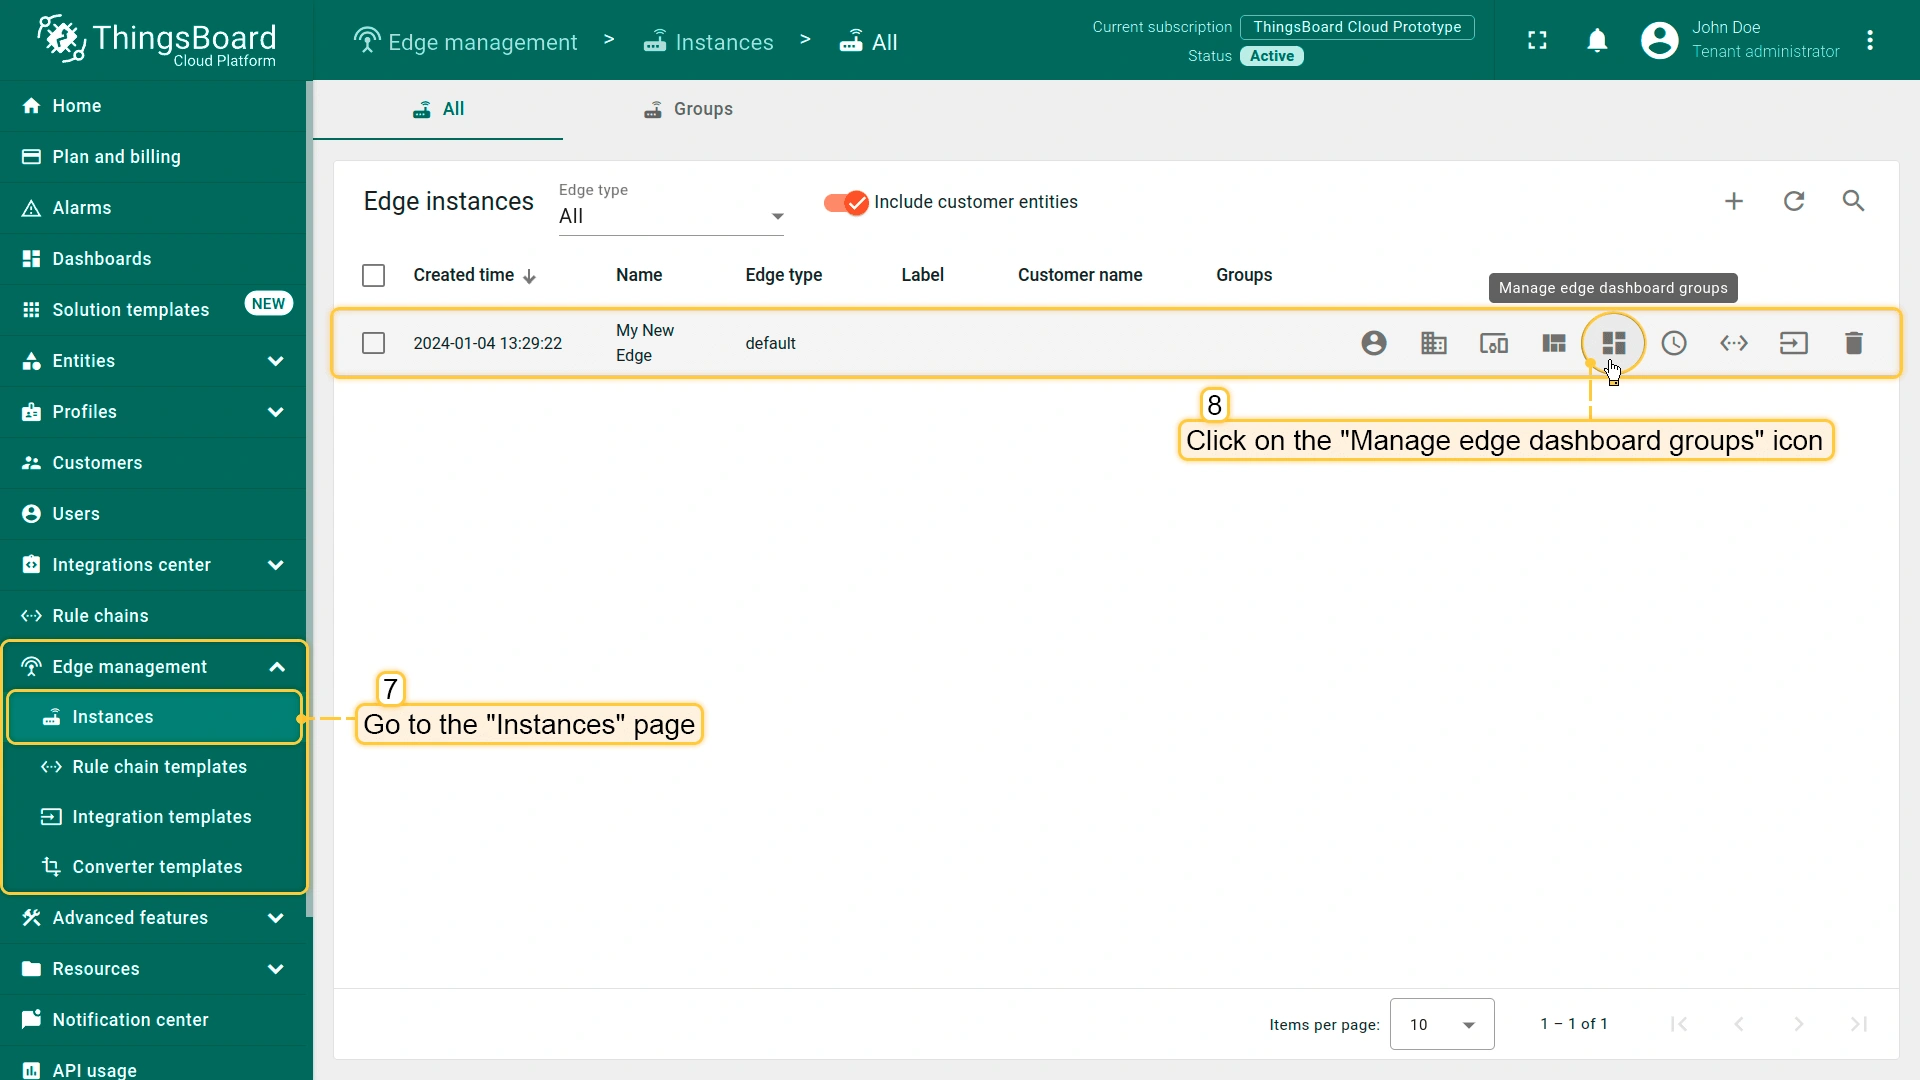
- Go to the Edge management > Instances section. Click the "Manage edge dashboard groups" icon of the instance in question.
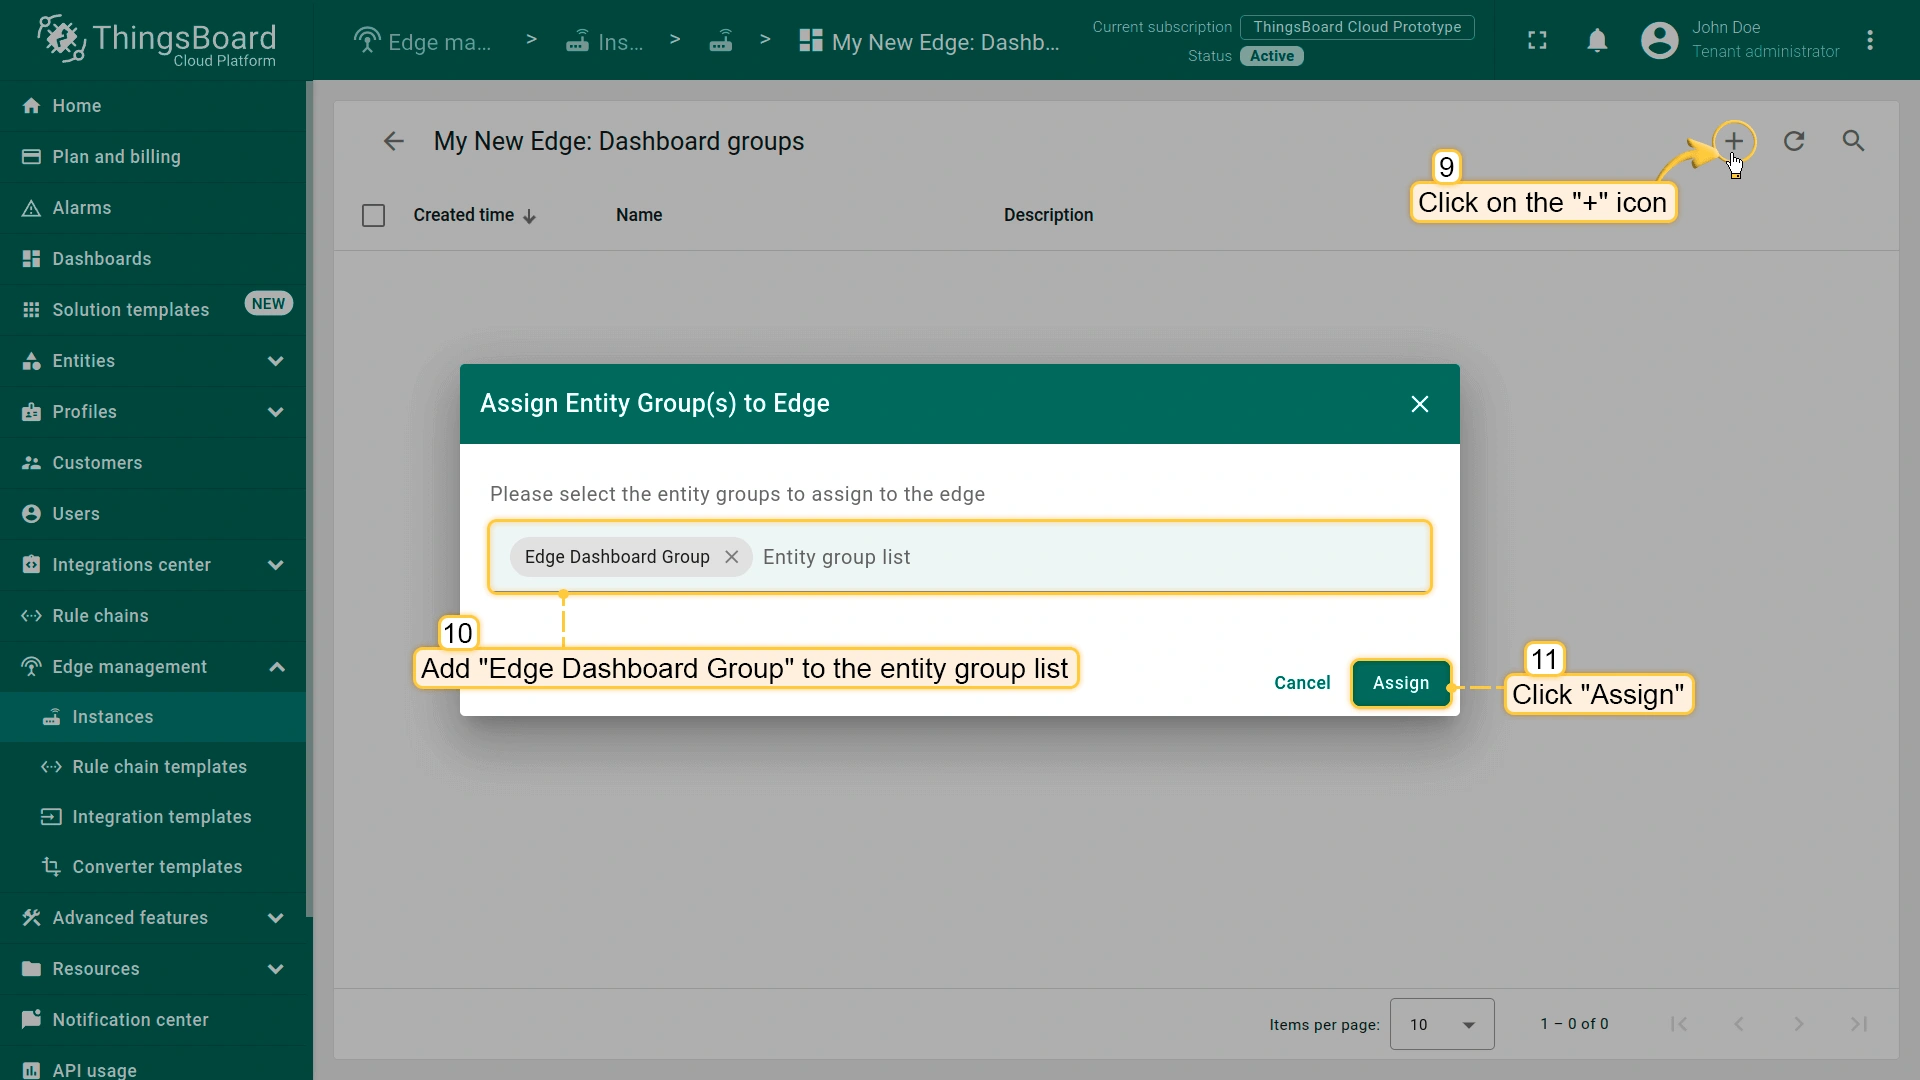
- On the Edge Dashboard Groups page, you will see all the dashboard groups that are already assigned to this Edge. To assign another dashboard group, click the "+" icon and select "Edge Dashboard Group" from the drop-down-menu. Click the "Assign" button.
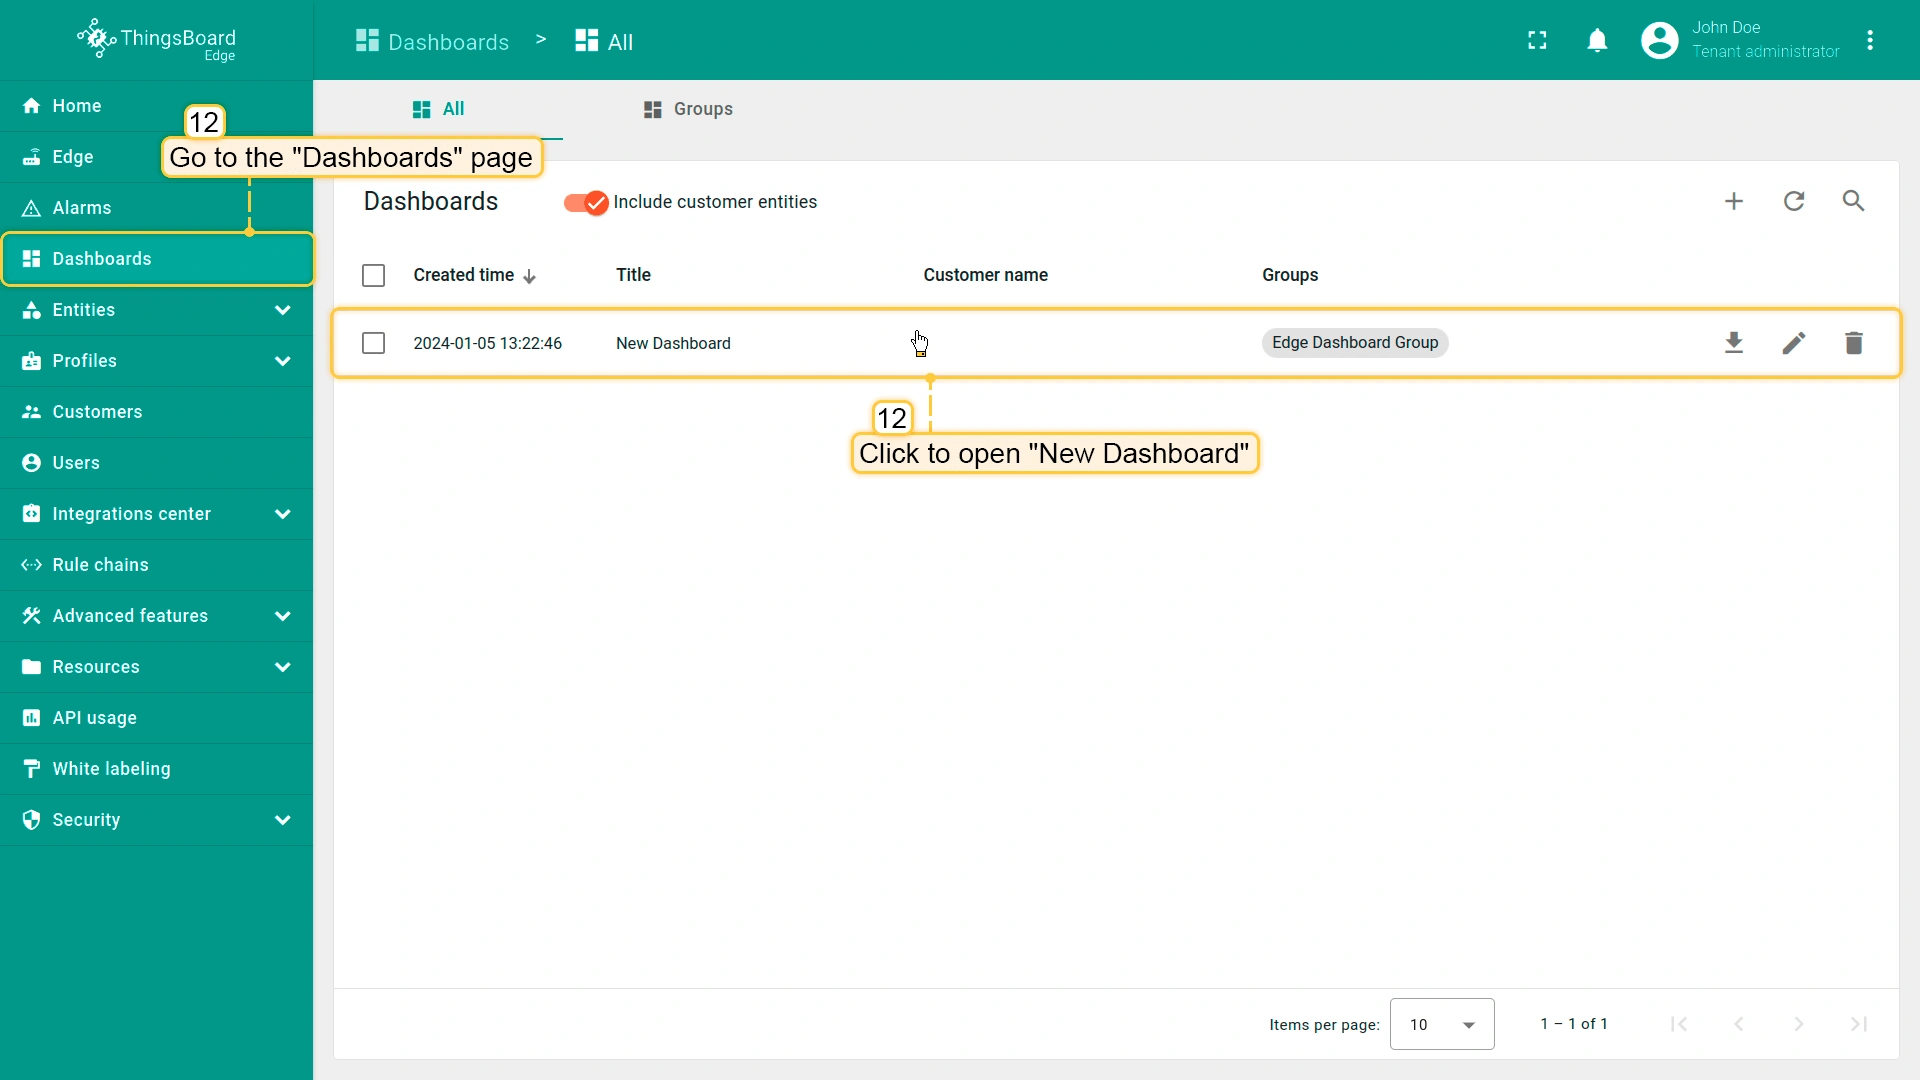
To confirm that assigned entity is available on the Edge, open the EDGE_URL and go to the corresponding entity section:
- Go to the Dashboards section and open the dashboard you have created on the ThingsBoard Professional Edition Server
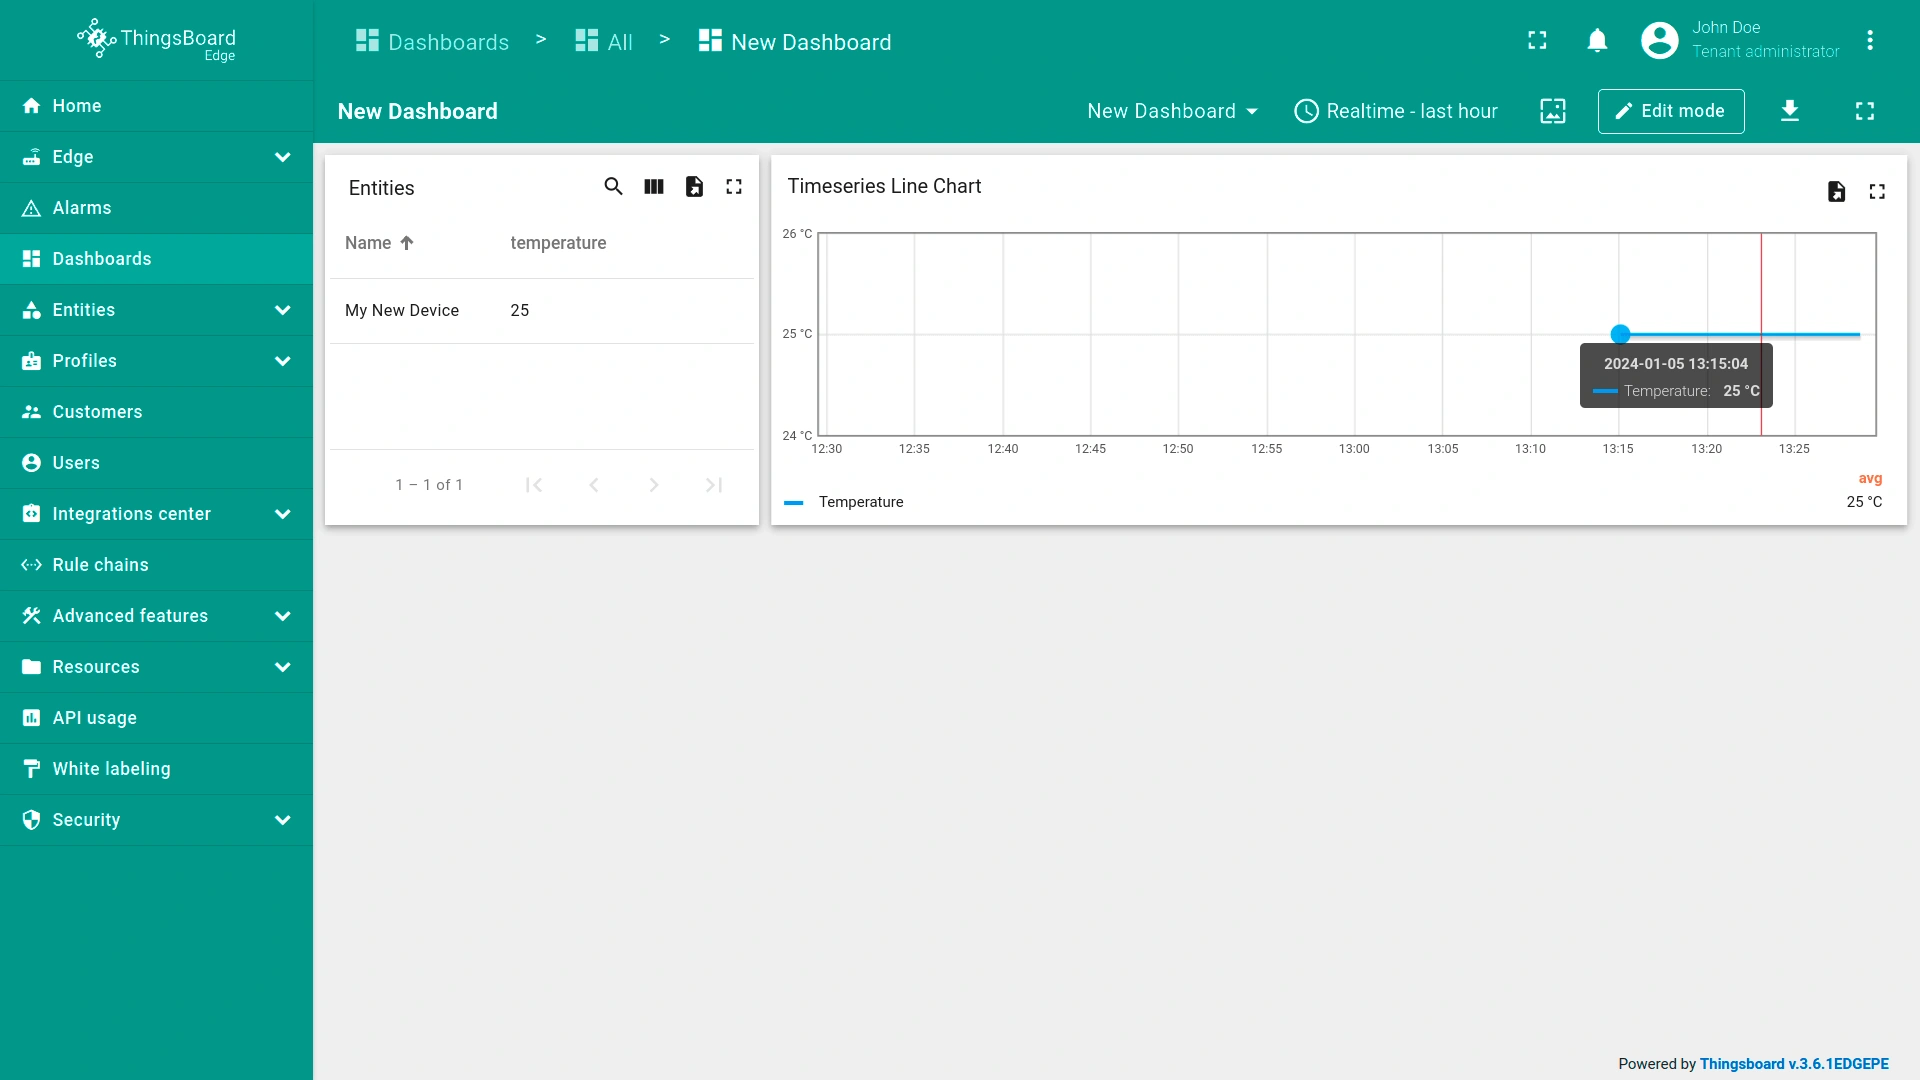
- Verify that these are the same widgets that you have added on the Cloud.
Your Feedback
Congratulations! You have successfully completed the initial configuration steps for ThingsBoard Edge. Now you can send new telemetry readings and they will appear on the dashboard immediately.
Help us improve by providing your feedback at GitHub/Issues or through the “Contact us” form. We would also greatly appreciate it if you could star our project on GitHub!
Next steps
-
Installation guides - Learn how to setup ThingsBoard Edge on various available operating systems and connect to ThingsBoard Server.
-
Edge Rule Engine:
-
Rule Chain Templates - Learn how to use ThingsBoard Edge Rule Chain Templates.
-
Provision Rule Chains from cloud to edge - Learn how to provision edge rule chains from cloud to edge.
-
- Security:
- gRPC over SSL/TLS - Learn how to configure gRPC over SSL/TLS for communication between edge and cloud.
-
Features:
-
Edge Status - Learn about Edge Status page on ThingsBoard Edge.
-
Cloud Events - Learn about Cloud Events page on ThingsBoard Edge.
-
-
Use cases:
-
Manage alarms and RPC requests on edge devices - This guide will show how to generate local alarms on the edge and send RPC requests to devices connected to edge:
-
Data filtering and traffic reduce - This guide will show how to send to cloud from edge only filterd amount of device data:
-
- Roadmap - ThingsBoard Edge roadmap.