Only Professional Edition supports Custom translations feature.
Use ThingsBoard Cloud or install your own platform instance.
- Change platform language
- Adding new language
- Translation editor
- Custom translation
- Delete language
- Next steps
ThingsBoard supports a multilingual interface through its built-in internationalization (i18n) system. Select and use the interface in the language that suits you best.
However, for more specific requirements, the Custom translation feature is available, which allows you to:
- Add new languages;
- Modify or extend existing translations;
- Use custom translations for dashboard titles, widgets, devices, telemetry keys, and other interface elements.
Change platform language
To change the language of your account, follow these steps:
- Click the three-dot icon in the top-right corner of the screen and select “Account”.
- In the profile settings, choose the desired language from the dropdown list.
- Apply the changes.
After that, the ThingsBoard interface will switch to the selected language.
Navigate to your profile by clicking on the three dots in the top right corner of the screen and select “Account”.
Click on the “Language” field and choose desired system language from the drop-down list.
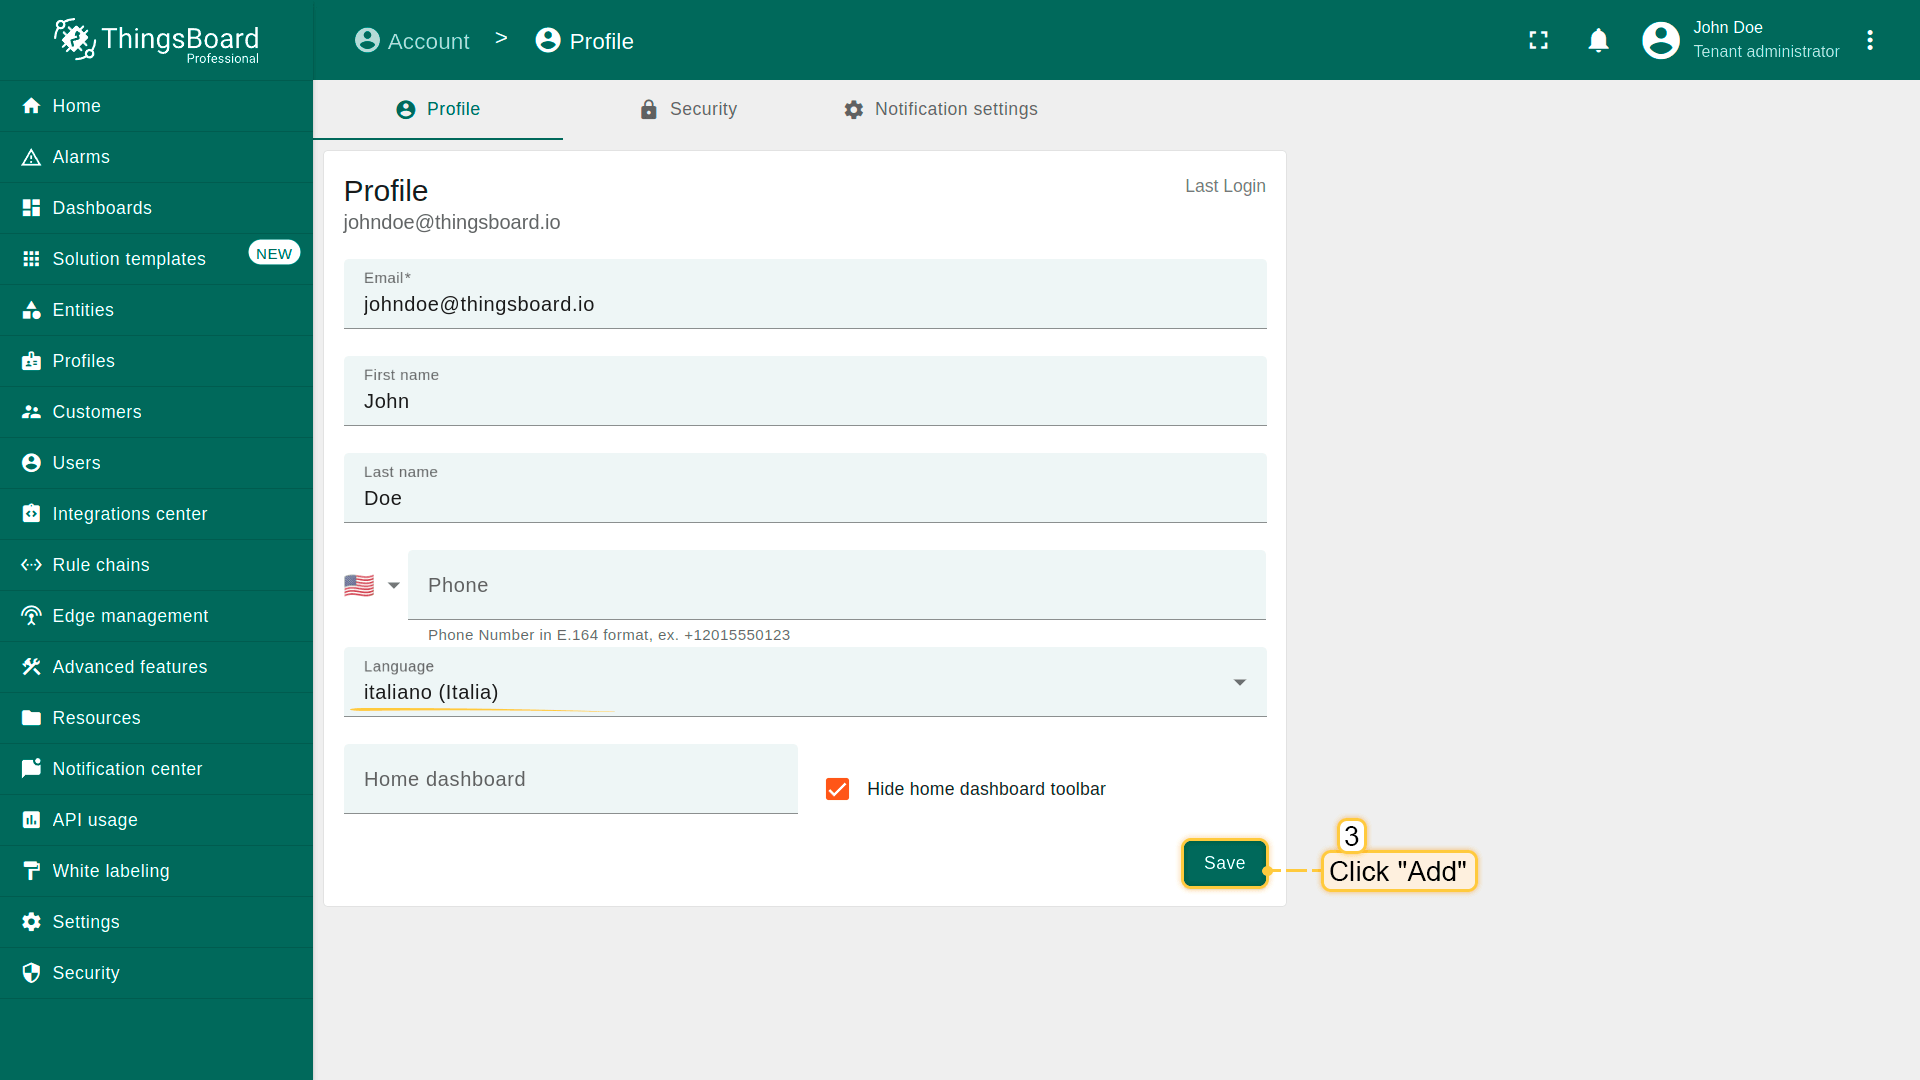
Click the “Save” button to apply the changes;

After that, the ThingsBoard interface will switch to the selected language.
Adding new language
If the desired language is not in the list, you can add a new one. To do this:
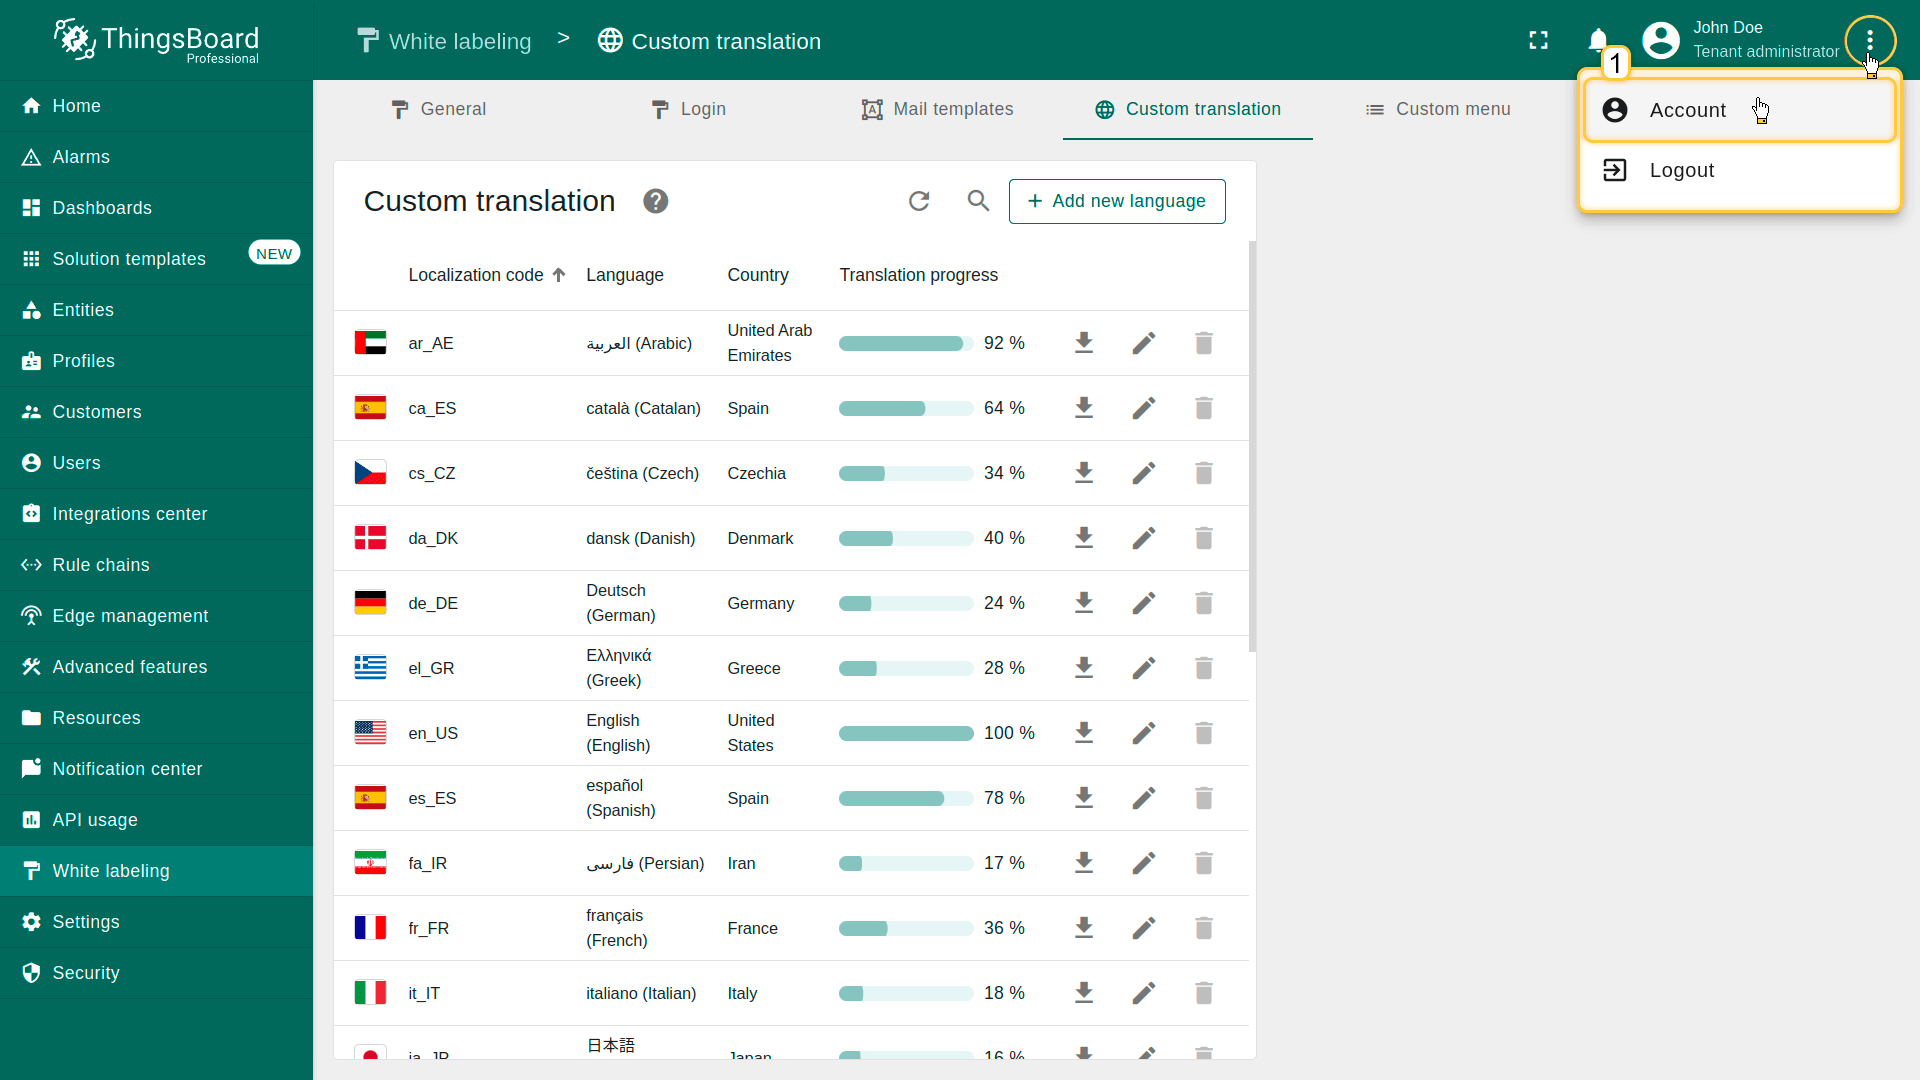
- Go to the “Custom translation” tab of the “White labeling” page, and click the “Add new language” button in the upper-right corner.
- In the window that opens, select the desired language from the list.
- You can immediately upload a JSON file with a translation map for quick localization setup, or leave this step for later and gradually fill in the translations.
- Click “Add”.
The new language has been successfully added. You and your users can now use it as the interface language for your instance.
Since the JSON file I provided includes only a limited set of translation keys, the translation progress is currently at 5%. As you continue adding more translations, the progress indicator will automatically increase.

Go to the “Custom translation” tab of the “White labeling” page. Click the “Add new language” button in the upper-right corner.
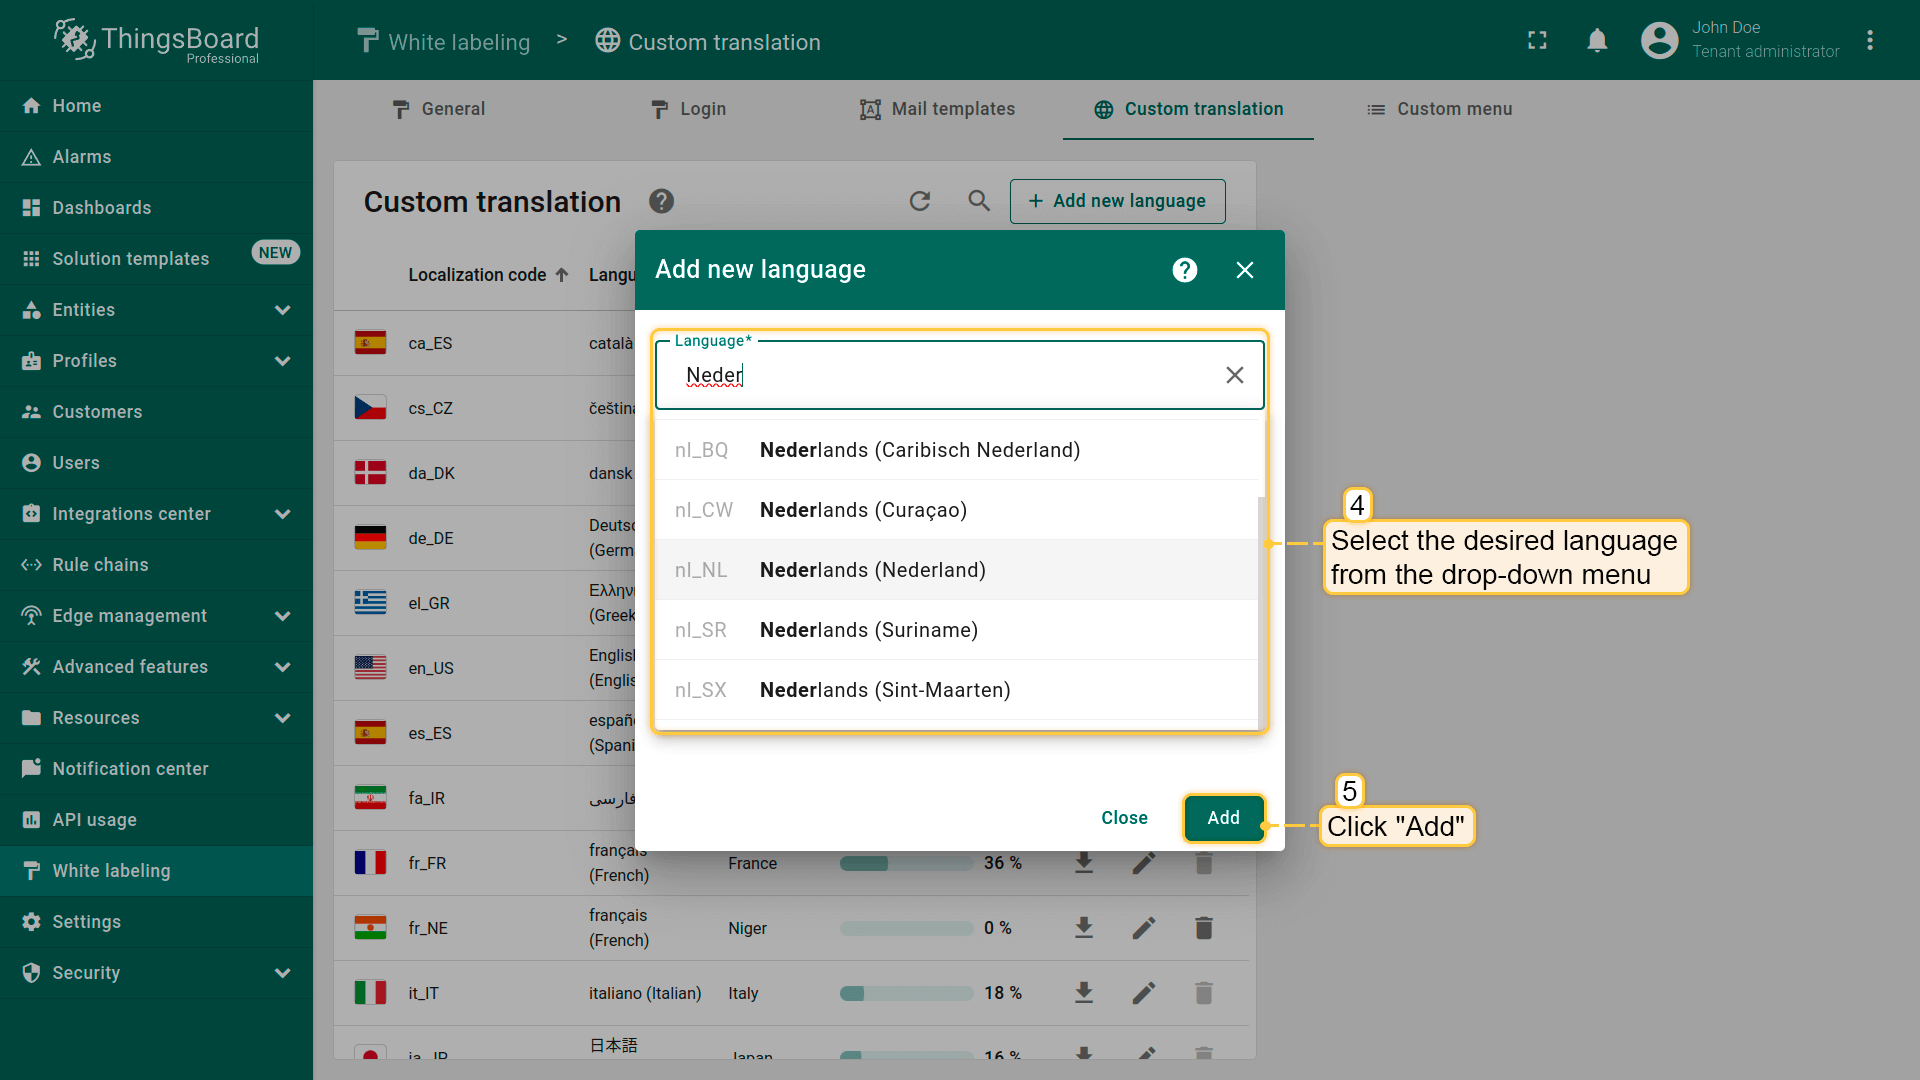
Select the desired language from the list.
You can immediately upload a JSON file with a translation map for quick localization setup, or leave this step for later and gradually fill in the translations. Then, click “Add”.
The new language has been successfully added. You and your users can now use it as the interface language for your instance. Since the JSON file I provided includes only a limited set of translation keys, the translation progress is currently at 5%. As you continue adding more translations, the progress indicator will automatically increase.
Translation editor
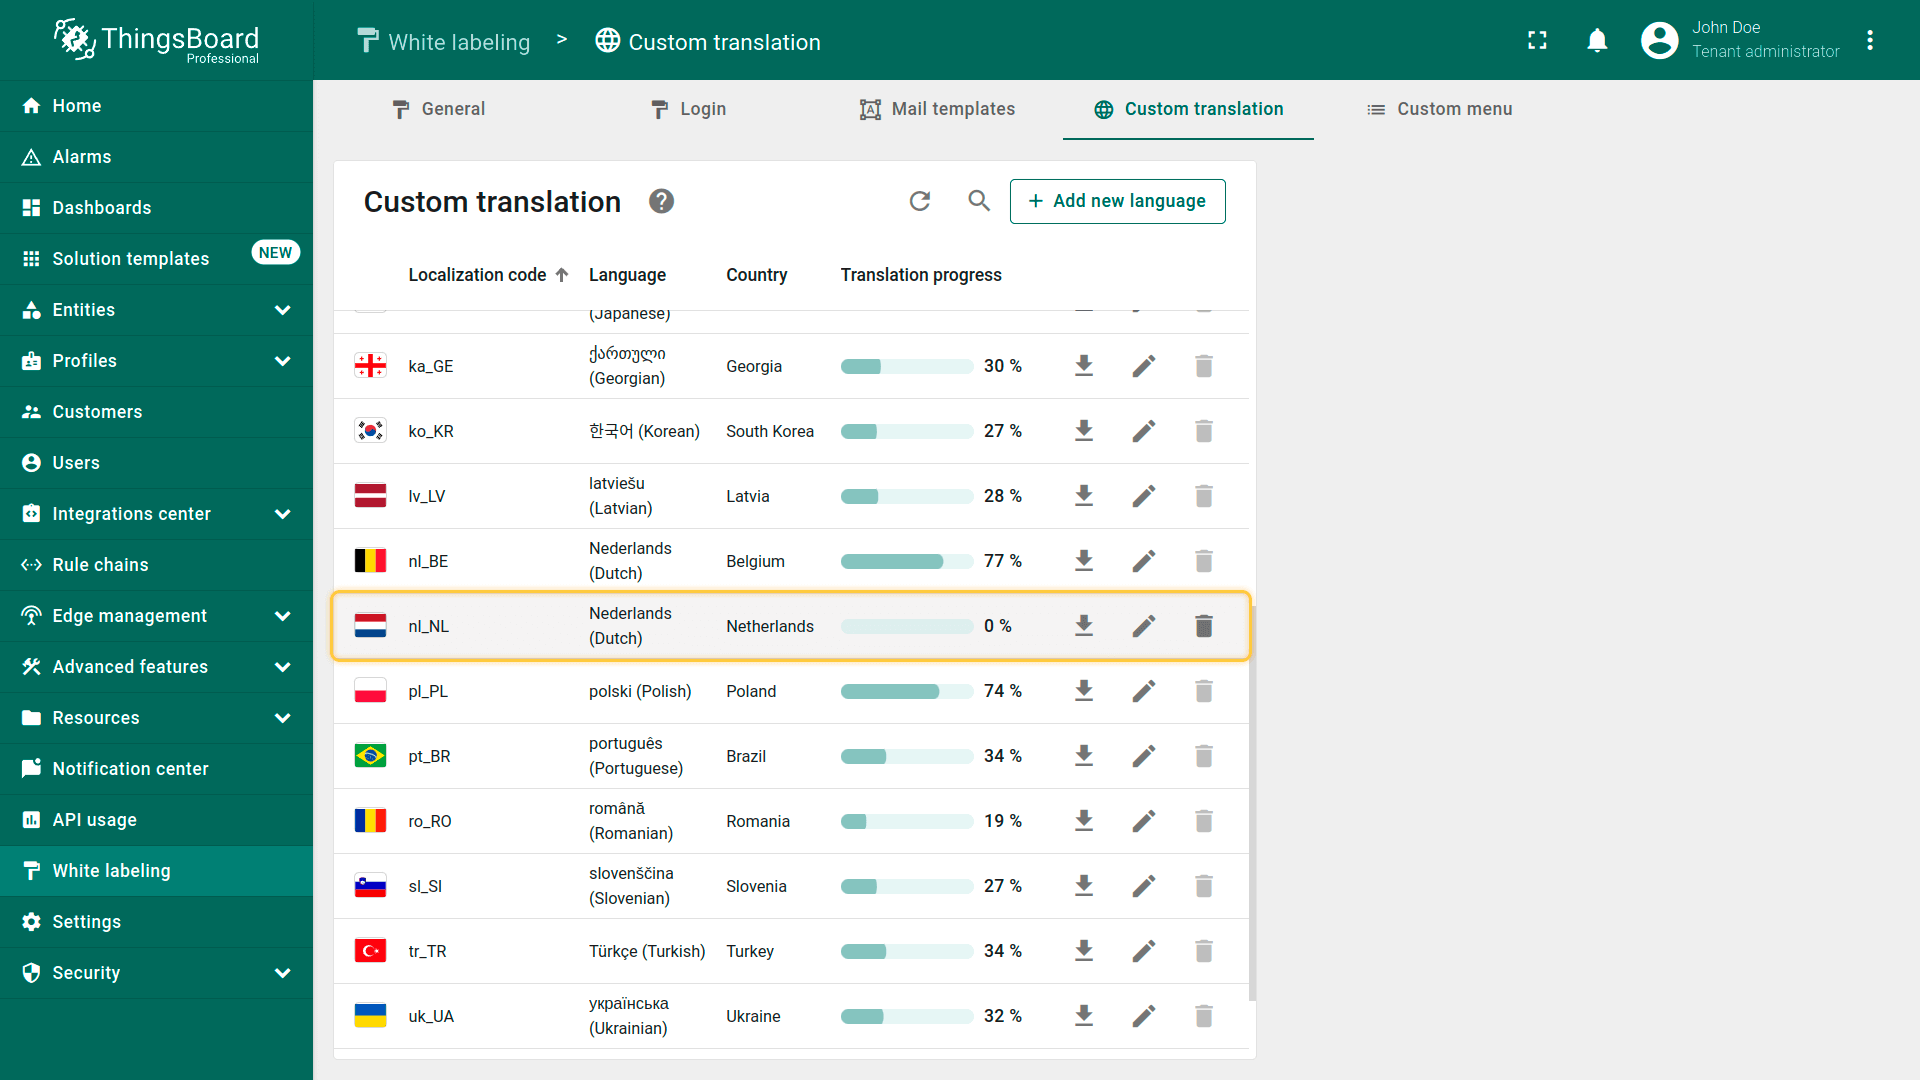
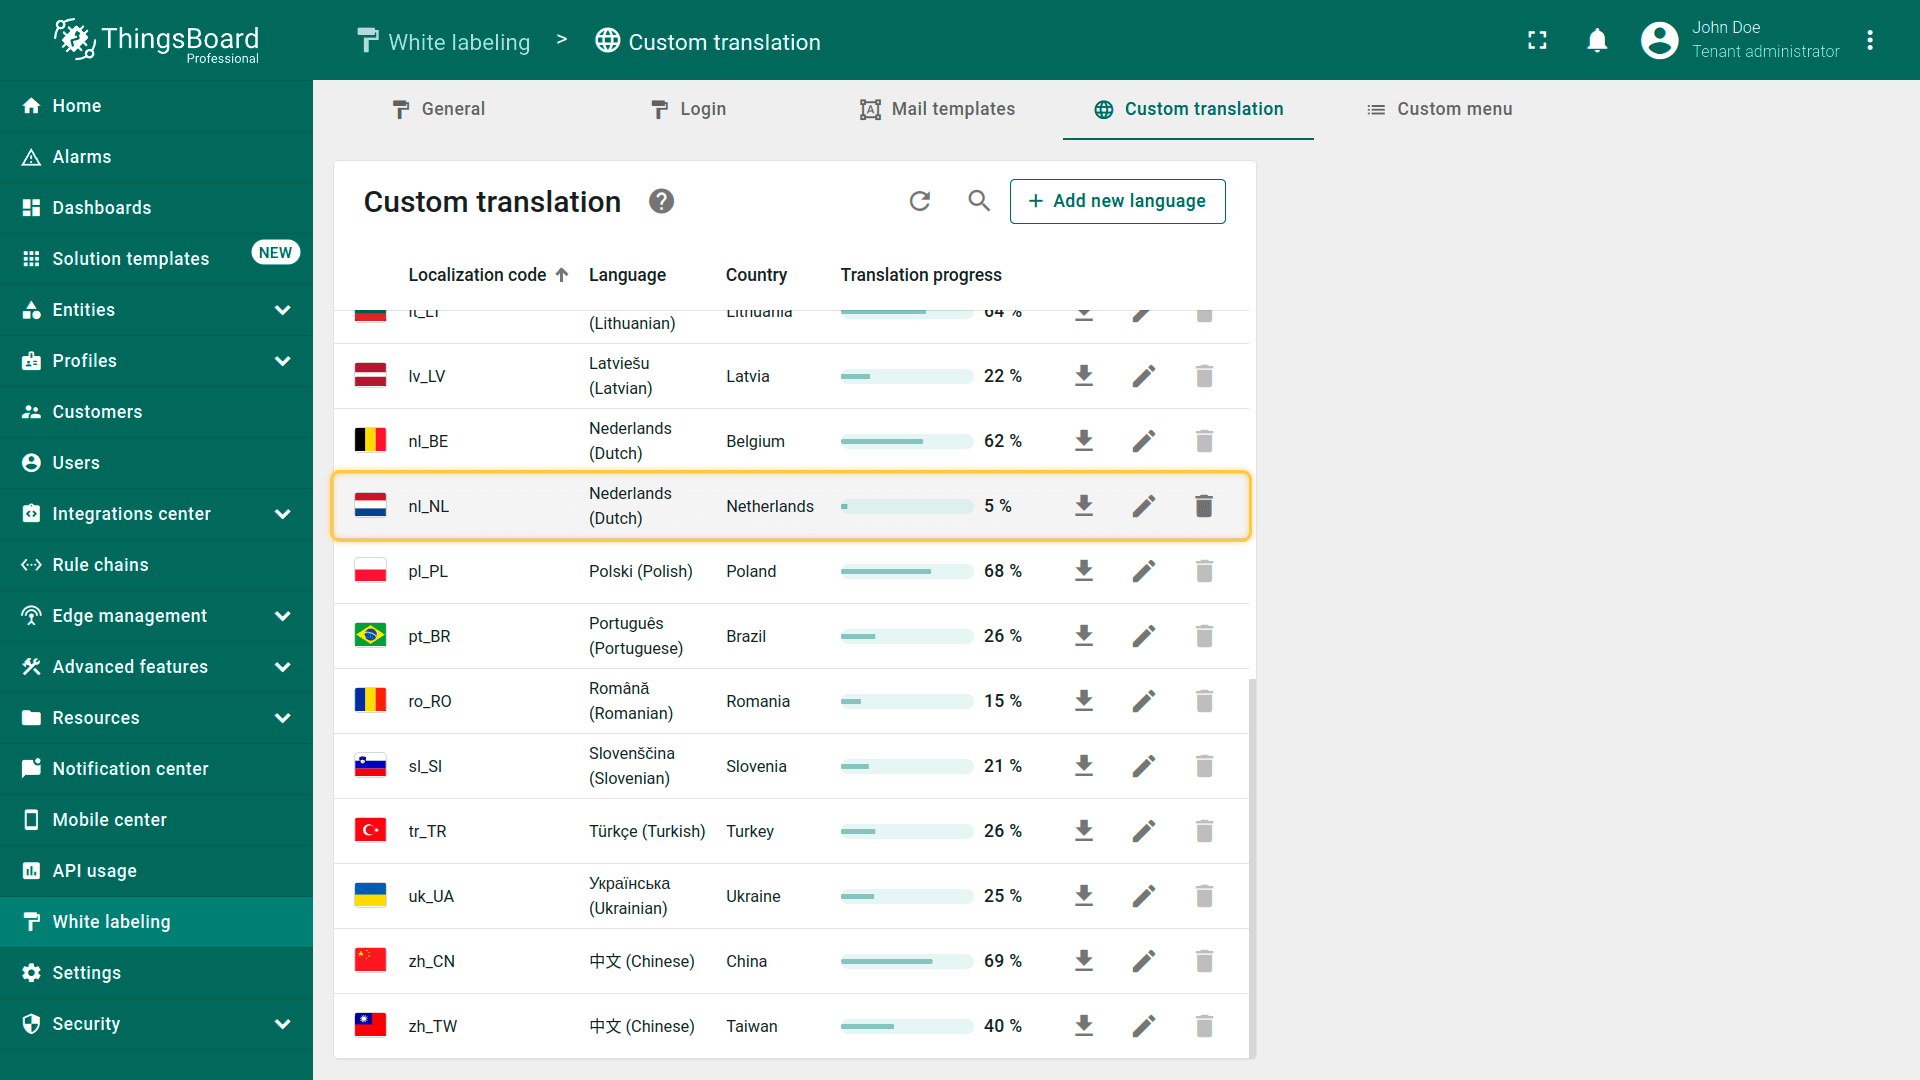
Go to the “White labeling” page and open the “Custom translation” tab. Here you'll see a list of available languages and their translation progress indicated in percentages.
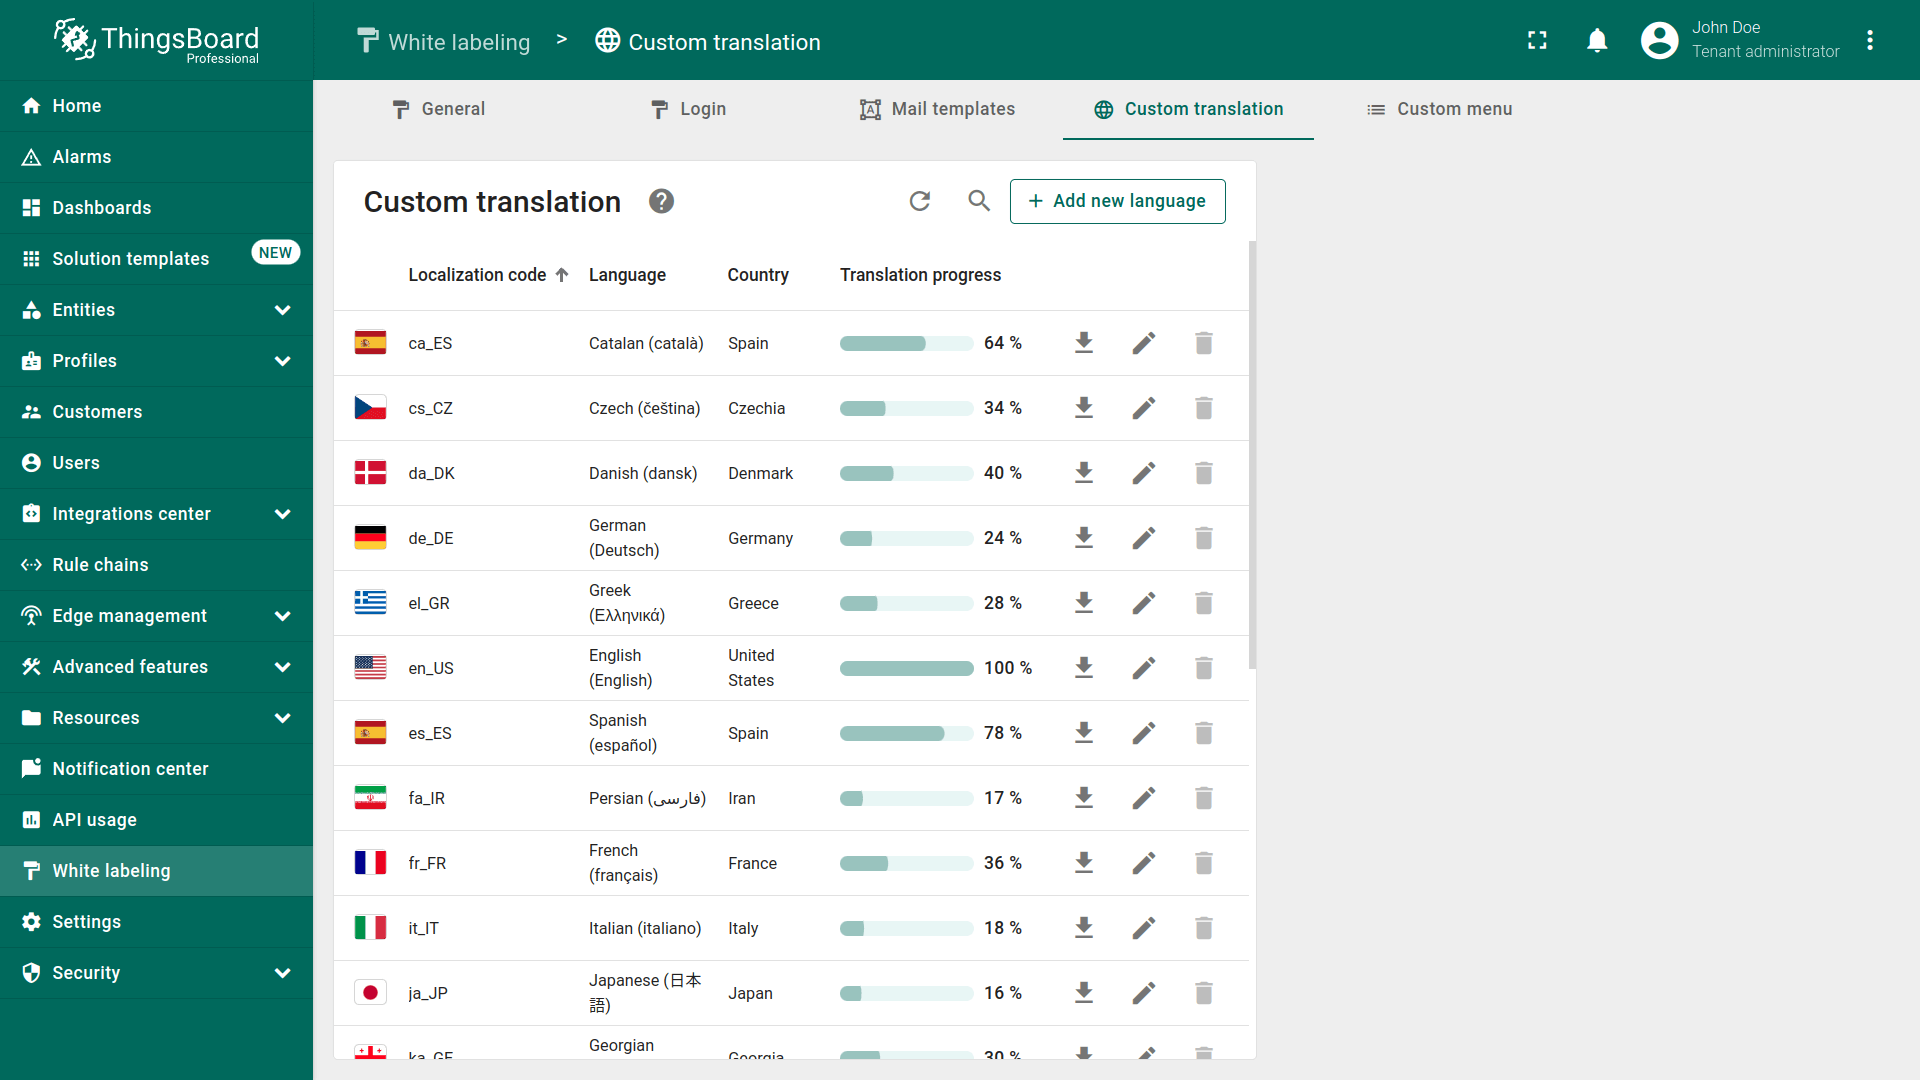
Please note: The initial list of custom translations is created by the system administrator. A tenant cannot delete the system's custom translations but can make changes to them and add new translations.
You can modify or extend the translation for any language. To do this, click the “pencil” icon next to the language you want to edit.
In the top-right corner, you'll find a toggle to switch between basic and advanced settings:
- On the “Basic” tab, you can edit existing translation key or add new ones.
- On the “Advanced” tab, you can upload a JSON file containing a translation map with keys and their corresponding translations.
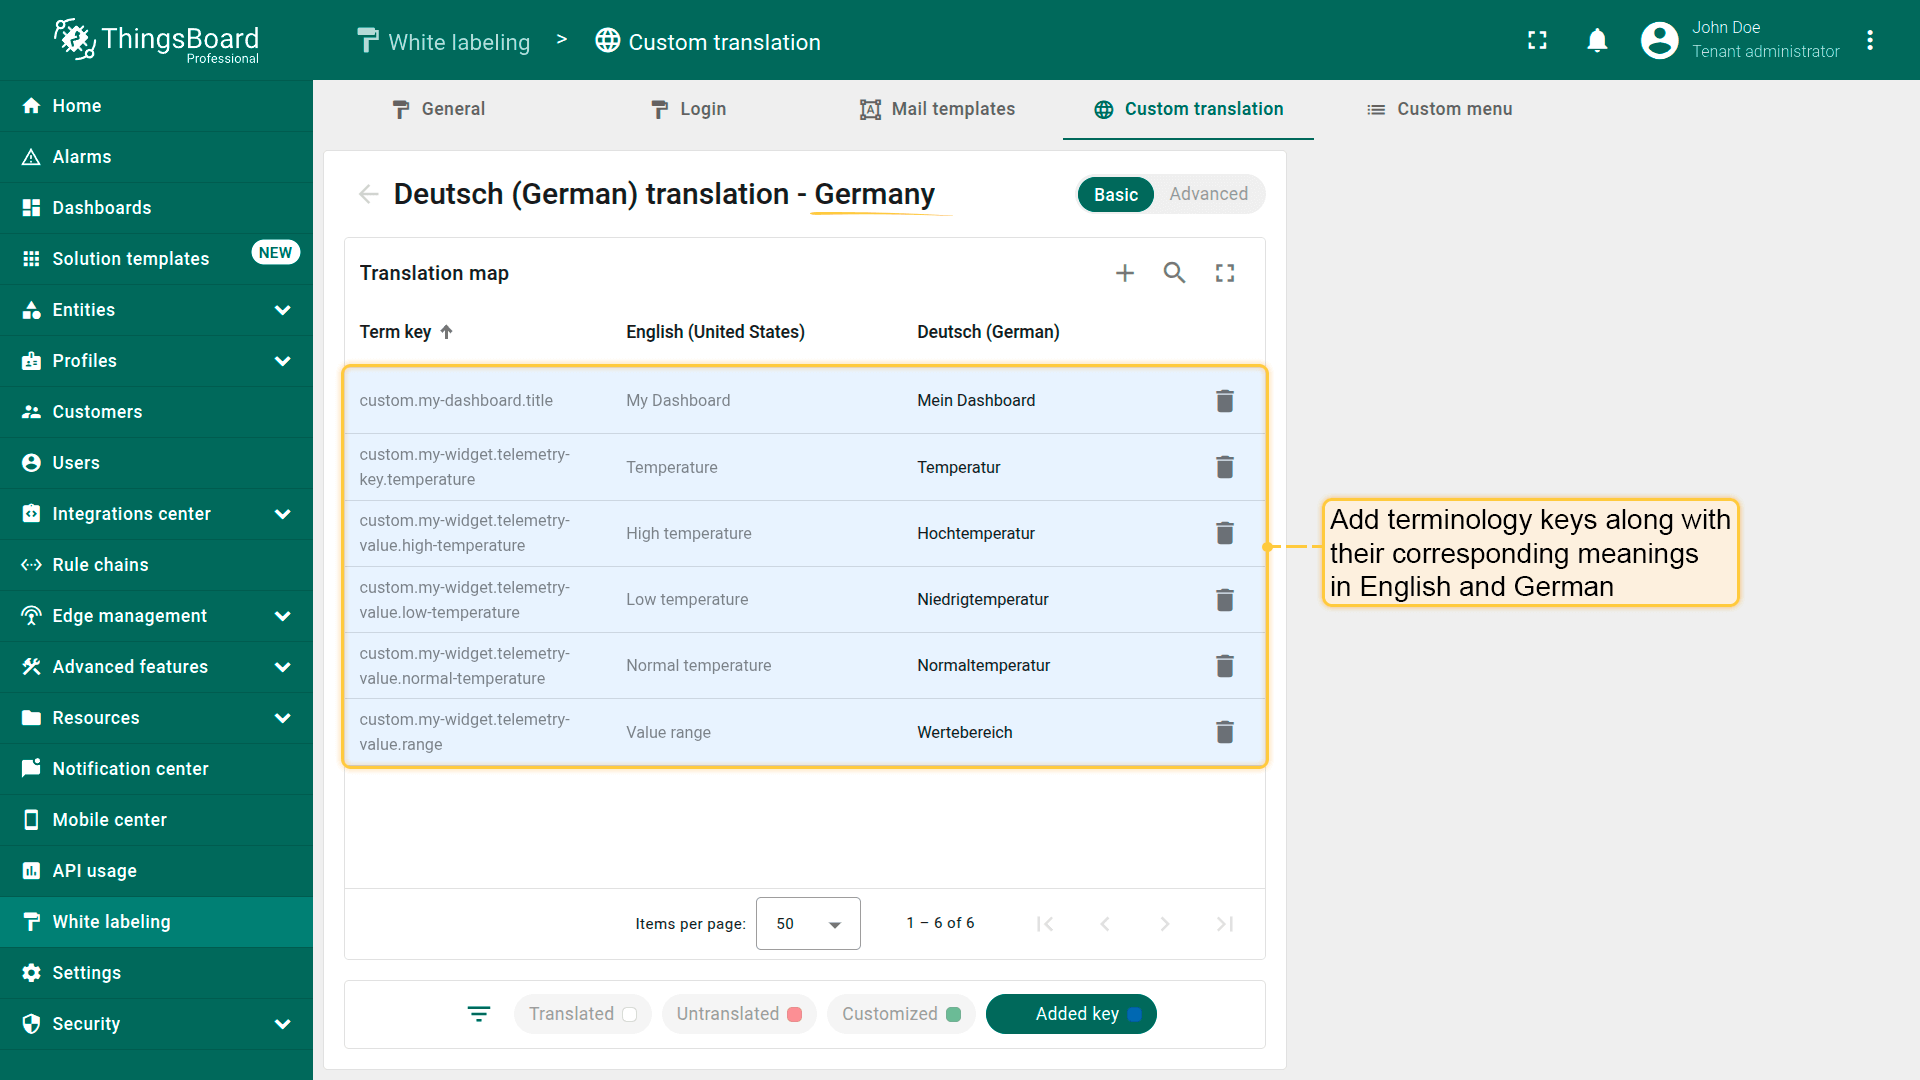
Just below, you'll see a table with three columns:
- A terminology key used to link a user interface element with its translation.
- Input field for the key value in English. This value will be used as a fallback for all languages that don't have a specific translation for this key.
- Input field for the key value in the selected language.
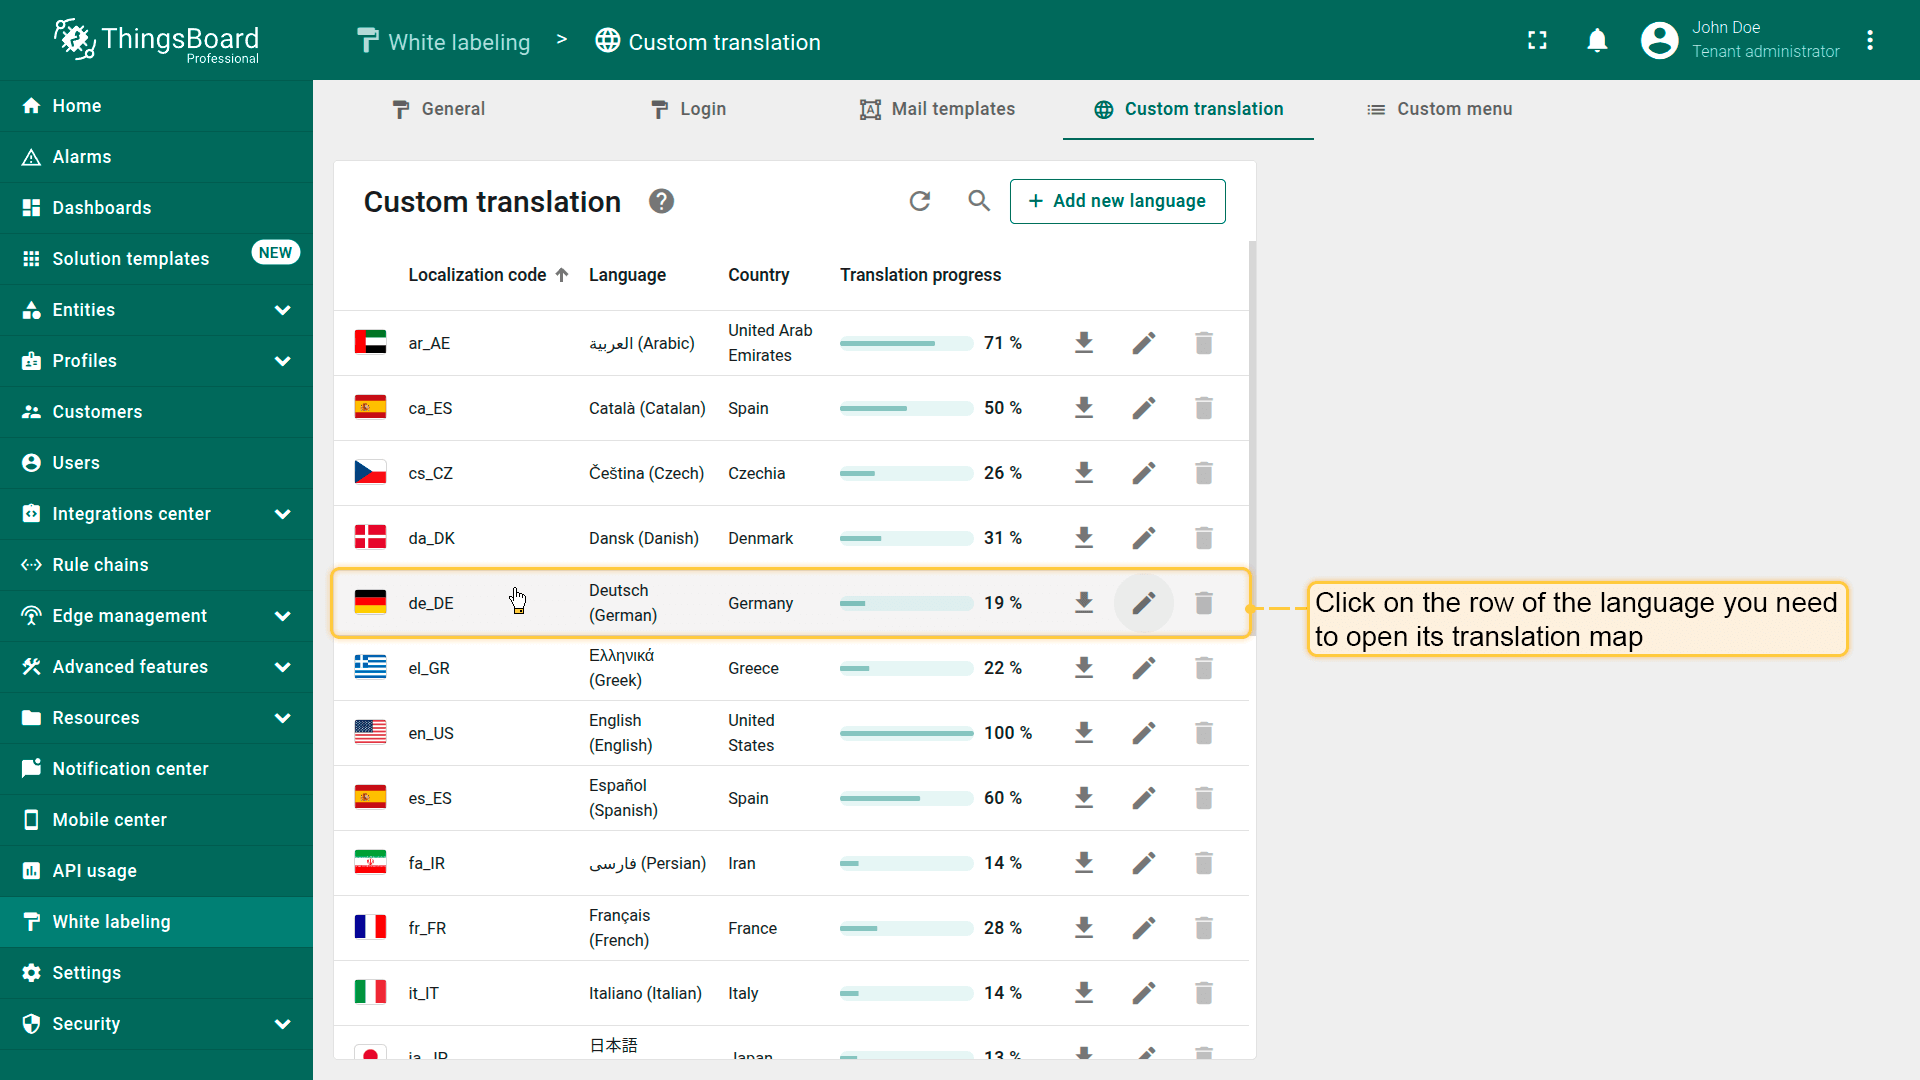
Click the “pencil” icon button next to the language you want to open the editor menu.
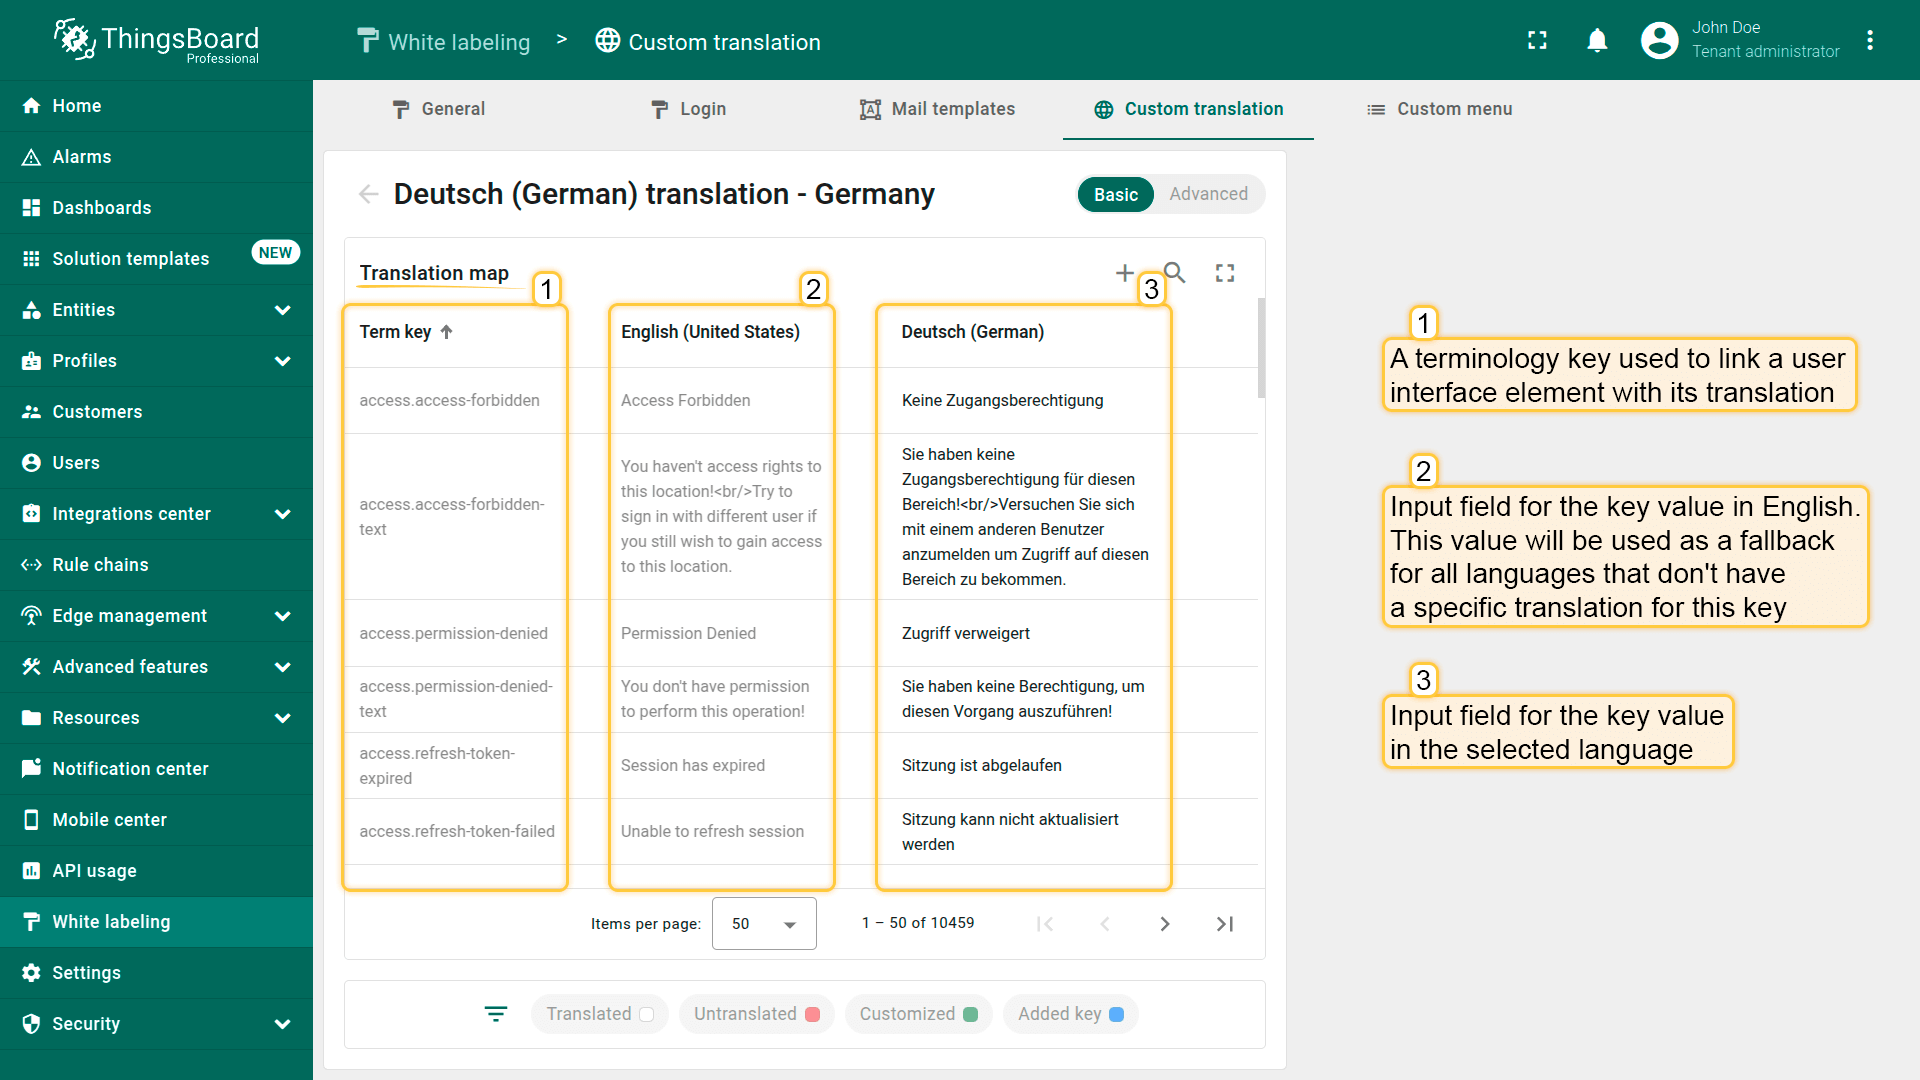
You'll see a table with three columns: The term key, which links an interface element to a translation; Input field for the key value in English. This value will be used as a fallback for all languages that don't have a specific translation for this key; Input field for the key value in the selected language.
Filters
Below the translation map, you'll find convenient filters to help you locate specific keys:
- The “Translated” filter displays keys that already have a translation for the selected localization.
- The “Untranslated” shows keys that are still missing translations.
- The “Customized” filter highlights only the keys whose translations have been manually modified by the user.
- The “Added key” shows the keys that were manually added to the localization file.
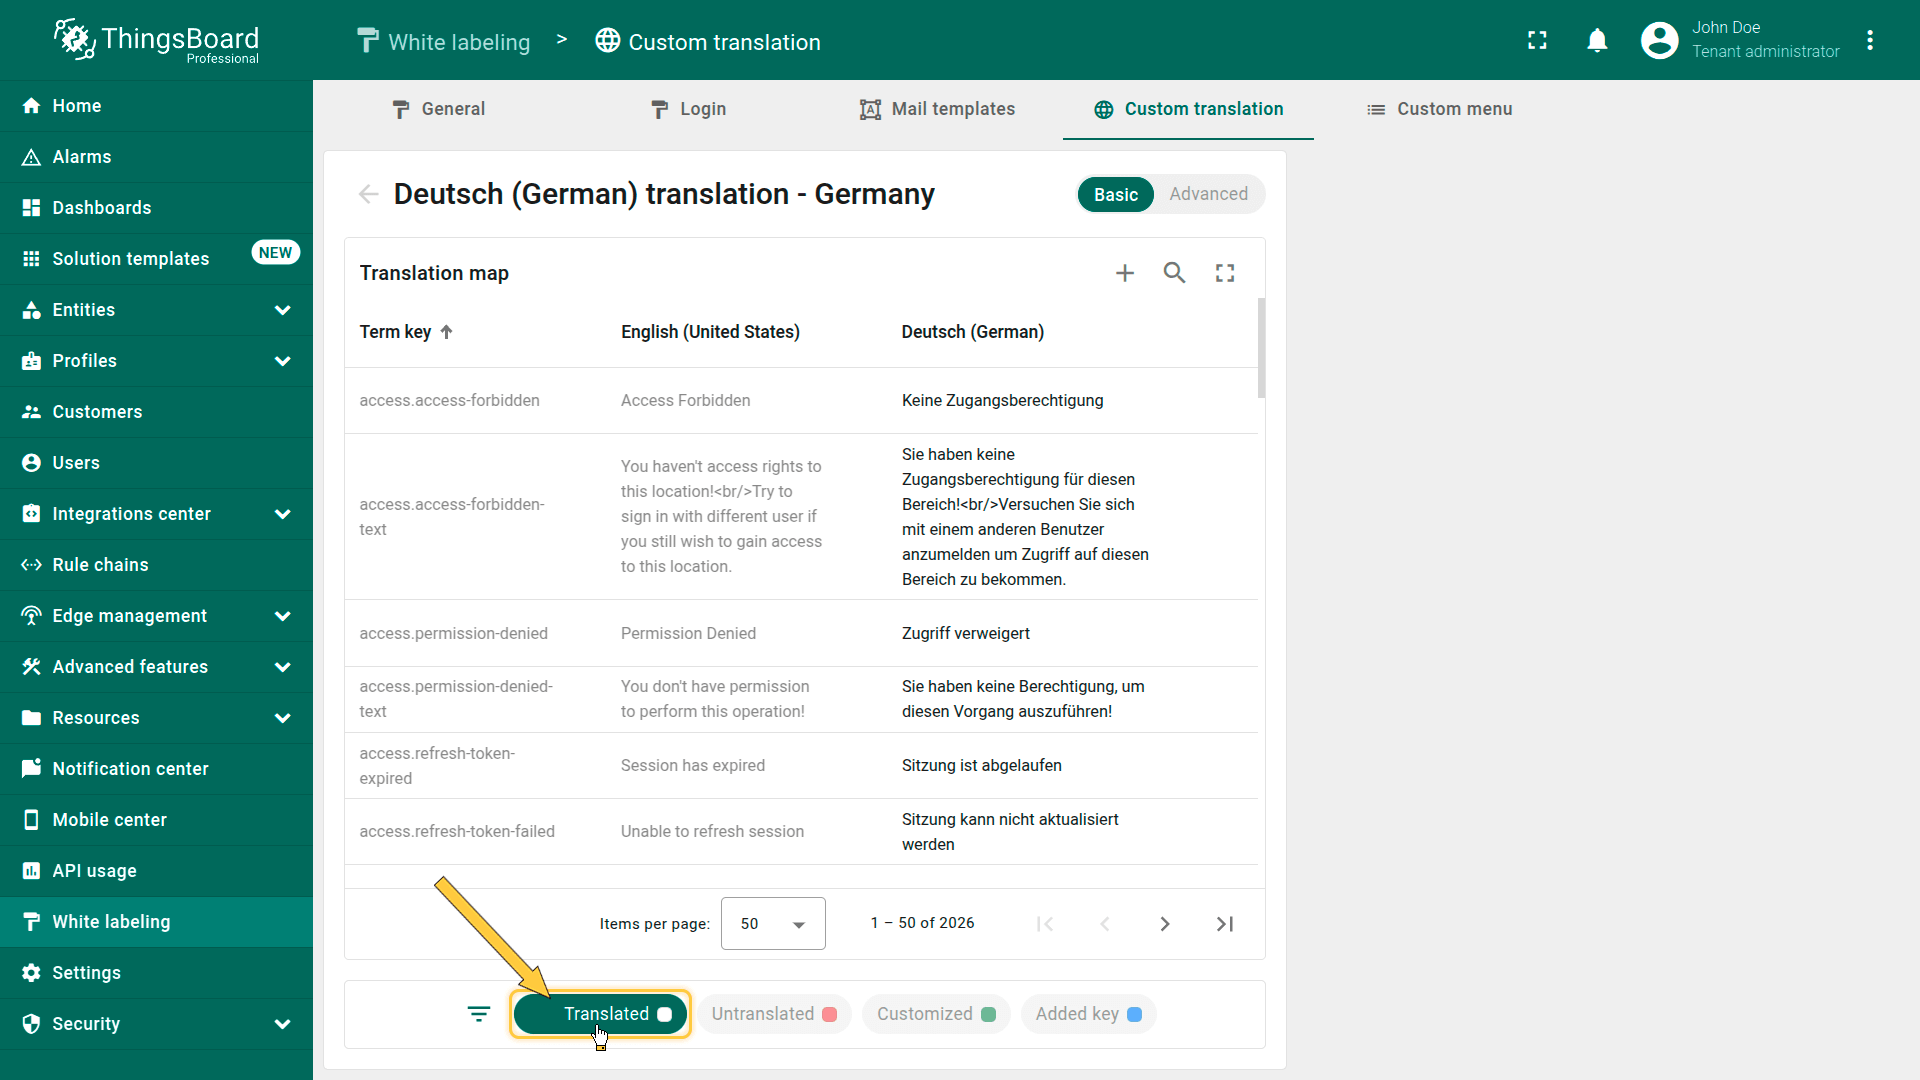
The “Translated” filter displays keys that already have a translation for the selected localization.
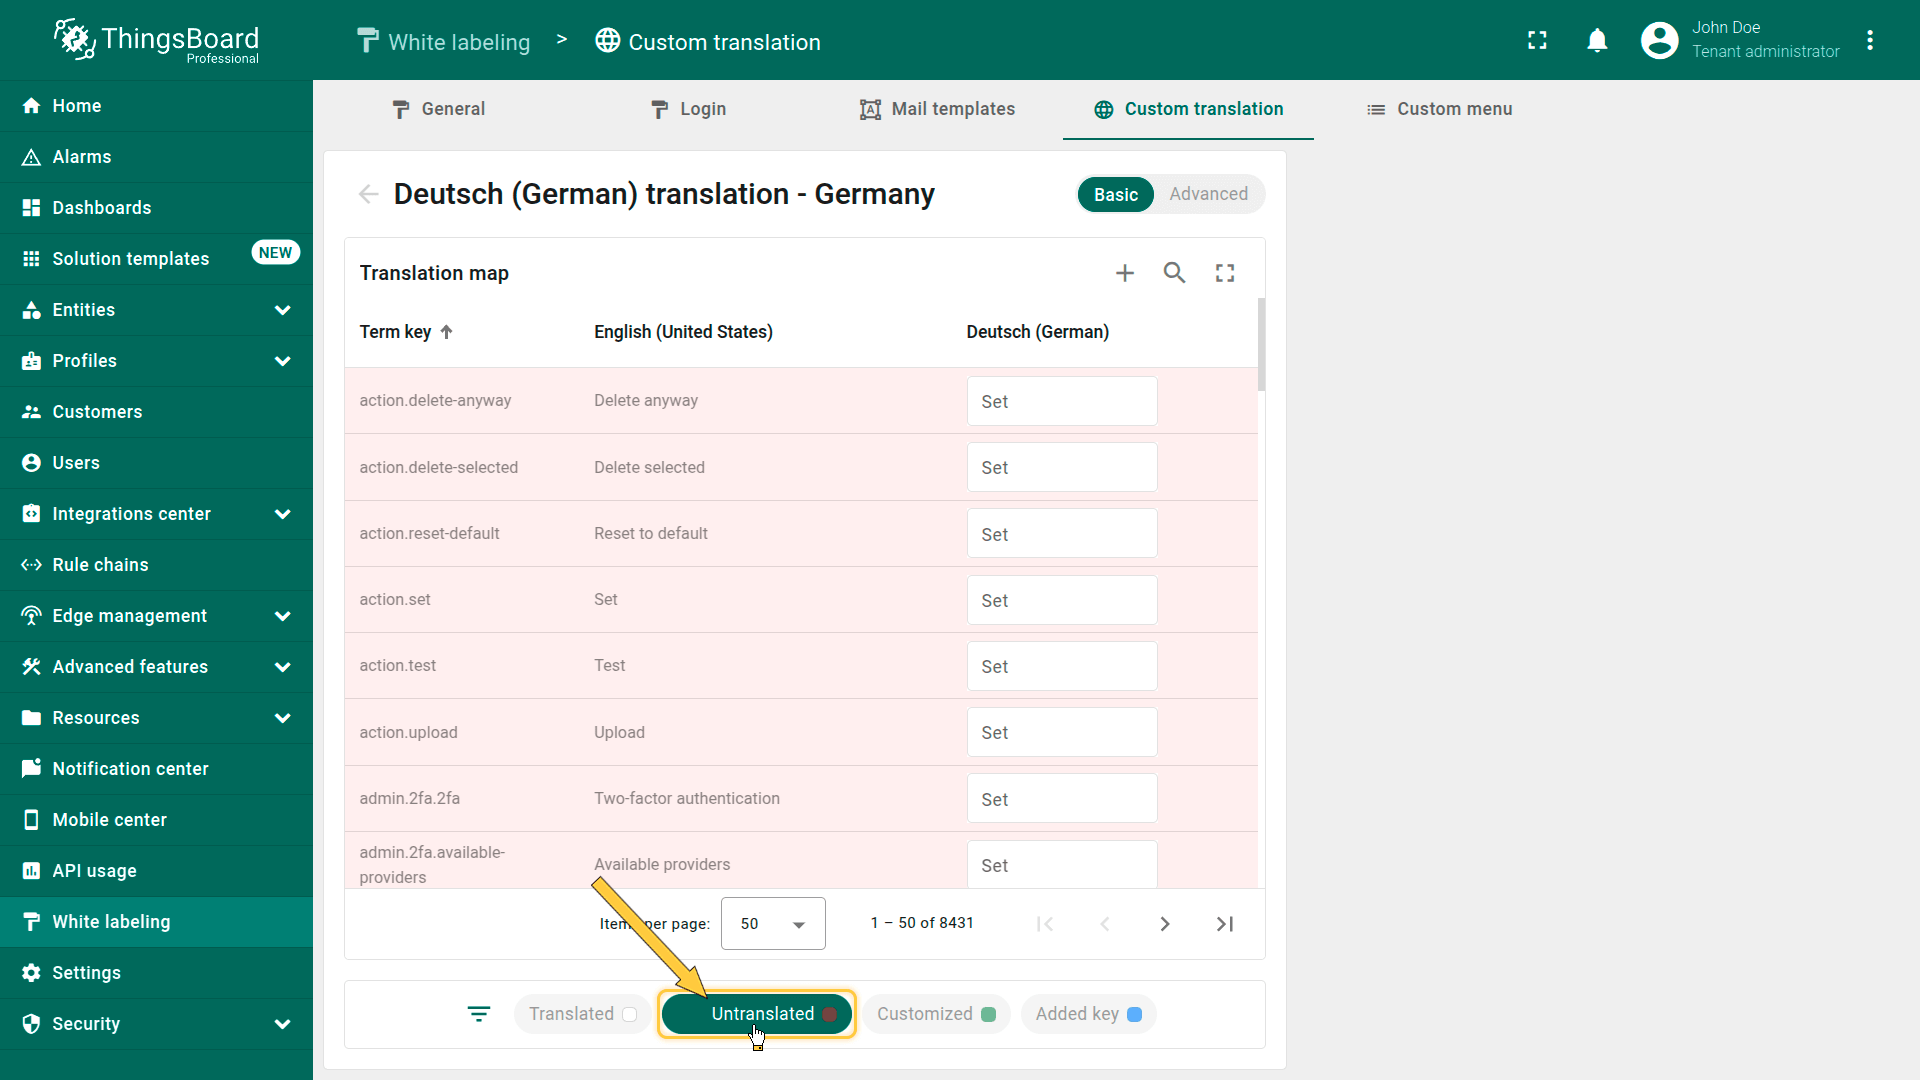
The “Untranslated” shows keys that are still missing translations.
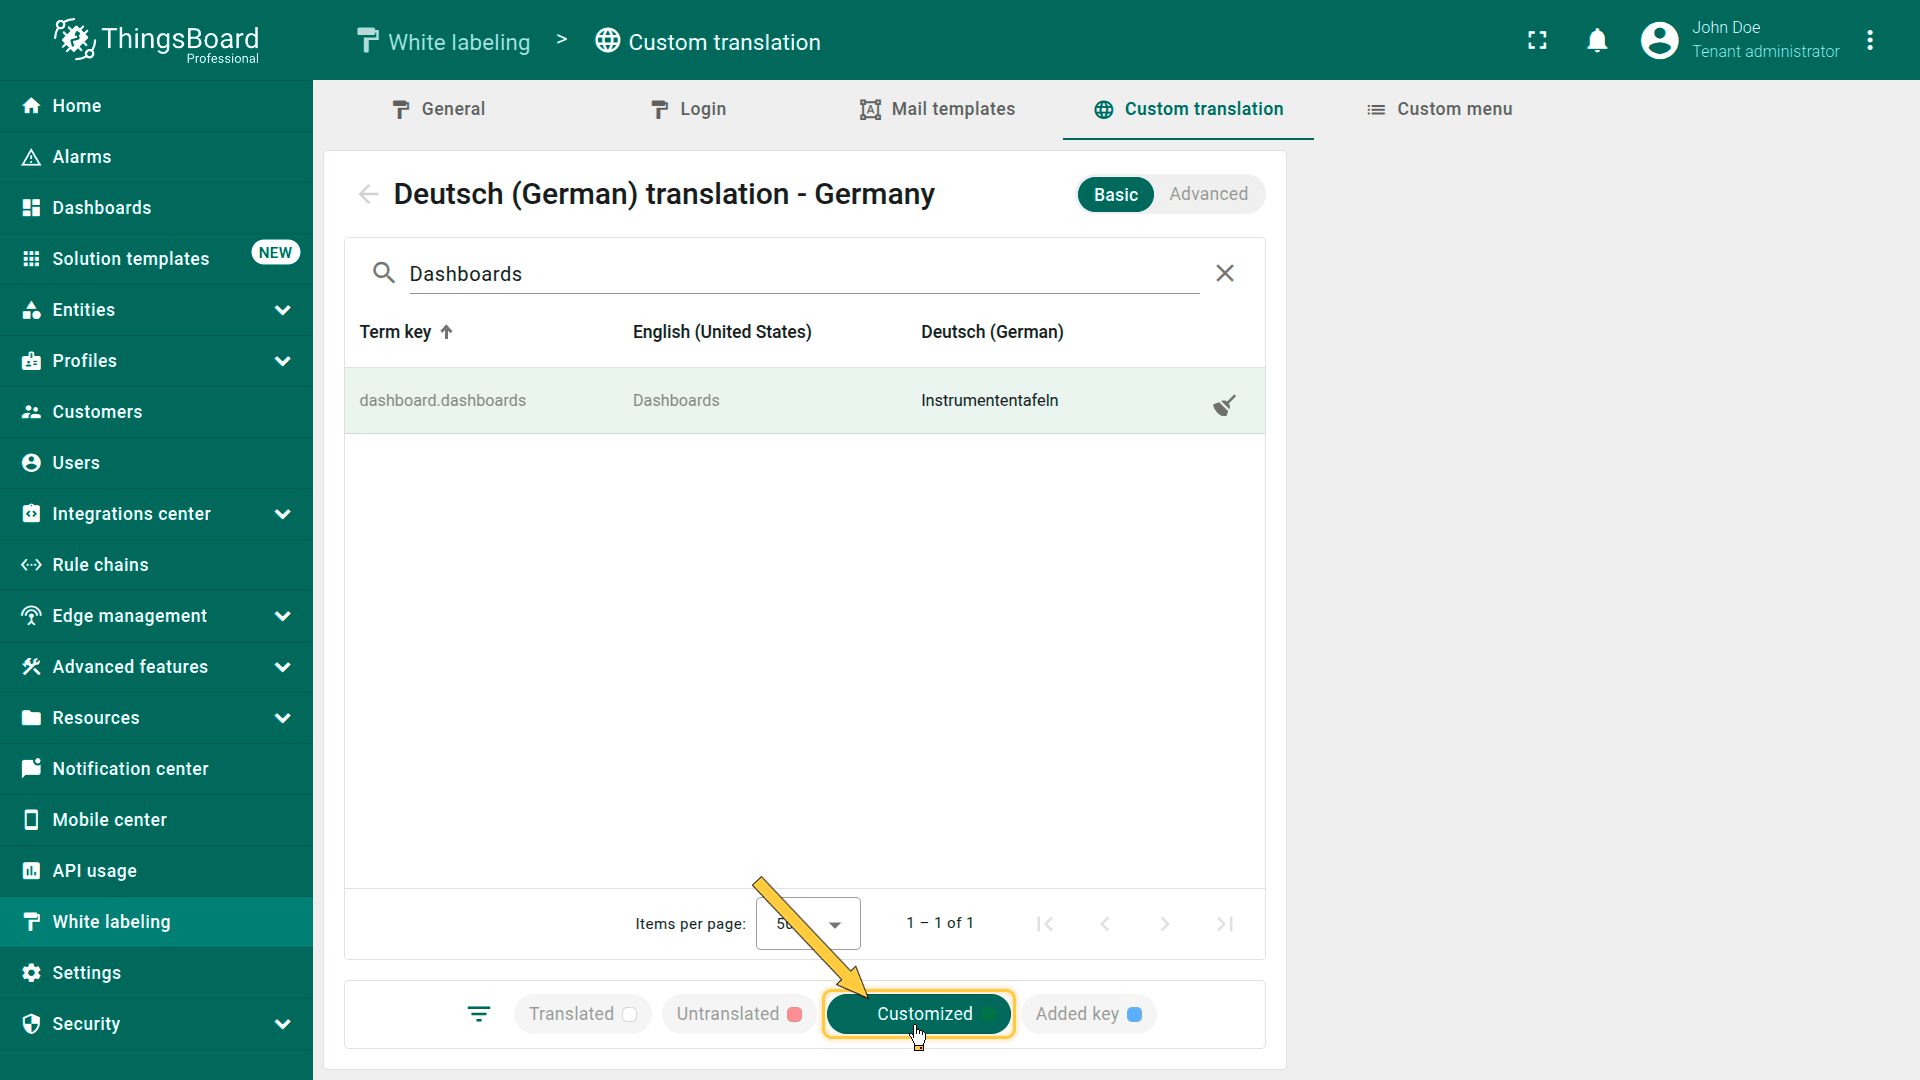
The “Customized” filter highlights only the keys whose translations have been manually modified by the user.
The “Added key” shows the keys that were manually added to the localization file.
Adding new translation key
To add a new translation key, go to the translation map of the desired language and follow these steps:
- Click the plus icon in the top-right corner.
- A new row will appear in the table below. Fill in the fields with the appropriate values — enter the key, its English value, and the value for the selected language.
- Then click anywhere outside the input field to apply the changes.
The newly created key will be added to every language in your language list. All of these languages will use the English value as the default key value unless you provide a custom translation.
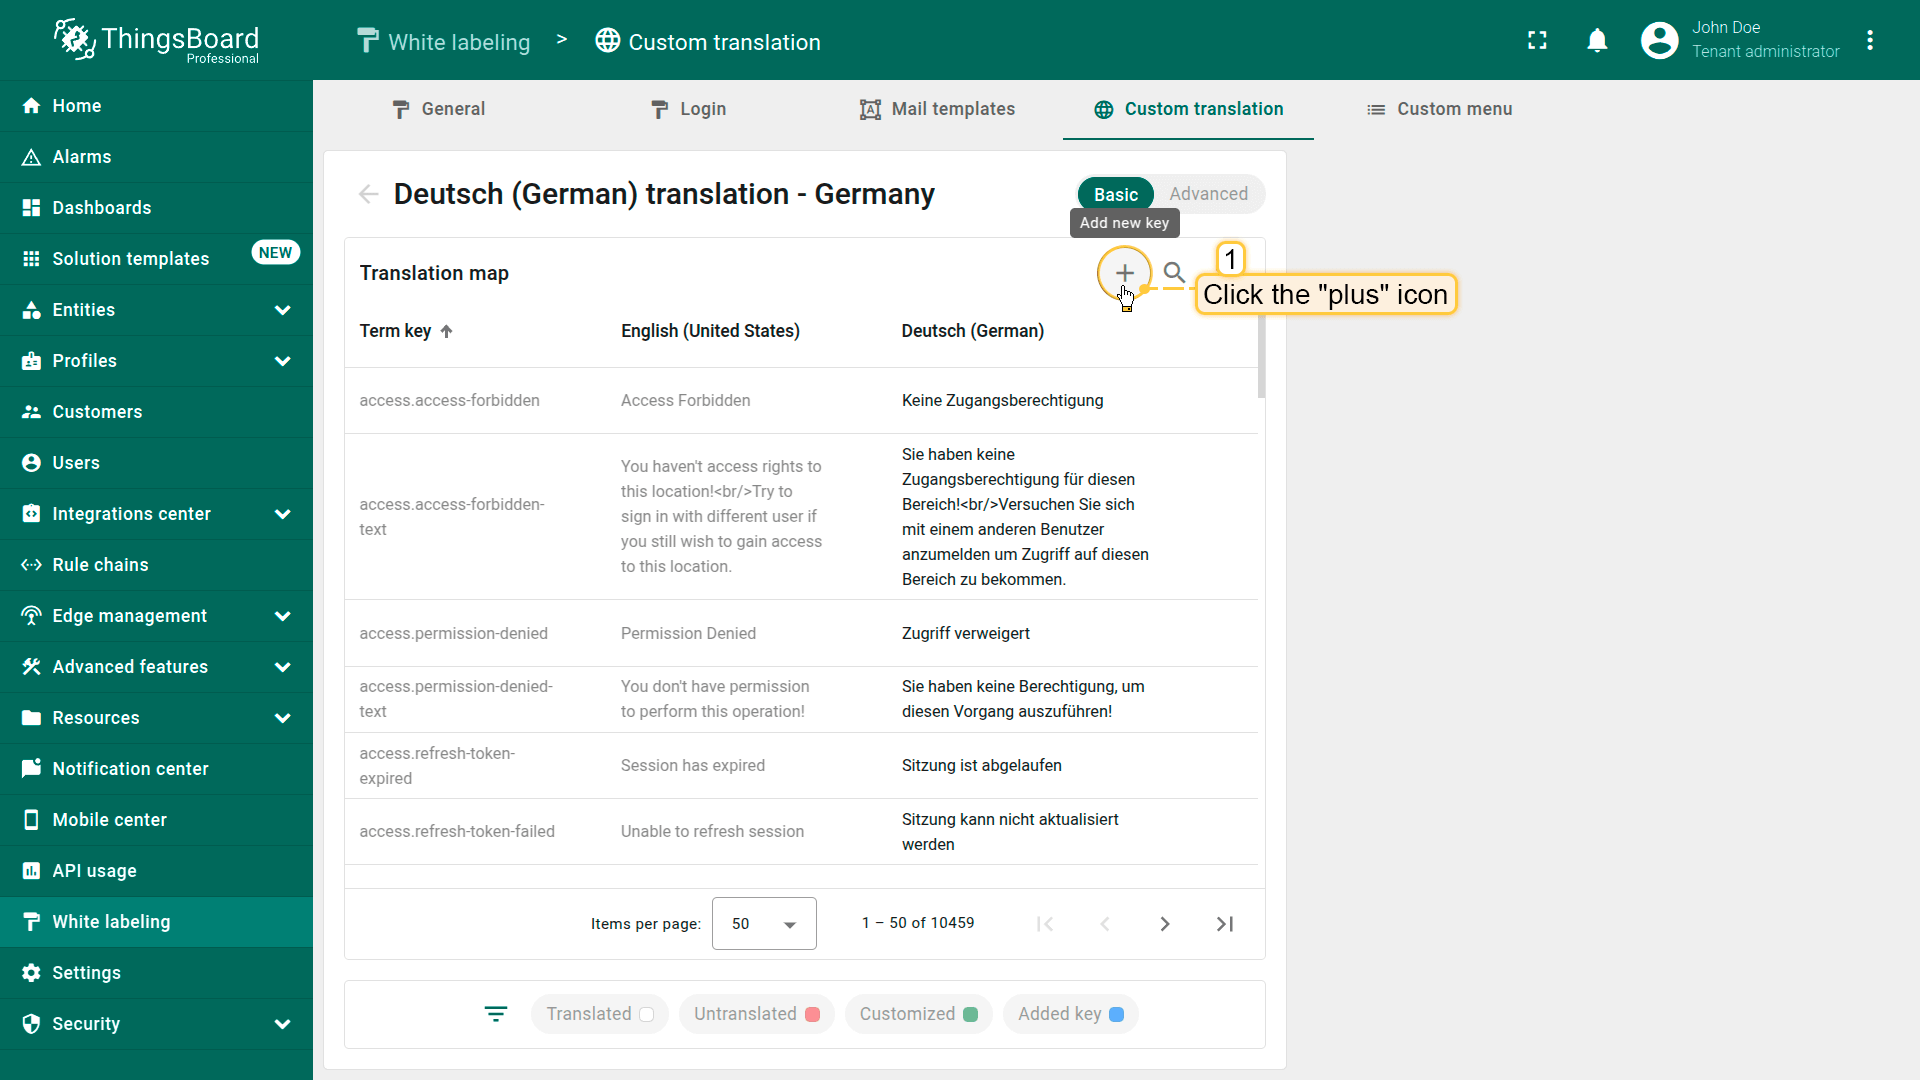
Go to the translation map of the desired language and click the “plus” icon in the top-right corner.
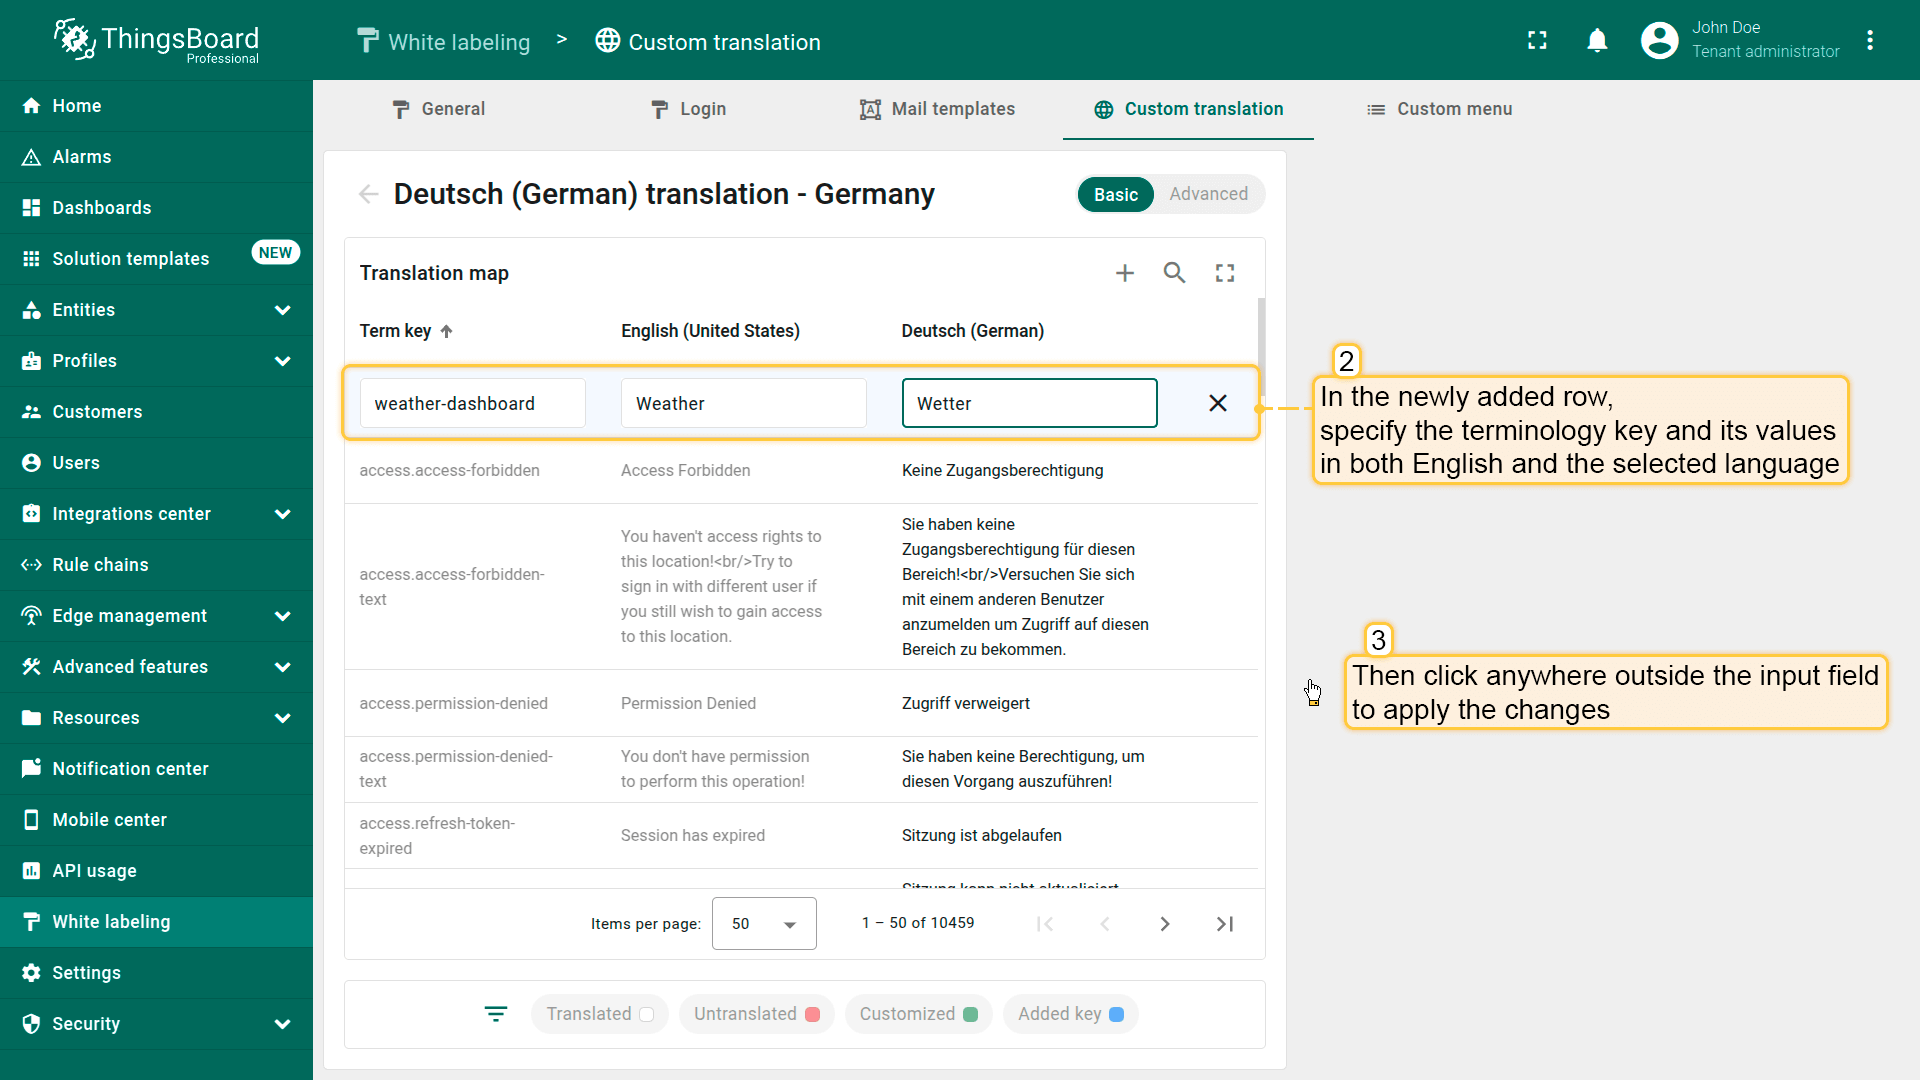
A new row will appear in the table below. Fill in the fields with the appropriate values — enter the key, its English value, and the value for the selected language. Then click anywhere outside the input field to apply the changes.
Modify current translation
Let's take a look at how to edit an existing translation for a terminology key:
-
Go to the language editing menu and use the search to find the key you want to edit.
-
Update the translation for that key.
-
Then click anywhere outside the input field to apply the changes.
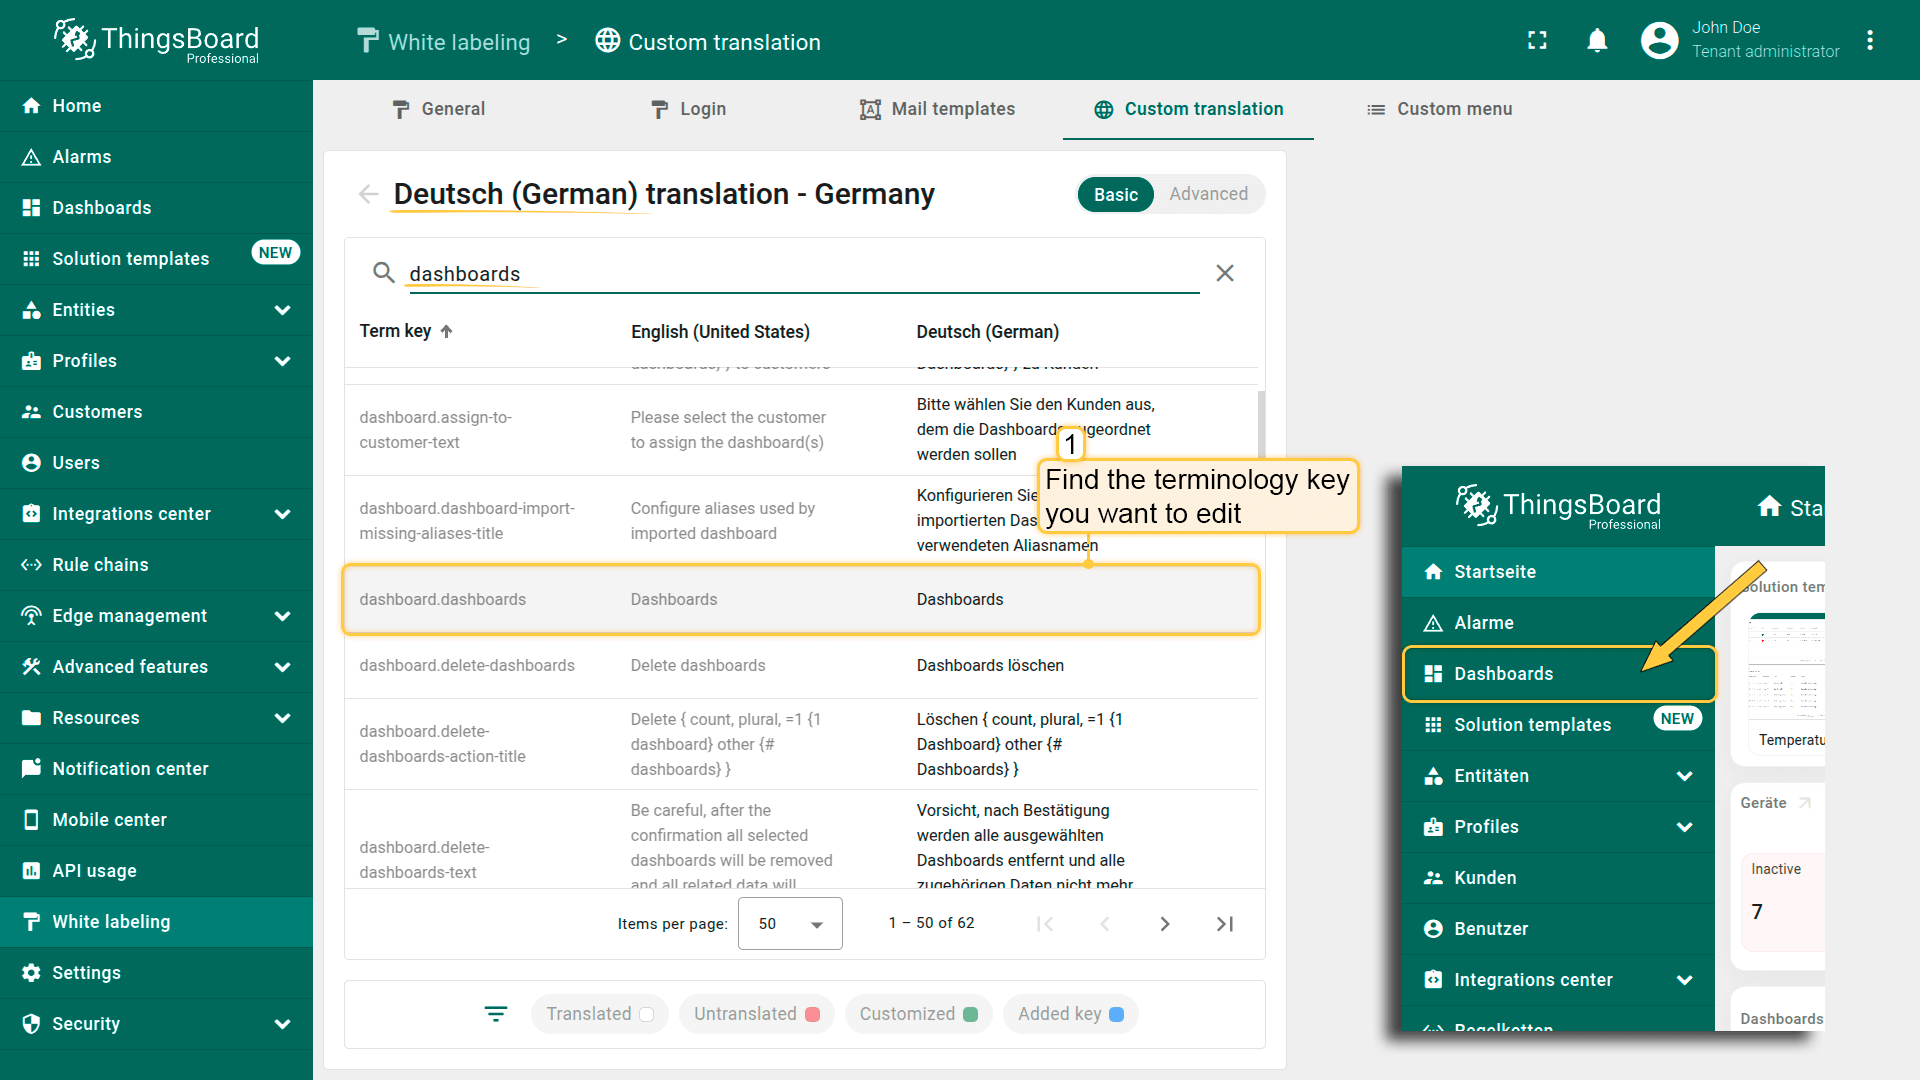
Go to the language editing menu and use the search to find the key you want to edit.
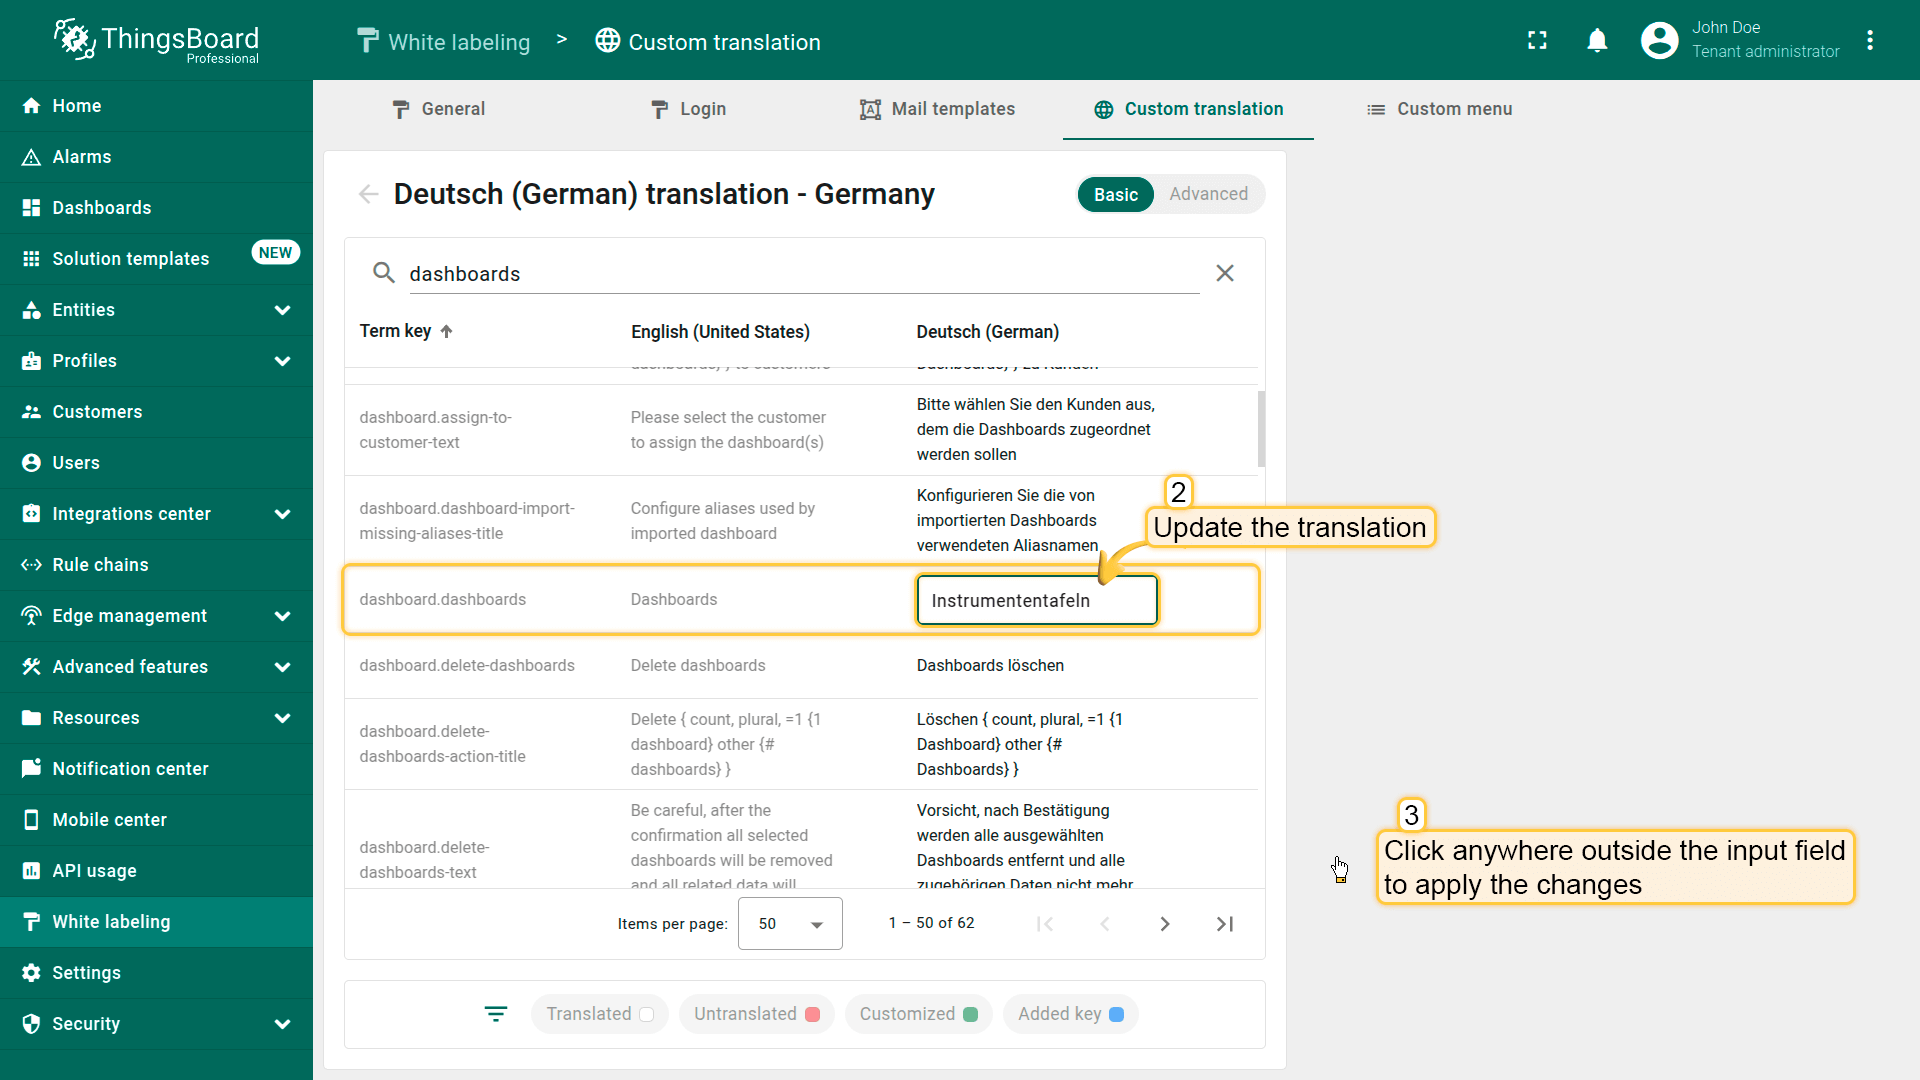
Update the translation for that key.
Then click anywhere outside the input field to apply the changes.
To reset the translation value of a key to the one defined by the system administrator, click the “broom” icon in that key's row.
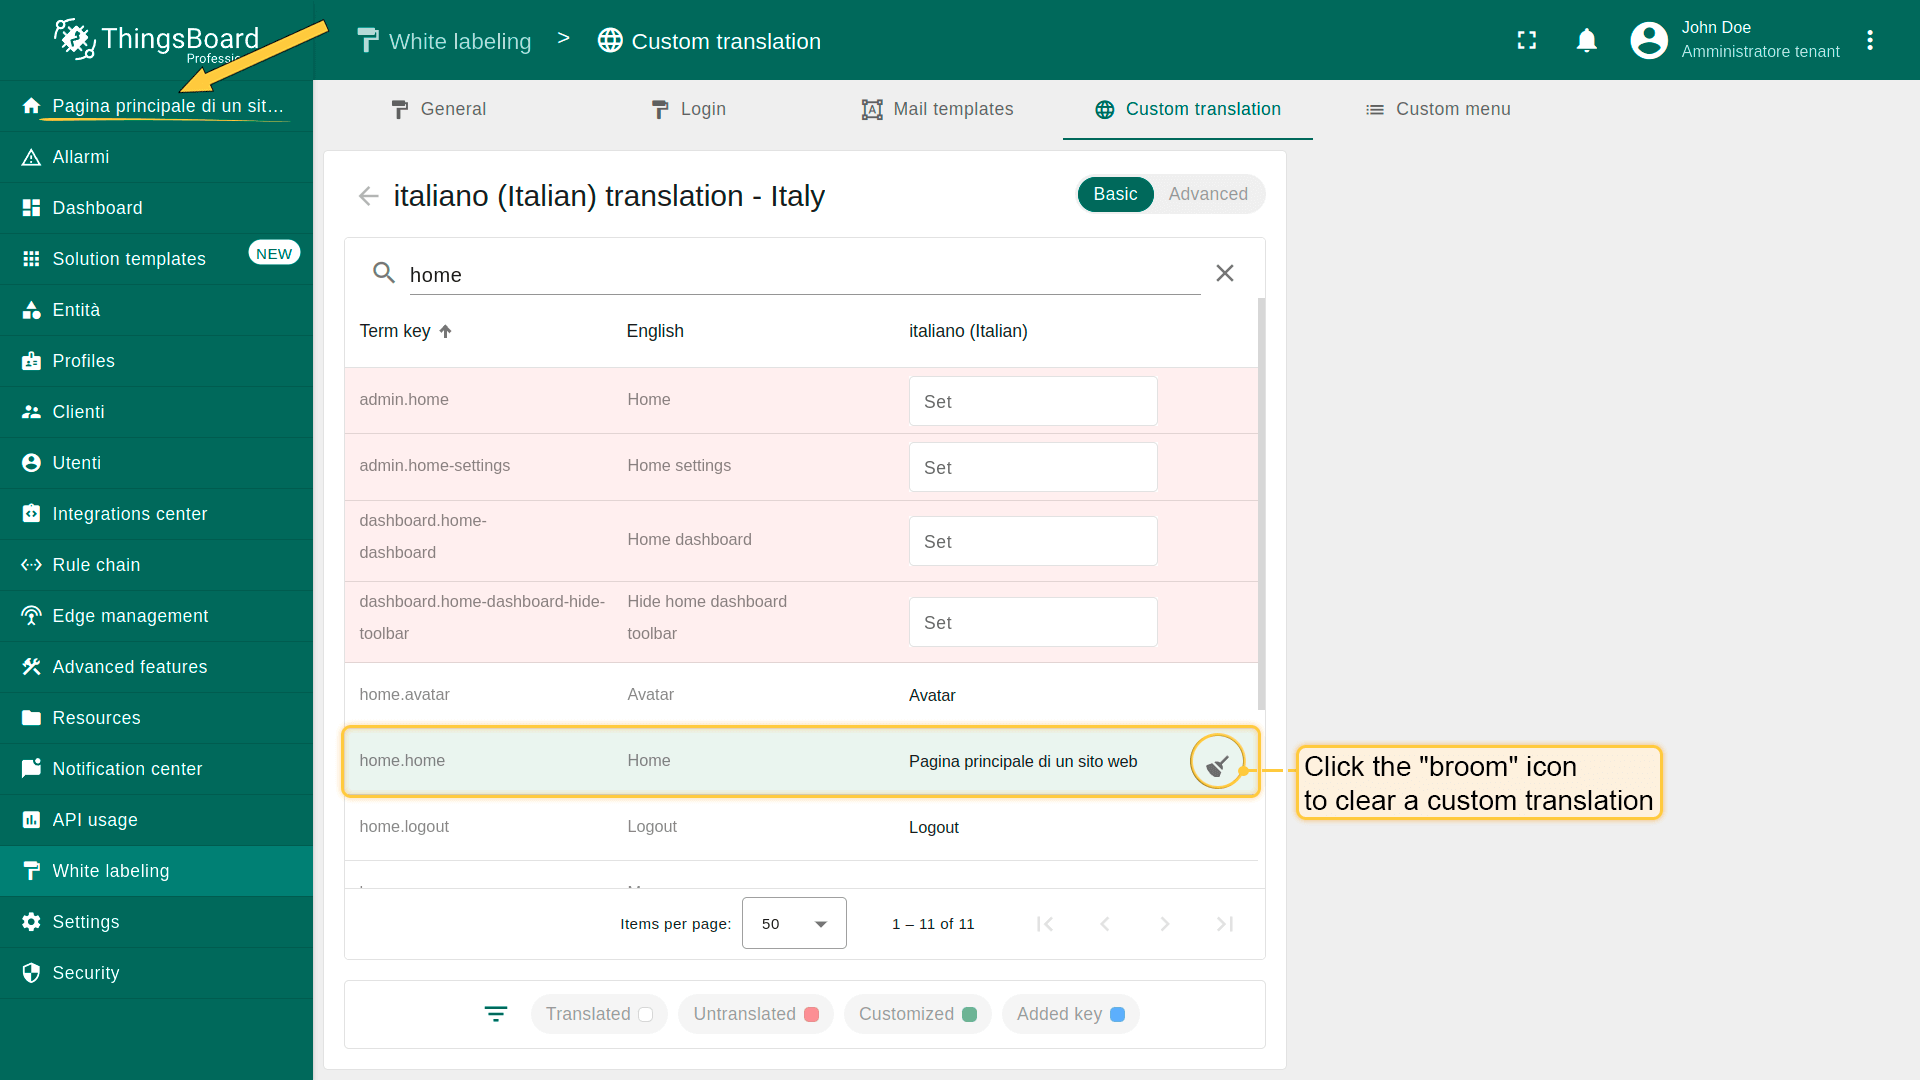
To reset the translation value of a key to the one defined by the system administrator, click the “broom” icon in that key's row.
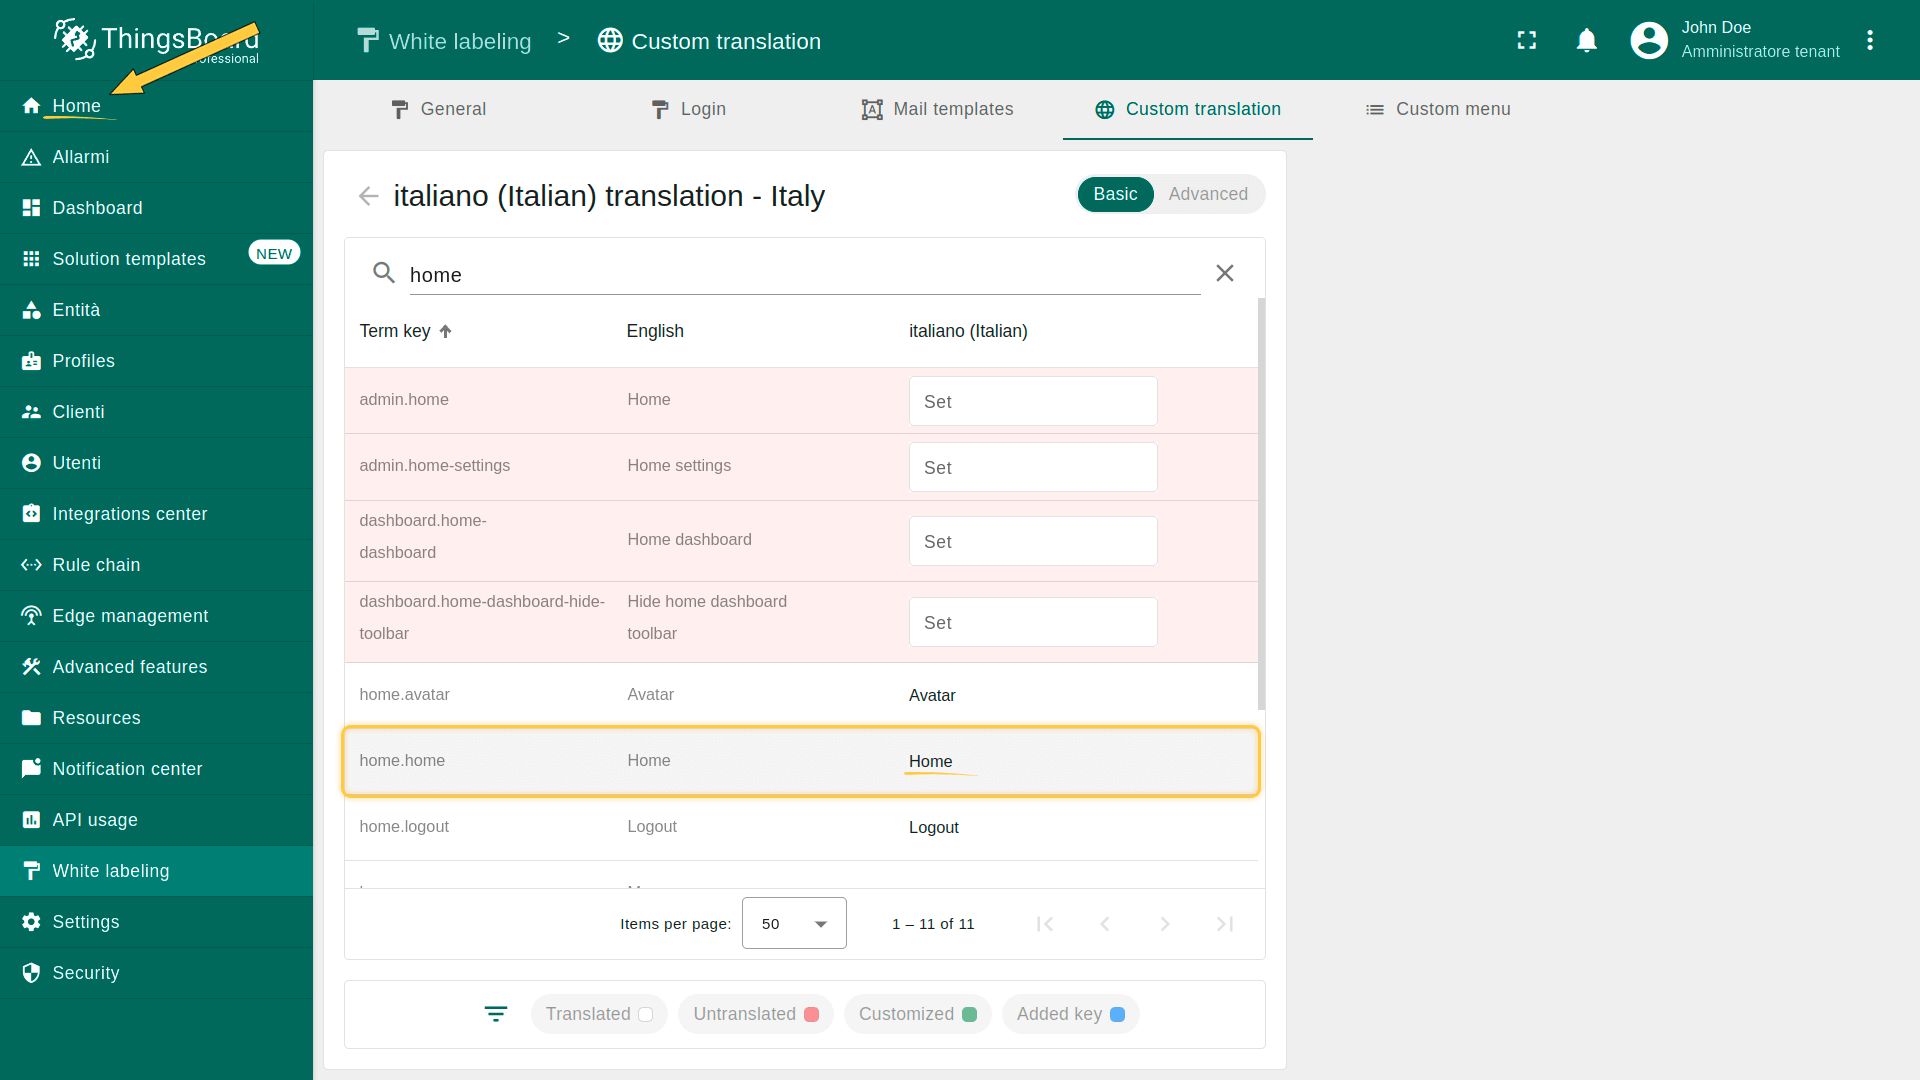
The translation has been reset to the default value.
Upload translation map from JSON file
You can upload a JSON file containing a translation map with keys and their corresponding translations. This option is useful if you have a large number of translation keys, and creating them manually through the basic interface would be too time-consuming.
- Go to the language editing menu.
- Switch to the “Advanced” tab.
- Insert translation map with keys and their corresponding translations in JSON format.
- Click “Save”.

Go to the language editing menu and switch to the “Advanced” tab. Insert translation map with keys and their corresponding translations in JSON format. Then, click “Save”.
Example of the translation map:
1
2
3
4
5
6
7
8
9
10
11
12
13
14
{
  "dashboard": {
    "dashboards": "Instrumententafeln"
  },
  "notification": {
    "notification-center": "Benachrichtigungszentrale"
  },
  "white-labeling": {
    "white-labeling": "Weißkennzeichnung"
  },
  "integration": {
    "integrations-center": "Integrationszentrum"
  }
}
Custom translation
You can provide custom translations for new custom menu items or individual UI elements (such as dashboard titles, widget names, device names, data keys, etc.) using translation keys in the i18n format.
To add custom translations:
1. In the title field of the interface element, instead of plain text, insert a key with the i18n: prefix wrapped in curly braces:
1
{i18n:custom.translation.key}
* where:
ㅤㅤ‐ i18n: - required prefix.
ㅤㅤ‐ custom.translation.key - the internationalization key that has been added to the translation map.
2. Then, add the corresponding value for this key in the selected language's translation map.
| Term key | English (United States) | Selected language |
|---|---|---|
| your.custom.key | Value in English | Value in the selected language |
Note: If the i18n structure is used as the title of a UI element, but the corresponding key is not included in the translation map, the i18n string itself will be displayed as-is.
Tips:
- Always add translations for all required languages.
- Avoid duplicate keys; use a structured hierarchy (e.g., custom.section.subsection).
- Test how the key is displayed after switching the UI language.
Using custom translation in the dashboard
Let’s say you’re an English-speaking user who manages a dashboard that is accessed by clients from different countries. To ensure that every user can easily understand the interface, the names of all components — including the dashboard title, widgets title, device names, data keys, and any other elements — should be displayed in the user's preferred language.
As an example, I'll apply a custom translation for German language to the previously listed elements of the “Weather” dashboard. Of course, you can use any other language depending on your specific needs.
First, add the “Weather” dashboard to your instance:
- Download the dashboard configuration as a JSON file.
- Import it into your ThingsBoard instance.
For this dashboard, I'm emulating telemetry data using a Generator node with the function provided below:
1
2
3
4
5
6
var temperature = toFixed(Math.random()*10 + 18, 2);
var humidity = toFixed(Math.random()*15 + 40, 2);
var msg = { temperature: temperature, humidity: humidity, };
var metadata = { data: 40 };
var msgType = "POST_TELEMETRY_REQUEST";
return { msg: msg, metadata: metadata, msgType: msgType };

For this dashboard, I'm emulating telemetry data using a Generator node.
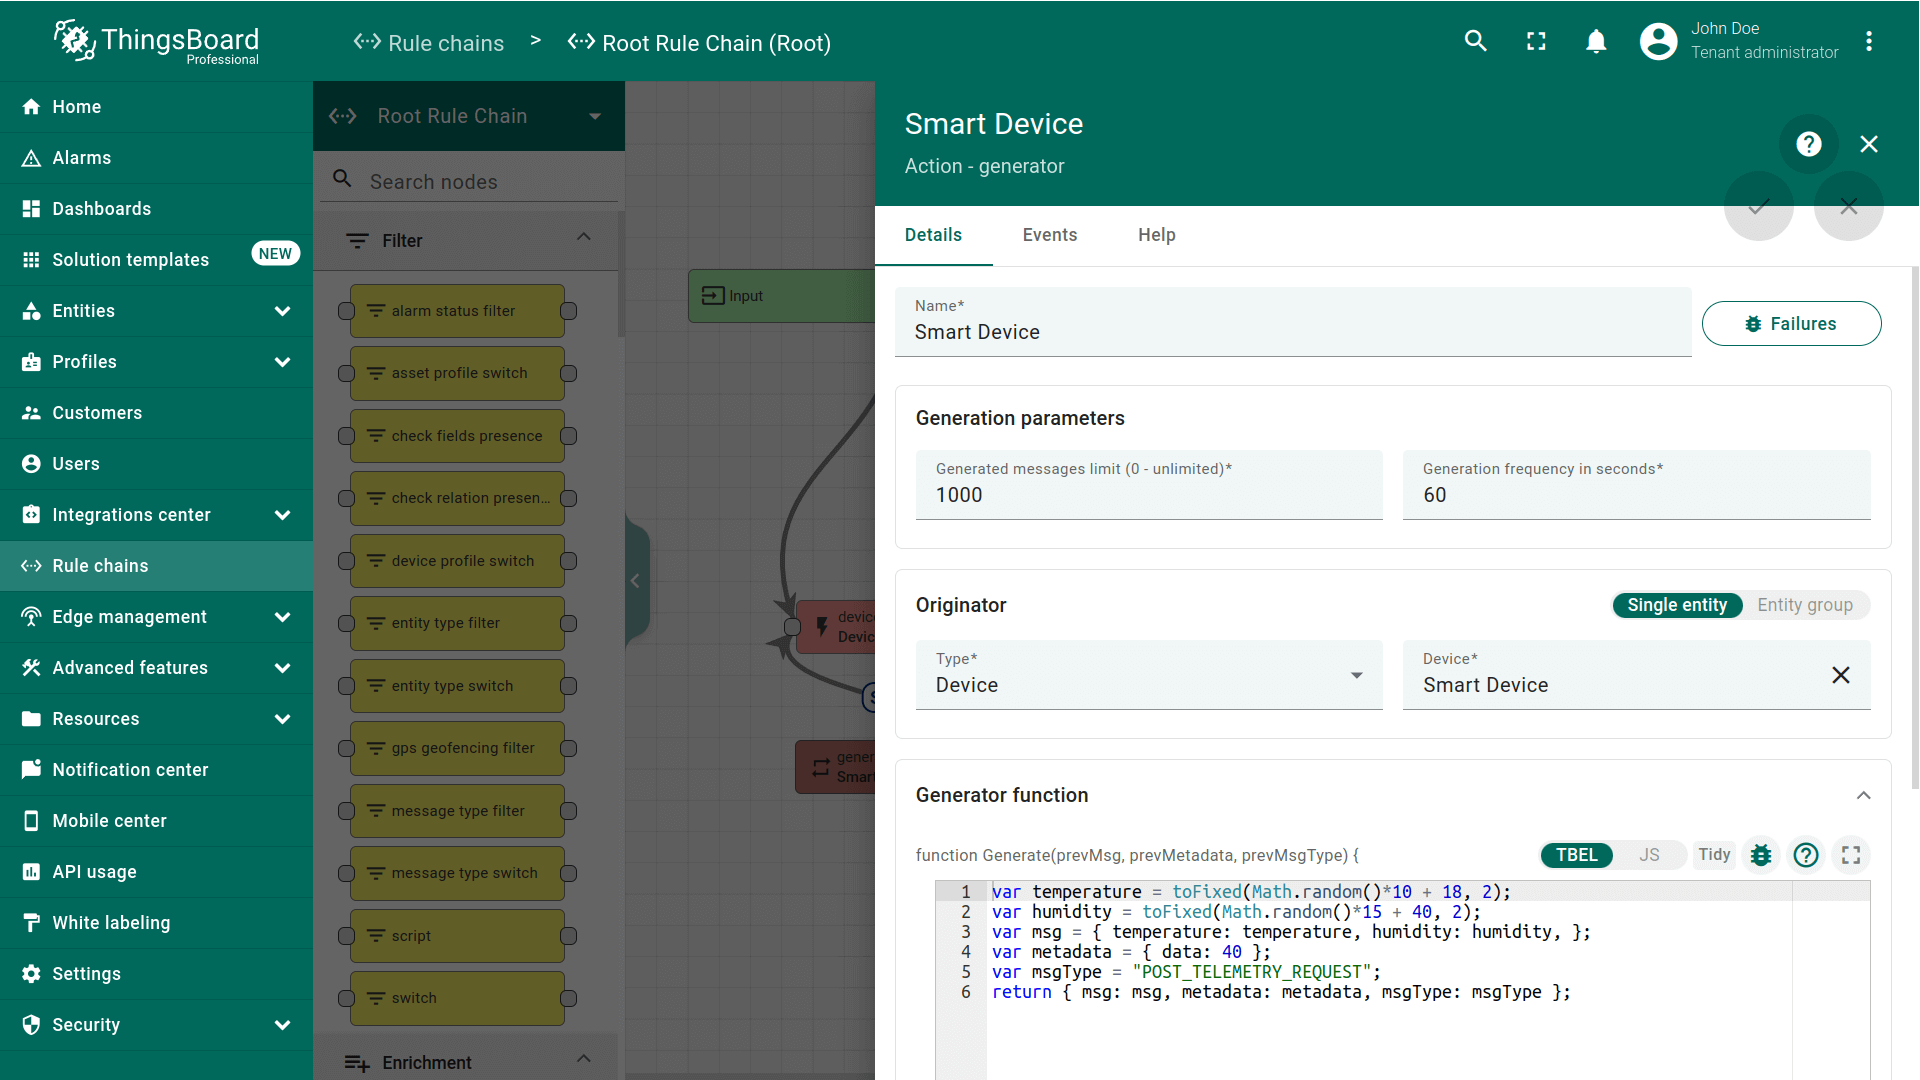
The generator node emulates telemetry using the specified function.
Also, don't forget to update the data source for your dashboard.
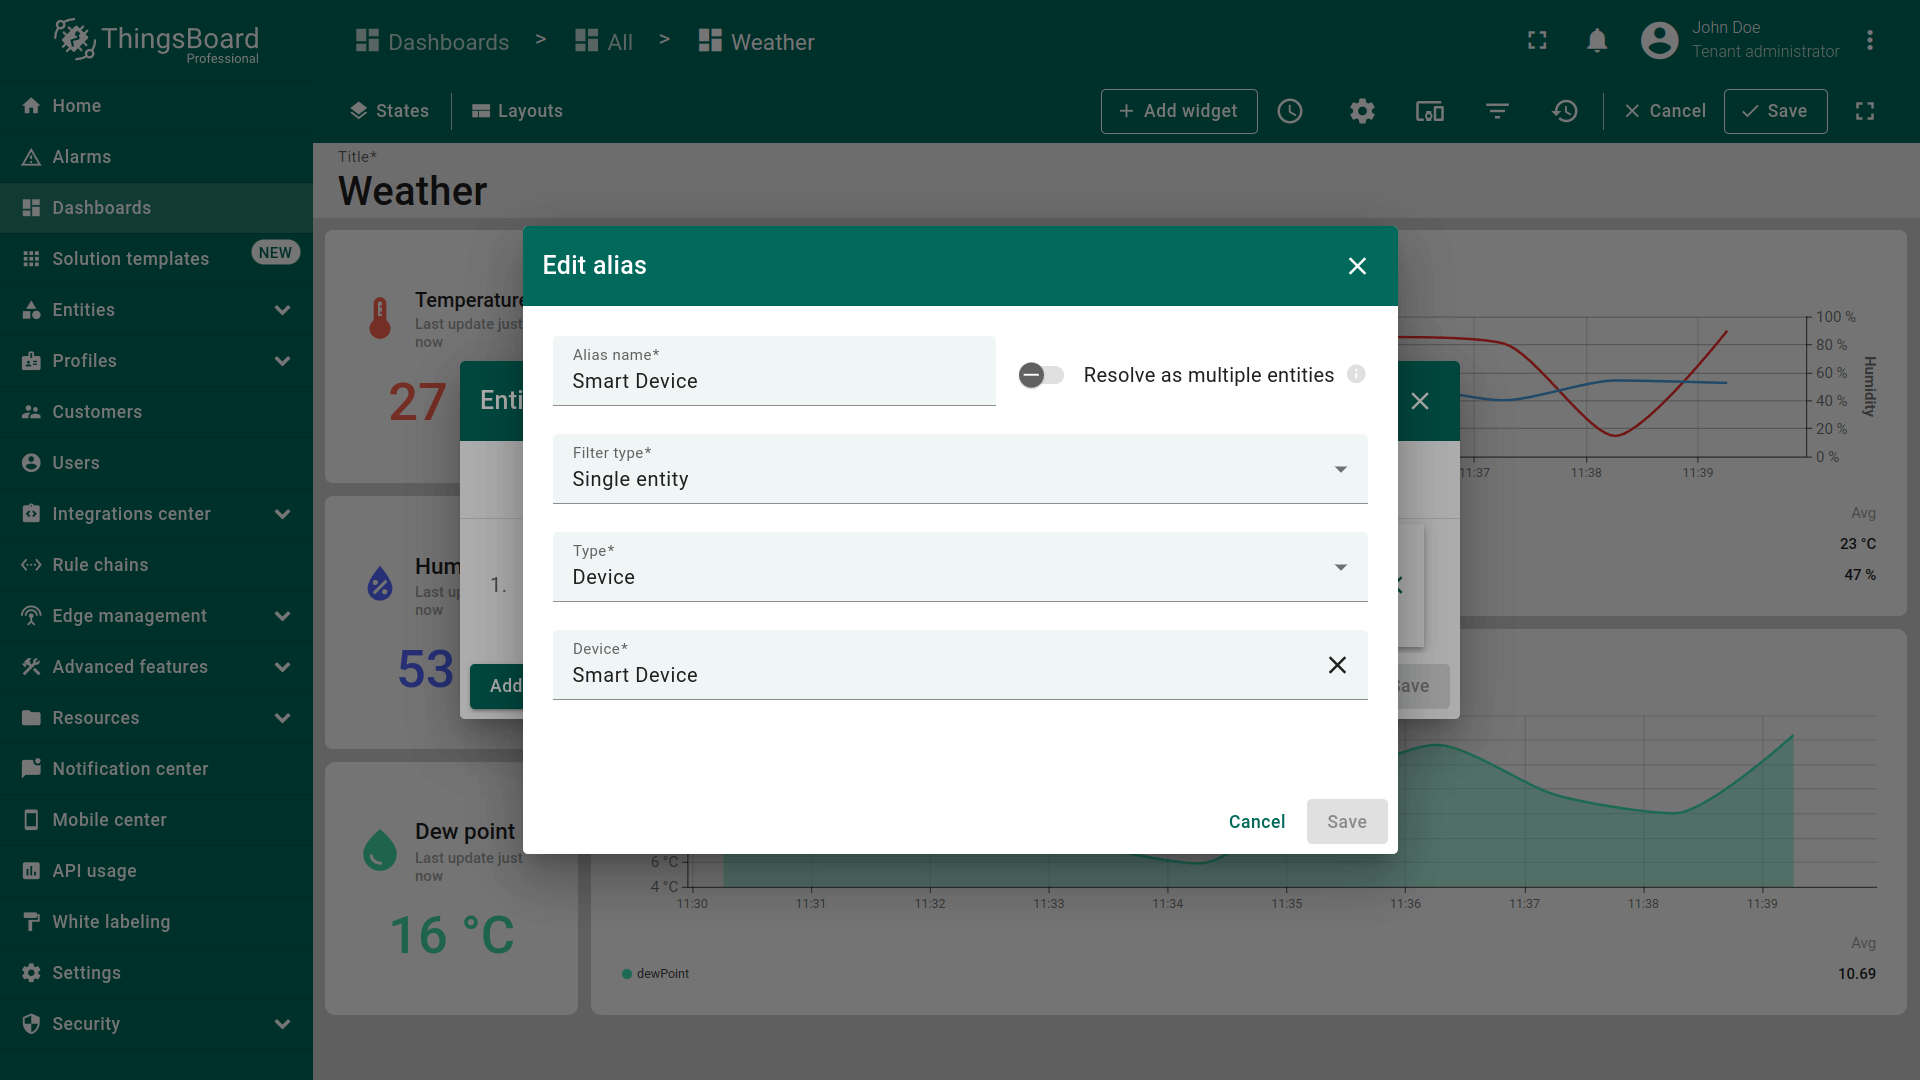
Also, don't forget to update the data source for your dashboard.
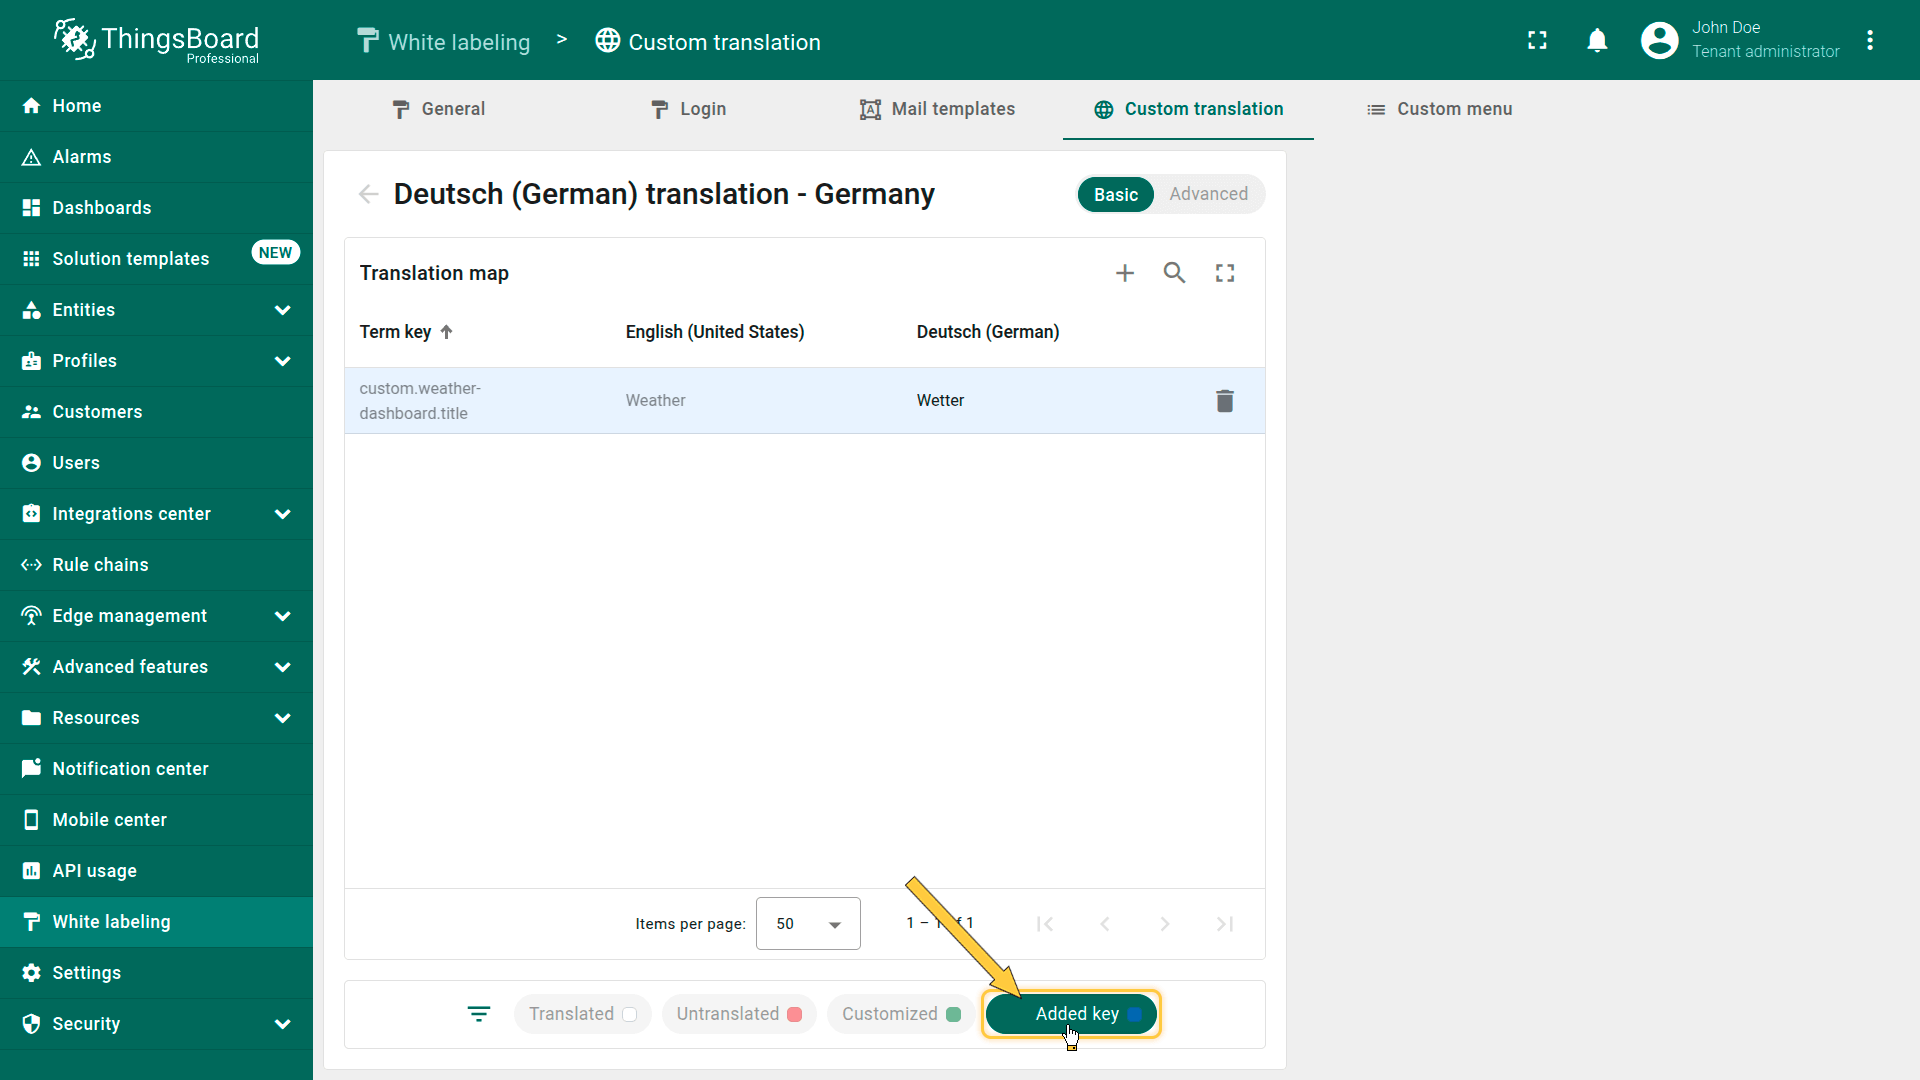
Custom translation for dashboard title
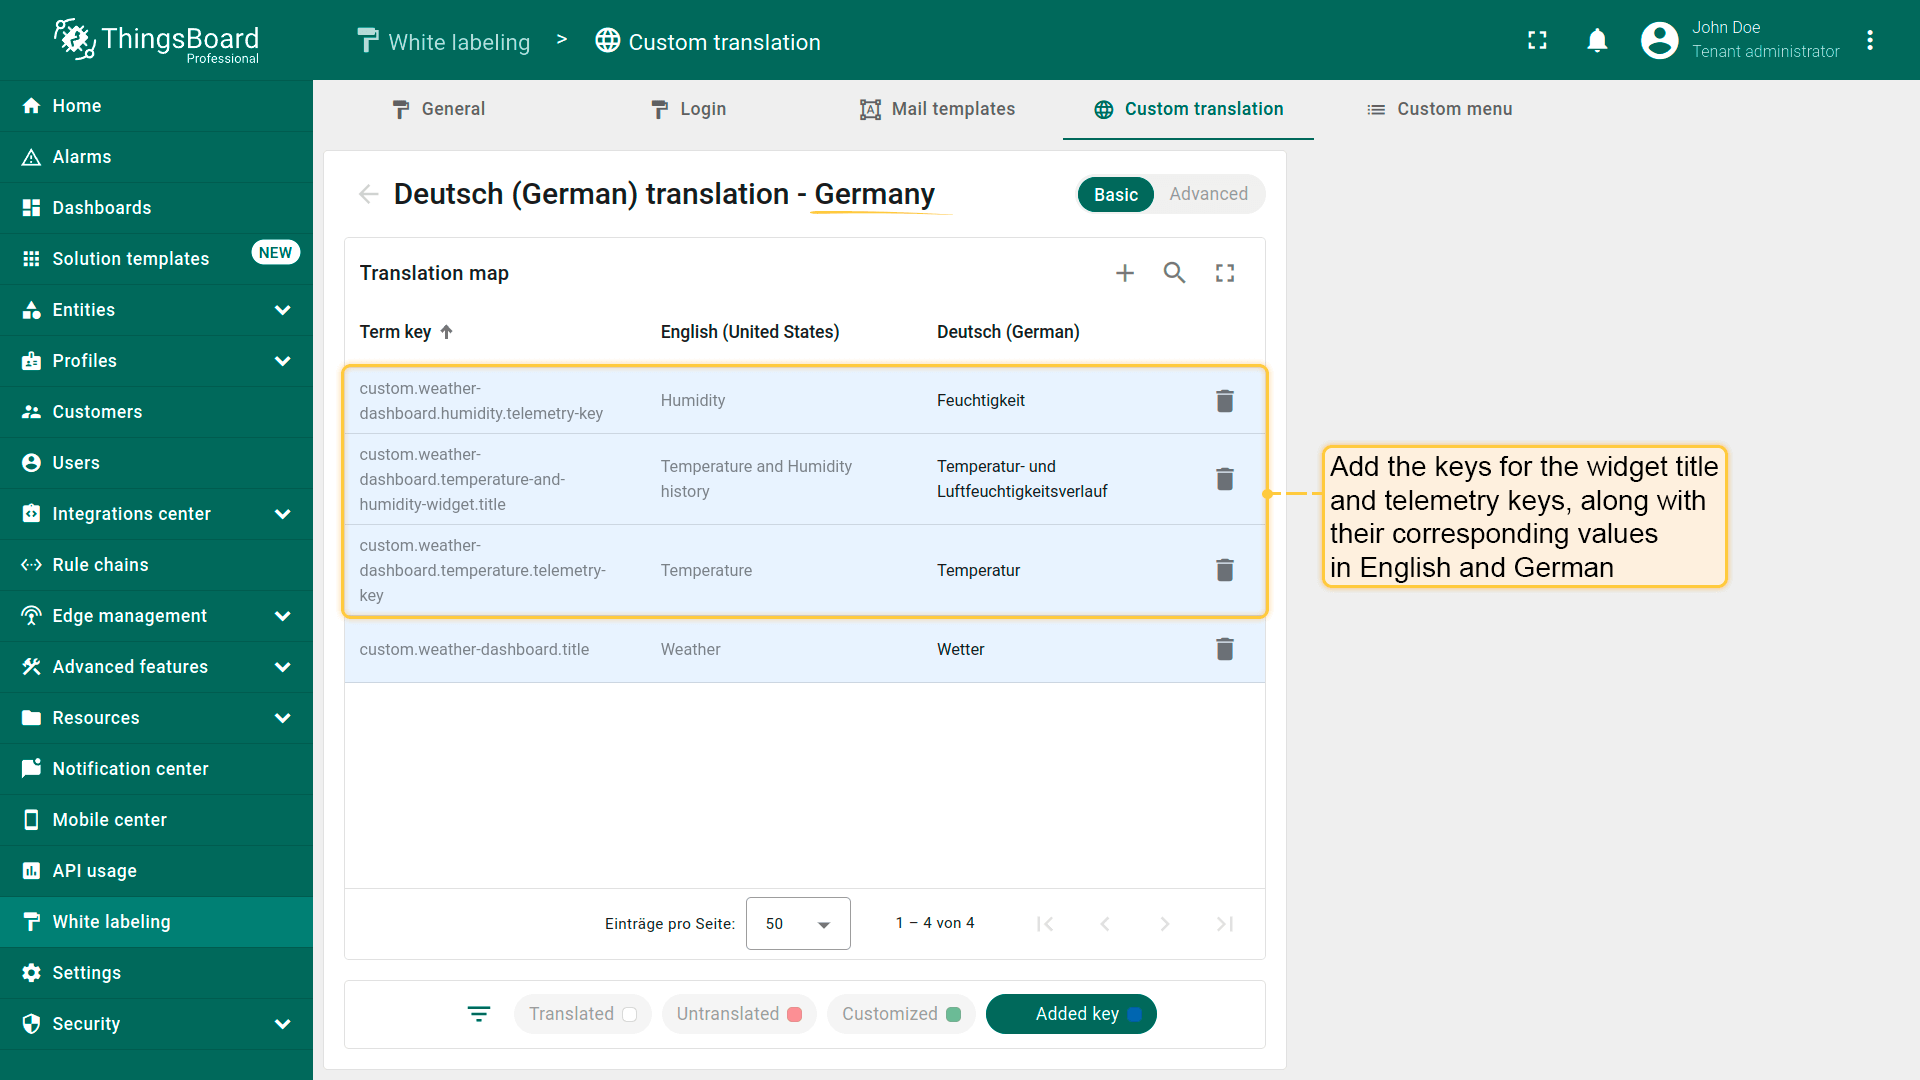
To set a custom translation for the dashboard title, follow these steps:
- Go to the “Custom translations” tab and open the translation map for the German language.
- Click the “plus” icon in the top-right corner.
- Enter the translation key for the dashboard title:
1
custom.weather-dashboard.title
- Enter the translations for this key in English and German in the appropriate fields. You can find all the required values in the table below.
| Term key | Value in English | Value in German | Key description |
|---|---|---|---|
| custom.weather-dashboard.title | Weather | Wetter | Dashboard title |
- Click anywhere outside the input field to save the key.
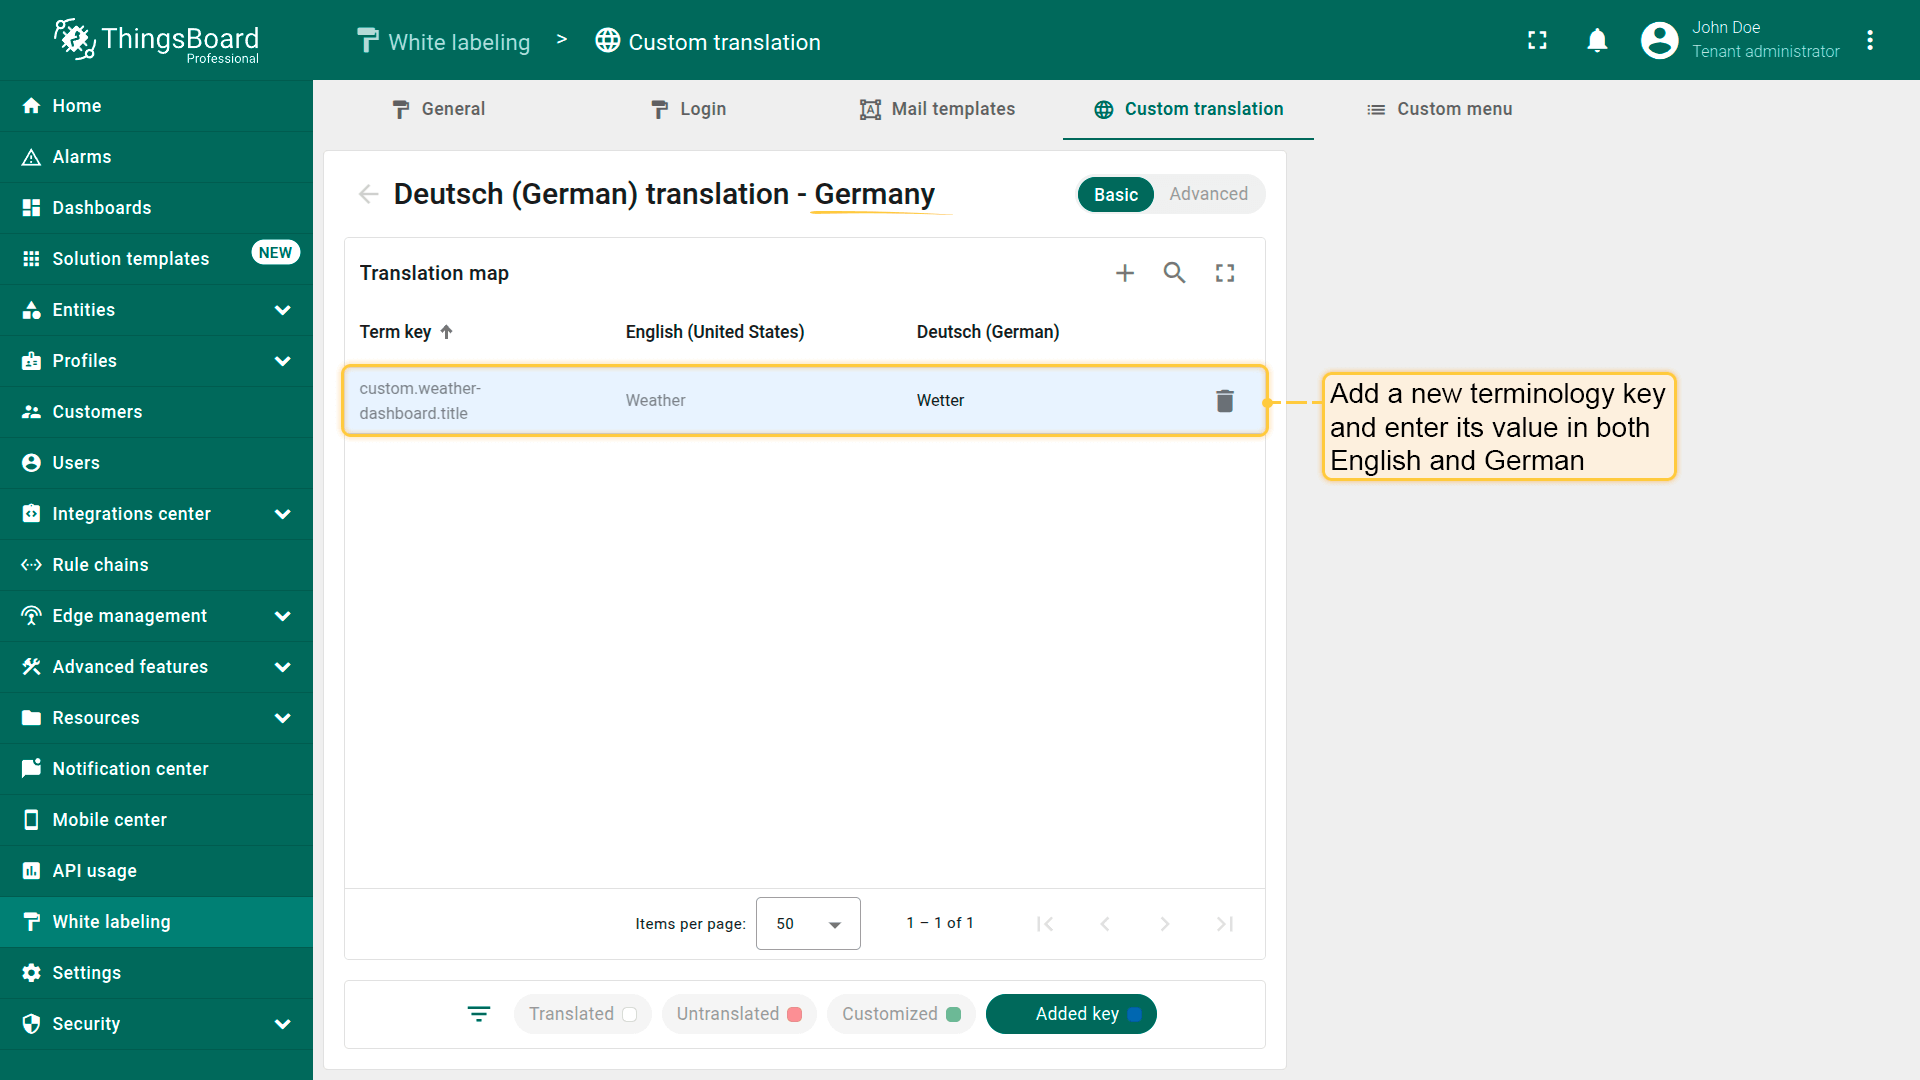
Go to the “Custom translations” tab. Add a new key and enter its value in English and German.
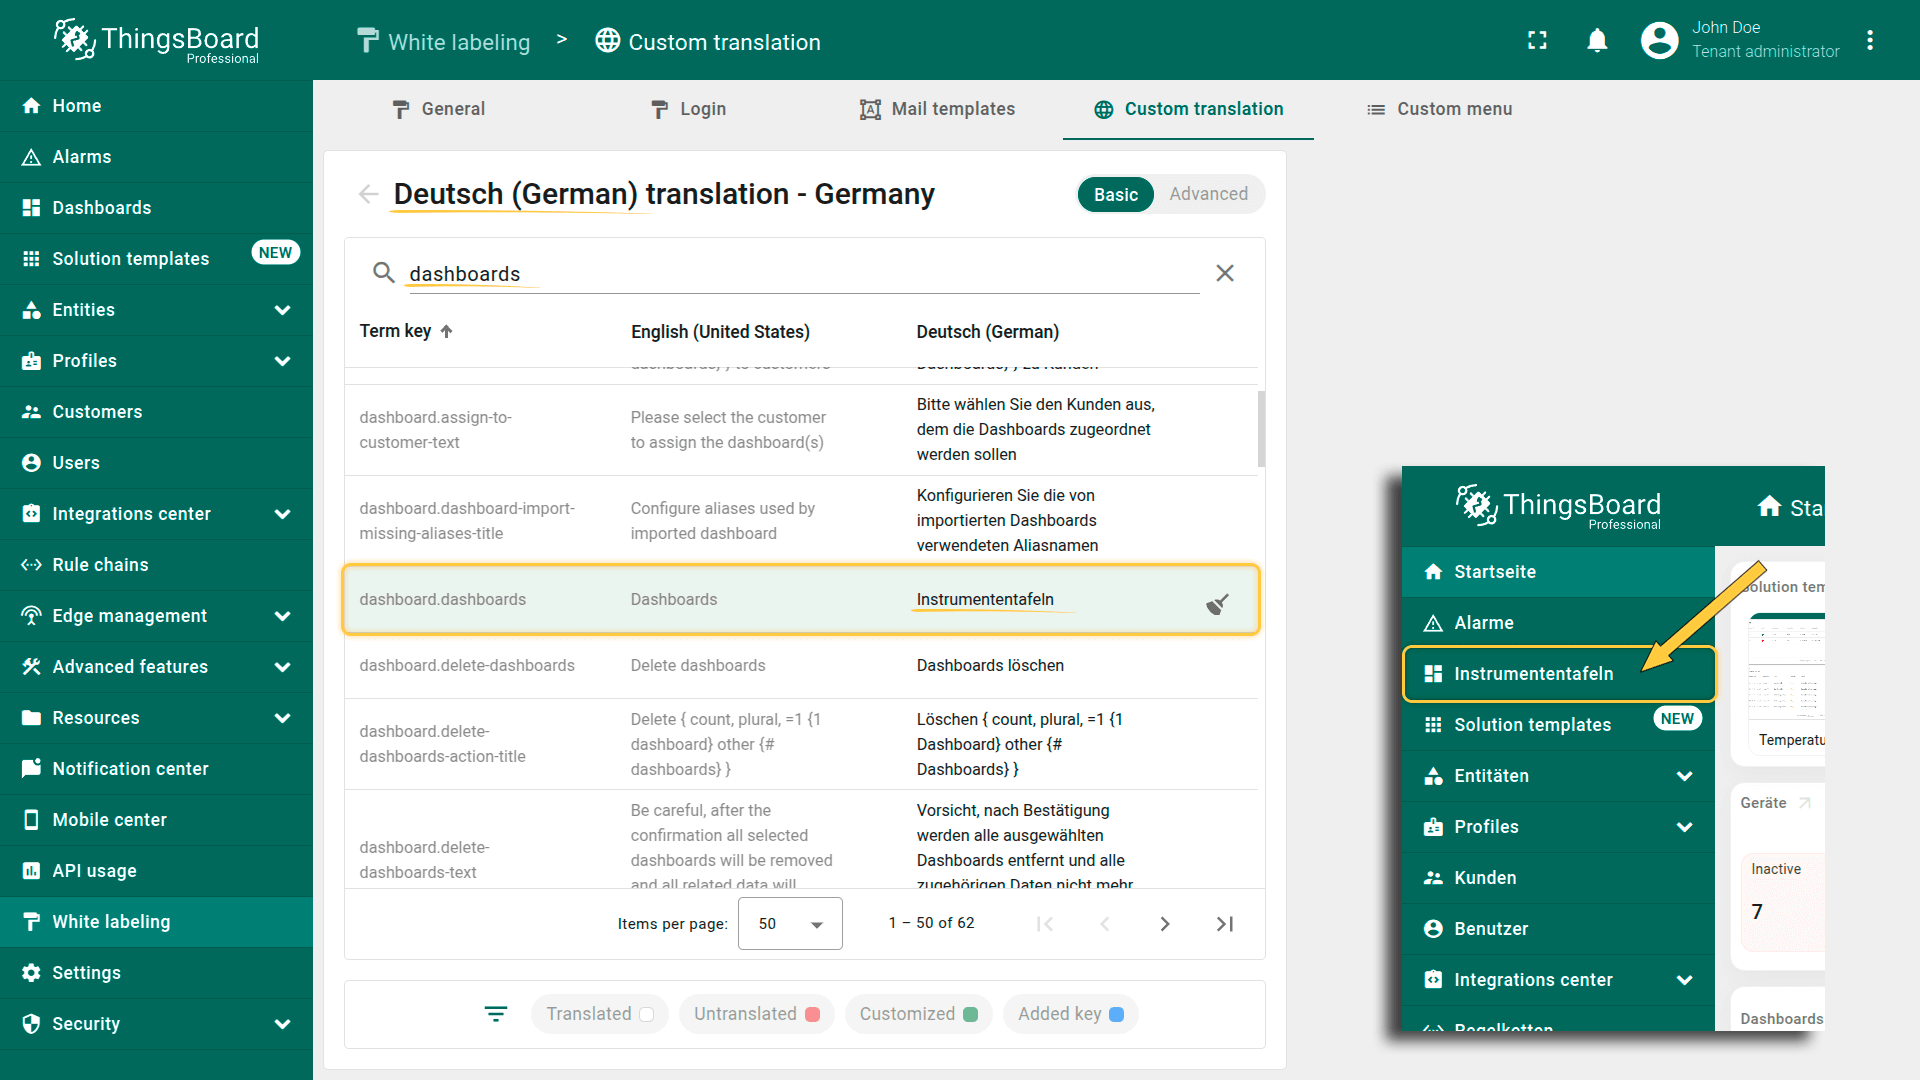
The key and its translations have been added. Now let's set this key as the dashboard title:
- Navigate to the “Dashboards” page and open the “Weather” dashboard details.
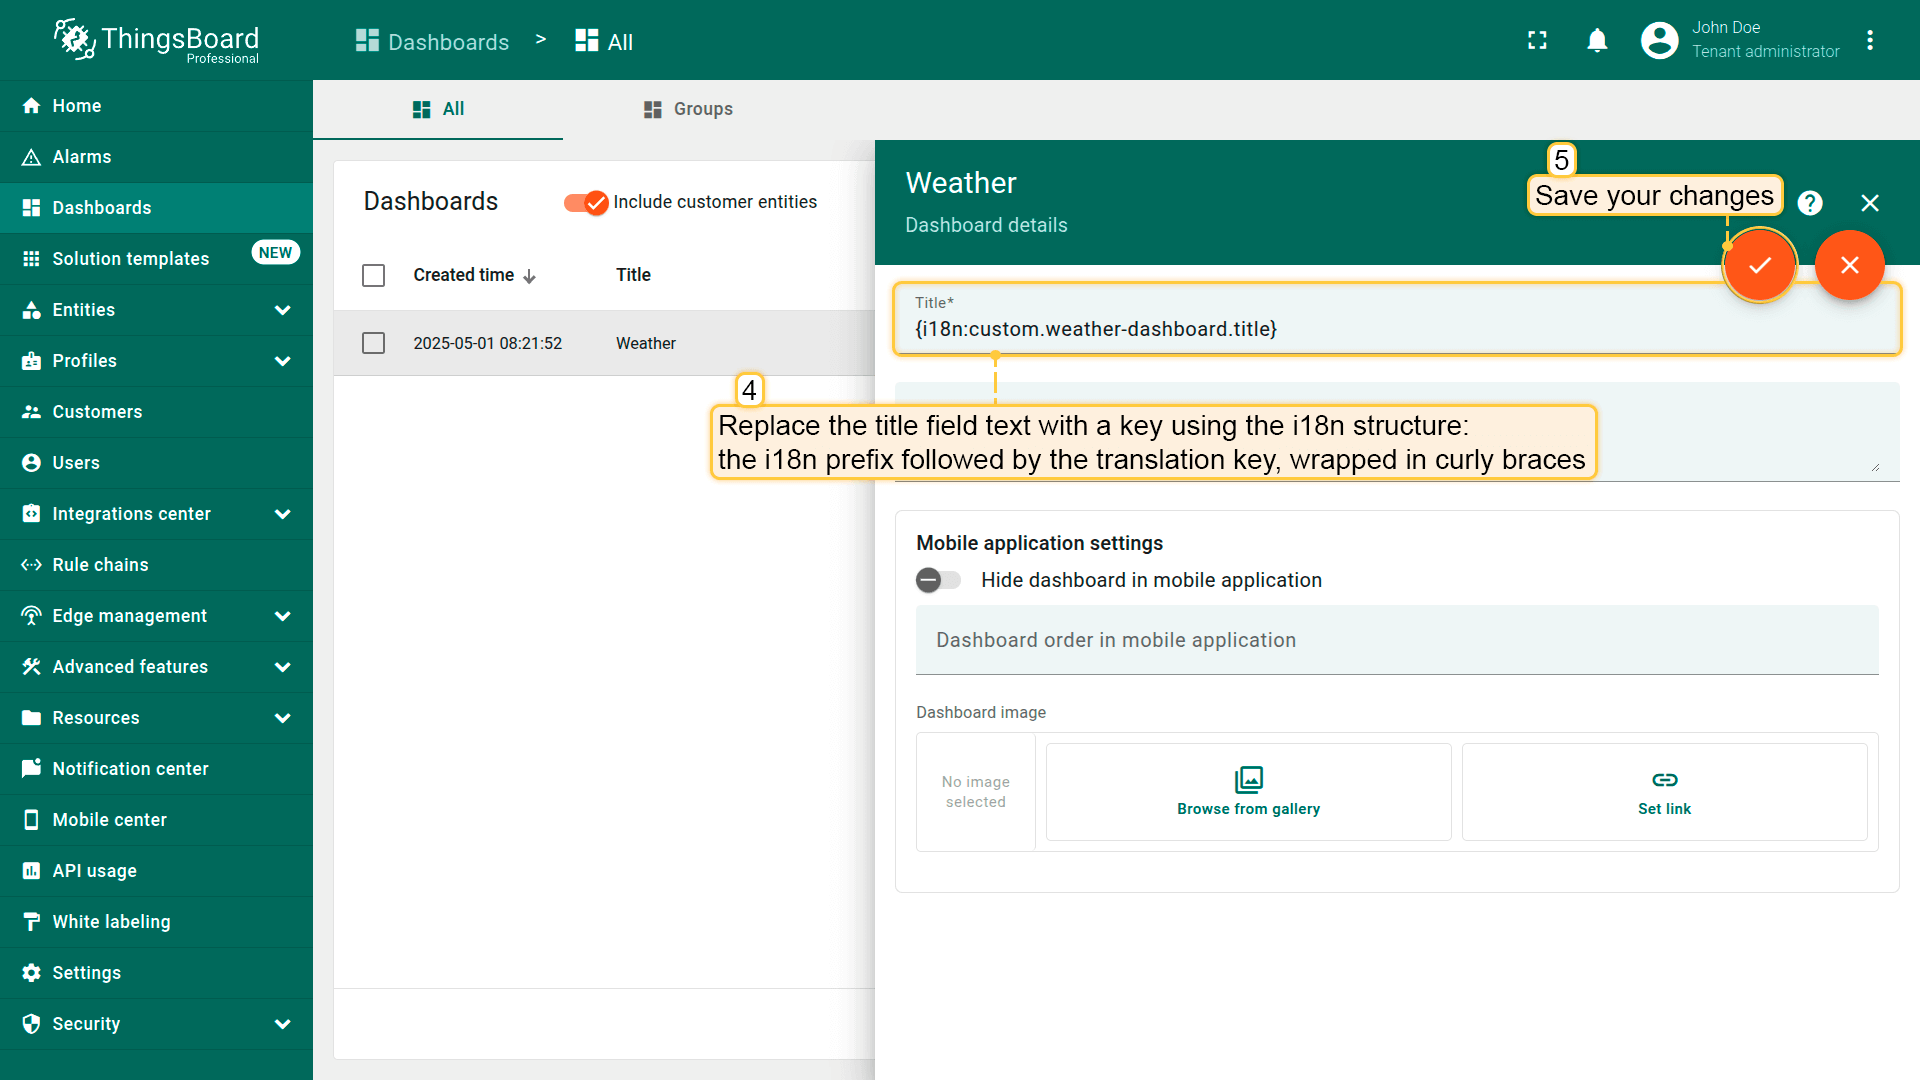
- Enter edit mode and replace the title field text with a key using the i18n structure: the i18n prefix followed by the translation key, wrapped in curly braces — like this:
1
{i18n:custom.weather-dashboard.title}
- Save your changes.
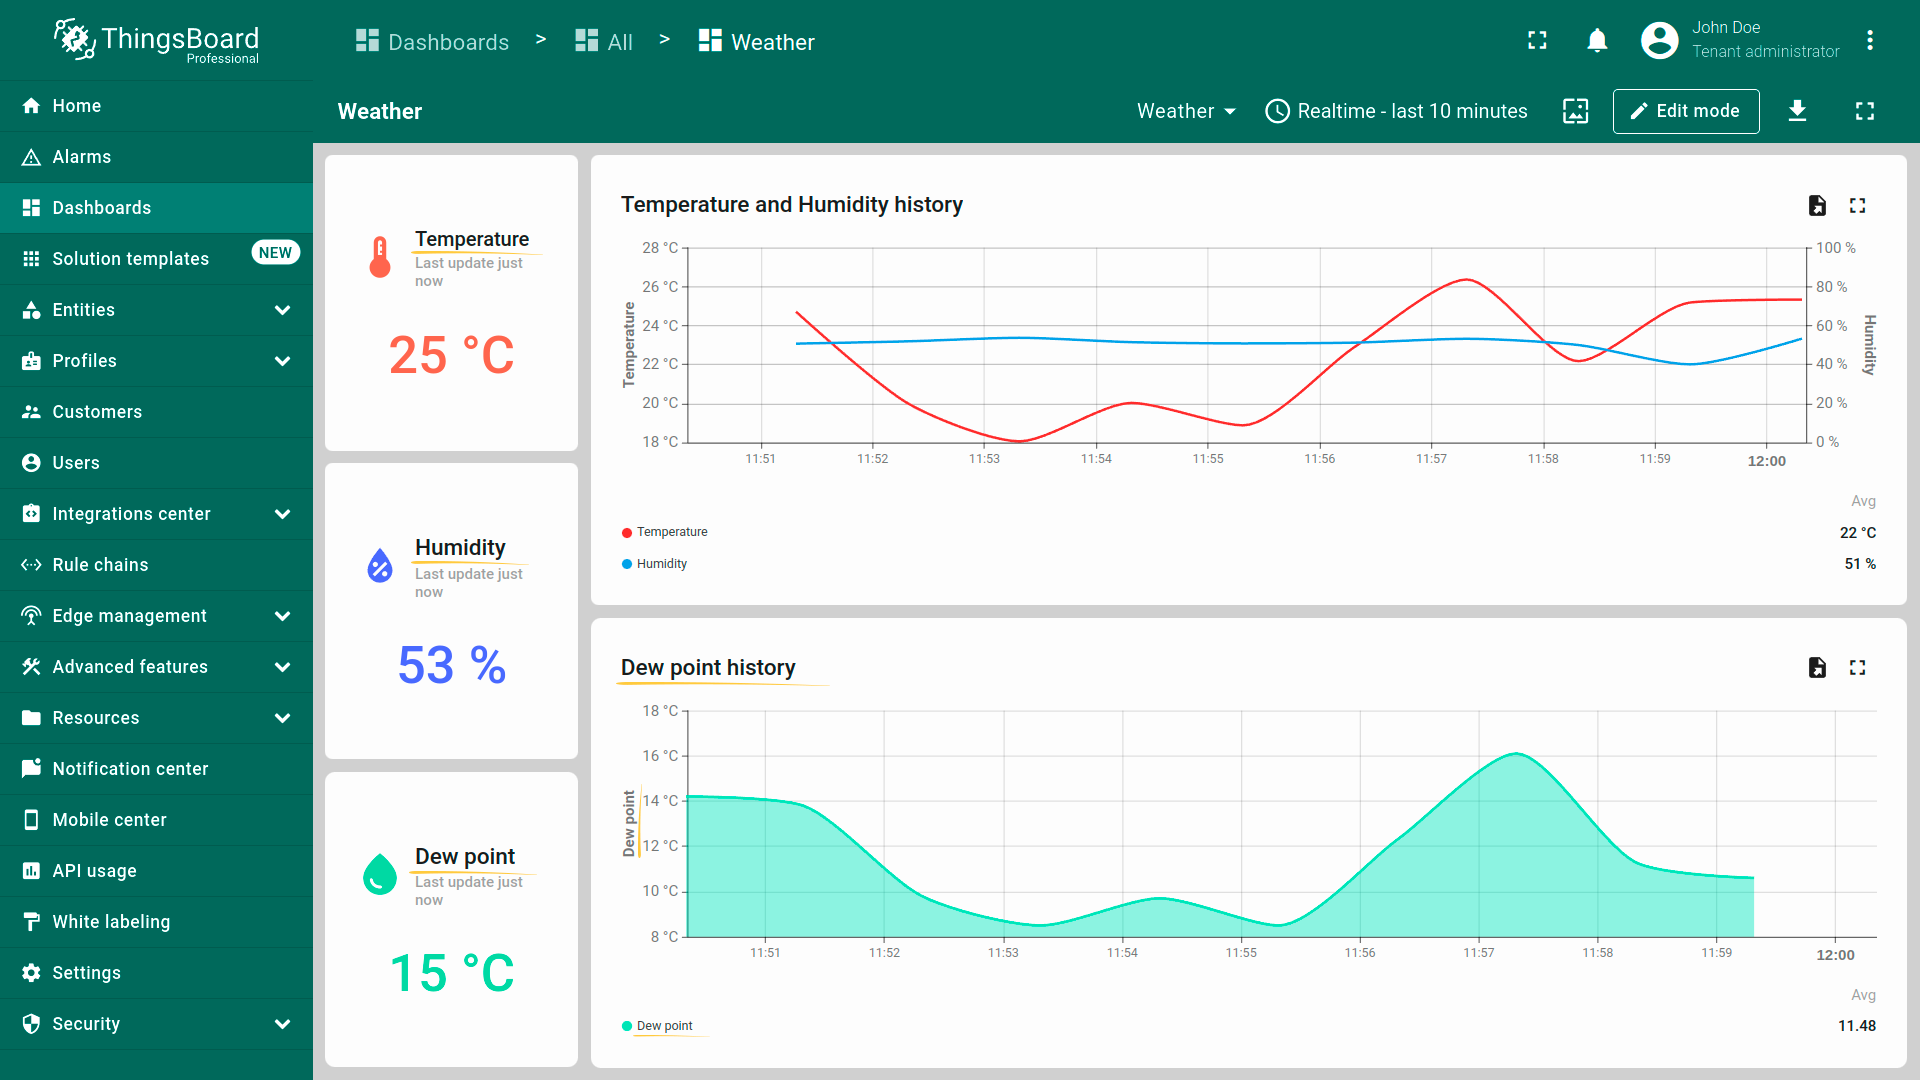
Since I'm using English as my interface language, the dashboard title appears in English.
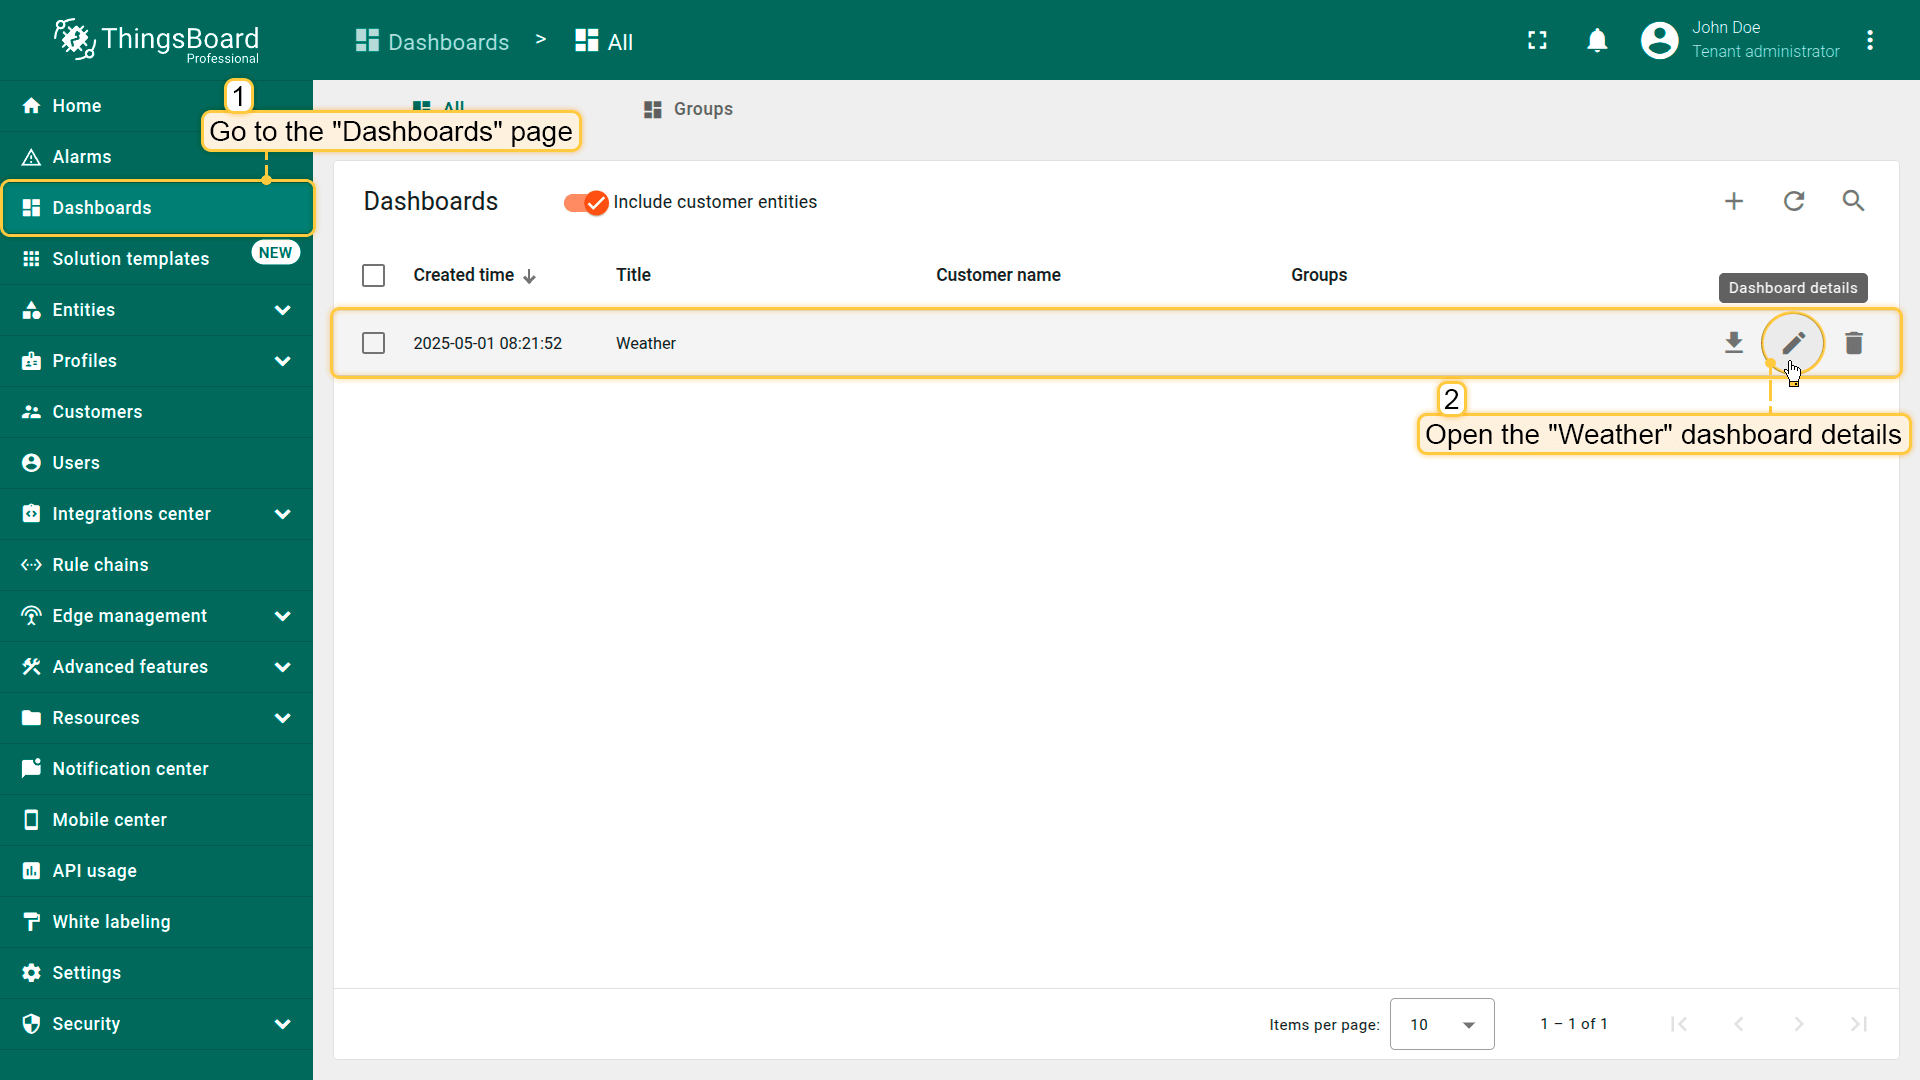
Navigate to the “Dashboards” page. and open the dashboard details.
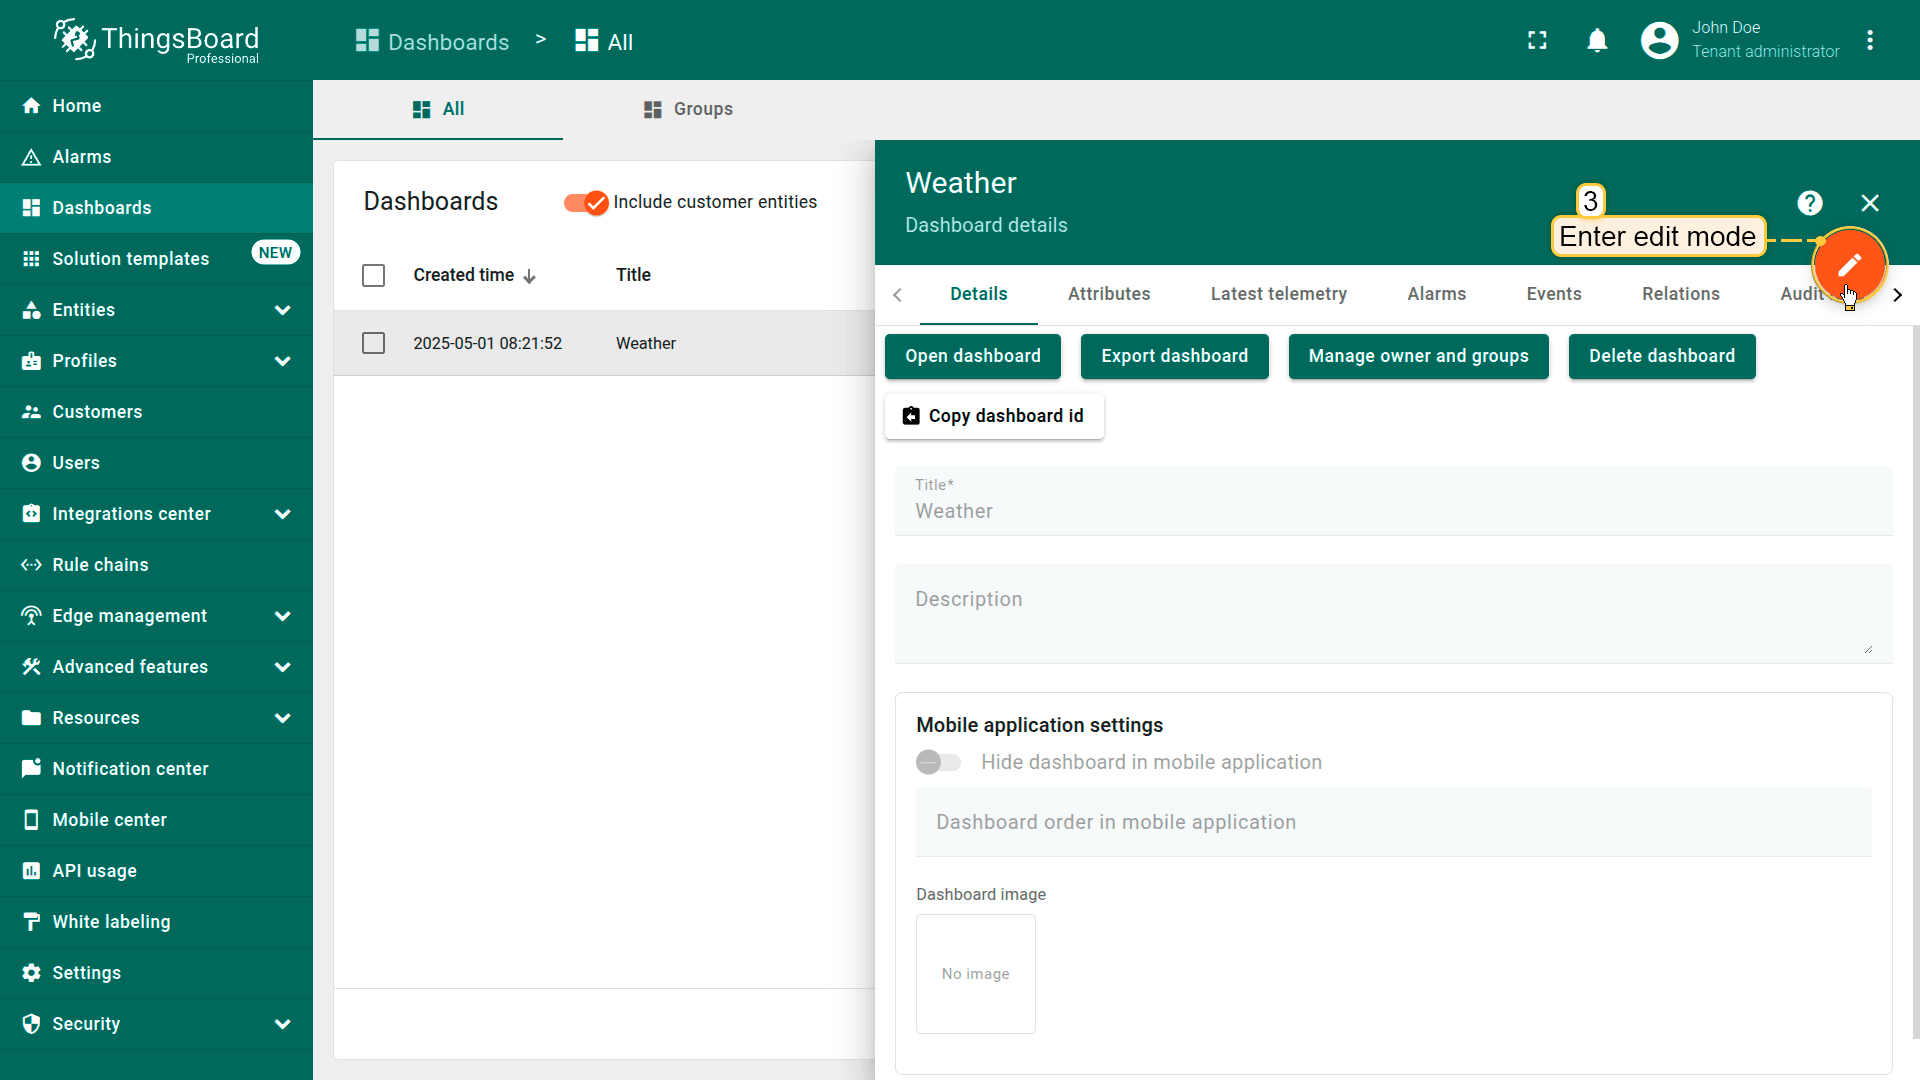
Enter edit mode.
Replace the title field text with a key using the i18n structure: the i18n prefix followed by the translation key, wrapped in curly braces. Then, save your changes.
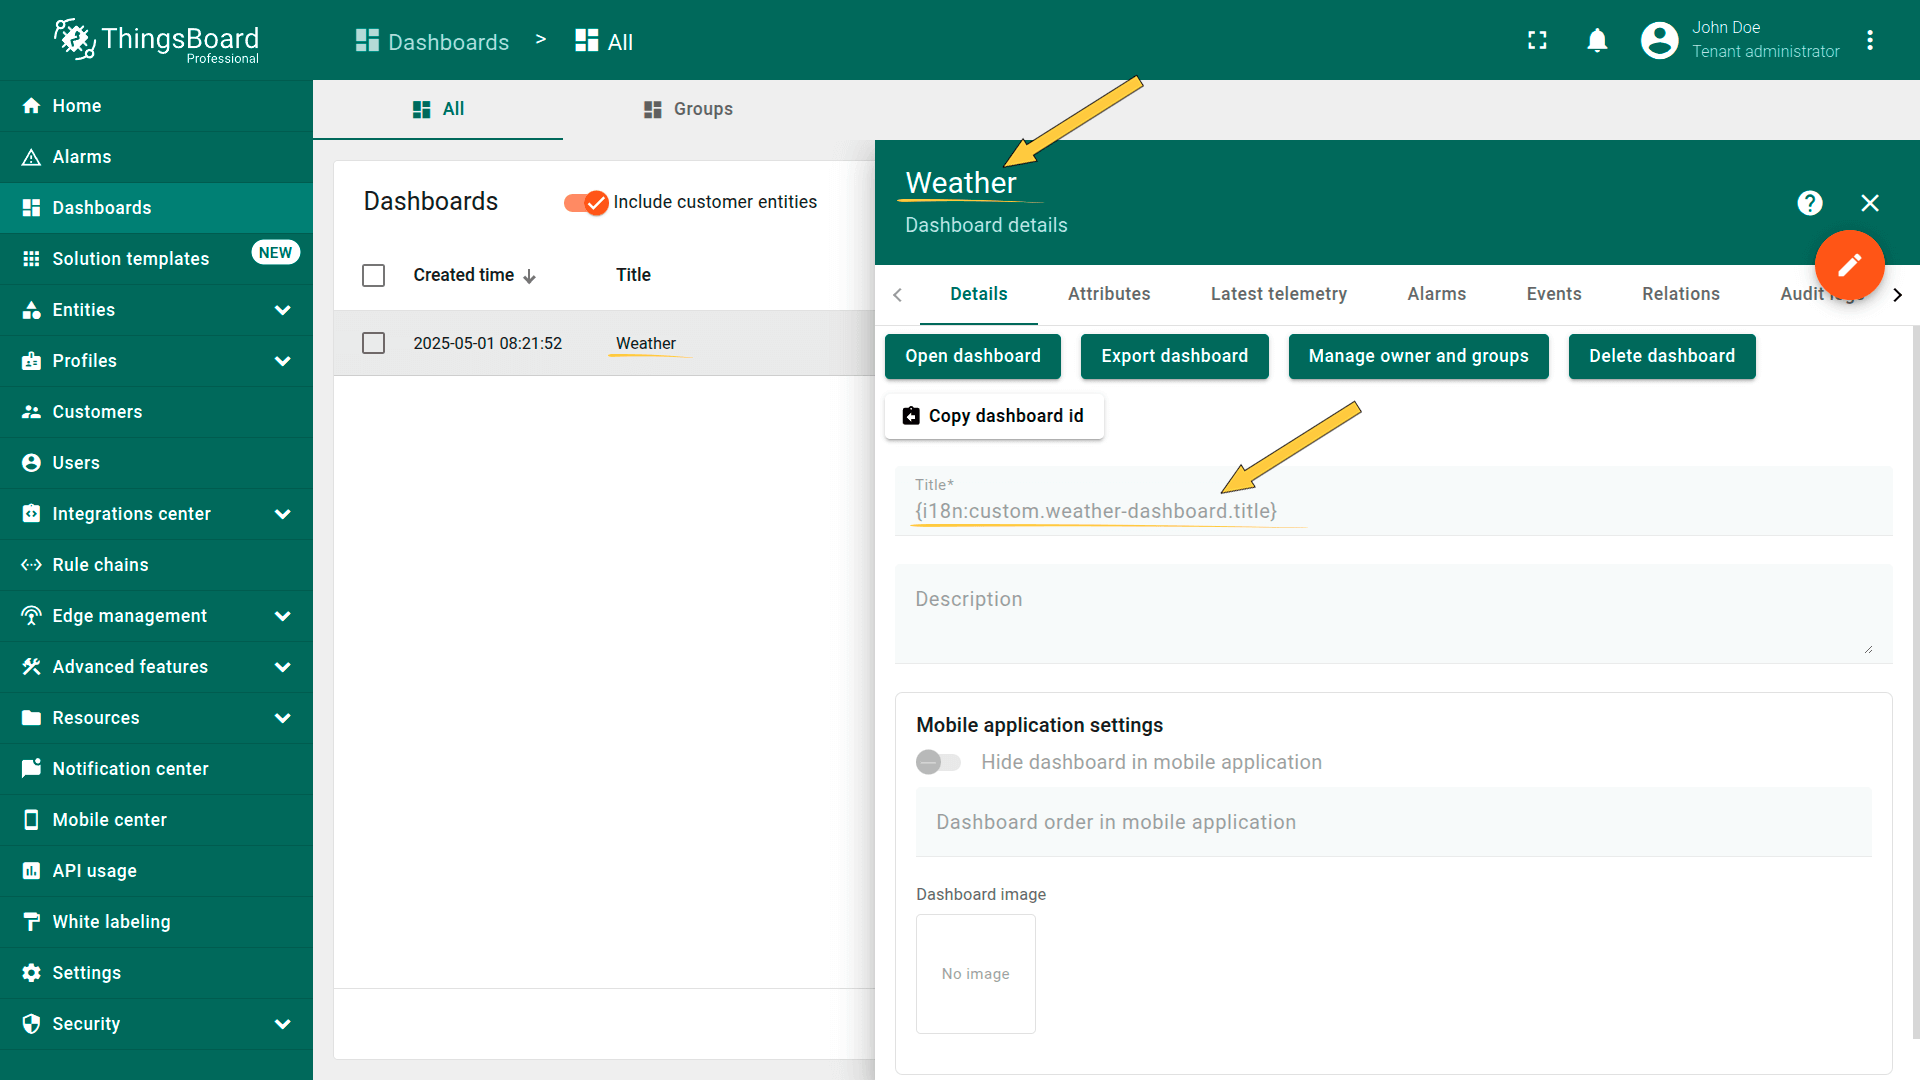
I'm using English as my interface language, so the dashboard title is displayed in English.
Now, either switch to your user's account where the interface language is set to German, or simply change your own interface language to German.
You should see the dashboard title displayed in German according to the translation map — which means everything is working as expected.
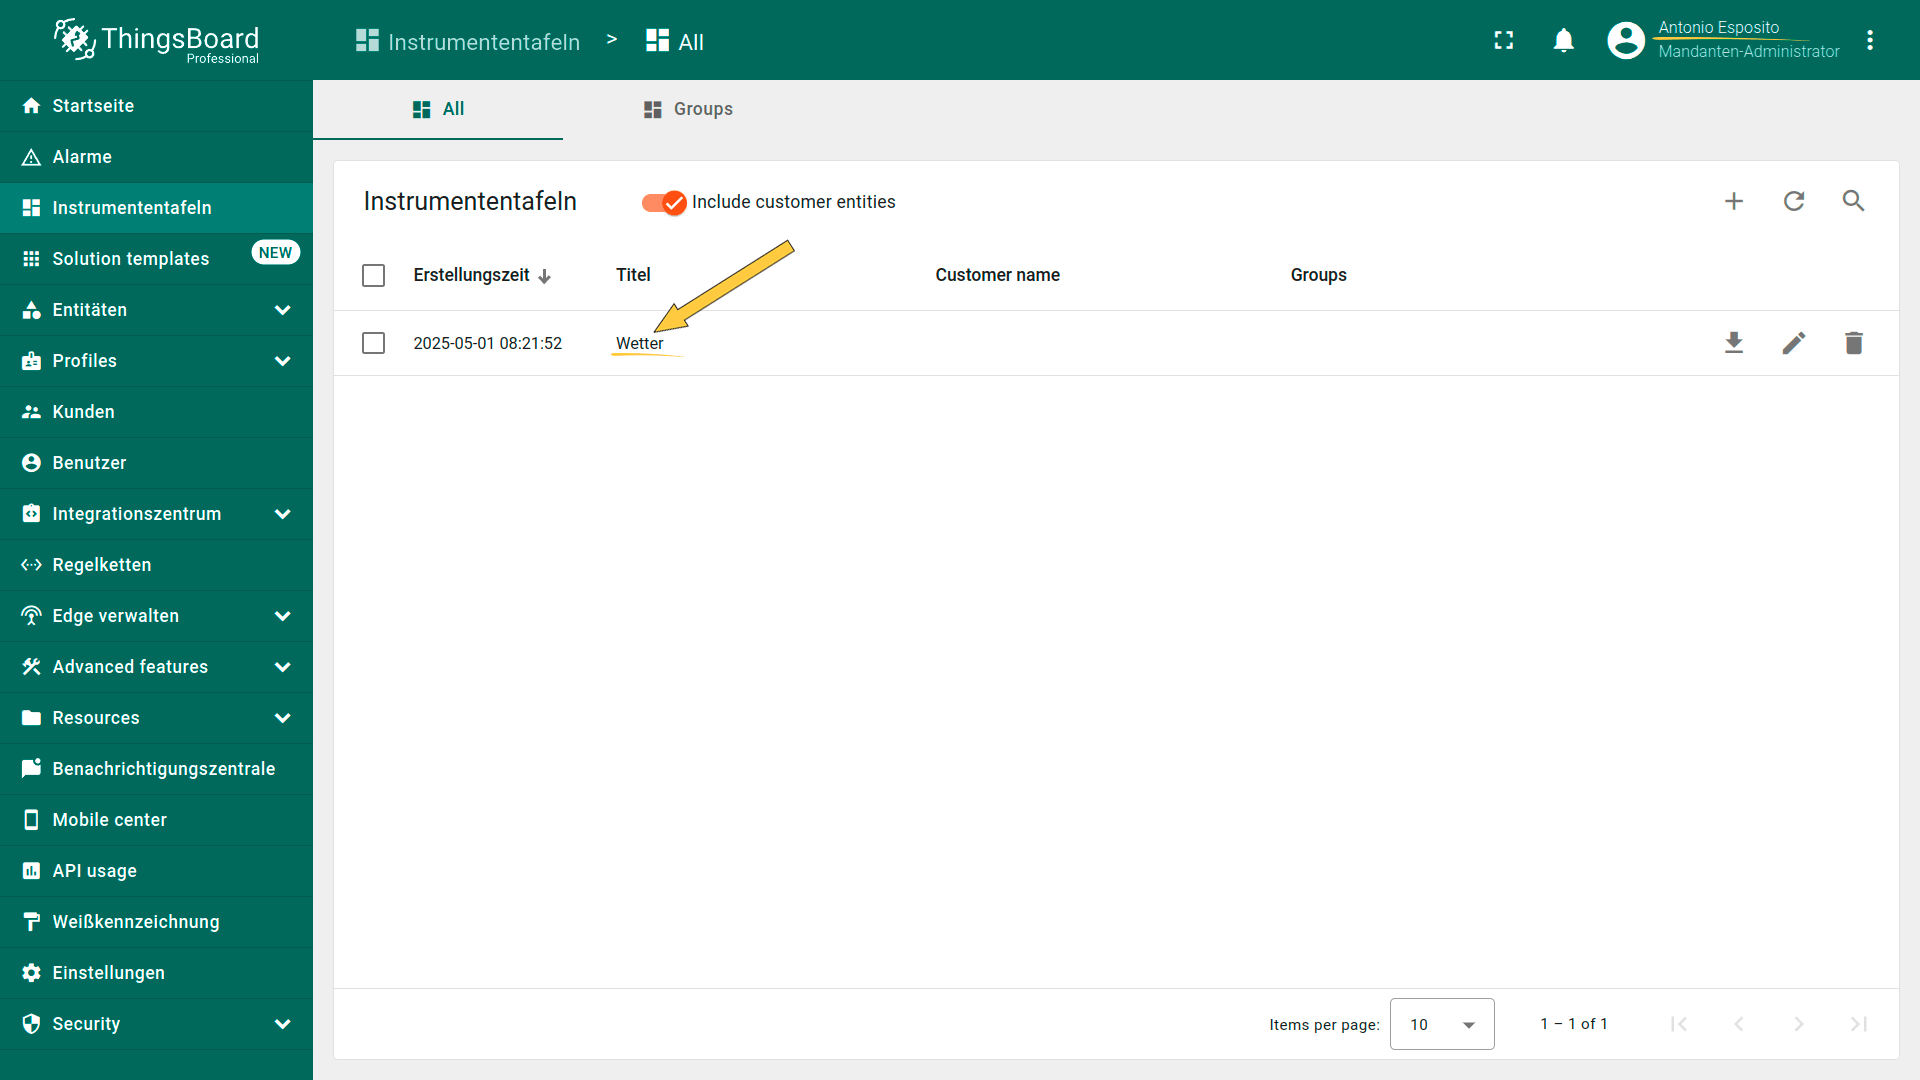
Now, either switch to your user's account where the interface language is set to German, or simply change your own interface language to German. You should see the dashboard title displayed in German according to the translation map — which means everything is working as expected.
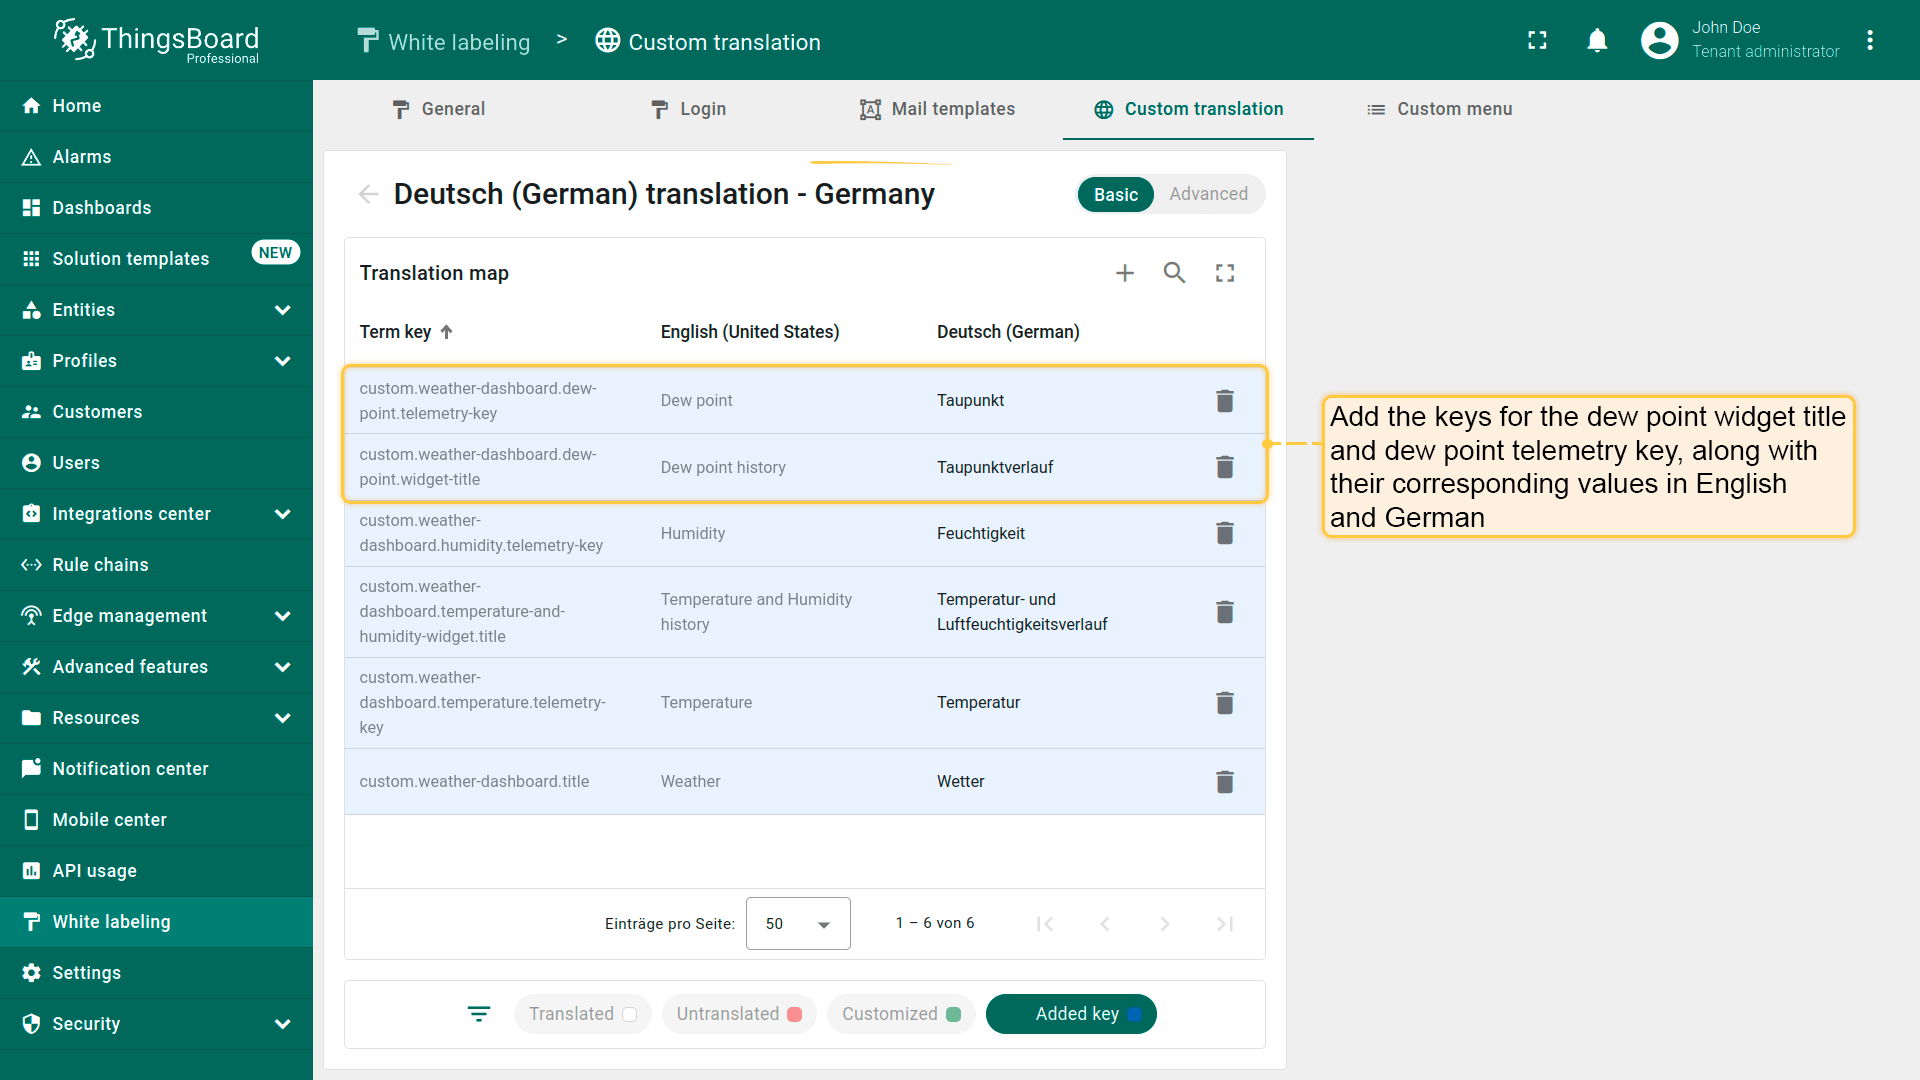
Custom translation for widget elements
Just like we did for the dashboard title, let's now apply internationalization to the “Temperature and Humidity history” widget title, telemetry keys, and axis labels. Once again, to demonstrate the result, I'll use a user instance with German set as the interface language.
First, add the keys along with their corresponding values in English and the selected language (in our case German). Use the values provided in the table below.
| Term key | Value in English | Value in German | Key description |
|---|---|---|---|
| custom.weather-dashboard.temperature-and-humidity-widget.title | Temperature and Humidity history | Temperatur- und Luftfeuchtigkeitsverlauf | Temperature and Humidity history widget title |
| custom.weather-dashboard.temperature.telemetry-key | Temperature | Temperatur | Temperature telemetry key name |
| custom.weather-dashboard.humidity.telemetry-key | Humidity | Feuchtigkeit | Humidity telemetry key name |
Add the keys along with their corresponding values in English and the selected language (in our case German).
Now go to the “Weather” dashboard and enter the “Temperature and Humidity history” widget edit mode.
Assign the added keys in the i18n structure to the following fields:
- Labels for the temperature and humidity keys:
- temperature: {i18n:custom.weather-dashboard.temperature.telemetry-key}
- humidity: {i18n:custom.weather-dashboard.humidity.telemetry-key}
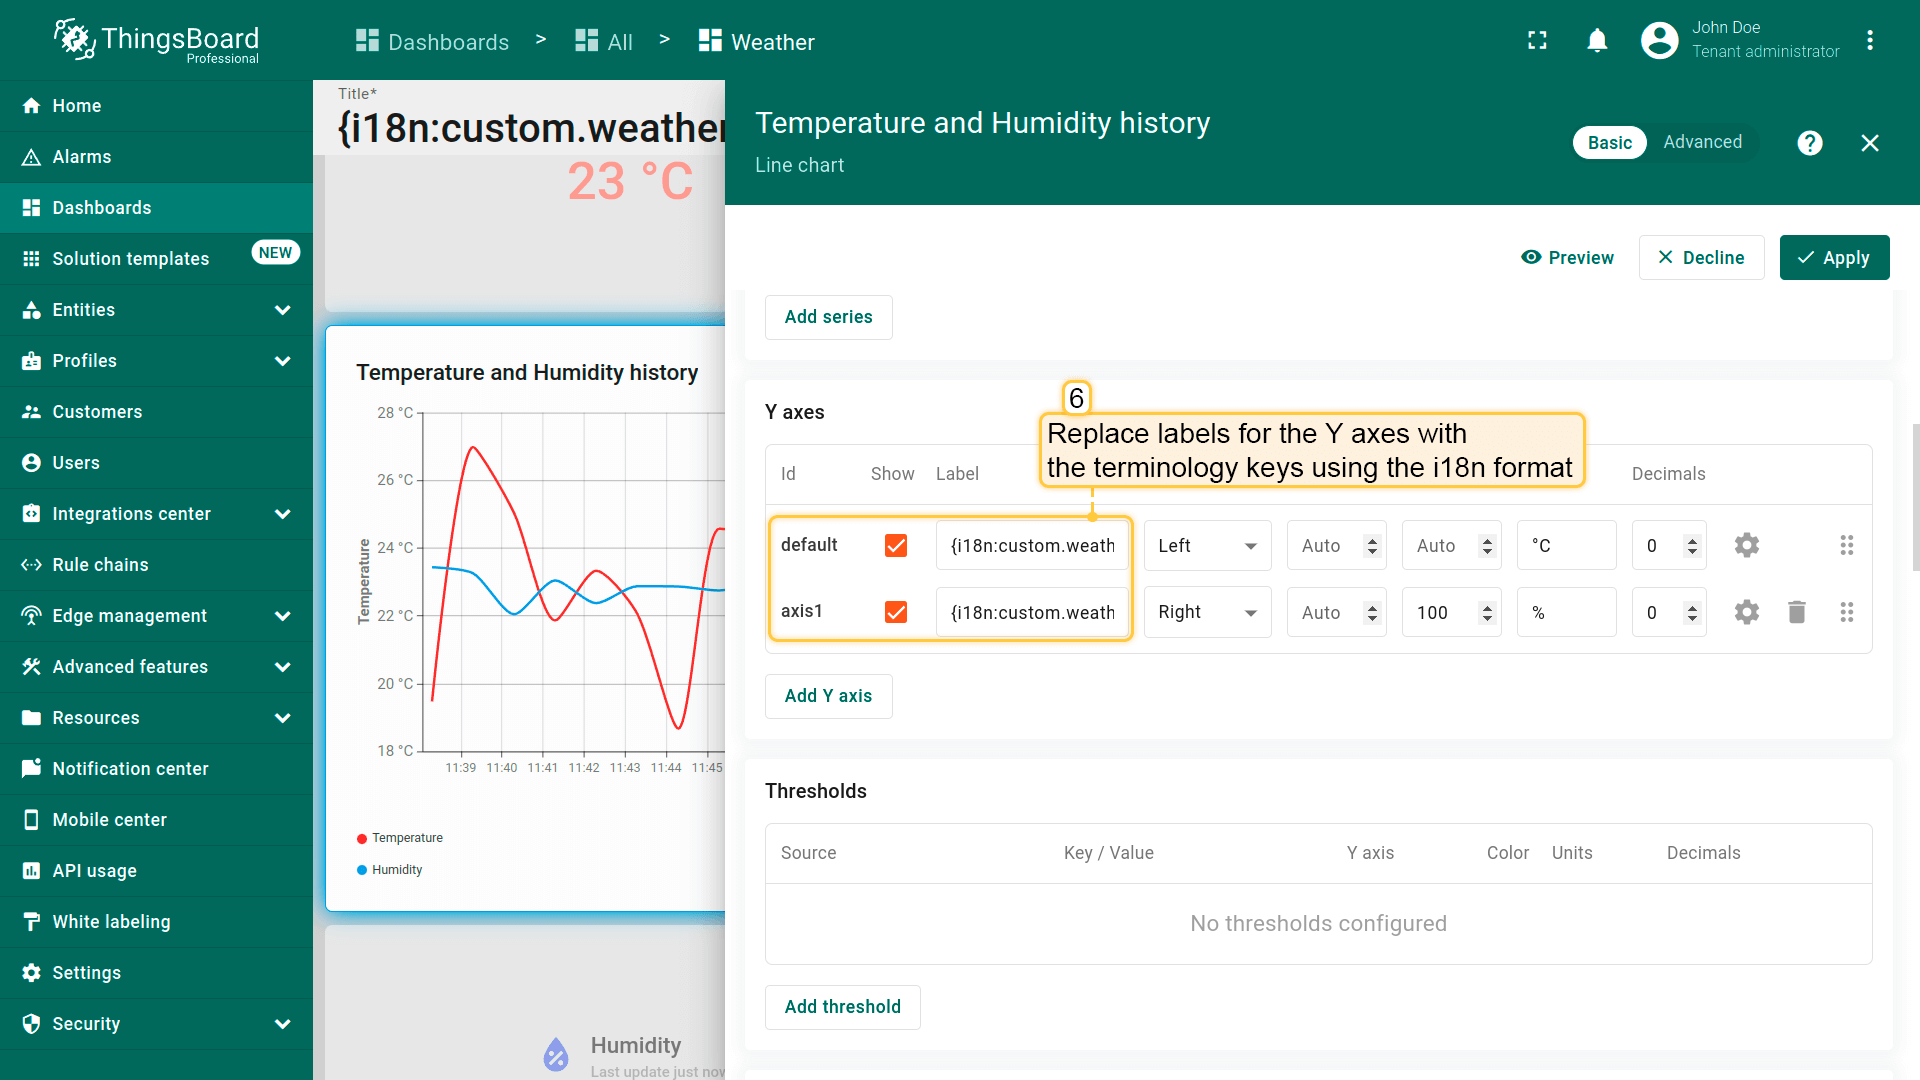
- Labels for the Y axes:
- default (temperature): {i18n:custom.weather-dashboard.temperature.telemetry-key}
- axis1 (humidity): {i18n:custom.weather-dashboard.humidity.telemetry-key}
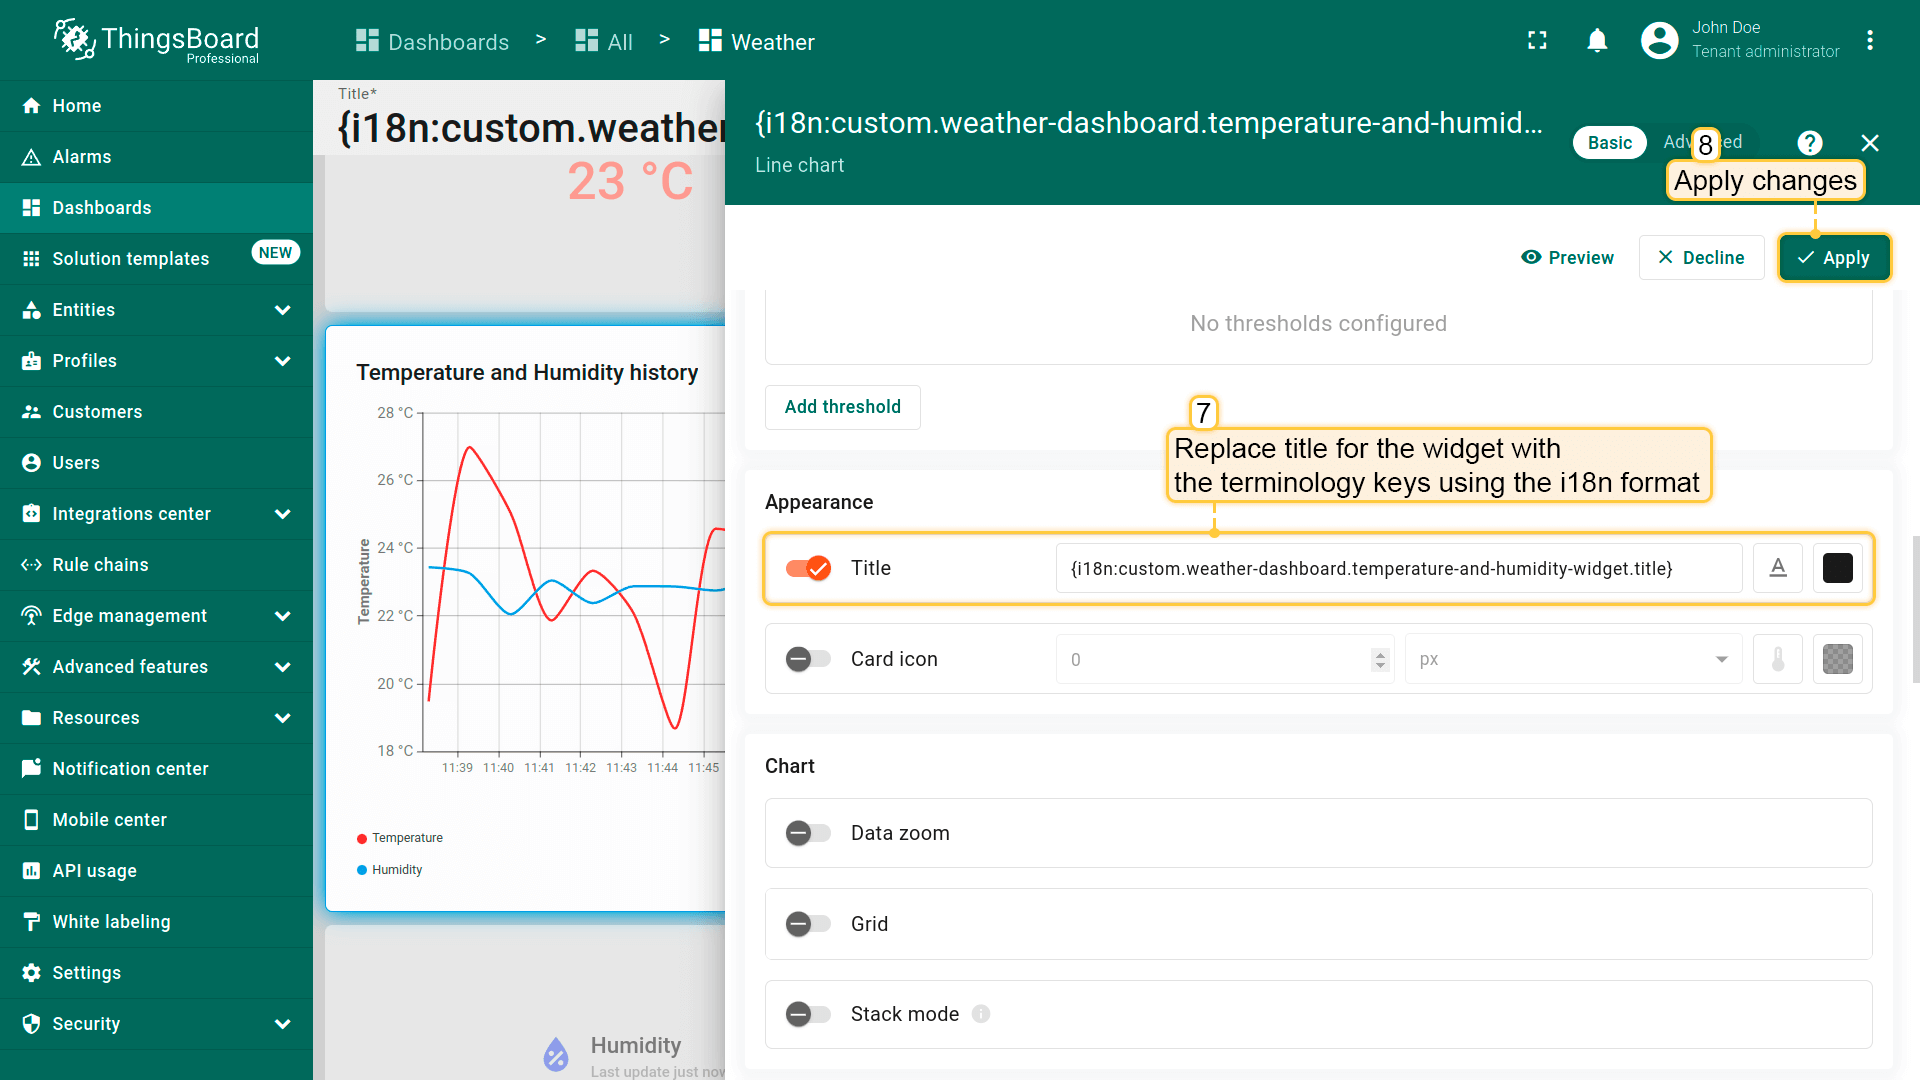
- Title for the widget: {i18n:custom.weather-dashboard.temperature-and-humidity-widget.title}
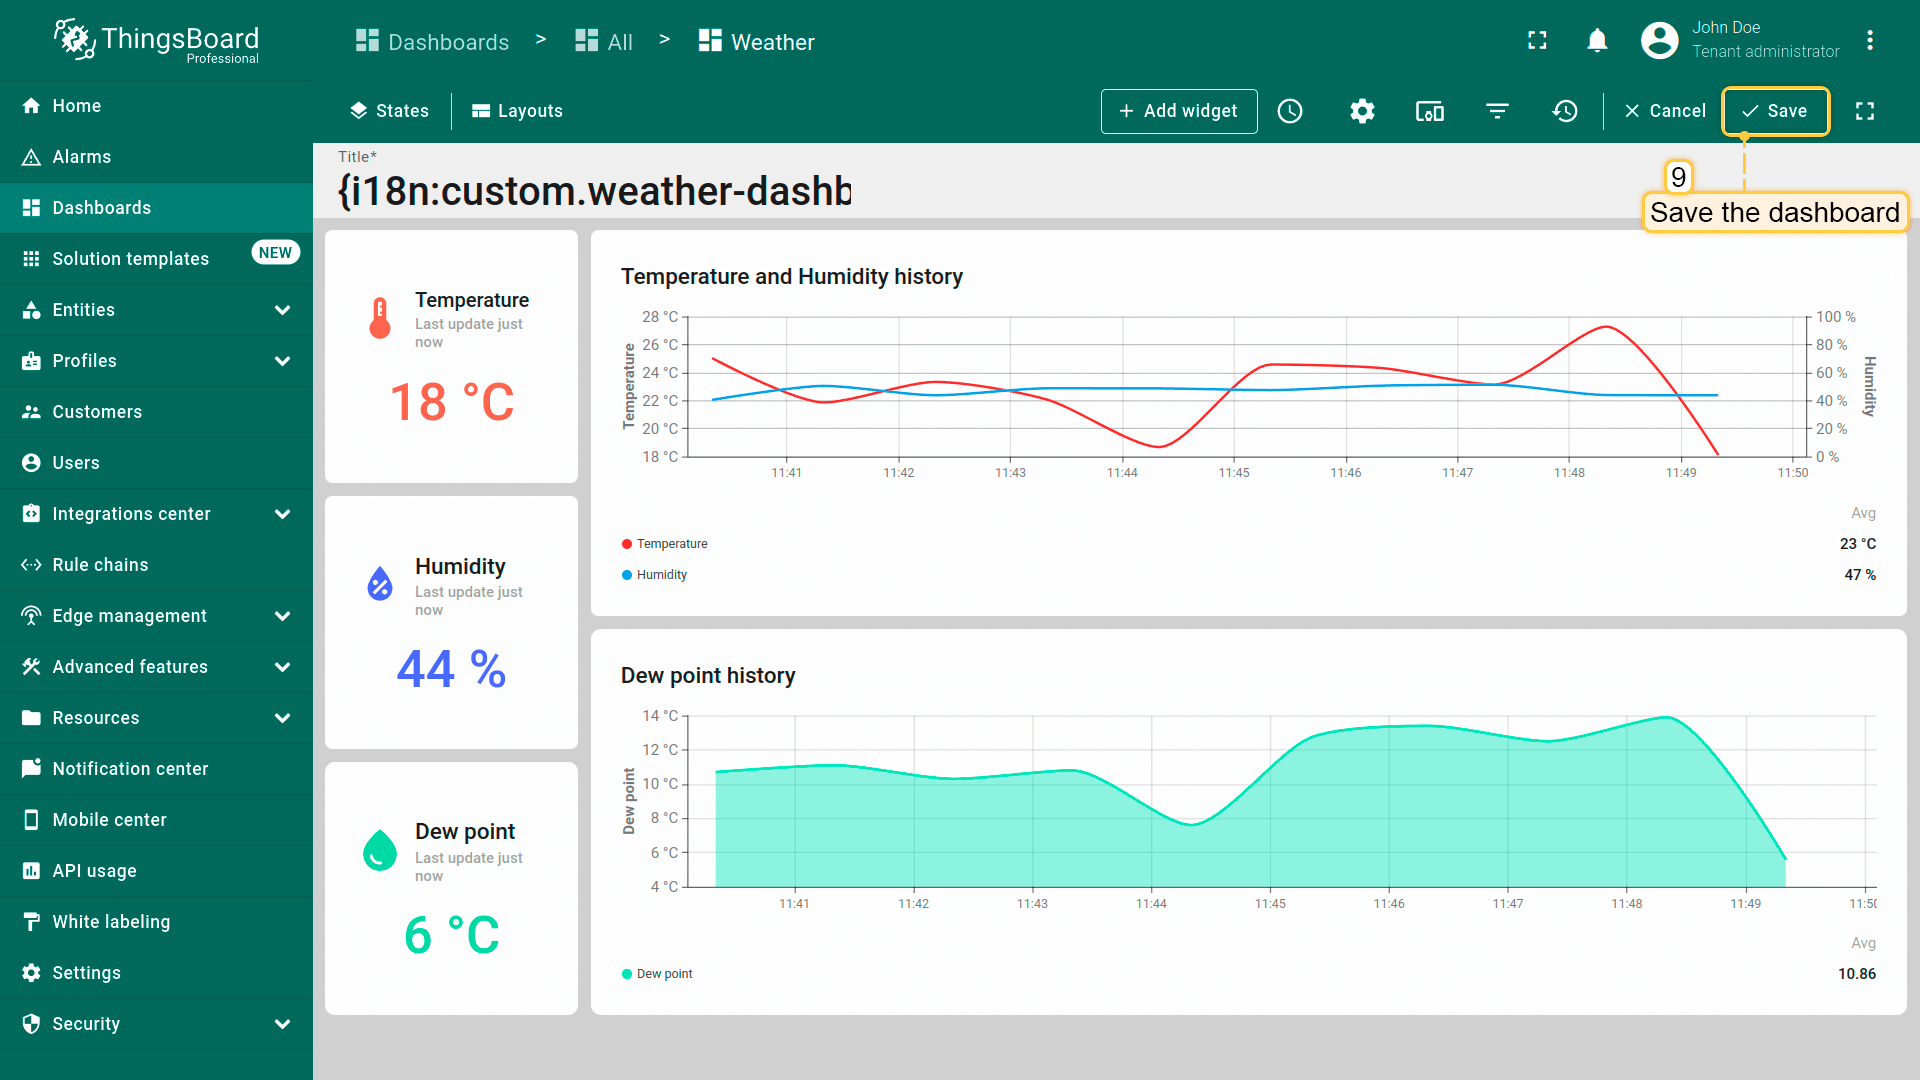
After that, save your changes.
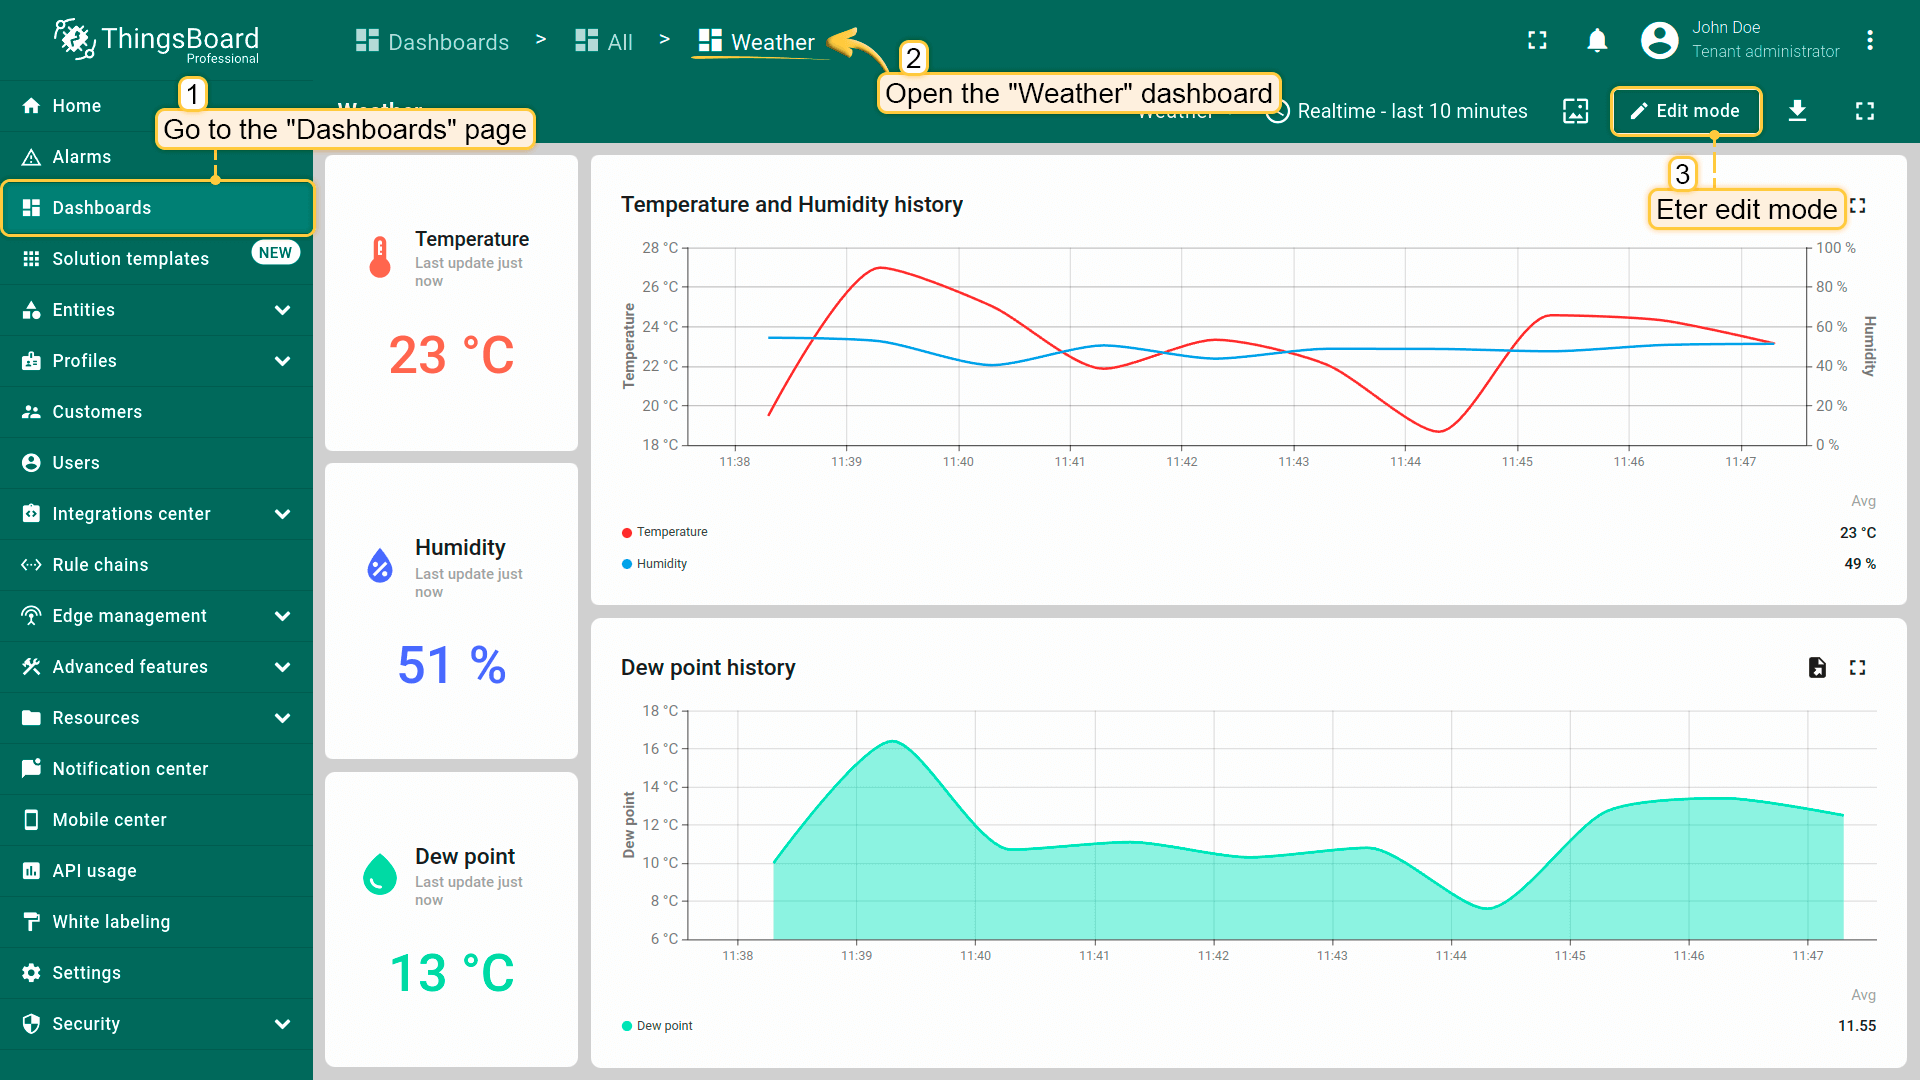
Now navigate to the “Weather” dashboard and enter its edit mode.
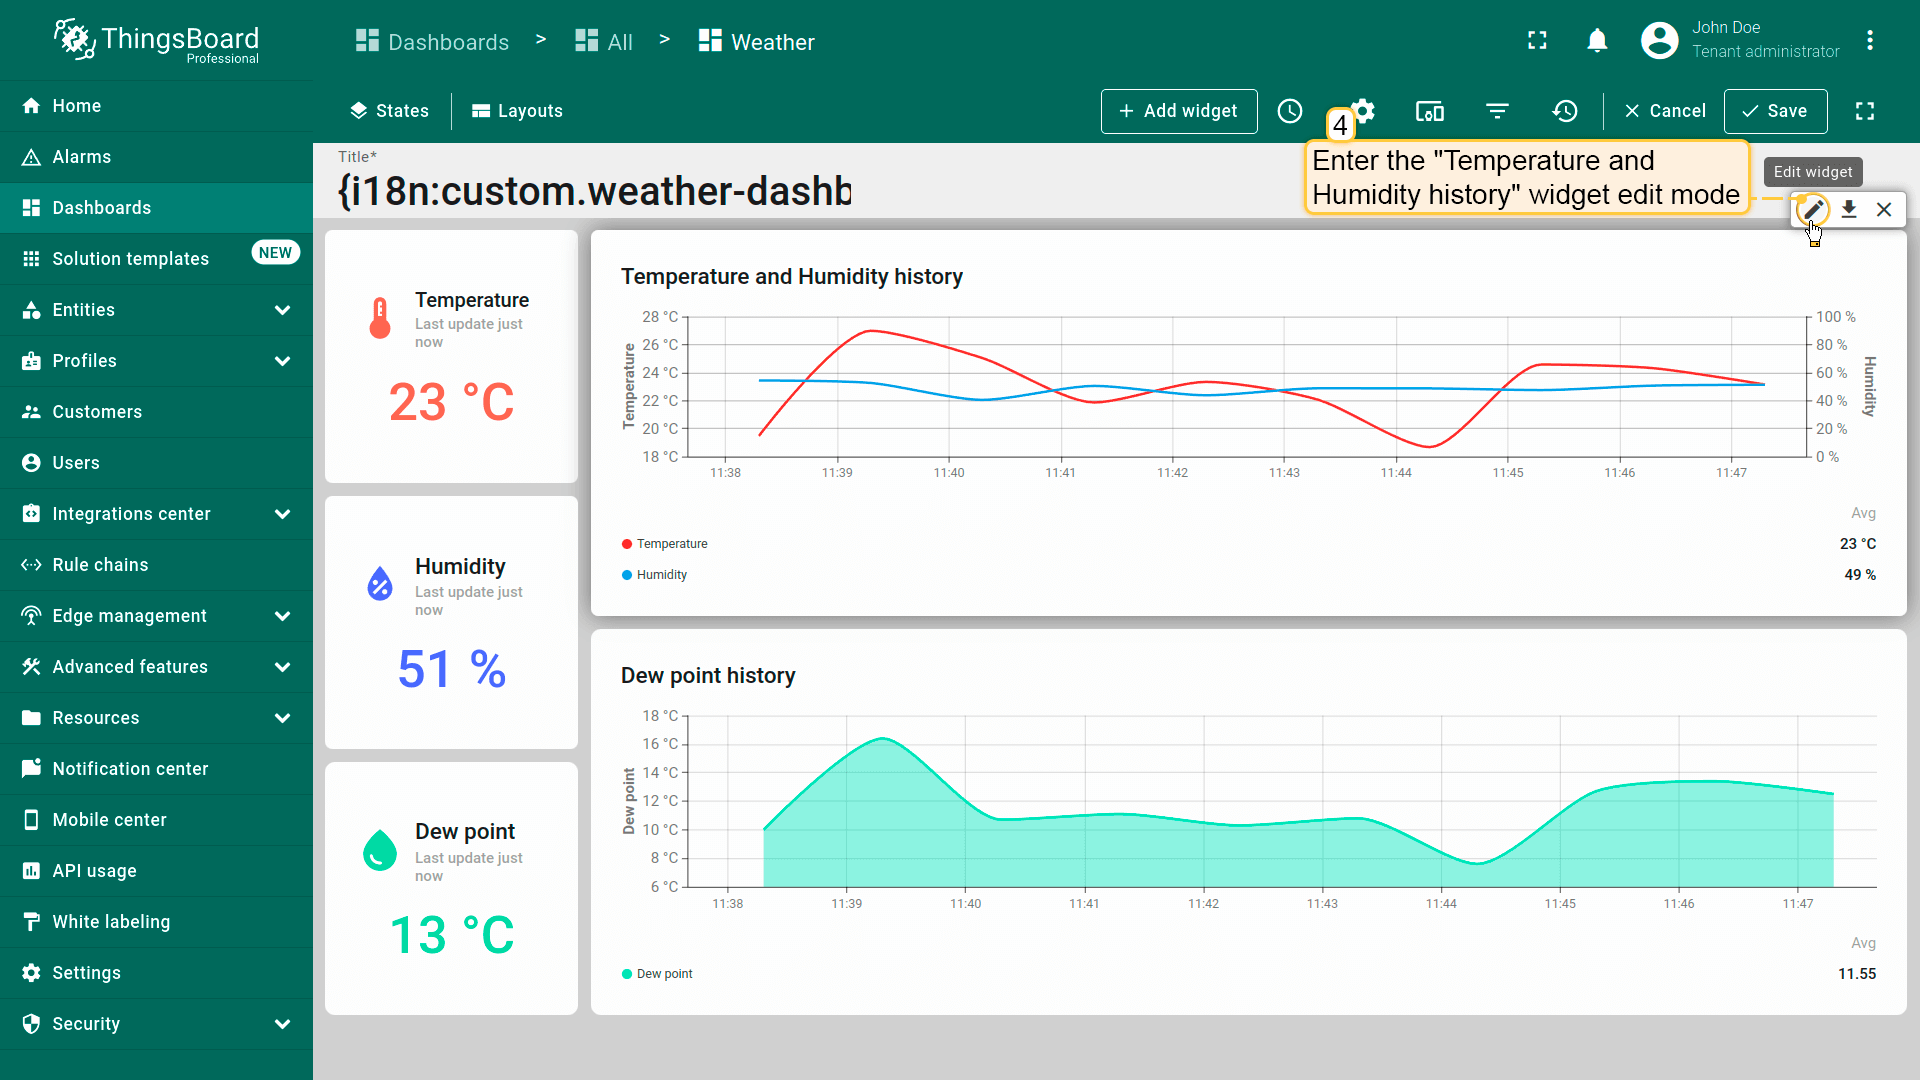
Enter the “Temperature and Humidity history” widget edit mode.
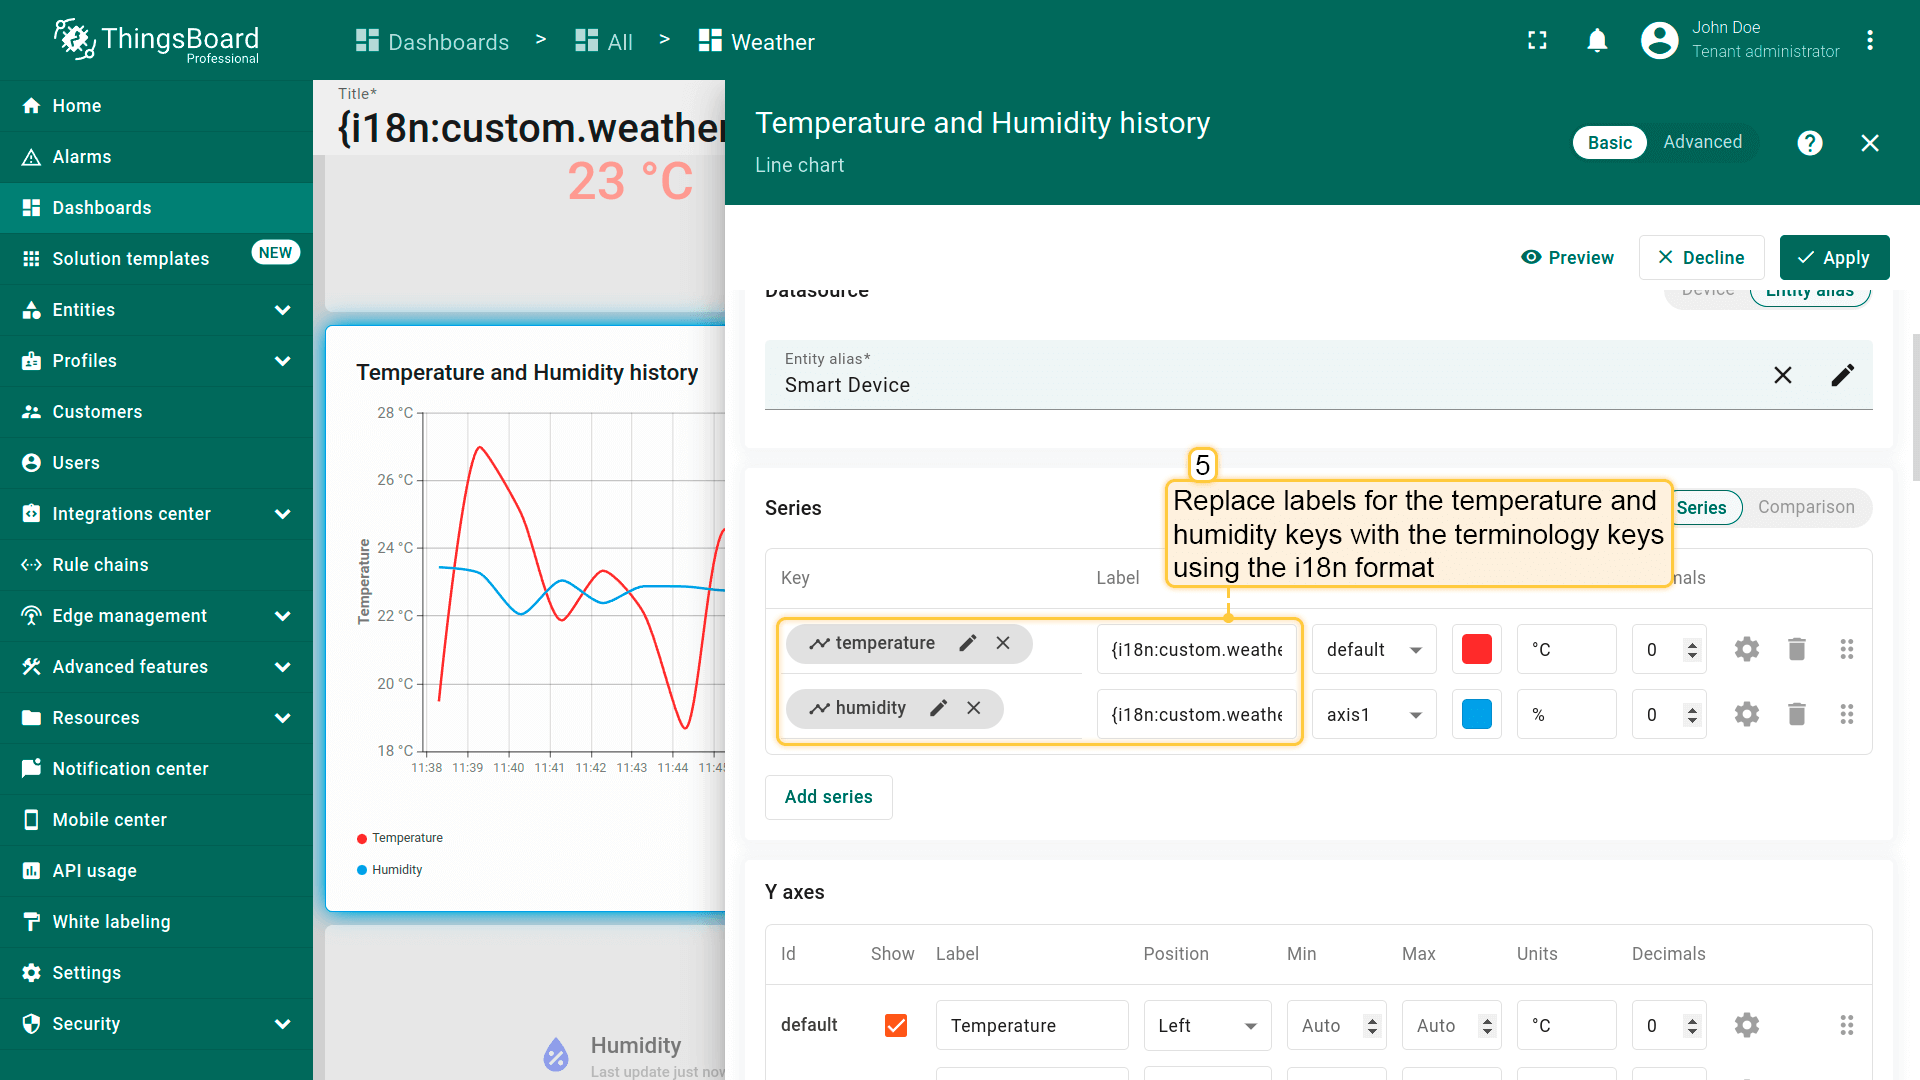
Assign the added internationalization keys as labels for the temperature and humidity telemetry keys.
Use the same values as labels for the Y axes of the temperature and humidity keys.
Now set the translation key for the widget
After that, save your changes.

.
Now, switch to the user who has German set as their interface language. As you can see, all elements of the “Temperature and Humidity history” widget are now displayed in German.
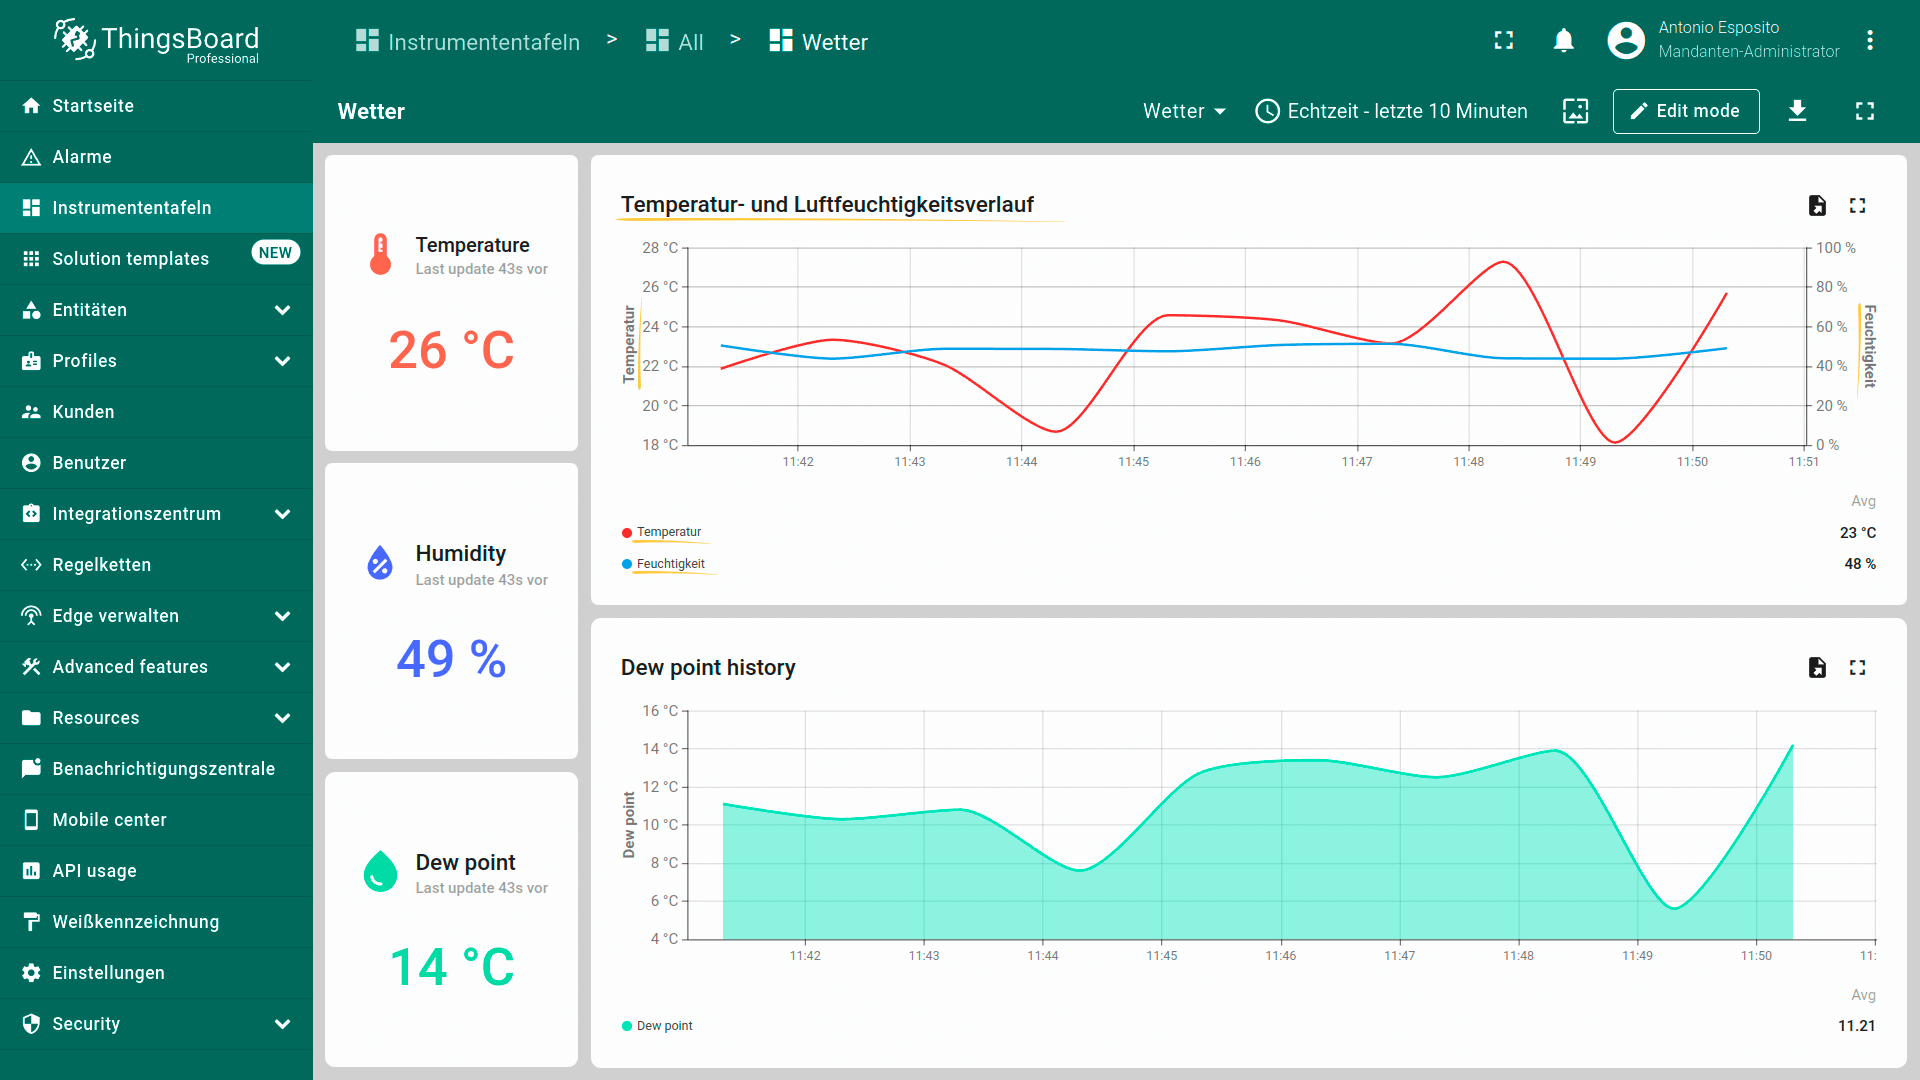
Switch to the user who has German set as their interface language. As you can see, all elements of the “Temperature and Humidity history” widget are now displayed in German.
Apply your custom translations to other widgets in the same way.
First, add the required custom translation keys to the translation map, and then assign those keys—using the i18n structure—to the appropriate widgets fields.
| Term key | Value in English | Value in German | Key description |
|---|---|---|---|
| custom.weather-dashboard.dew-point.widget-title | Dew point history | Taupunktverlauf | Dew point history widget title |
| custom.weather-dashboard.dew-point.telemetry-key | Dew point | Taupunkt | Dew point telemetry key name |
Add the required custom translation keys to the translation map
User interface in English
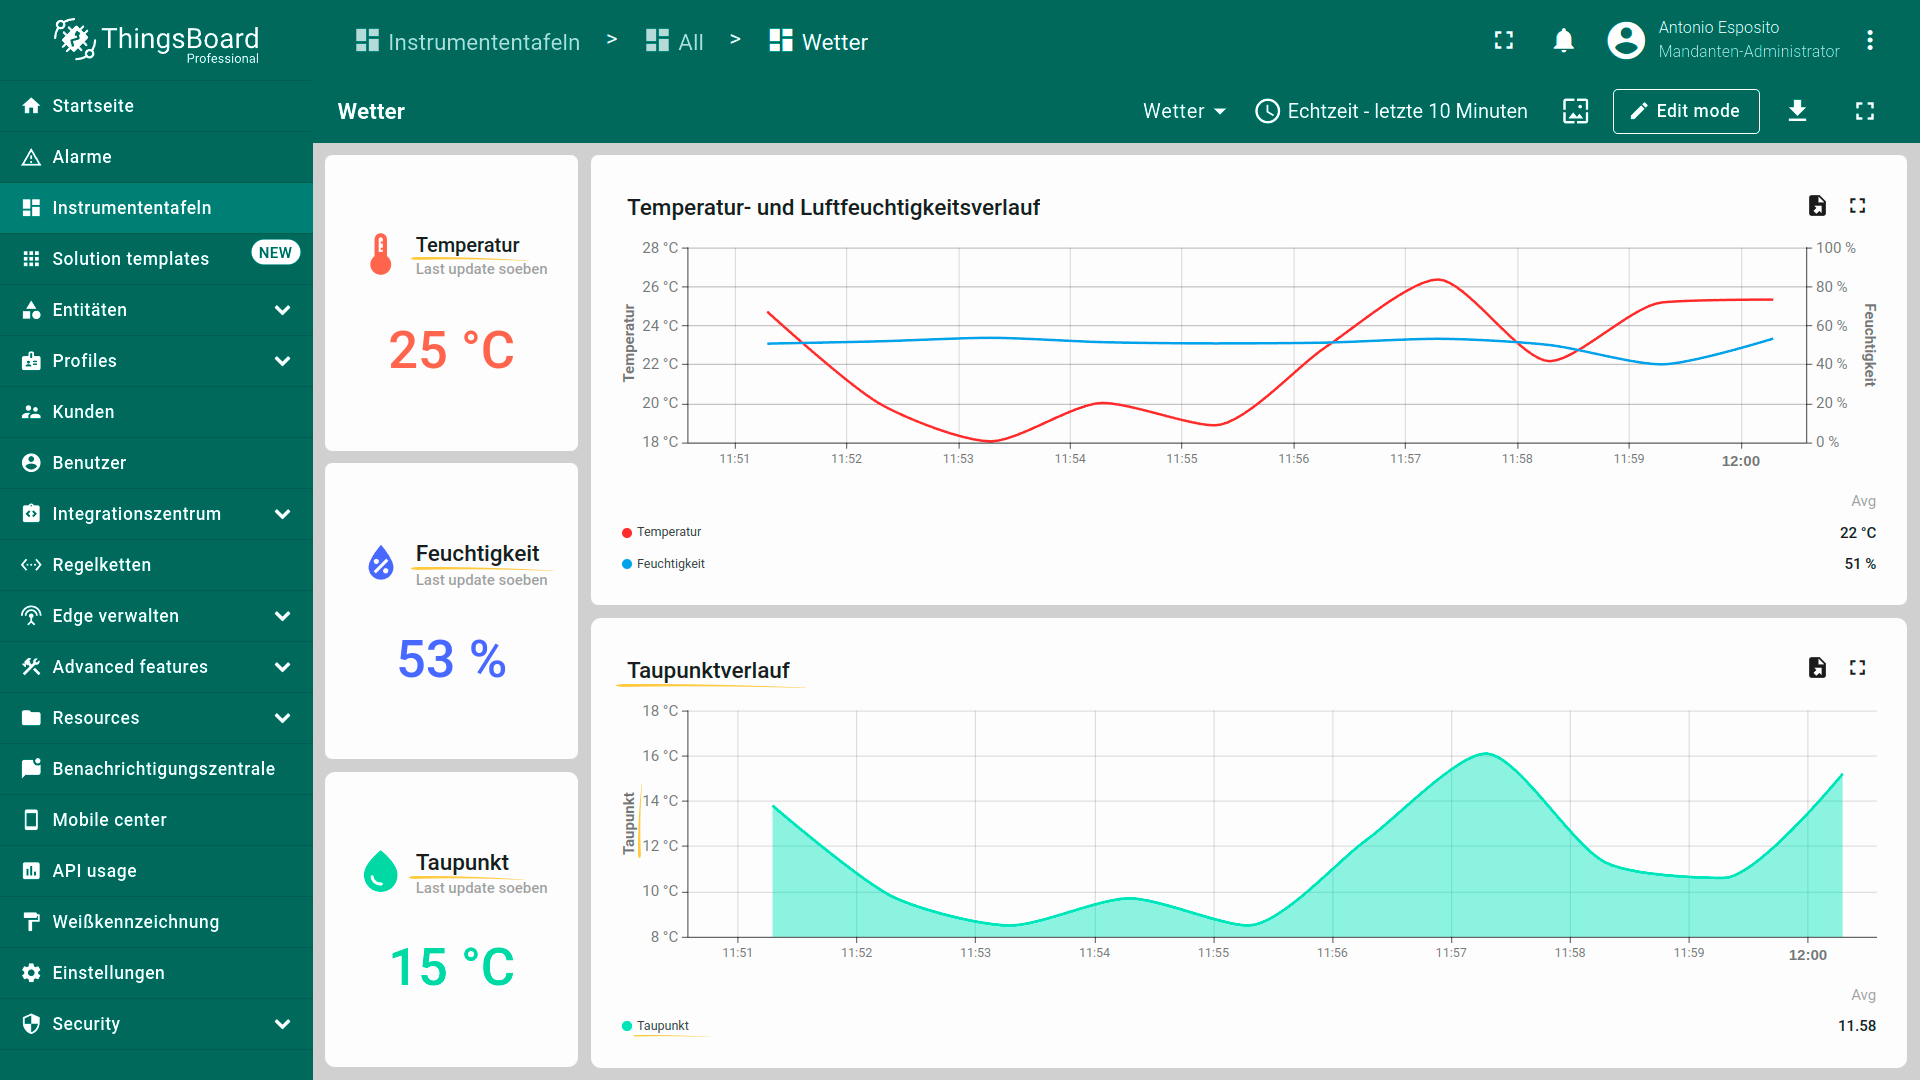
User interface in German.
Using custom translation in HTML Value Card widget
Custom translations can be used in widget functions — for example, in the “HTML Value Card” widget. Let's take a look at one such example.
1. Add translation keys to the translation map of the selected language (in my case, German).
| Term key | Value in English | Value in German | Key description |
|---|---|---|---|
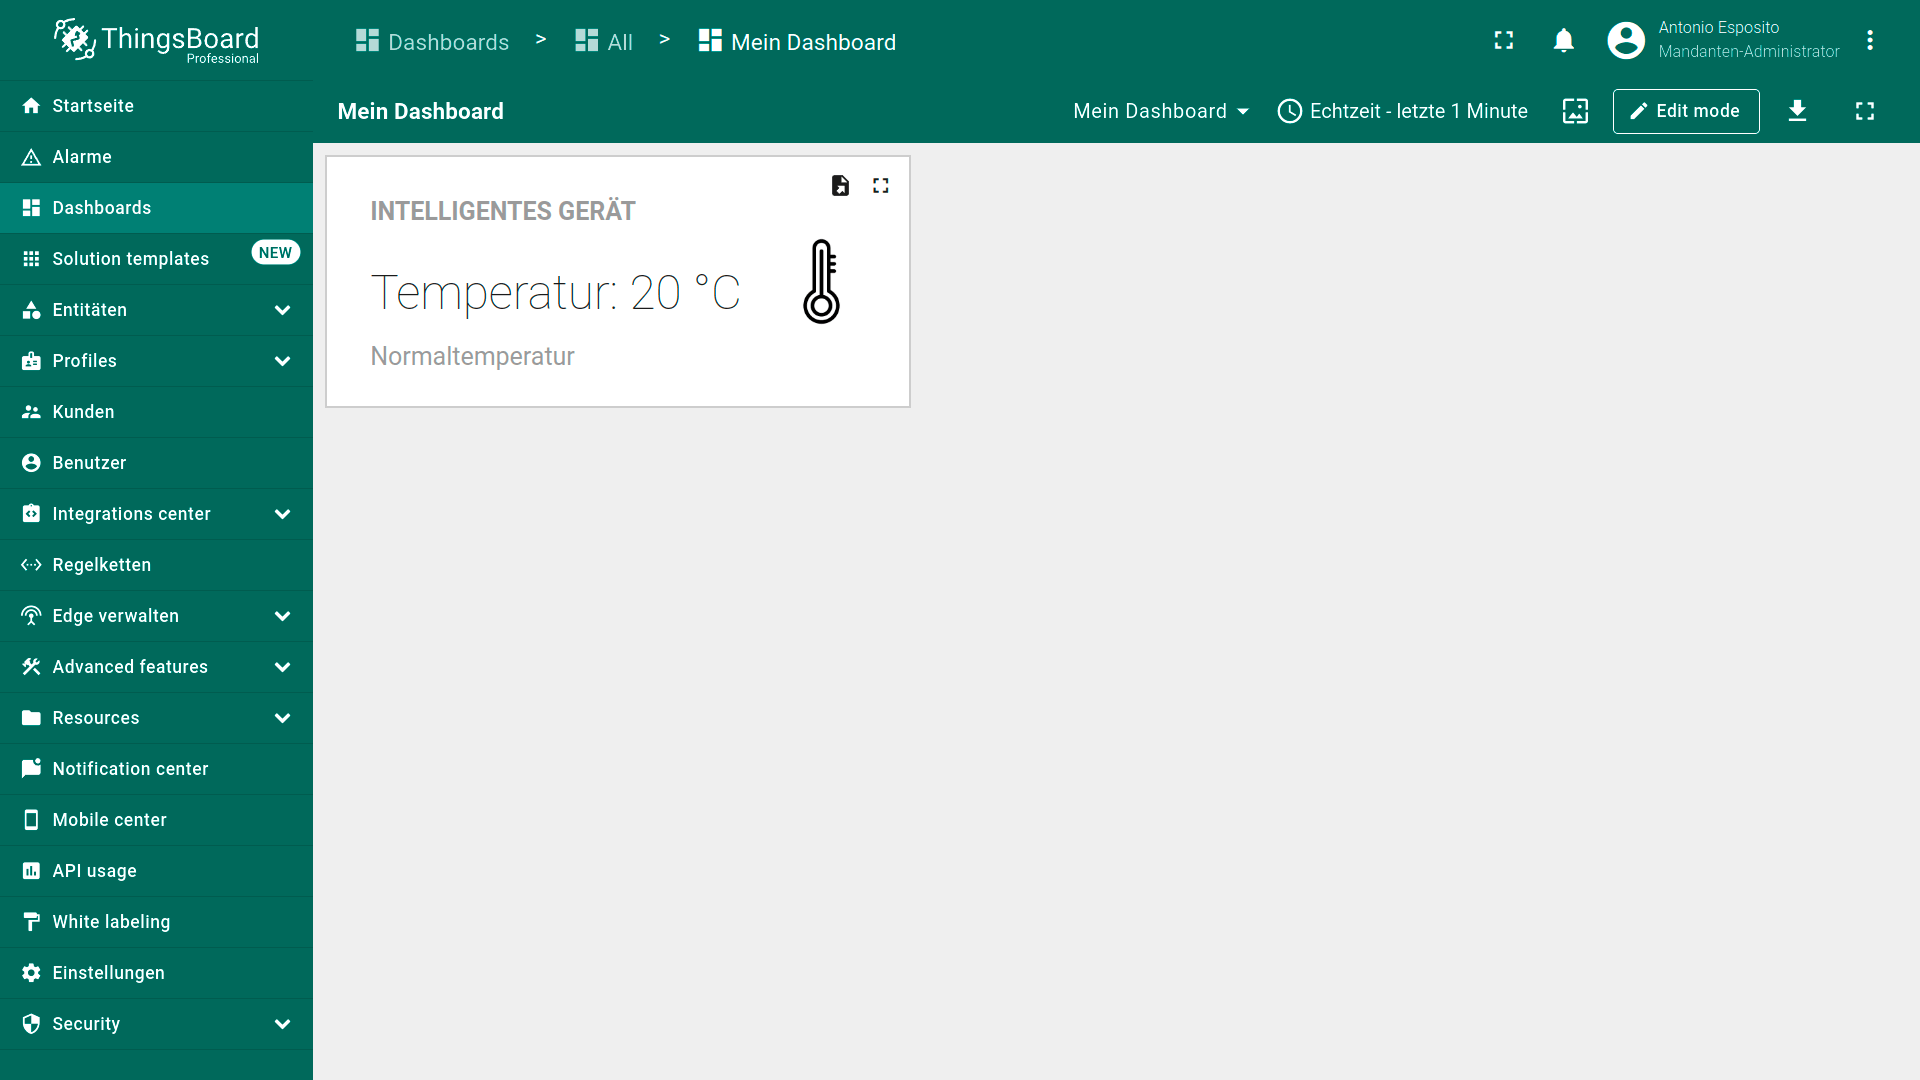
| custom.devices.smart-device.name | Smart Device | Intelligentes Gerät | Device name |
| custom.my-dashboard.title | My Dashboard | Mein Dashboard | Dashboard title |
| custom.my-widget.telemetry-key.temperature | Temperature | Temperatur | Temperature telemetry key name |
| custom.my-widget.telemetry-value.low-temperature | Low temperature | Niedrigtemperatur | Low temperature value |
| custom.my-widget.telemetry-value.high-temperature | High temperature | Hochtemperatur | High temperature value |
| custom.my-widget.telemetry-value.normal-temperature | Normal temperature | Normaltemperatur | Normal temperature value |

Add the required custom translation keys to the translation map of the selected language.
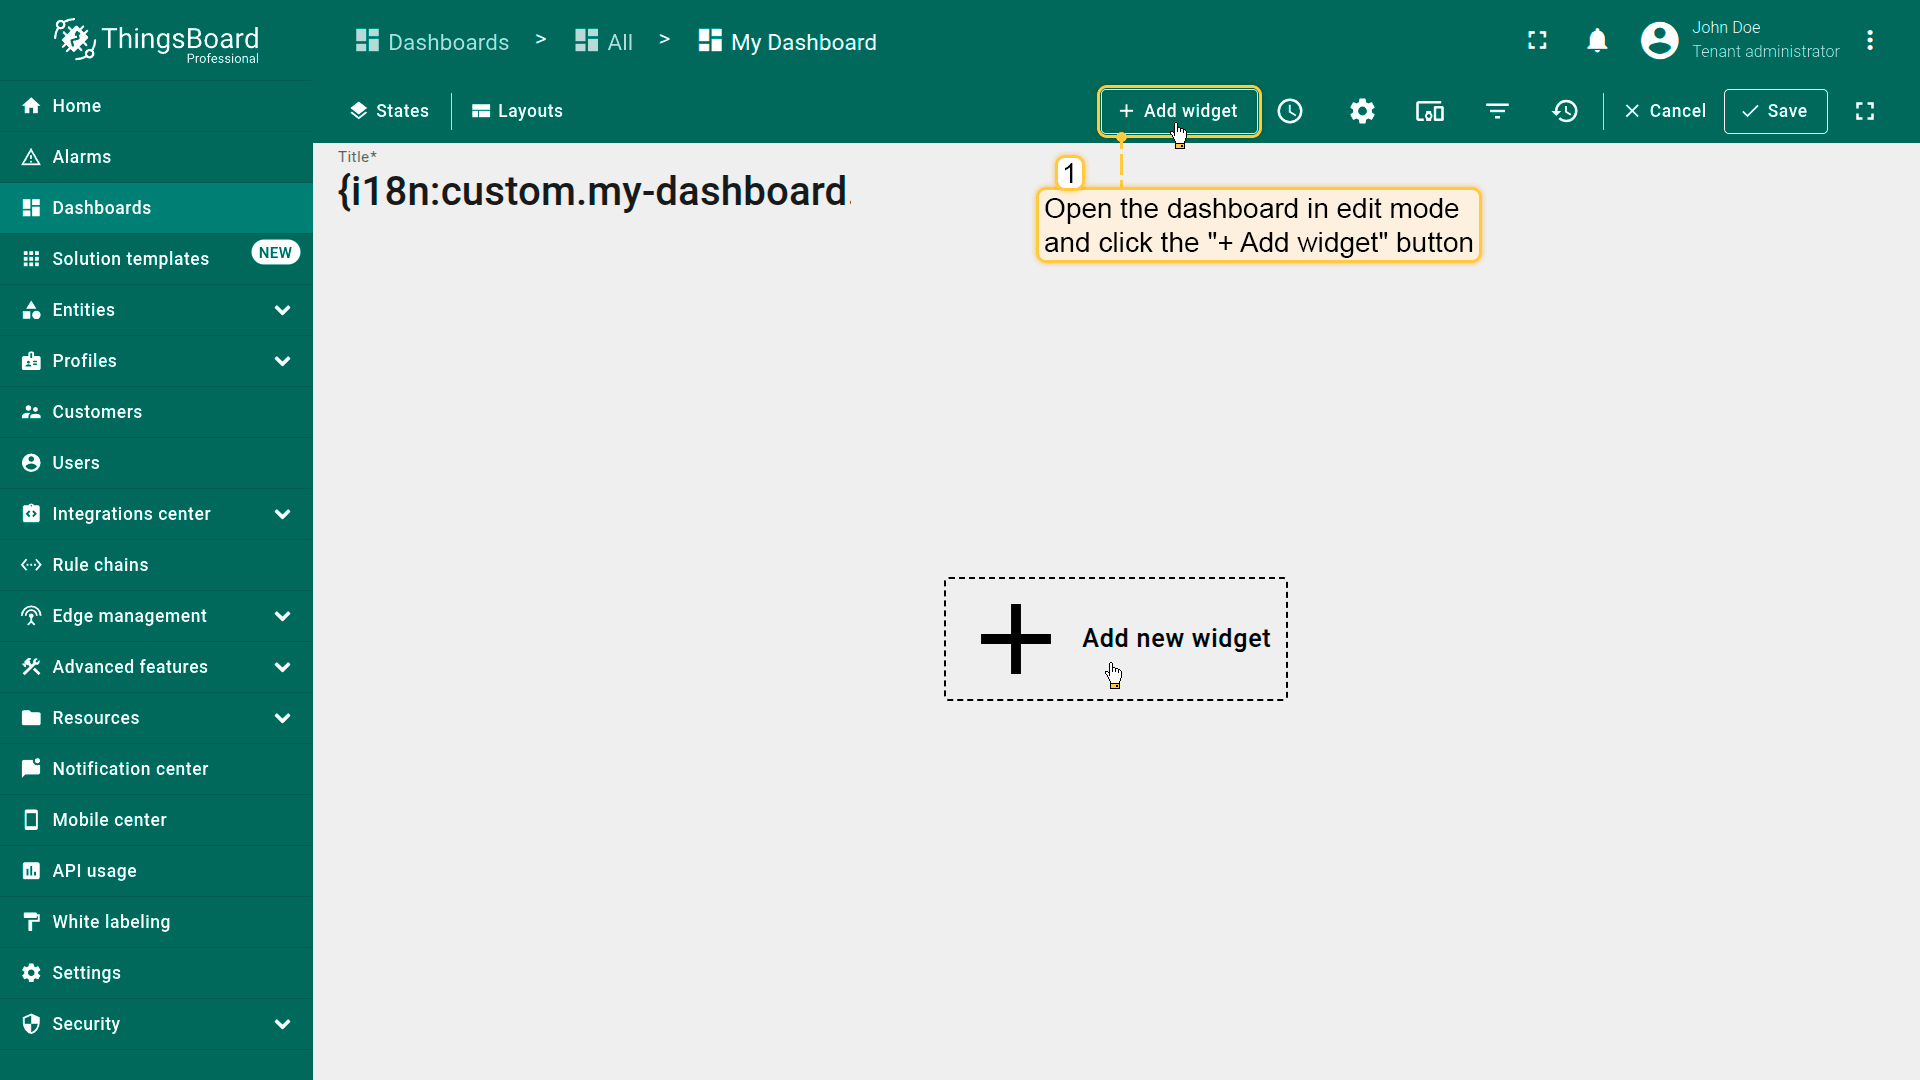
2. Add a “HTML Value Card” widget:
- Open the dashboard in edit mode and click the “Add widget” button.
- Select the “HTML Value Card” widget from the “Cards” widgets bundle.
- Specify the device that sends temperature readings as the data source, along with the corresponding telemetry key.
- Go to the “Appearance” tab. Use your own code or copy the one provided below and paste it into the “HTML” field.
The code syntax requires placing the i18n key in quotation marks.
Example of using custom translation in the “HTML Value Card” widget:
- Click “Add”.
- Save the dashboard.
Open the dashboard in edit mode and click the “Add widget” button.
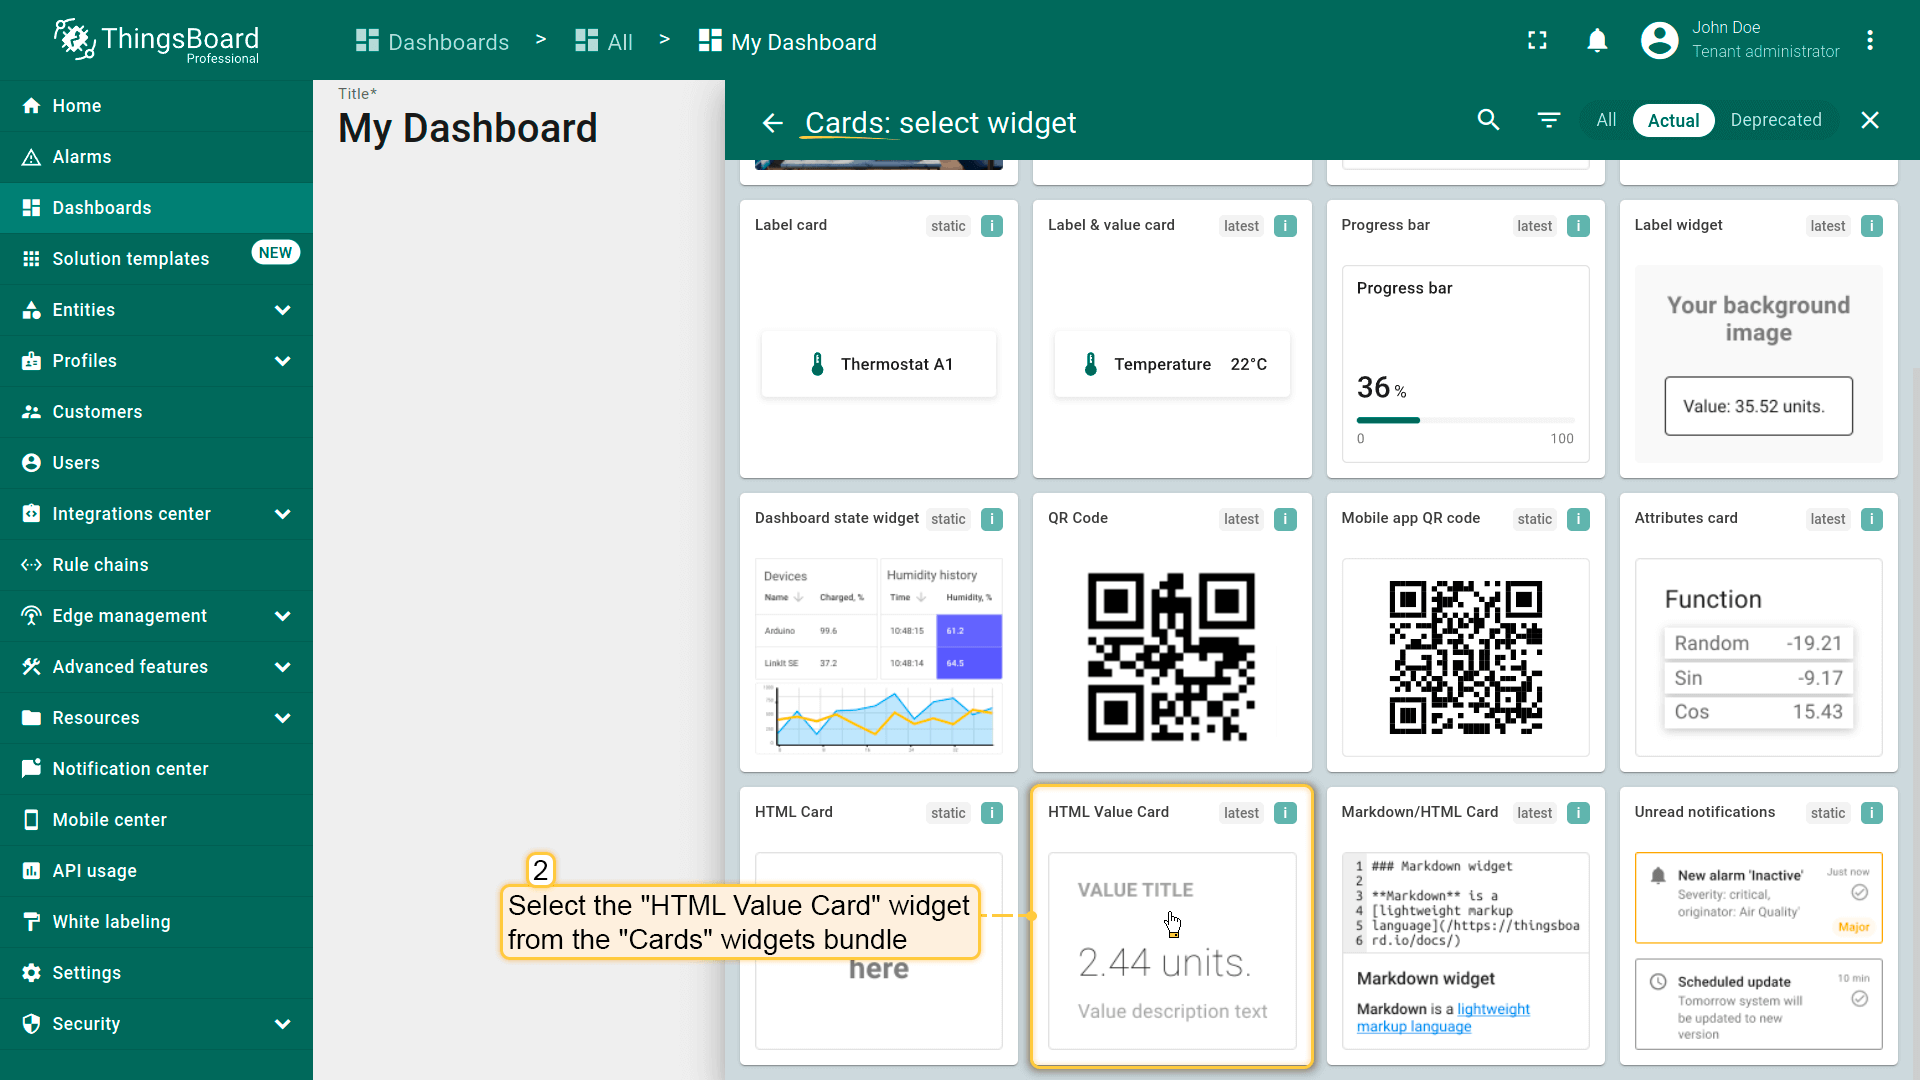
Select the “HTML Value Card” widget from the “Cards” widgets bundle.
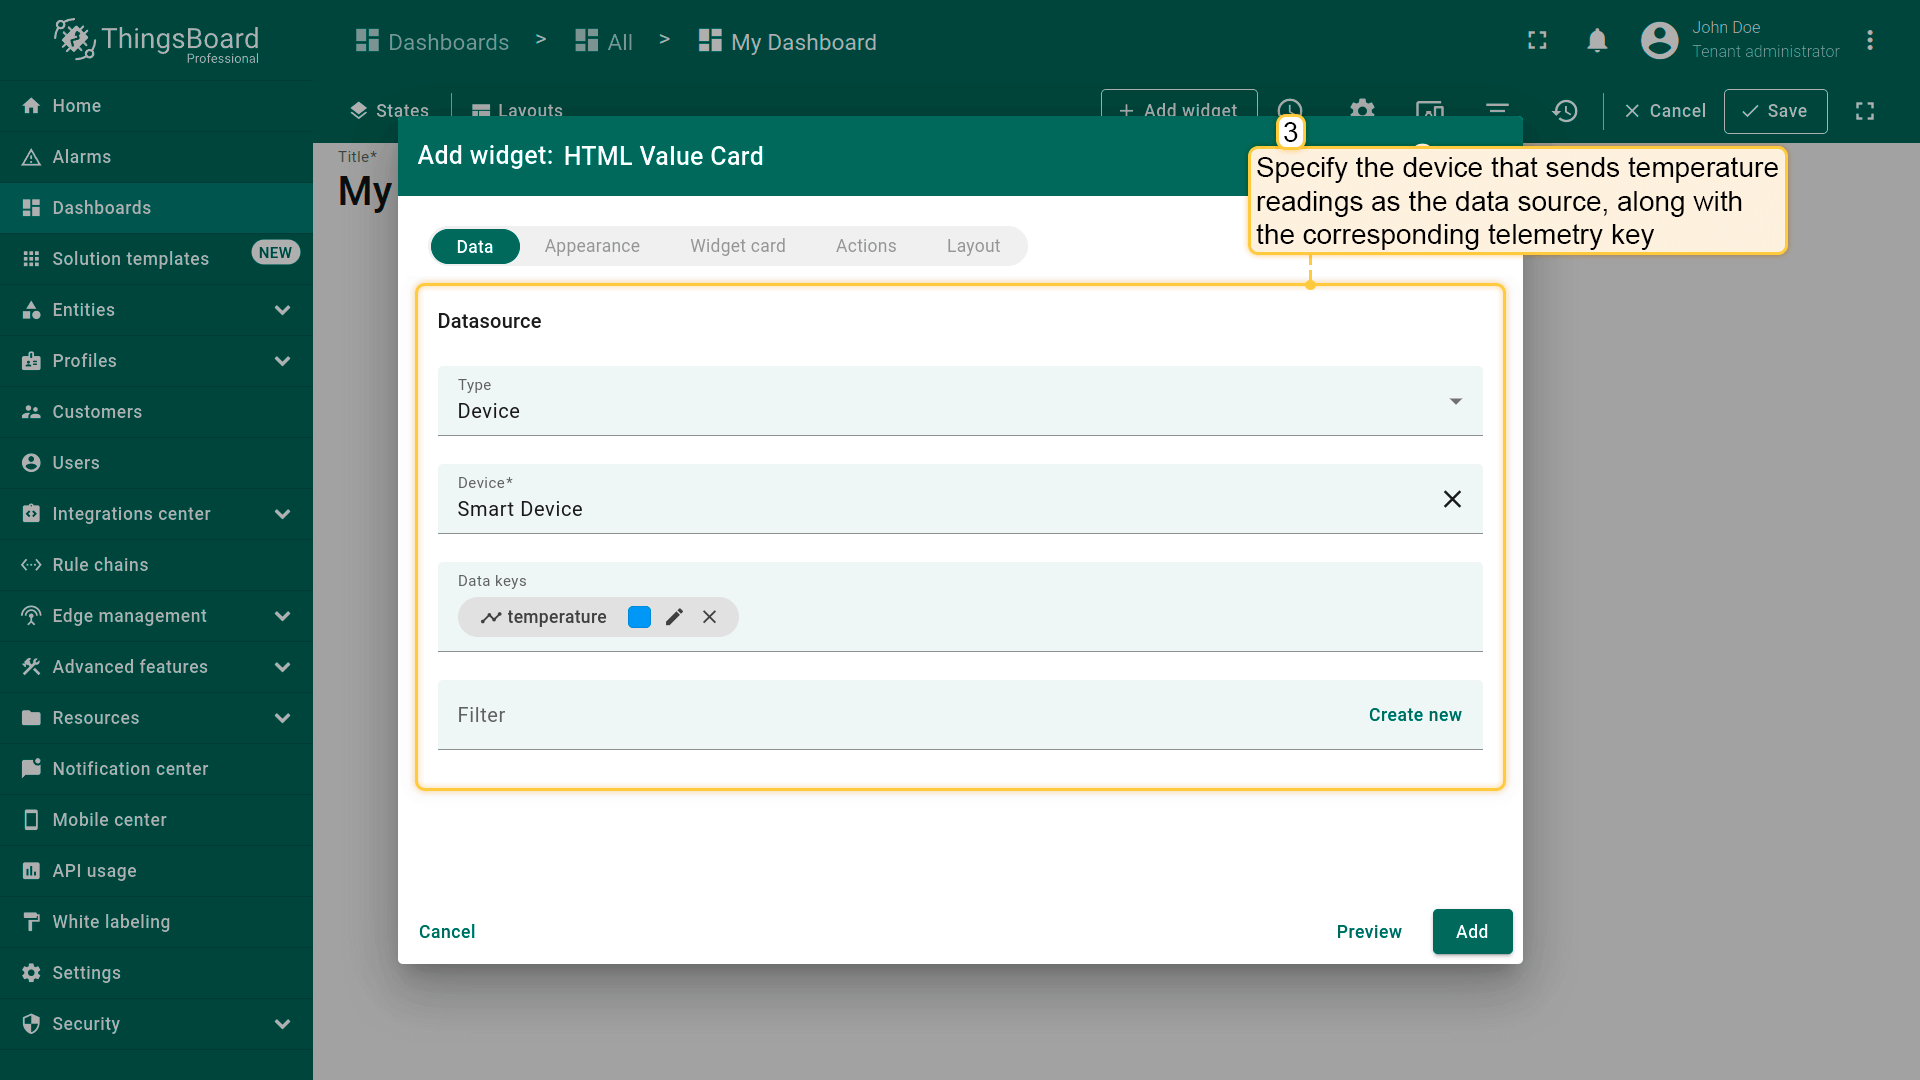
Specify the device that sends temperature readings as the data source, along with the corresponding telemetry key.
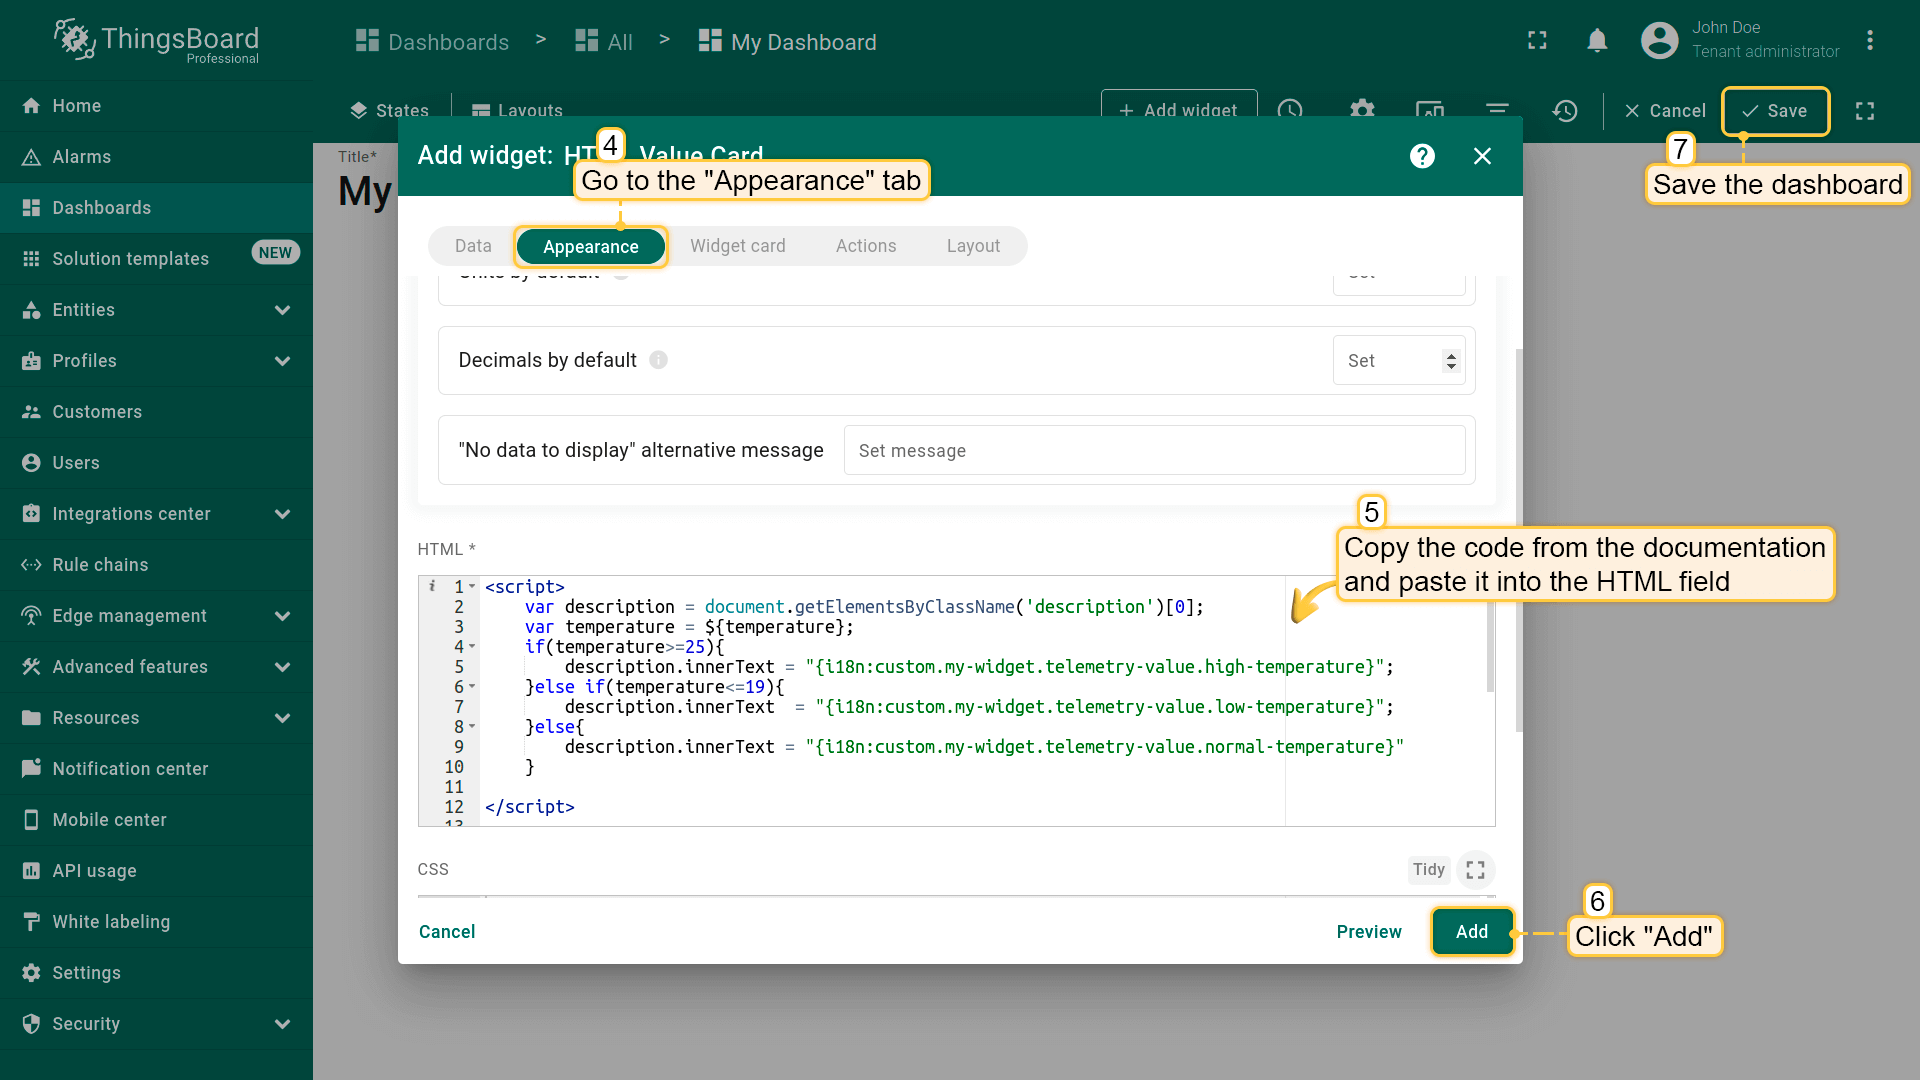
Go to the “Appearance” tab. Use your own code or copy the one provided below and paste it into the “HTML” field and click “Add”. Then, save the dashboard.
Now check the result. The value displayed in the HTML card will dynamically update based on the incoming telemetry data.
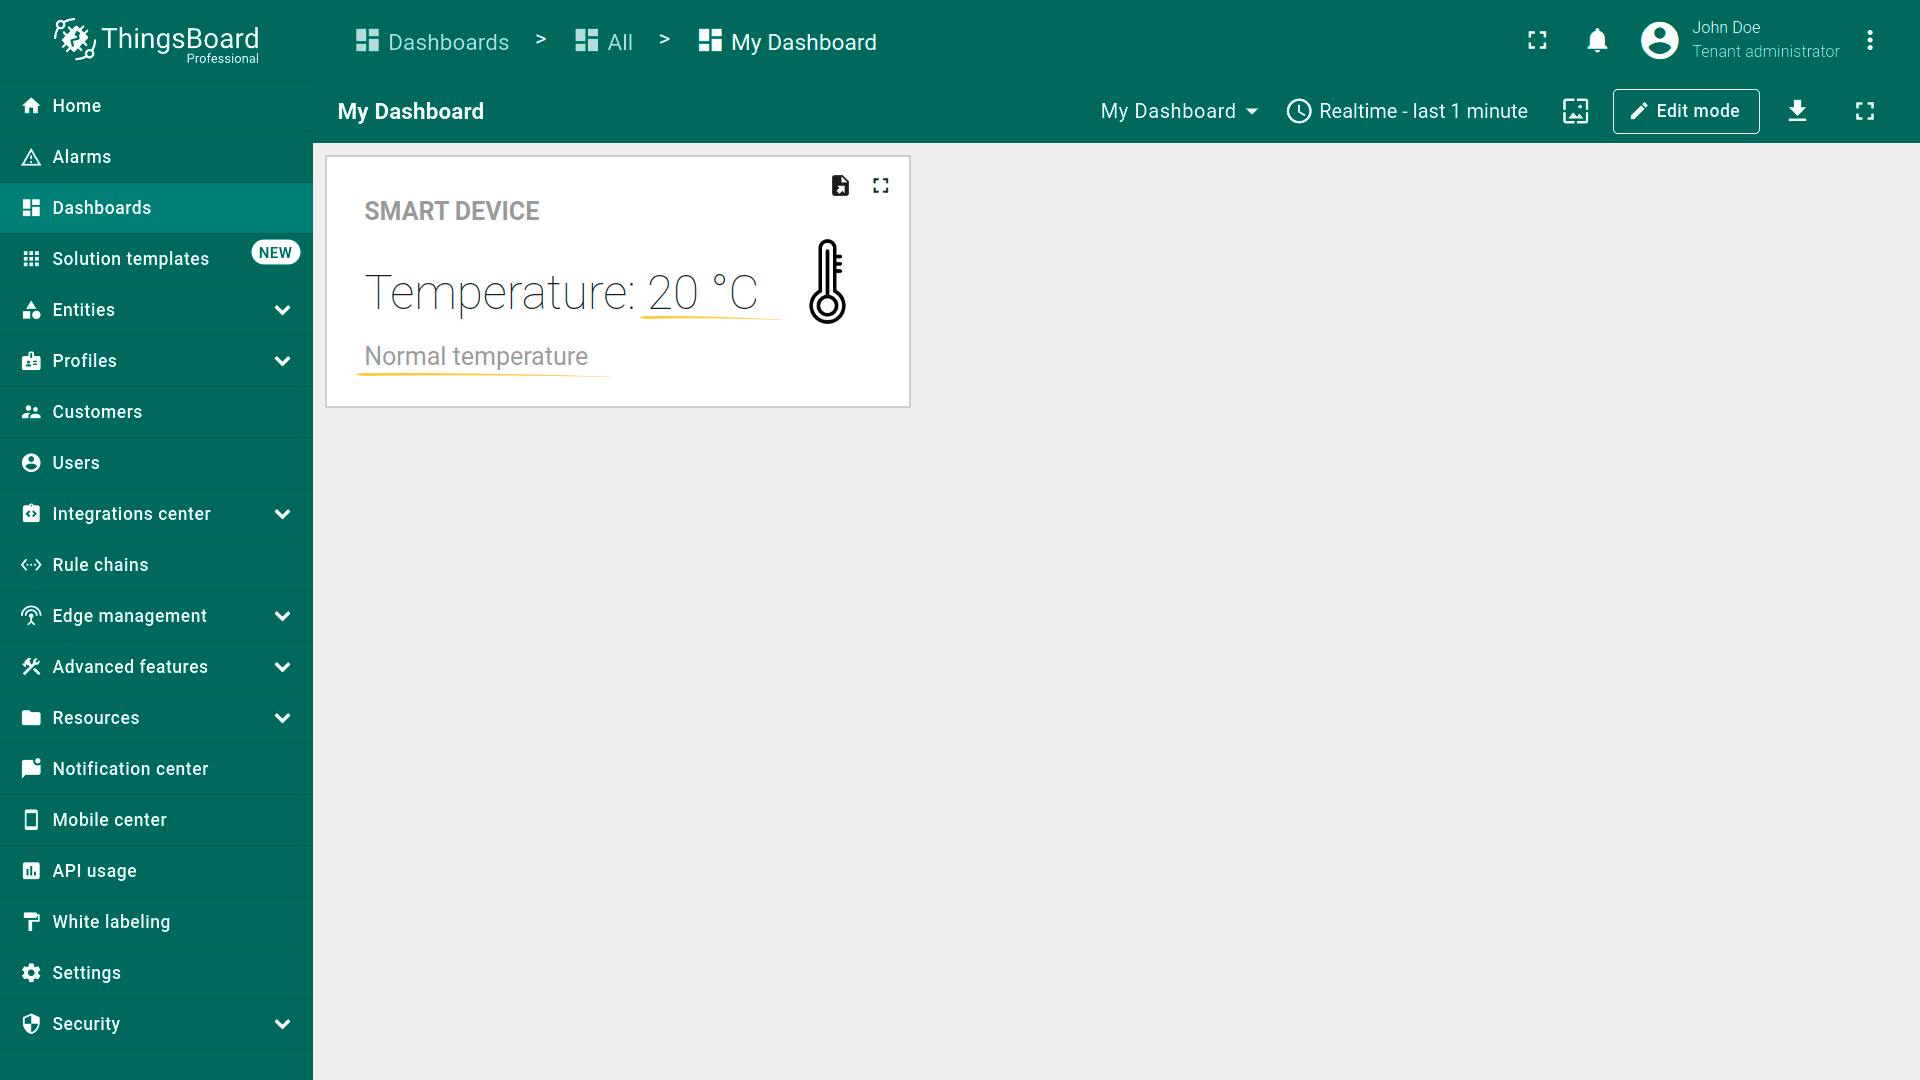
Now check the result. The value displayed in the HTML card will dynamically update based on the incoming telemetry data.
For a user whose interface language is set to German, the widget will also be displayed in German.
Click the “Add widget” button.
Using custom translation in the data post-processing function
Custom translations can be used in data post-processing functions. Let's take a look at one such example.
1. Add translation keys to the translation map of the selected language (in my case, German).
| Term key | Value in English | Value in German | Key description |
|---|---|---|---|
| custom.my-dashboard.title | My Dashboard | Mein Dashboard | Dashboard title |
| custom.my-widget.telemetry-key.temperature | Temperature | Temperatur | Temperature telemetry key name |
| custom.my-widget.telemetry-value.range | Value range | Wertebereich | Temperature range |
| custom.my-widget.telemetry-value.low-temperature | Low temperature | Niedrigtemperatur | Low temperature value |
| custom.my-widget.telemetry-value.high-temperature | High temperature | Hochtemperatur | High temperature value |
| custom.my-widget.telemetry-value.normal-temperature | Normal temperature | Normaltemperatur | Normal temperature value |
Add the required custom translation keys to the translation map of the selected language.
2. Add a “HTML Value Card” widget:
- Open the dashboard in edit mode and click the “Add widget” button.
- Select the “Entities table” widget from the “Tables” widgets bundle.
- Specify the device that sends temperature readings as the data source.
- In the “Columns” section, the name column (which displays the device name) is already added by default. Now, add two more columns:
- For the first one, add the telemetry key “temperature” to display the temperature value in degrees Celsius.
- For the second one, also use the telemetry key “temperature”, but configure this column to show the temperature range instead of the raw value.
For both column labels, apply the appropriate i18n translation keys wrapped in curly braces:
- first: {i18n:custom.my-widget.telemetry-key.temperature}
- second: {i18n:custom.my-widget.telemetry-value.range}
- first: {i18n:custom.my-widget.telemetry-key.temperature}
Open the dashboard in edit mode and click the “Add widget” button.
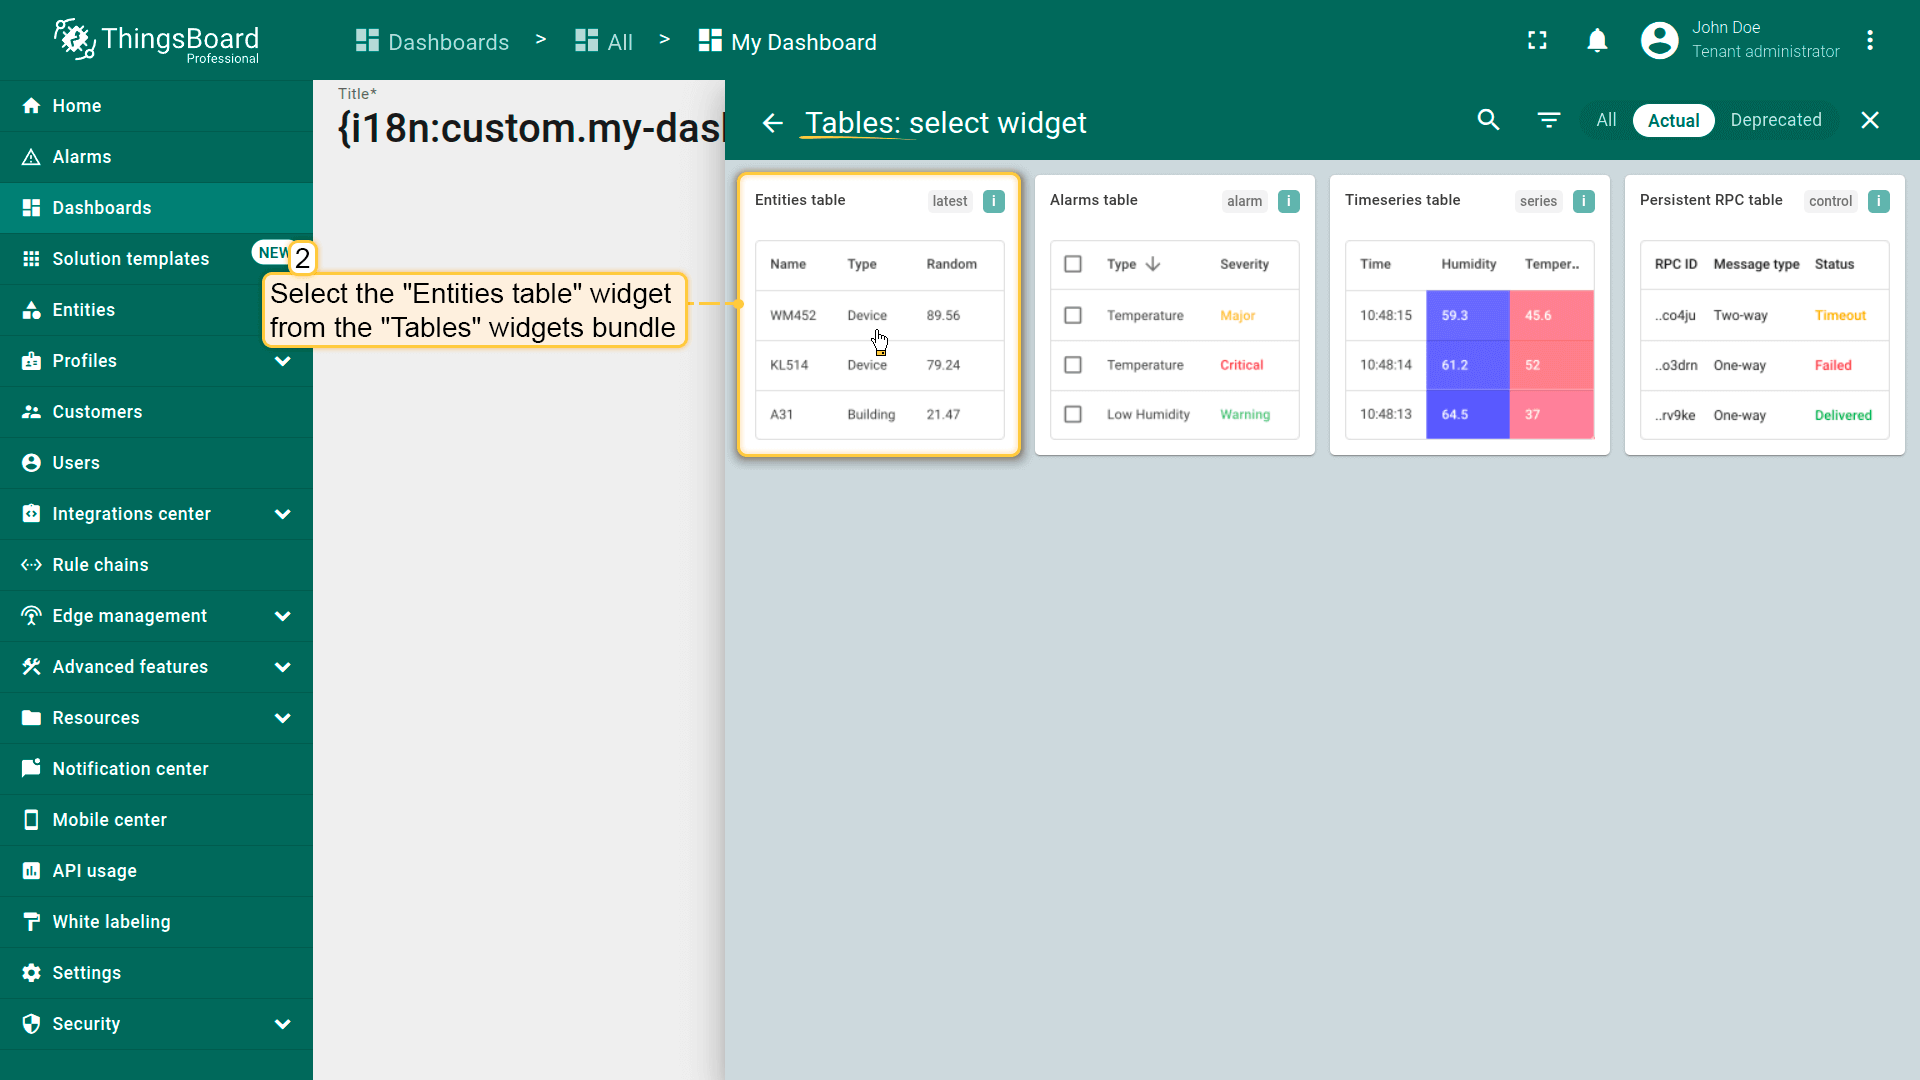
Select the “Entities table” widget from the “Tables” widgets bundle.
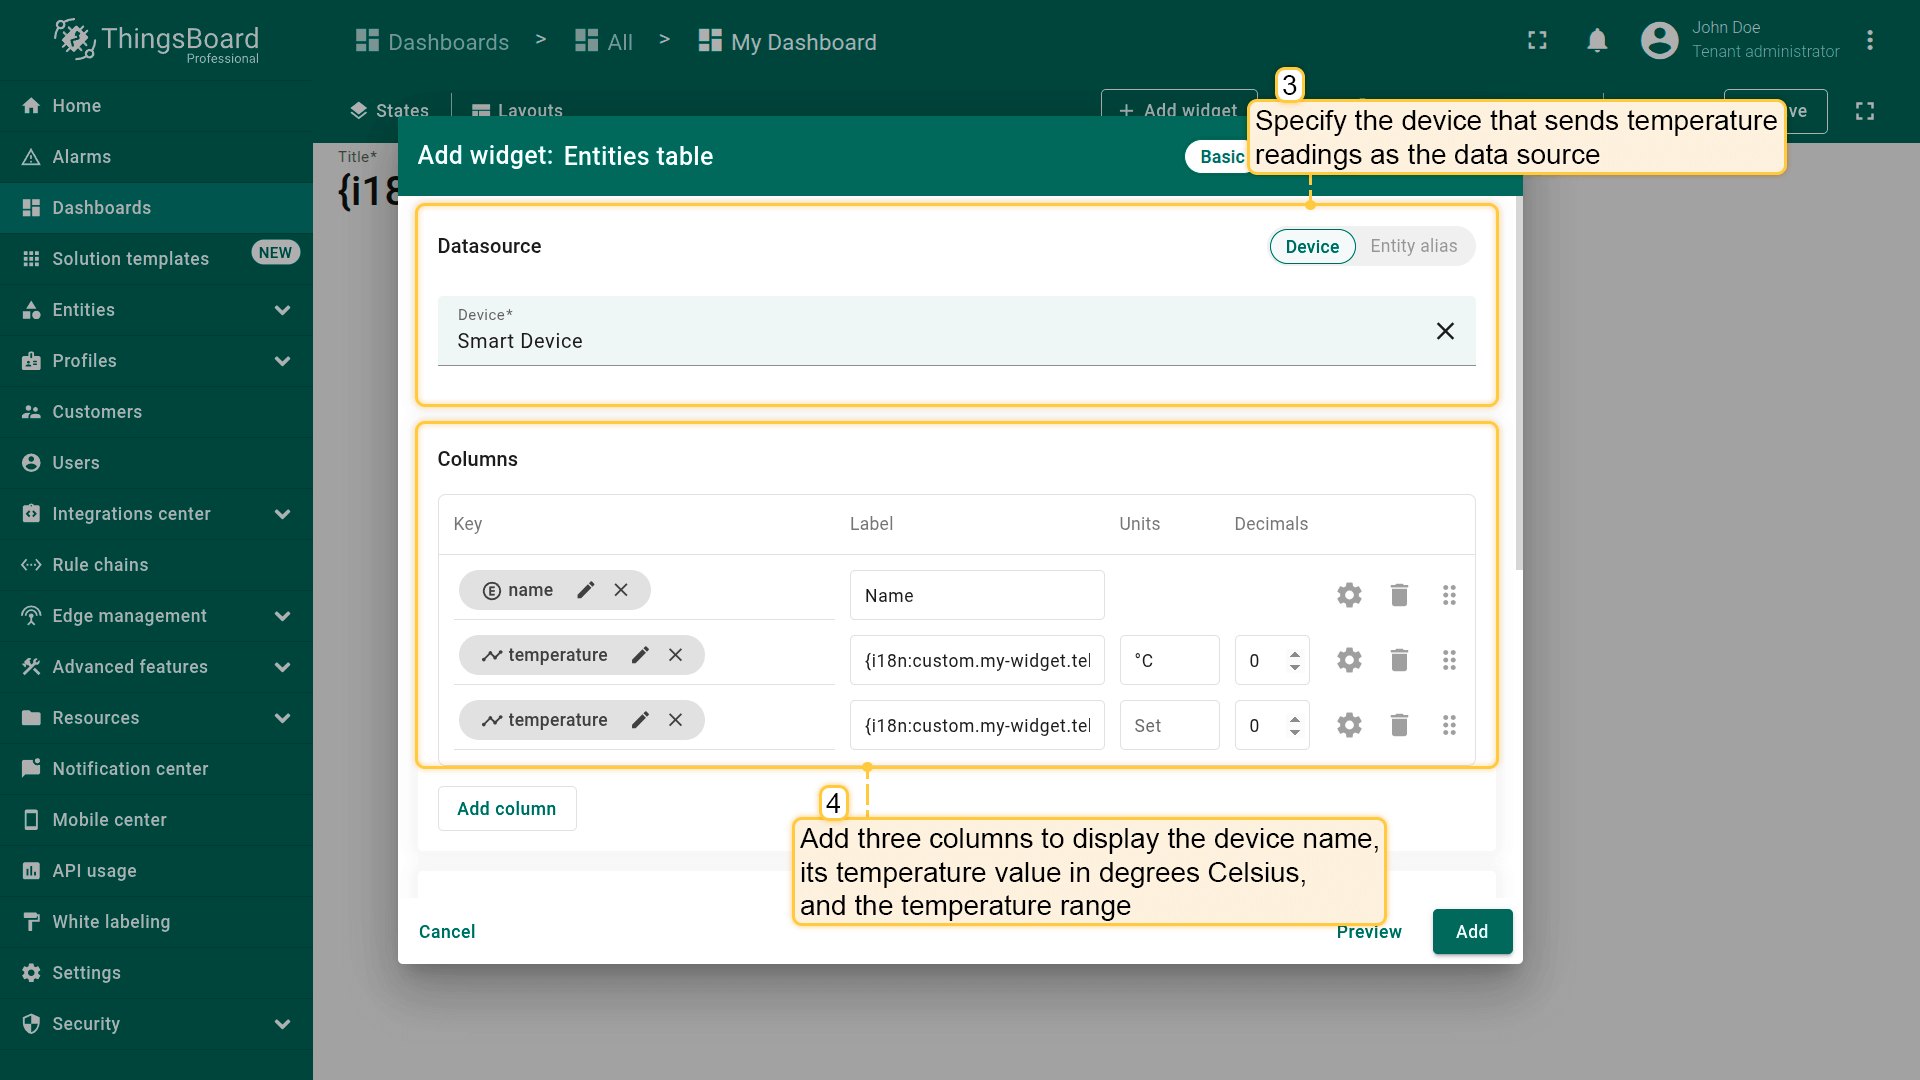
Specify the device that sends temperature readings as the data source. Then, add three columns to display the device name, its temperature value in degrees Celsius, and the temperature range.
- Open the configuration for the key of the last column.
- Use the data post-processing function provided below to display the temperature range value retrieved from a custom translation key. Then, click Save.
The code syntax requires placing the i18n key in quotation marks.
Example of using custom translation in the data post-processing function:
1
2
3
4
5
6
7
if(value>=25){
    return "{i18n:custom.my-widget.telemetry-value.high-temperature}";
}else if(value<=19){
    return "{i18n:custom.my-widget.telemetry-value.low-temperature}";
}else{
    return "{i18n:custom.my-widget.telemetry-value.normal-temperature}";
}
- Click “Add” to add widget on the dashboard. Then, save dashboard.

Open the configuration for the key of the last column.
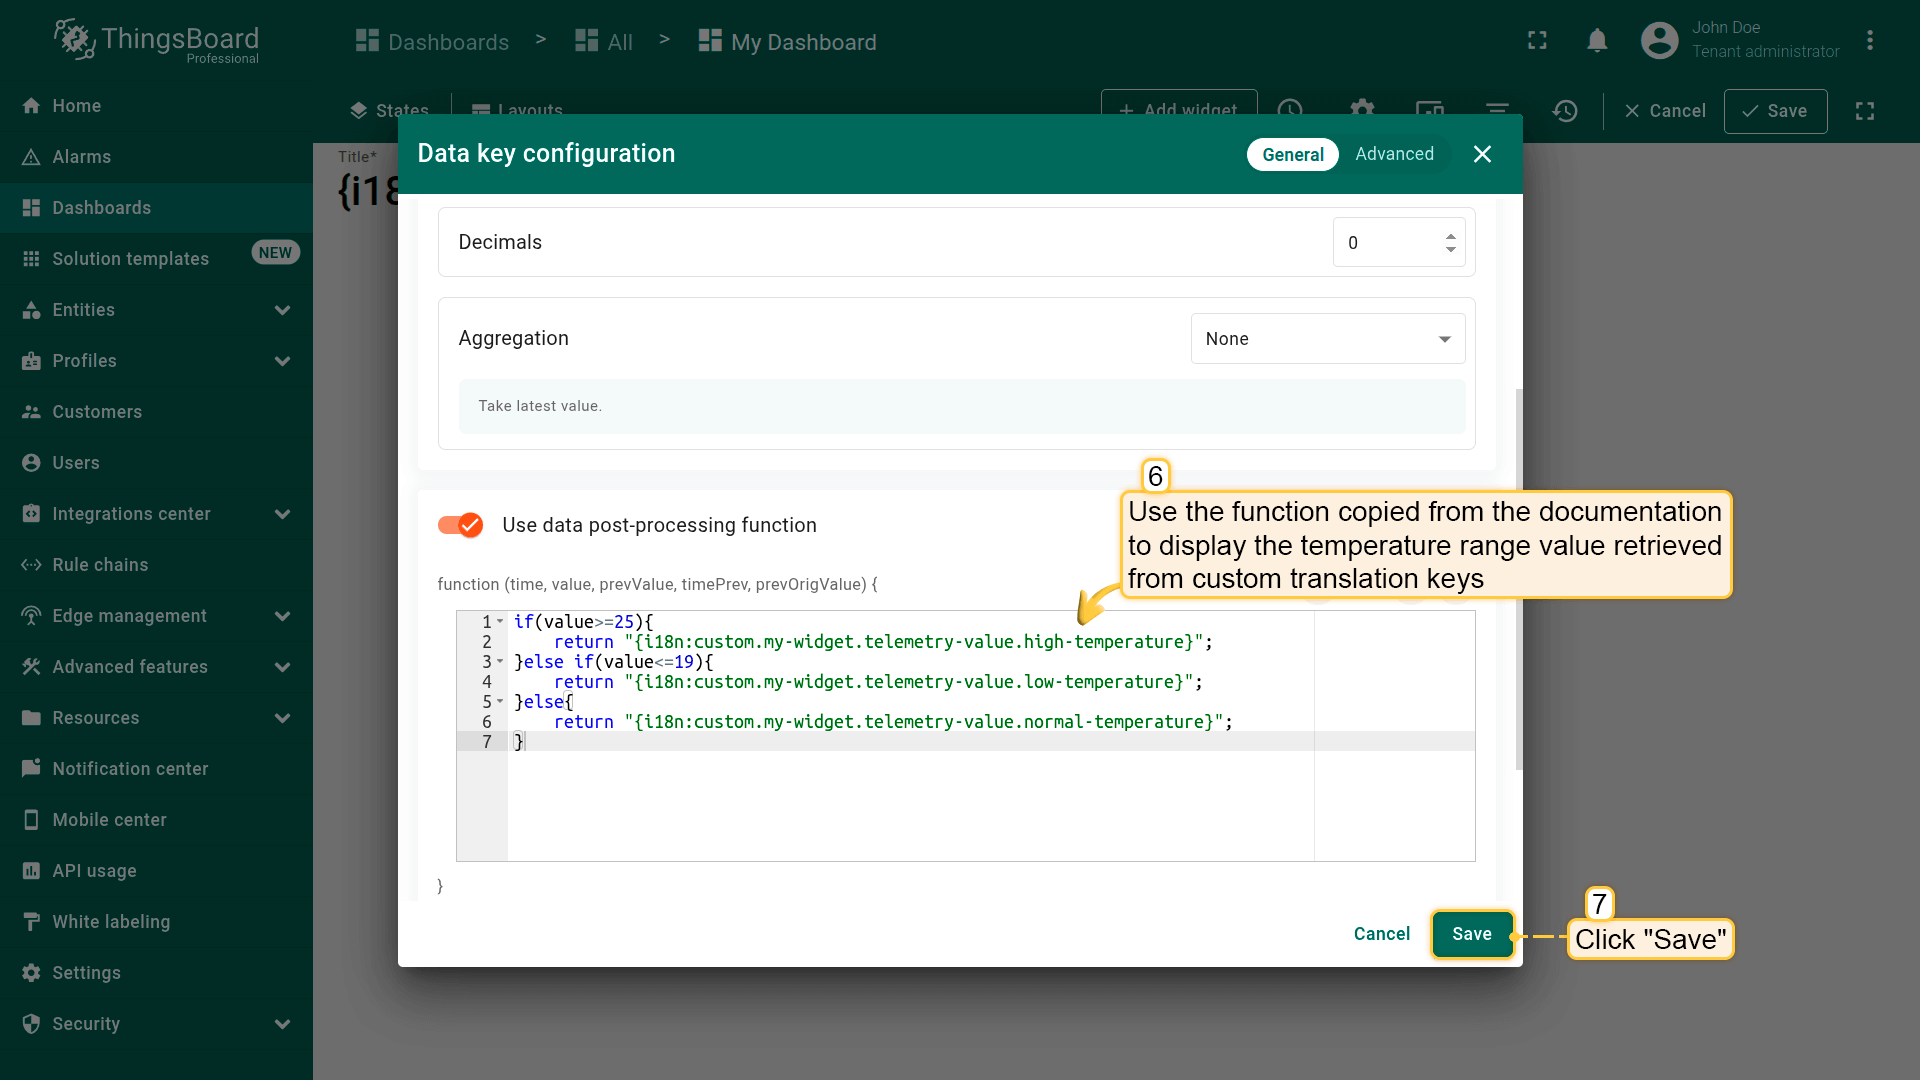
Use the data post-processing function provided below to display the temperature range value retrieved from a custom translation key. Then, click “Save”.

Click “Add” to add widget on the dashboard. Then, save dashboard.
Check the result. The value in the column responsible for temperature readings will change depending on the value of the incoming telemetry.
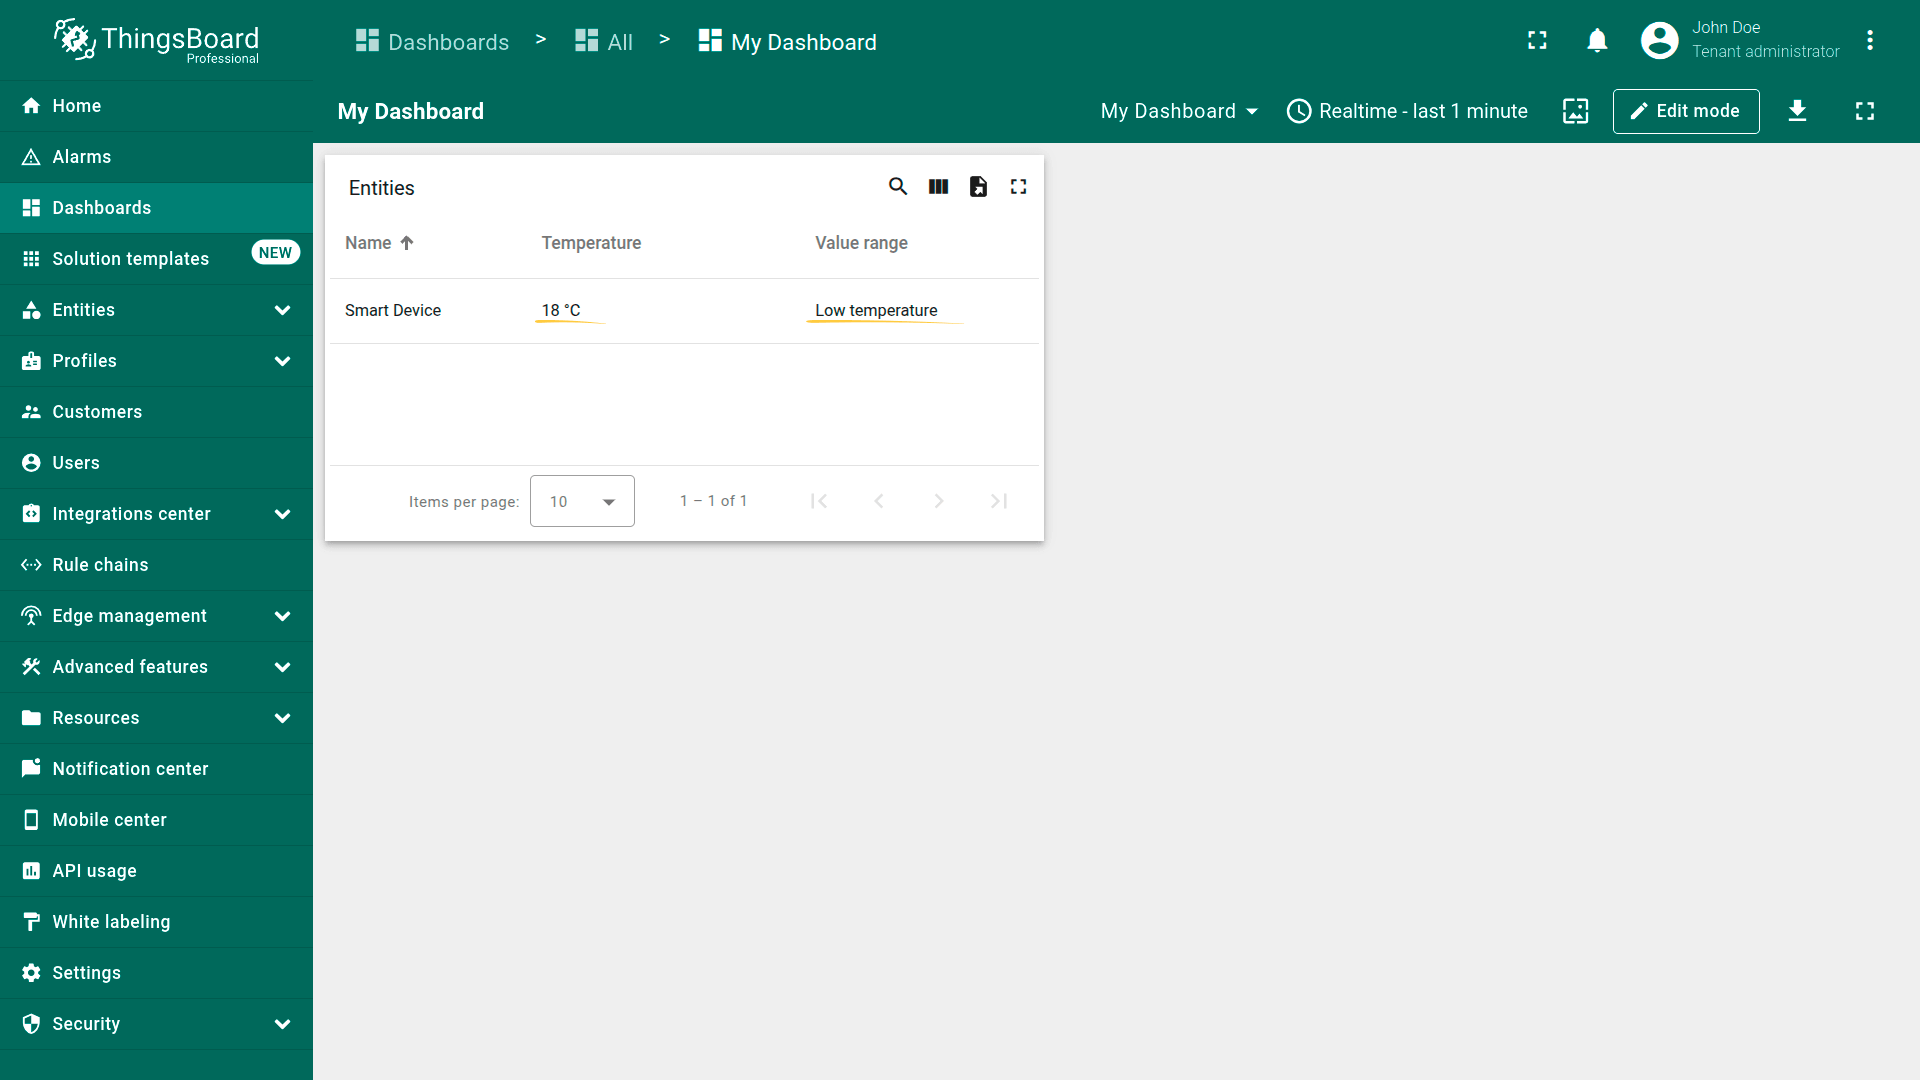
Check the result. If the temperature value is less than or equal to 19 degrees, the “Temperature range” column will display “Low temperature”.

If the temperature value is between 19 and 25 degrees, the “Temperature range” column will display “Normal temperature”.
Delete language
If at any time you need to delete a language or reset its translations to the default version, simply click the trash bin icon next to the corresponding language and confirm the deletion in the dialog window.
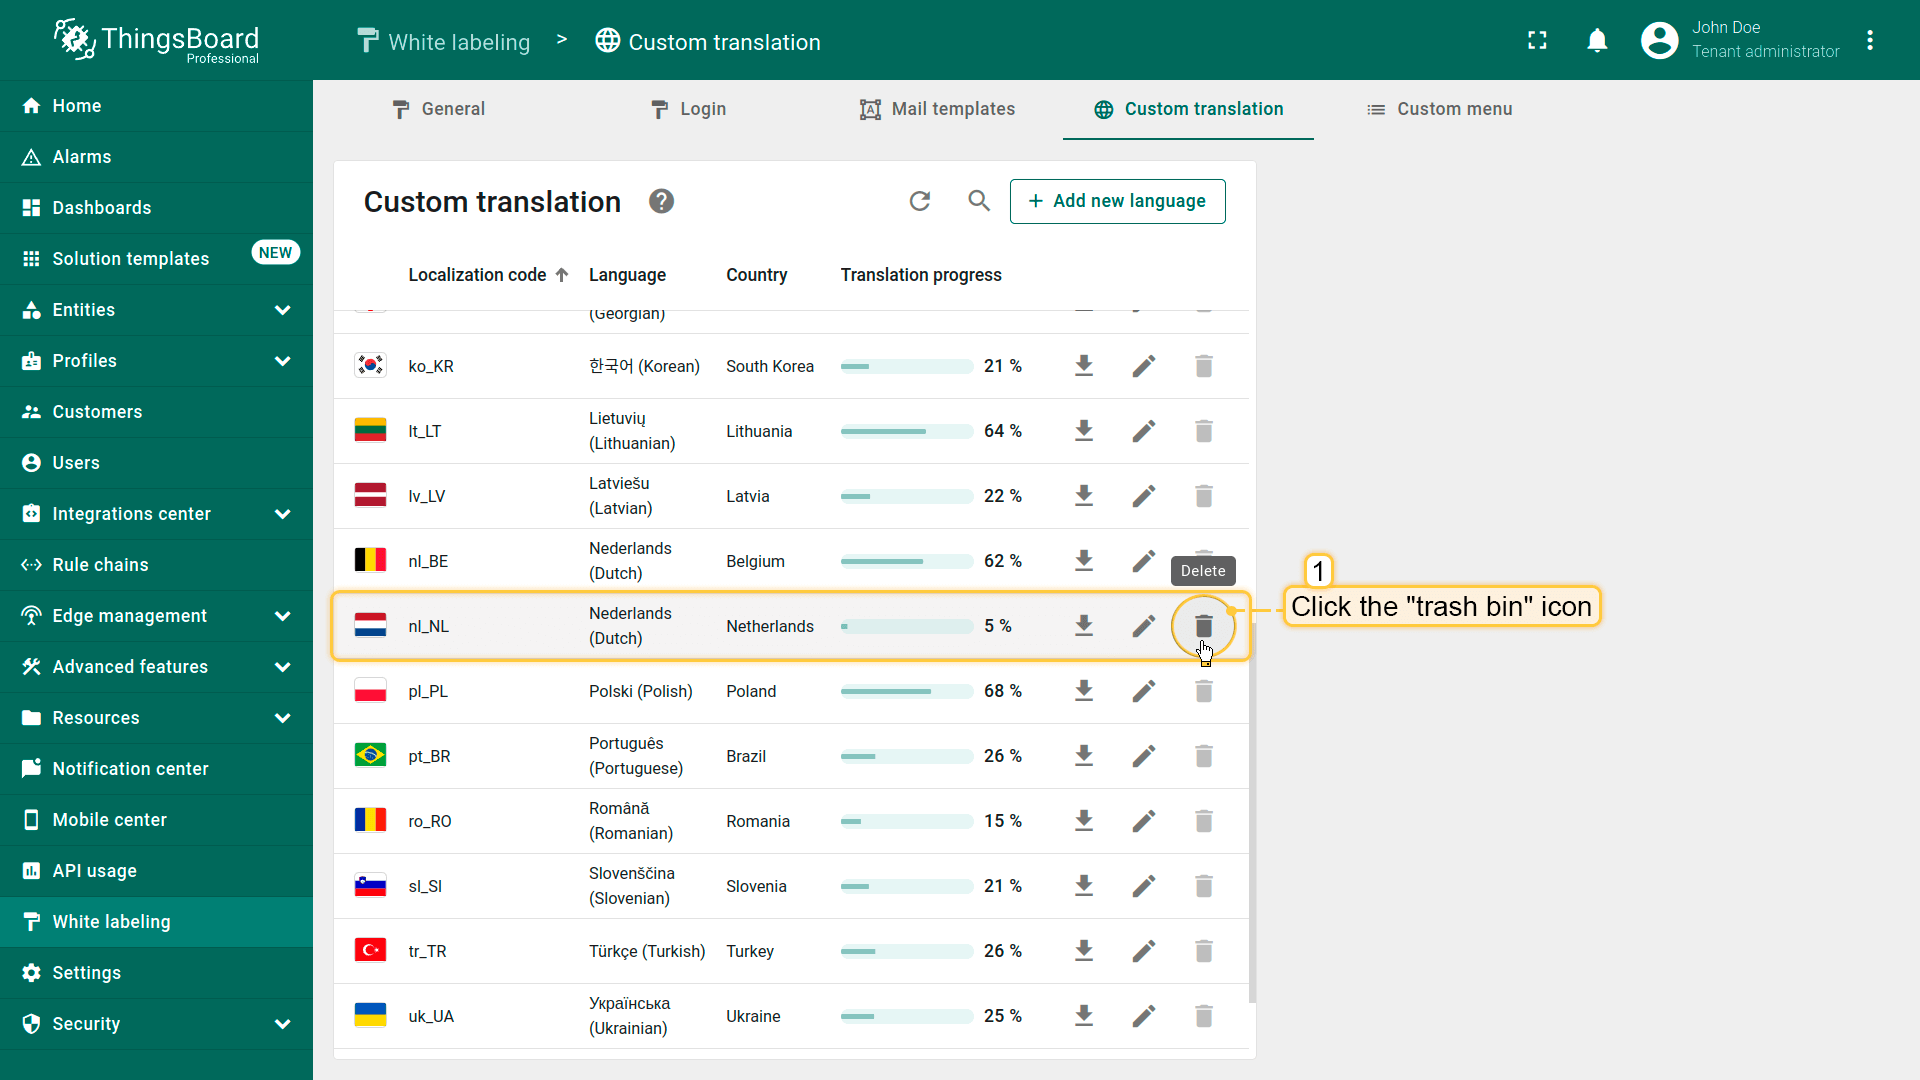
Tto delete a language or reset its translations to the default version, simply click the trash bin icon next to the corresponding language.
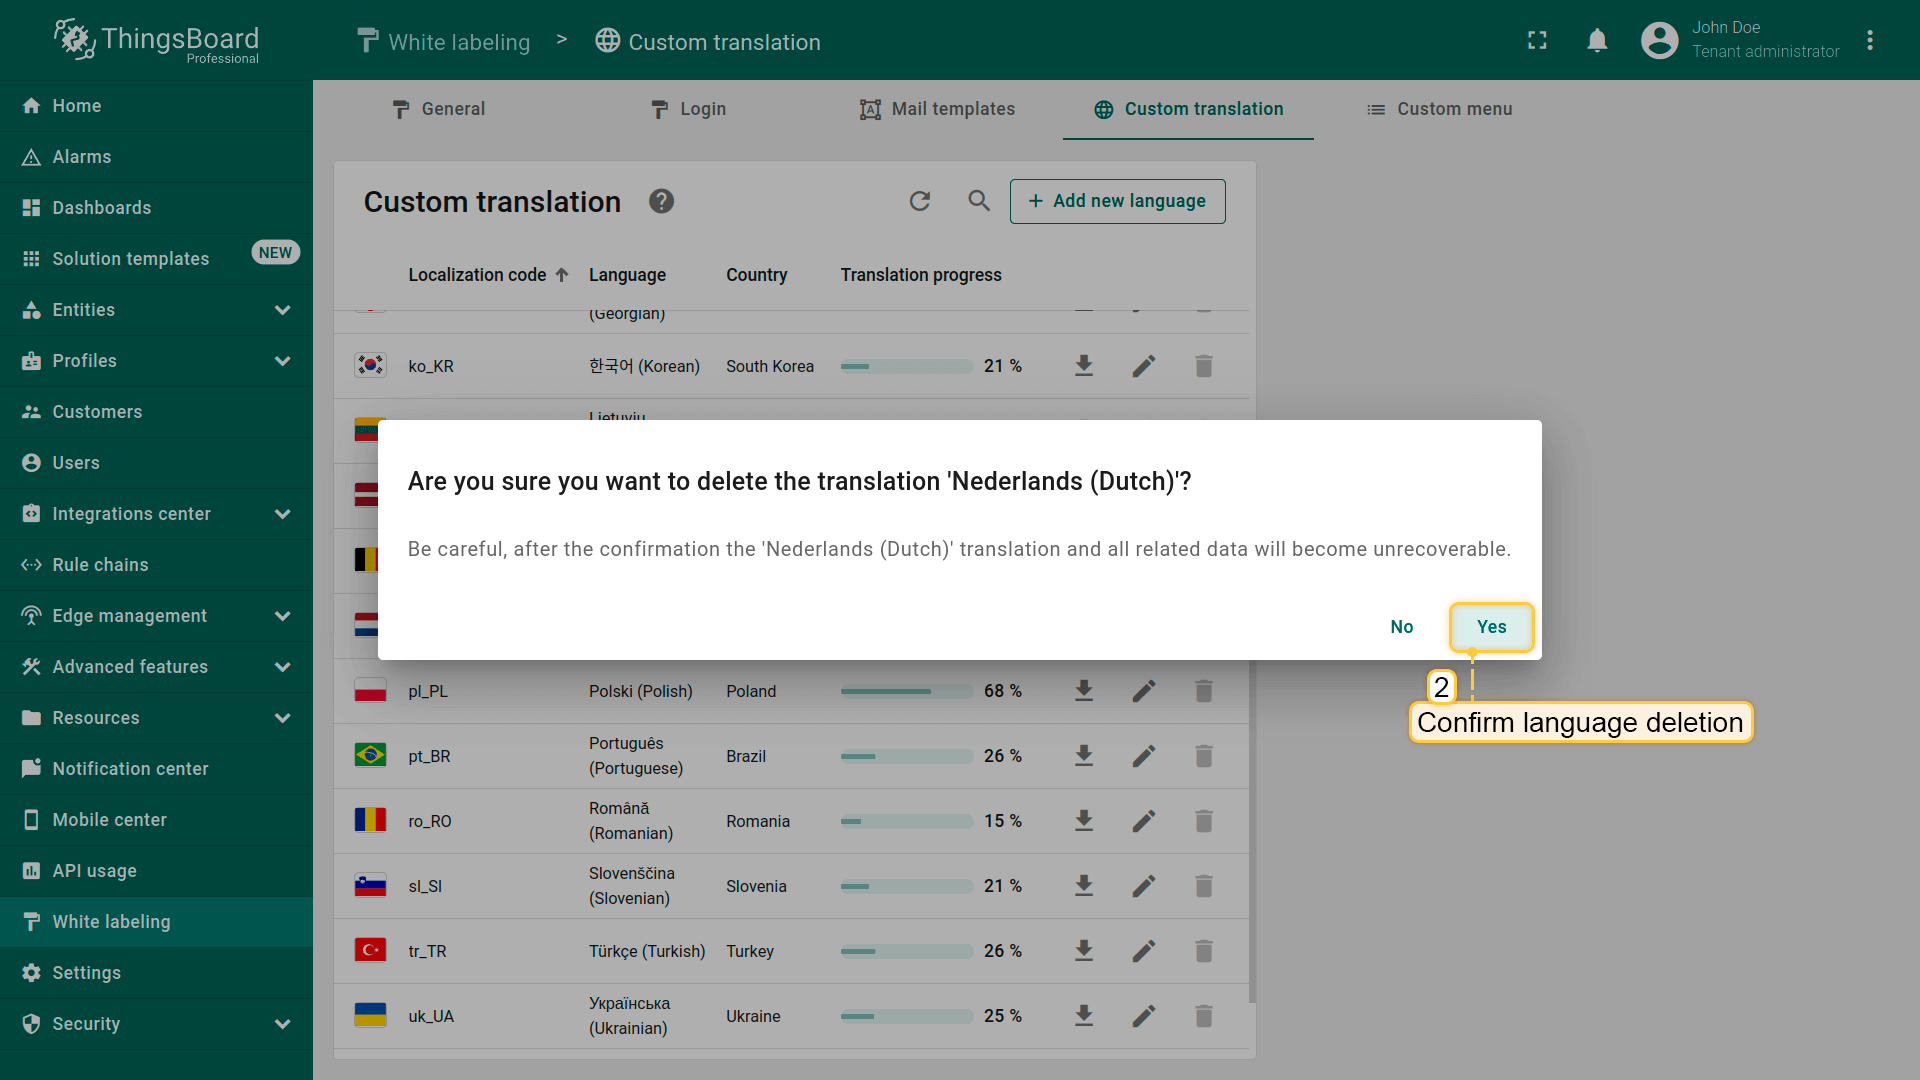
Confirm the deletion in the dialog window.
Next steps
-
Getting started guides - These guides provide quick overview of main ThingsBoard features. Designed to be completed in 15-30 minutes.
-
Connect your device - Learn how to connect devices based on your connectivity technology or solution.
-
Data visualization - These guides contain instructions on how to configure complex ThingsBoard dashboards.
-
Data processing & actions - Learn how to use ThingsBoard Rule Engine.
-
IoT Data analytics - Learn how to use rule engine to perform basic analytics tasks.