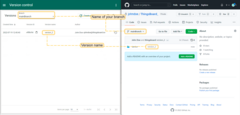
| Available since TB Version 3.4 |
ThingsBoard Version control service provides the ability to export and restore ThingsBoard Entities using Git. As a Tenant administrator, you can configure access to the Git repository using UI or REST API. As a platform user, you can export single or multiple ThingsBoard Entities, browse version history and restore entities to the specific version.
This feature improves user experience when multiple engineers design the same Rule Chain or Dashboard and simplifies CI/CD. It also allows you to easily clone the solution between tenants or platform instances.
Architecture
Entity External ID
Every ThingsBoard entity has the “id” field, which is the unique identifier of the entity in scope of a particular ThingsBoard environment. Every exportable ThingsBoard entity contains new filed “externalId”. The field is used to identify the same Entity in case of import and export between multiple environments. Both “id” and “externalId” fields is of type UUID.
The “externalId” is also used to automatically substitute entity ids in the rule chains (rule nodes) and dashboards (aliases and widget actions). So, if you decide to import rule chain that is referencing some devices or assets, make sure you have exported/imported the corresponding devices or assets as well.
Exportable Entities and settings
Initial release of this feature supports following entities: Device, Asset, Entity View, Customer, Dashboard, Widget Bundle, Rule Chain, Entity group, Role, Converter and Integration.
We intentionally omit support of the User entity, since user email is unique in scope of the platform instance. It seems wrong to export user emails and credentials to Git.
While exporting the entity, we store the JSON representation of the entity in Git. It is also possible to export entity attributes, relations and credentials (device only).
Repository structure
When you first export the entity to Git, the entity “id” is used to name the file inside git repository. Then, when you import entities from Git to ThingsBoard, the “id” from the file name becomes “externalId” of the entity. The “externalId” is unique in scope of Tenant. So, you may import/export entities between tenants of the same platform instance, or between different instances. Any time you perform export and import operations, the “externalId” is used to find the right entity to update. See example below.
Let’s assume you have a development ThingsBoard instance and exported a single dashboard with the name “Dashboard 1” and id “4864b750-da7d-11ec-a496-97fa2815d2fe”. Then the repository will have a single file with the following full name and path:
1
dashboard/4864b750-da7d-11ec-a496-97fa2815d2fe.json
Let’s assume you have imported the dashboard “D1” to the production ThingsBoard instance. The “externalId” filed is set when you first import the entity to the new ThingsBoard instance. In such a case, the dashboard entity in production environment will have different id, but the “externalId” of the dashboard will be set to the same “4864b750-da7d-11ec-a496-97fa2815d2fe”.
Customer hierarchy is stored in the ‘hierarchy’ folder which is recursive and similar to the ‘Customer hierarchy’ page in the UI. Entity groups are stored in the ‘groups’ folder. Each group has ‘id.json’ file which stores group entity and ‘id_entities.json’ file which stores list of entity ids in the group. Reserved group ‘All’ does not contain the ‘id_entities.json’ file because group ‘All’ contains all entities.
Sync strategy
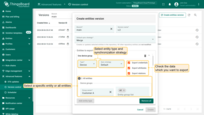
Platform supports two sync strategies for export to Git: Merge and Overwrite. “Merge” is the default sync strategy which simply appends the selected entities to the repository. This strategy is useful when you want to save one or multiple files without deleting all other files from the repository. “Overwrite” strategy completely rewrite the corresponding repository files. This strategy is useful when you want to completely synchronize the list of entities (e.g. Dashboards) in your instance and your Git repository. All entities that were previously save to the Git but are not present in your platform instance will be deleted from the Git repository in the corresponding commit.
Scalability
ThingsBoard Version Control service is available as part of a monolithic ThingsBoard instance or as a separate microservice for horizontal scalability. Every instance of the Version Control service is responsible for handling synchronization tasks for the specific partition(s) of the Tenants in the cluster. Each “commit” API call may take some time. Concurrent “commit” API calls in scope of the same Tenant are not supported. The system will cancel the “commit” API call if it is in progress and the new “commit” API call arrives.
Usage
Git Settings configuration
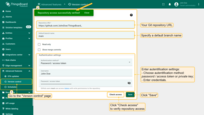
As a Tenant administrator, you can navigate to the “Version control” page of the “Advanced features” section. The page allows you to provision Git repository URL, default branch name and authentication settings. We expect you to provide URL to the empty Git repository.
Export to Git
Single Entity Export
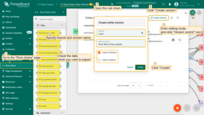
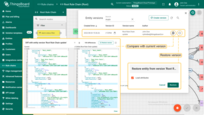
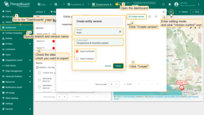
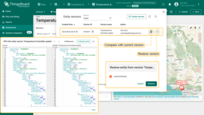
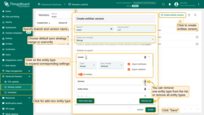
Navigate to entity details and open the “Version control” tab. Rule Chains and Dashboards have built-in version control button and popup widget to the corresponding editors. See screenshots below.
Device:
Rule Chain:
Dashboard:
Multiple Entity Export
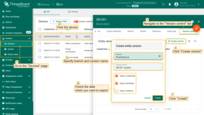
Navigate to version control page. You may select one or more entity types to restore. By default, all entity types are selected.
Auto-commit
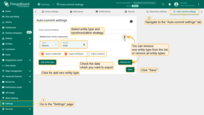
Auto-commit is a useful feature to automatically commit the Dashboard and Rule Chains when we save the entity via UI or REST API call. The auto-commit happens asynchronously to improve UI experience. The auto-commit does not happen when you assign entity to the customer (change entity owner). In such case you should commit all entities of the specific entity type with the overwrite strategy.
Restore from Git
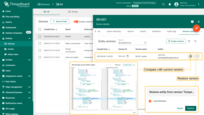
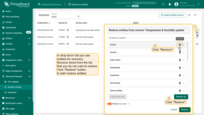
Navigate to version control page. Select the commit and specify restore settings.
Next steps
-
Getting started guides - These guides provide quick overview of main ThingsBoard features. Designed to be completed in 15-30 minutes.
-
Connect your device - Learn how to connect devices based on your connectivity technology or solution.
-
Data visualization - These guides contain instructions on how to configure complex ThingsBoard dashboards.
-
Data processing & actions - Learn how to use ThingsBoard Rule Engine.
-
IoT Data analytics - Learn how to use rule engine to perform basic analytics tasks.
