- Overview
- Configure Azure Service Bus
- Create Uplink Converter
- Create Integration in Thingsboard
- Test it up!
- Advanced usage: Downlink Messaging
- Conclusion
- Next steps
Overview
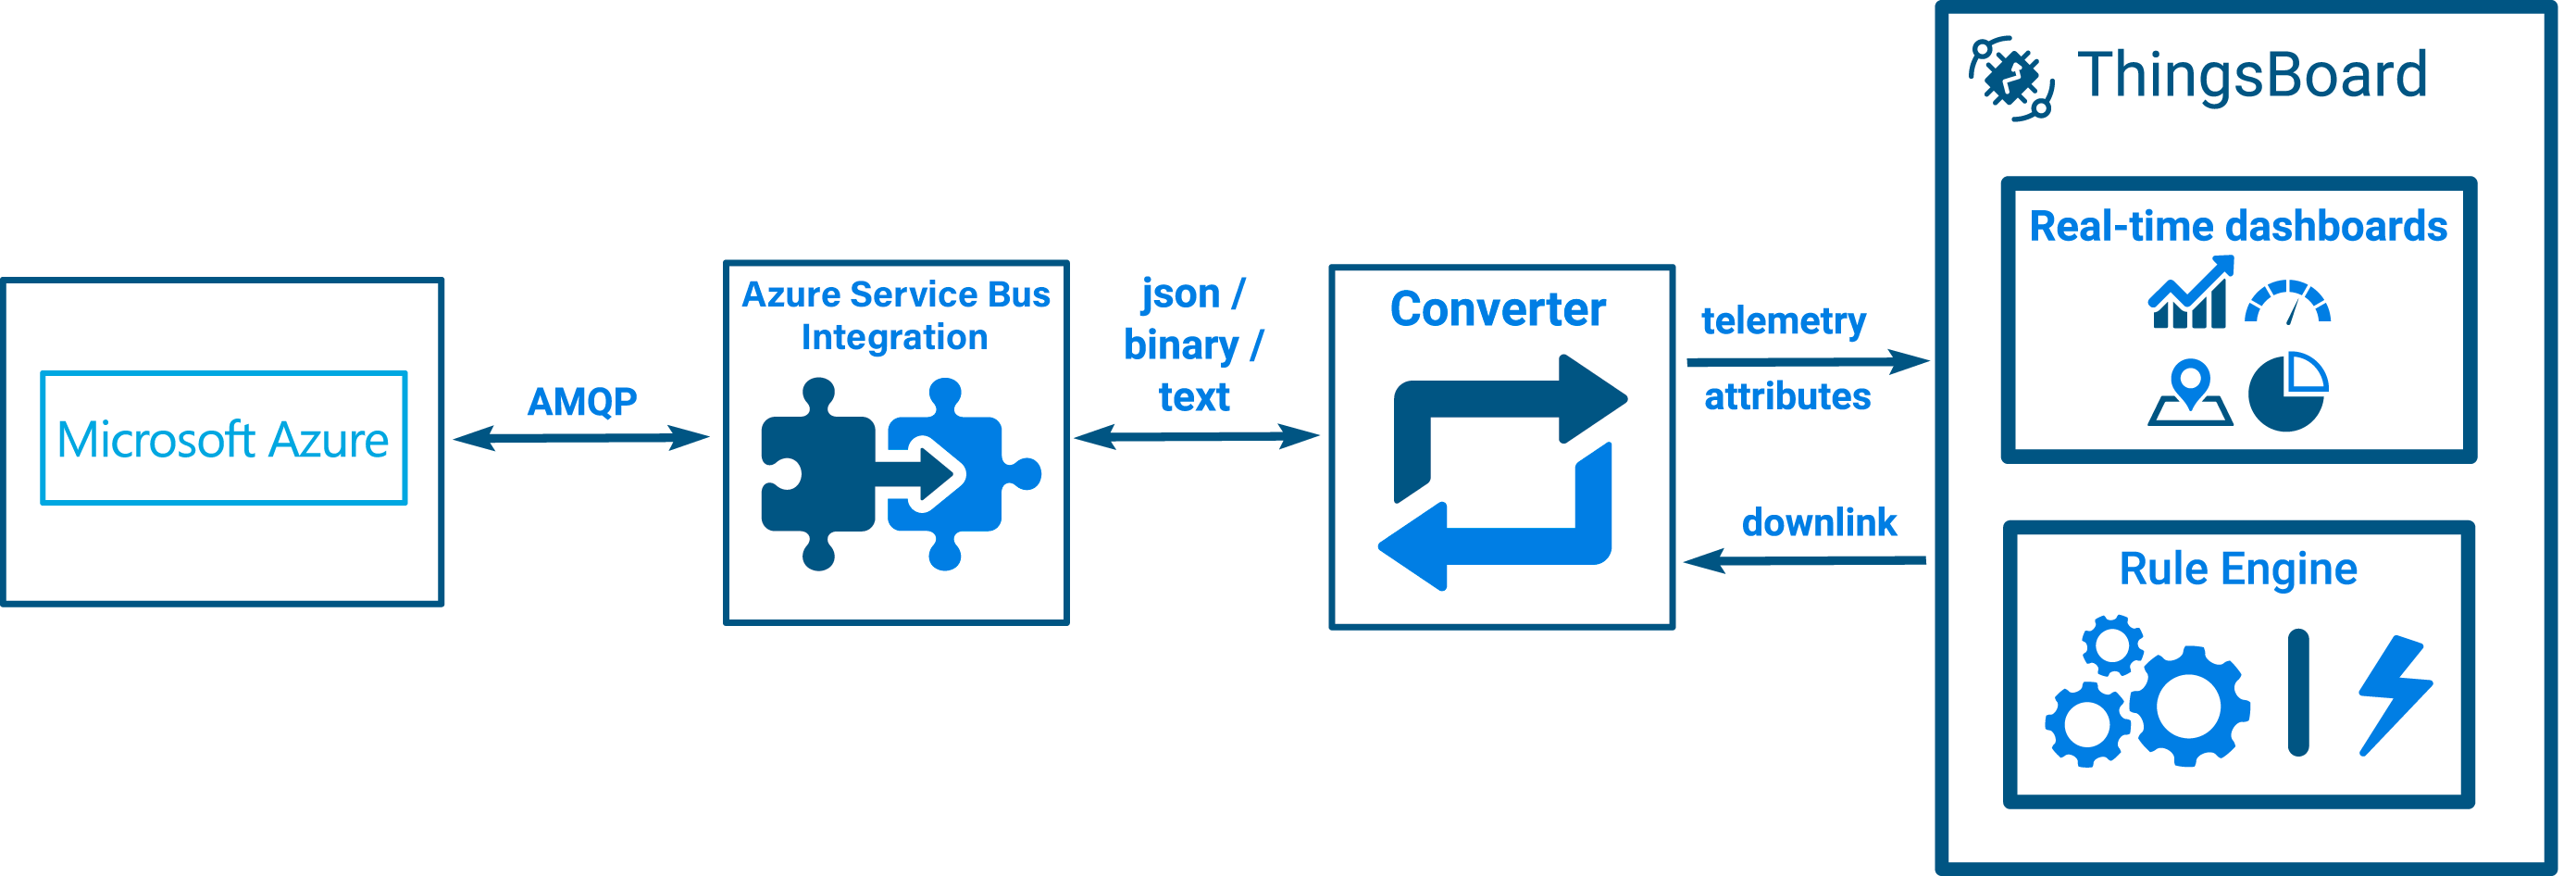
Azure Service Bus Integration allows to stream data from Azure Service bus to ThingsBoard and converts device payloads to the ThingsBoard format.
Configure Azure Service Bus
To create ThingsBoard Service Bus integration you will need two things created in Azure portal: topic and subscription to the topic. You will also need to find and save connection string for your Servise Bus namespace, you will need it later.
Create Uplink Converter
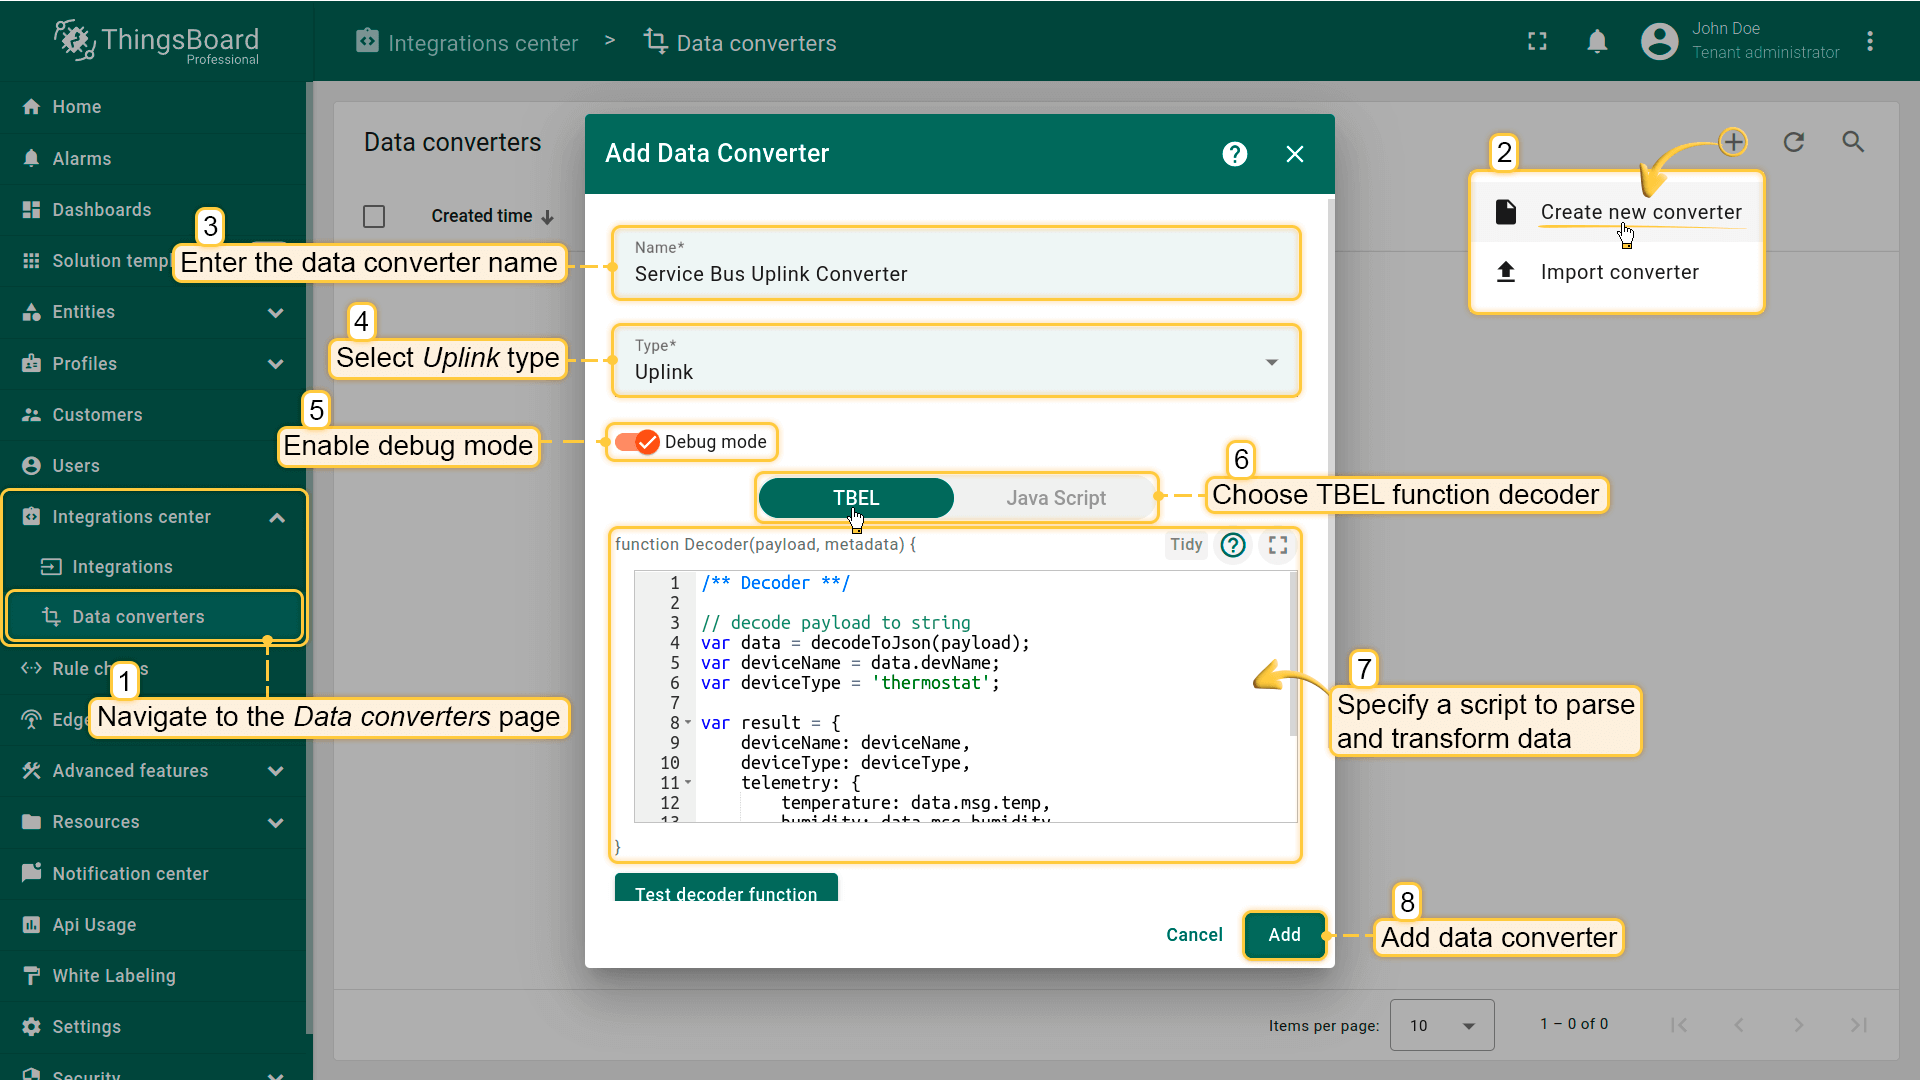
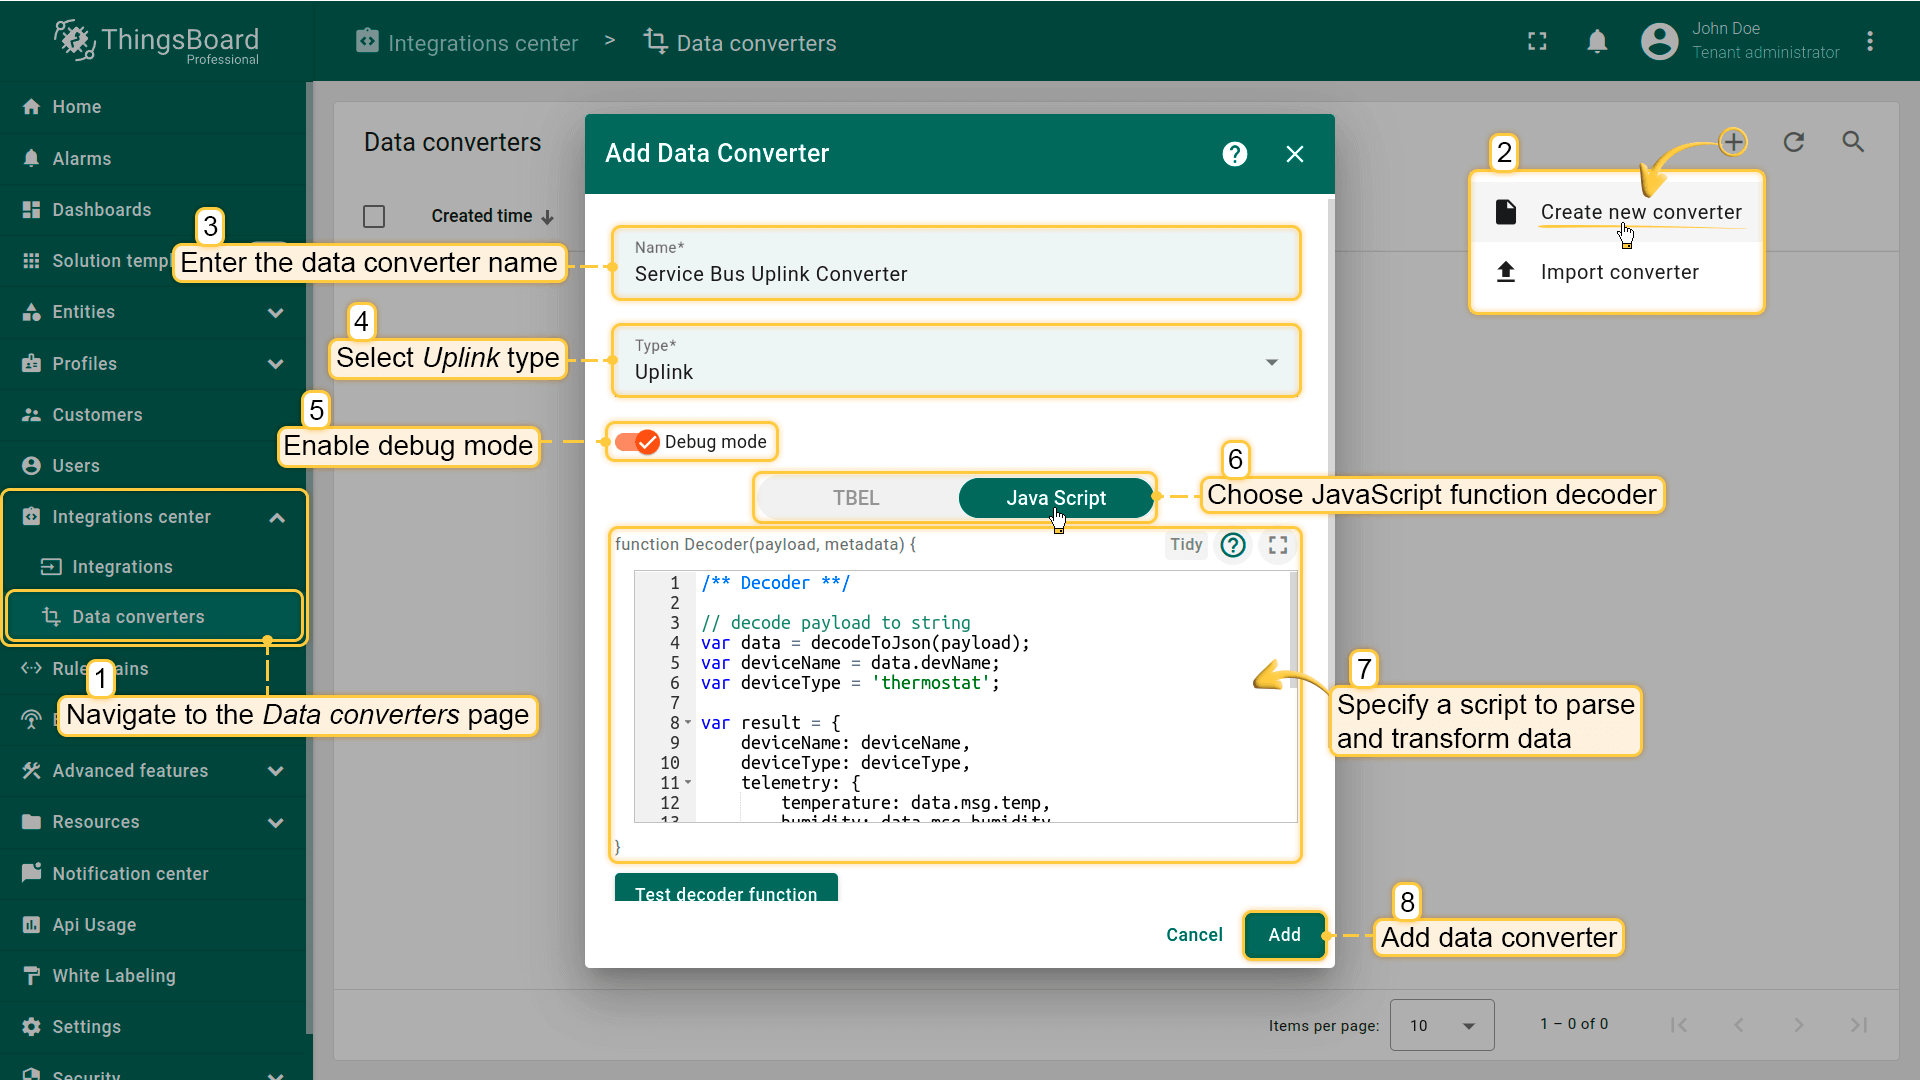
You can сreate an Uplink converter in the Data converters section or directly in the integration. Uplink is necessary in order to convert the incoming data from the device into the required format for displaying them in ThingsBoard. Click on the “plus” and on “Create new converter”. To view the events, enable Debug. In the function decoder field, specify a script to parse and transform data.
Debug mode
Enabling debug mode allows you to track events, states, and potential errors related to the execution of integrations. This greatly simplifies development and troubleshooting.
Debug mode settings can be combined or disabled entirely.
Let’s review sample uplink message from Service Bus topic:
1
2
3
4
5
6
7
{
   "devName": "Sensor A1",
   "msg": {
      "temp": 23,
      "humidity": 40
   }
}
One can use either TBEL (ThingsBoard expression language) or JavaScript to develop user defined functions. We recommend utilizing TBEL as it’s execution in ThingsBoard is much more efficient compared to JS.
You can use the following code, copy it to the decoder function section:
|
You can use the following code, copy it to the decoder function section:
|
Create Integration in Thingsboard
Now that we have a topic created in Azure Portal and an Uplink converter created, it is possible to create an integration.
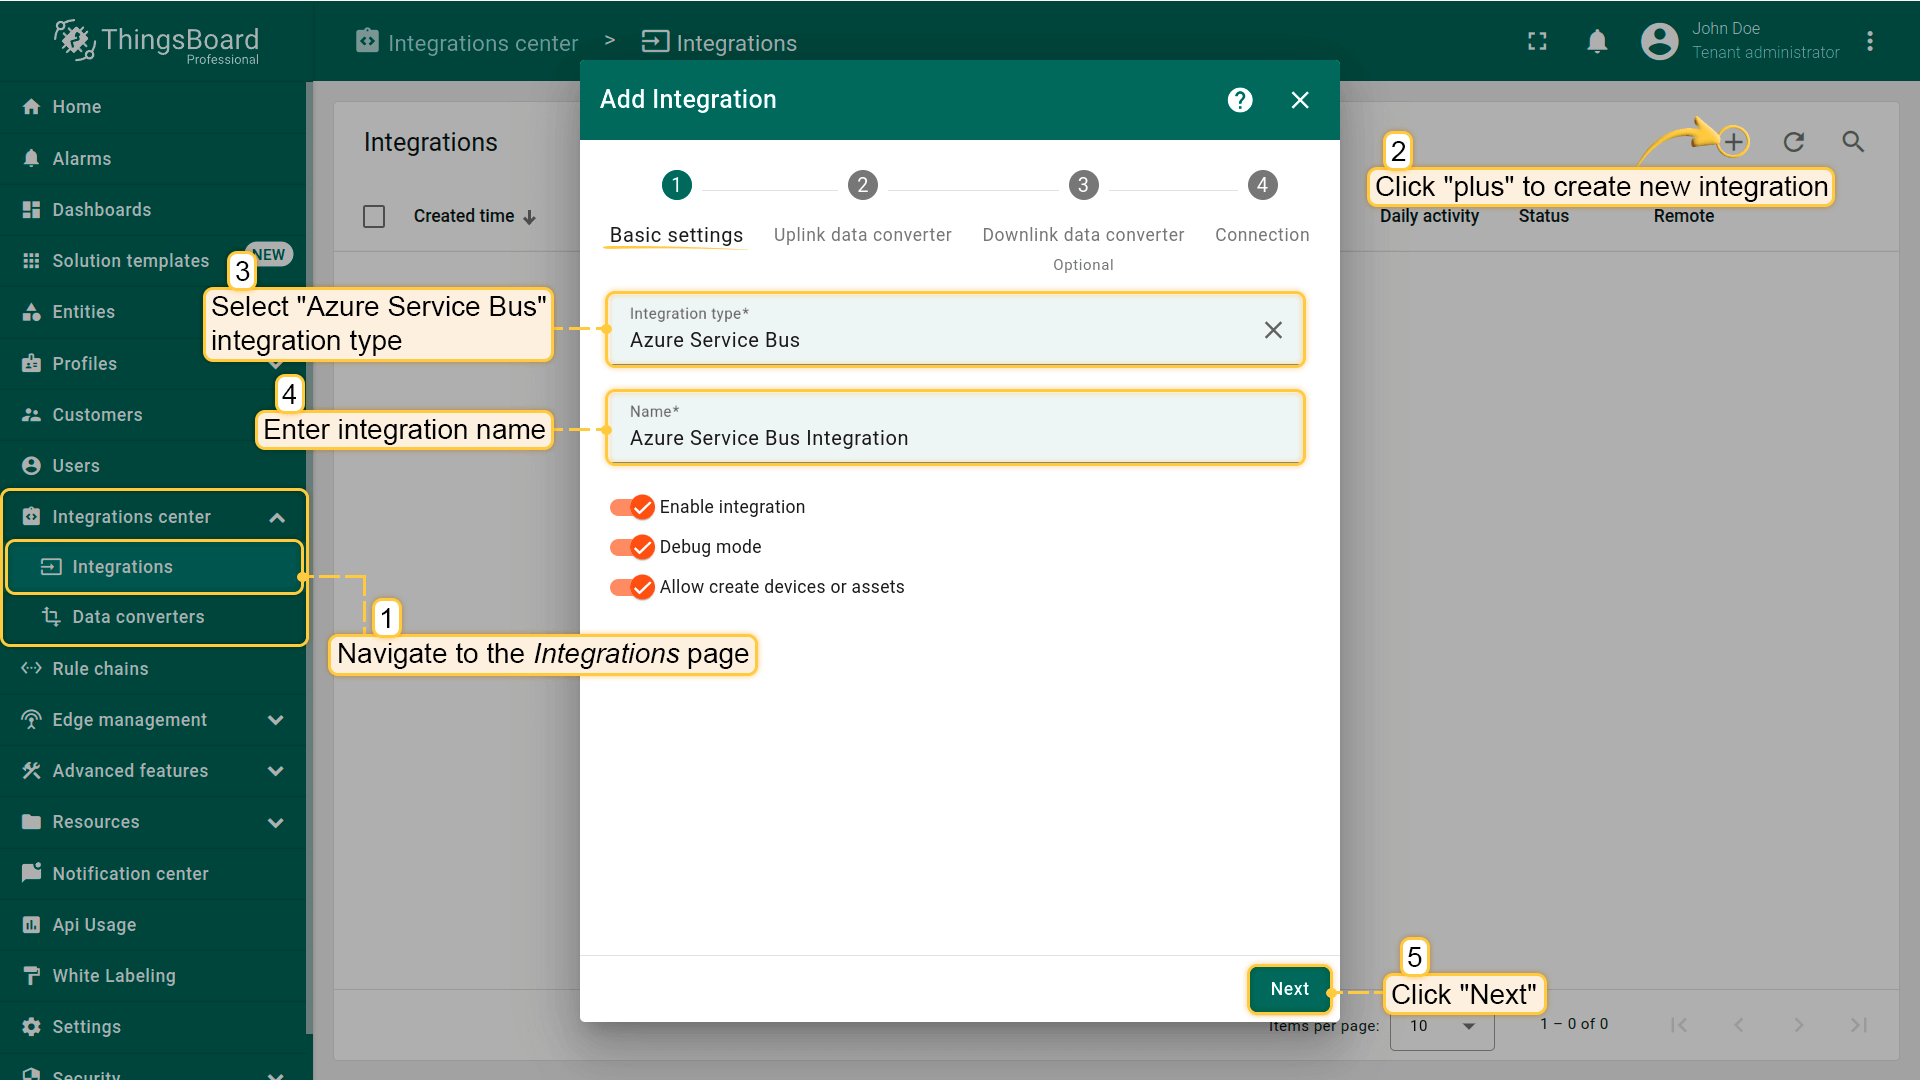
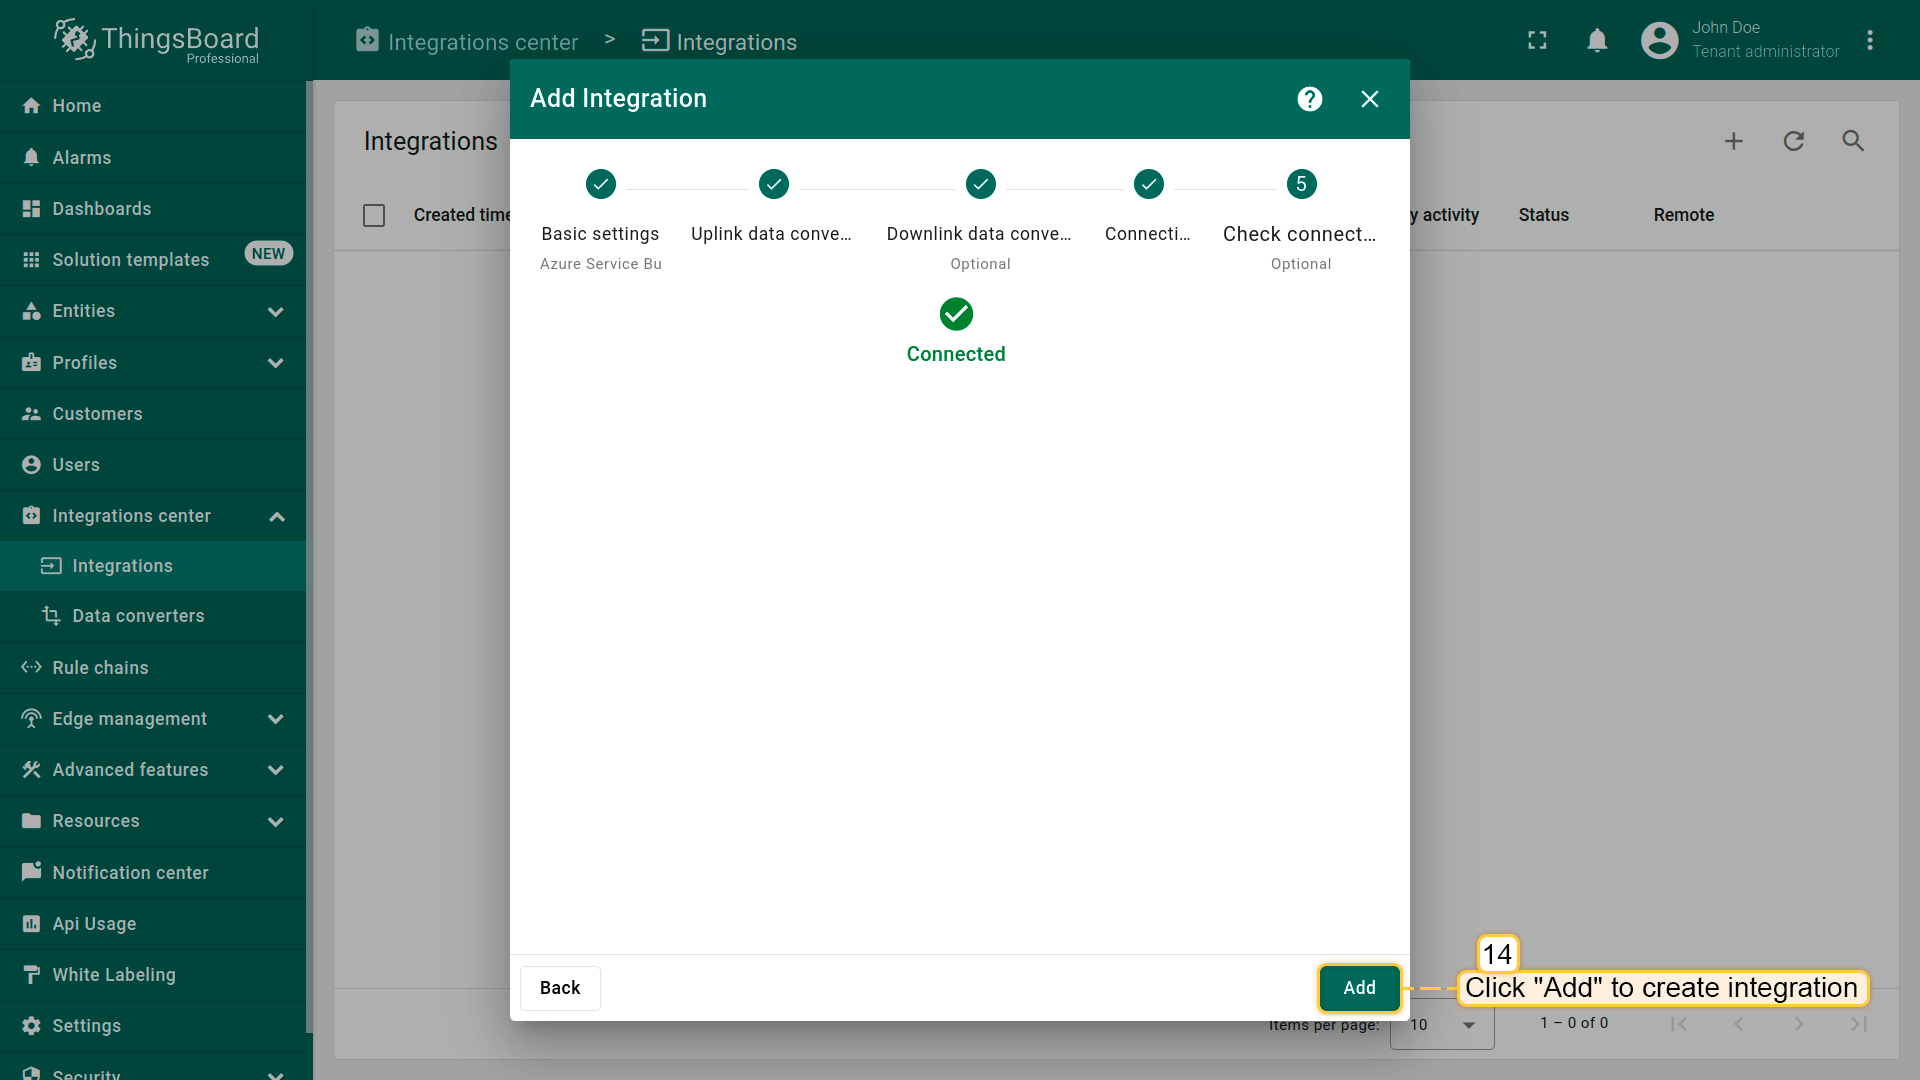
1) Go to Integrations center section -> Integrations page and click “plus” button to create new integration. Name it Azure Service Bus Integration, select type Azure Service Bus. Click “Next”;
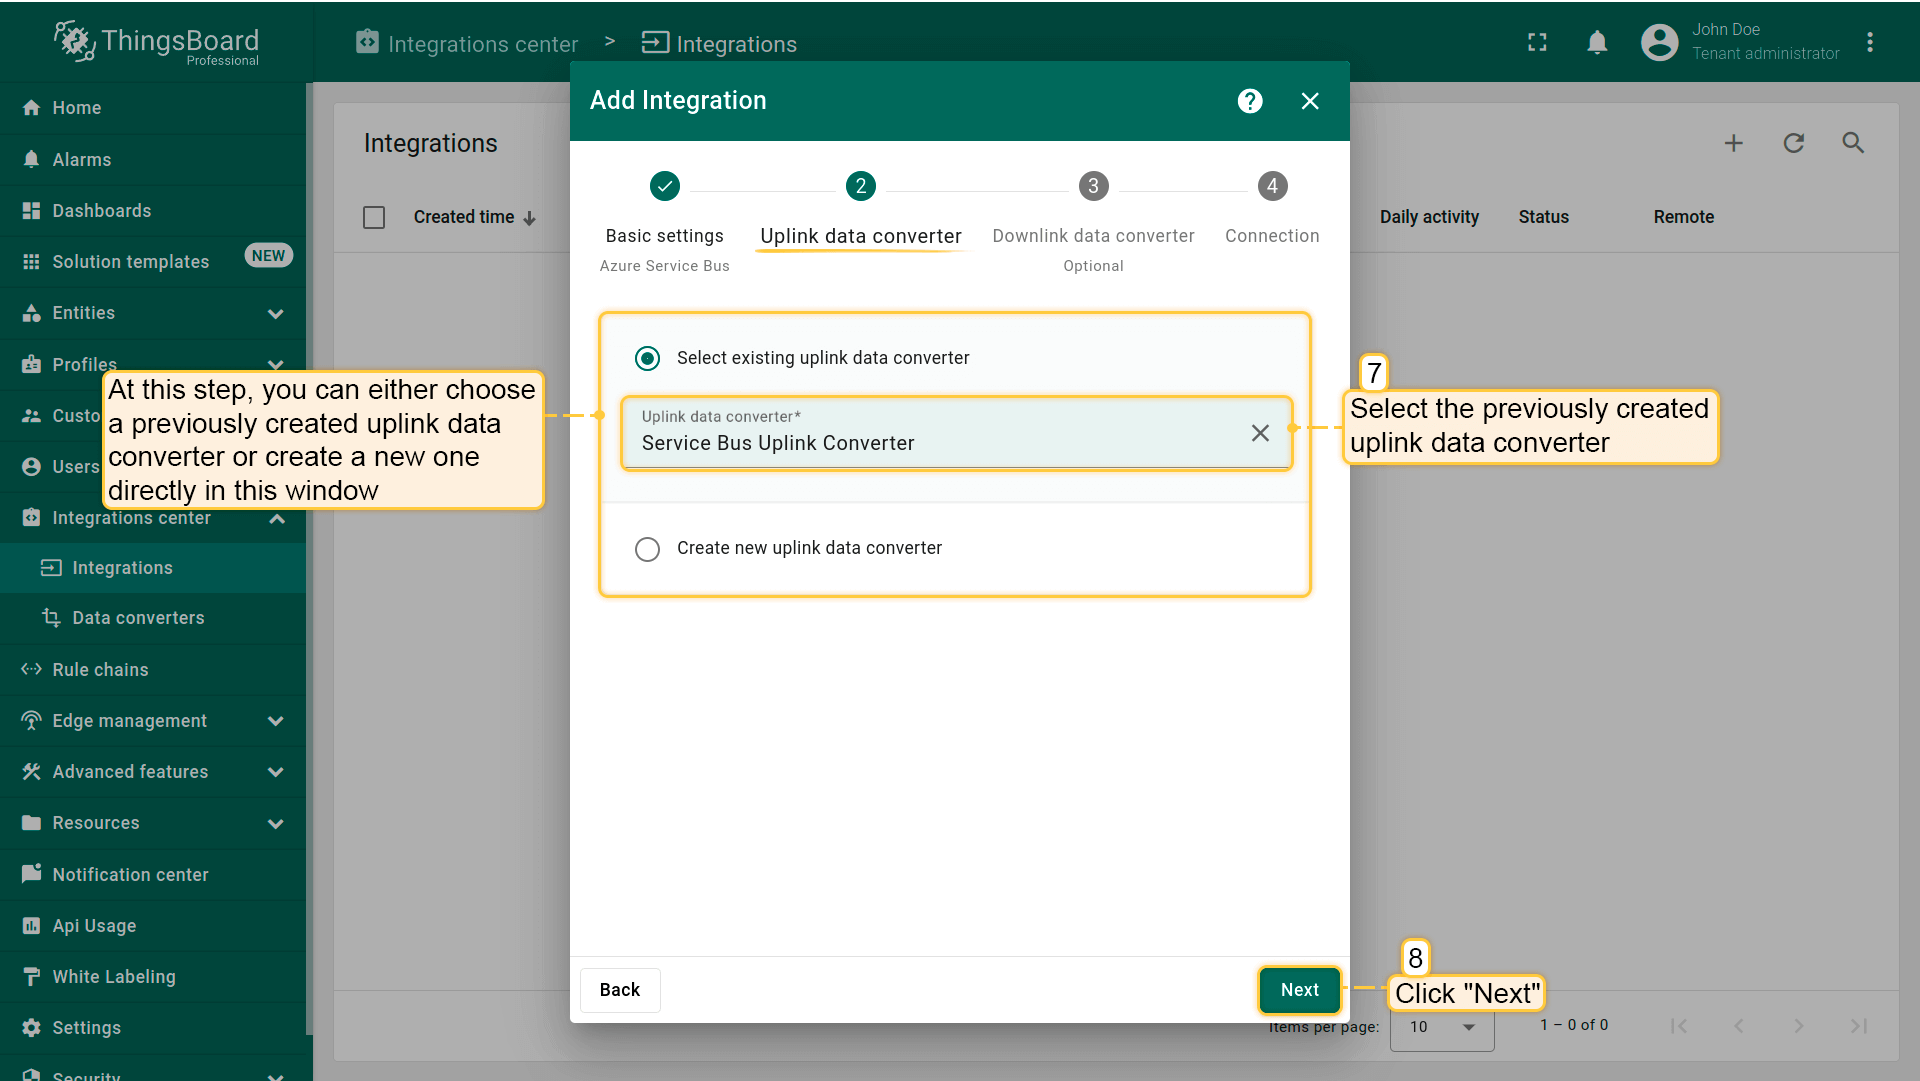
2) At this step, you can select a previously created or create a new upnlink converter right in this window. Select the previously created Service Bus Uplink Converter. Click “Next”;
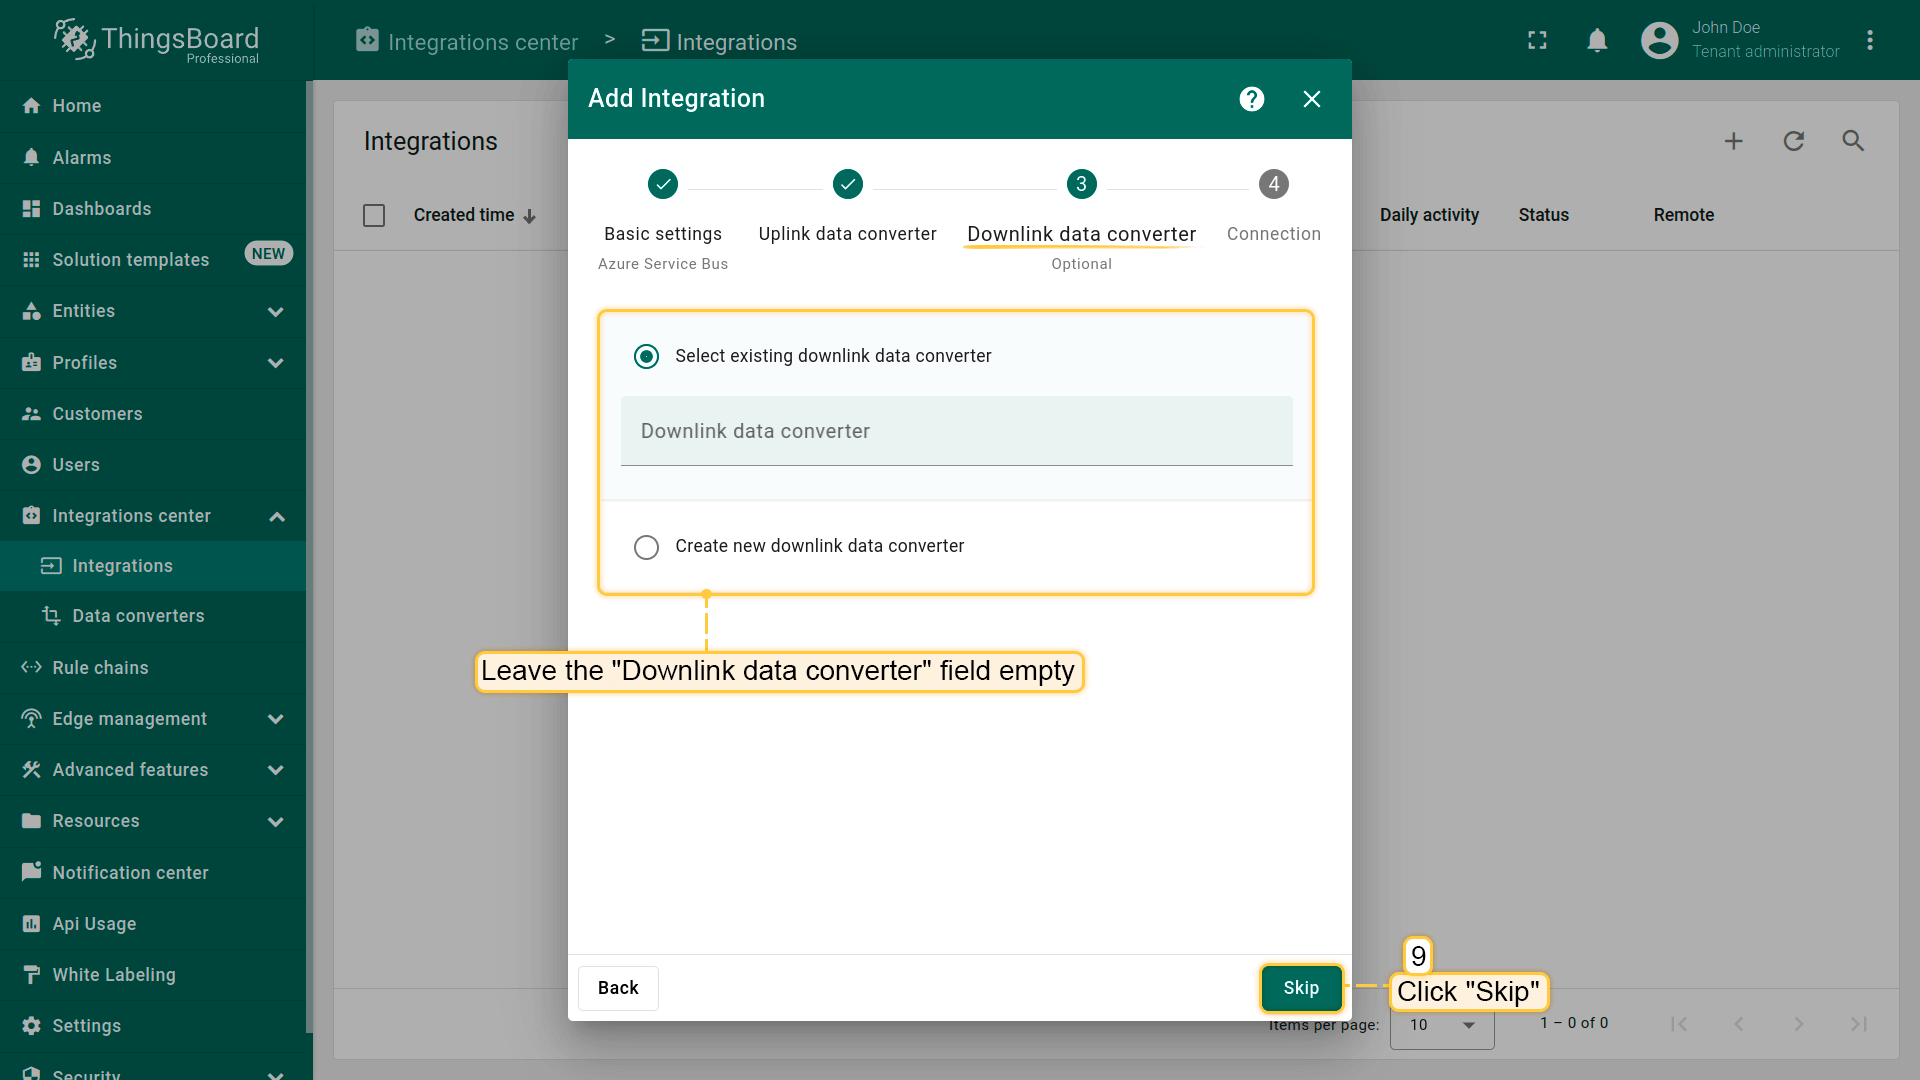
3) At the step of adding a downlink converter, you can also select a previously created or create a new downlink converter. But for now, leave the “Downlink data converter” field empty. Click “Skip”;
4) Fill in connection string for your Service Bus namespace, topic and subscription names;
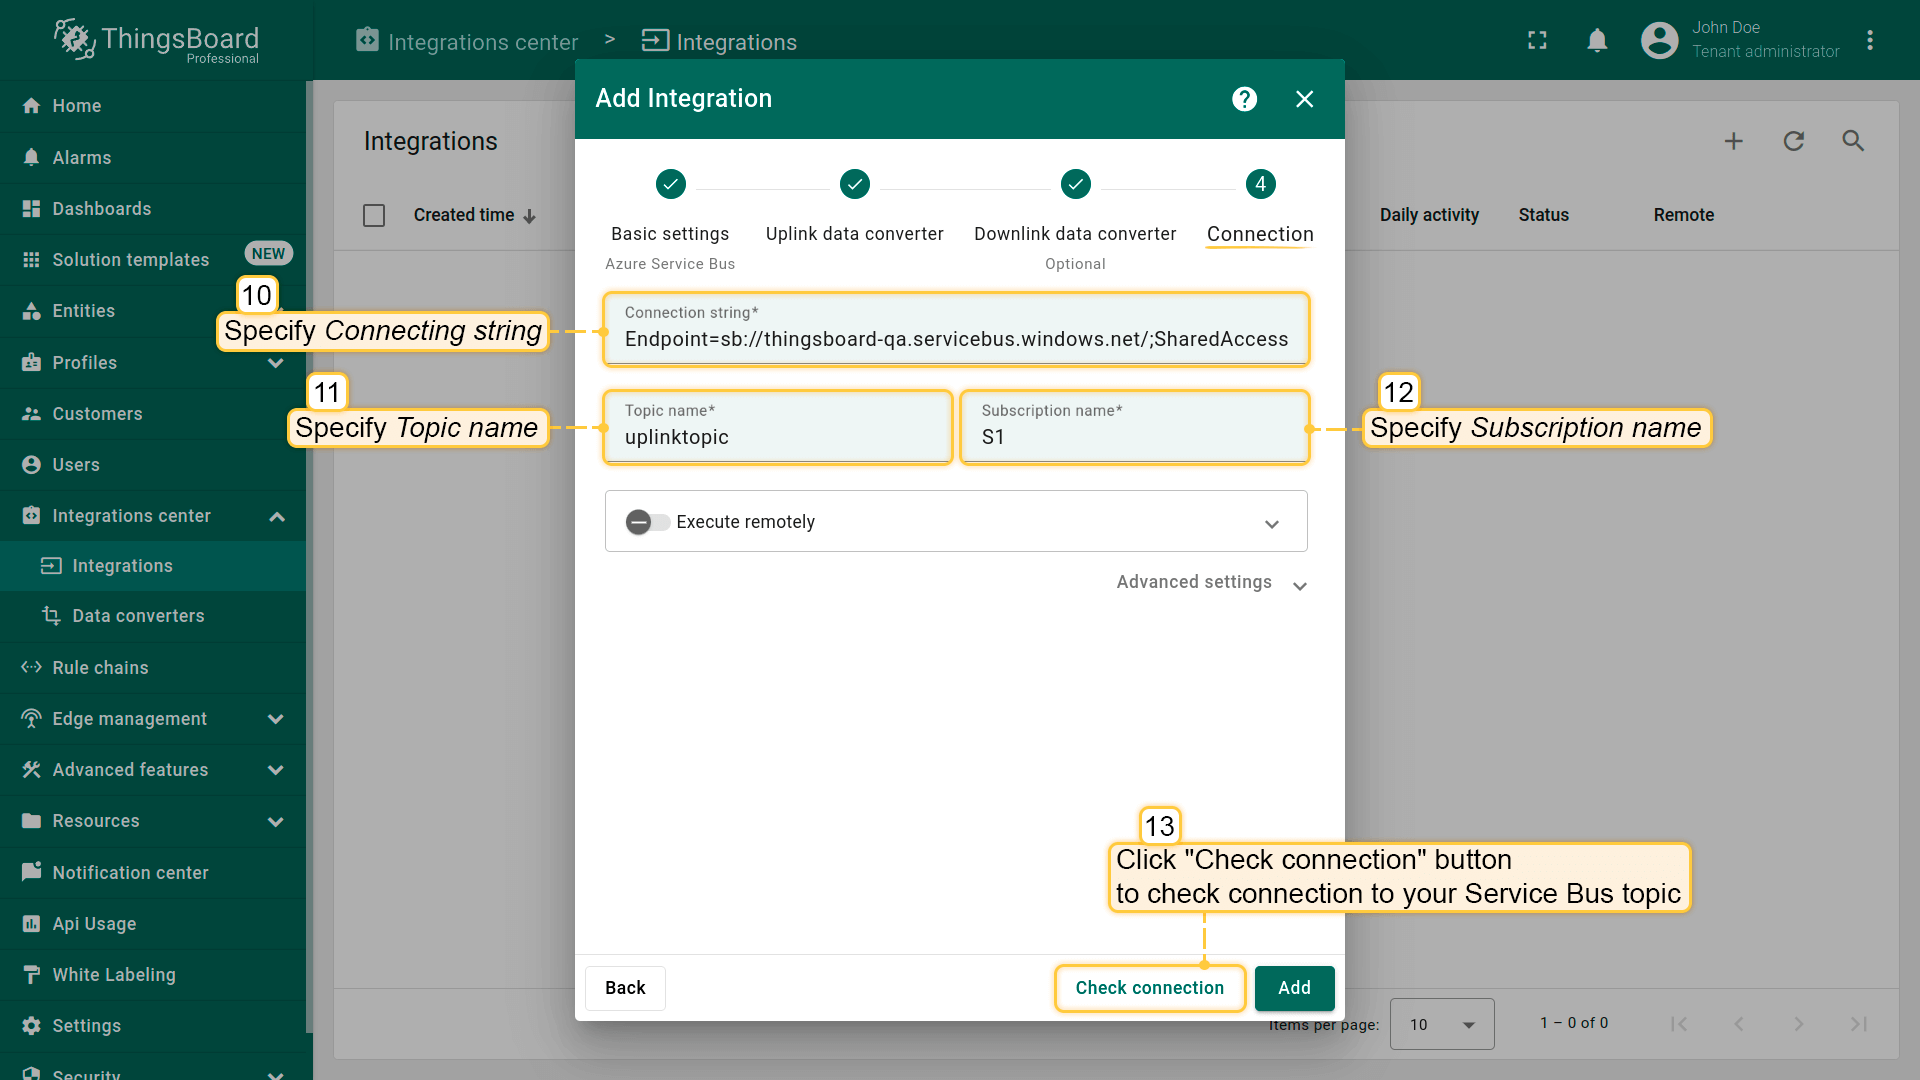
5) [Optional] Click on Check connection button to check connection to your Service Bus topic. Click Add button to create the integration.
Test it up!
To send a test message, use the additional functionality of Azure Service bus, Service Bus Explorer.
Sign-in to Azure portal and select your namespace. Choose topic to uplink. On the left blade select ‘Service Bus Explorer’ tab. Click on ‘Send message’, choose type of payload according to uplink converter and send test message.
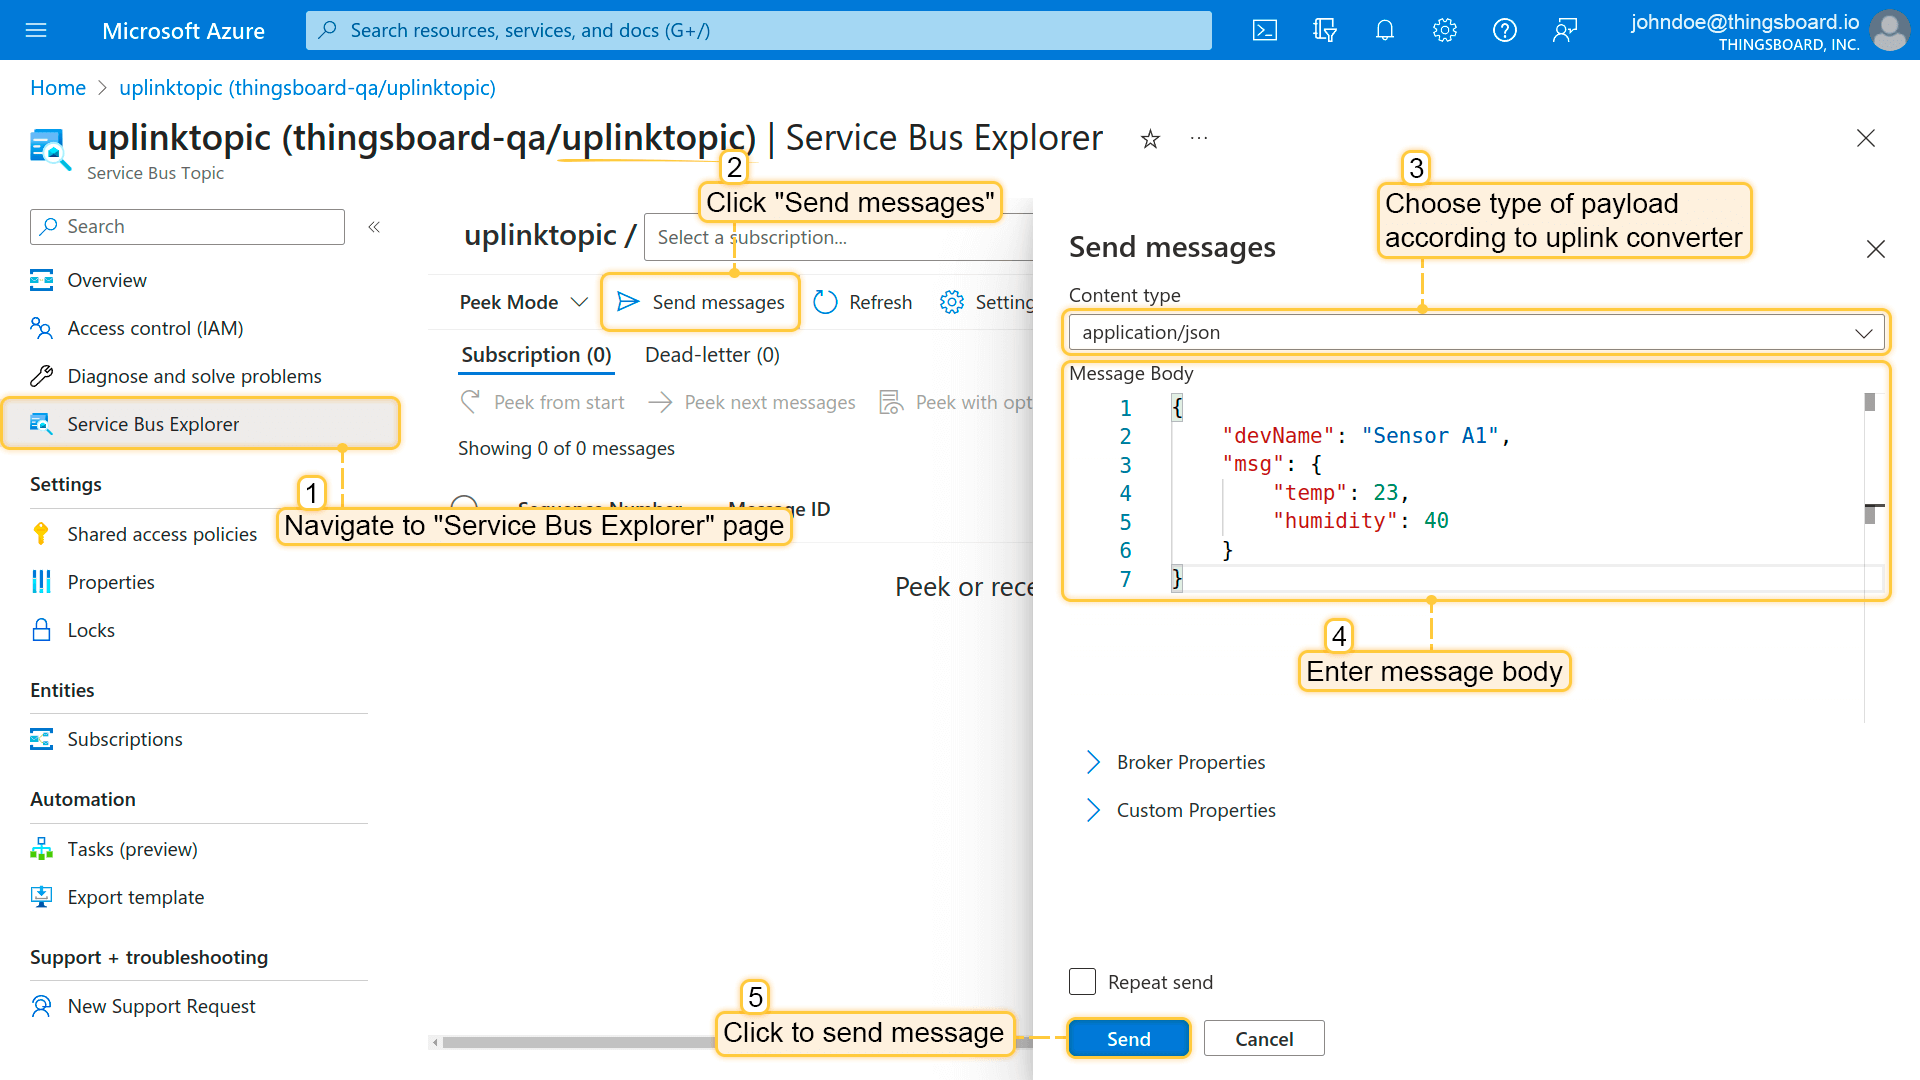
Example of payload:
1
2
3
4
5
6
7
{
    "devName": "Sensor A1",
    "msg": {
        "temp": 23,
        "humidity": 40
    }
}
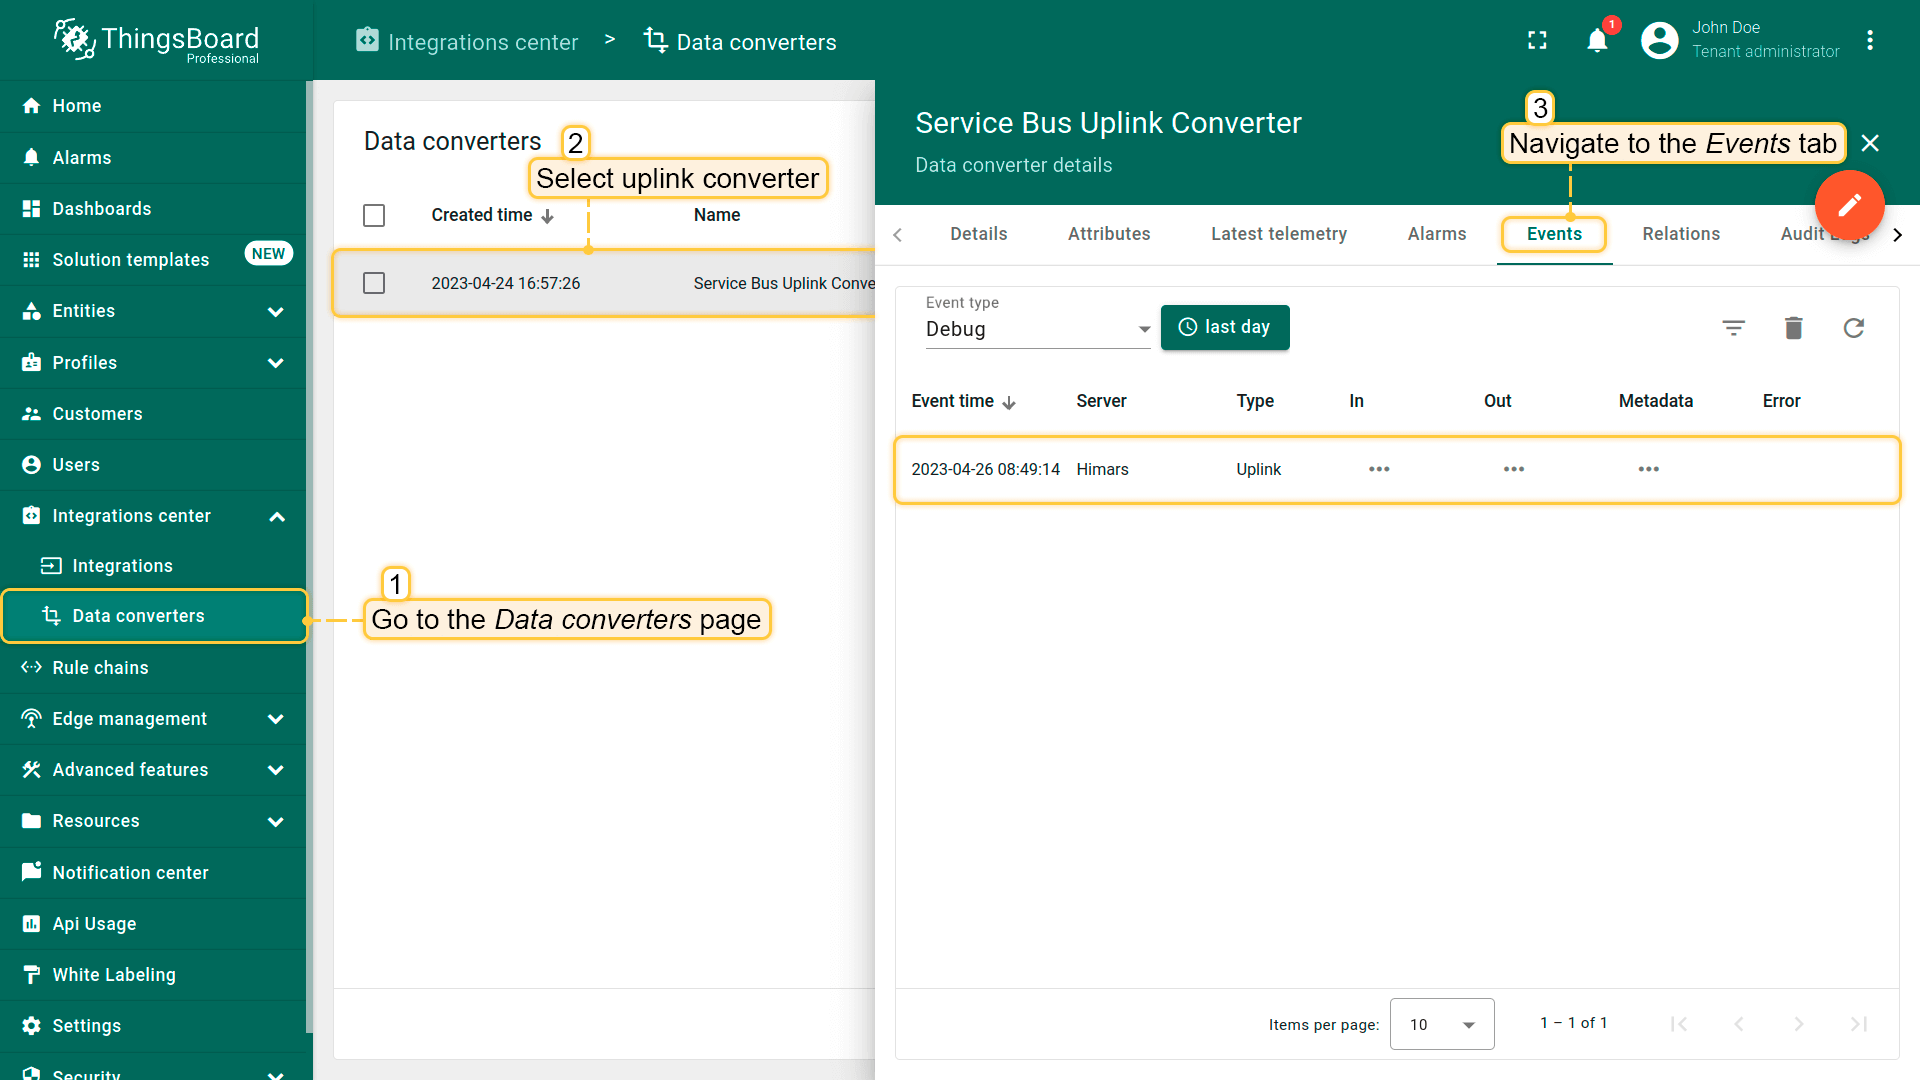
To check if the message has arrived at Service Bus integration open the ‘Events’ tab of integration.
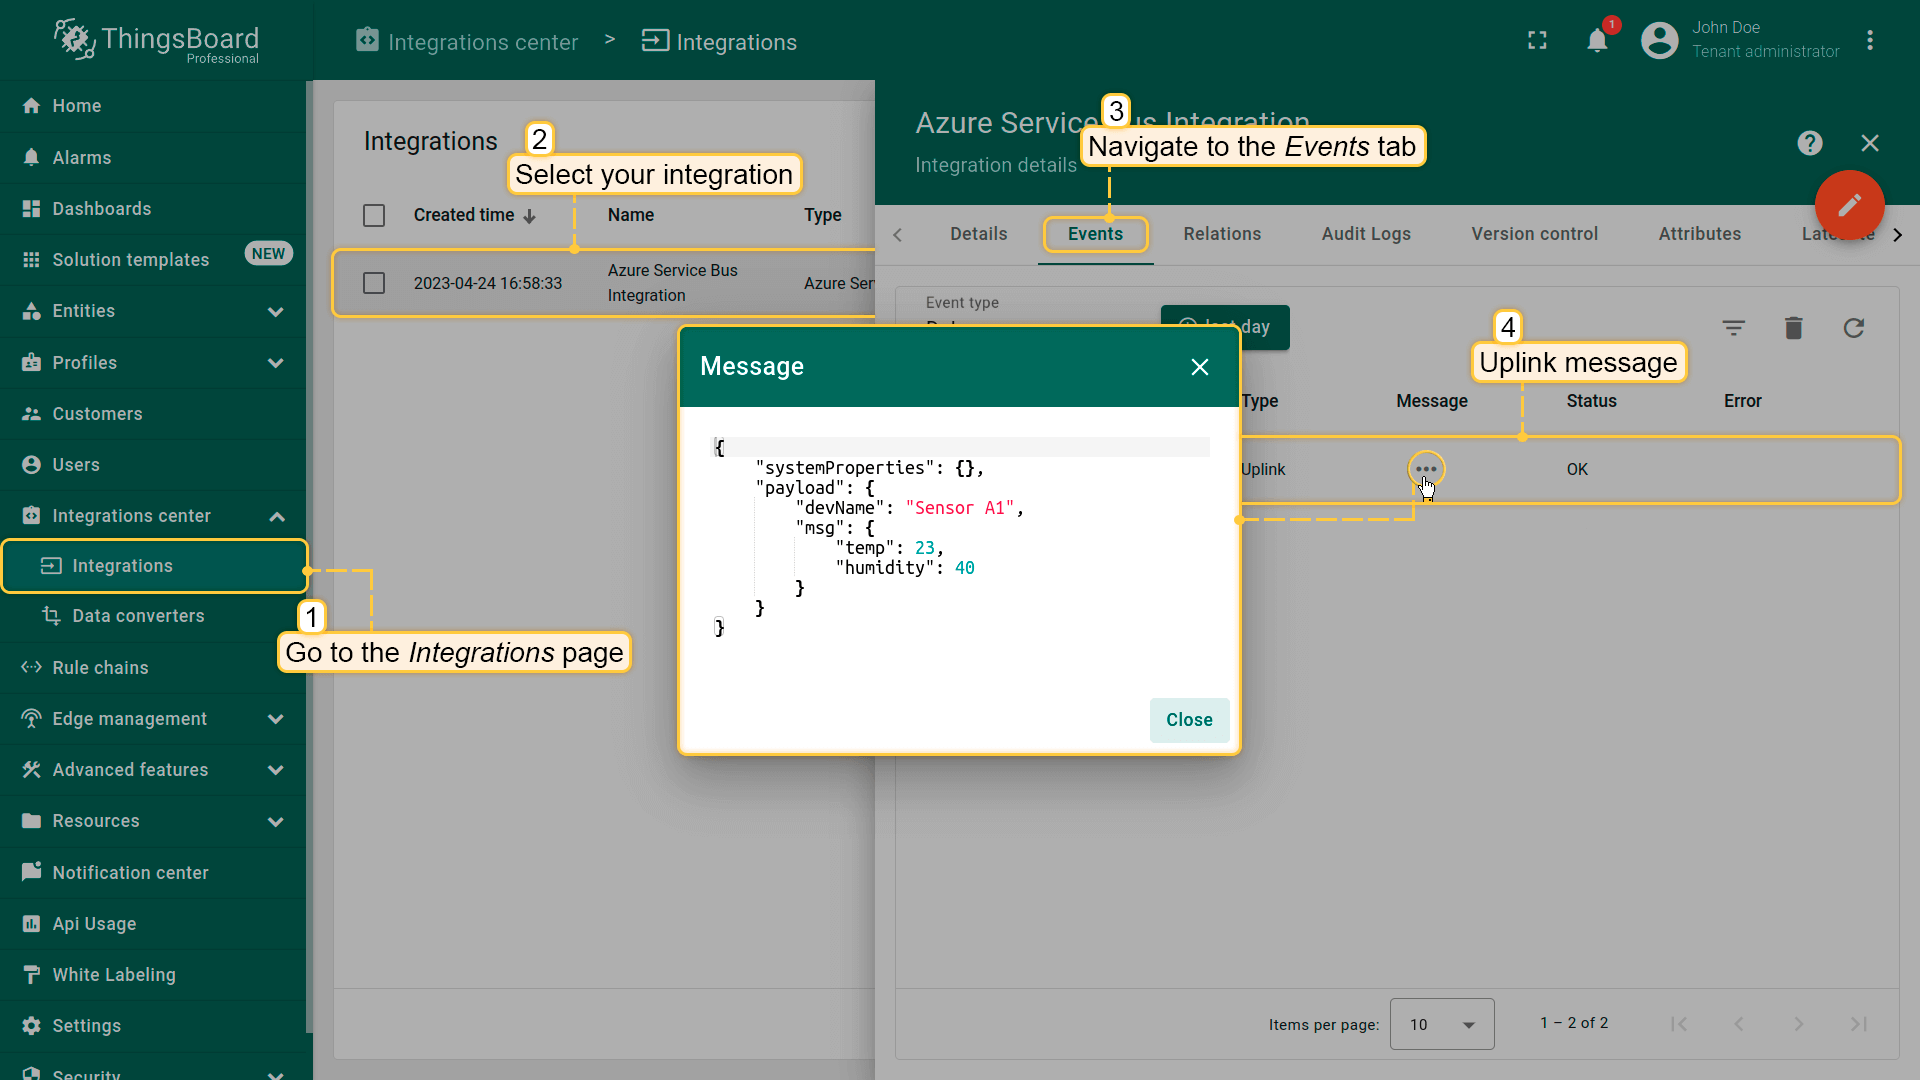
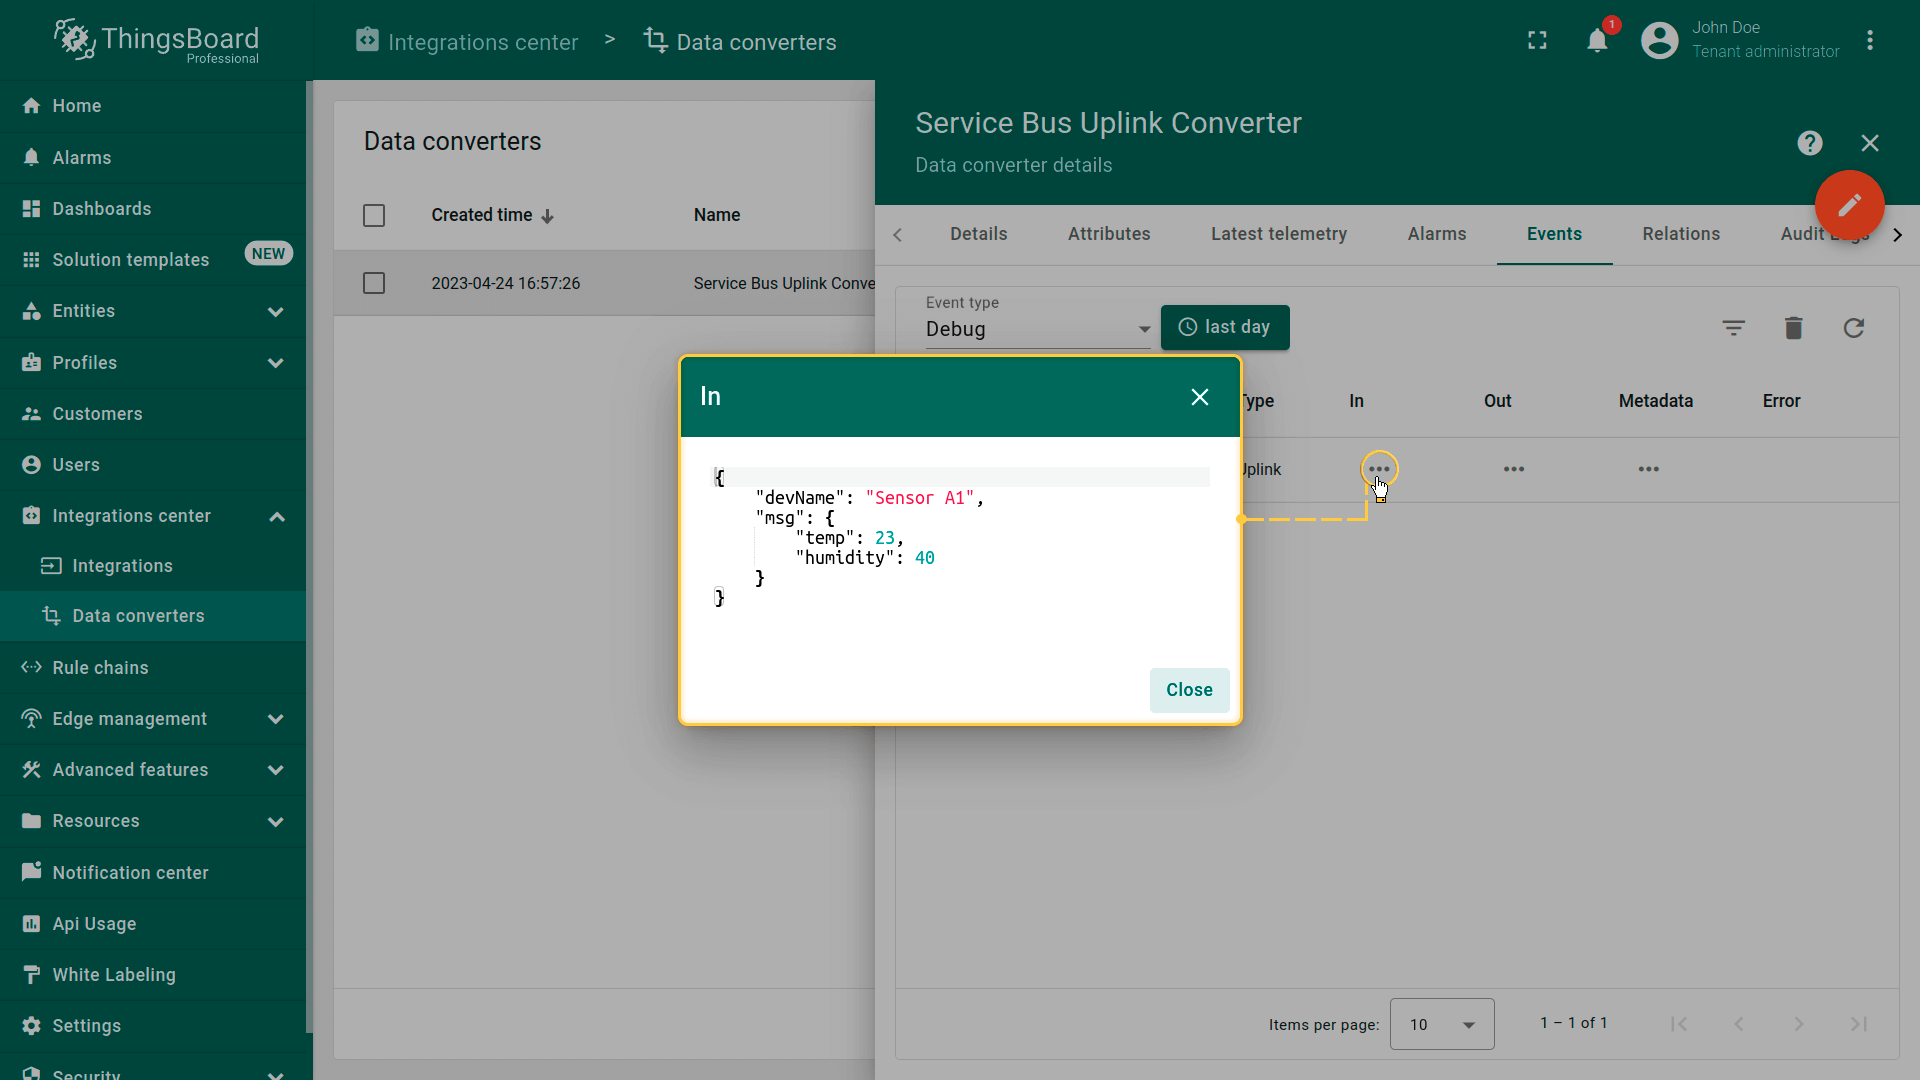
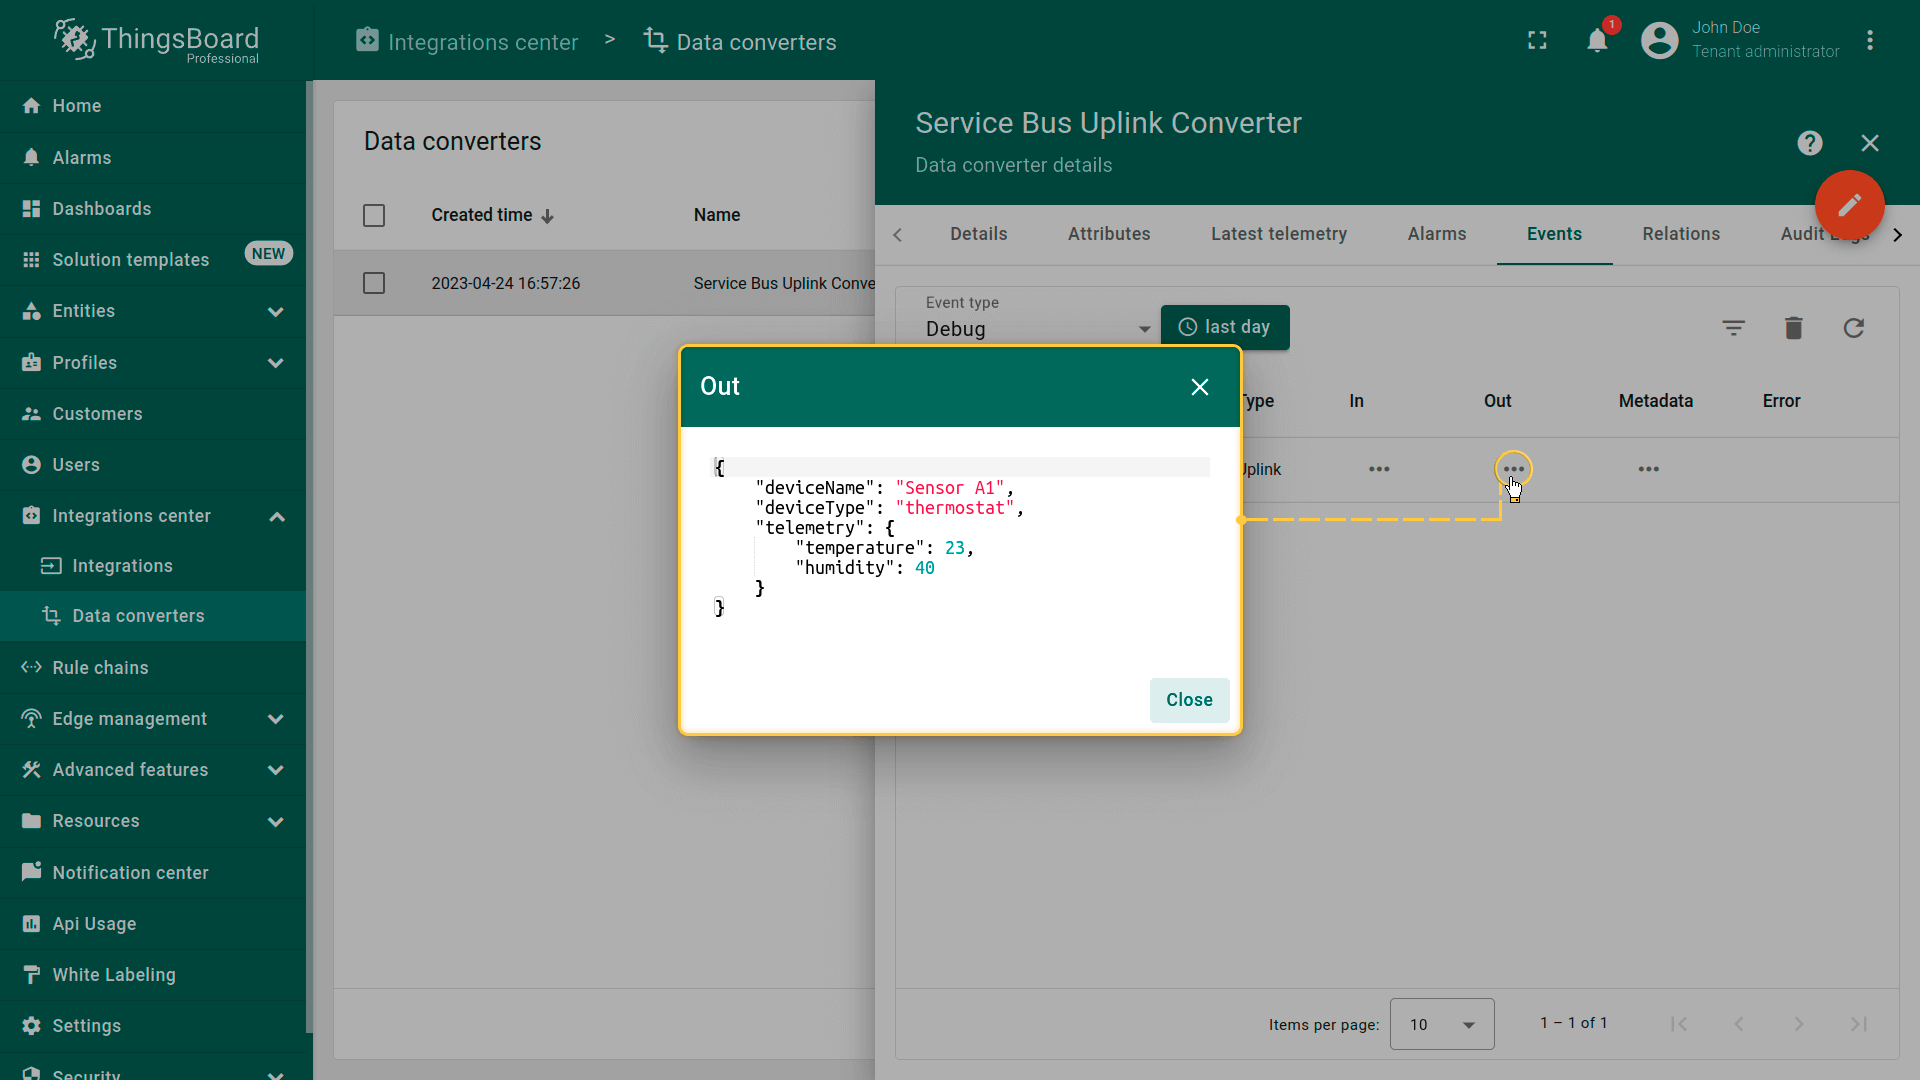
Received data can be viewed in the Uplink converter. In the ‘In’ and ‘Out’ blocks of the ‘Events’ tab:
After you sent uplink message a new device was created. You should receive a notification about it. To view notification click on the bell icon in the upper right corner of the screen. The notification will contain link to created device. Go to this device.
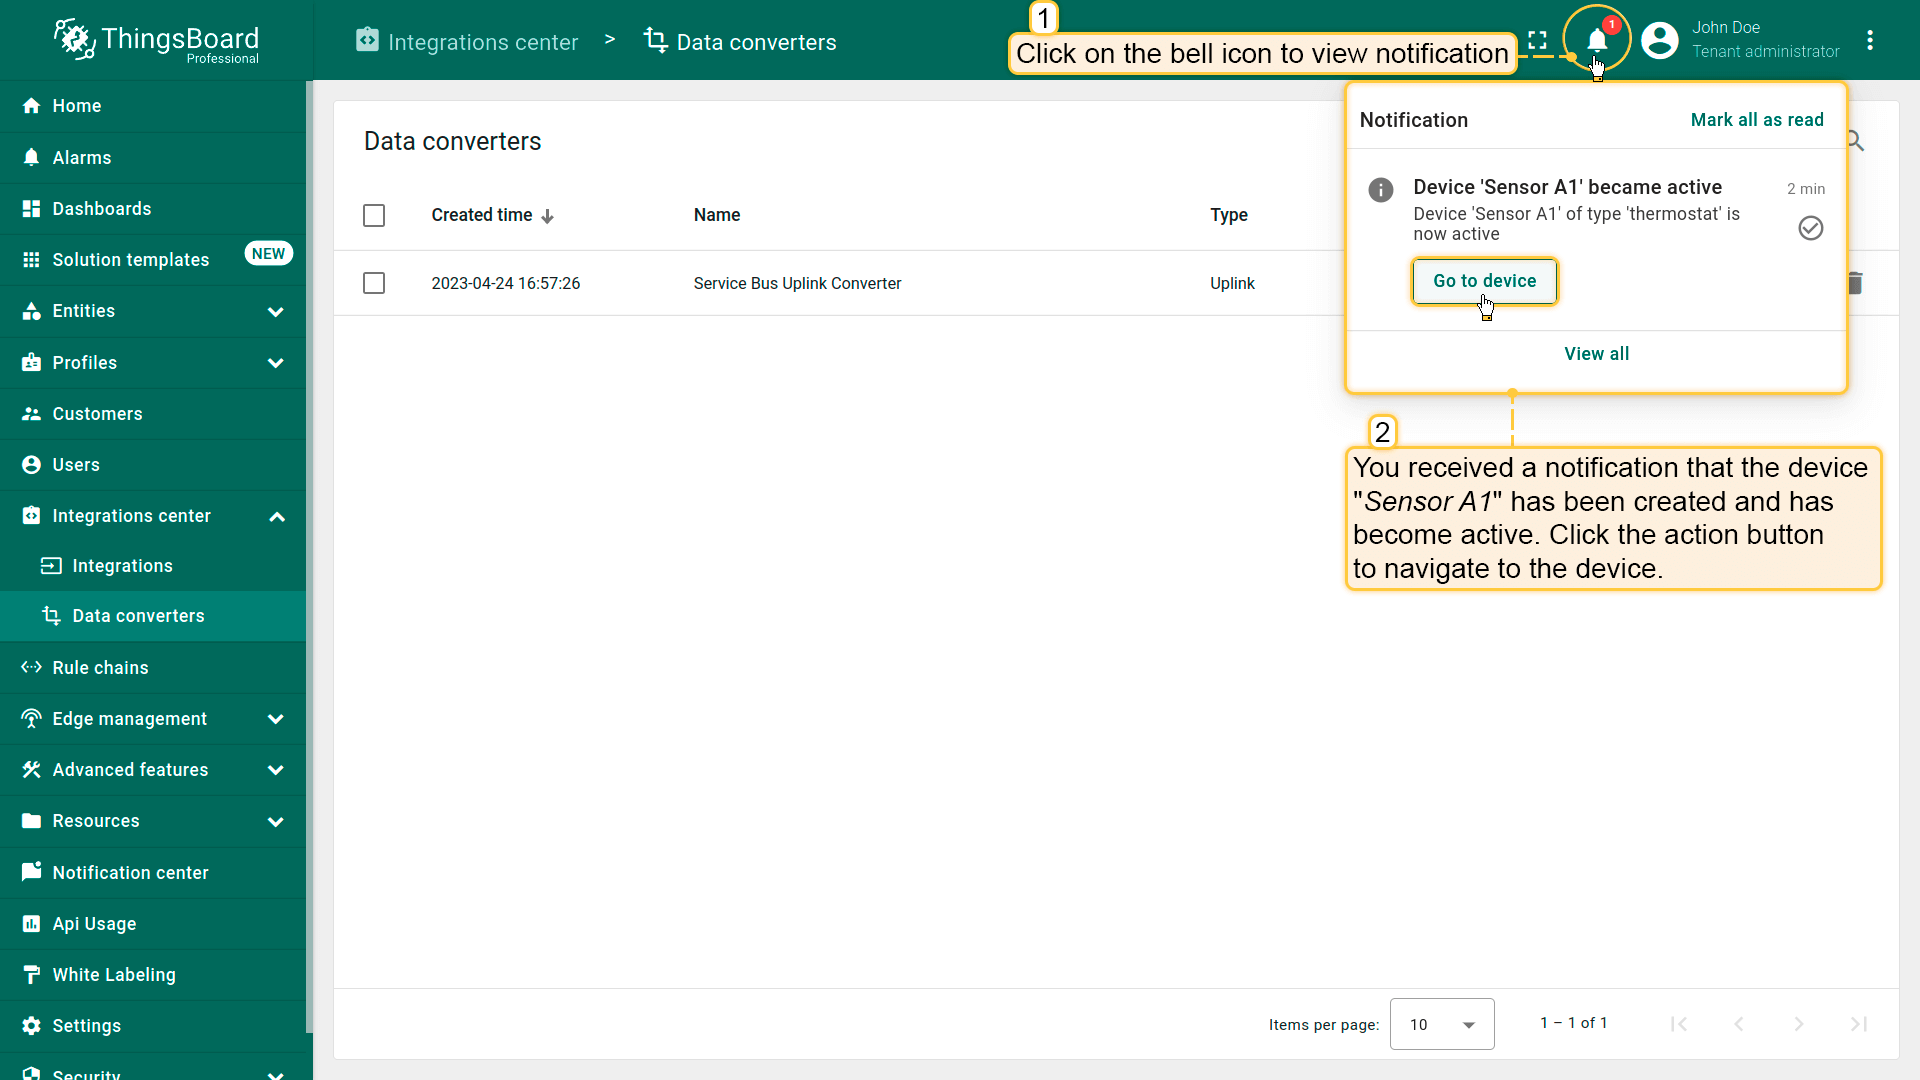
Here you will see information about the new device. As well as the telemetry which we sent to the device.
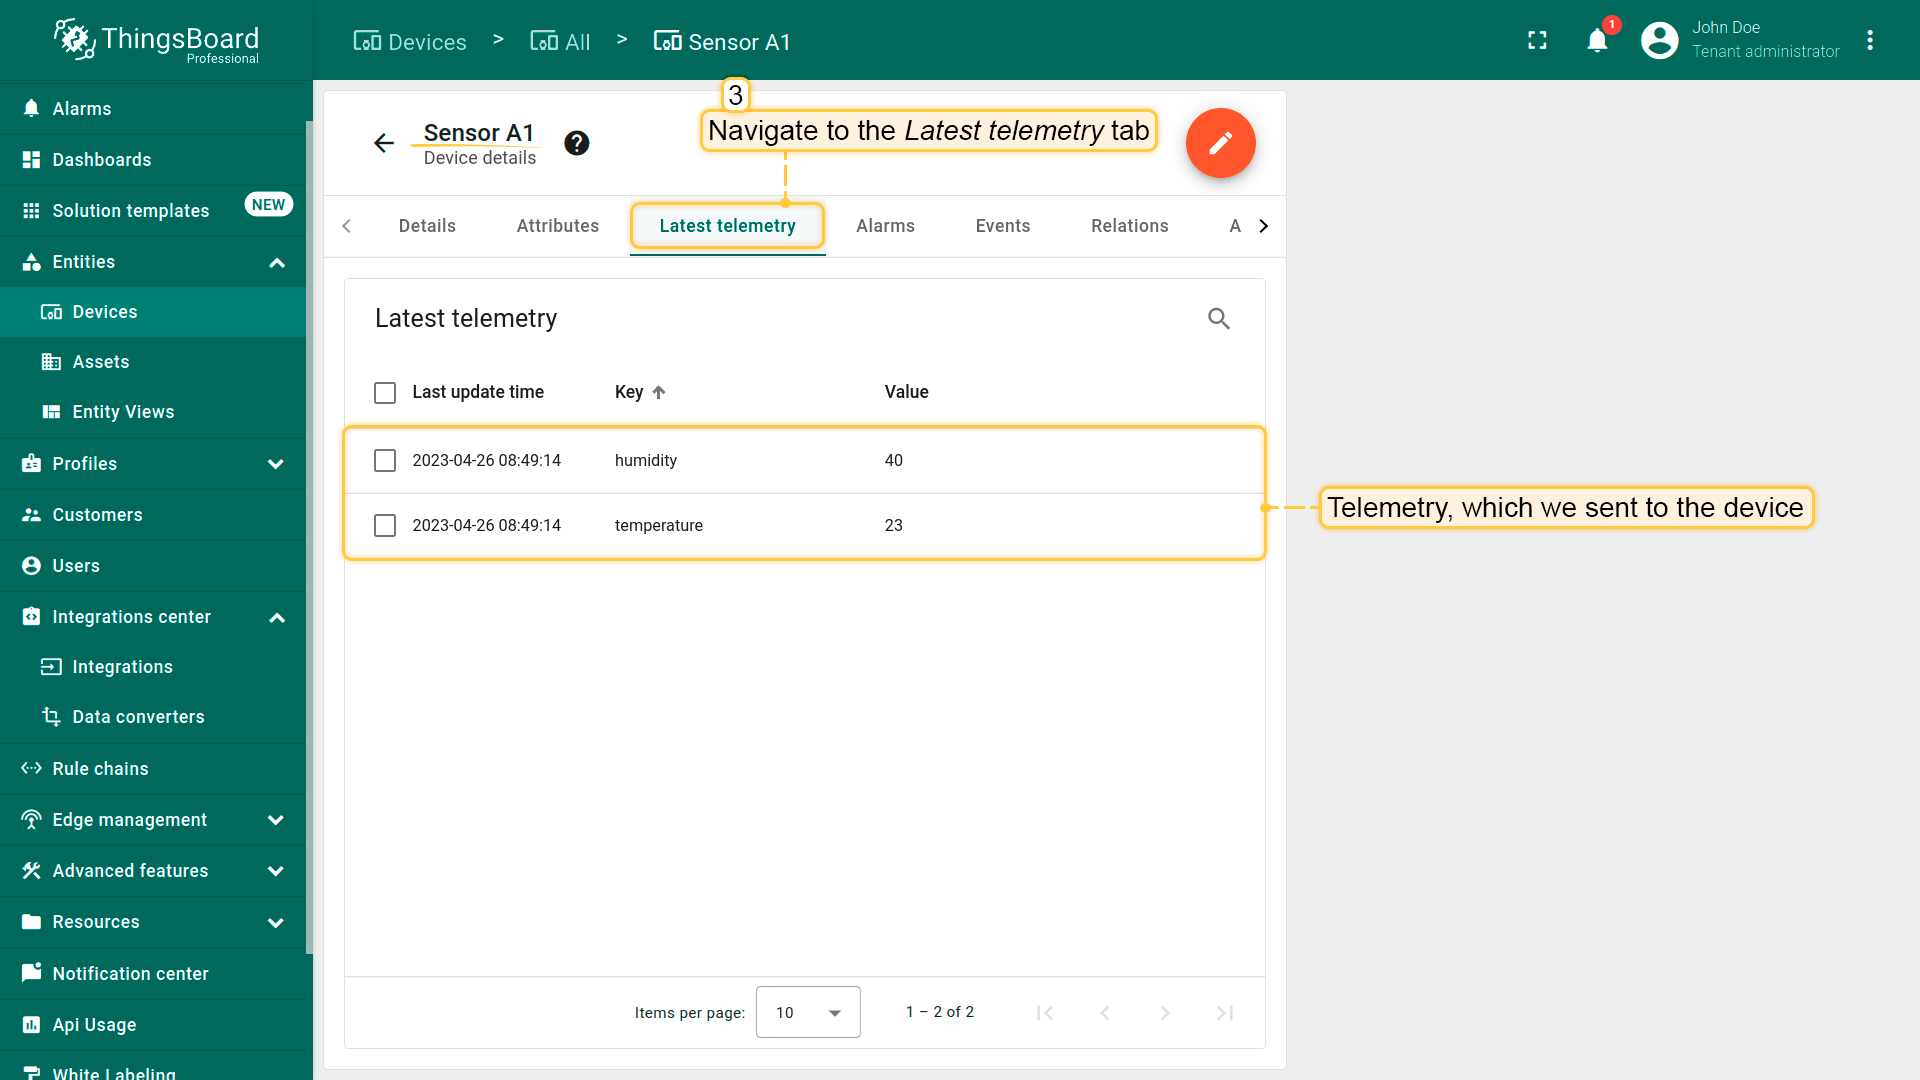
Learn more about notifications and how to configure them here.
Advanced usage: Downlink Messaging
To send messages to device you need to configure downlink settings, such as downlink converter and information about Service Bus topic that will receive mesages. Create topic for downlink messaging in Azure portal. (We advise also to create subscription to the topic so that you can check messages later in Azure portal).
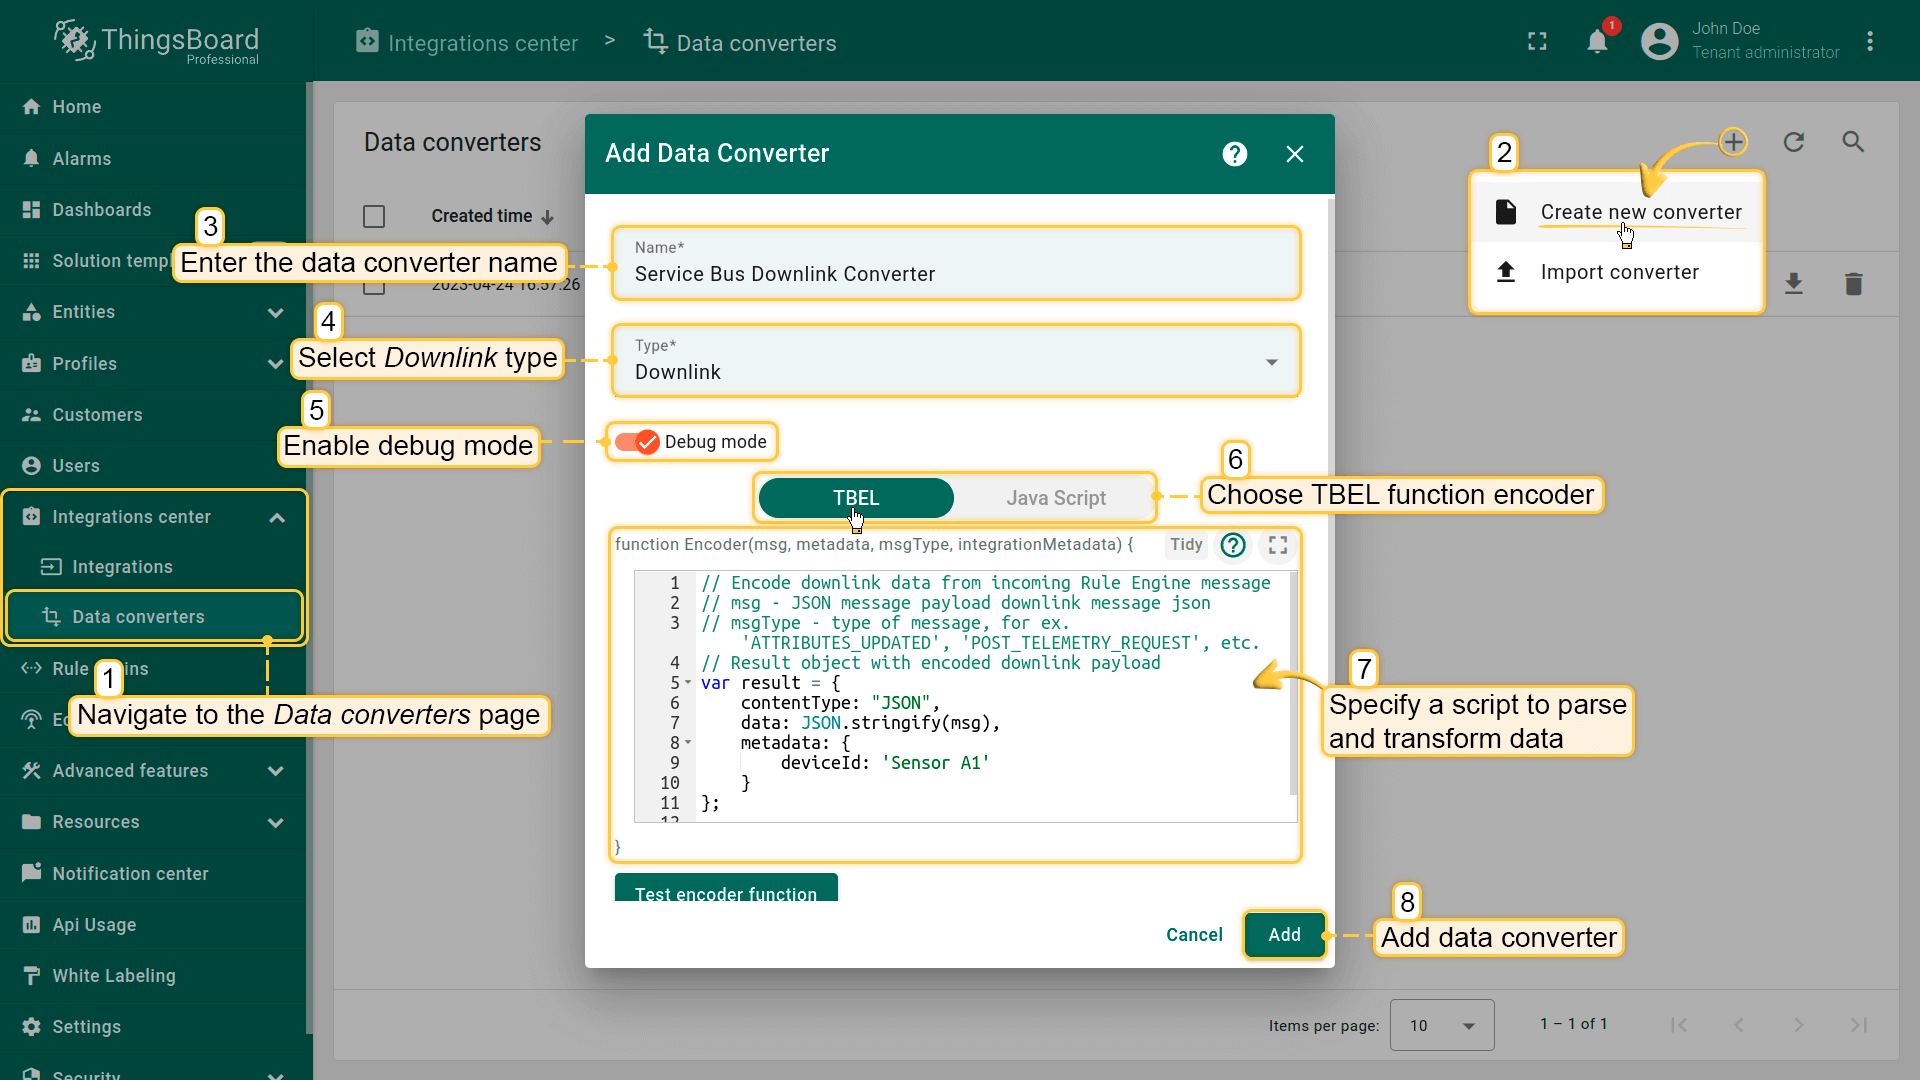
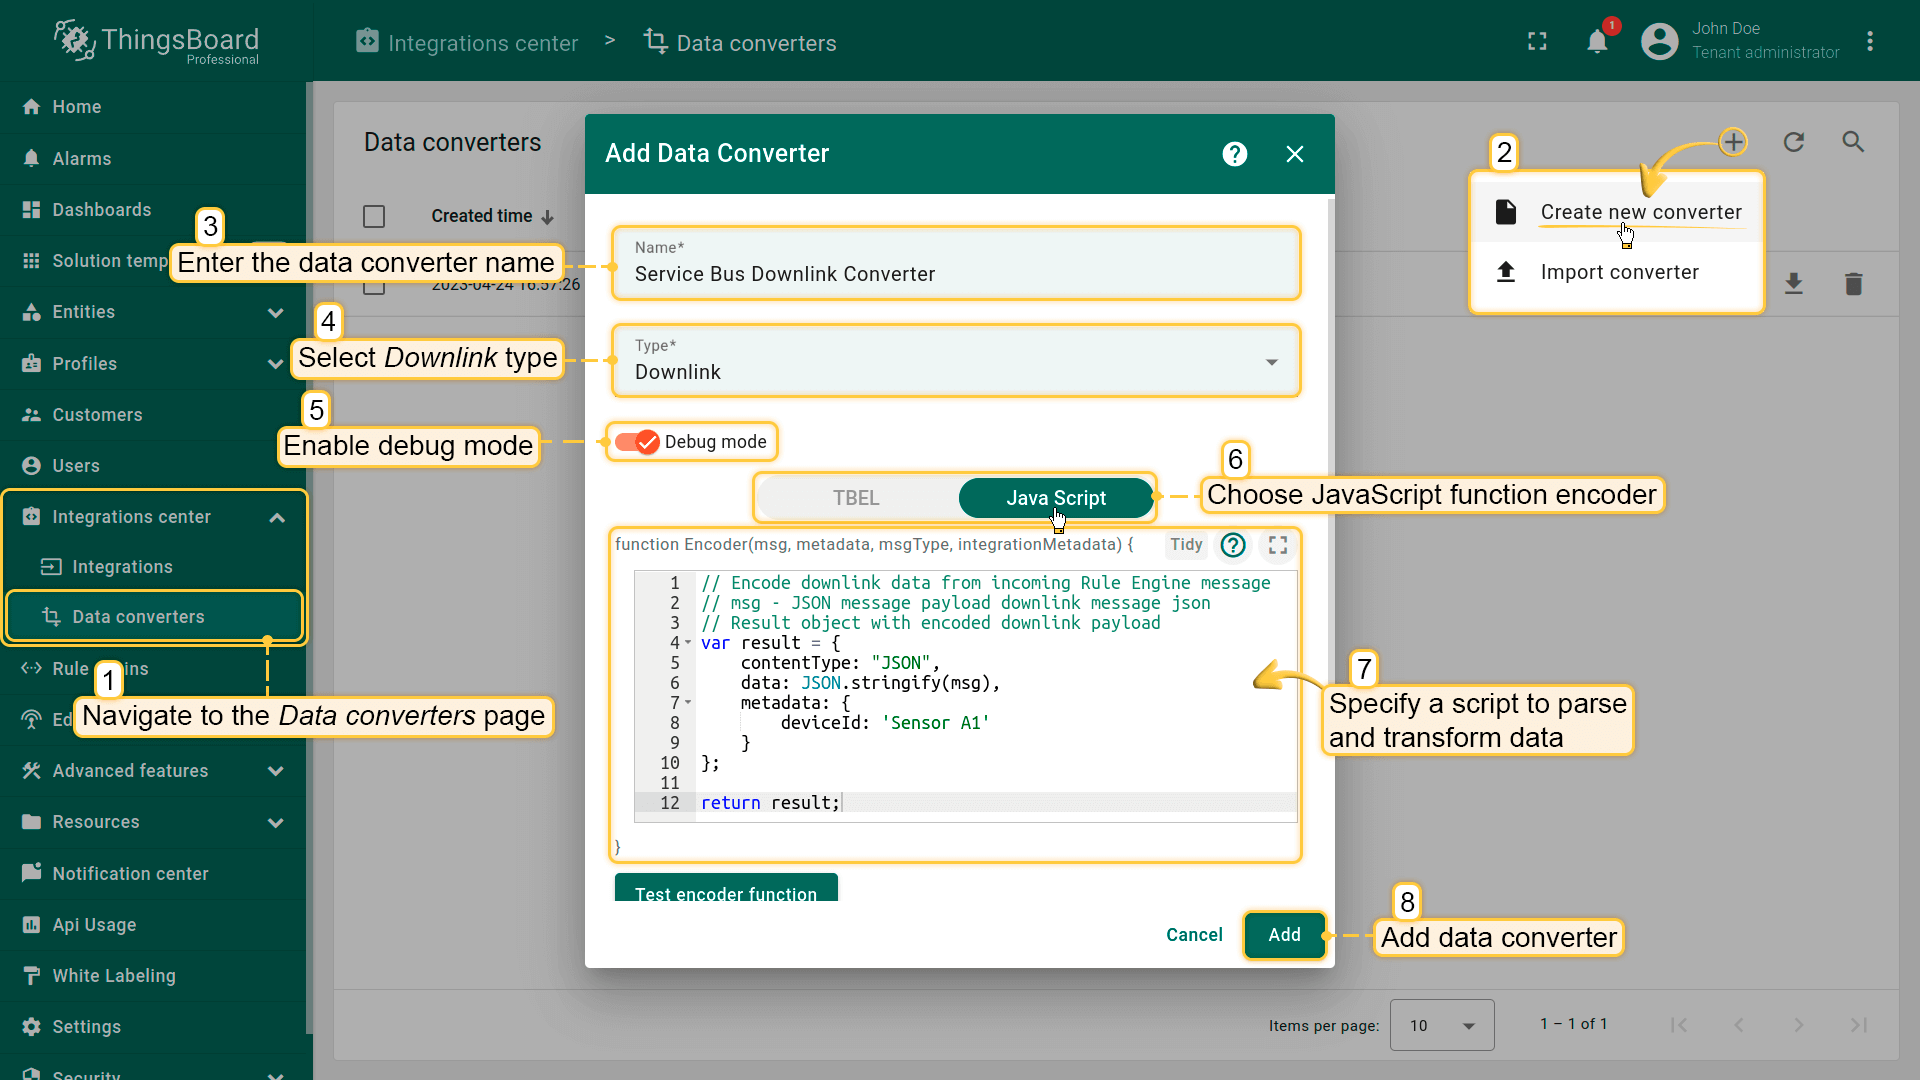
Now, create downlink converter (You need to do same steps like when was creating Uplink but choose Downlink and specify another function).
You can use our example of downlink converter or write your own according to your configuration:
|
You can use our example of downlink converter or write your own according to your configuration:
|
Go to integration and specify created downlink converter. Then open Advanced settings to specify Downlink topic and Downlink connection string for your Service Bus namespace (copy connection string from uplink settings if you use the same namespace for downlink).
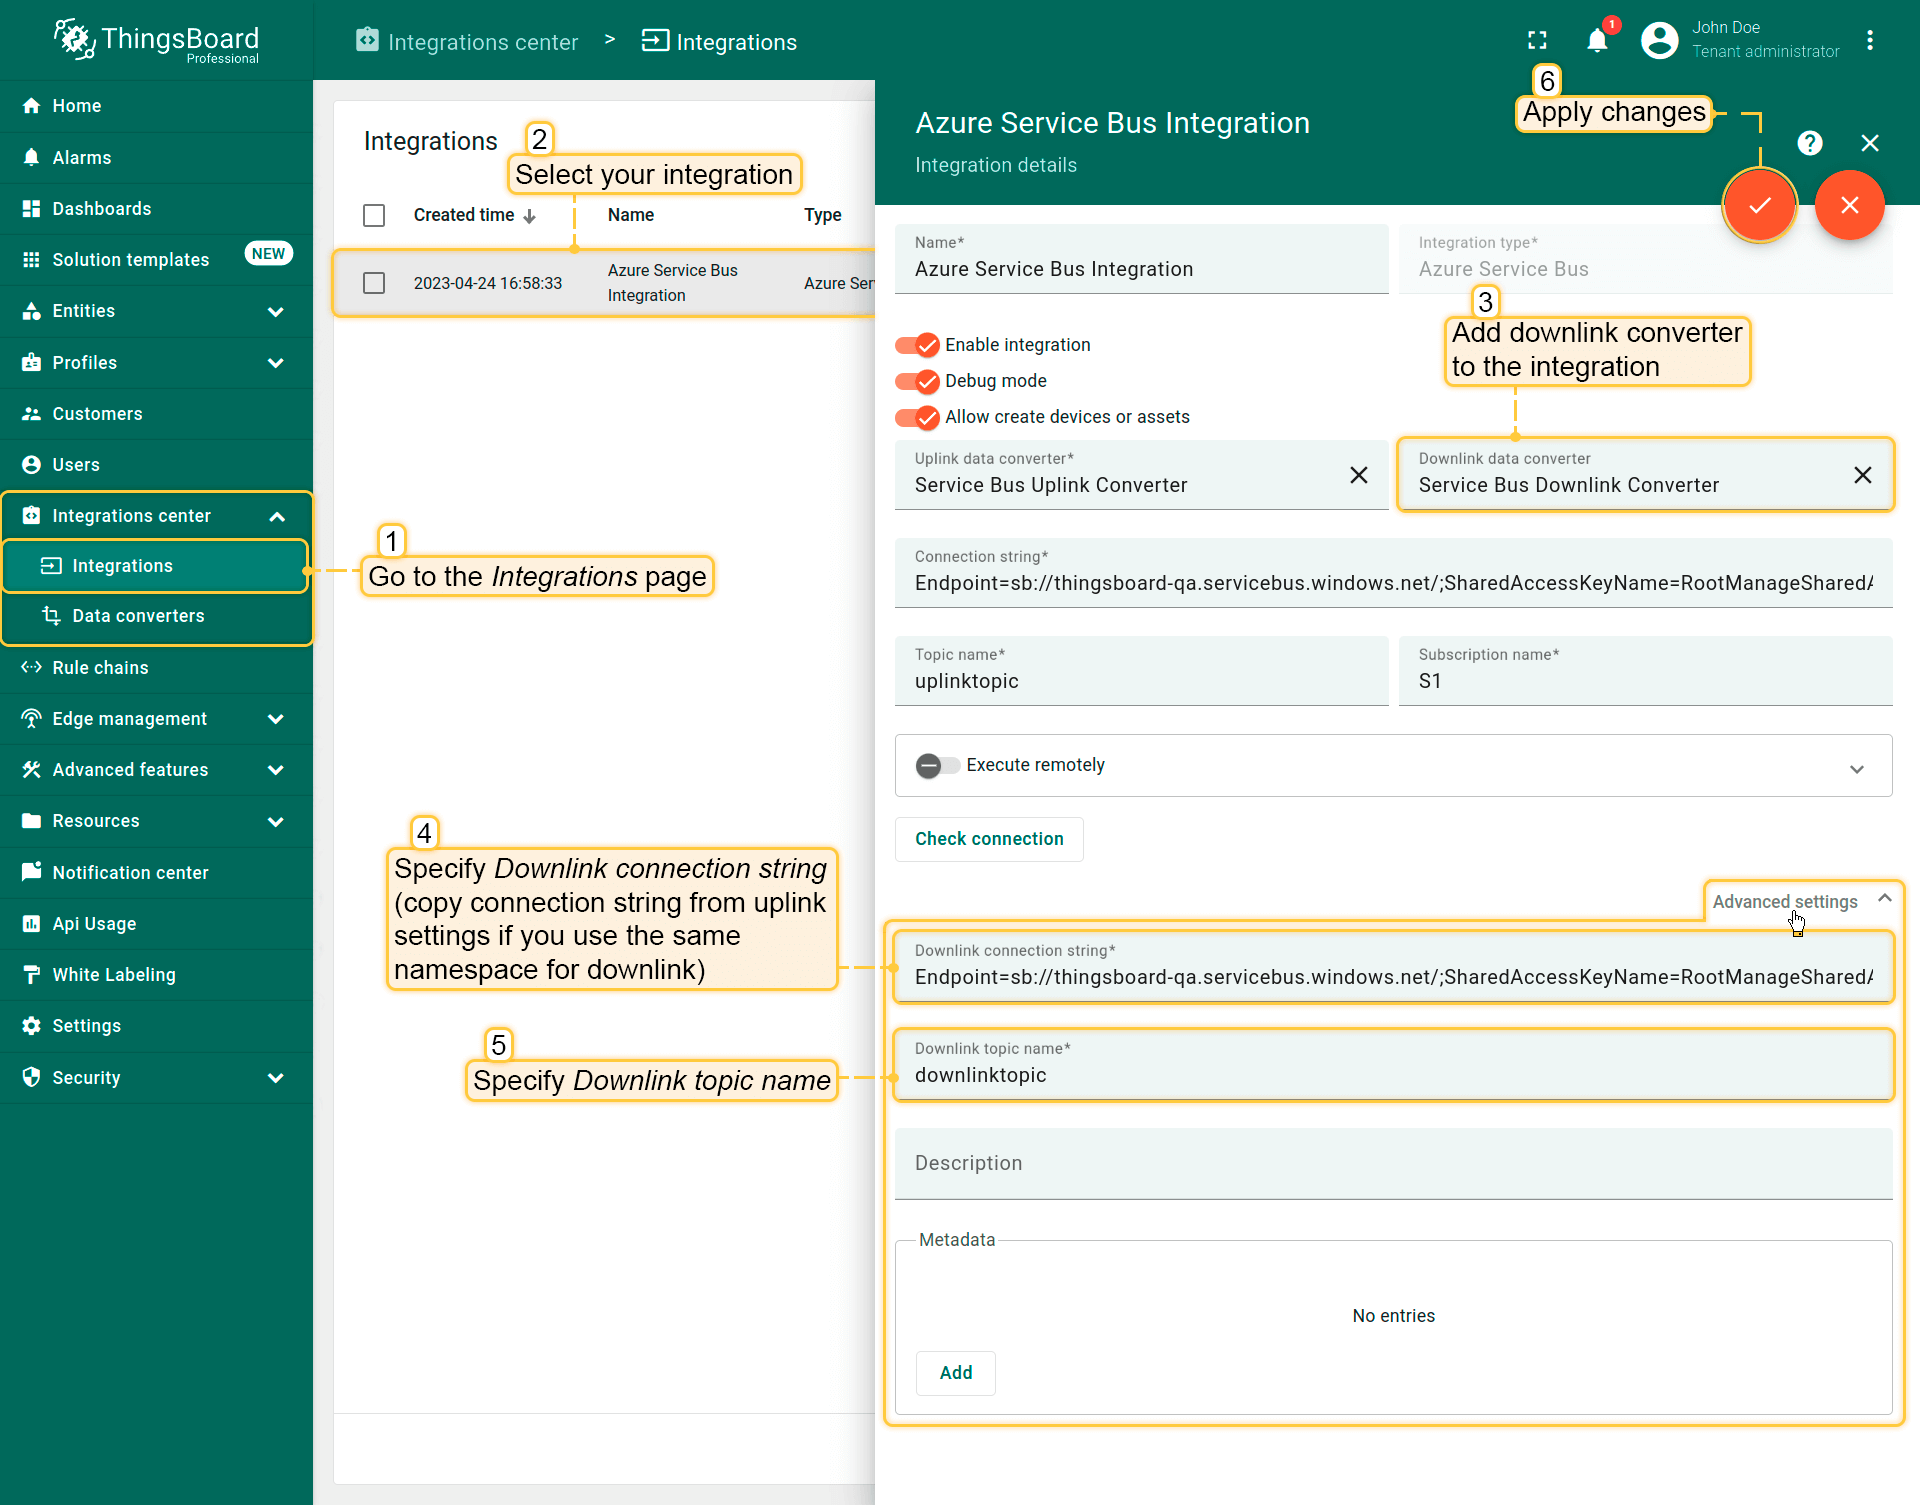
Ok, downlink converter ready, integration ready. Let’s test integration with help of downlink node.
After test uplink message was sent integration has created the device inside Thingsboard. Let`s check with which Rule Chain it is connected. For this go to Entities -> Devices page in Thingsboard menu and find the device with the name that we have used in the uplink. Find and navigate to the device profile used by the device.
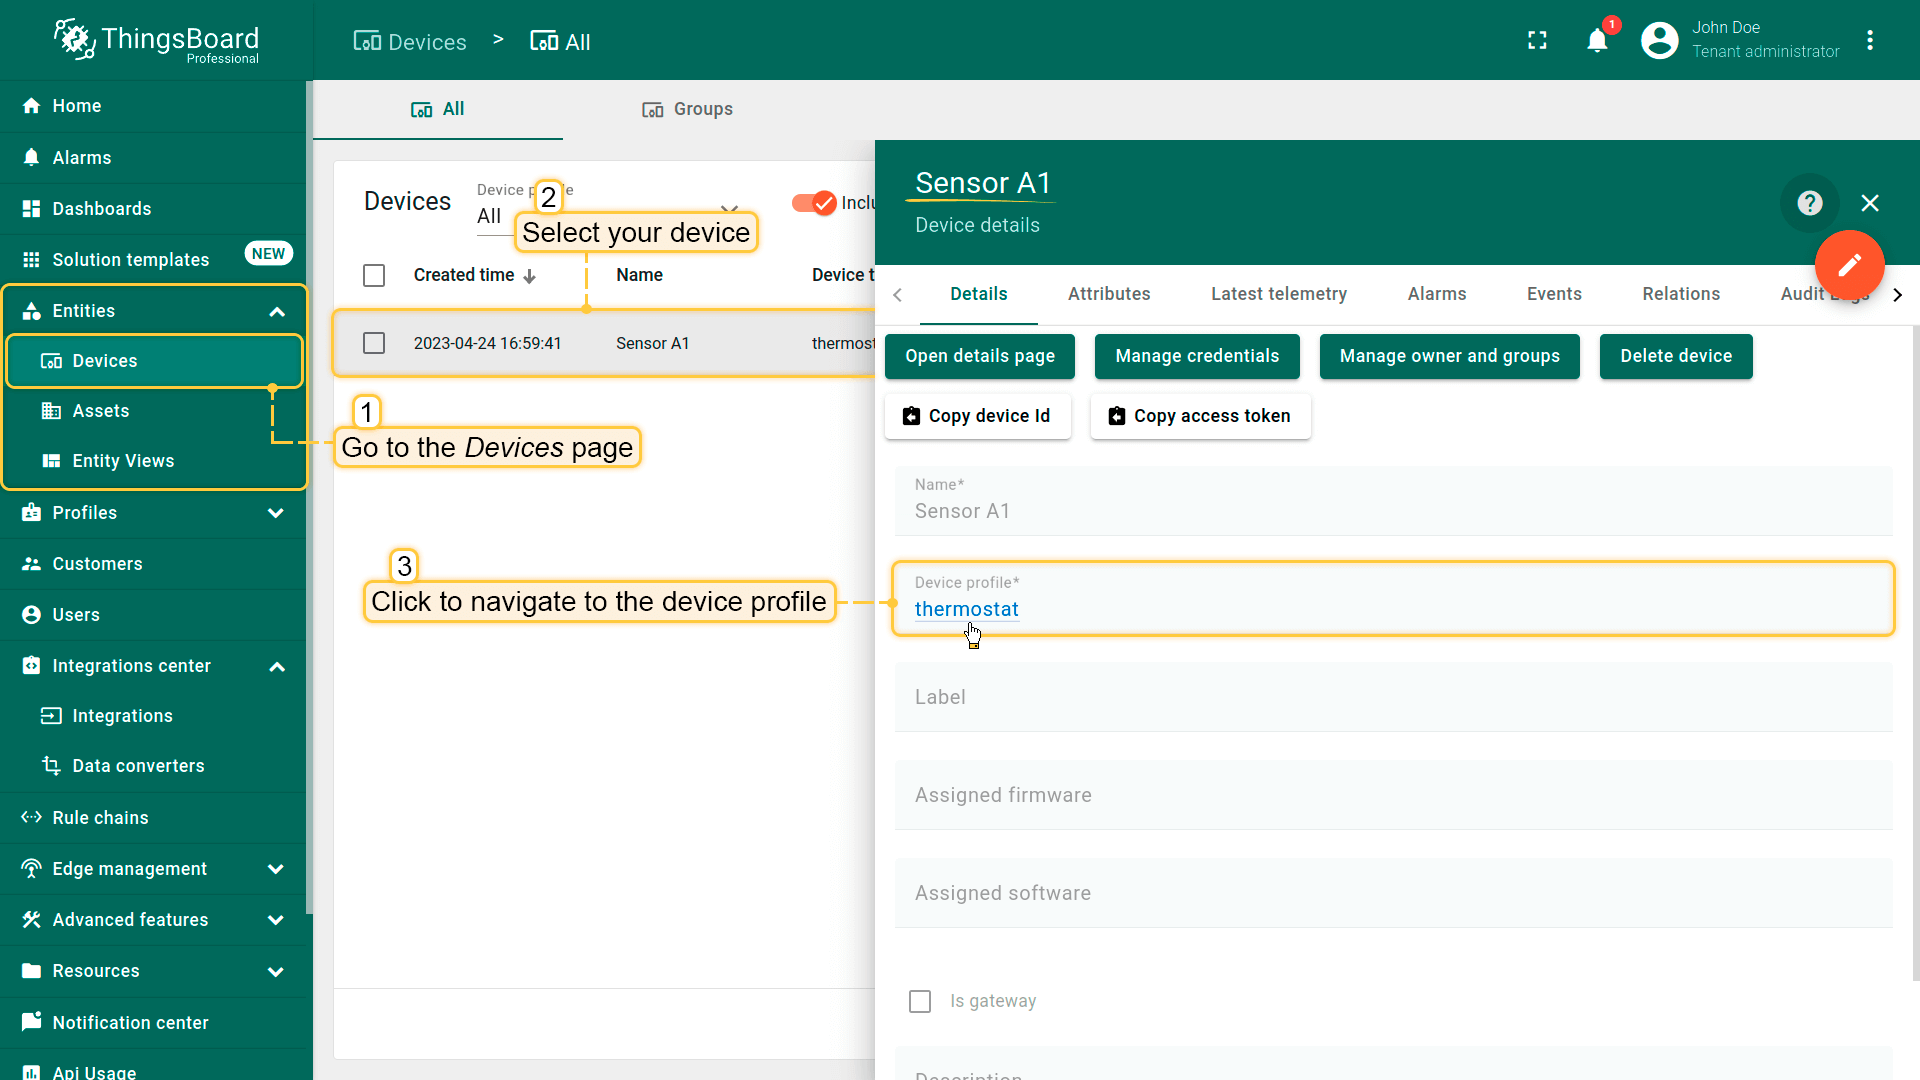
Find the name of rule chain that device profile uses.
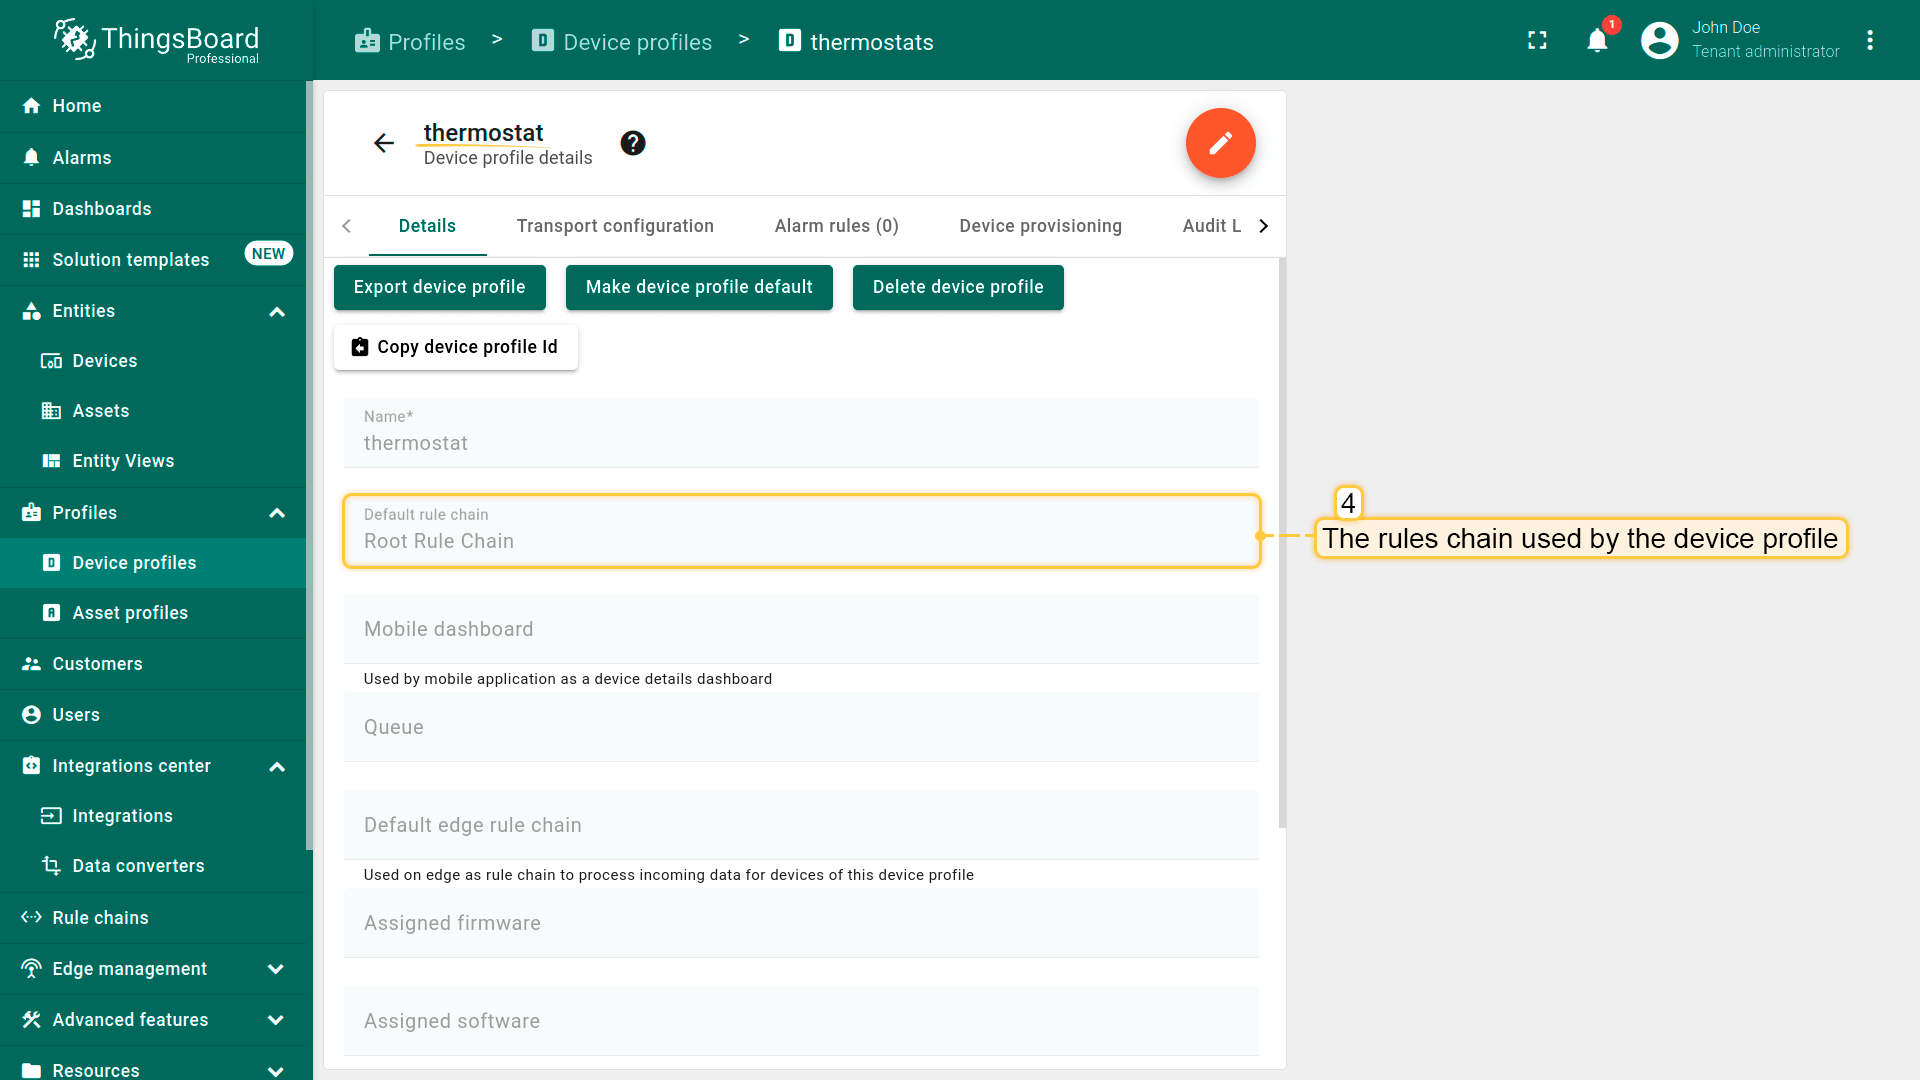
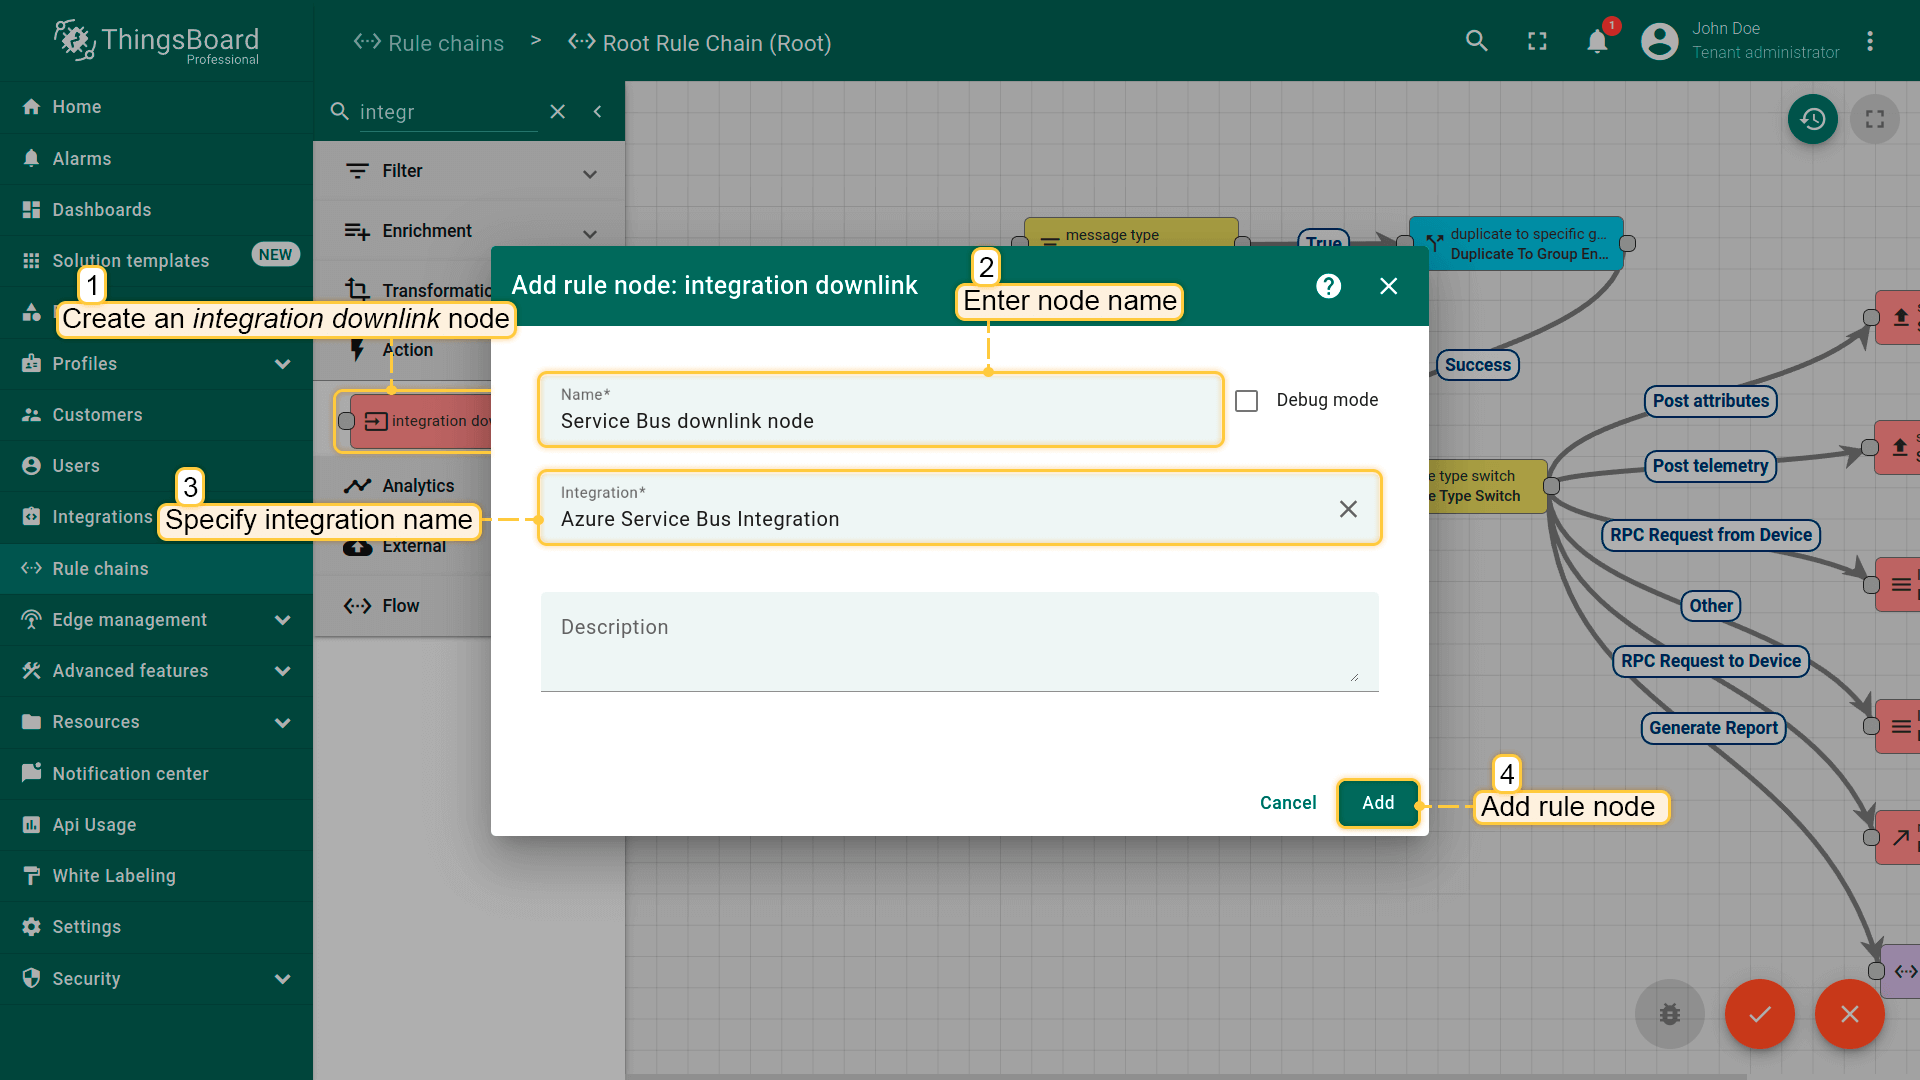
Go to the Rule chains page. In ‘Search nodes’ field type ‘downlink’ and choose in the menu ‘integration downlink’ node and drag it to the canvas. In pop-up you need to specify the name of rule node and choose your integration.
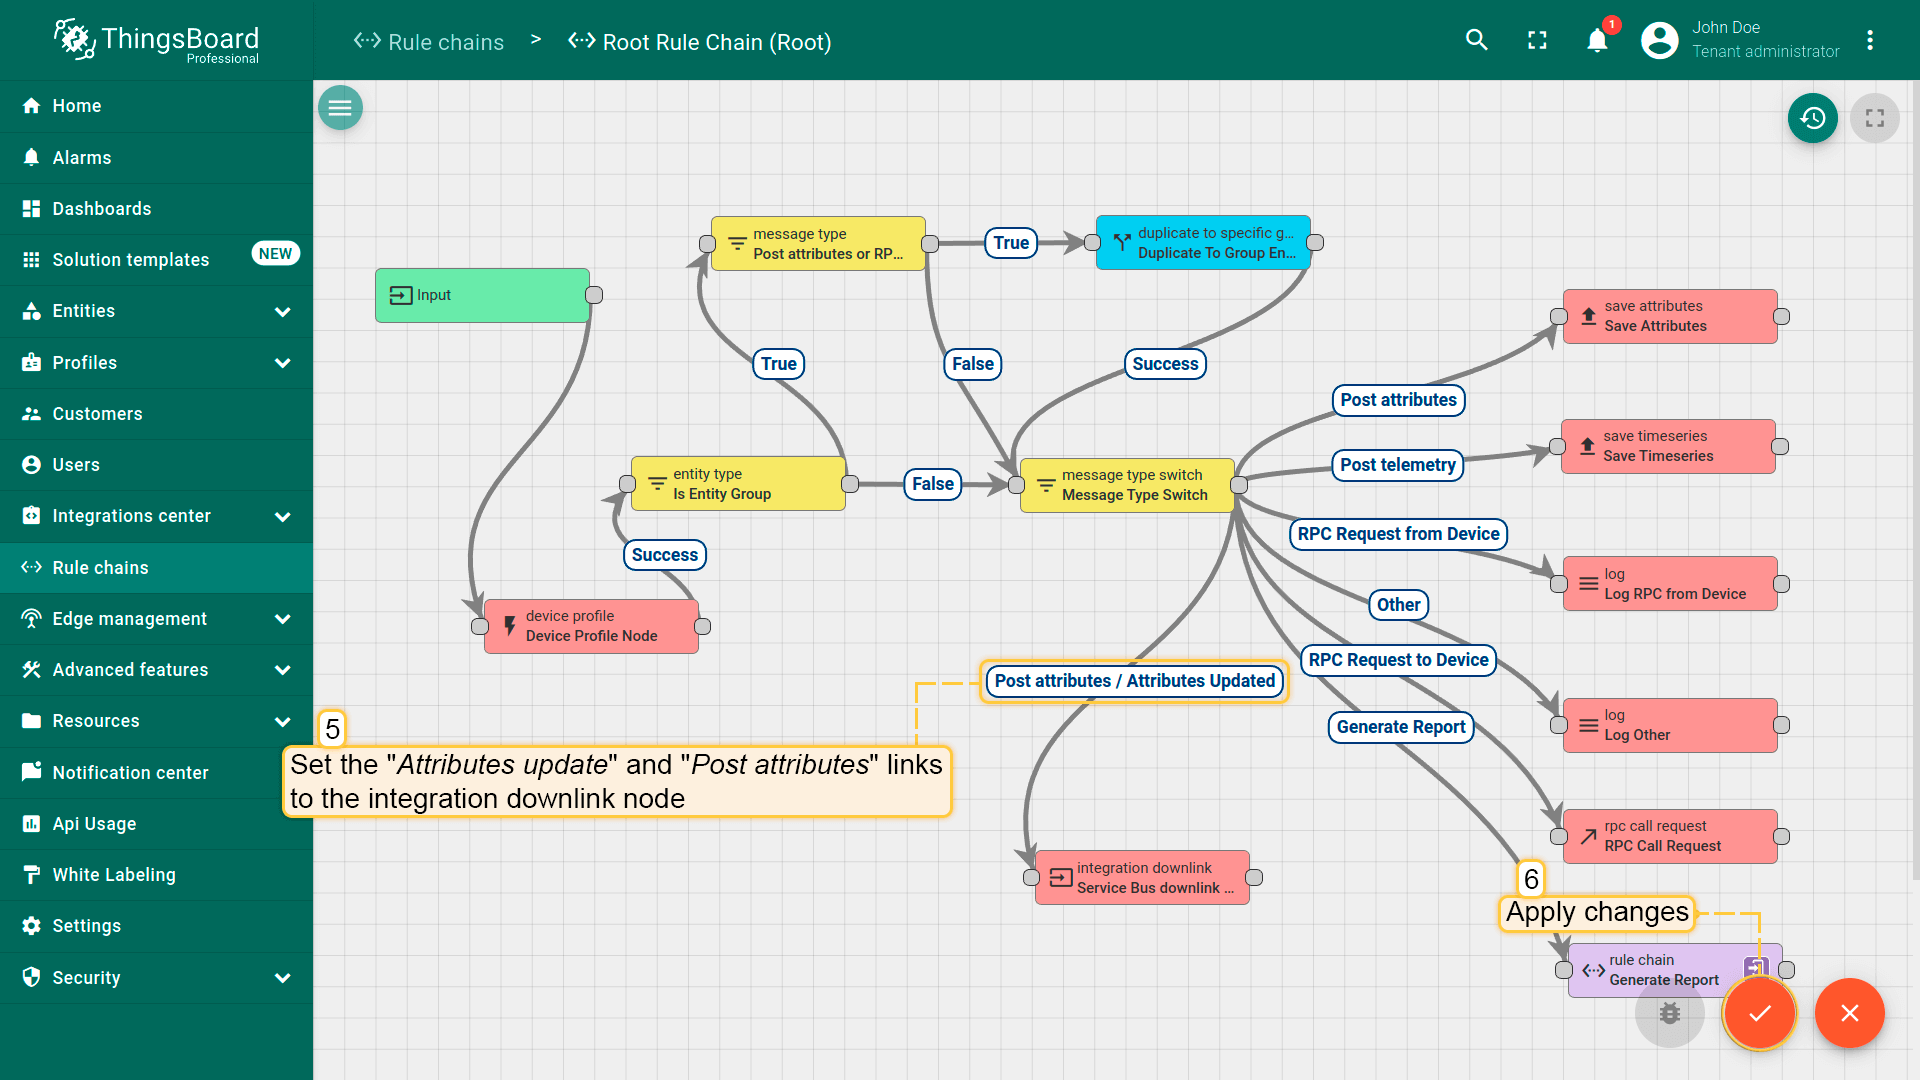
Then we need to tap on a right grey circle of ‘message type switch’ rule node and drag this circle to left side of ‘integration downlink’ node, here choose ‘Post attribute’ and ‘Attributes update’, tap “Add” link and save Rule chain.
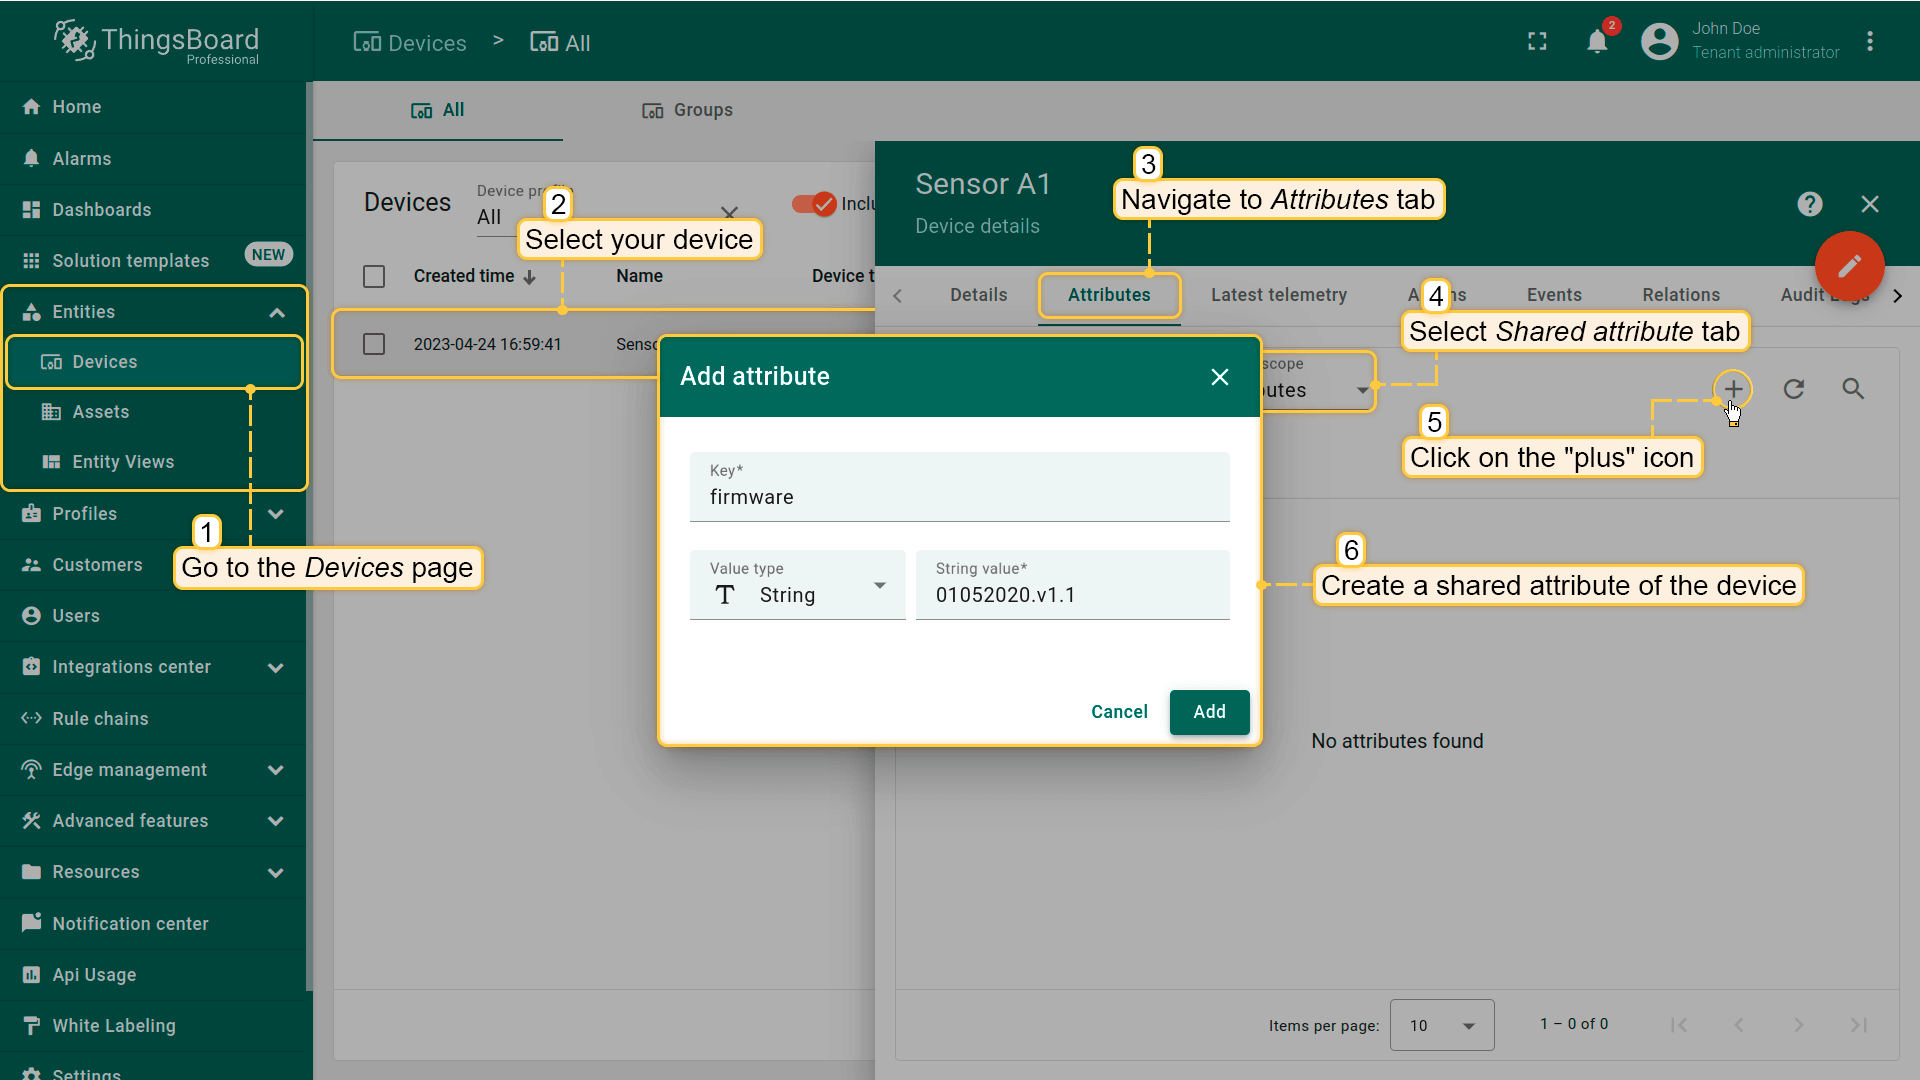
Let’s go to ‘Entities’ -> ‘Devices’ page and choose our device. Switch to Attributes tab. In ‘Entity attributes scope’ list choose Shared attributes. Tap on ‘plus’ to create a new attribute. Specify in pop-up the key name of attribute, type of value and some value and tap ‘Add’.
Go to the Integrations page to check the result of downlink.
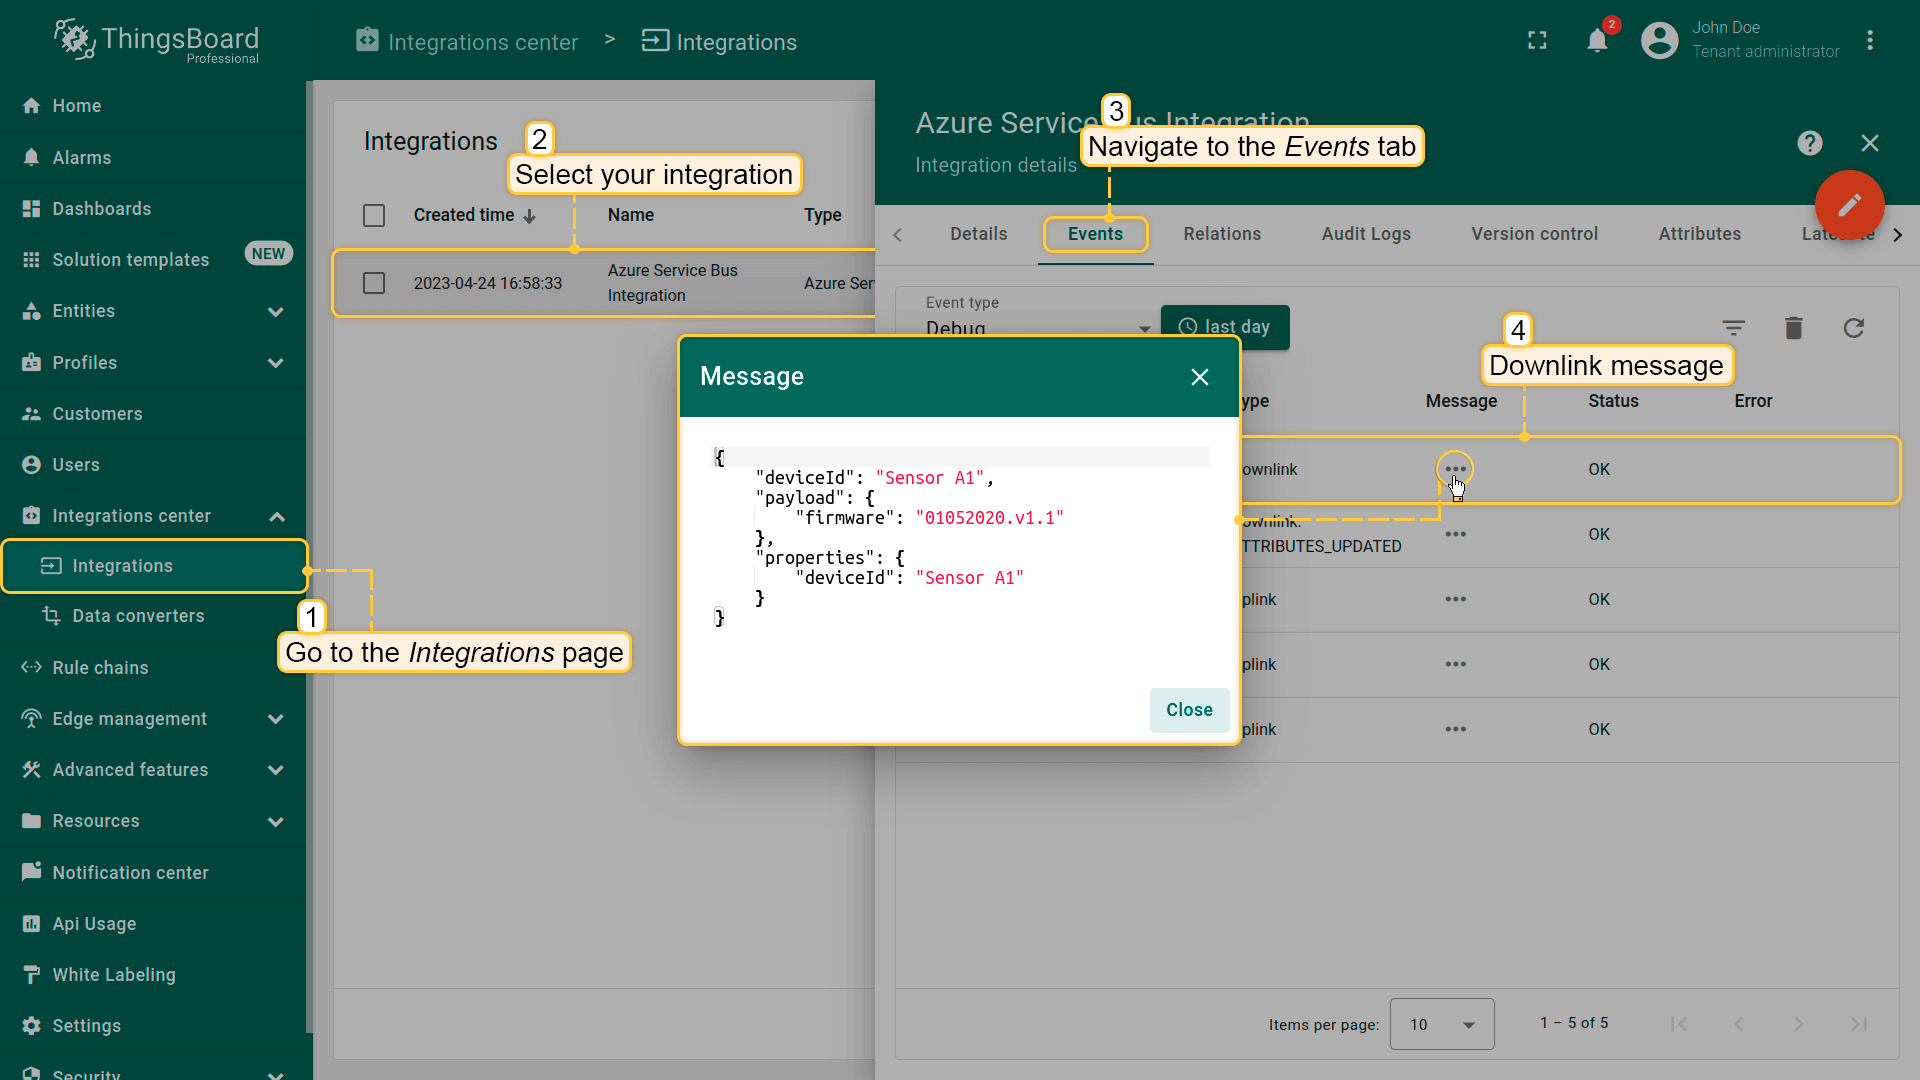
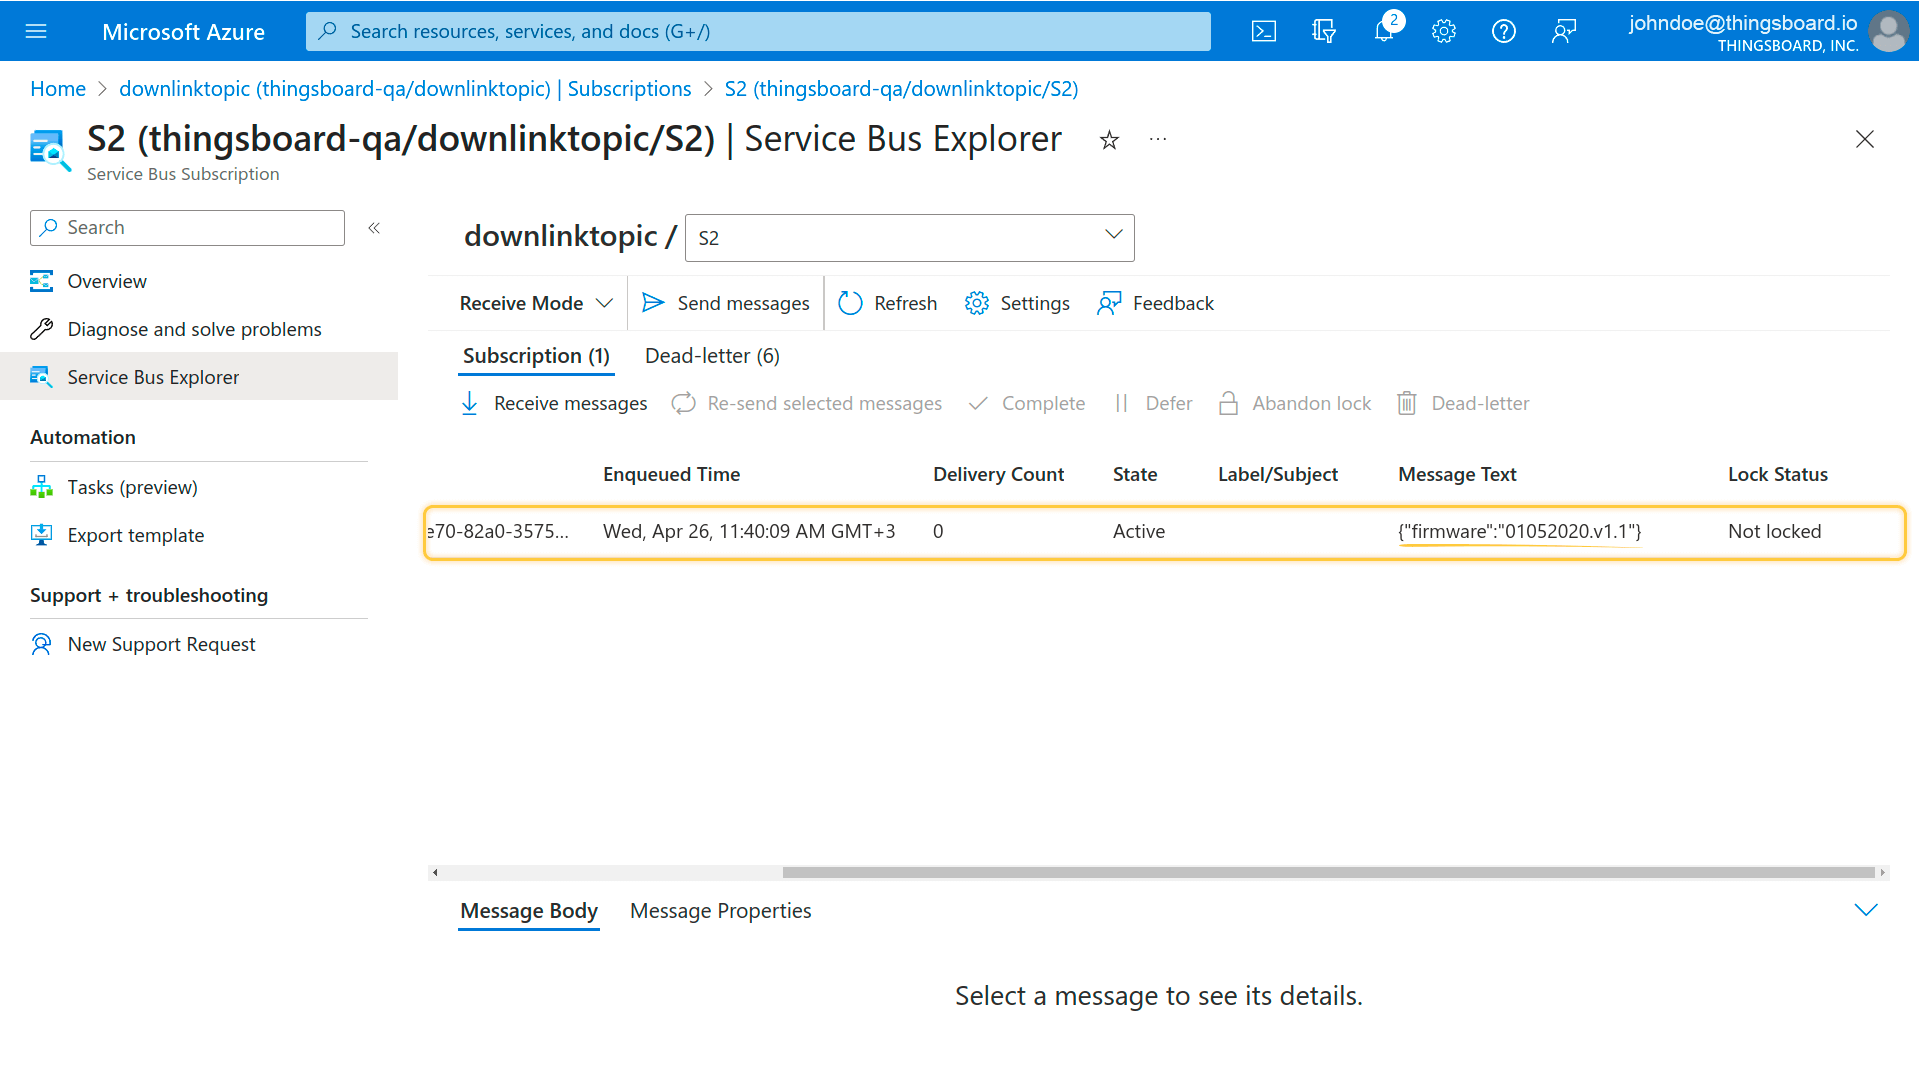
As you can see we have an event that downlink message was successfully generated by Integration and was sent to Azure Service Bus.
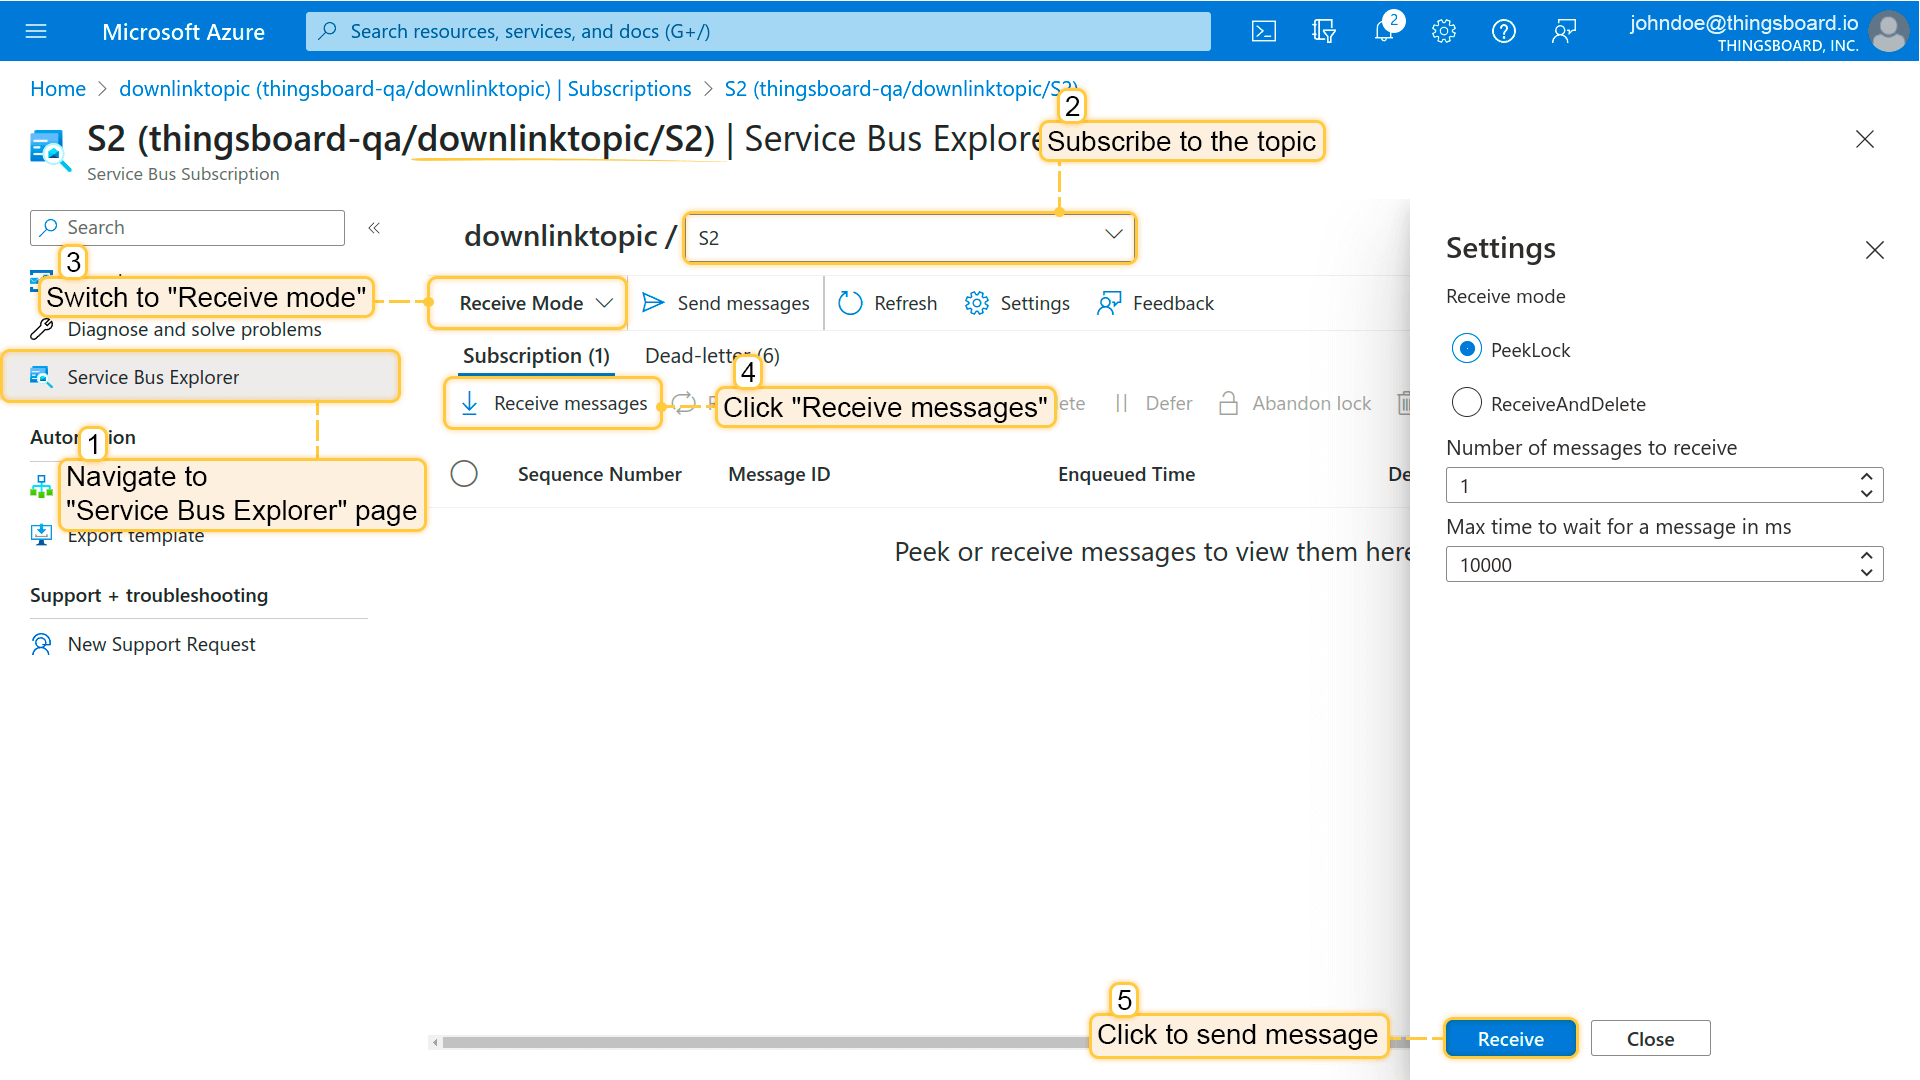
To check it in Azure Service Bus you need to go to Azure Portal, choose topic you have used for downlink and subscription to the topic. Select Receive mode, then click on Receive messages. In pop-up click ‘Receive’ button.
Conclusion
That’s it! Good luck in configuring of you IoT devices and dashboards!
Next steps
-
Getting started guides - These guides provide quick overview of main ThingsBoard features. Designed to be completed in 15-30 minutes.
-
Data visualization - These guides contain instructions on how to configure complex ThingsBoard dashboards.
-
Data processing & actions - Learn how to use ThingsBoard Rule Engine.
-
IoT Data analytics - Learn how to use rule engine to perform basic analytics tasks.
-
Advanced features - Learn about advanced ThingsBoard features.
