- Assigning custom attributes to entities and attributes managing
- Attribute names
- Attribute types
- Attributes persistence
- Data Query API
- Data visualization
- Rule engine
- Old video Tutorial
Assigning custom attributes to entities and attributes managing
ThingsBoard provides the ability to assign custom attributes to your entities and manage these attributes. Those attributes are stored in the database and may be used for data visualization and data processing.
Attributes are treated as key-value pairs. Flexibility and simplicity of the key-value format allow easy and seamless integration with almost any IoT device on the market. Key is always a string and is basically an attribute name, while the attribute value can be either string, boolean, double, integer or JSON. For example:
1
2
3
4
5
6
7
8
9
10
11
{
 "firmwareVersion": "v2.3.1",
 "booleanParameter": true,
 "doubleParameter": 42.0,
 "longParameter": 73,
 "configuration": {
    "someNumber": 42,
    "someArray": [1, 2, 3],
    "someNestedObject": { "key": "value" }
 }
}
Attribute names
As a platform user, you can define any attribute name. However, we recommend to use camelCase. This make it easy to write custom JS functions for data processing and visualization.
Attribute types
ThingsBoard supports three types of attributes: server-side, shared, and client-side. Each type has a specific purpose, access rules, and use cases, which we explain below.
Server-side attributes
This type of attribute is supported by almost any platform entity: Device, Asset, Customer, Tenant, User, etc. Server-side attributes are the ones that you may configure via Administration UI or REST API. The device firmware can’t access the server-side attribute.
Let’s assume you would like to build a building monitoring solution and review few examples:
- The latitude, longitude and address are good examples of server-side attribute you may assign to assets that represent building or other real estate. You may use this attributes on the Map Widget in your dashboard to visualize location of the buildings.
- The floorPlanImage may contain a URL to the image. You may use this attribute to visualize floor plan on the Image Map Widget.
- The maxTemperatureThreshold and temperatureAlarmEnabled may be used to configure and enable/disable alarms for a certain device or asset.
Administration UI
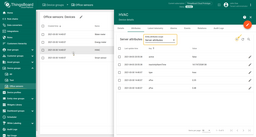
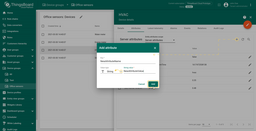
- Go to Entities → Devices and open the device you want to edit by clicking its row. In the device details, open the "Attributes" tab, select the "Server attributes" scope, and click the "+" icon to add a new attribute.
- In the dialog, enter the attribute key, select the value type (for example, String), and provide a value.
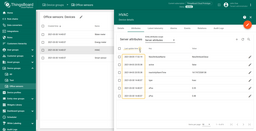
- After saving, the new attribute appears in the list with its key, value, and last update time. Sort using "Last update time" to quickly locate the newly created attribute.
REST API
Use REST API documentation to get the value of the JWT token. You will use it to populate the ‘X-Authorization’ header and authenticate your REST API call request.
Send POST request with JSON representation of the attribute to the following URL:
1
https://$YOUR_THINGSBOARD_HOST/api/plugins/telemetry/$ENTITY_TYPE/$ENTITY_ID/SERVER_SCOPE
The example below creates attribute with the name “newAttributeName” and value “newAttributeValue” for device with ID ‘ad17c410-914c-11eb-af0c-d5862211a5f6’ and ThingsBoard Cloud server:
1
2
3
4
curl -v 'https://eu.thingsboard.cloud/api/plugins/telemetry/DEVICE/ad17c410-914c-11eb-af0c-d5862211a5f6/SERVER_SCOPE' \
-H 'x-authorization: Bearer $YOUR_JWT_TOKEN_HERE' \
-H 'content-type: application/json' \
--data-raw '{"newAttributeName":"newAttributeValue"}'
Similar, you can fetch all server-side attributes using the following command:
1
2
3
curl -v -X GET 'https://eu.thingsboard.cloud/api/plugins/telemetry/DEVICE/ad17c410-914c-11eb-af0c-d5862211a5f6/values/attributes/SERVER_SCOPE' \
  -H 'x-authorization: Bearer $YOUR_JWT_TOKEN_HERE' \
  -H 'content-type: application/json'
The output will include ‘key’, ‘value’ and timestamp of the last update:
1
2
3
4
5
6
7
[
    {
        "lastUpdateTs": 1617633139380,
        "key": "newAttributeName",
        "value": "newAttributeValue"
    }
]
As an alternative to curl, you may use Java or Python REST clients.
Shared attributes
Shared attributes are available only for entities of type Device. It is not available for any other entity types, such as Assets or Customers. They are designed to send configuration or operational parameters such as thresholds from the server to the device.
How Devices Interact with Shared Attributes
A device cannot publish or change the value of a shared attribute. From the device’s perspective, these attributes are read-only. A device’s firmware or application can interact with shared attributes in the following ways:
- Request Current Values: The device can send a request to the server to retrieve the current value(s) of one or more shared attributes.
- Subscribe to Updates: The device can subscribe to receive notifications whenever a shared attribute’s value is changed on the server.
- Receive Updates via Downlinks: For certain network integrations, shared attribute updates can be pushed to the device as a downlink message.
Communication Protocol Examples
The method for receiving updates typically depends on the communication protocol used by the device:
- Real-time Subscriptions (e.g., MQTT): Devices that use bi-directional protocols like MQTT can subscribe to attribute updates and receive notifications in real-time as soon as a value changes.
- Periodic Polling (e.g., HTTP): Devices that use request-response protocols like HTTP can periodically poll the server to fetch the latest values of their shared attributes.
The most common use case of shared attributes is to store device settings. Let’s assume the same building monitoring solution and review few examples:
- The targetFirmwareVersion attribute may be used to store the firmware version for particular Device.
- Devices can monitor the maxTemperatureThreshold attribute and activate cooling if the temperature exceeds the set limit.
The user may change the attribute via UI. The script or other server-side application may change the attribute value via REST API.
Administration UI
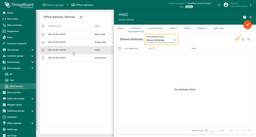
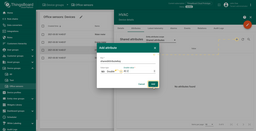
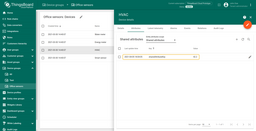
- Go to Entities → Devices and open the device you want to edit by clicking its row. In the device details, open the "Attributes" tab, select the "Shared attributes" scope, and click the "+" icon to add a new attribute.
- In the dialog, enter the attribute key, select the value type (for example, Double), and provide a value.
- After saving, the new attribute appears in the list with its key, value, and last update time.
REST API
Use REST API documentation to get the value of the JWT token. You will use it to populate the ‘X-Authorization’ header and authenticate your REST API call request.
Send POST request with JSON representation of the attribute to the following URL:
1
https://$YOUR_THINGSBOARD_HOST/api/plugins/telemetry/$ENTITY_TYPE/$ENTITY_ID/SHARED_SCOPE
The example below creates attribute with the name “newAttributeName” and value “newAttributeValue” for device with ID ‘ad17c410-914c-11eb-af0c-d5862211a5f6’ and ThingsBoard Cloud server:
1
2
3
4
curl -v 'https://eu.thingsboard.cloud/api/plugins/telemetry/DEVICE/ad17c410-914c-11eb-af0c-d5862211a5f6/SHARED_SCOPE' \
-H 'x-authorization: Bearer $YOUR_JWT_TOKEN_HERE' \
-H 'content-type: application/json' \
--data-raw '{"newAttributeName":"newAttributeValue"}'
Similar, you can fetch all shared attributes using the following command:
1
2
3
curl -v -X GET 'https://eu.thingsboard.cloud/api/plugins/telemetry/DEVICE/ad17c410-914c-11eb-af0c-d5862211a5f6/values/attributes/SHARED_SCOPE' \
  -H 'x-authorization: Bearer $YOUR_JWT_TOKEN_HERE' \
  -H 'content-type: application/json' \
The output will include ‘key’, ‘value’ and timestamp of the last update:
1
2
3
4
5
6
7
[
    {
        "lastUpdateTs": 1617633139380,
        "key": "newAttributeName",
        "value": "newAttributeValue"
    }
]
As an alternative to curl, you may use Java or Python REST clients.
API for device firmware or applications:
- request shared attributes from the server: MQTT API, CoAP API, HTTP API, LwM2M API;
- subscribe to shared attribute updates from the server: MQTT API, CoAP API, HTTP API, LwM2M API;.
Client-side attributes
This type of attributes is available only for Devices. It is used to report various semi-static data from Device (Client) to ThingsBoard (Server). It is similar to shared attributes, but has one important difference. The device firmware/application may send the value of the attributes from device to the platform.
The most common use case of client attributes is to report device state. Let’s assume the same building monitoring solution and review few examples:
- The currentFirmwareVersion attribute may be used to report the installed firmware/application version for the device to the platform.
- The currentConfiguration attribute may be used to report current firmware/application configuration to the platform.
- The currentState may be used to persist and restore current firmware/application state via network, if device does not have the persistent storage.
The user and server-side applications may browse the client-side attributes via UI/REST API but they are not able to change them. Basically, the value of the client-side attribute is read-only for the UI/REST API.
Fetch client-side attributes via REST API
Use REST API documentation to get the value of the JWT token. You will use it to populate the ‘X-Authorization’ header and authenticate your REST API call request.
Send GET request to the following URL:
1
https://$YOUR_THINGSBOARD_HOST/api/plugins/telemetry/$ENTITY_TYPE/$ENTITY_ID/CLIENT_SCOPE
The example below gets all attributes for device with ID ‘ad17c410-914c-11eb-af0c-d5862211a5f6’ and ThingsBoard Cloud server:
1
2
3
curl -v -X GET 'https://eu.thingsboard.cloud/api/plugins/telemetry/DEVICE/ad17c410-914c-11eb-af0c-d5862211a5f6/values/attributes/CLIENT_SCOPE' \
  -H 'x-authorization: Bearer $YOUR_JWT_TOKEN_HERE' \
  -H 'content-type: application/json' \
The output will include ‘key’, ‘value’ and timestamp of the last update:
1
2
3
4
5
6
7
[
    {
        "lastUpdateTs": 1617633139380,
        "key": "newAttributeName",
        "value": "newAttributeValue"
    }
]
As an alternative to curl, you may use Java or Python REST clients.
API for device firmware or applications:
- publish client-side attributes to the server: MQTT API, CoAP API, HTTP API;
- request client-side attributes from the server: MQTT API, CoAP API, HTTP API.
Attributes persistence
ThingsBoard stores latest value of the attribute and last modification time in the SQL database. This enables use of entity filters in the dashboards. Changes to the attributes initiated by the user are recorded in the audit logs.
Data Query API
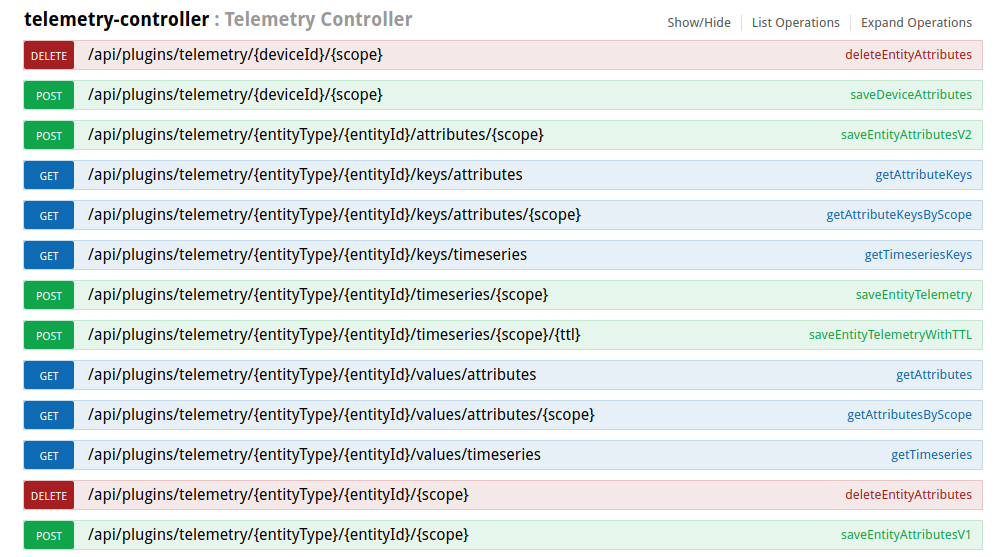
Telemetry Controller provides the following REST API to fetch entity data:
Data visualization
We assume you have already provisioned device attributes. Now you may use them in your dashboards. We recommend dashboards overview to get started. Once you are familiar how to create dashboards and configure data sources, you may use digital and analog gauges to visualize temperature, speed, pressure or other numeric values. You may also use cards to visualize multiple attributes using card or entities table.
You may also use input widgets to allow dashboard users to change the values of the attributes on the dashboards.
Rule engine
The Rule Engine is responsible for processing all sorts of incoming data and event. You may find most popular scenarios of using attributes within rule engine below:
Generate alarms based on the logical expressions against attribute values
Use alarm rules to configure most common alarm conditions via UI or use filter nodes to configure more specific use cases via custom JS functions.
Modify incoming client-side attributes before they are stored in the database
Use message type switch rule node to filter messages that contain “Post attributes” request. Then, use transformation rule nodes to modify a particular message.
React on the change of server-side attribute
Use message type switch rule node to filter messages that contain “Attributes Updated” notification. Then, use action or external to react on the incoming event.
Fetch attribute values to analyze incoming telemetry from device
Use enrichment rule nodes to enrich incoming telemetry message with attributes of the device, related asset, customer or tenant. This is extremely powerful technique that allows to modify processing logic and parameters based on settings stored in the attributes.


