- Quick Start: Your First Workflow
- When to use n8n with ThingsBoard
- Requirements
- Installation
- How to Use the Node
- Common Workflow Patterns
- Usage Examples
- API Reference
- Links
- Support
- License
n8n is a workflow automation platform that lets you connect ThingsBoard to hundreds of other services.
The ThingsBoard n8n Node gives you direct access to your IoT entities, telemetry, and alarms from n8n workflows.
- Manage IoT devices, assets, and customers directly from n8n workflows
- Access and manipulate telemetry data in real-time with attribute and time-series operations
- Monitor alarms and create automated responses based on alarm severity and type
- Navigate entity relationships to understand your IoT infrastructure topology
- Build AI-powered IoT automation using n8n AI Agents with natural language commands
Quick Start: Your First Workflow
Here’s what you can build in 5 minutes - a real-world data pipeline that exports IoT telemetry to cloud storage.
Scenario: Every day at midnight, automatically export the last 24 hours of device telemetry to AWS S3 as JSON files for data warehousing, analytics, or compliance archival.
The Workflow:
1
2
3
4
5
6
7
8
9
10
11
Schedule (Daily at 00:00 UTC)
    ↓
Code node (calculate last 24h time range in MS)
    ↓
ThingsBoard: Get device by a name
    ↓
ThingsBoard: Get timeseries data for device
    ↓
Convert to File (JSON format)
    ↓
Upload to AWS S3
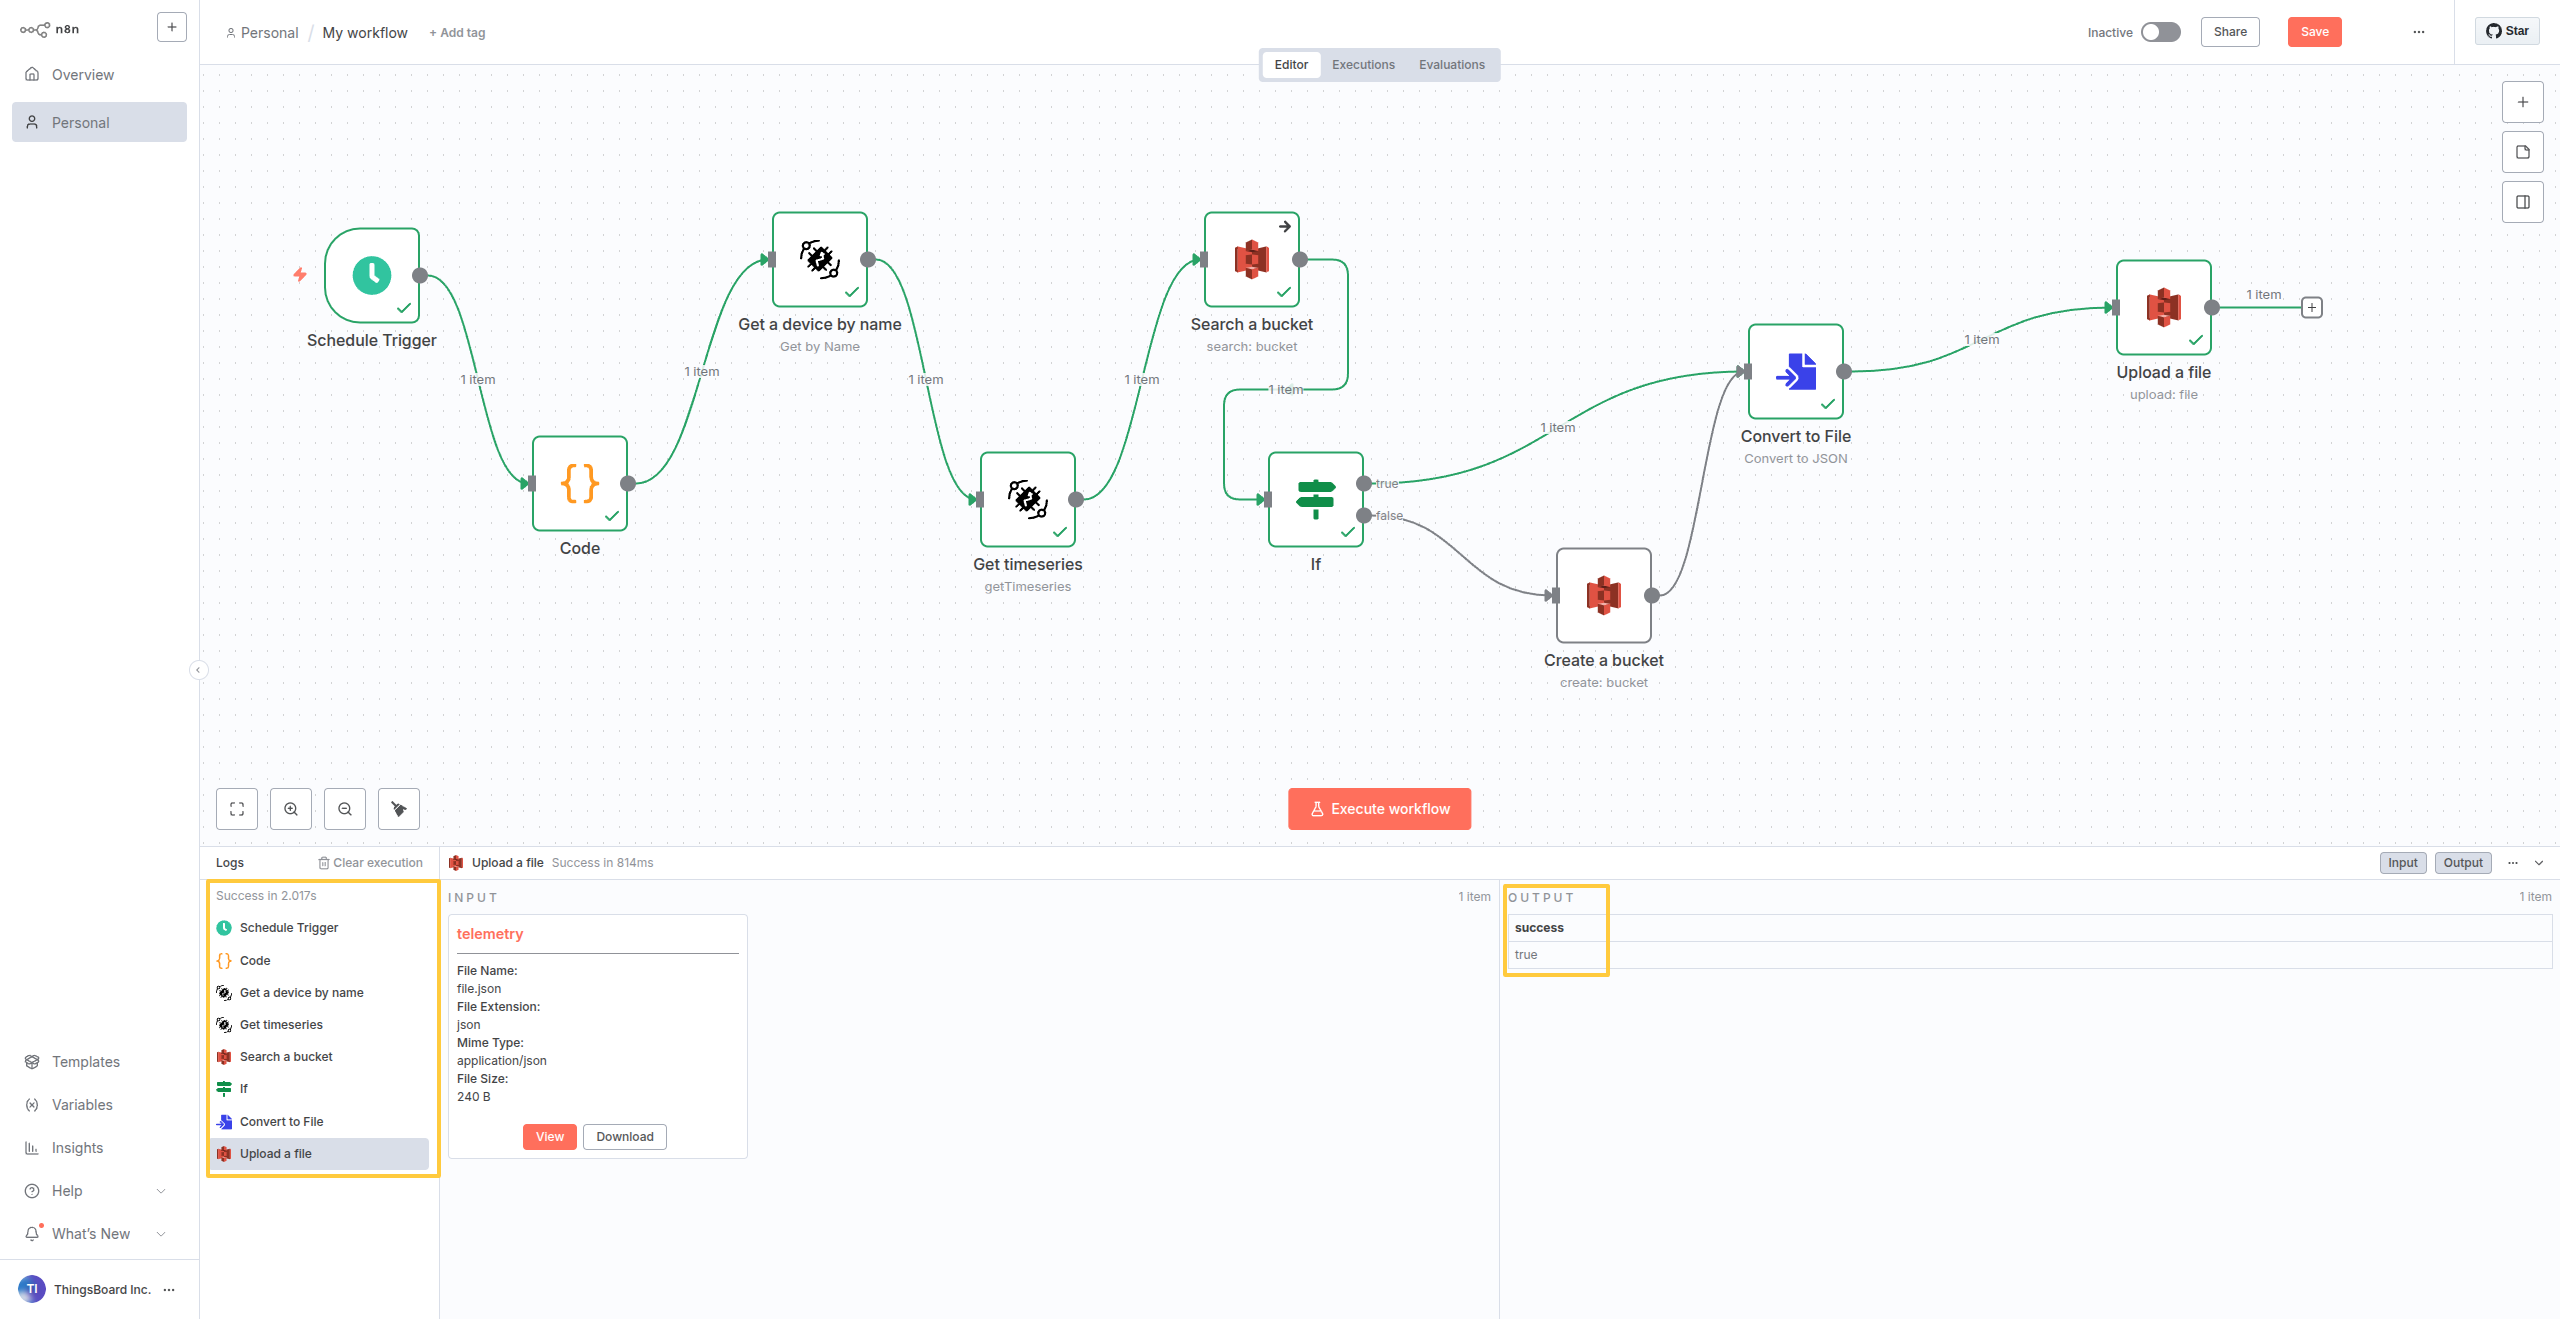
The complete workflow showing all nodes: Schedule trigger → Code (time calc) → Get device → Get timeseries → Convert to file → AWS S3 upload.
Successful execution result showing the telemetry data exported to S3 as a JSON file.
This is a production-ready pattern used for IoT data archival, analytics pipelines, and compliance logging.
Want to see the full step-by-step walkthrough with code details? Jump to Example 2: Daily Telemetry Export to AWS S3 after installation.
When to use n8n with ThingsBoard
ThingsBoard’s Rule Engine is great for IoT-specific automation. But when you need to connect to external systems that ThingsBoard doesn’t integrate with natively, n8n fills the gap.
Use n8n when you need to:
- Archive telemetry to AWS S3, Google Cloud Storage, or Azure Blob for data warehousing
- Export data to databases (PostgreSQL, Snowflake, ClickHouse) for analytics
- Create tickets in Jira, ServiceNow, or other ticketing systems
- Sync device data with CRMs (Salesforce, HubSpot) or ERPs
- Let non-technical users write query via AI chat
Requirements
Before you begin, ensure you have the following:
-
EU ThingsBoard Cloud: Fully managed cloud service available at eu.thingsboard.cloud
- Authentication credentials: API key or username and password (deprecated) with appropriate permissions on the ThingsBoard instance. See API Keys for details on generating API keys.
- n8n instance:
- Local n8n installation: Self-hosted n8n on your infrastructure, or
- Docker-based n8n deployment: n8n running in Docker containers
- Cloud n8n: The ThingsBoard node is verified and available on n8n Cloud — no manual installation required.
Installation
Before you start, make sure n8n is already running. Check the official n8n docs if you need to install it first.
Install the ThingsBoard Node
Note: Community nodes require N8N_COMMUNITY_PACKAGES_ENABLED=true in your n8n environment. Most n8n installations have this enabled by default. If you can’t access the Community Nodes section in Settings, you’ll need to set this variable before starting n8n.
Recommended: Use the n8n GUI (for self-hosted instances):
- Open n8n in your browser
- Click the three dots (bottom-left) → Settings → Community Nodes
- Click Install a community node
- Enter:
@thingsboard/n8n-nodes-thingsboardand click Install - Refresh your browser
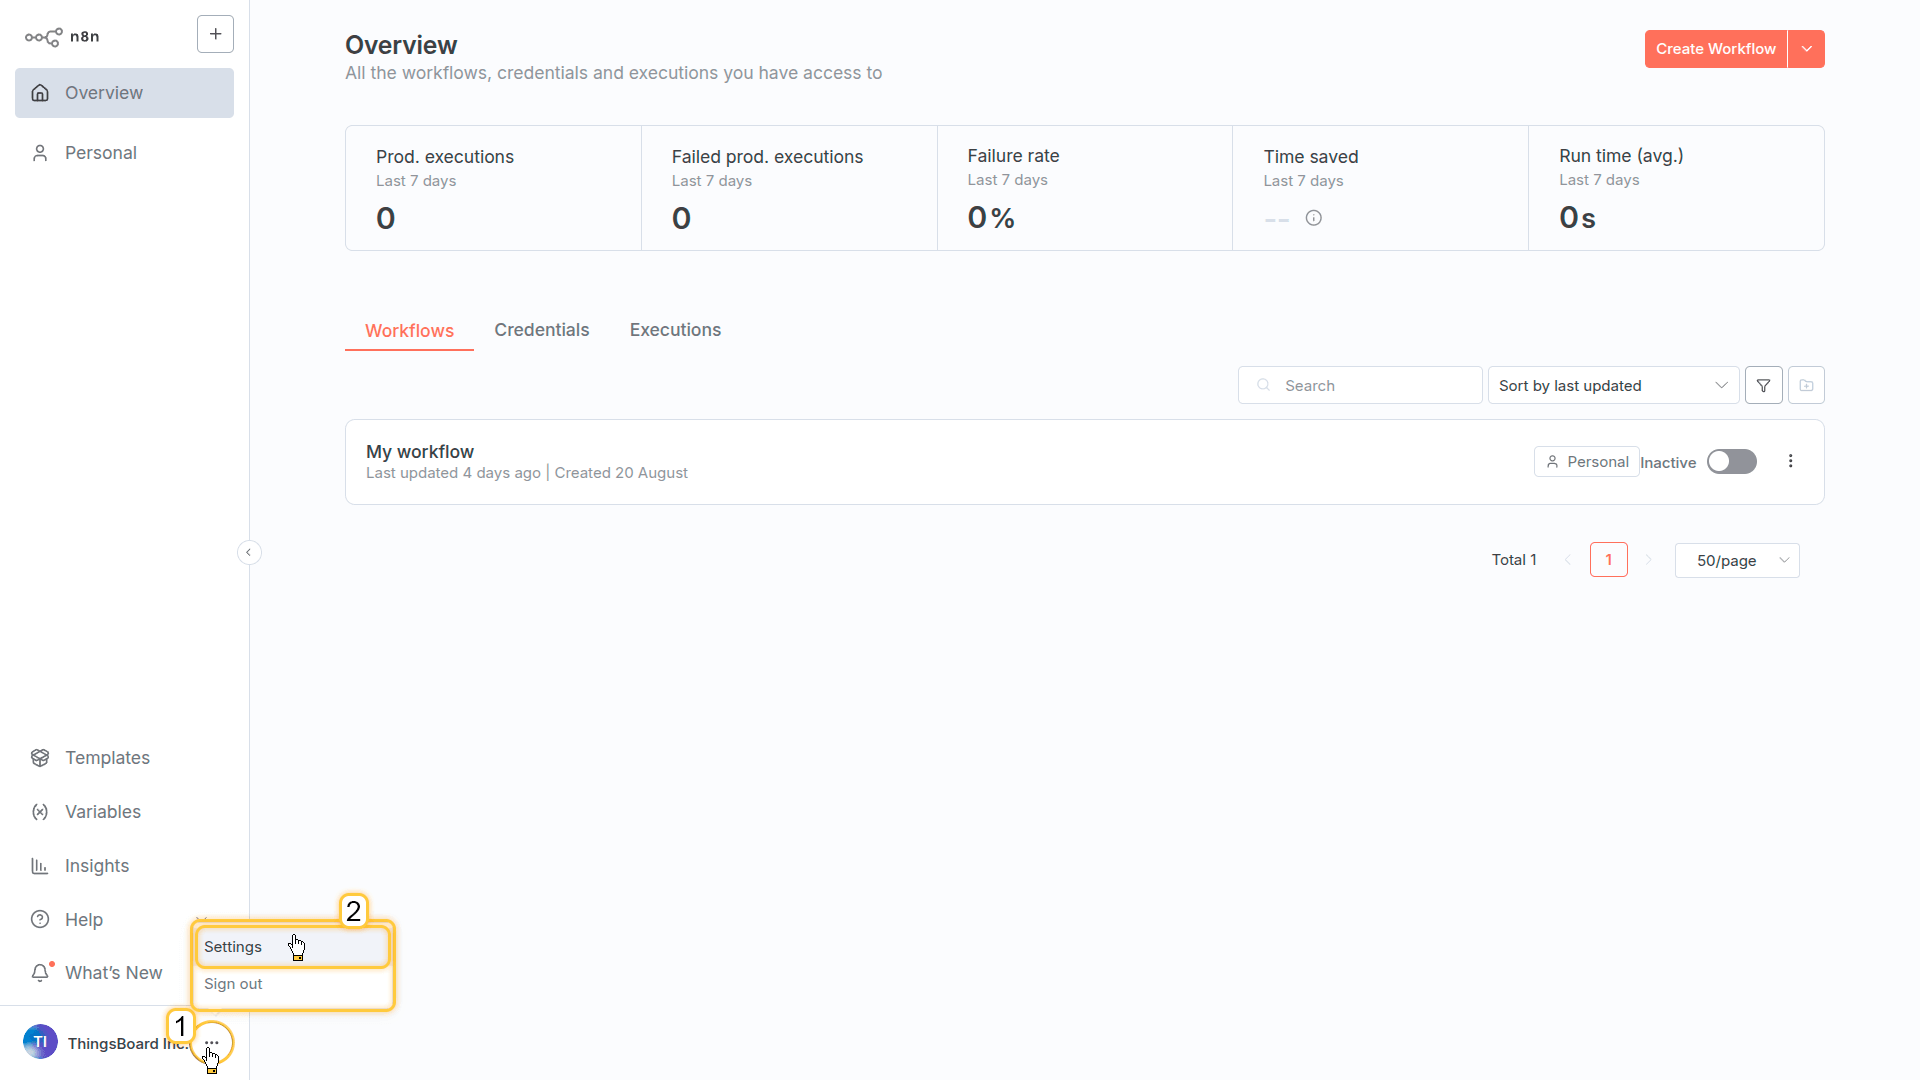
Open n8n in your browser. In the bottom-left corner, click the three dots button and select Settings from the dropdown menu.
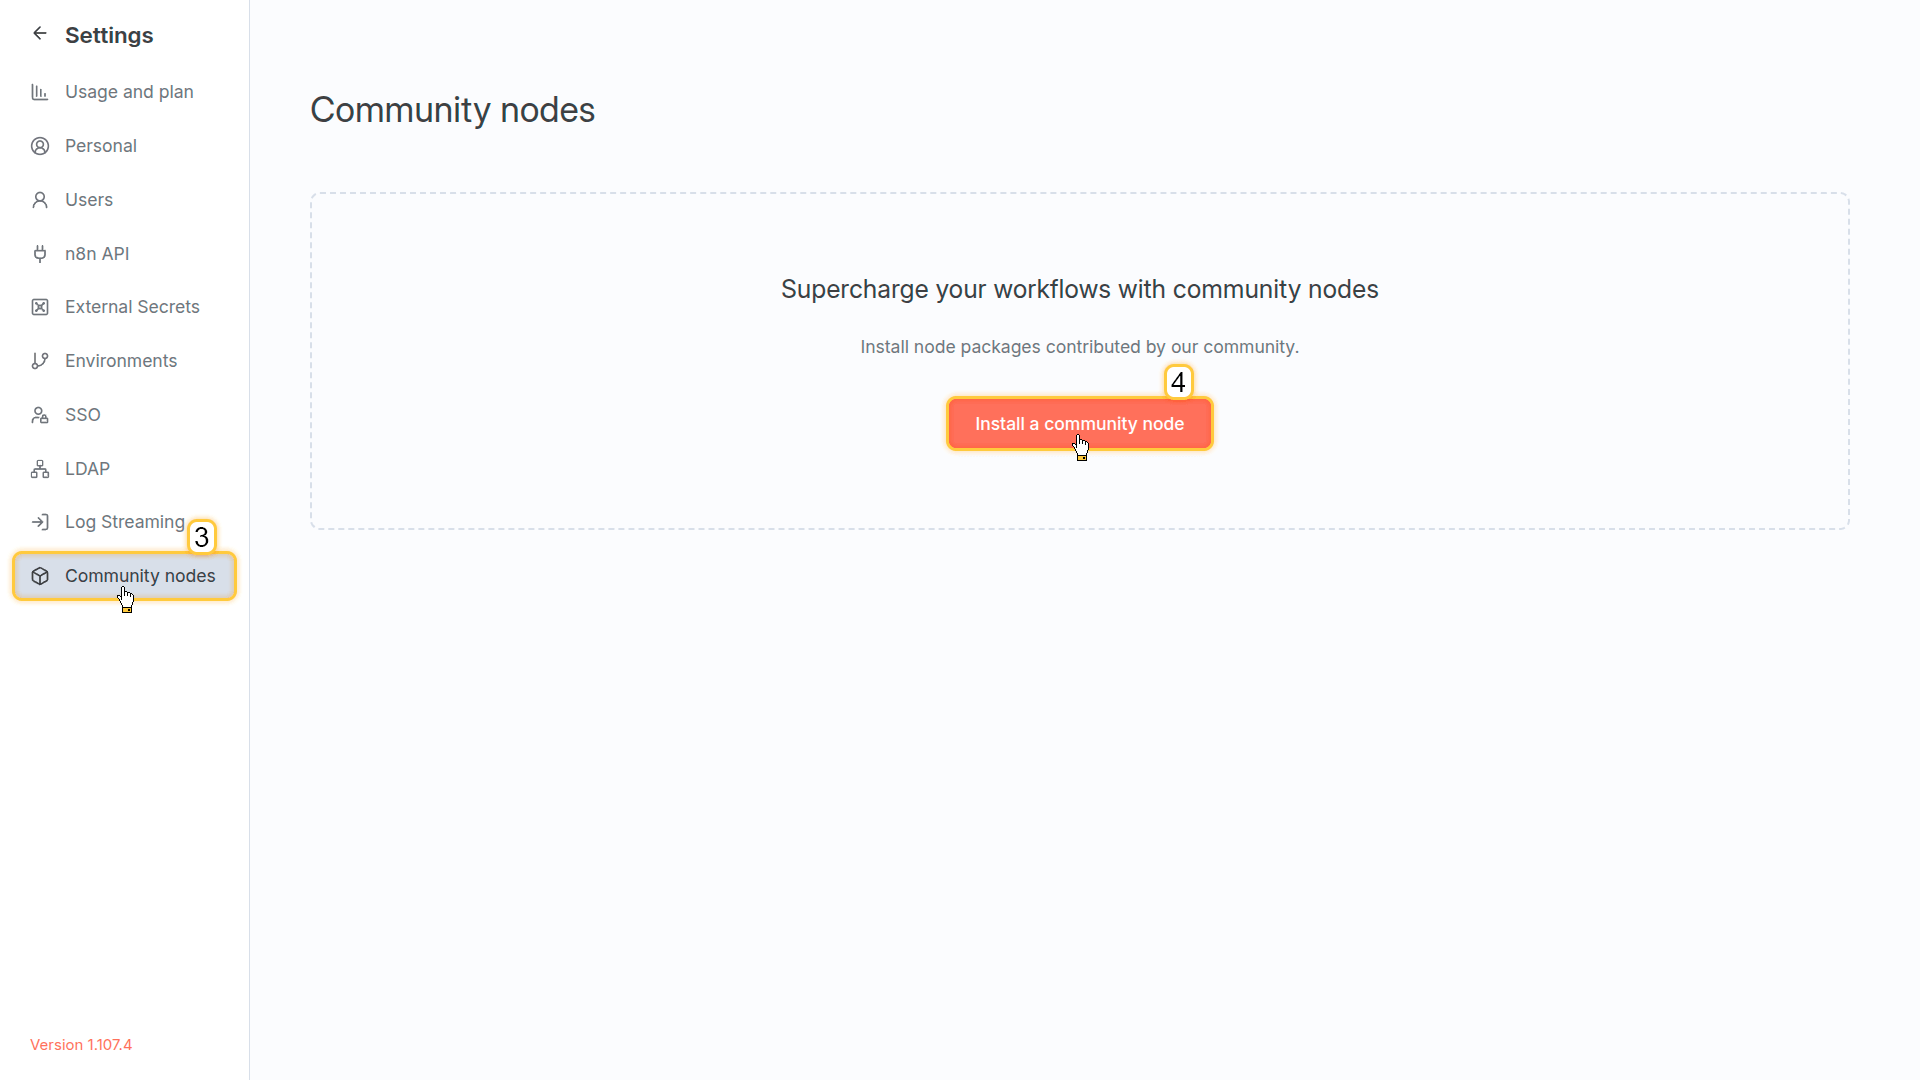
Go to the Community Nodes tab and click Install a community node.
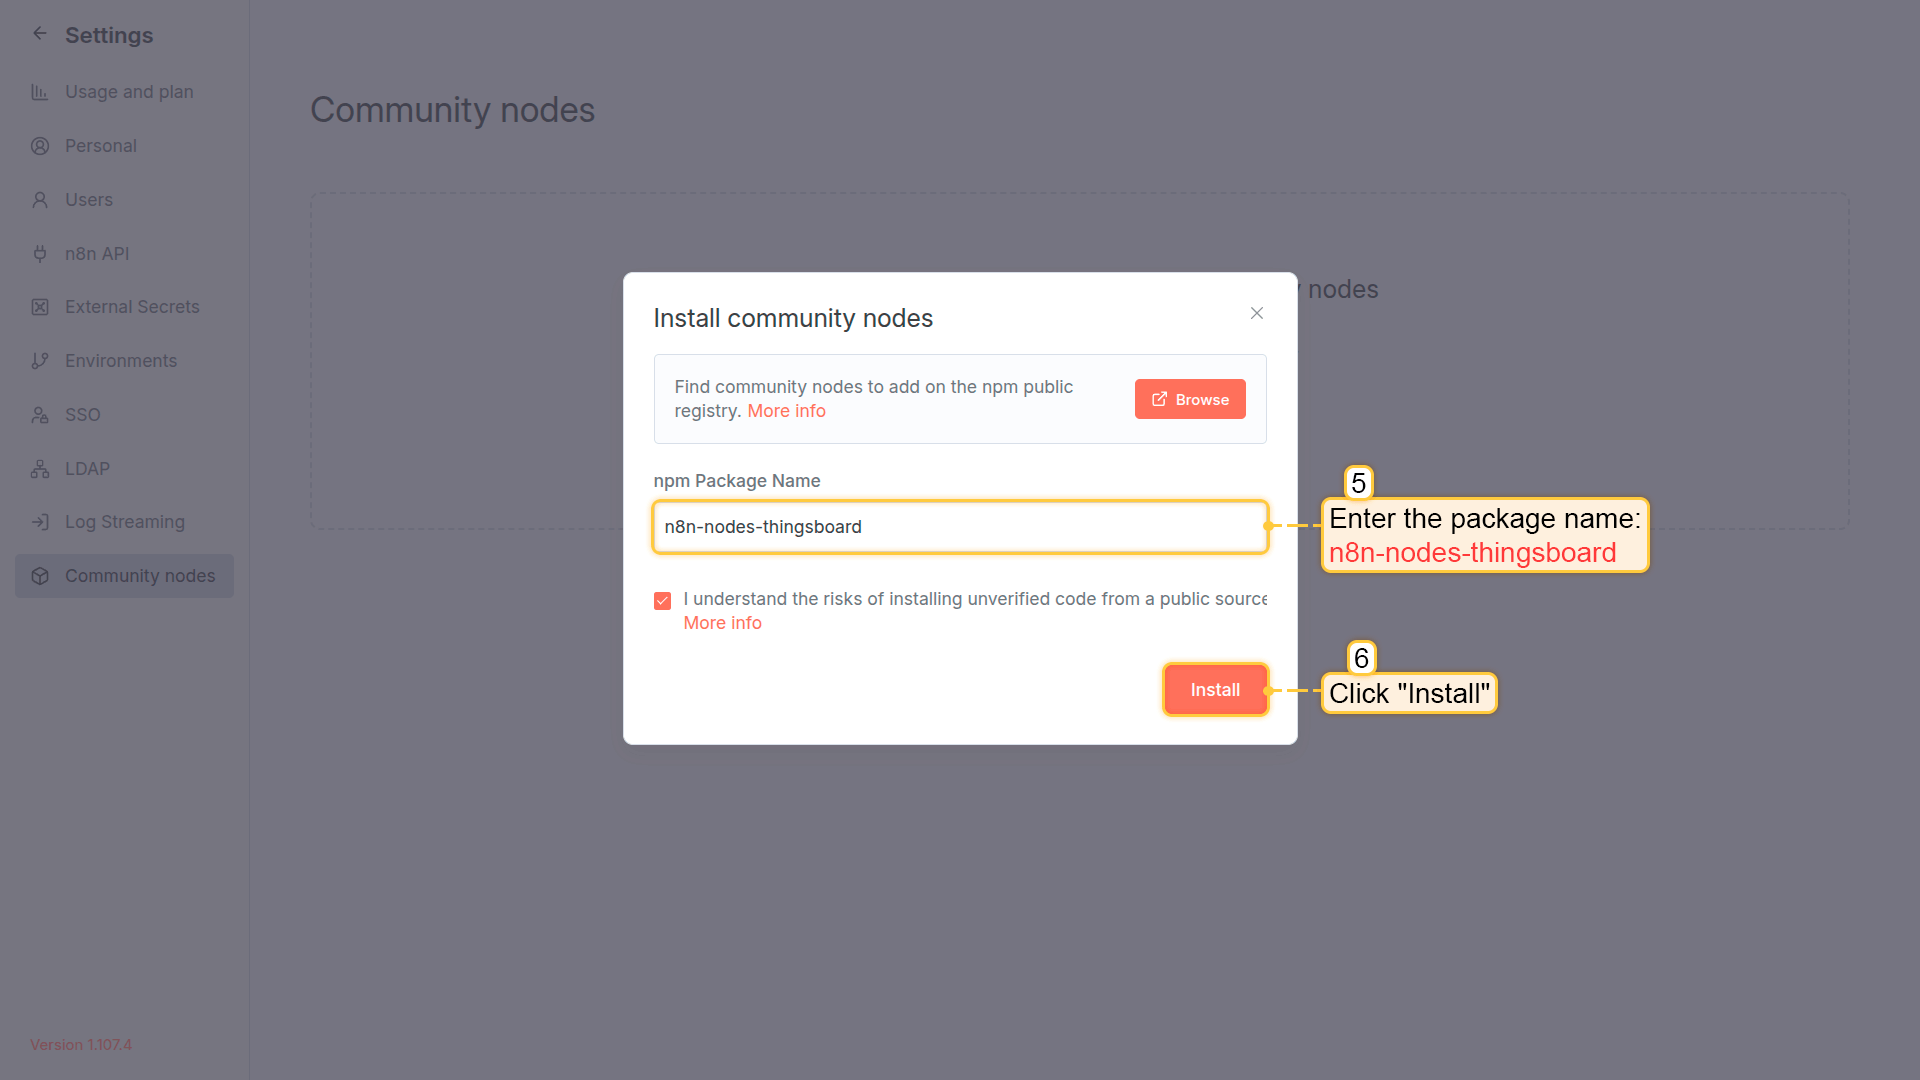
Enter the package name: @thingsboard/n8n-nodes-thingsboard and click Install.
Wait for the installation to complete. Then, refresh the browser page.
Configure AI Agent Support (Optional)
Skip this if you’re only using the node in regular workflows (not with AI agents).
To let AI agents use ThingsBoard as a tool, add this additional environment variable before starting n8n:
1
N8N_COMMUNITY_PACKAGES_ALLOW_TOOL_USAGE=true
How to set it:
- Docker: Add to
docker-compose.ymlenvironment section (along withN8N_COMMUNITY_PACKAGES_ENABLED=true) - npm/local: Export in your shell:
N8N_COMMUNITY_PACKAGES_ALLOW_TOOL_USAGE=true n8n start
Configure Credentials
Connect n8n to your ThingsBoard instance. There are two authentication options:
Option A: API Key
- Click + (top-left) → Credentials
- Search for ThingsBoard API Key → Continue
- Fill in the required fields:
- Base URL: Your instance URL (e.g.,
https://eu.thingsboard.cloud) - Connect using: API Key
- API Key: Generated from your ThingsBoard instance. See API Keys for details.
- Base URL: Your instance URL (e.g.,
- Click Save
Option B: Username/Password (Deprecated)
- Click + (top-left) → Credentials
- Search for ThingsBoard Username/Password → Continue
- Fill in the required fields:
- Base URL: Your instance URL (e.g.,
https://eu.thingsboard.cloud) - Connect using: Username/Password
- Username: Your email
- Password: Your password
- Base URL: Your instance URL (e.g.,
- Click Save
The credentials are encrypted and stored securely by n8n. You can reuse the same credentials across multiple ThingsBoard nodes in different workflows.

In the top-left corner, click + and select Credentials from the dropdown menu.
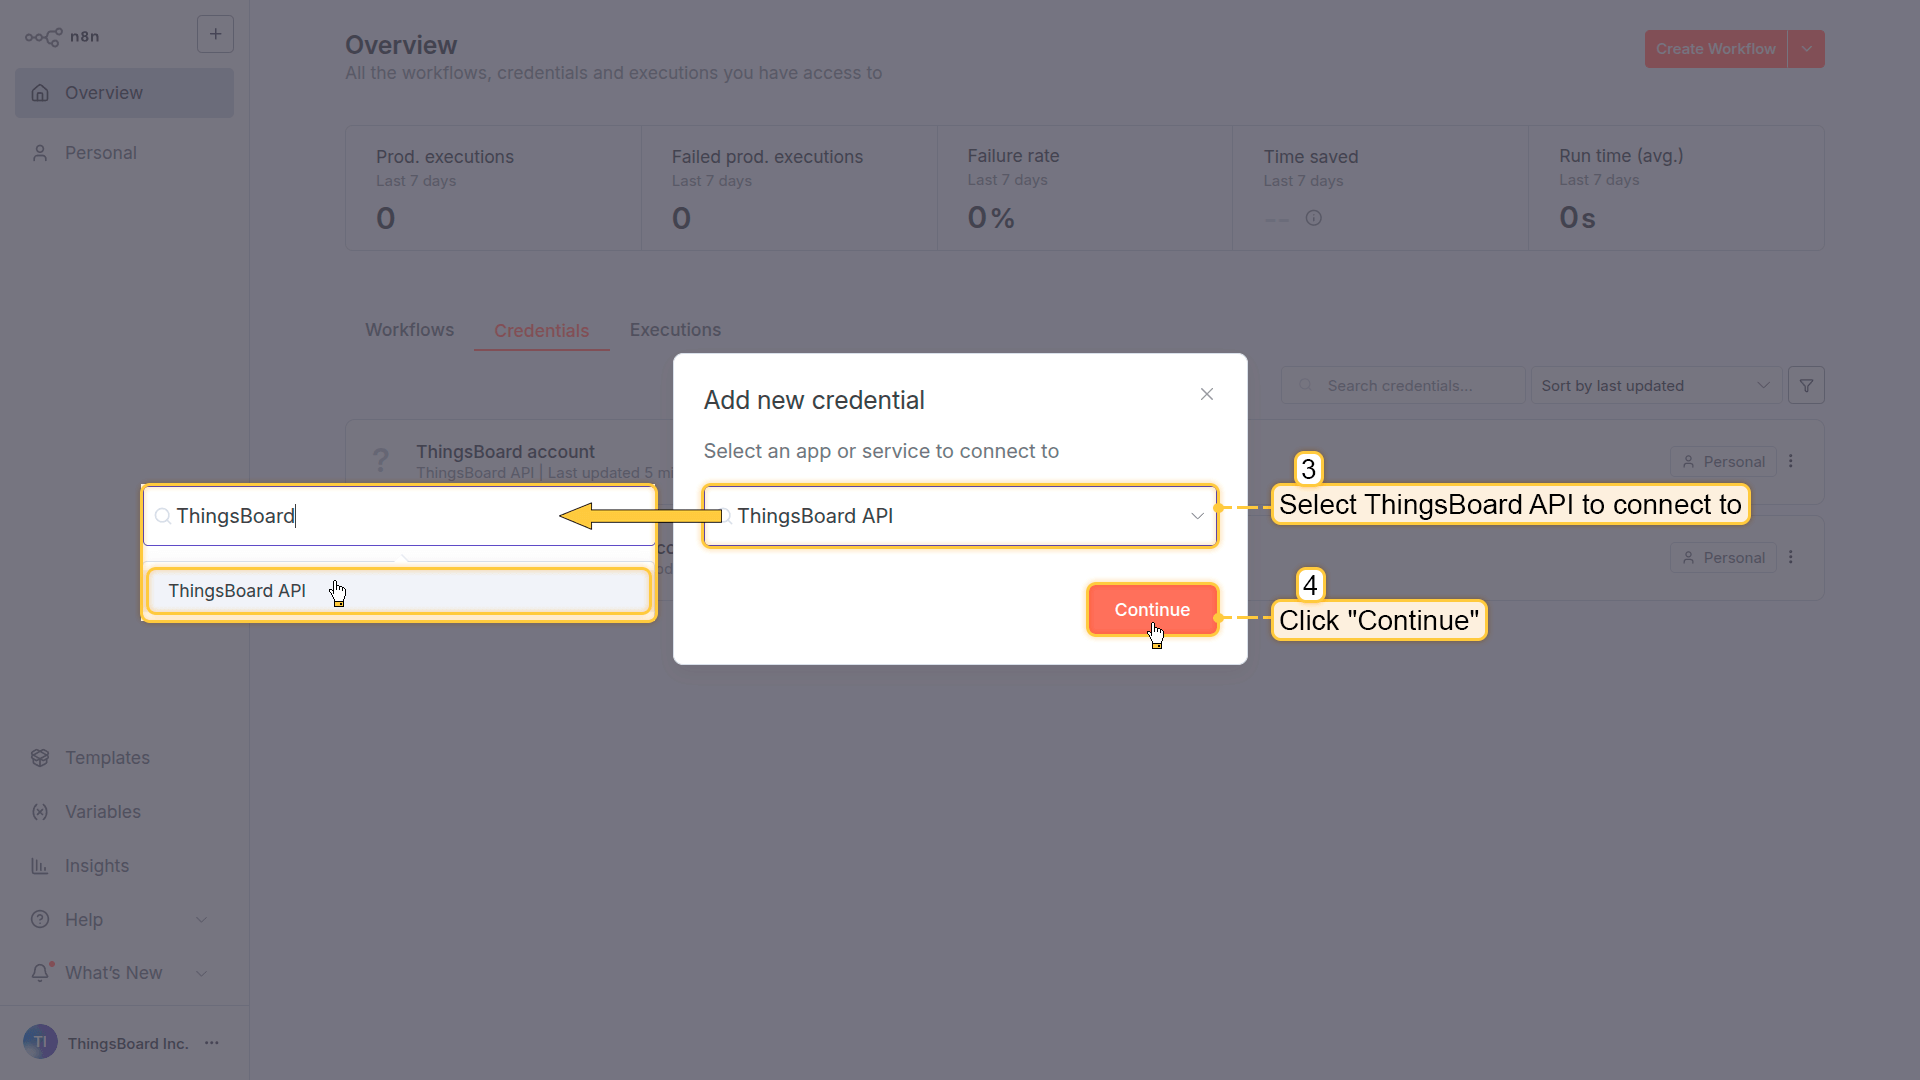
Search and select ThingsBoard API to connect to and click Continue.
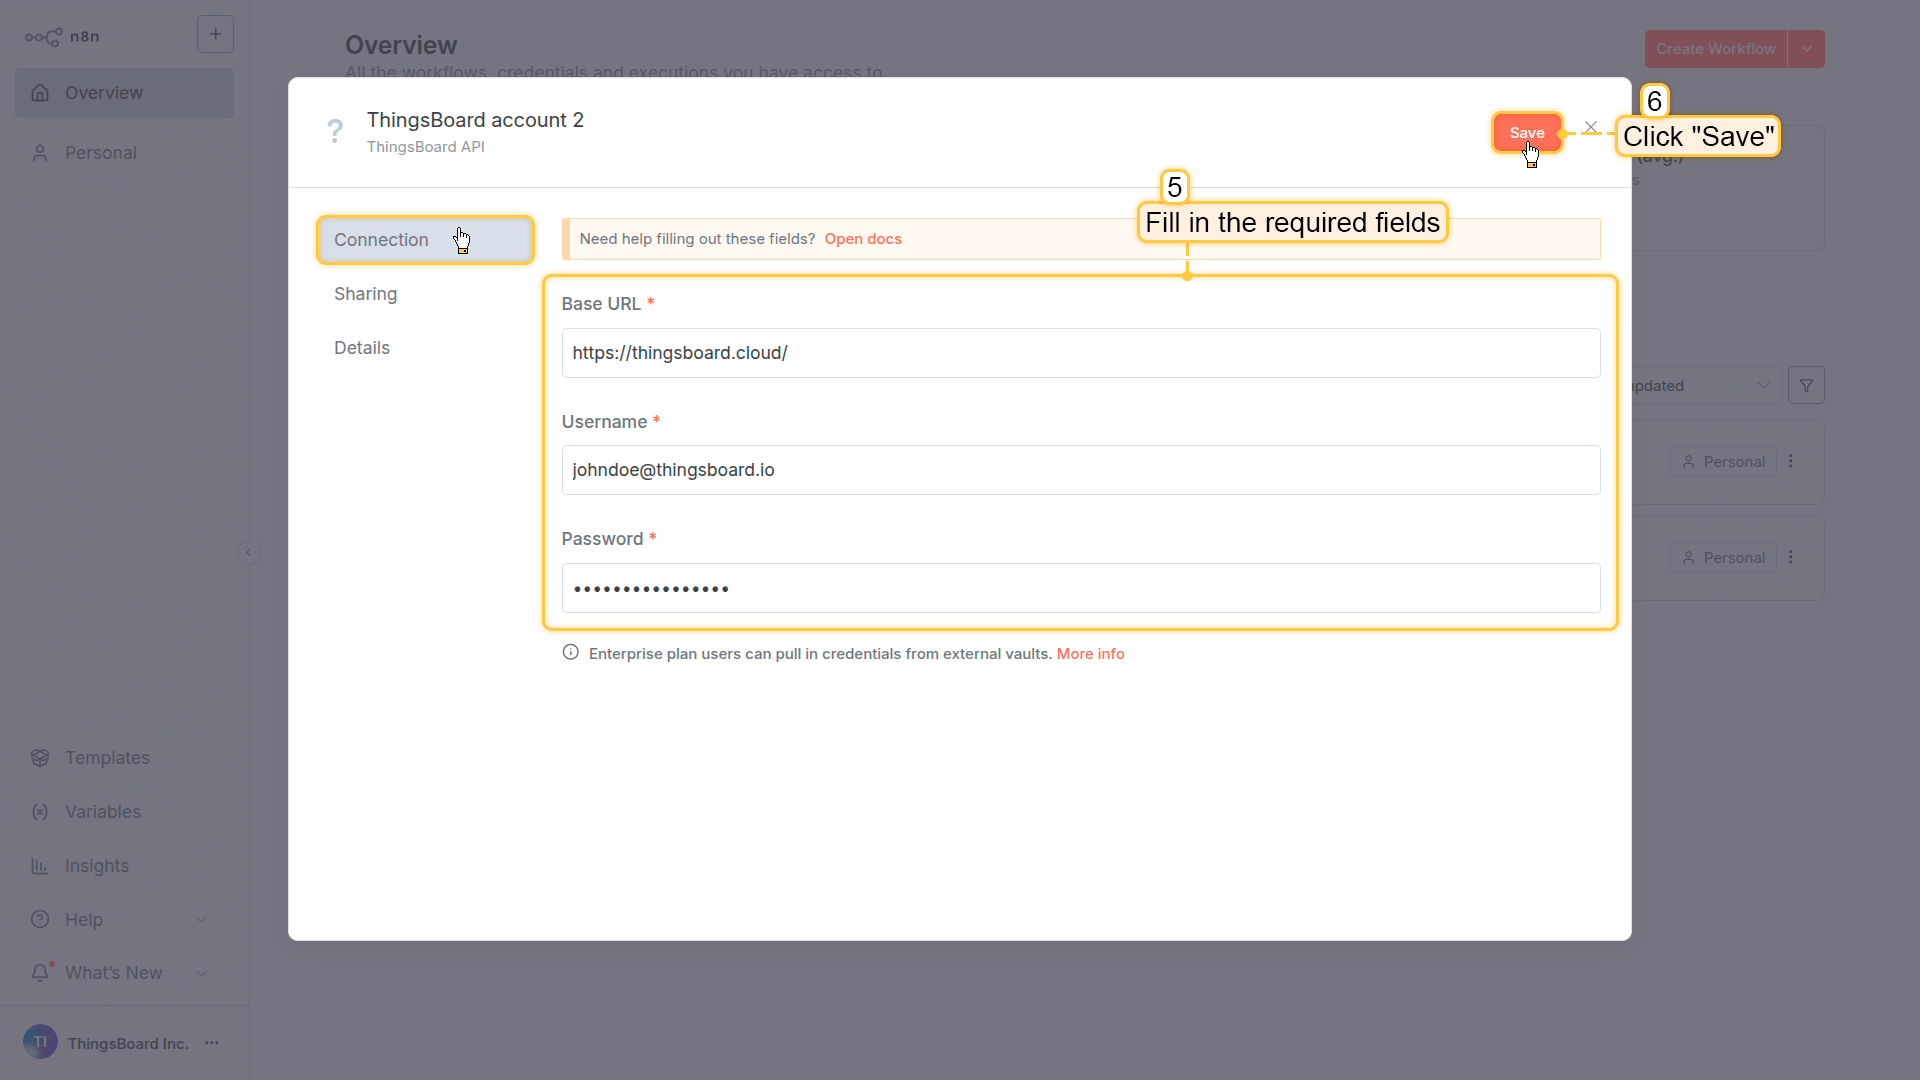
Fill in the Base URL — your ThingsBoard instance URL (without a trailing slash), and the API Key — generated from your ThingsBoard instance. Click Save to store the credentials.

The credentials are saved and the connection is tested successfully. You can reuse the same credentials across multiple ThingsBoard nodes in different workflows.
Verify Installation
After installing the node and restarting n8n, verify the ThingsBoard node is available:
- Open n8n in your browser (typically http://localhost:5678)
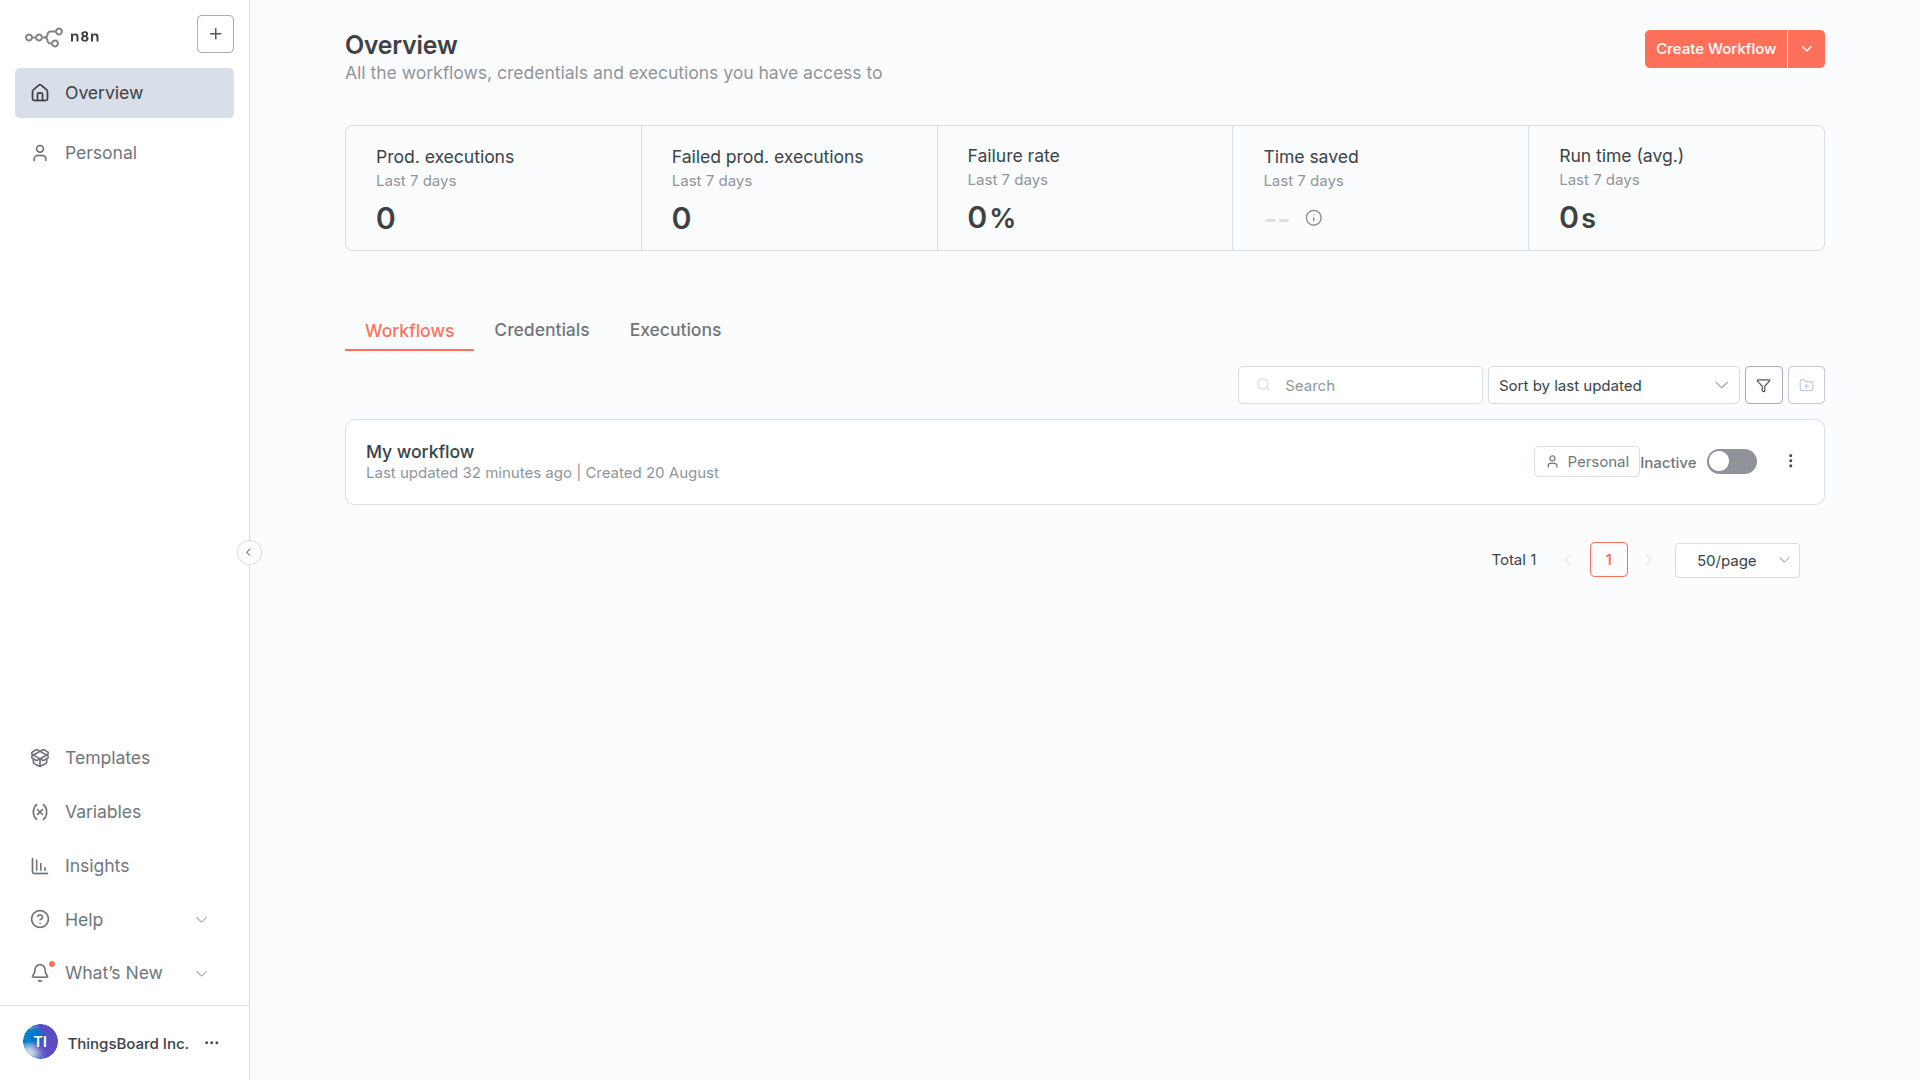
- Create a new workflow - Click Create Workflow in the top-right corner
- Add a node - Click the + button on the workflow canvas
- Search for ThingsBoard - Type “ThingsBoard” in the search field
- Verify it appears - You should see the ThingsBoard node with available actions
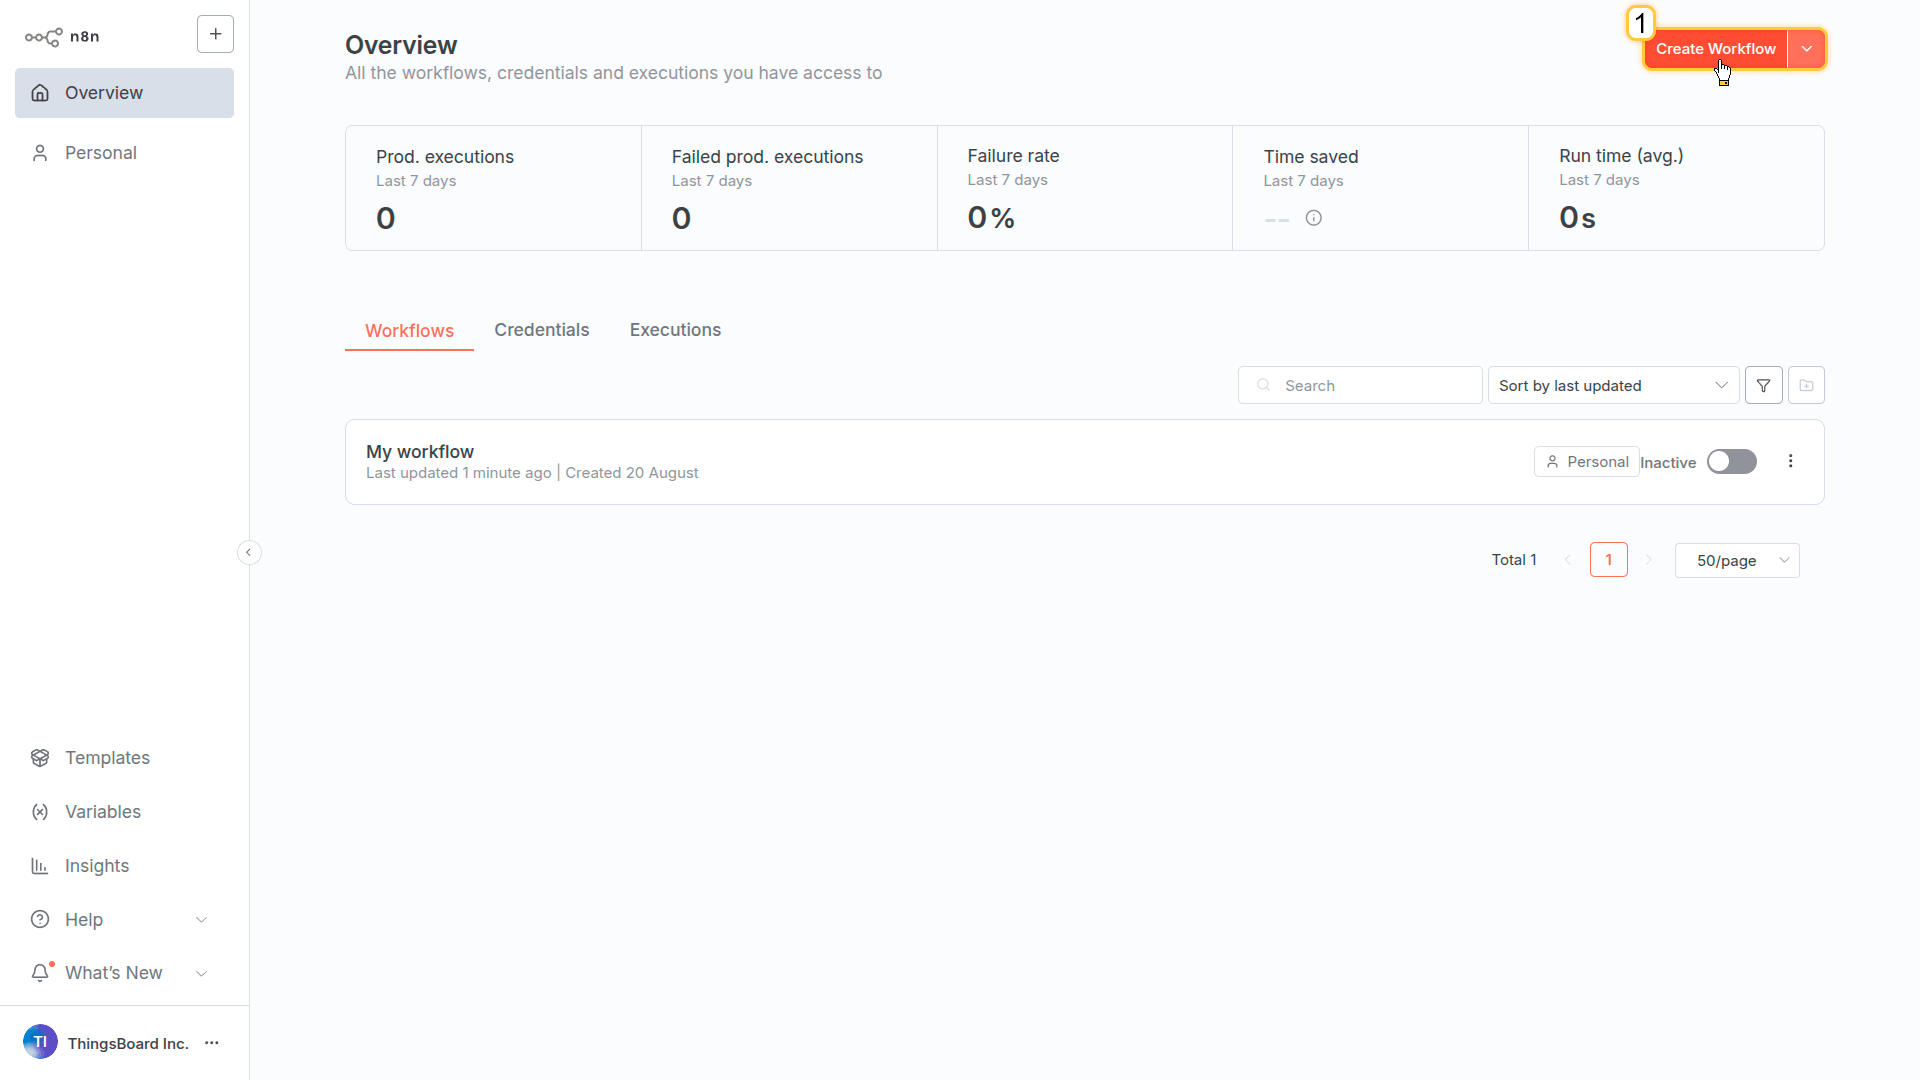
In the top-right corner of the interface, click Create Workflow.

On the workflow canvas, click the + button to open the list of available nodes.

In the node search field, type ThingsBoard. The ThingsBoard node should appear in the search results. Click on it.

A list of available actions will be displayed.
Note: The number of operations may differ between Community Edition and Professional Edition.
If you don’t see the node:
- Verify
N8N_COMMUNITY_PACKAGES_ENABLED=trueis set - Check that npm installation completed without errors
- Restart n8n after installation
- Check n8n logs for loading errors
How to Use the Node
There are two ways to use the ThingsBoard node:
1. Regular Workflow Node
Drag the ThingsBoard node onto your canvas and configure what you want to do (get devices, save telemetry, create alarms, etc.).
Good for:
- Scheduled tasks (daily reports, health checks)
- Webhooks (incoming sensor data, external triggers)
- Multi-step workflows (get device → fetch telemetry → send to Slack)
2. AI Agent Tool
Give an AI agent access to ThingsBoard operations. Users can then ask questions in plain English instead of building workflows.
Good for:
- Non-technical users querying entities, data, etc
- Support teams troubleshooting issues
Setup required: See AI Agent Configuration above.
Check out the examples below to see both approaches in action.
Common Workflow Patterns
Archive telemetry to cloud storage: Schedule (daily) → Code (calc time range) → Get timeseries → Convert to file → S3/GCS upload
Create tickets from alarms: Webhook (alarm) → Check severity → Create Jira/ServiceNow ticket
Customer onboarding automation: CRM webhook (new customer) → Create devices and dashboard → Assign to customer
AI-powered queries: Chat → AI Agent → ThingsBoard operations → Natural language response
Usage Examples
This section provides practical examples demonstrating the three usage patterns of the ThingsBoard n8n node.
Example 1: AI Agent
Real-world scenario: Ask questions in plain text to check entities, their status, query data, update configurations, etc.
Why this matters:
- Just ask what you need (“Which devices are offline?”, “Show today’s temperature”) and the node handles the technical part for you.
- Reduces bottlenecks in your IoT operations
Setup: Use the ThingsBoard node as a tool for AI Agents to enable conversational IoT control

Create a new workflow with AI Agent node. Choose your AI Model (Gemini, Anthropic, ChatGPT, etc.) and configure memory settings.

Select ThingsBoard from the Tools list. Add Get devices and Get timeseries operations.
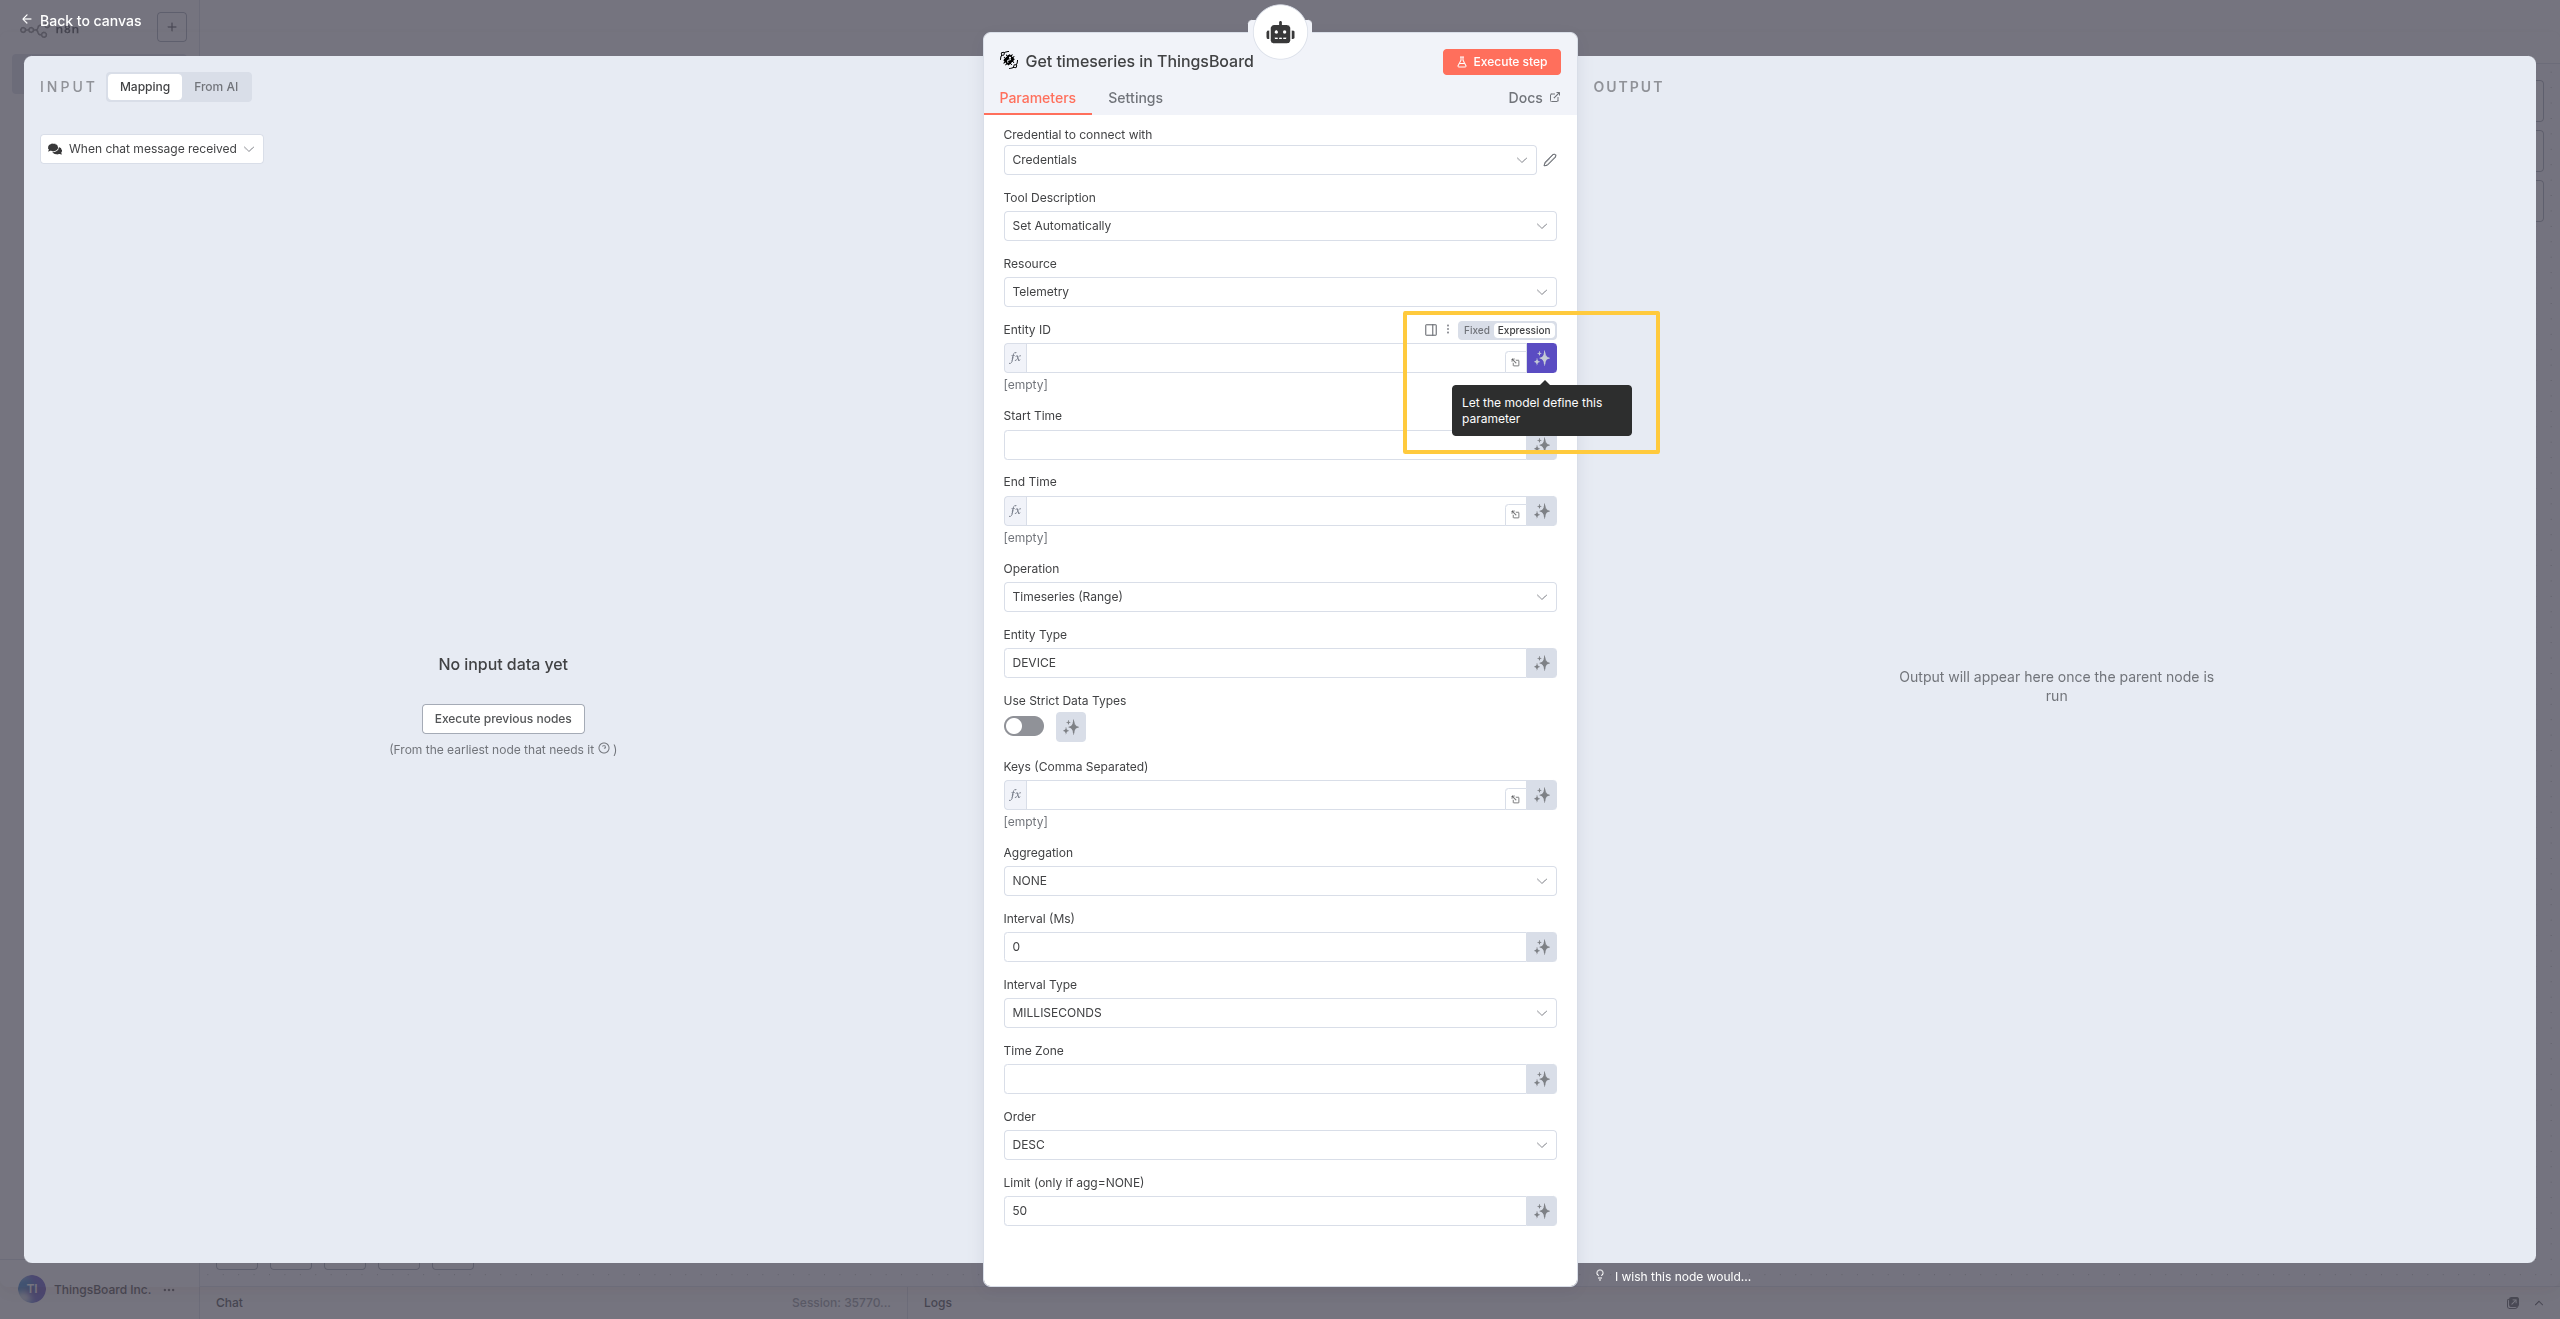
For tools with required or optional fields, the AI model intelligently determines parameter values based on conversation context. The model decides which values to pass automatically.
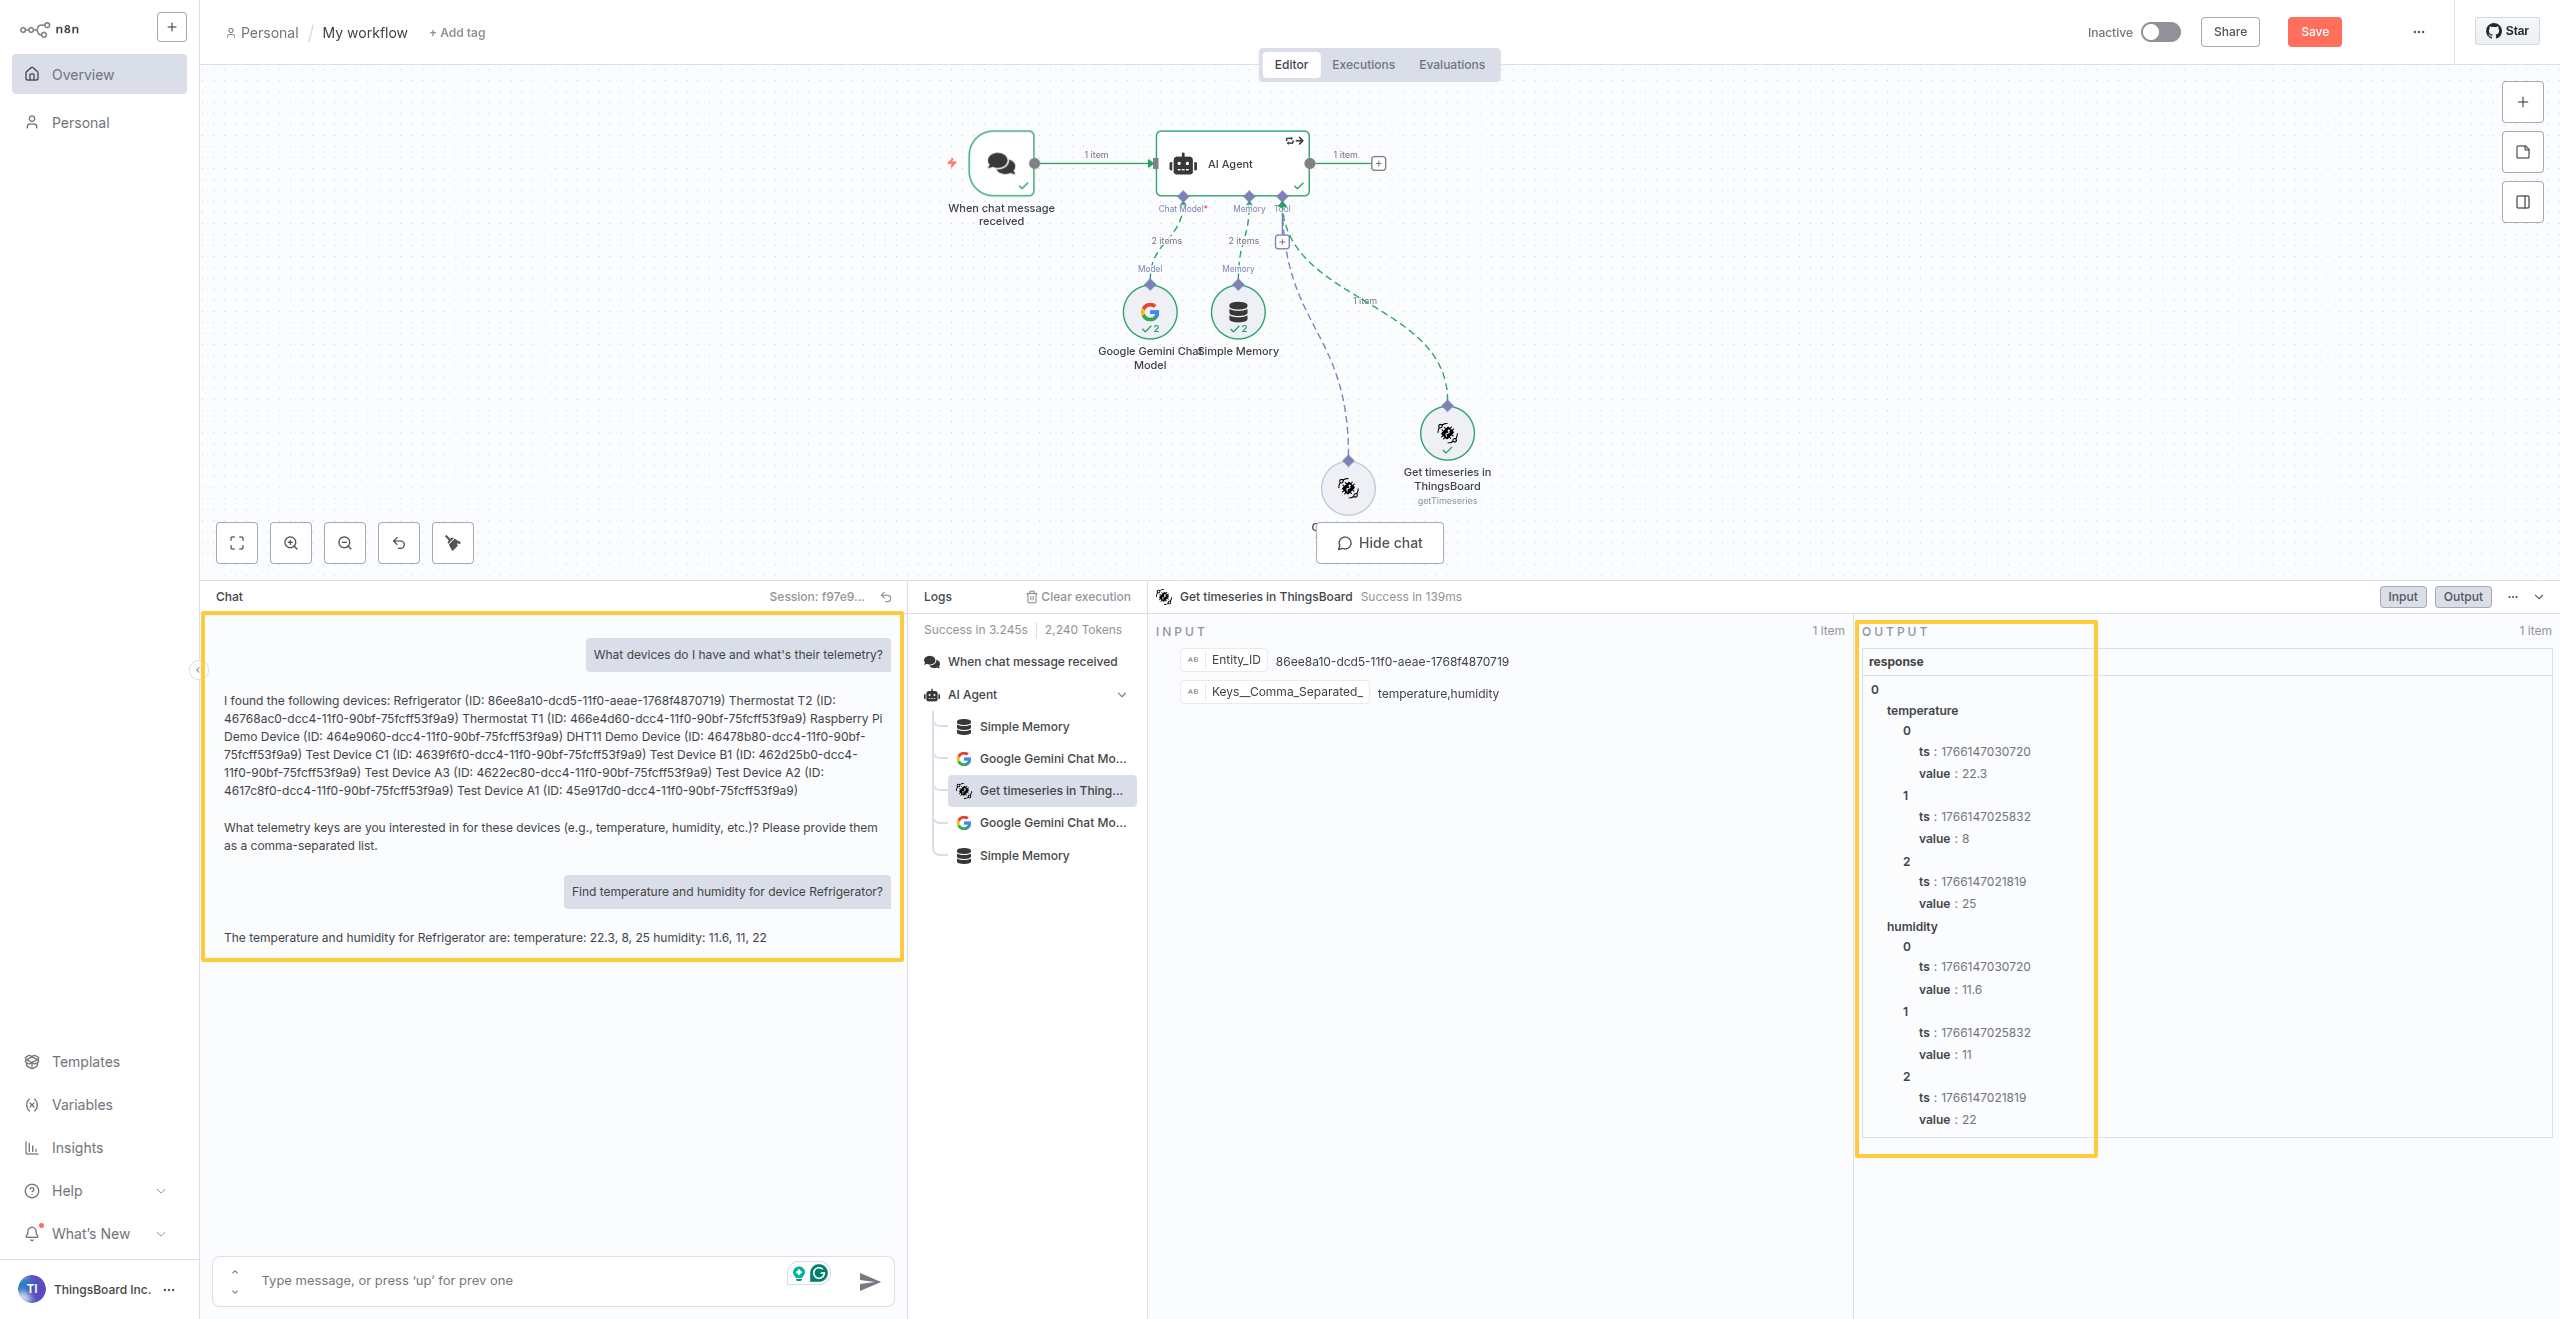
Open the chat interface and write your natural language query.
How it works:
- User asks: “Which freezers in the warehouse are showing temperatures above -10°C?”
- AI Agent (powered by Google Gemini, Anthropic, or OpenAI) automatically:
- Calls
Get devicesto find all freezer devices - Calls
Get timeseriesfor temperature readings - Filters results and responds in plain language
- Calls
- No code, no API knowledge needed
Real queries your team can ask:
- “Show me all devices that haven’t sent data in the last 24 hours”
- “What’s the current temperature of Freezer 3?”
- “Which sensors are in Building A?”
- “Get me the last week of humidity data for all warehouse sensors”
This democratizes IoT access - anyone can query your infrastructure without knowing ThingsBoard’s API.
Example 2: Daily Telemetry Export to AWS S3
Real-world scenario: Every night, export device telemetry to S3, but also enrich it with device metadata from your CRM, convert to Parquet format for Athena, and trigger a Lambda function to update your data warehouse. One workflow, multiple outputs.
Why use n8n instead of ThingsBoard’s native export:
- Multi-destination - Send the same data to S3 + Snowflake + email report in one workflow
- Data transformation - Enrich telemetry with business context (customer names, locations from CRM)
- Custom formats - Convert to Parquet, Avro, or CSV with specific schemas for your analytics tools
- Conditional logic - Export only specific devices, filter by customer tier, or aggregate before storage
- Integration chains - After S3 upload → Trigger AWS Lambda → Update tracking database → Send Slack notification
Building the workflow
Step 1: Create a new workflow and add Schedule Trigger
Start by creating a new workflow and adding a Schedule Trigger to run the export daily at midnight UTC.
Configuration:
- Click Add first step… → Select Schedule Trigger
- Set Trigger Interval: Every day at 00:00 (midnight)
- This ensures your export runs automatically every 24 hours
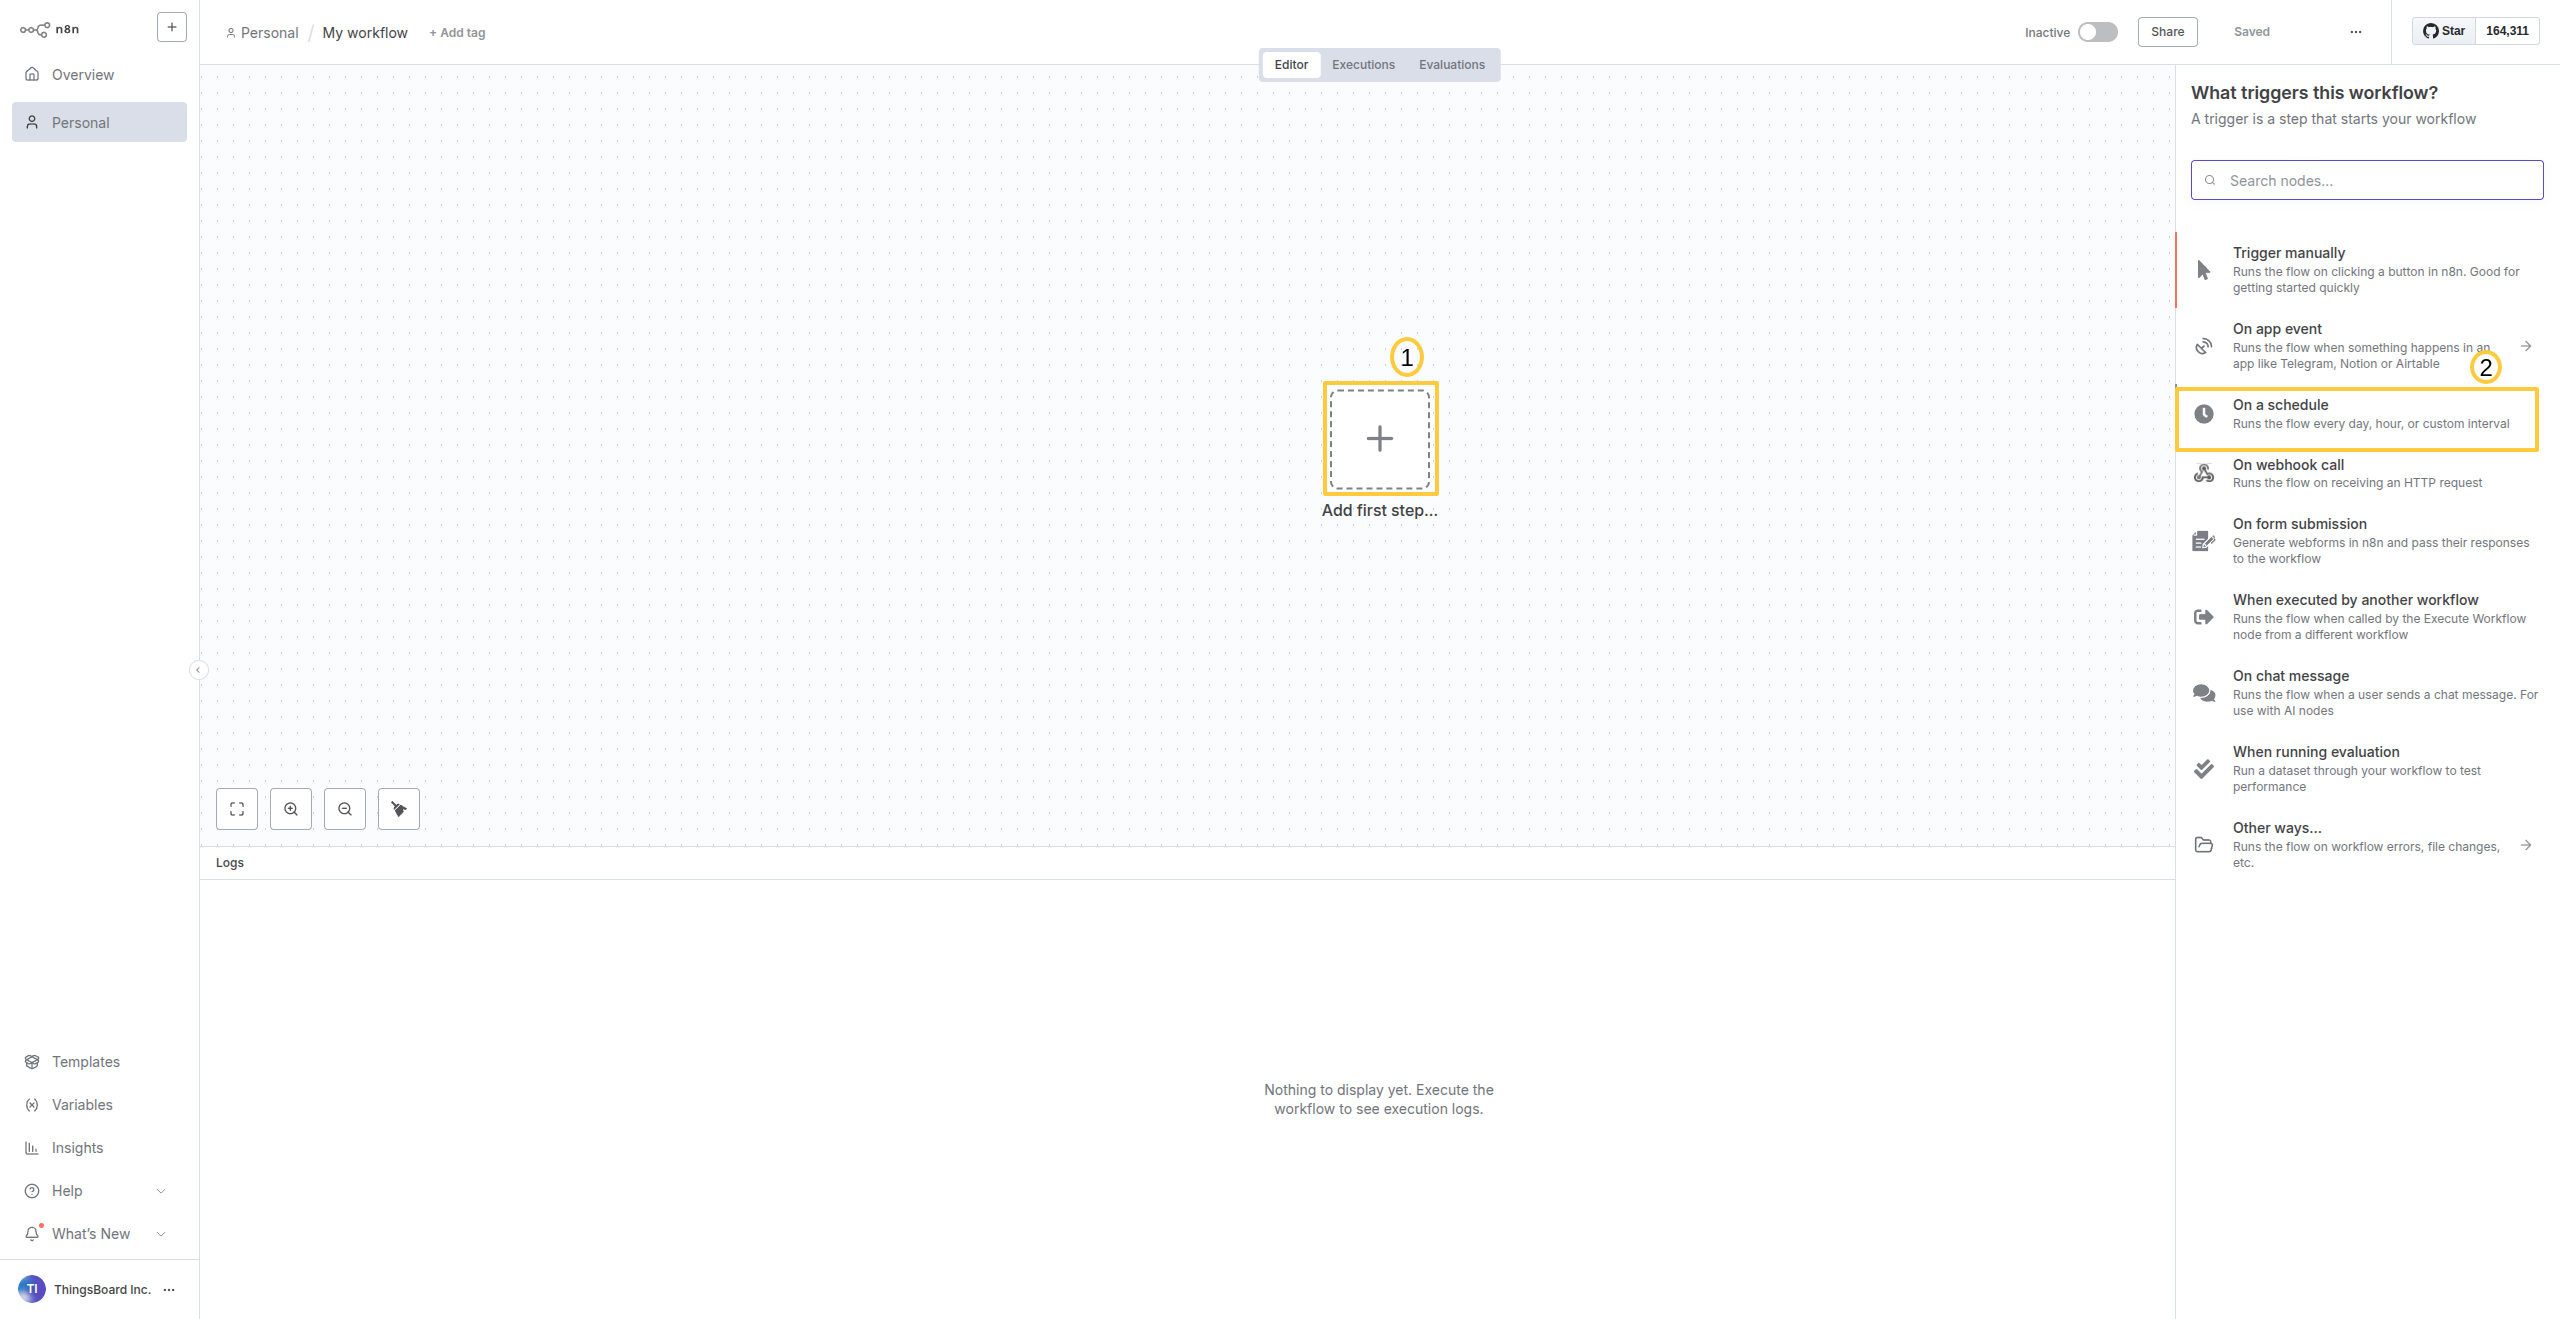
Create a new workflow and select Schedule Trigger to run the export daily.
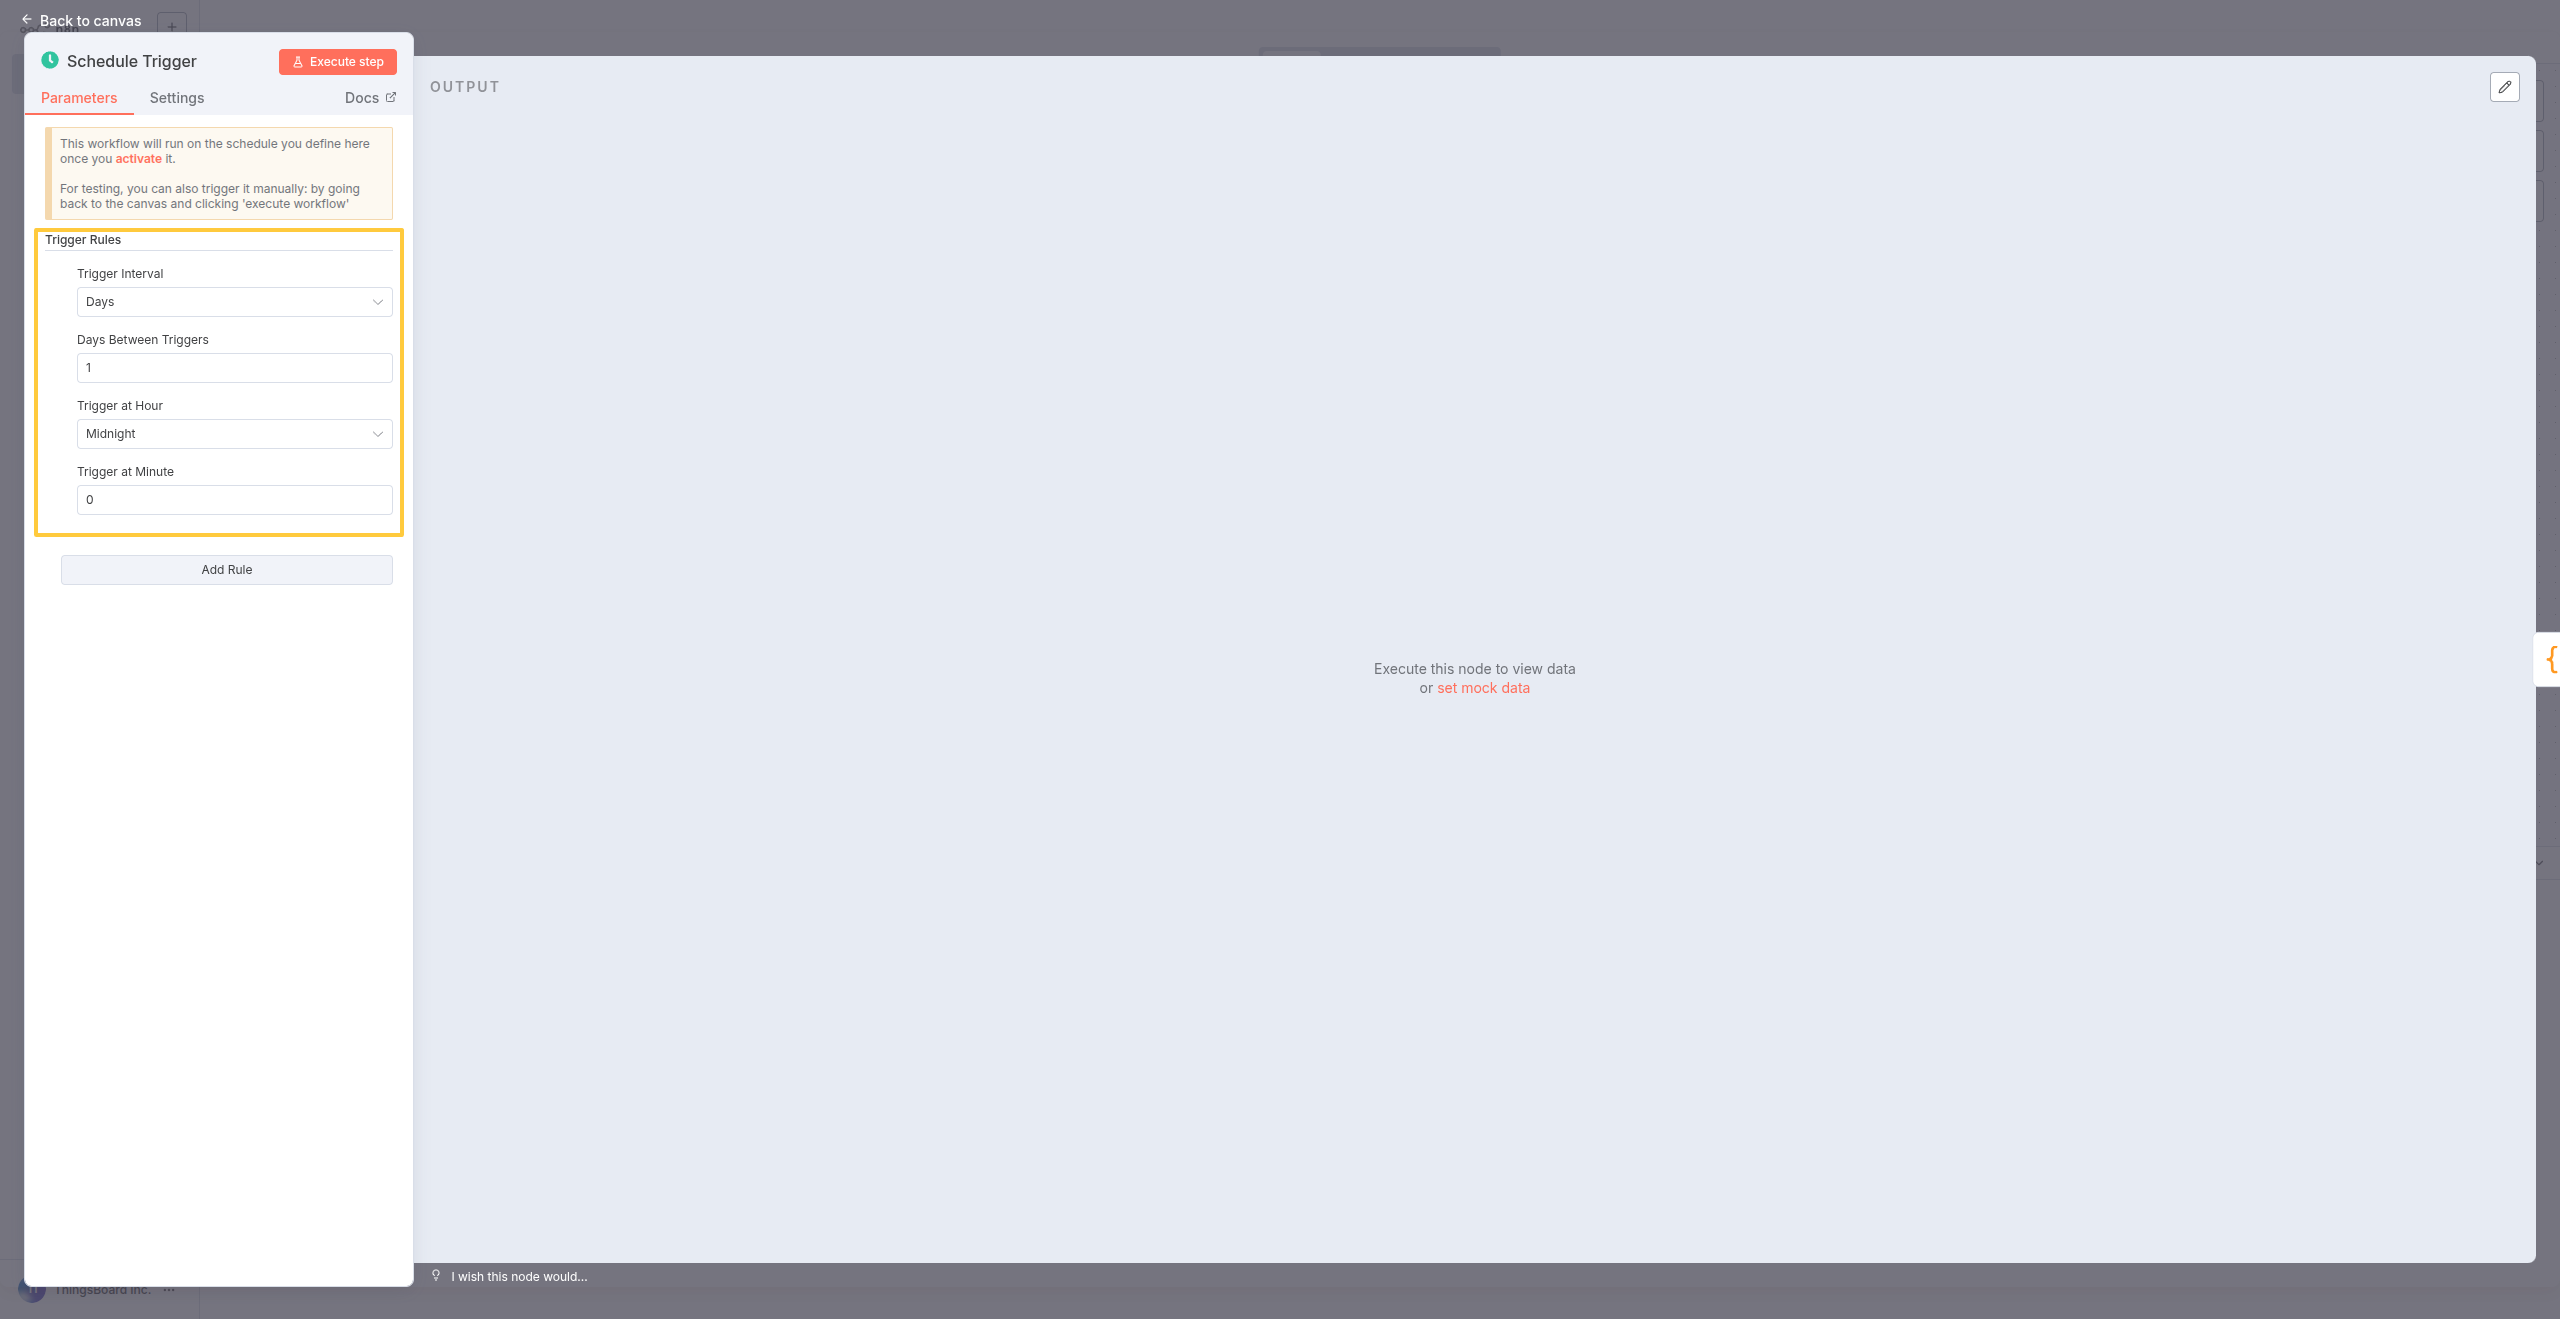
Configure the trigger to run every day at 00:00 UTC (midnight).
What you just did: Set up automated daily execution at midnight UTC.
Step 2: Add Code node for time range calculation
ThingsBoard’s API requires timestamps in milliseconds. Add a Code node to calculate the exact 24-hour time range.
Configuration:
- Click + after the Schedule node → Select Code
- Paste the following code:
1
2
3
4
5
const DAY_MS = 24 * 60 * 60 * 1000;  // 24 hours in milliseconds
const endTsMs = new Date($input.first().json.timestamp).getTime()  // Current time in MS
const startTsMs = endTsMs - DAY_MS;  // 24 hours ago in MS

return [{ startTsMs, endTsMs }];  // Pass to next node
- Click Execute node to test
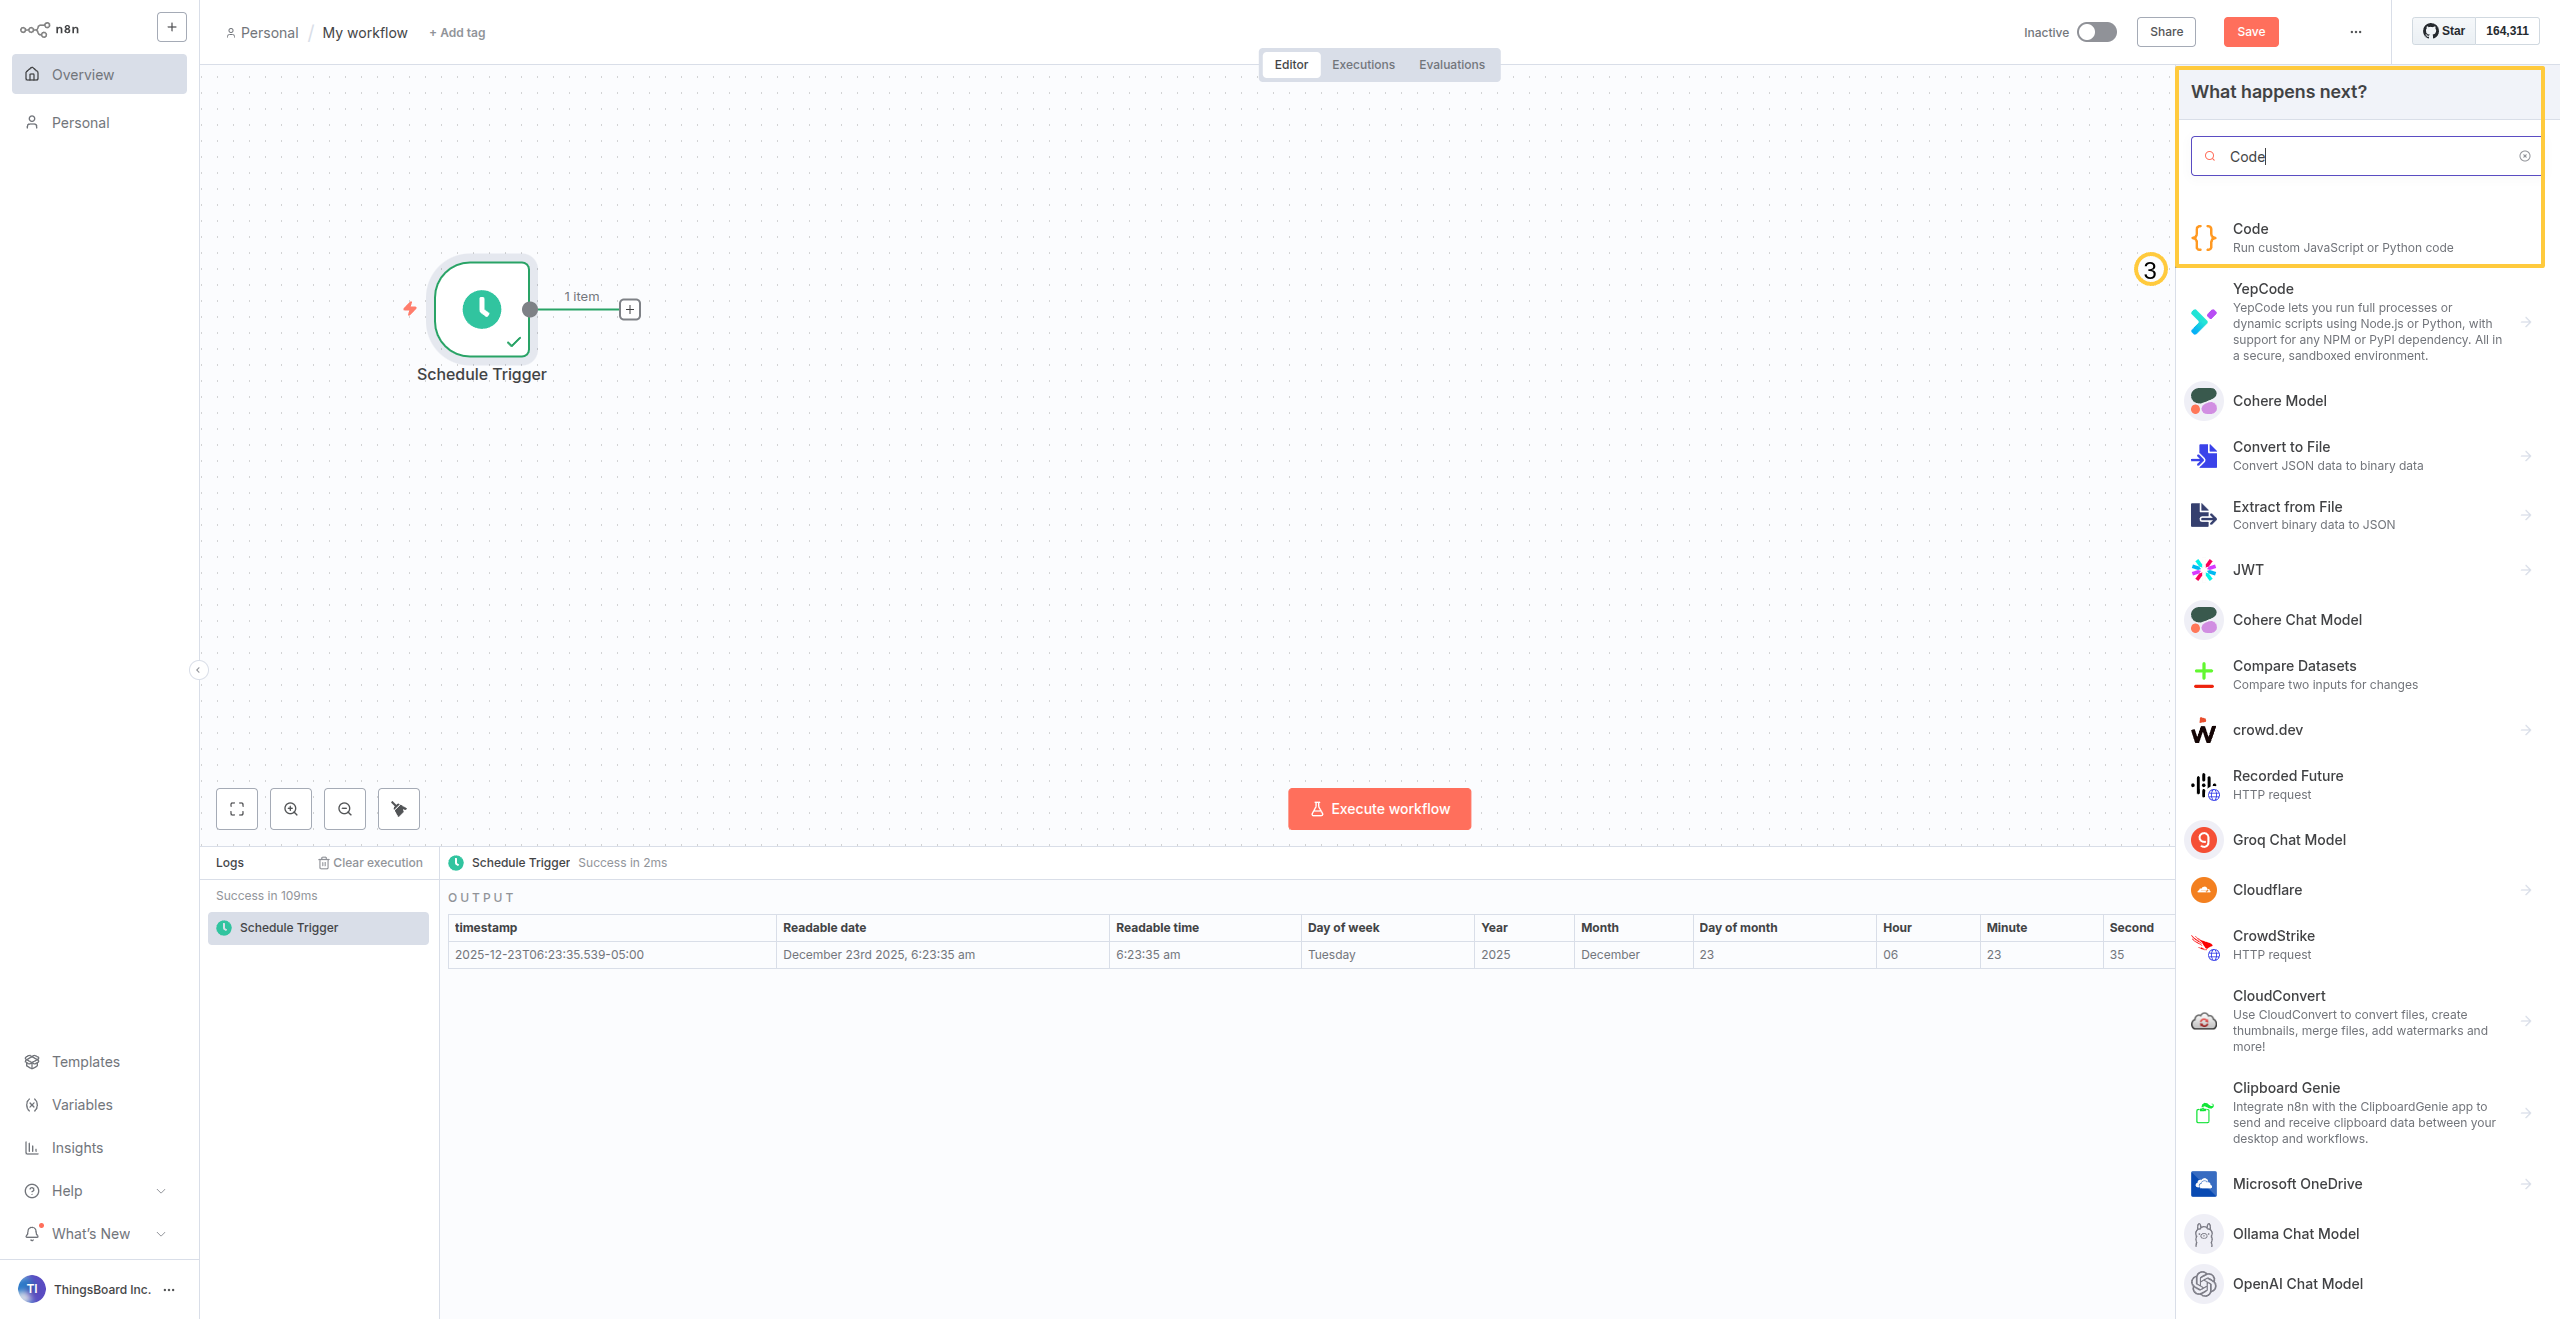
Add a Code node after the Schedule Trigger.
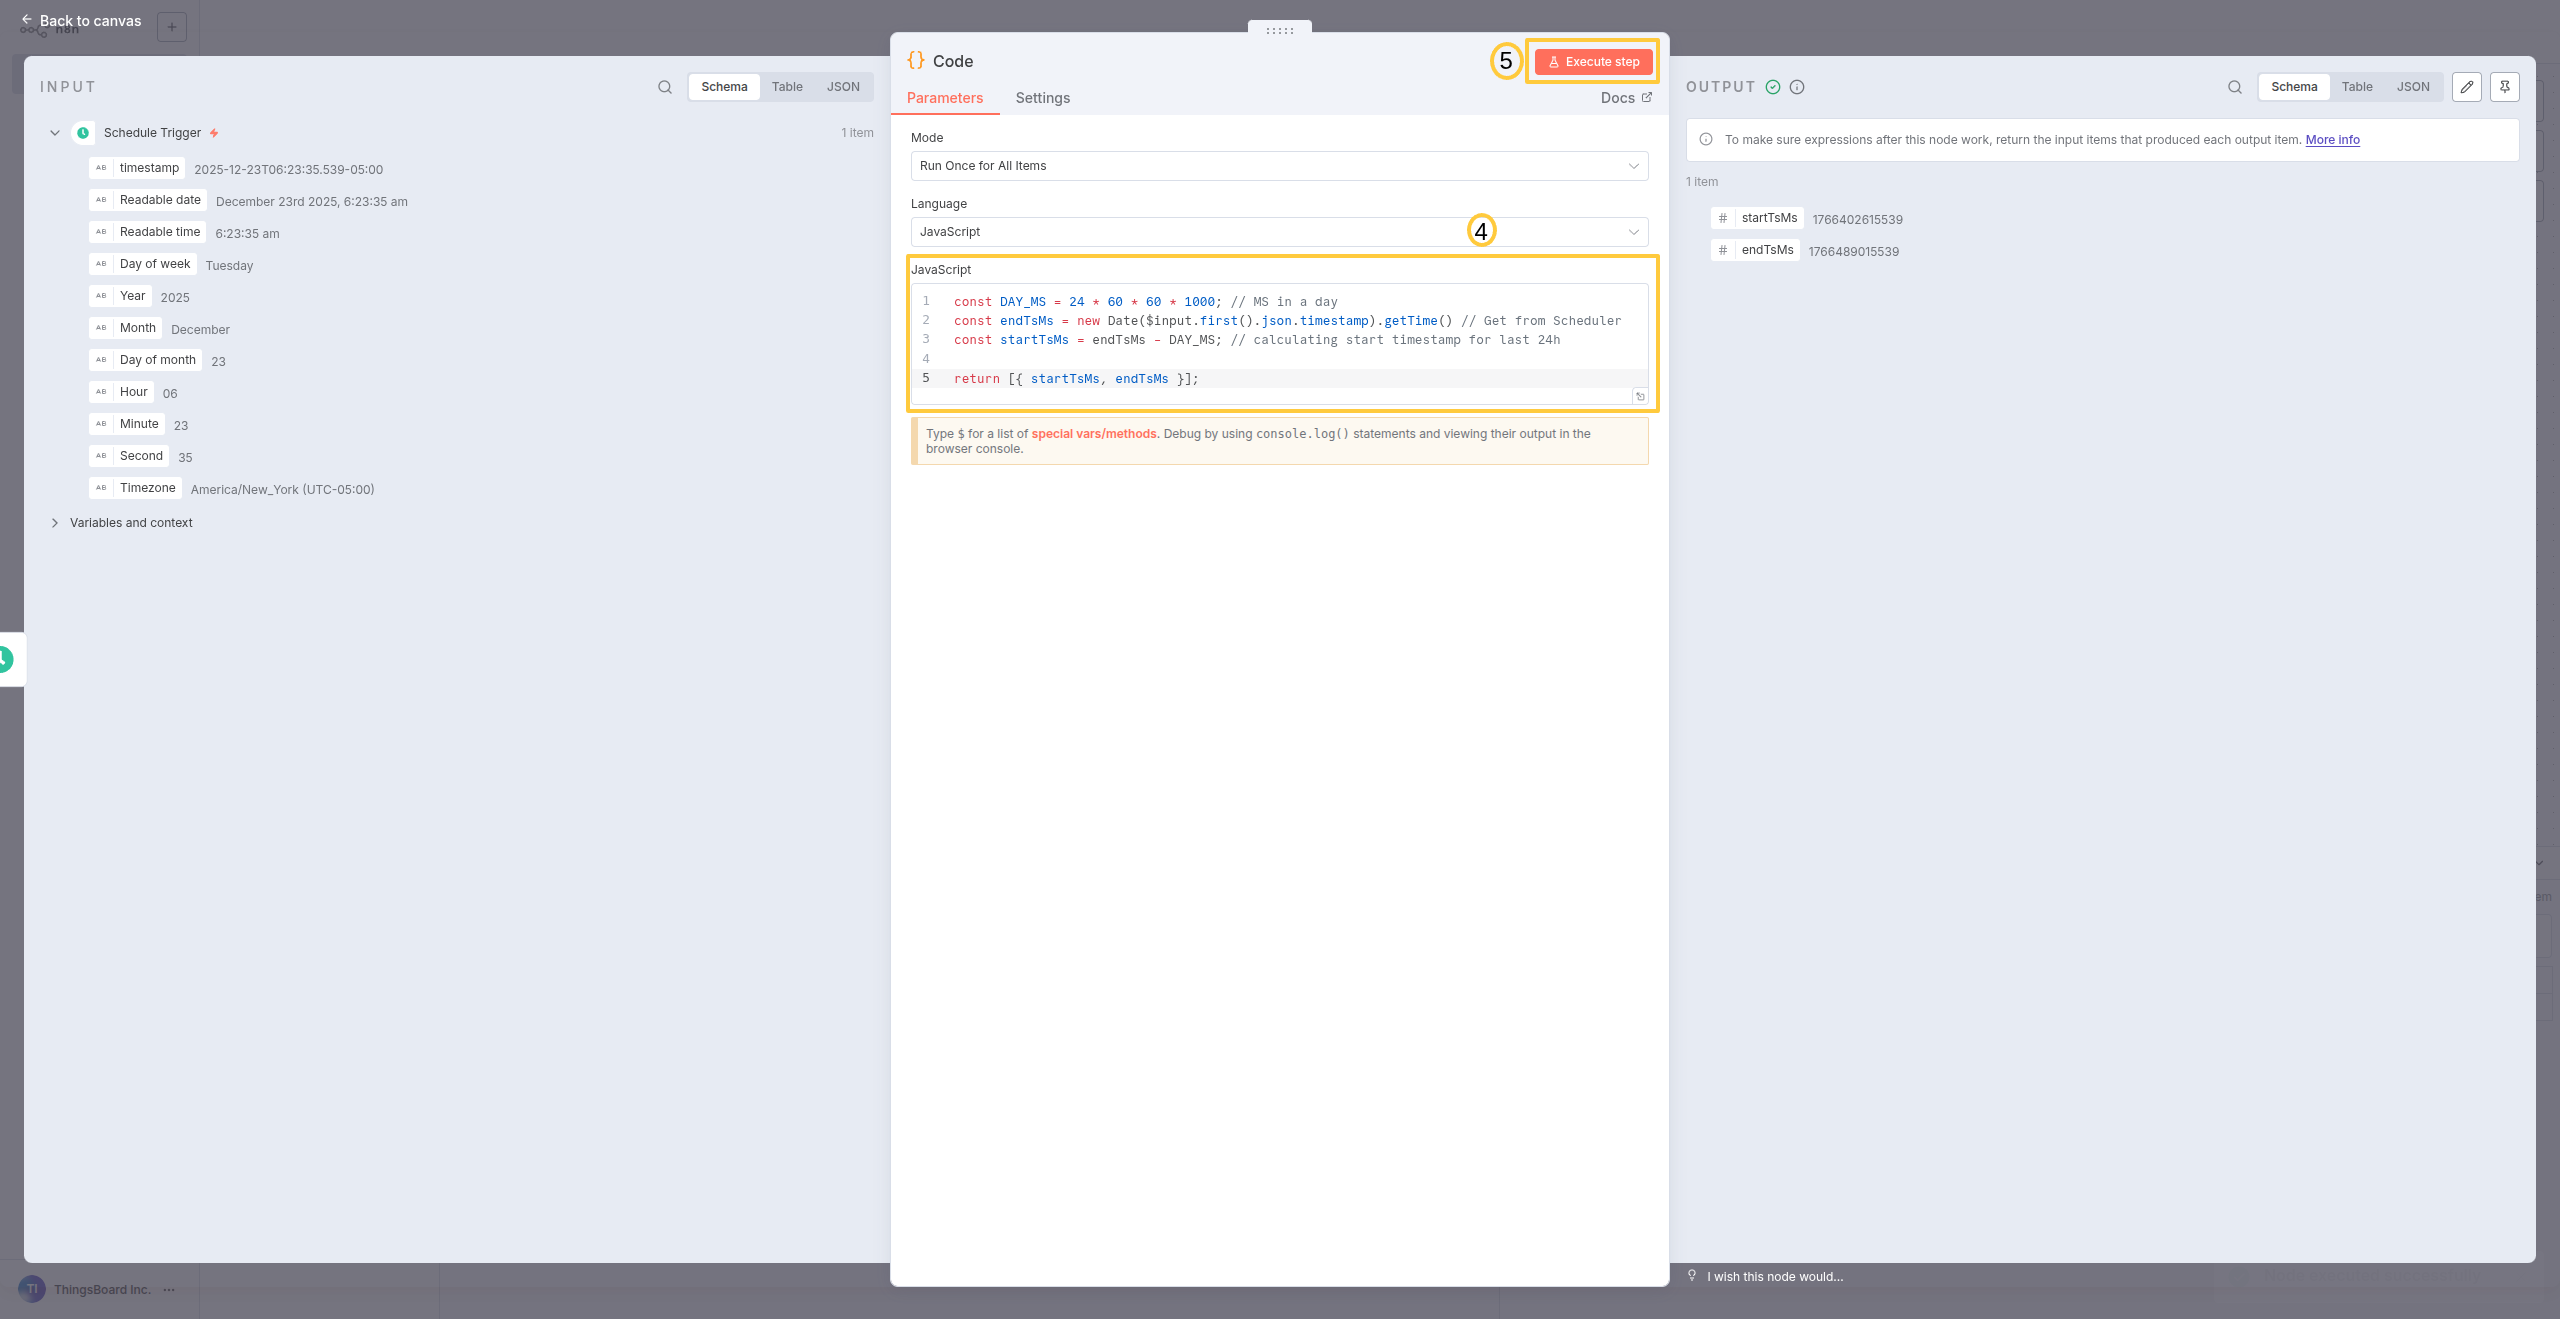
Paste the time calculation code and click Execute node to test it.
What you got: Two timestamps (startTsMs and endTsMs) representing exactly 24 hours of data.
Step 3: Get device by name from ThingsBoard
Now retrieve the device you want to export telemetry for.
Configuration:
- Click + → ThingsBoard → Get a device by name
- Device Name: Enter your device name (e.g., “Temperature Sensor 1”)
- Click Execute node
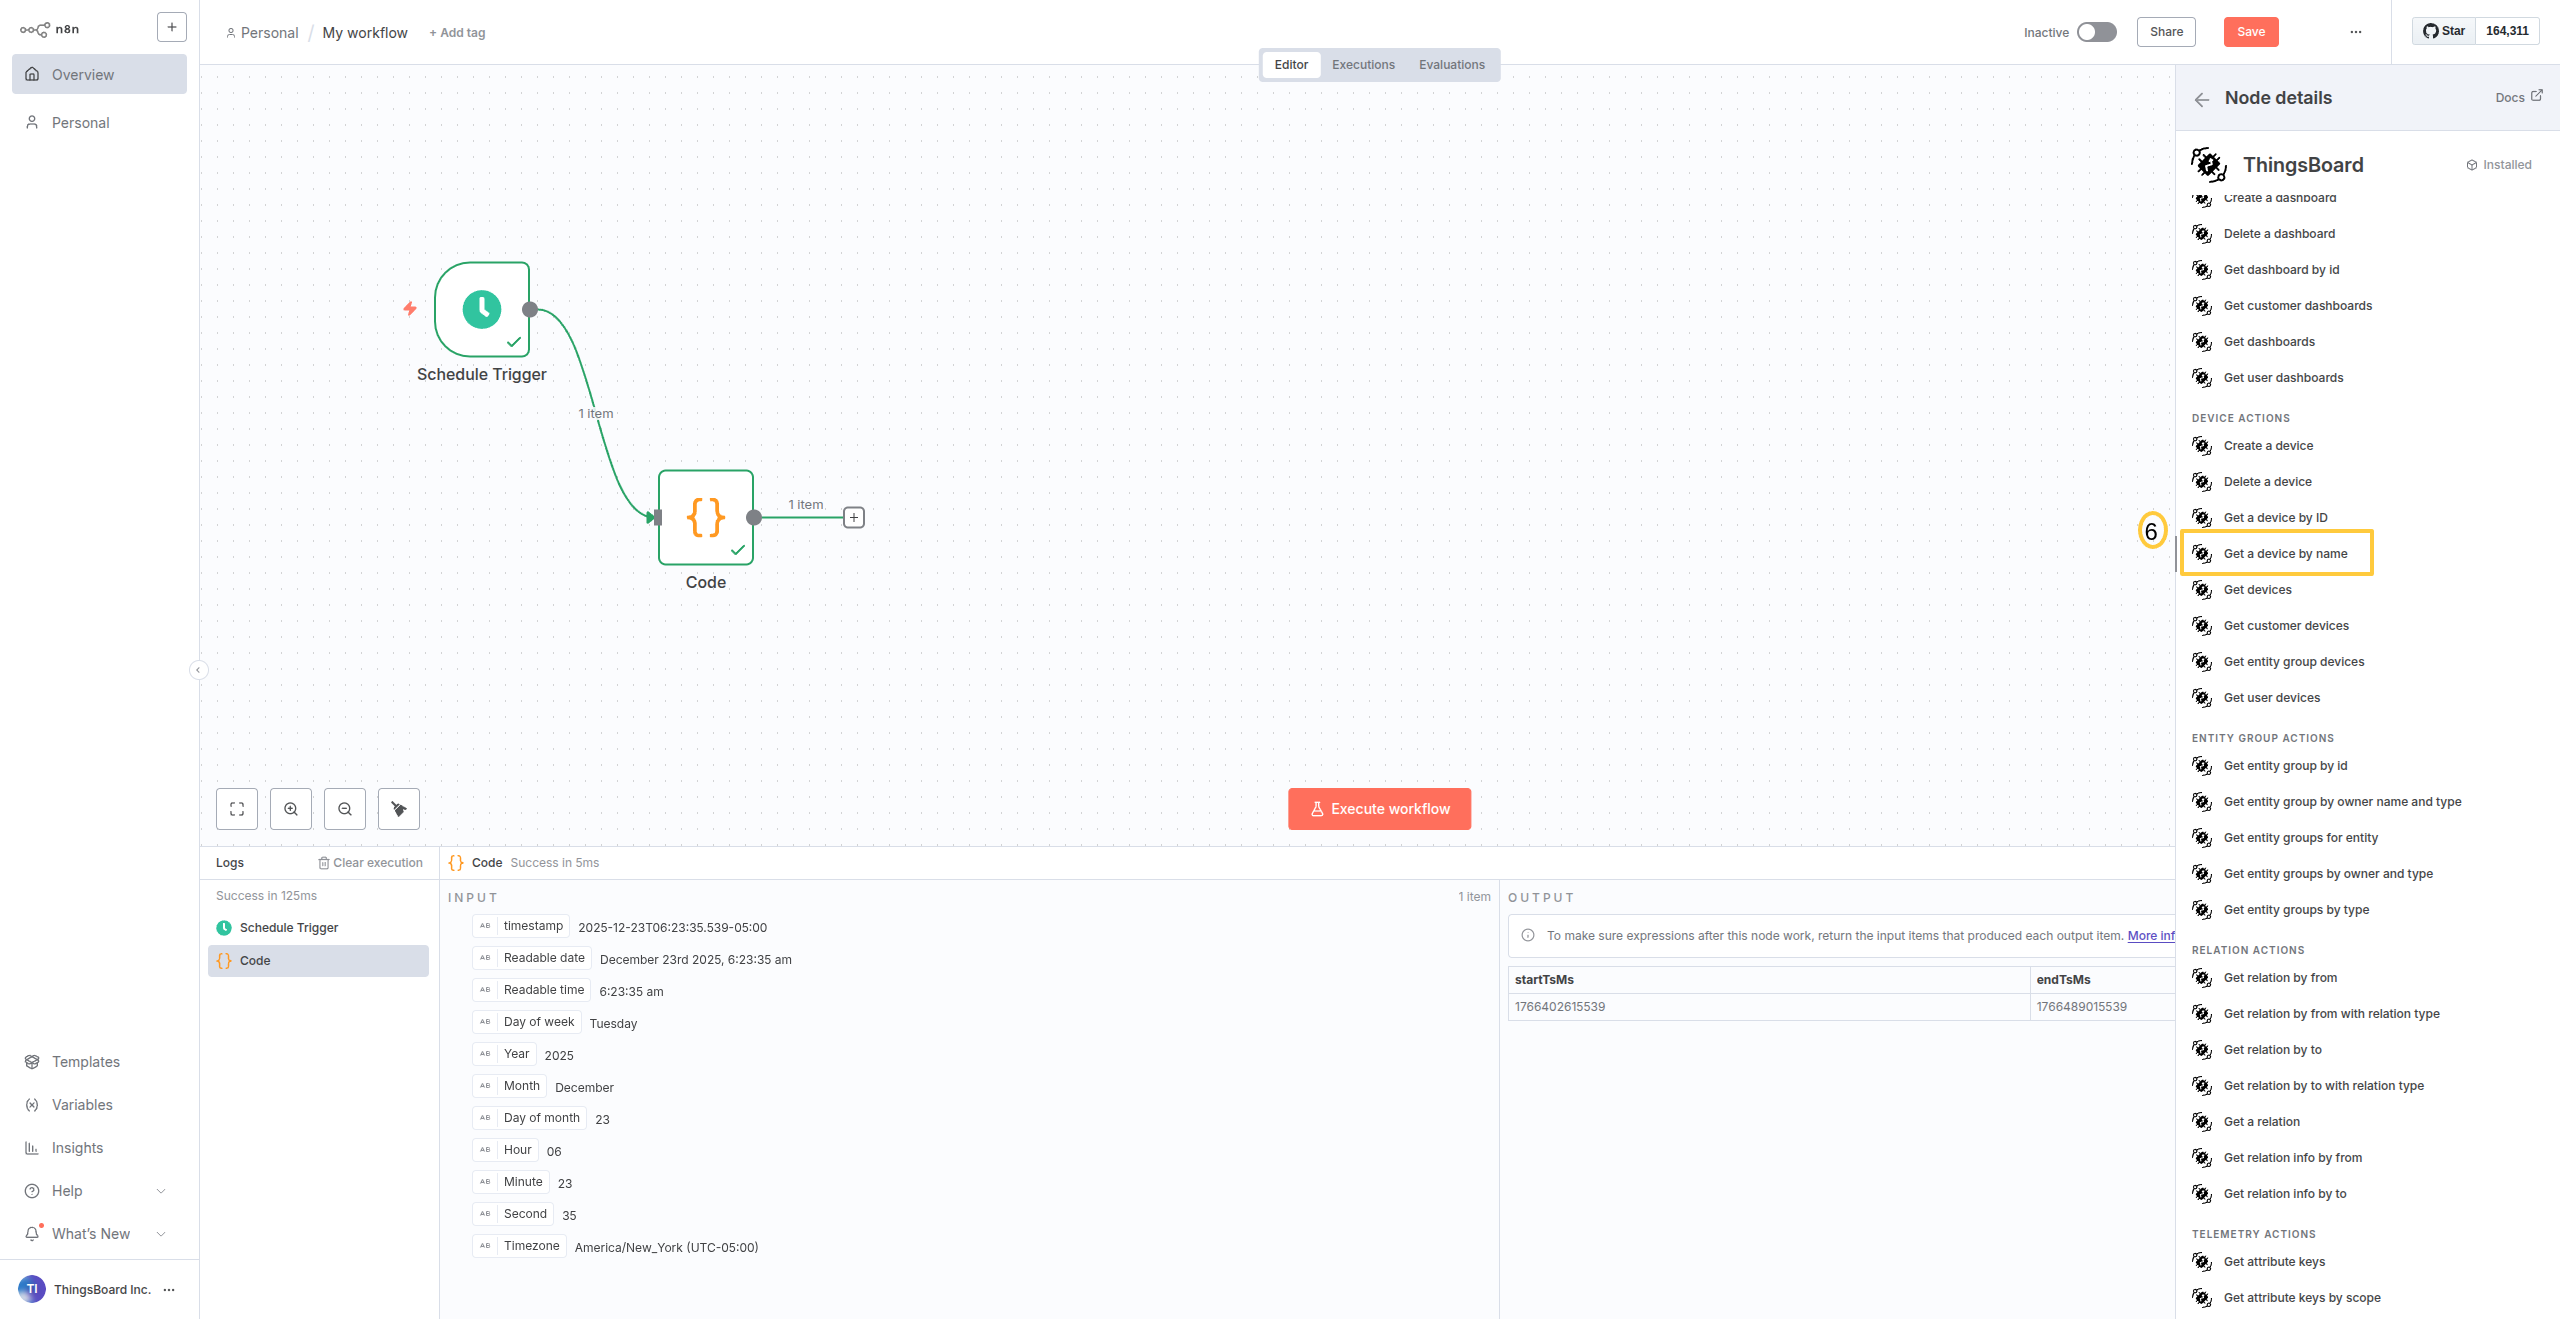
Add ThingsBoard node and select Get a device by name.
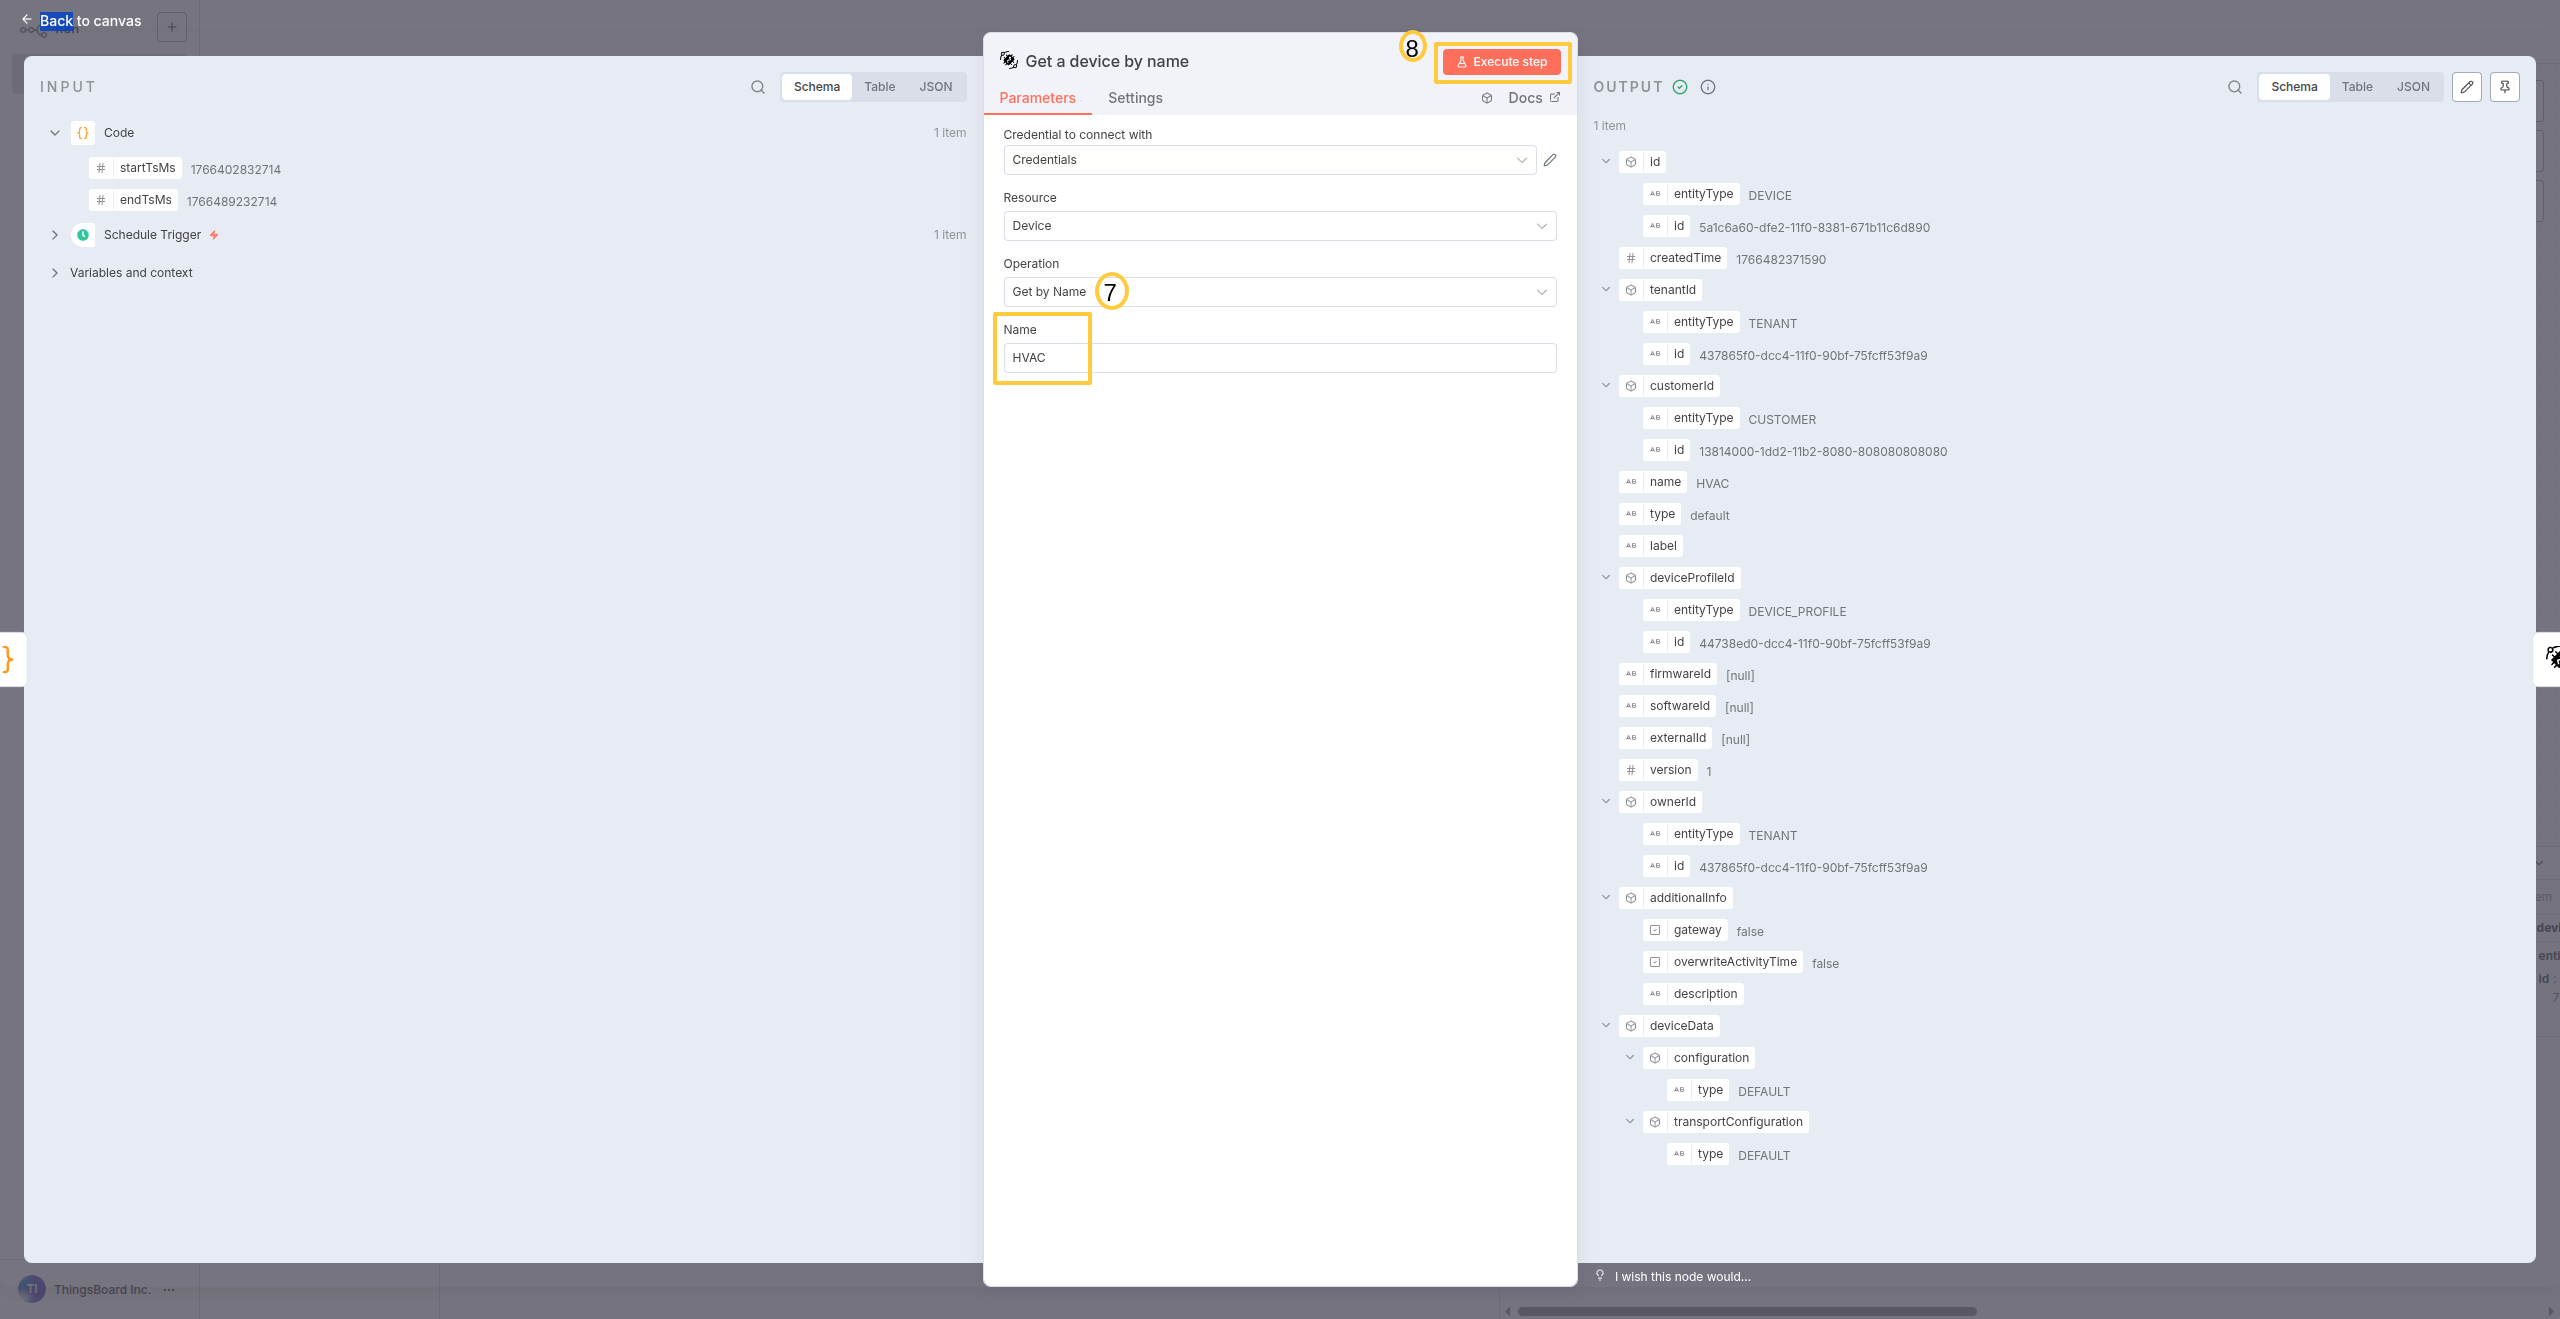
Enter the device name and execute to retrieve the device object.
What you got: The full device object including ID, type, and metadata needed for the next step.
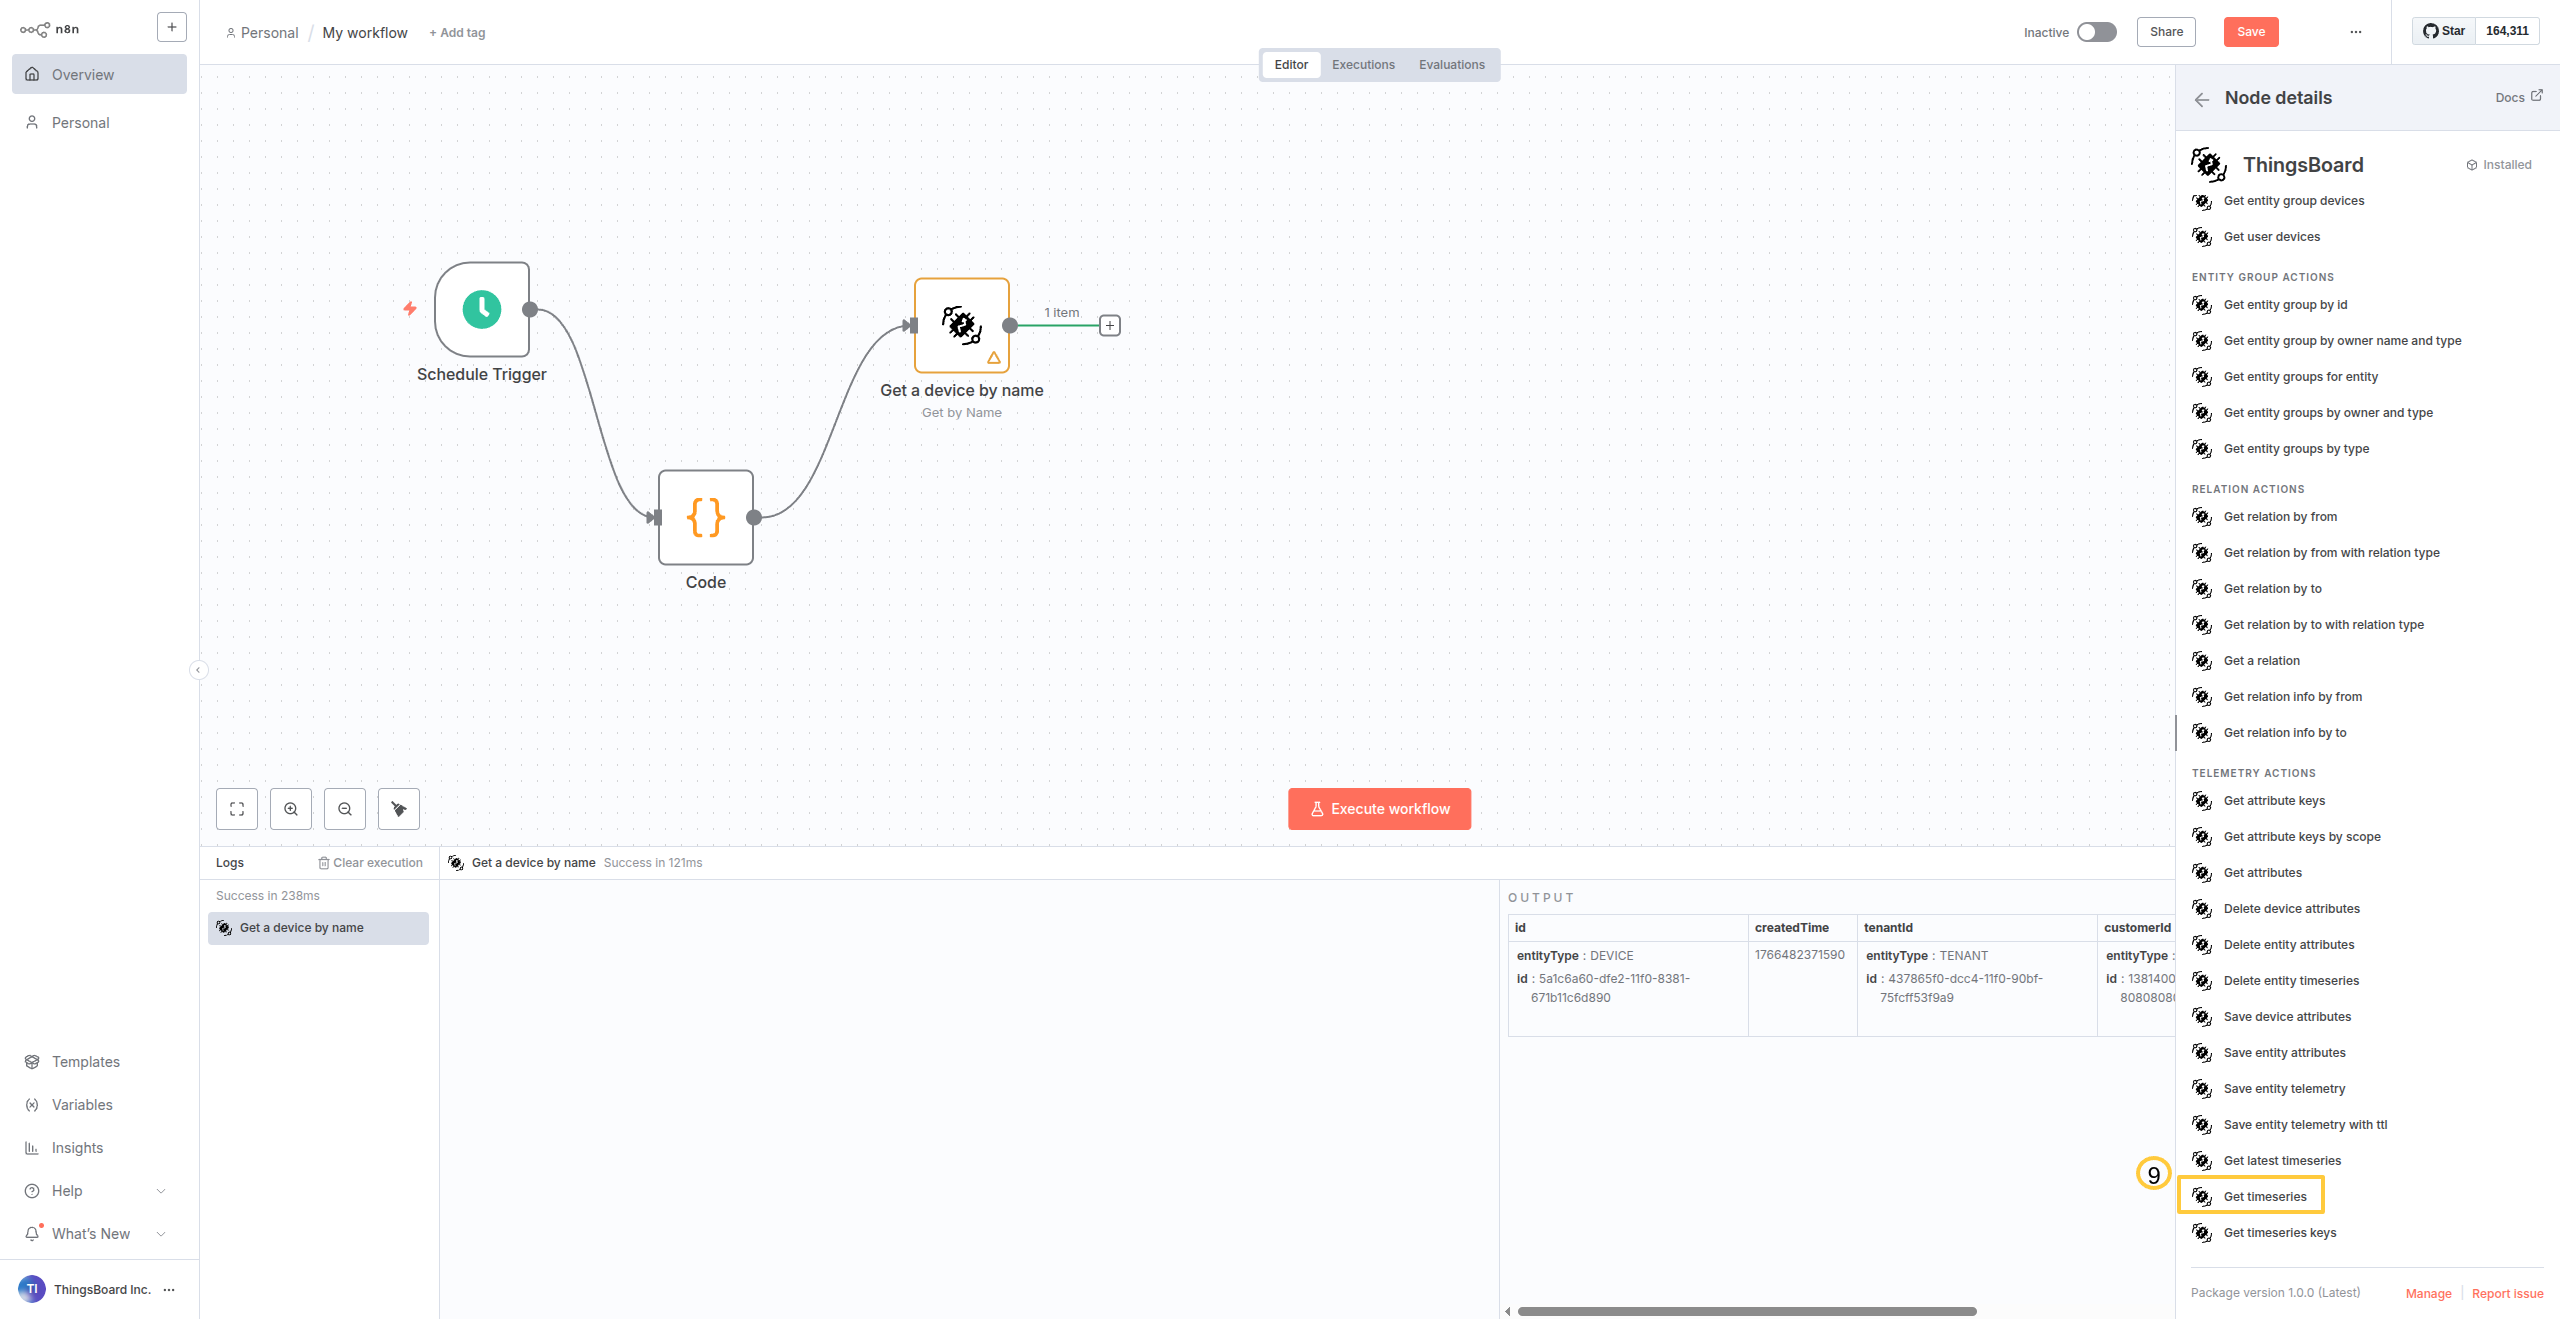
Step 4: Get timeseries data for the device
Fetch the telemetry data using the time range from the Code node.
Configuration:
- Click + → ThingsBoard → Get timeseries
- Drag values from the INPUT panel (left side):
- Entity ID: From “Get a device by name” → id → id
- Entity Type: From “Get a device by name” → id → entityType
- Start timestamp: From Code node → startTsMs
- End timestamp: From Code node → endTsMs
- Keys: Enter the telemetry keys you want (e.g., “temperature,humidity”)
- Click Execute node
Add ThingsBoard Get timeseries node.
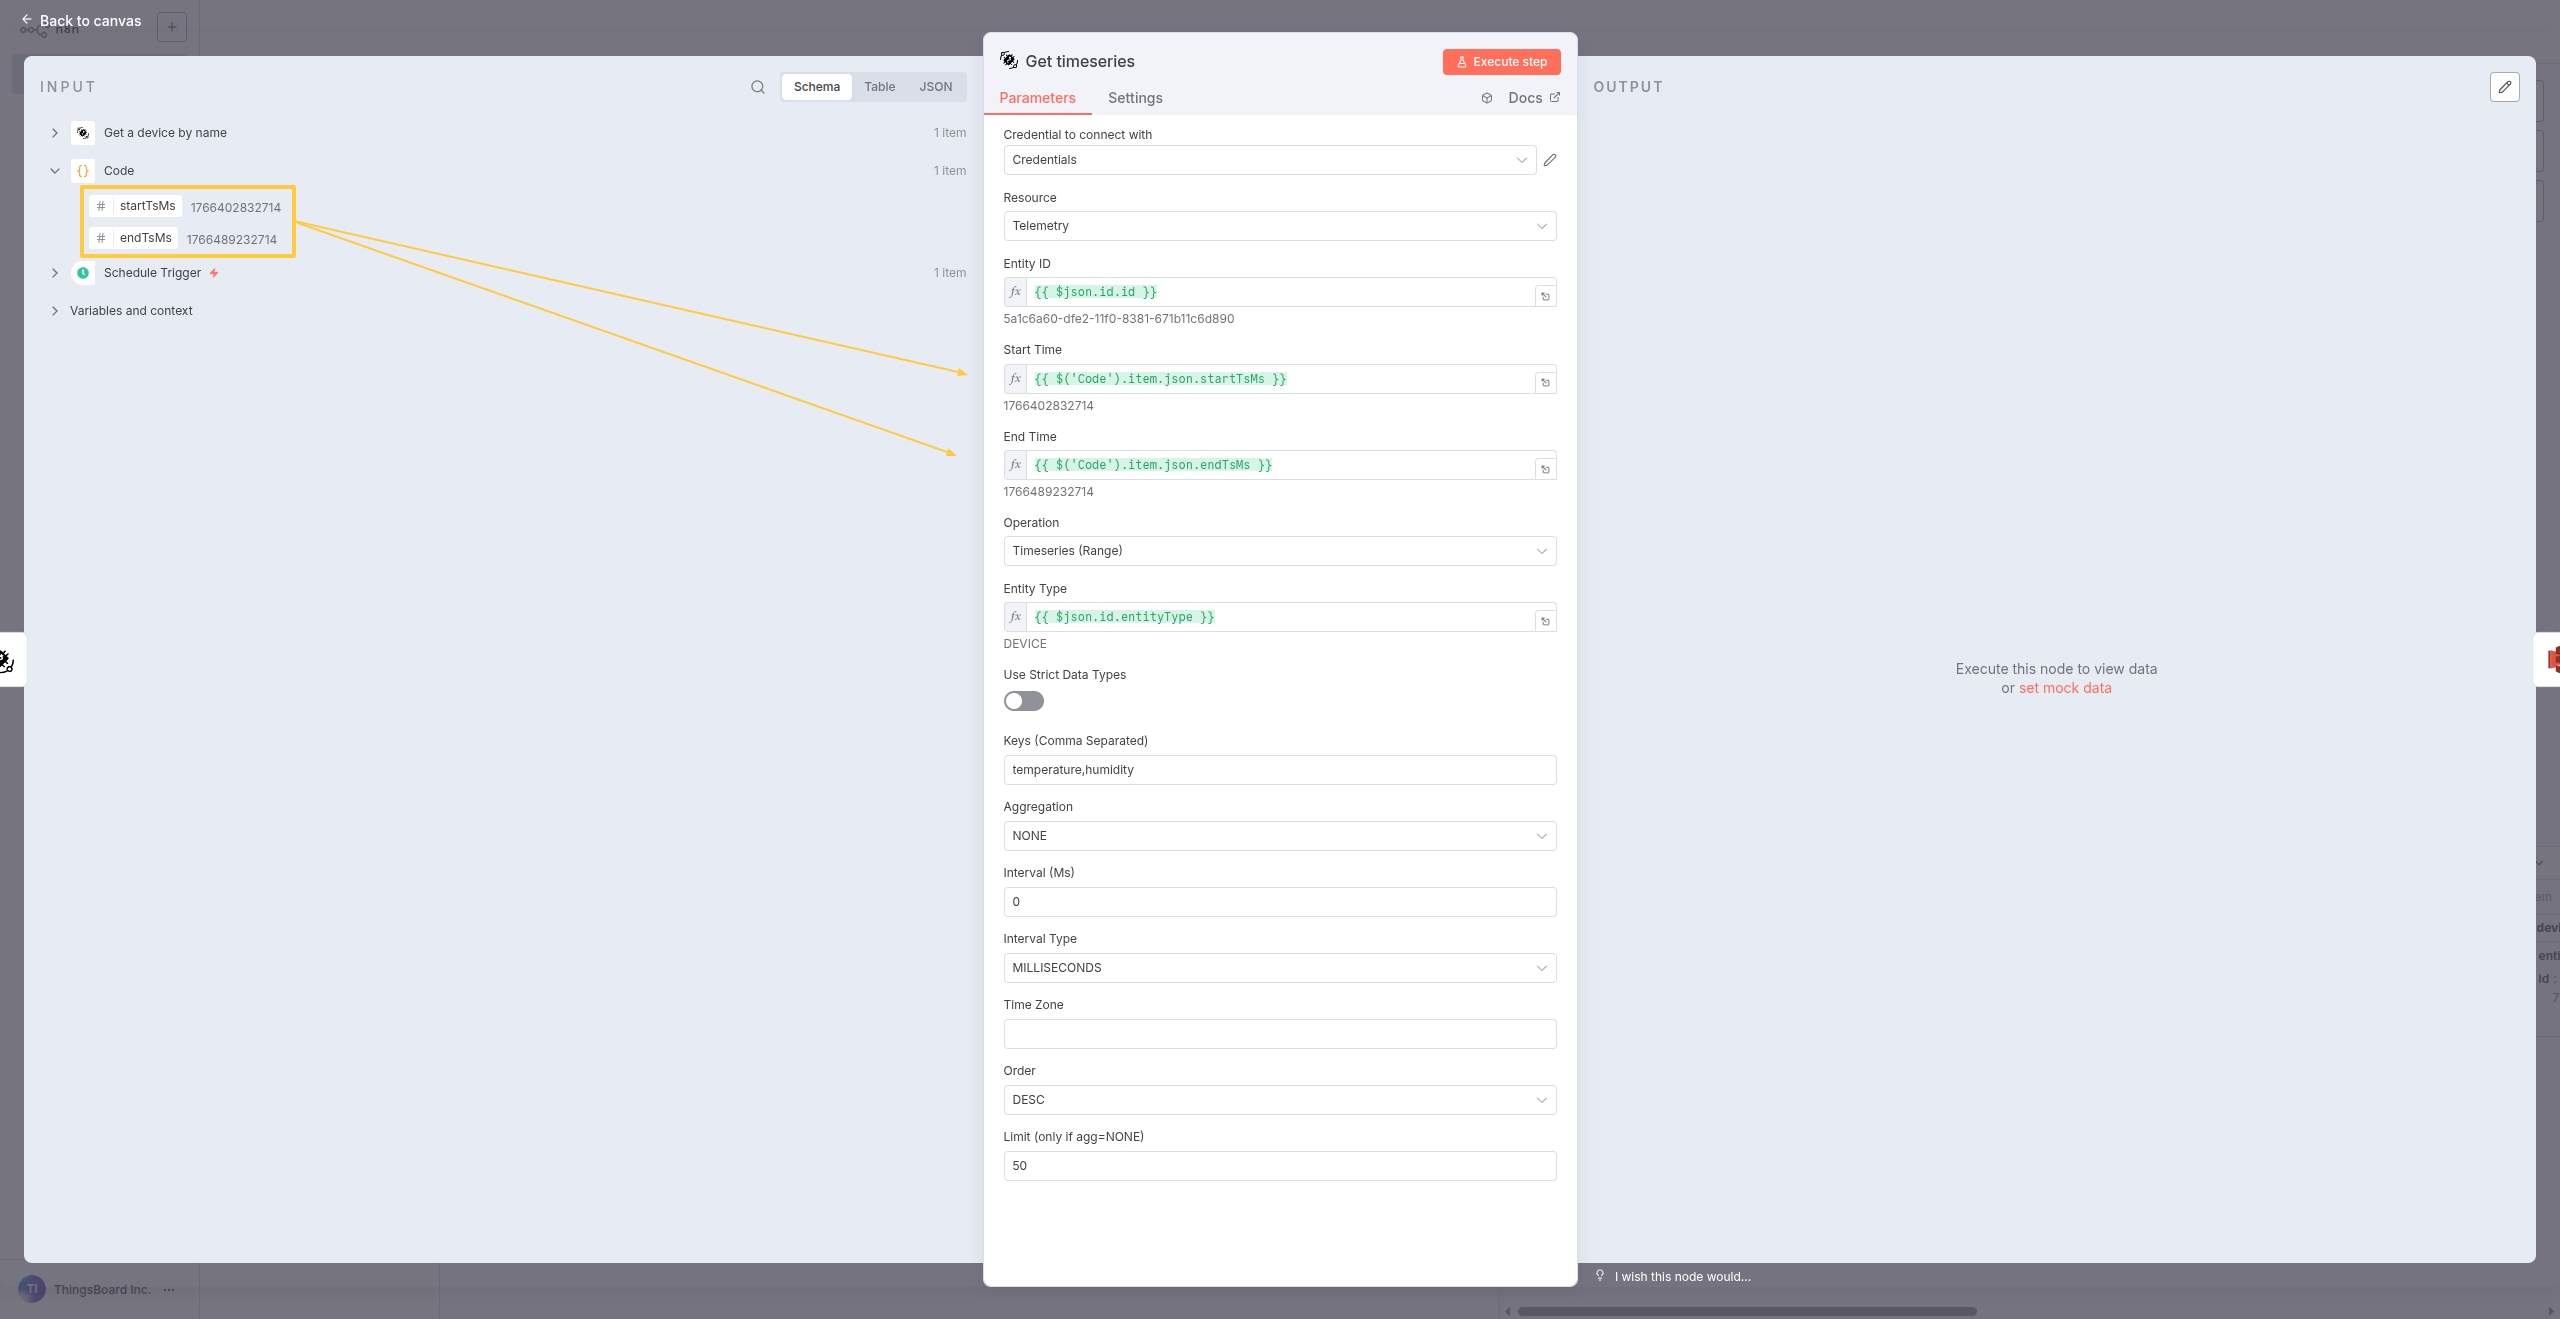
Configure with device ID, entity type, and time range from previous nodes. Execute to fetch telemetry data.
What you got: The last 24 hours of telemetry data for your device in JSON format.
Step 5: Build your logic with uploading to AWS S3
Finally, upload the file to your S3 bucket.
Configuration:
- Click + → AWS S3
- Operation: Upload
- Bucket Name: Your S3 bucket name
- File Name: Use expressions for datestamped names (e.g.,
telemetry-.json) - Configure AWS credentials
- Click Execute node

Add AWS S3 node and configure upload settings with your bucket name and credentials.
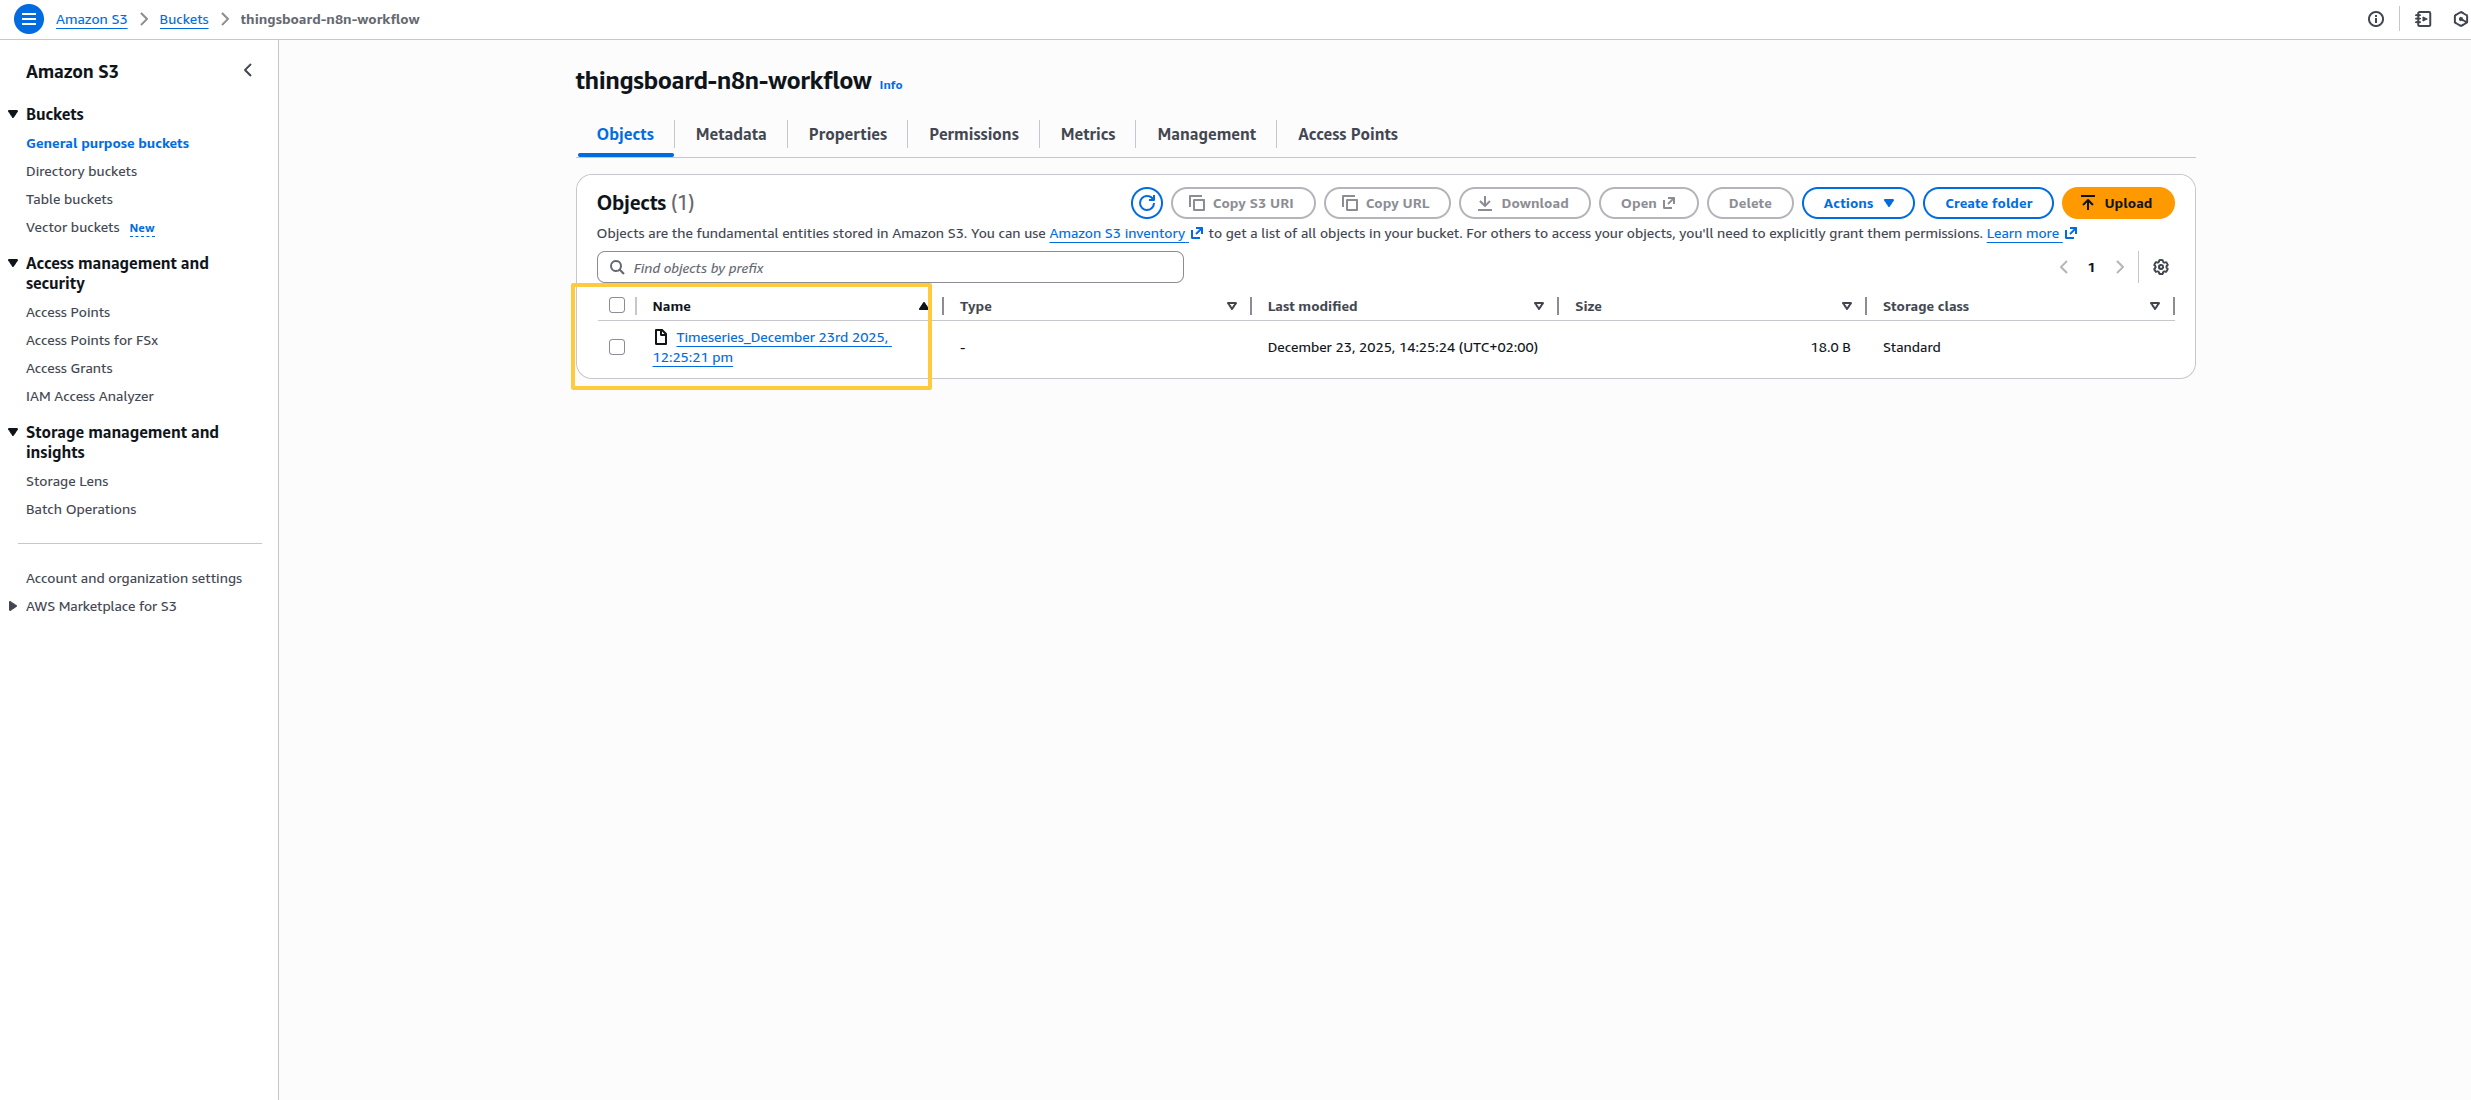
Execute the workflow to see the file successfully uploaded to S3.
What you got: Your telemetry data successfully uploaded to S3 with a datestamped filename.
Final result
You’ve built a complete automated data pipeline that:
- Runs every night at midnight UTC
- Calculates the exact 24-hour time window
- Fetches device telemetry from ThingsBoard
- Converts it to a file format
- Uploads to AWS S3 with predictable naming
What you get:
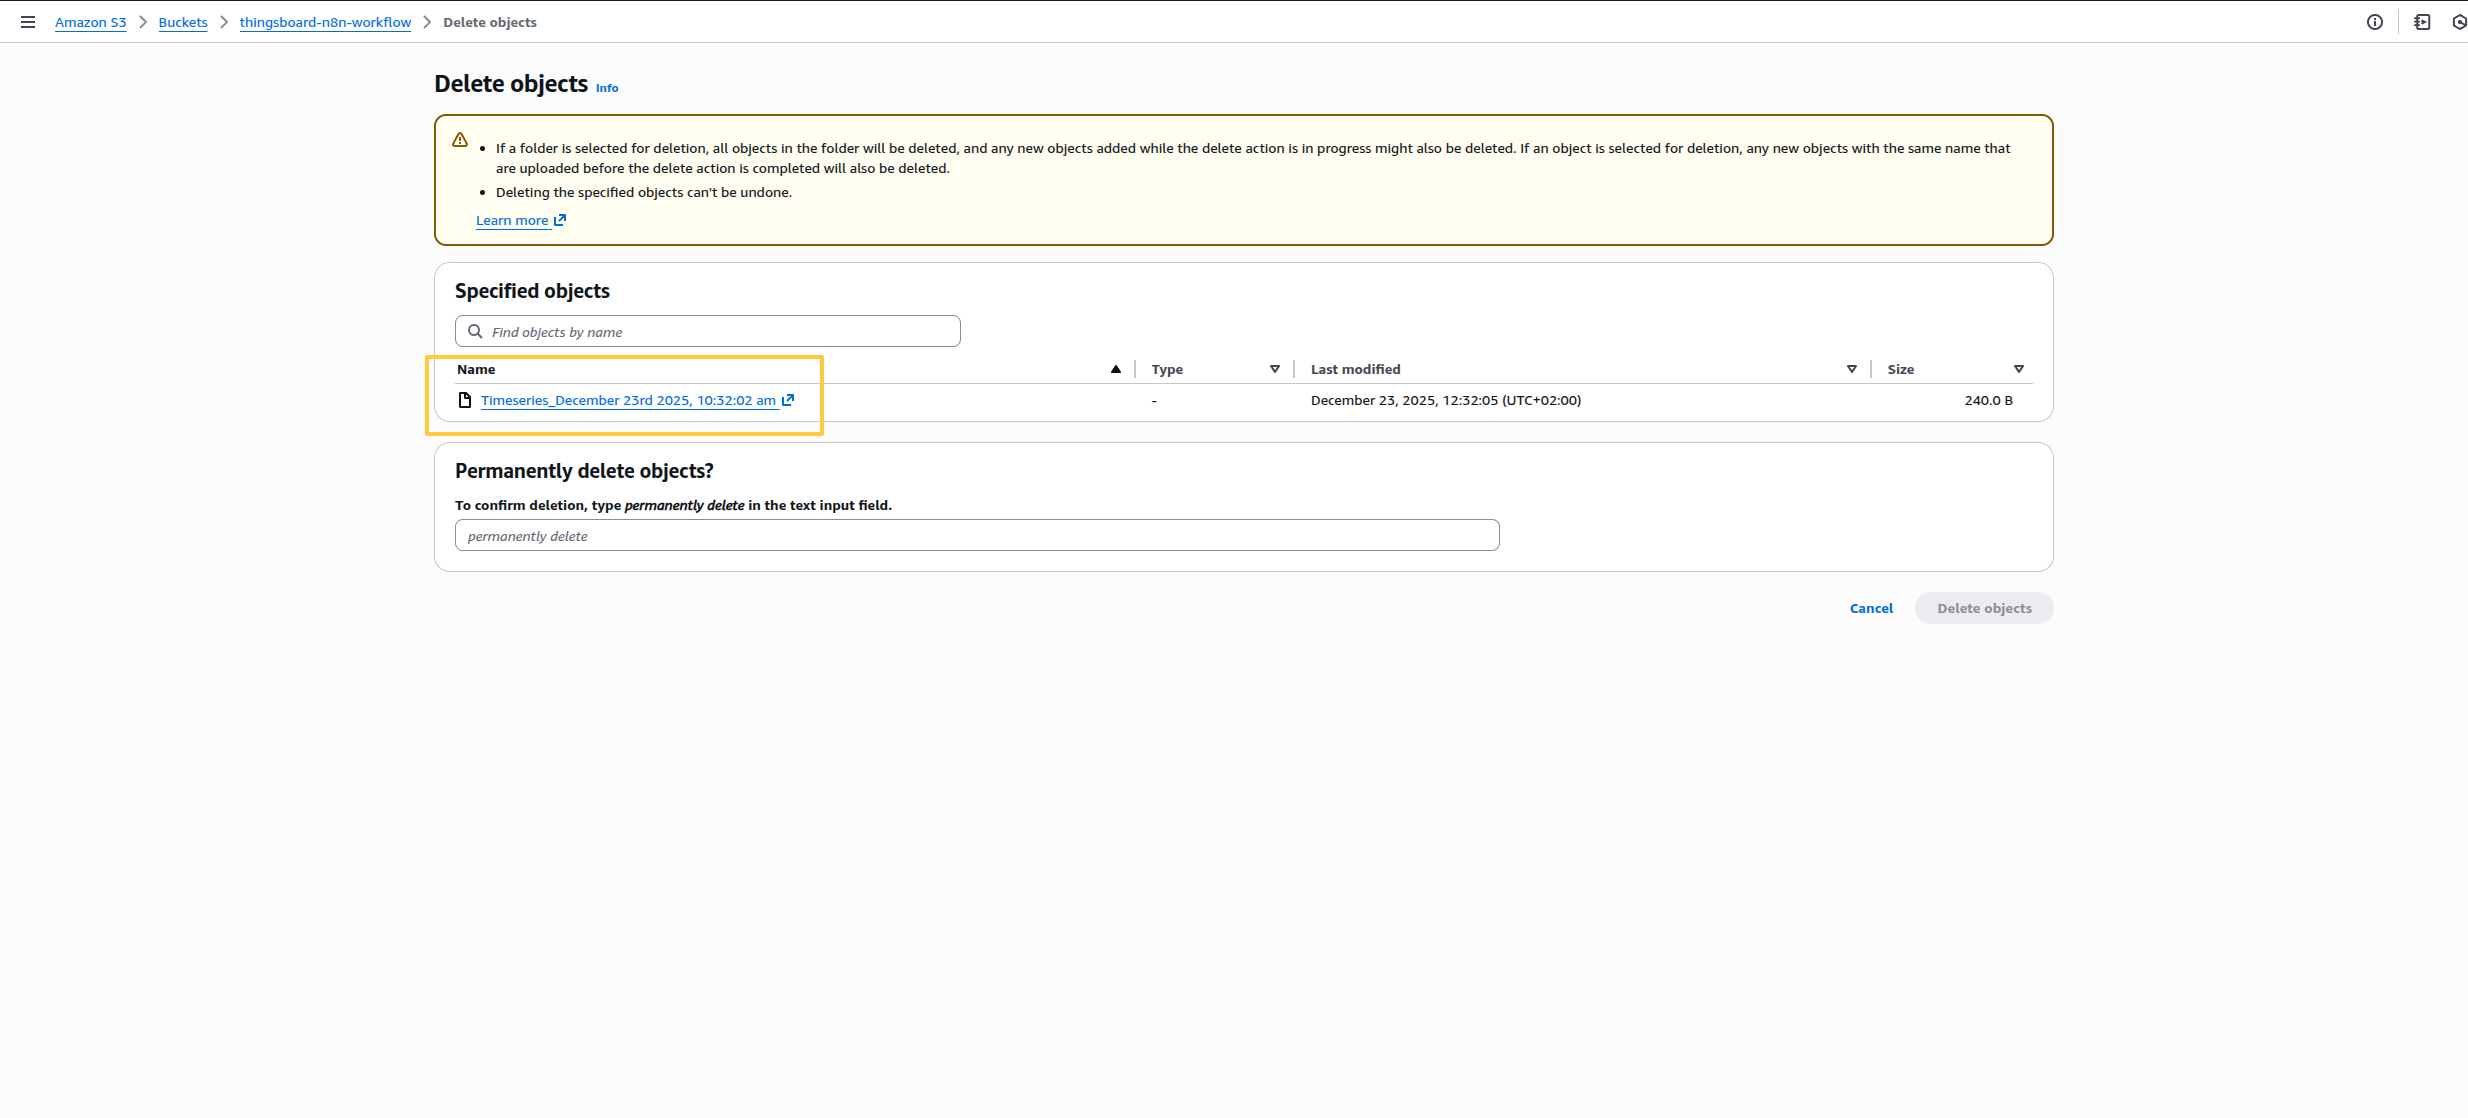
- Daily JSON files in S3:
s3://my-bucket/telemetry-2024-12-23.json - Automated backups without manual intervention
- Data ready for AWS Athena queries or data pipeline ingestion
- Complete audit trail of daily exports
What makes this powerful: n8n acts as the orchestration layer between ThingsBoard and your data ecosystem. You’re not just exporting data - you’re building a complete data pipeline with transformations, enrichments, and multi-system integration that ThingsBoard alone can’t handle.
Next steps - extend this workflow:
- Add multiple destinations: After “Convert to File”, split to also send to Snowflake, Google Sheets, or email
- Enrich the data: Before S3 upload, join with CRM data or add business context
- Conditional routing: Route high-value customers to premium storage, others to standard
- Trigger downstream actions: After S3 upload → Trigger AWS Lambda → Update inventory system → Notify team
Example 3: Webhook-Triggered Device Query
Real-world scenario: Your customer portal has a “Get Device Status” button. When clicked, it needs to fetch real-time telemetry for whatever device the customer owns - you don’t know which device in advance.
Why this pattern? Most real workflows are dynamic:
- Mobile apps that query devices by name (not hardcoded IDs)
- Chatbots that respond to “check temperature in Room 405”
- External systems triggering reports for specific assets
- Customer-facing dashboards that filter by user
What you’ll learn: How to chain ThingsBoard operations together, passing data between nodes (device name → device ID → telemetry keys → actual data).
Building the workflow
Step 1: Set up the trigger (simulating a webhook)
We’ll use a manual trigger to simulate what would normally be a webhook from your customer portal.
Configuration:
- Click Add first step… → Trigger manually
- Click the trigger node → Click pencil icon (top-right)
- Paste this JSON (simulating incoming webhook data):
1
2
3
{
  "deviceName": "Refrigerator"
}
- Save the changes
- Back to canvas
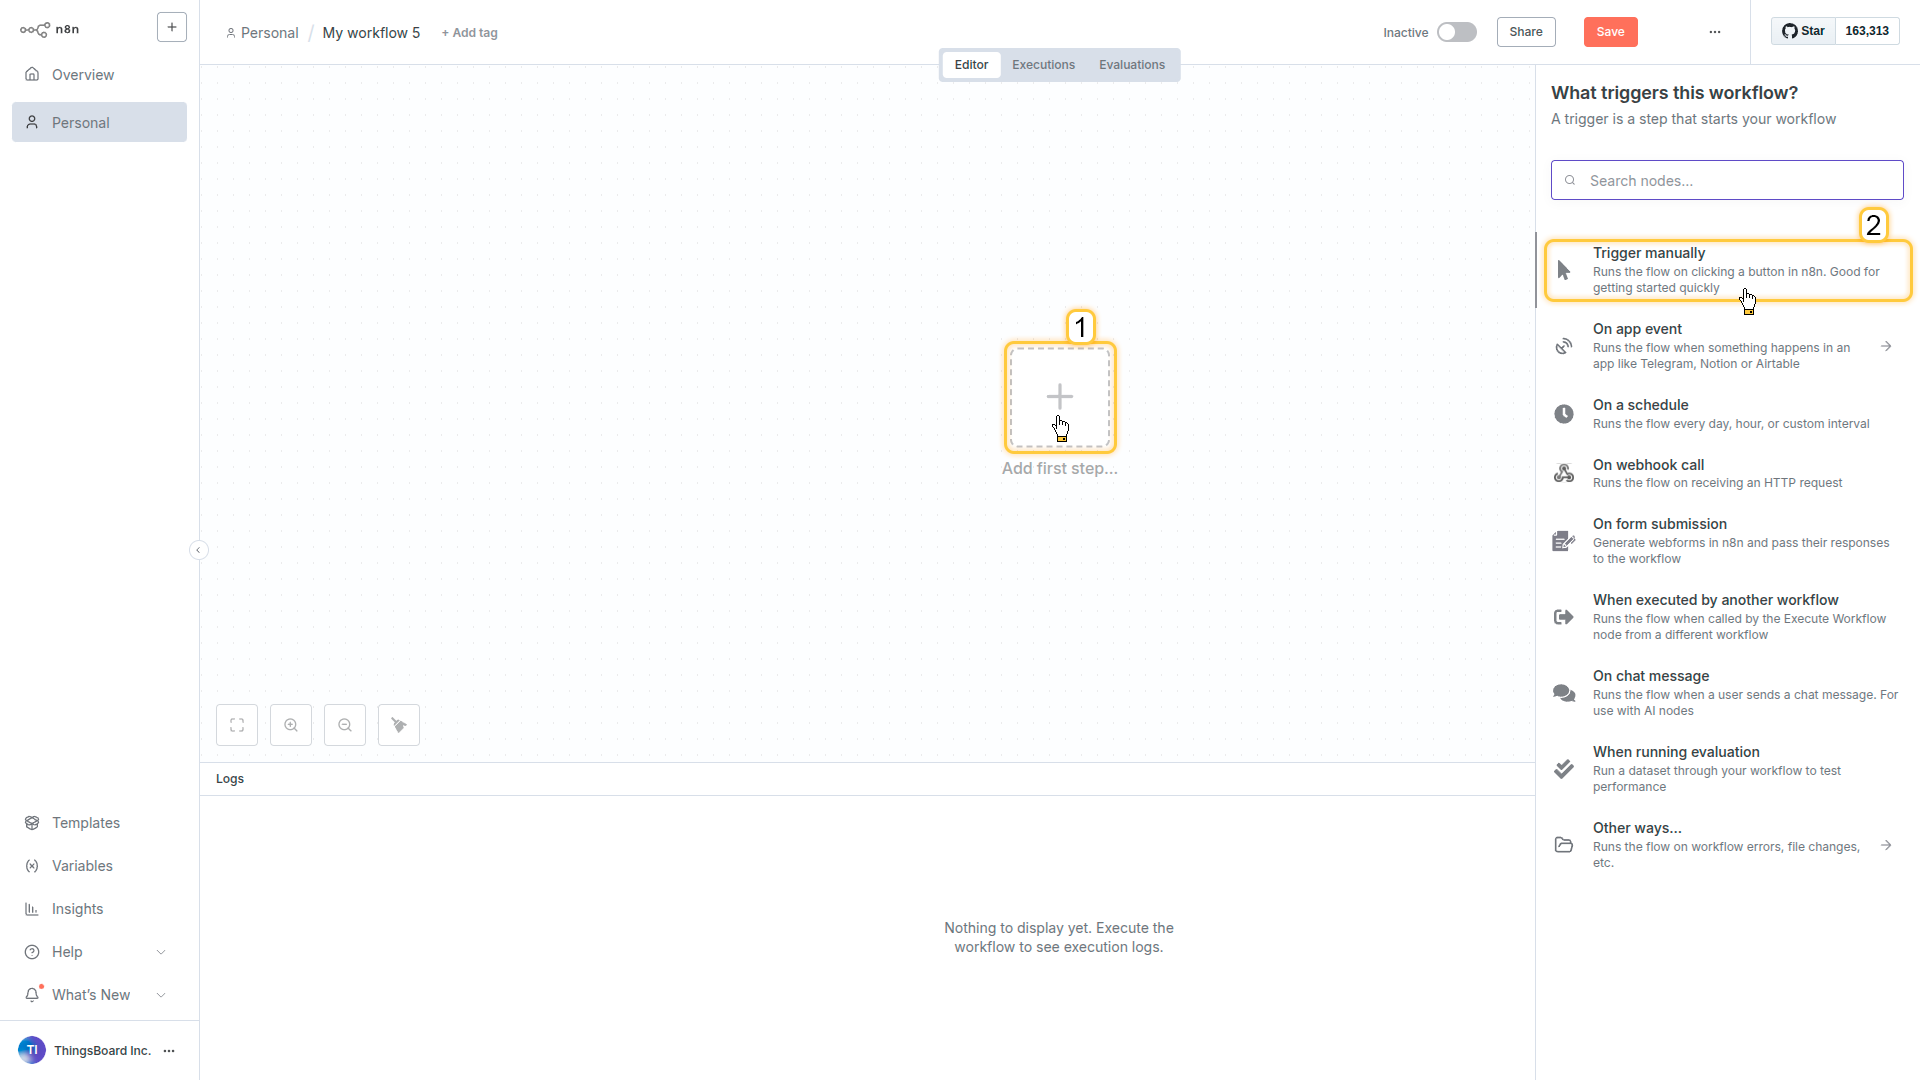
Click Add first step… and select Trigger manually.
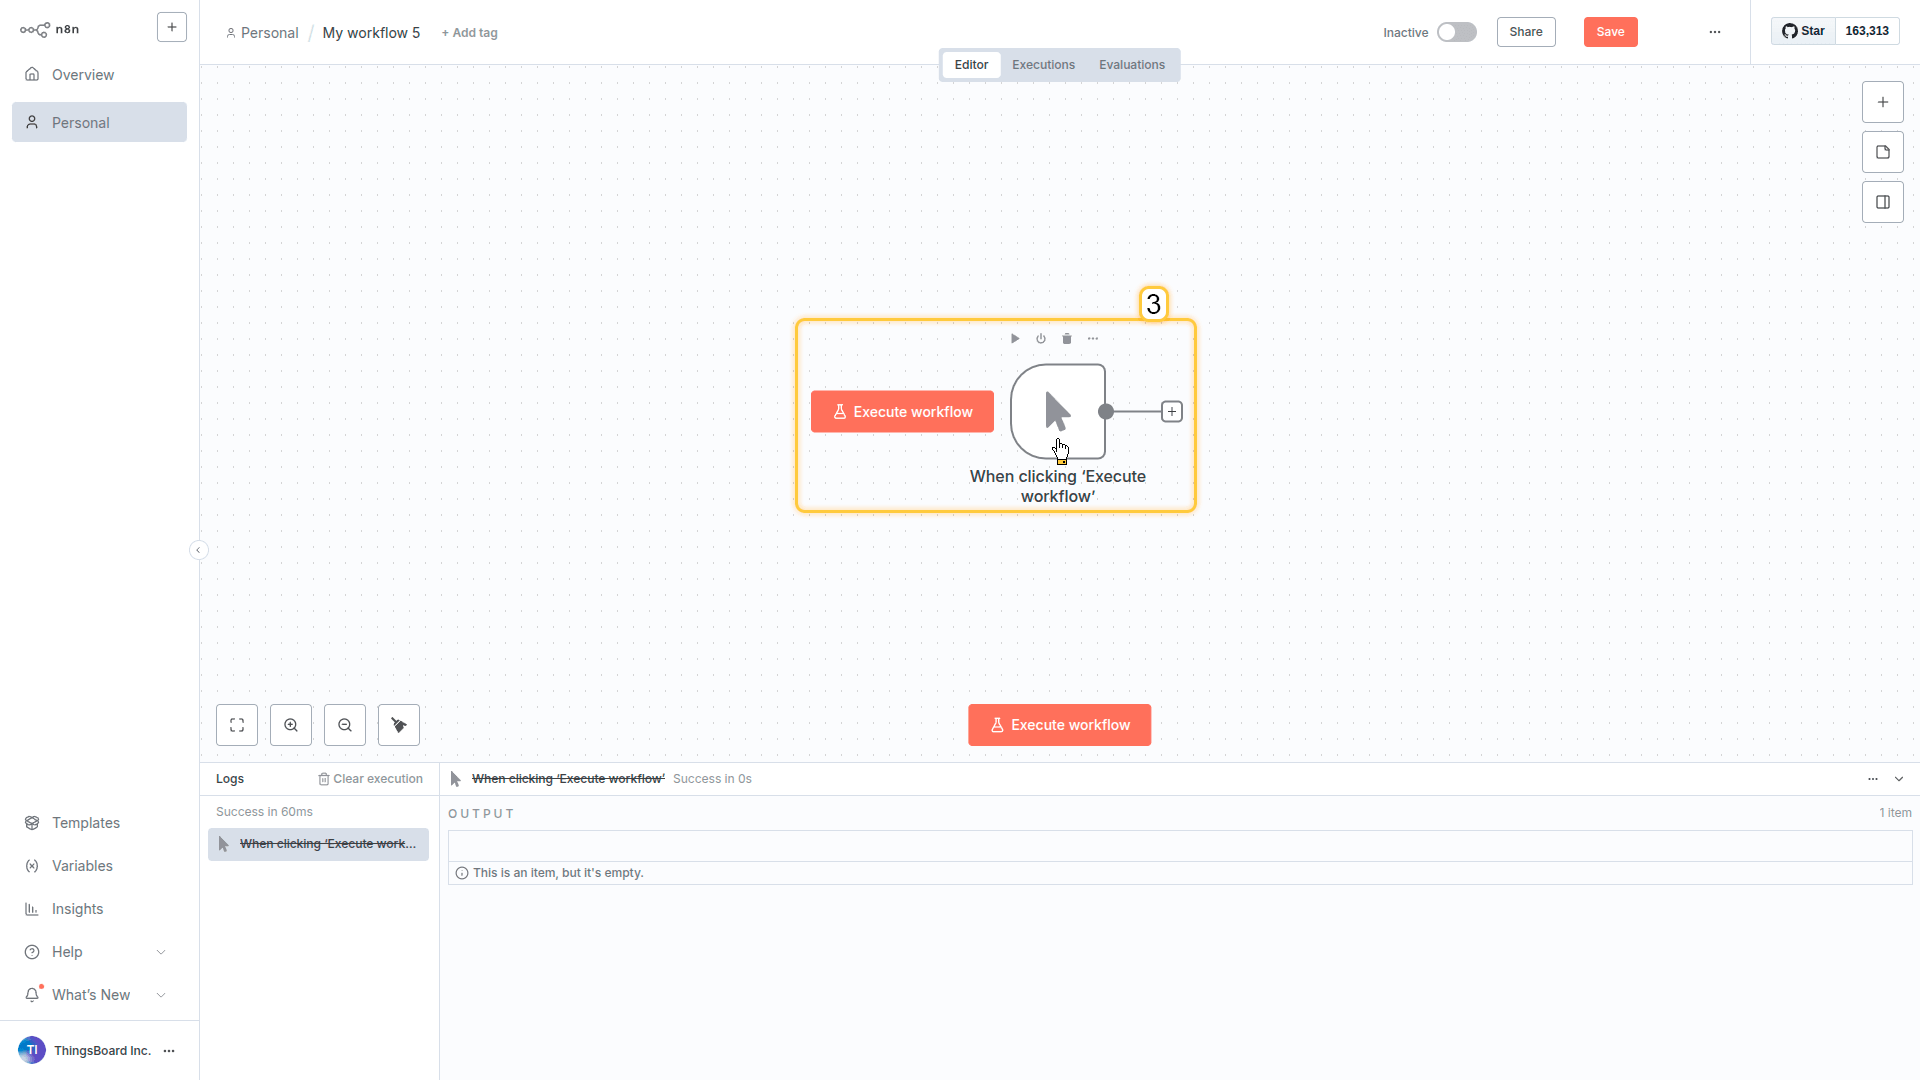
Click on the trigger node to open its configuration.
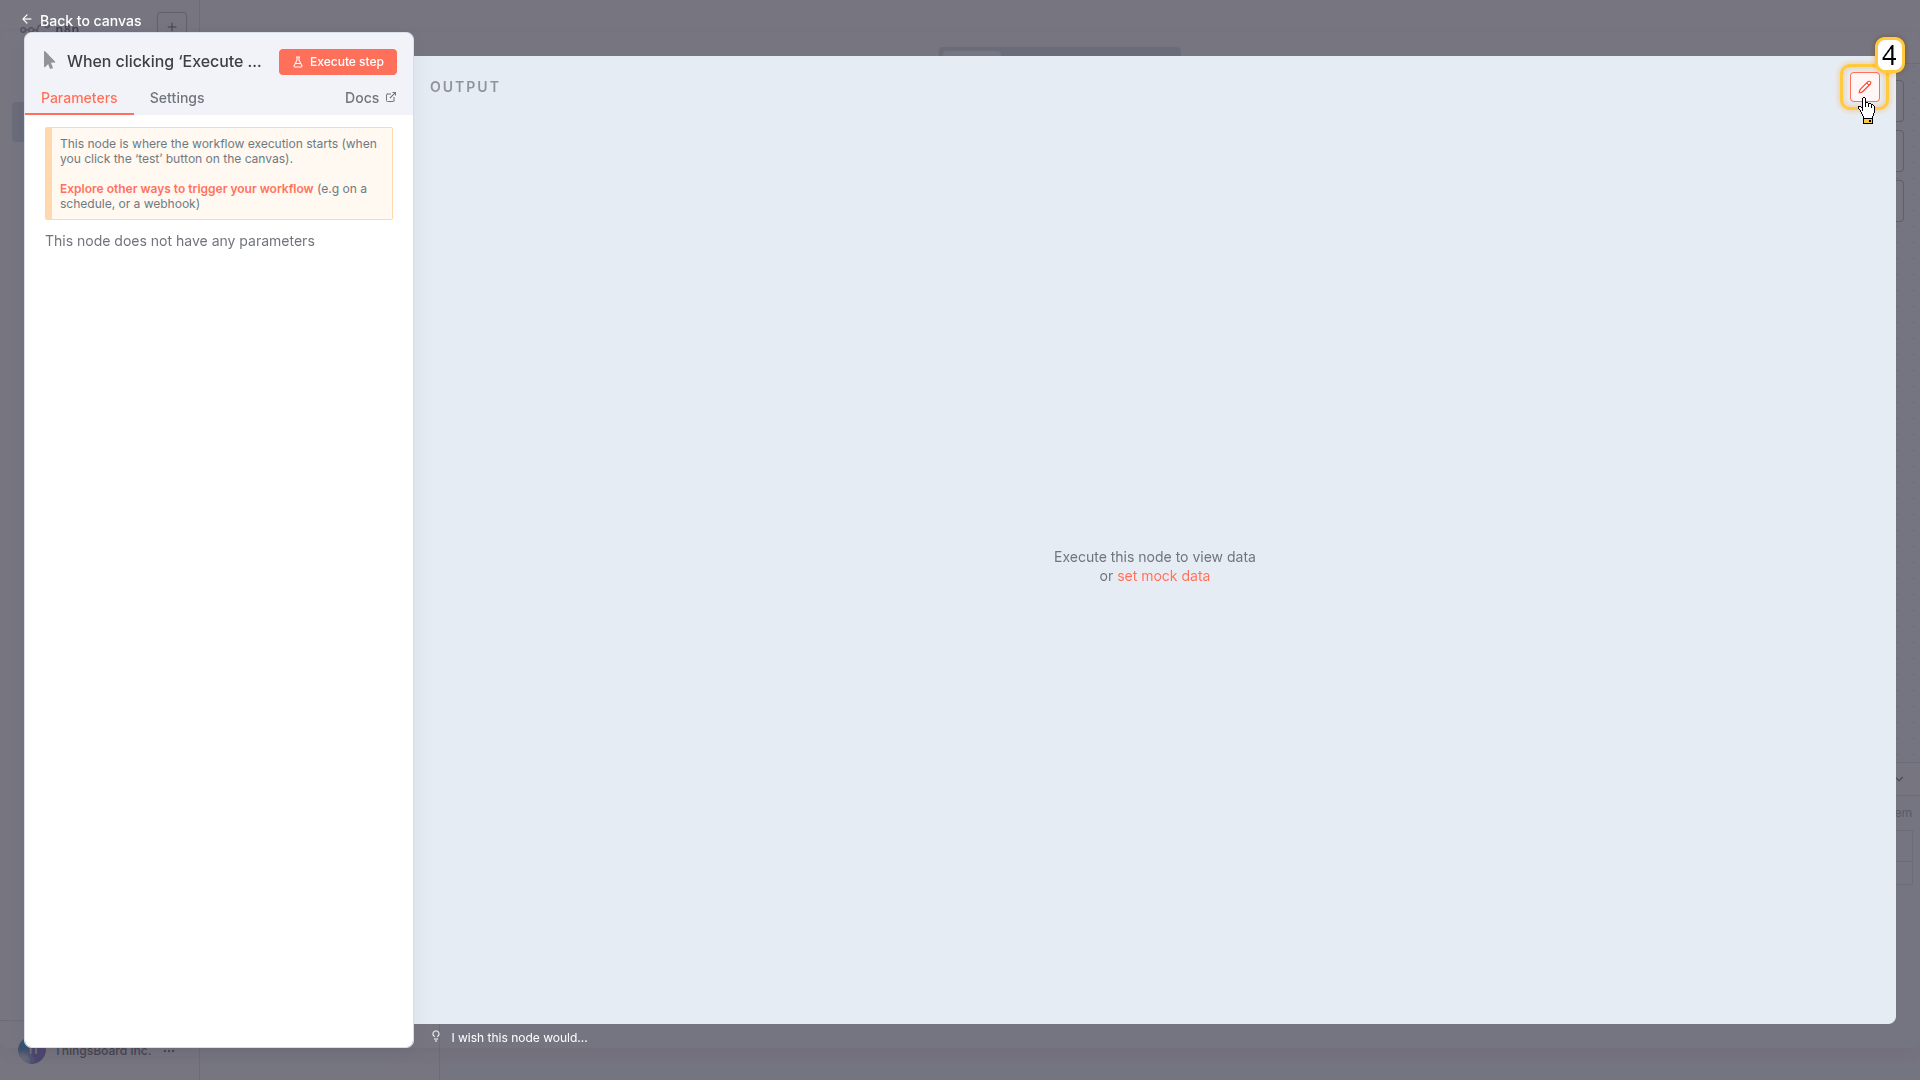
In the top-right corner, click the pencil icon.
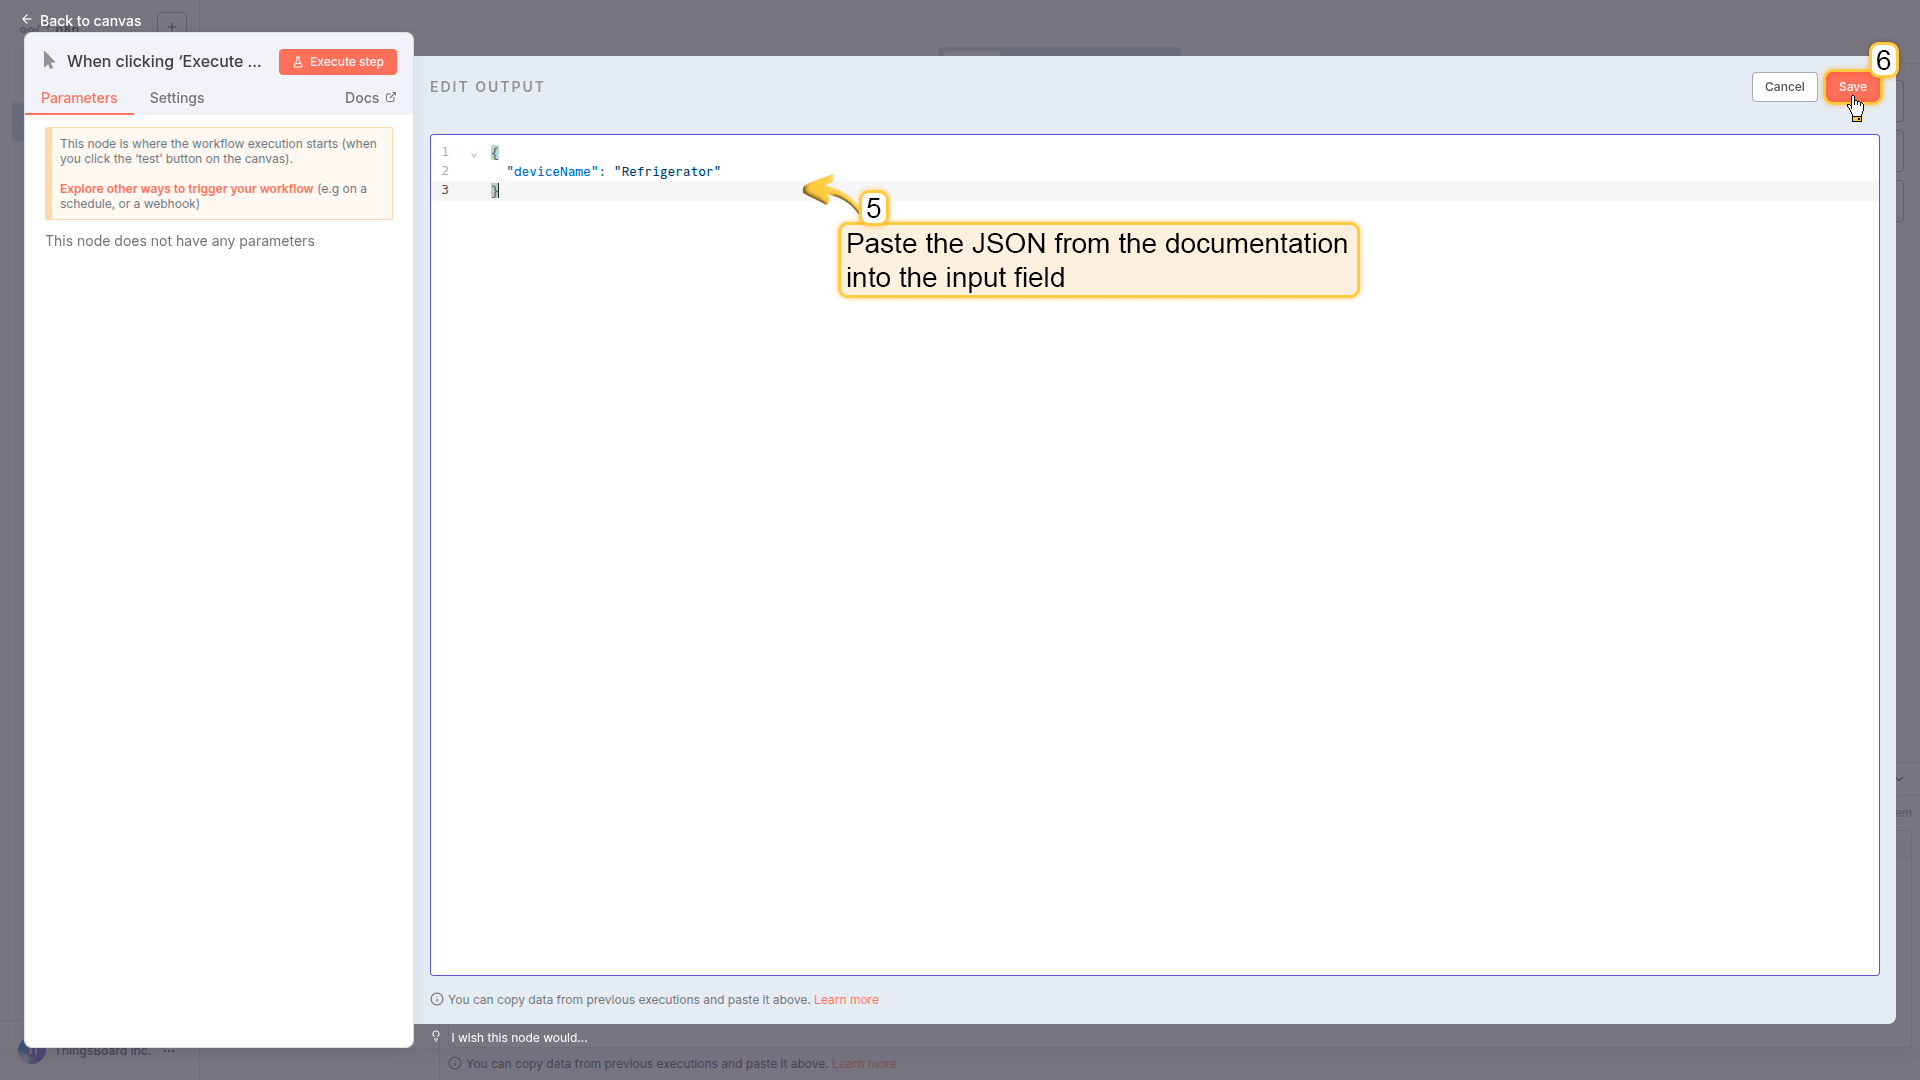
Paste the following JSON into the input field. Save the changes and back to canvas.
What you just did: Created a workflow input that accepts a device name. In production, this would come from a webhook, API call, or chat message.
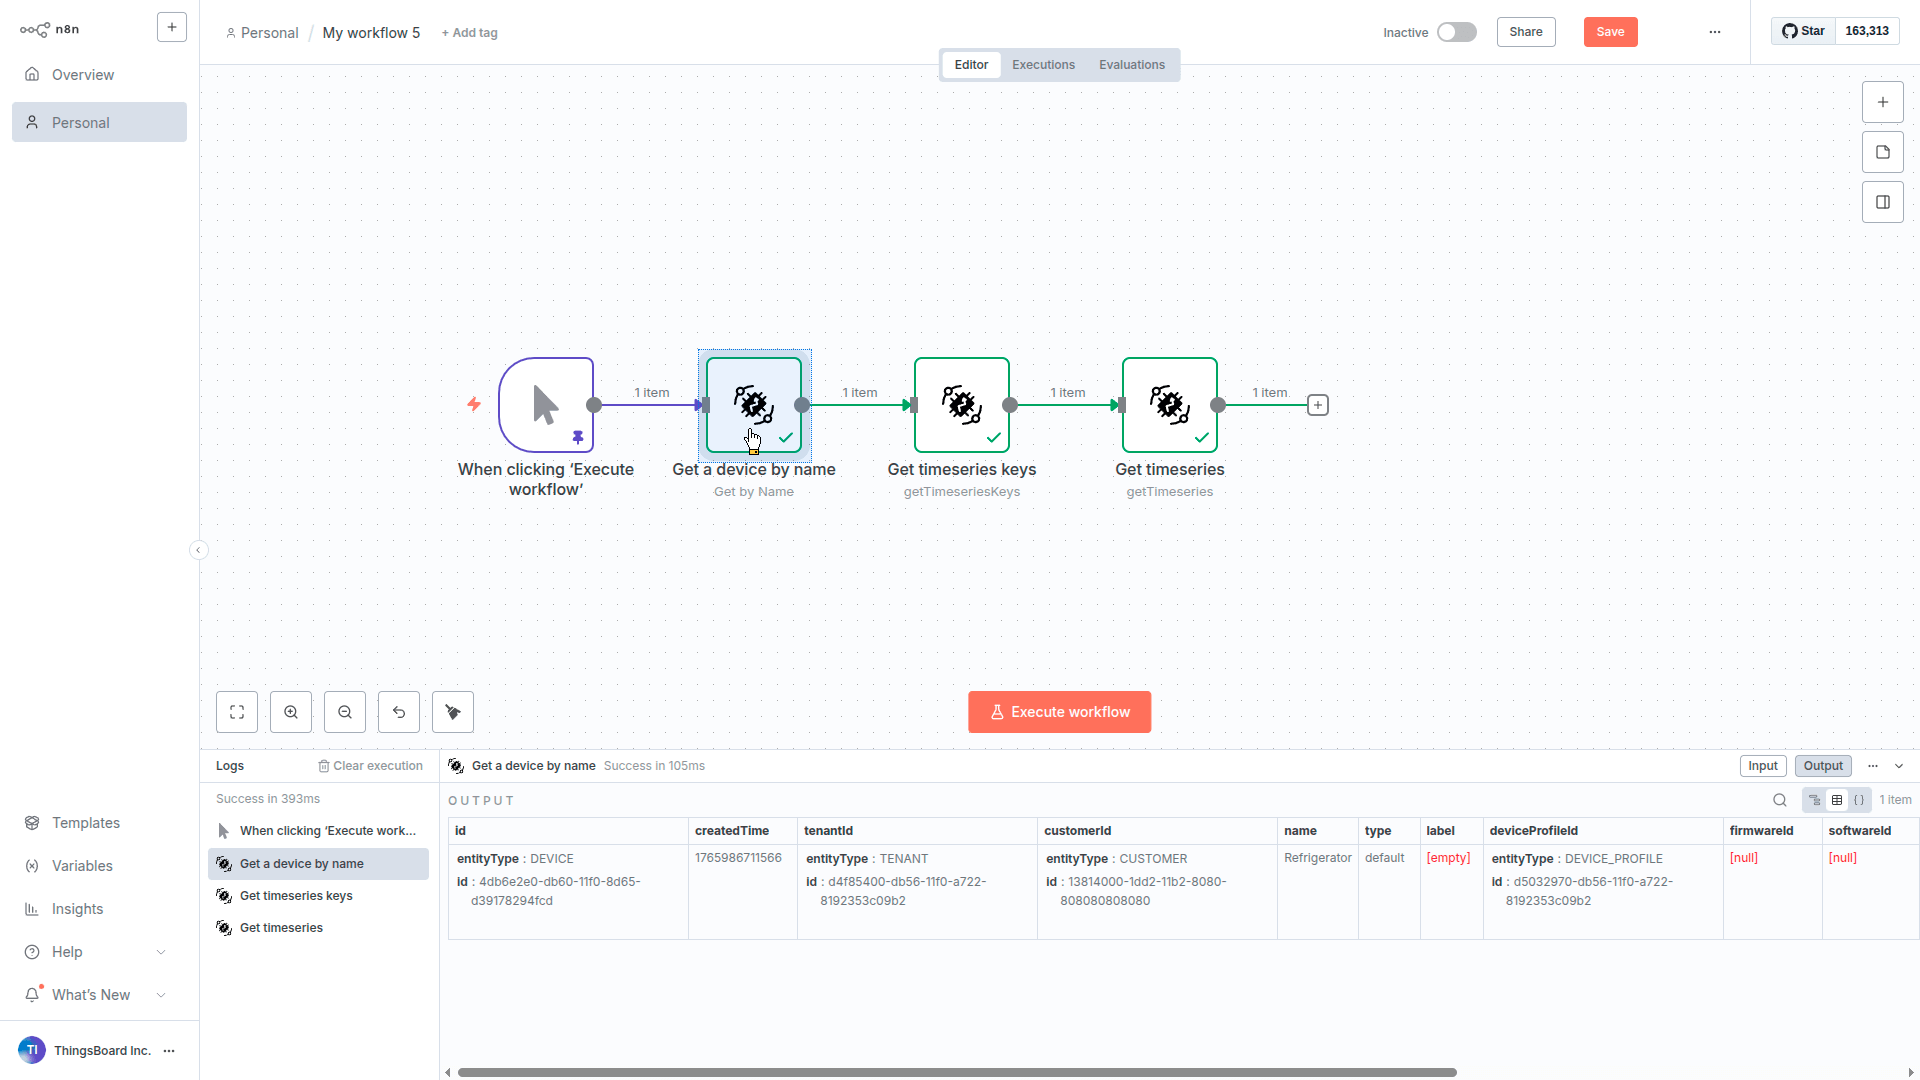
Step 2: Find the device in ThingsBoard
Now we need to look up the device by name to get its ID (since most ThingsBoard operations need the device ID, not the name).
Configuration:
- Click + next to the trigger node → ThingsBoard → Get device by name
-
Drag
deviceNamefrom the INPUT panel (left) into the Name fieldThis creates a dynamic link - the node will use whatever device name was in the trigger
- Click Execute step to test it
- Back to canvas
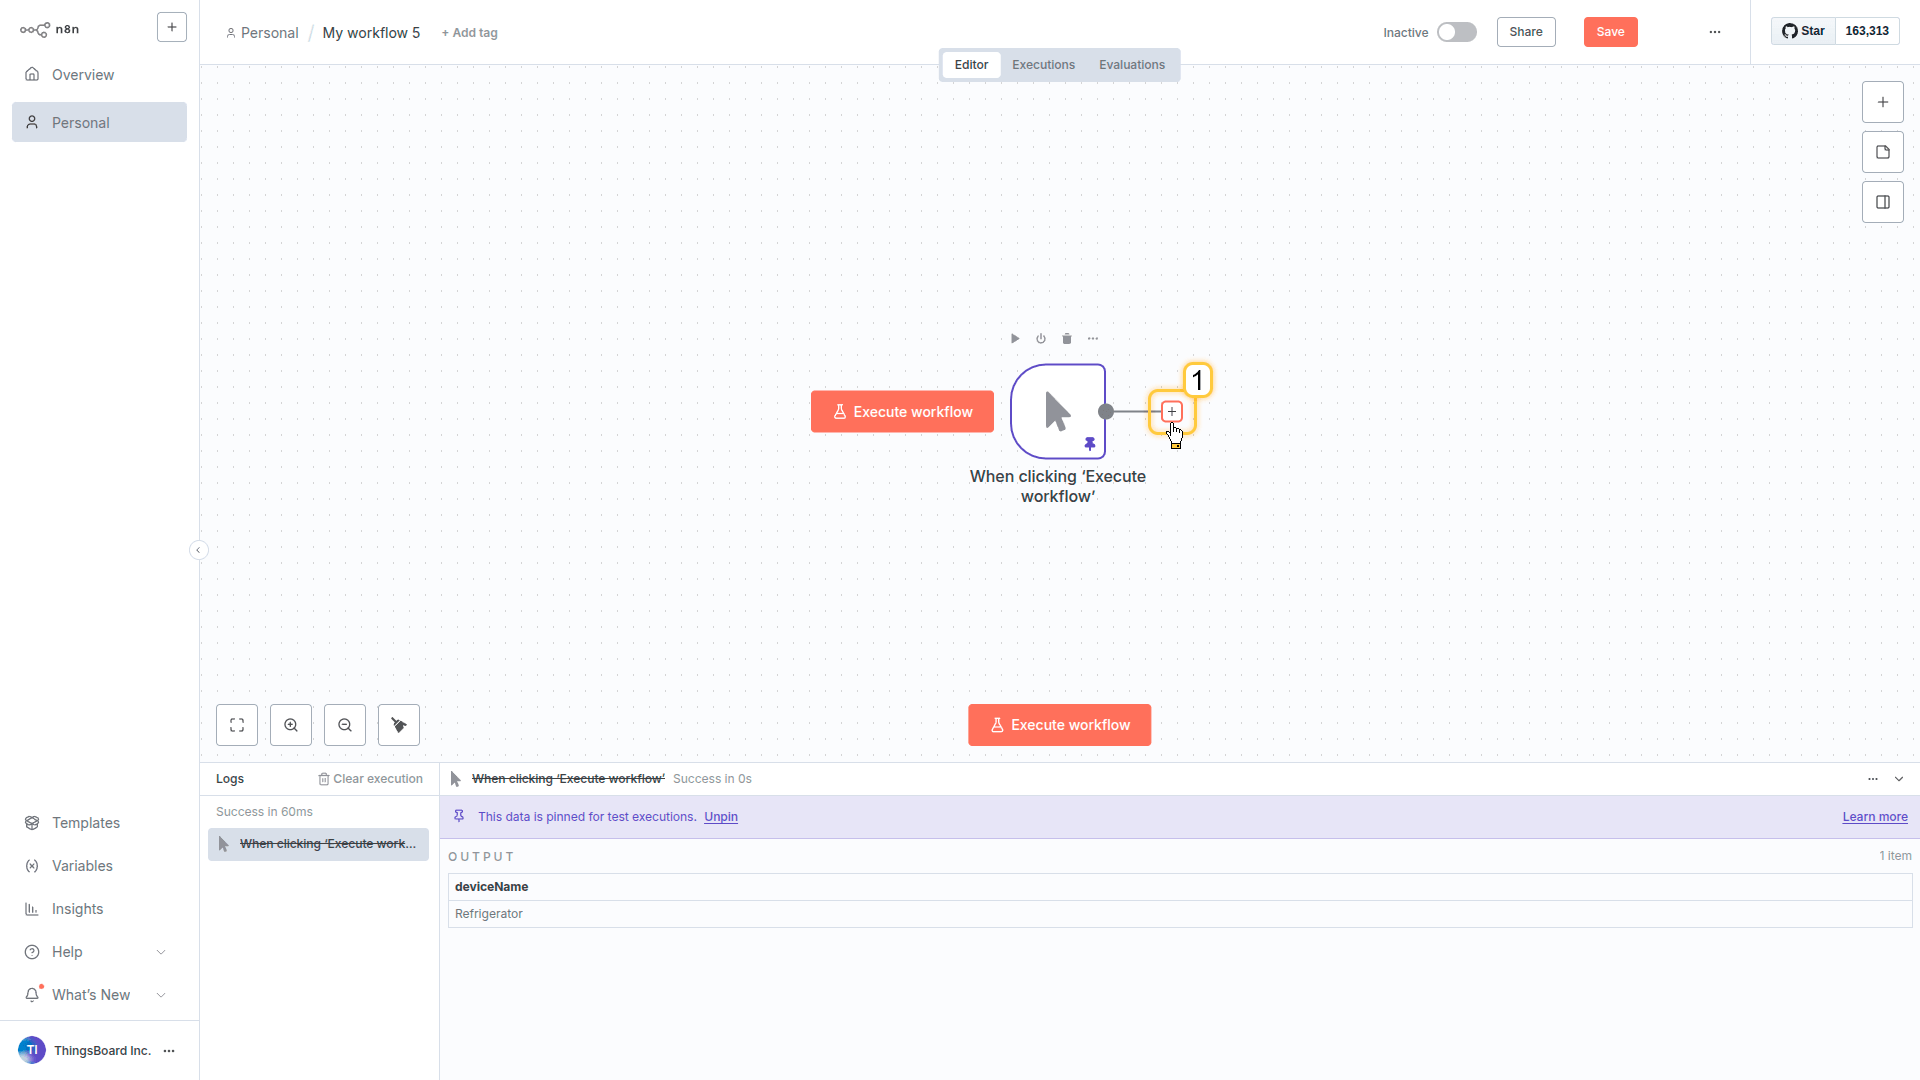
Click the + button to the right of the trigger node.
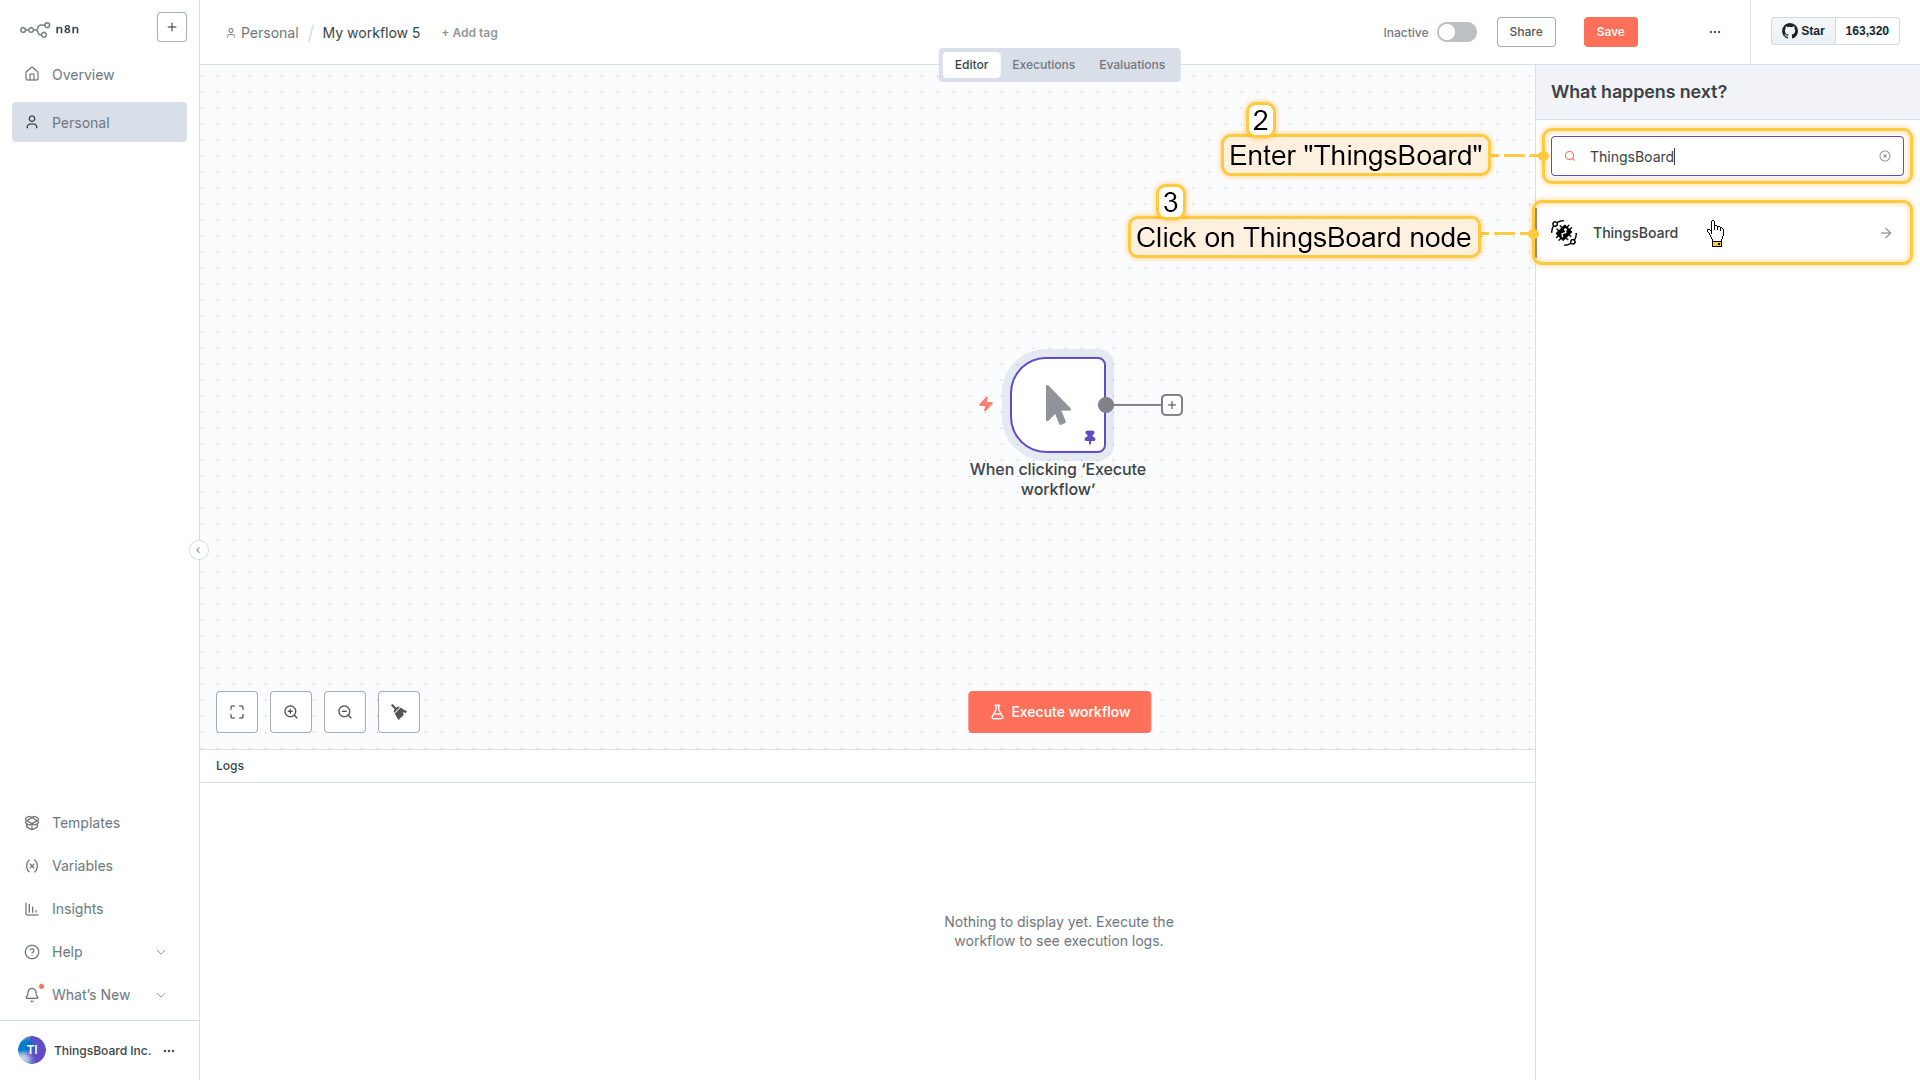
Find and select ThingsBoard
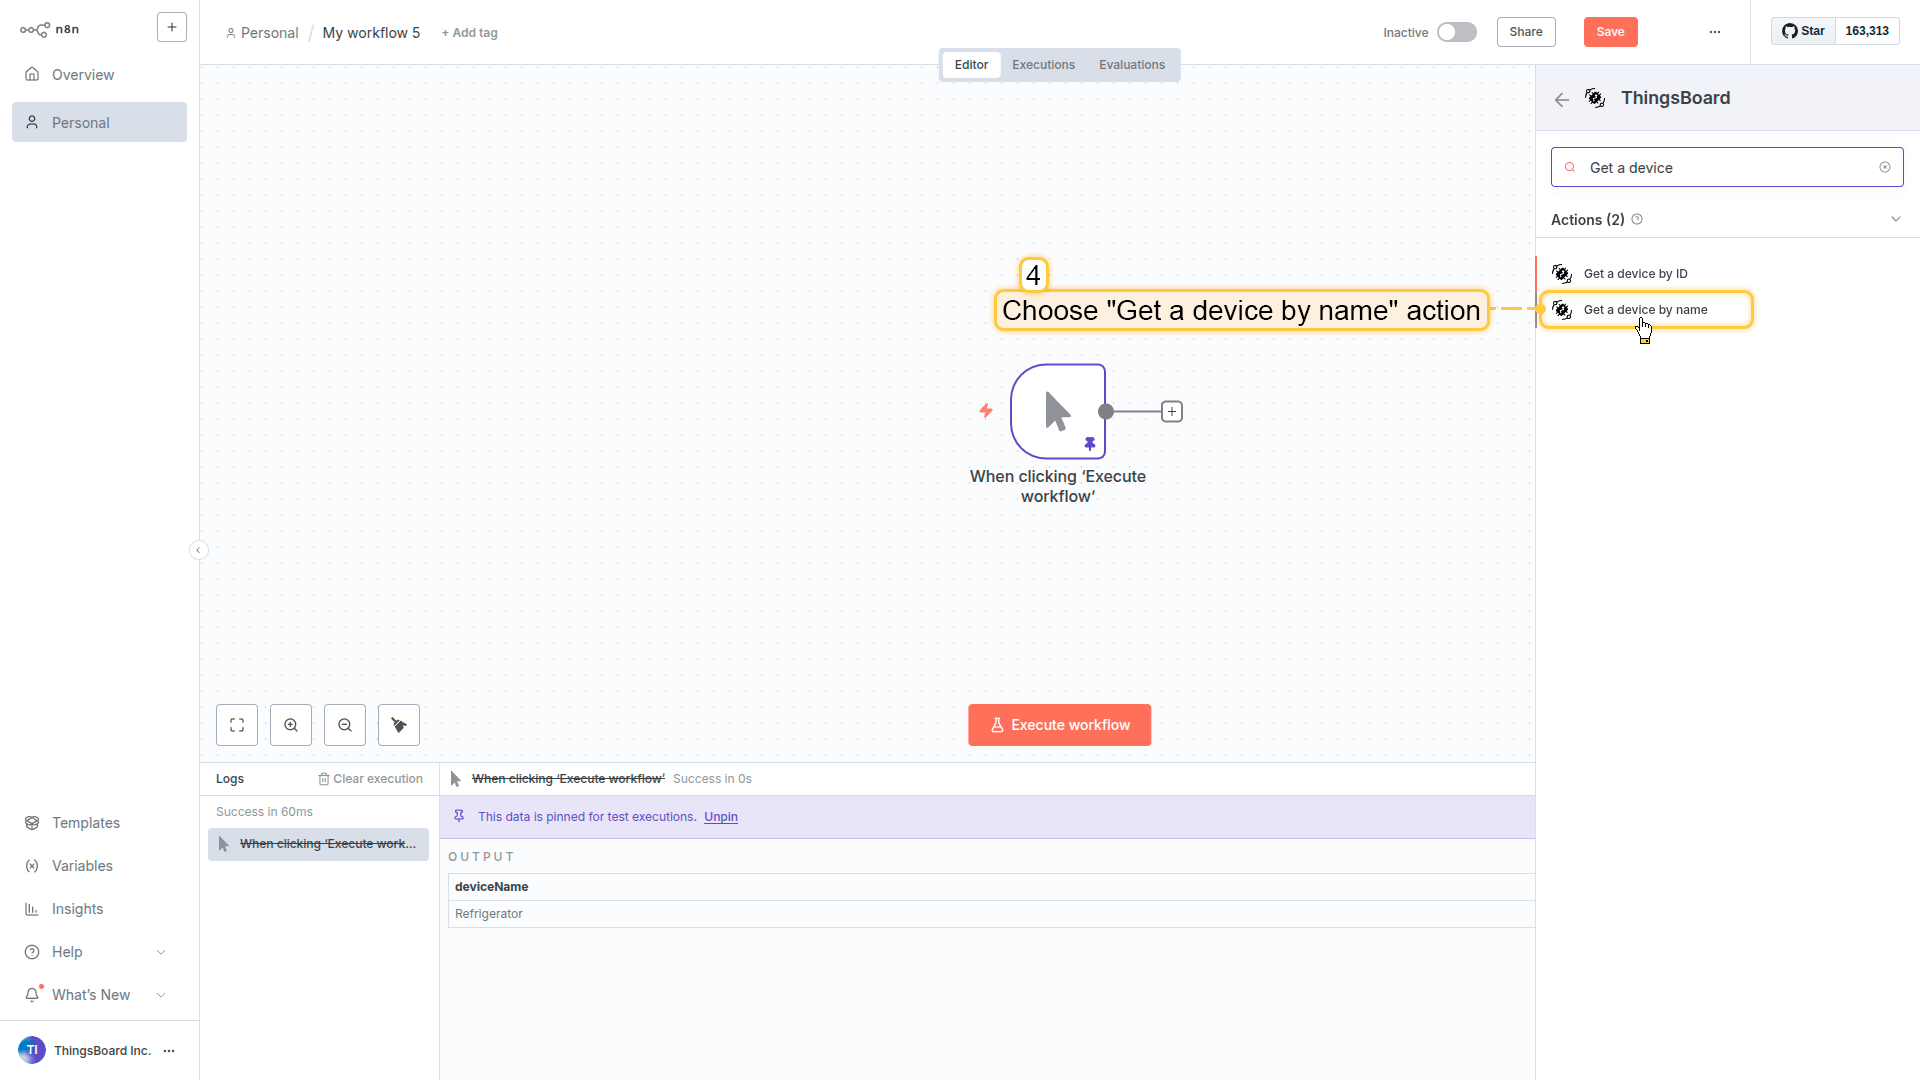
Choose Get a device by name action.
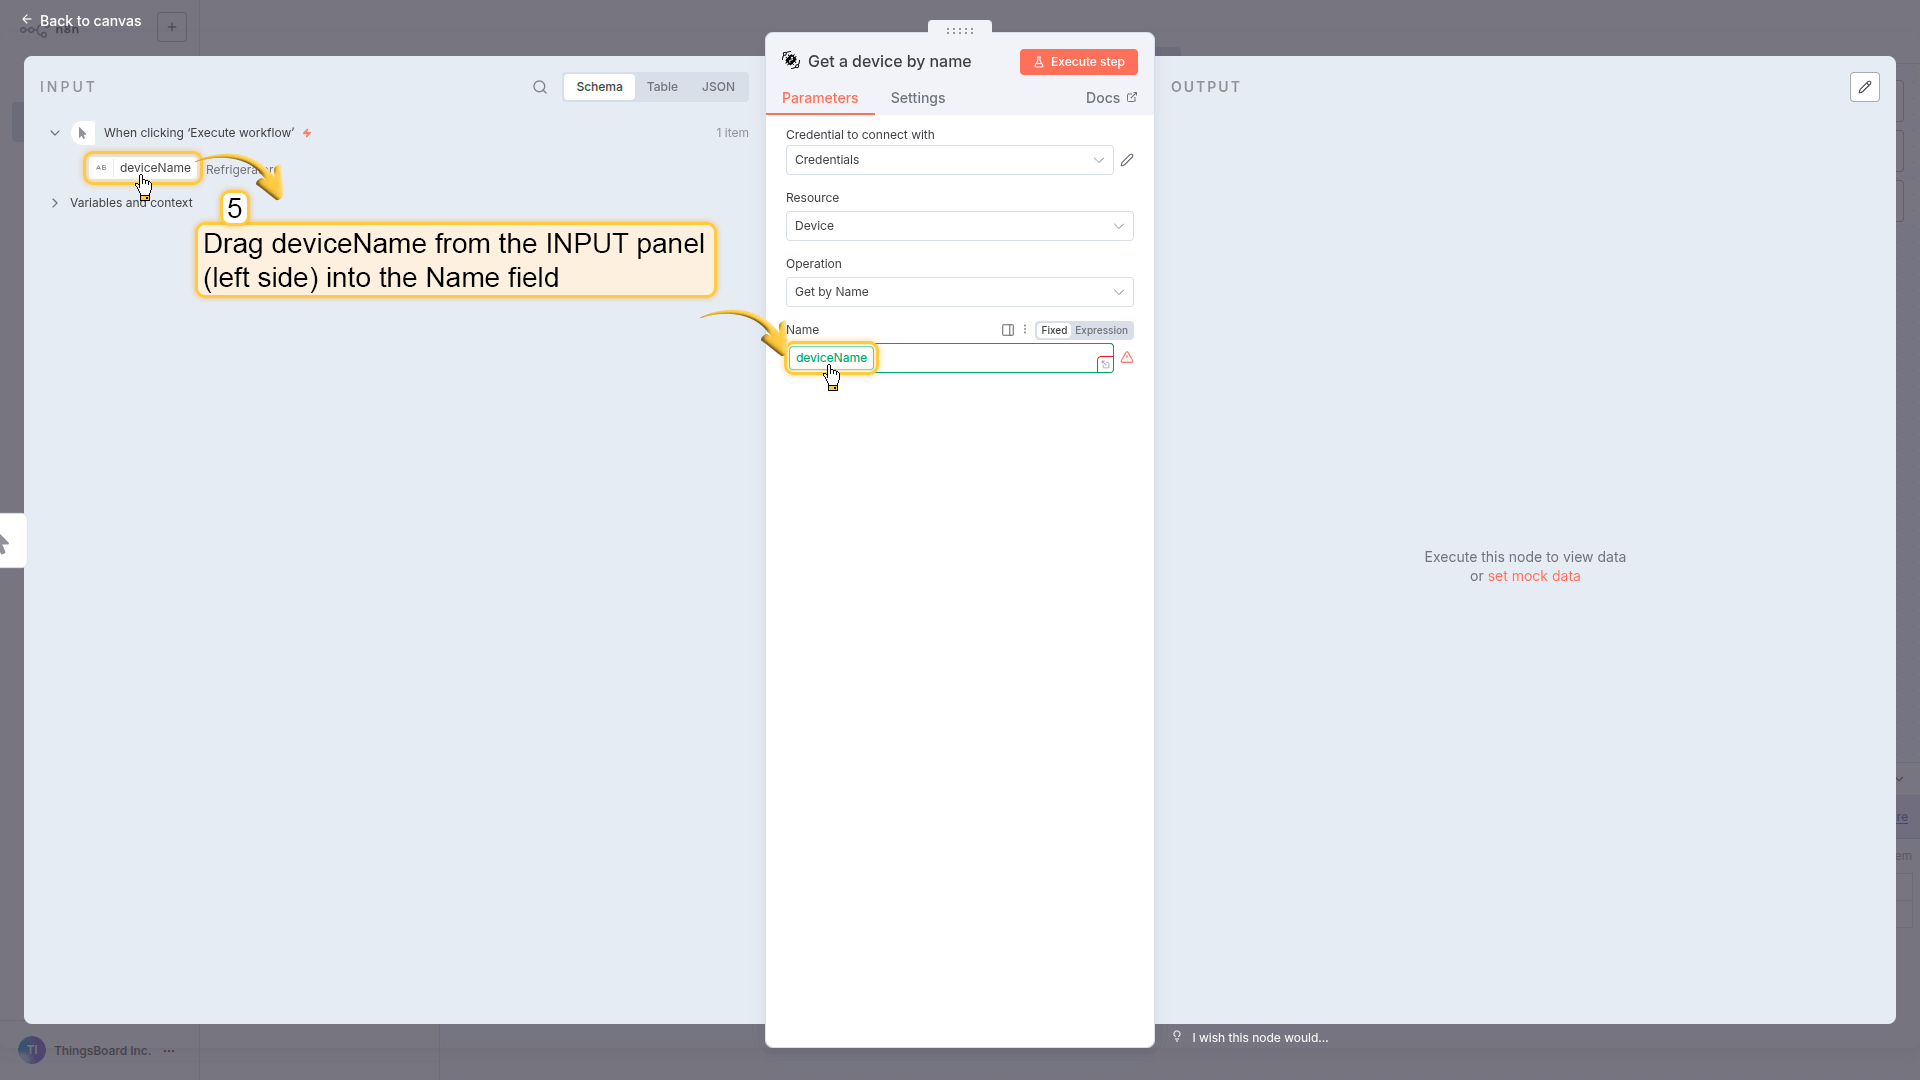
Drag deviceName from the INPUT panel (left side) into the Name field. This creates a dynamic reference to the trigger input.
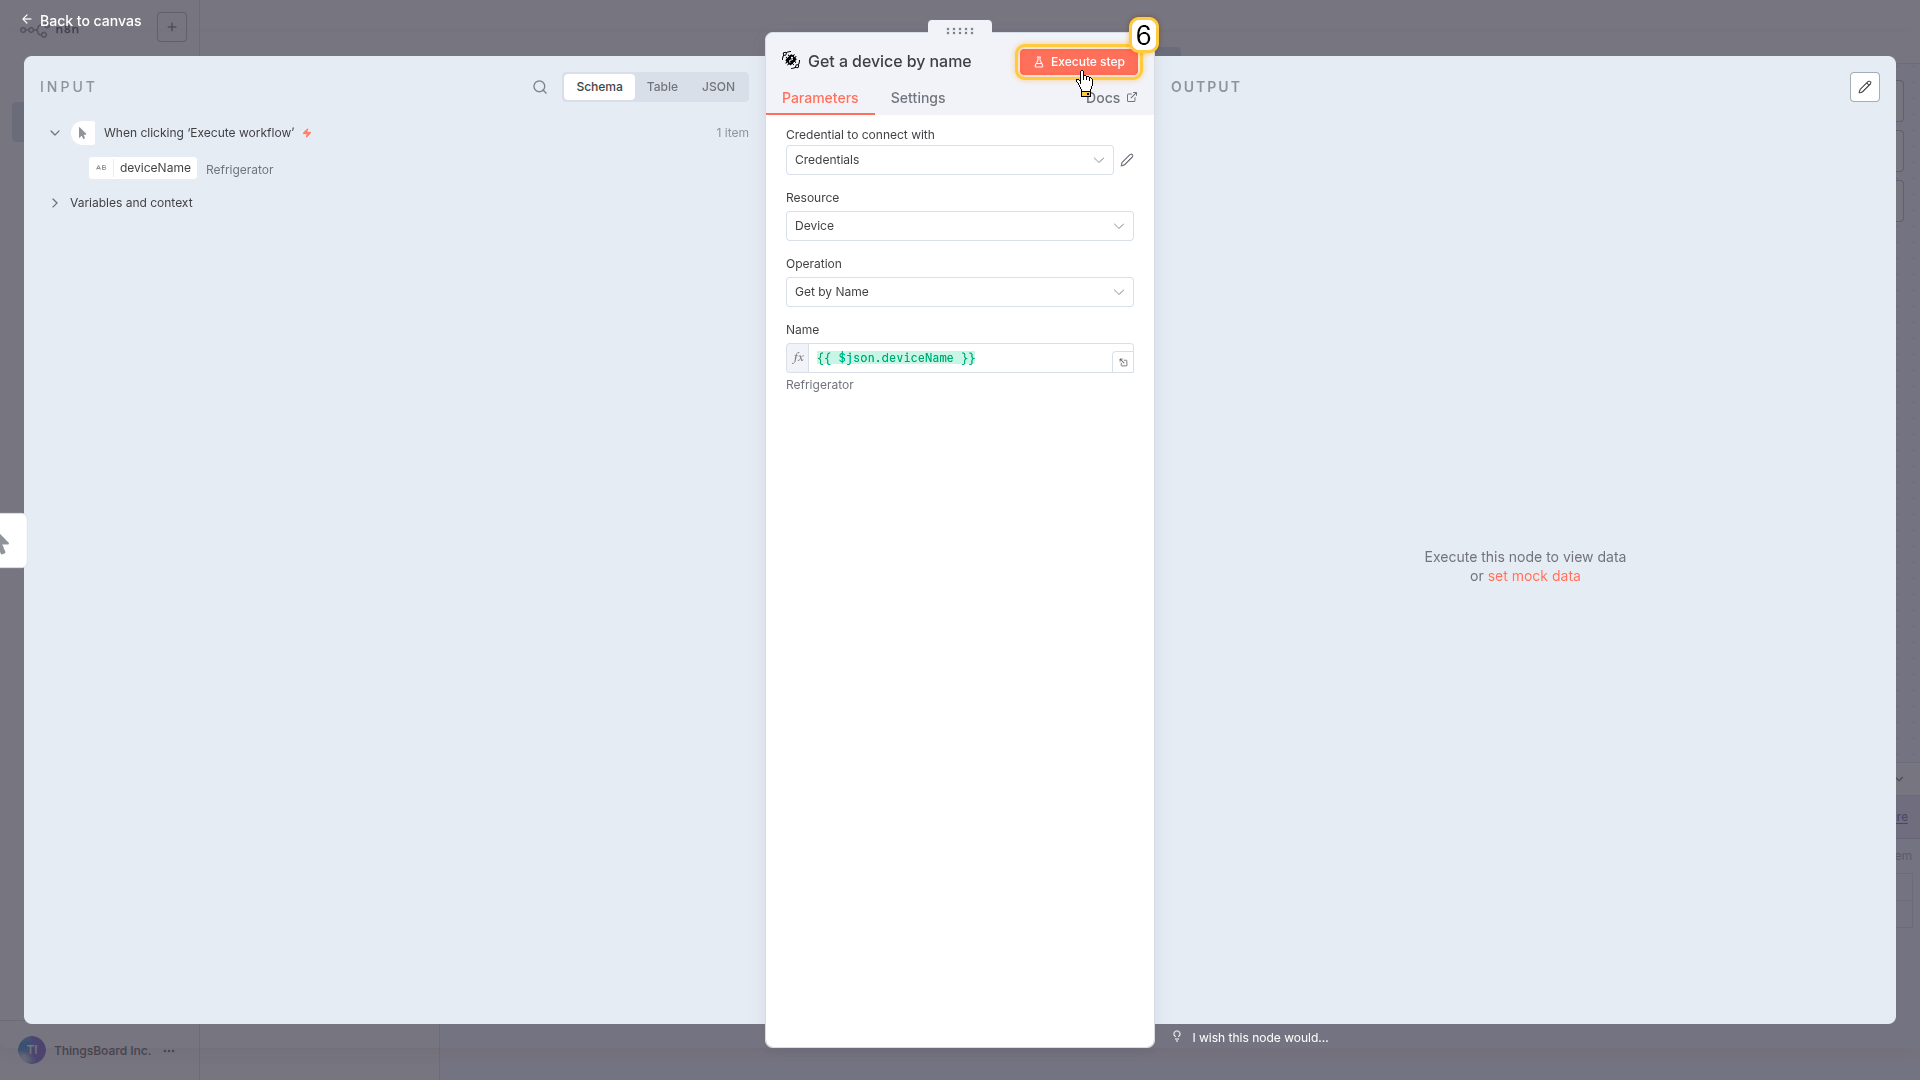
Click Execute step
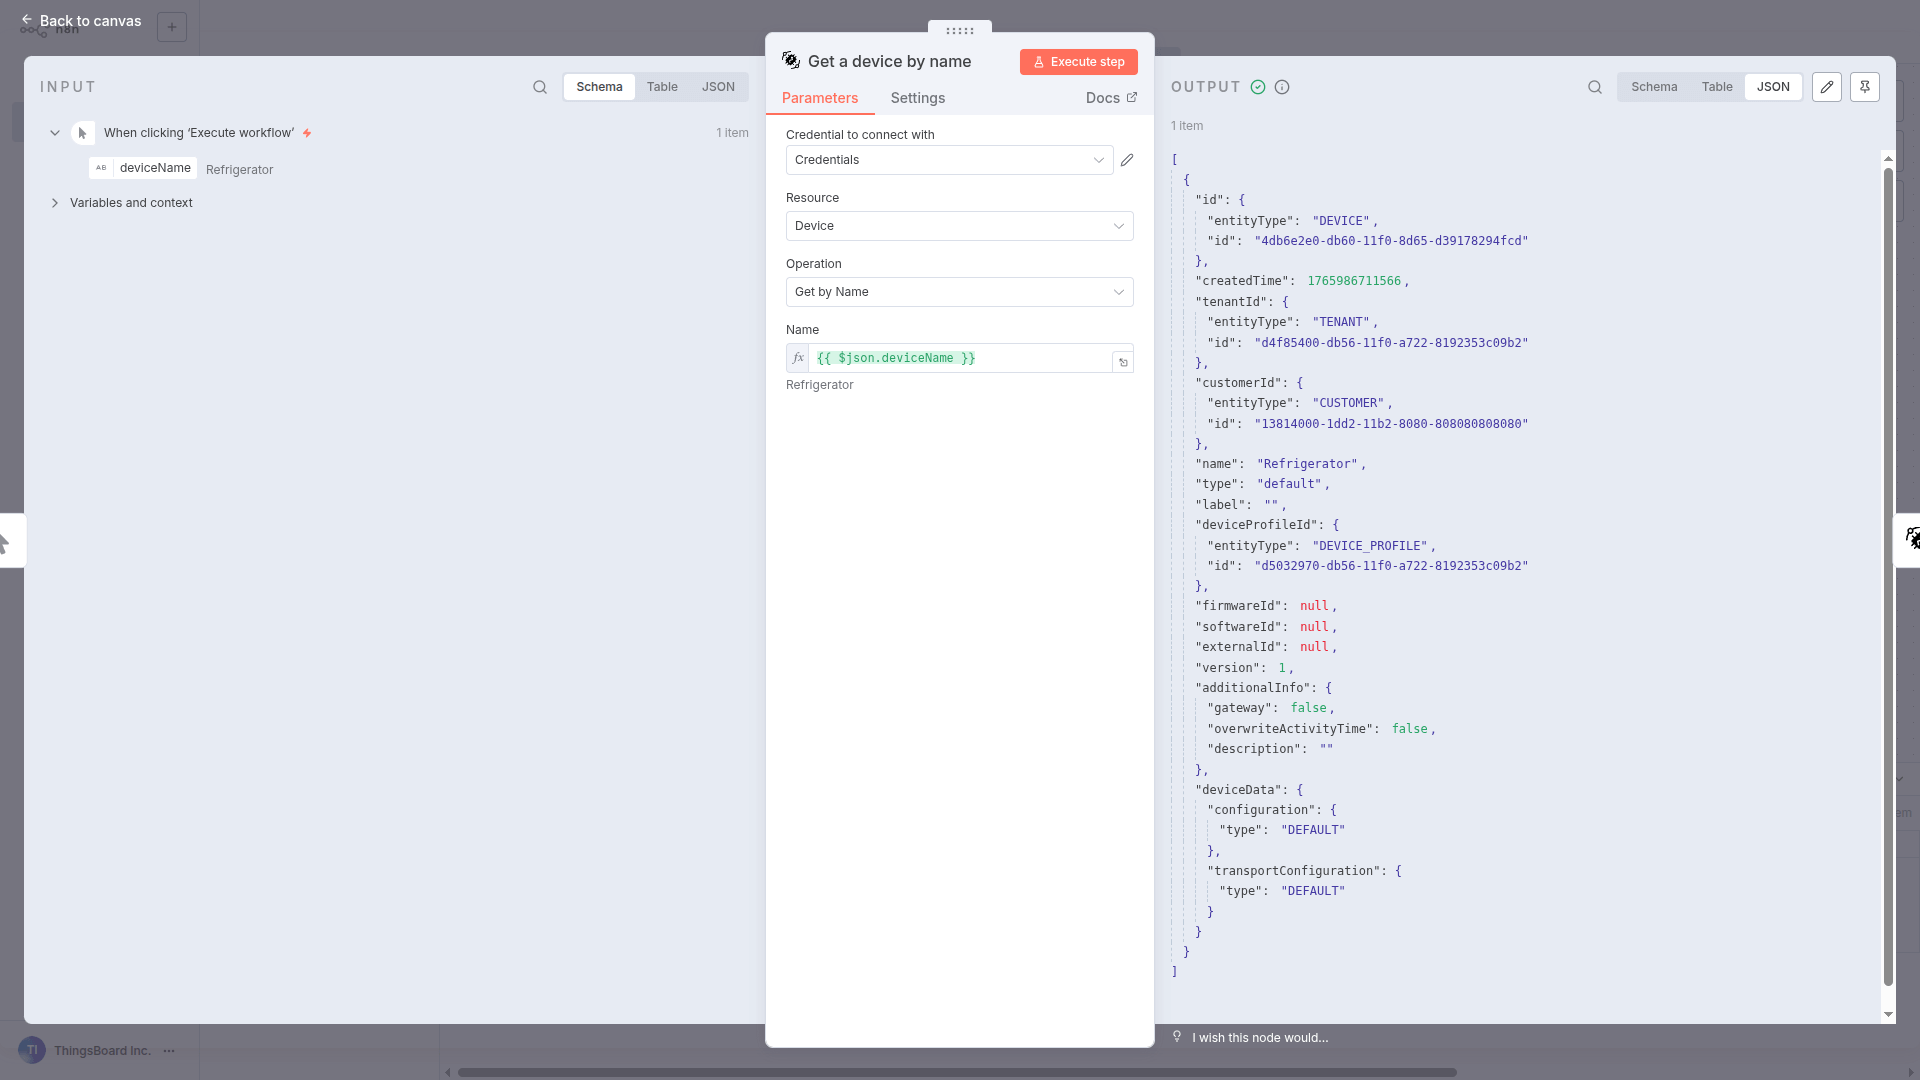
The node returns the full device object, including:
- device ID
- type
- additional metadata
Back to canvas.
What you got: The full device object - including the ID we need for the next steps.
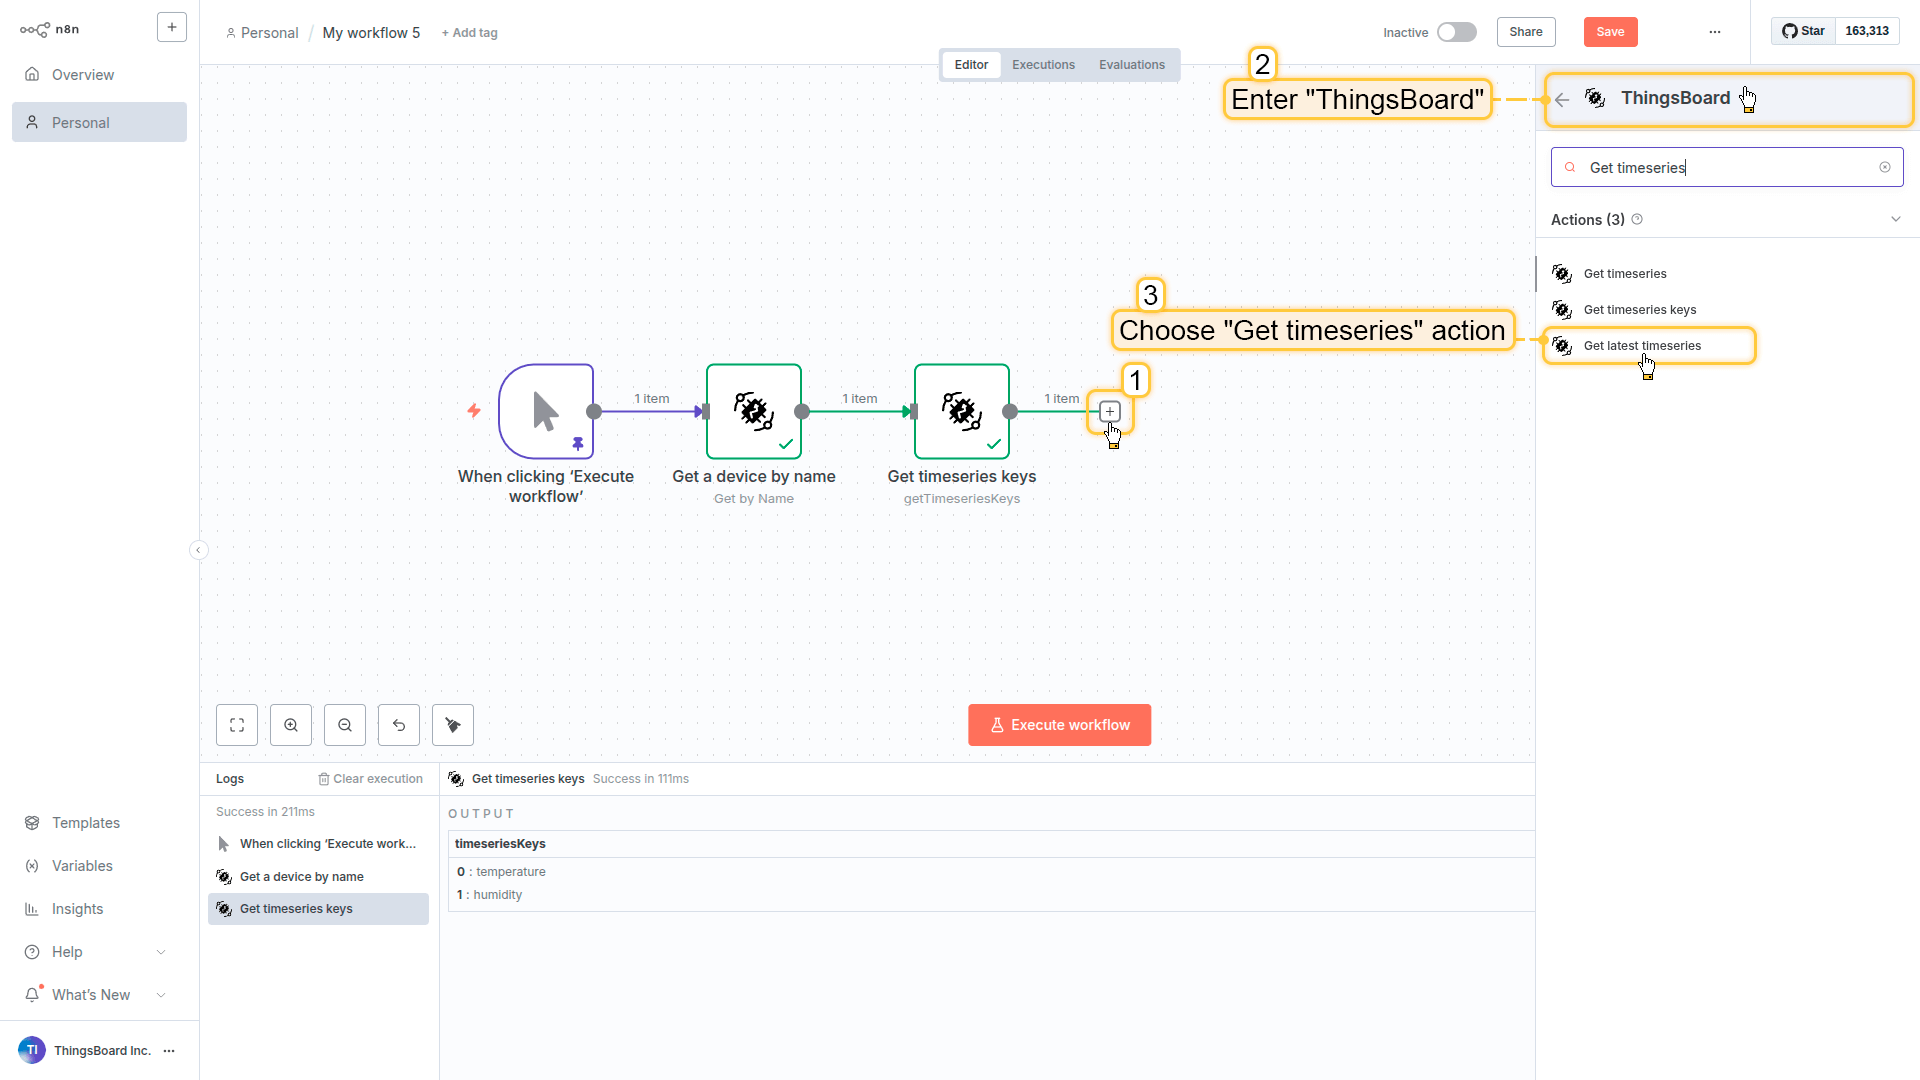
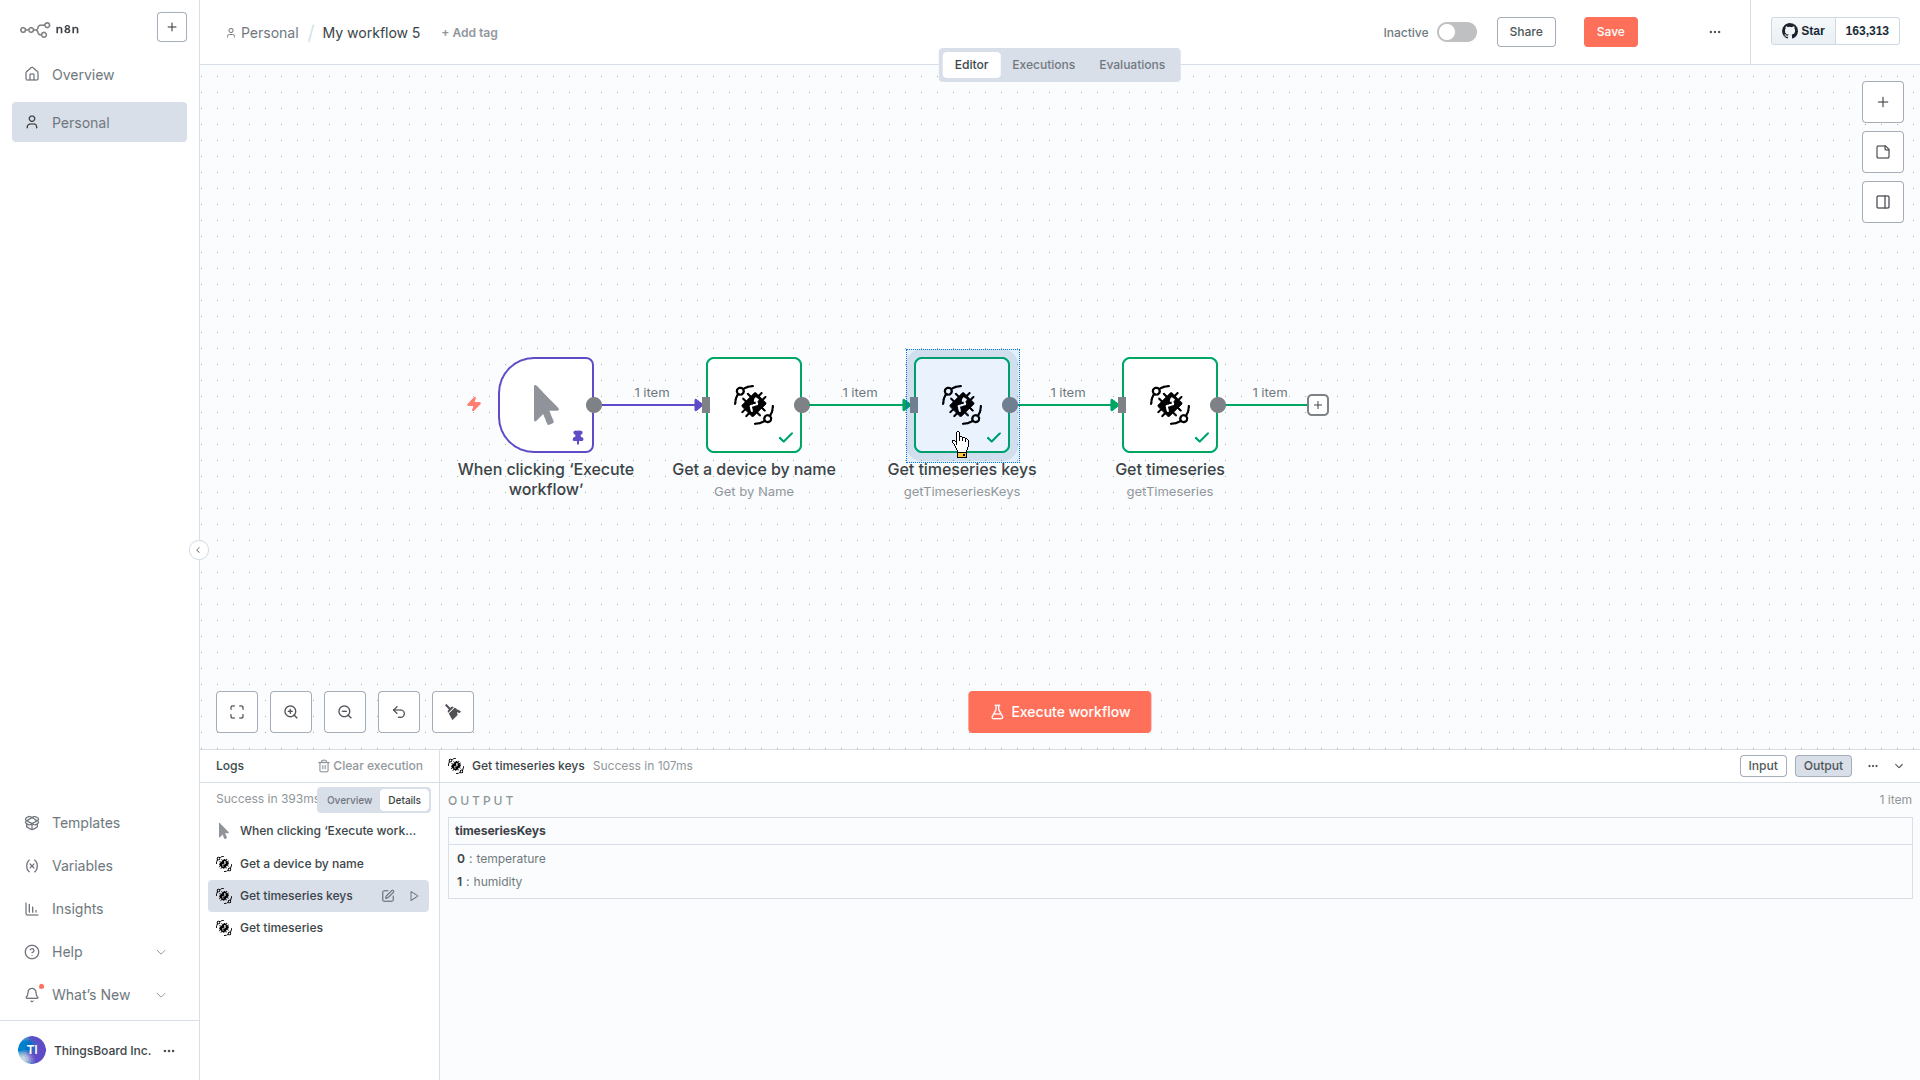
Step 3: Discover what telemetry this device has
Before we can fetch telemetry, we need to know what keys are available (temperature? humidity? battery?). This step finds that out.
Configuration:
- Click + → ThingsBoard → Get timeseries keys
-
Drag Entity ID and Entity Type from the INPUT panel (left)
We’re using the device info from Step 2 automatically
- Click Execute step
- Back to canvas

- Click the + button to the right of the Get a device by name node.
- Select ThingsBoard
- Choose Get timeseries keys action.
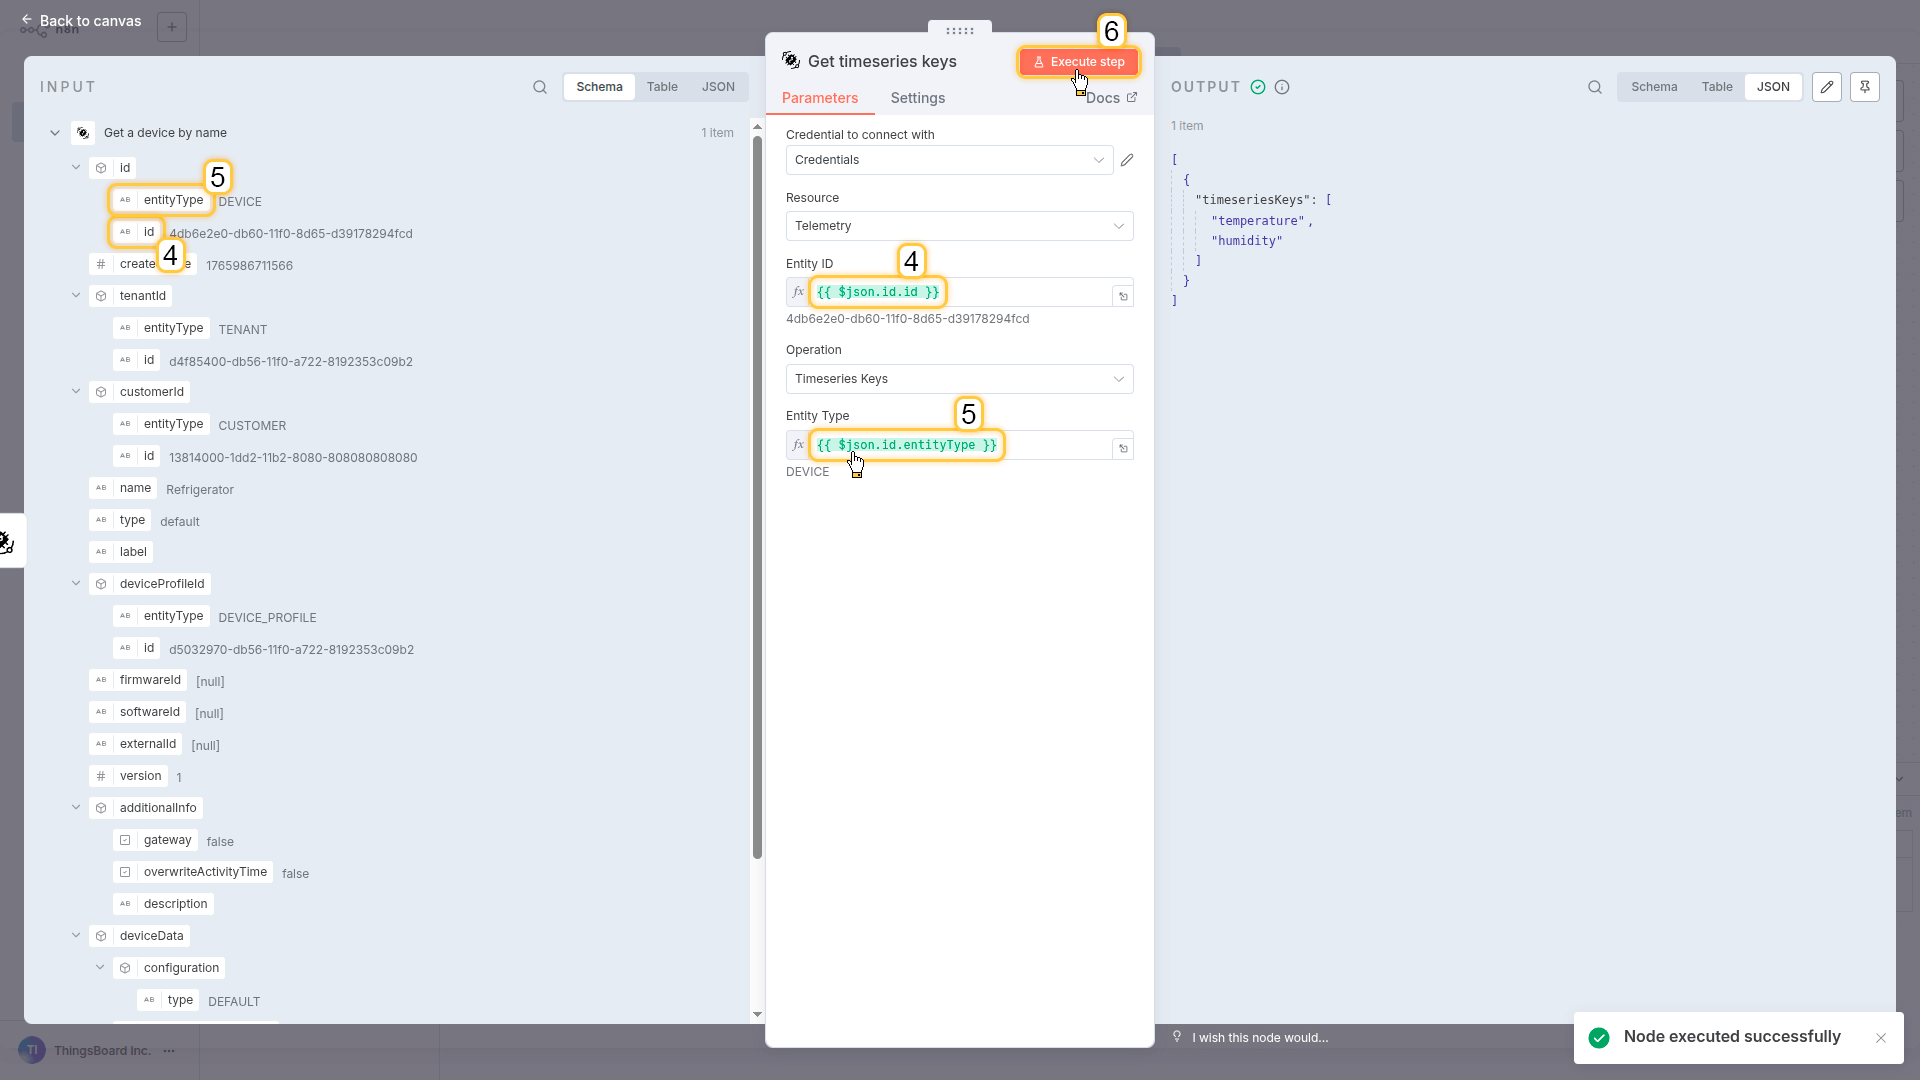
- Set parameters dynamically:
- Entity ID
- Entity Type
You can drag these values directly from the INPUT panel (left side).
- Click Execute step
- Back to canvas
What you got: A list of available telemetry keys (like temperature, humidity, etc.)
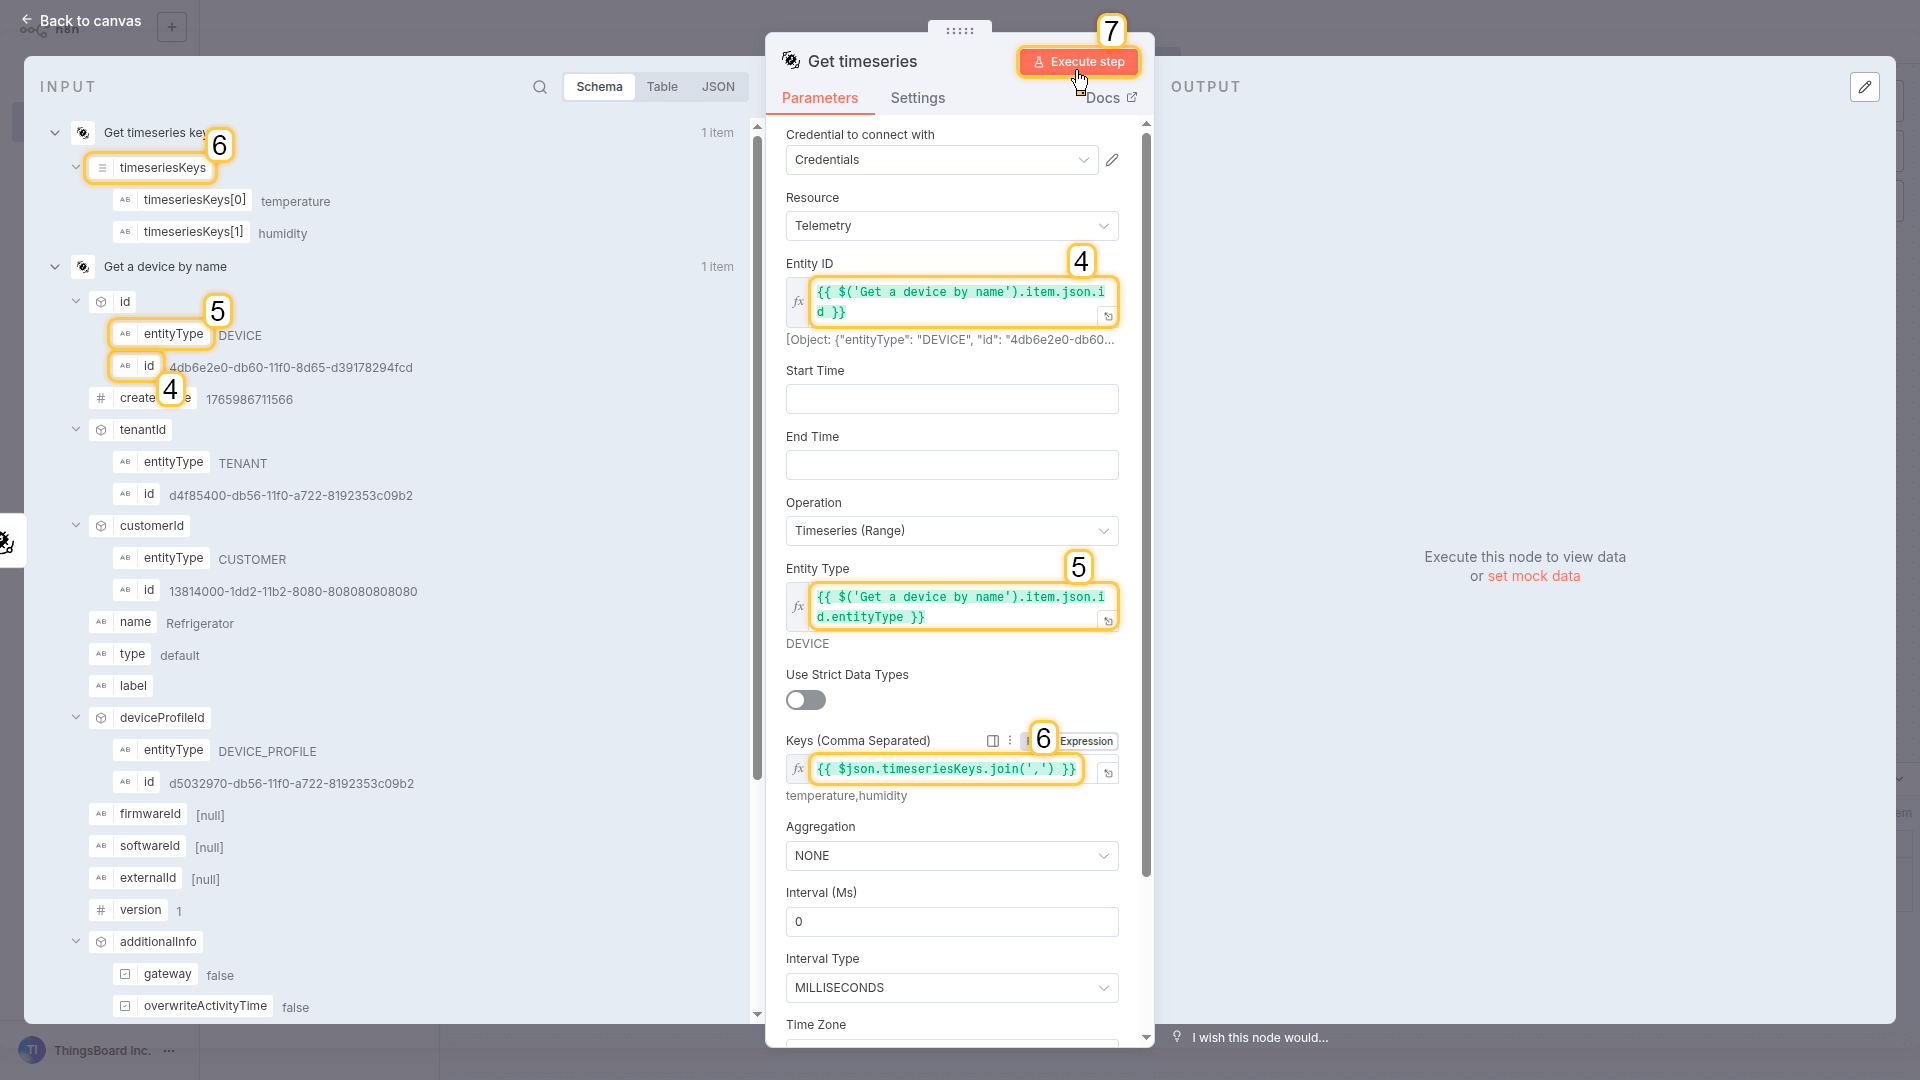
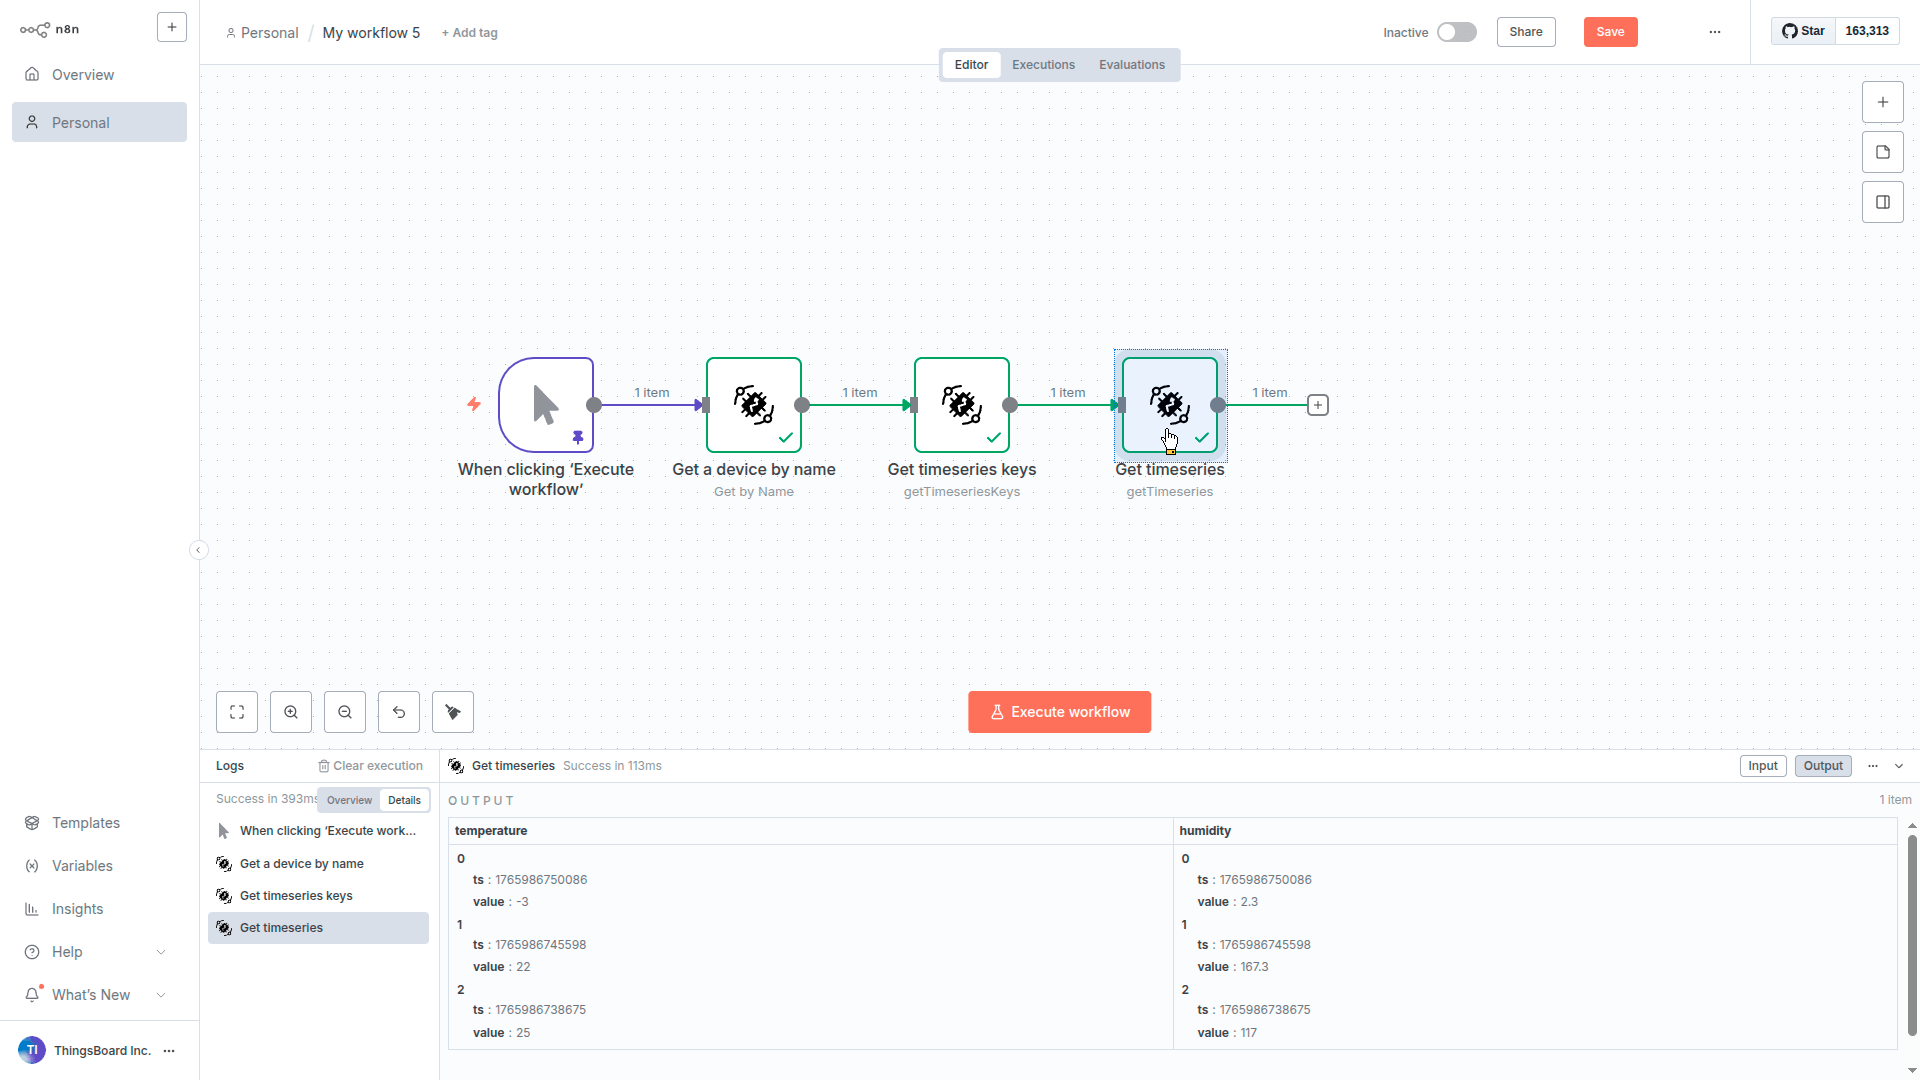
Step 4: Fetch the actual telemetry data
Finally, get the actual sensor readings using the keys we just discovered.
Configuration:
- Click the + button to the right of the Get timeseries keys node.
- Select ThingsBoard
- Choose Get timeseries action
- Configure parameters:
- Get a device by name -> id -> id to Entity ID
- Get a device by name -> id -> entityType to Entity Type
- Get timeseries keys -> timeseriesKeys to Keys (Comma Separated)
Note: The Keys field needs comma-separated values. Since Step 3 returns an array, you’ll need to join it: ``
- Click Execute step
- Back to canvas
Click the + button to the right of the trigger node.
Select ThingsBoard.
Choose Get timeseries action.
Configure parameters:
- Entity ID
- Entity Type
- Keys (Comma Separated)
You can drag these values directly from the INPUT panel (left side).
- Click Execute step.
- Back to canvas.
What you got: Real telemetry data! Temperature, humidity, or whatever sensors this device has.
Why this matters
You just built a completely reusable workflow. Change the input from “Refrigerator” to “Freezer 3” and it works automatically. No hardcoded IDs, no changes needed.
This pattern unlocks:
- Customer portals - each user sees their own devices
- Chatbots - “check the AC in Room 405” just works
- Mobile apps - query any device by name
- Multi-tenant systems - same workflow, different data
Accepts a device name as input. Finds the corresponding device in ThingsBoard.
Discovers available telemetry keys.
Retrieves telemetry values for the specified time window.
Next steps
- Replace the manual trigger with a Webhook to connect your customer portal
- Add a Slack or Email node at the end to send the telemetry data
- Use a Schedule trigger to run this hourly for monitoring
- Connect to an AI Agent so users can ask “check device X” in chat
API Reference
The ThingsBoard n8n node is built on top of the ThingsBoard REST API. For detailed information about API endpoints, request/response formats, and additional parameters, refer to the ThingsBoard REST API documentation.
Links
- npm Package: @thingsboard/n8n-nodes-thingsboard
- GitHub Repository: thingsboard/thingsboard-n8n-node
- n8n Documentation: docs.n8n.io
- n8n Community: community.n8n.io
- ThingsBoard REST API: REST API Reference
Support
If you encounter issues or have questions about the ThingsBoard n8n node:
- GitHub Issues: Report bugs or request features
- ThingsBoard Community: Get help from the community
- n8n Community: n8n community
License
MIT License - see the LICENSE file for details.