- Use case
- Prerequisites
- Configure Alarm Rules
- Provision devices
- Configure edge rule engine to handle alarms and send RPC calls
- Connect “Air Conditioner” to edge and subscribe for RPC commands
- Post telemetry to “DHT22” sensor to create alarm
- Verify that RPC request was send to “Air Conditioner” device
- Next Steps
Use case
Let’s assume you have a warehouse with two devices connected to ThingsBoard Edge:
- DHT22 temperature sensor
- Air Conditioner
ThingsBoard Edge has the following responsibilities:
- Collects temperature readings from the DHT22 sensor
- Creates and updates alarms if the temperature in the warehouse is higher than 50 °C
- In case if the temperature becomes critical, ThingsBoard Edge turns on the cooler system by sending RPC call requests to the Air Conditioner device
- Pushes telemetry to the cloud
Please note that this is just a simple theoretical use case to demonstrate the capabilities of the platform. You can use this tutorial as a basis for much more complex scenarios.
Prerequisites
We assume you have completed the following guides and reviewed the articles listed below:
- Getting Started guide.
- Rule Engine Overview article.
- ThingsBoard Edge Getting Started article.
- Edge Rule Chain Templates guide.
Please make sure that you have ThingsBoard server up and running. Additionally, ThingsBoard Edge must be up, running and connected to the cloud.
If you have these prerequisites in place let’s go to next steps.
In other case please visit this link to provision, install and connect Edge to Server guide.
For simplicity we are going to refer to server UI URL as SERVER_URL despite if you installed ThingsBoard server on-previse or using cloud host version. Edge UI URL respectively as EDGE_URL below in tutorial.
If the Edge HTTP bind port was changed to 18080 during Edge installation, access the ThingsBoard Edge instance at http://localhost:18080.
Configure Alarm Rules
We will use alarm rules feature to raise alarm when temperature reading is greater than 50 °C degrees. For this purpose, we should create new device profile and add new alarm rule. We recommend creating dedicated device profiles for each corresponding device type. Let’s create new device profile “edge thermostat”.
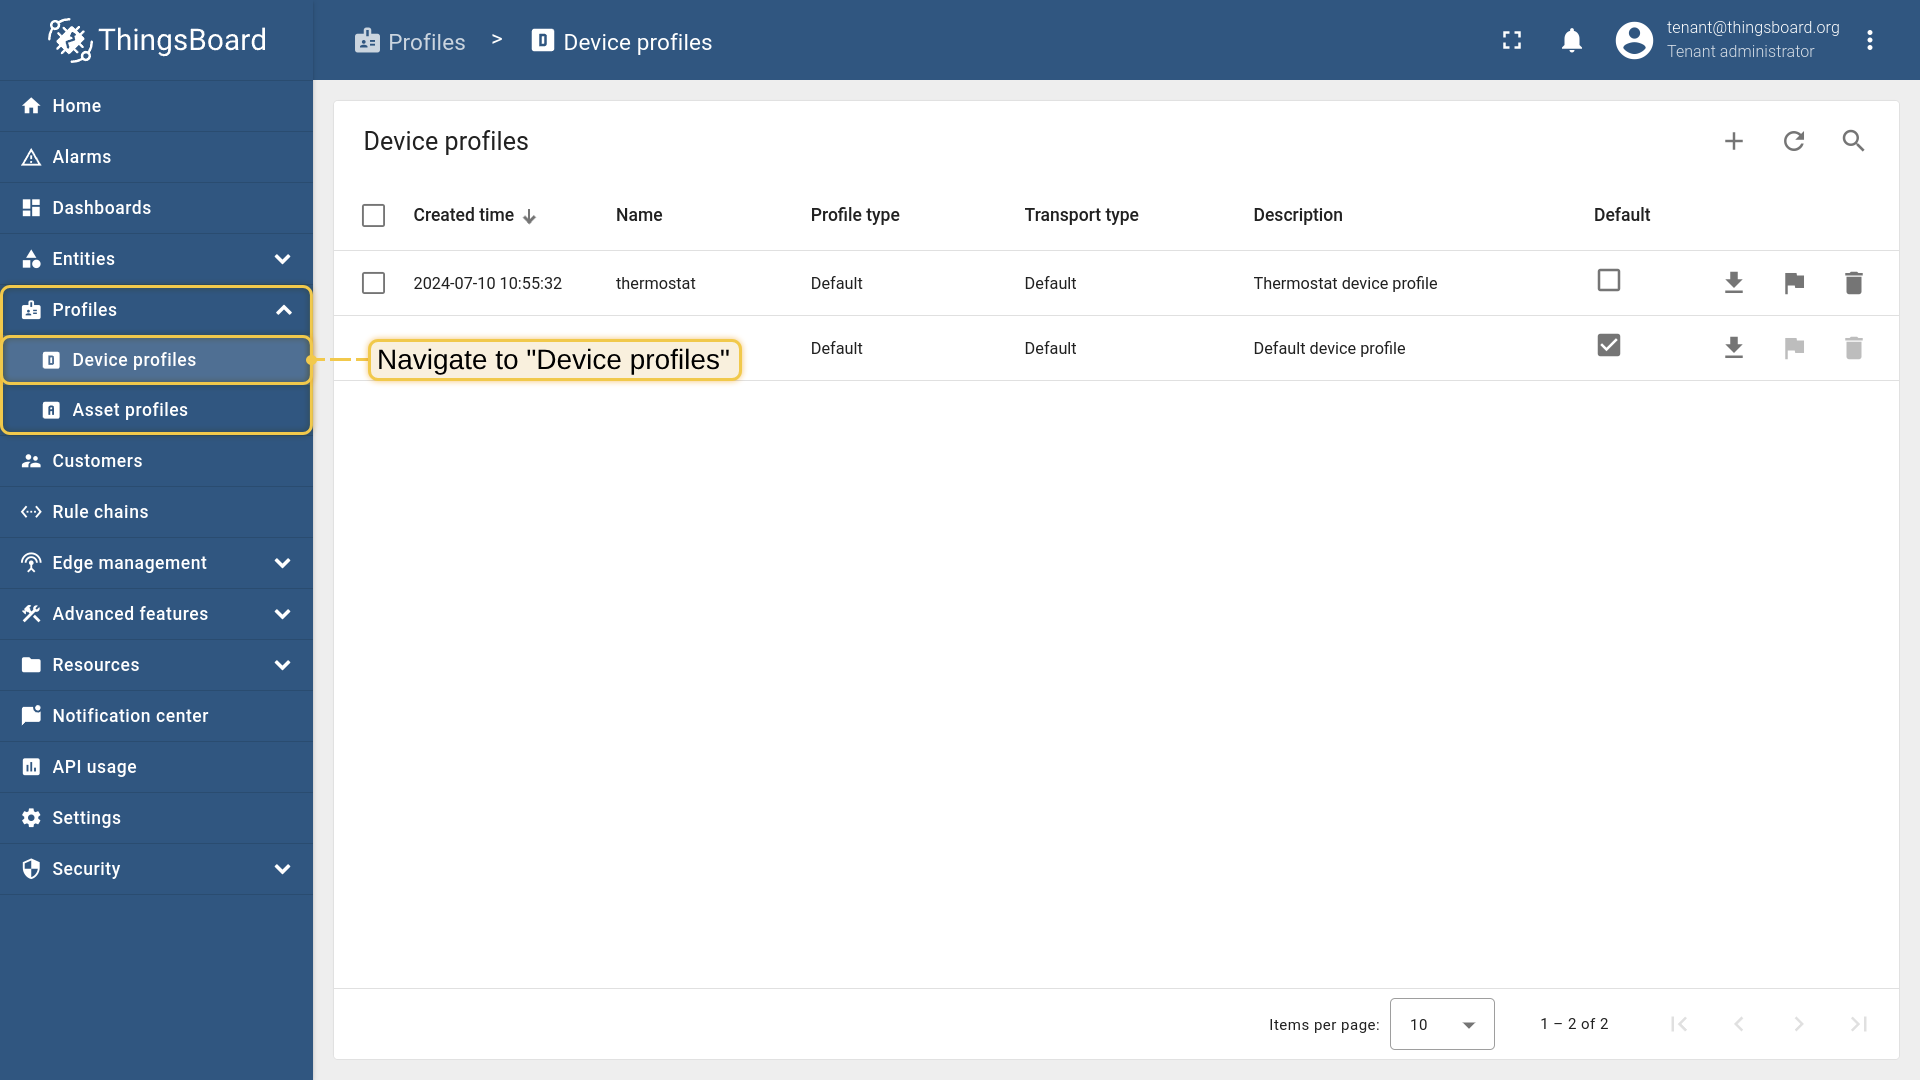
- Login to your ThingsBoard instance and open Device profiles menu page.
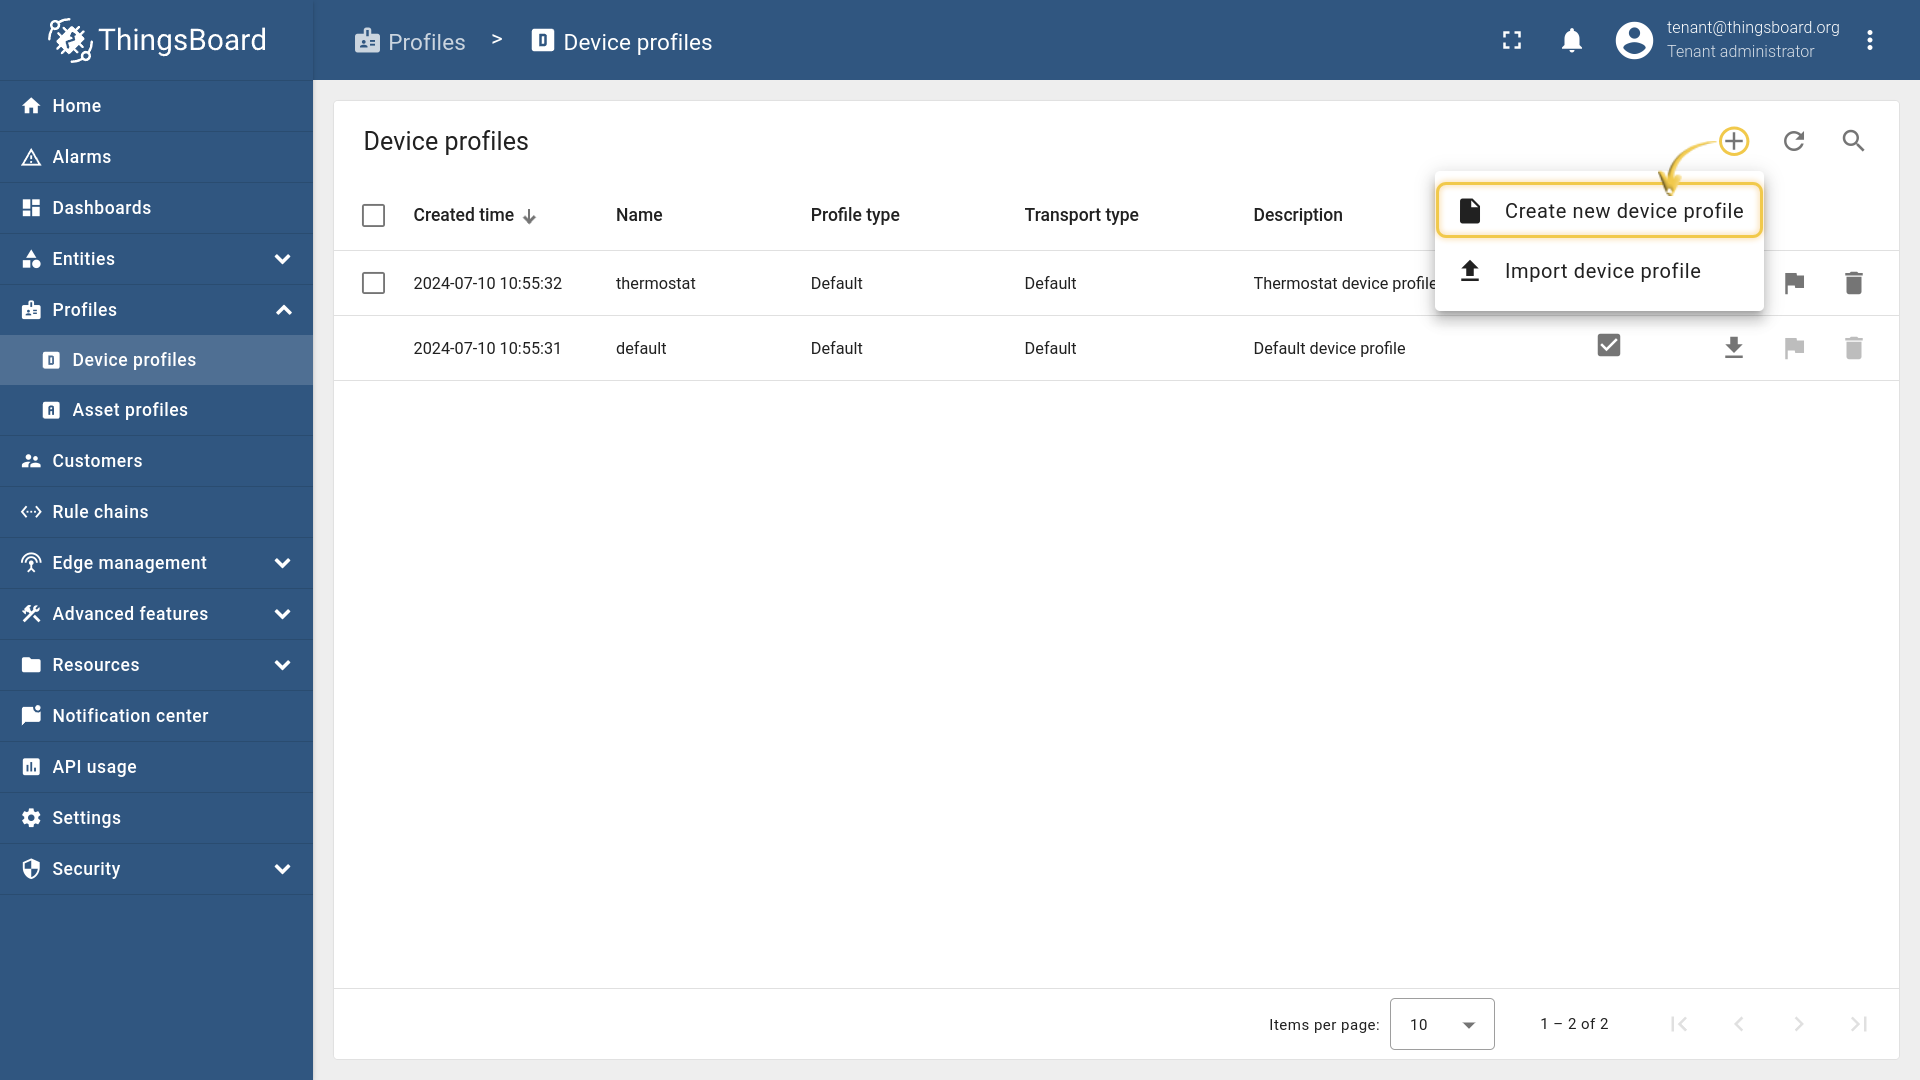
- Click the ("+") icon to add new device profile.
- 1. Input device profile name. For e.g., edge thermostat. 2. Click on the Transport configuration to proceed.
- For this example we will use default transport configuration. Click on the Alarm rules to proceed.
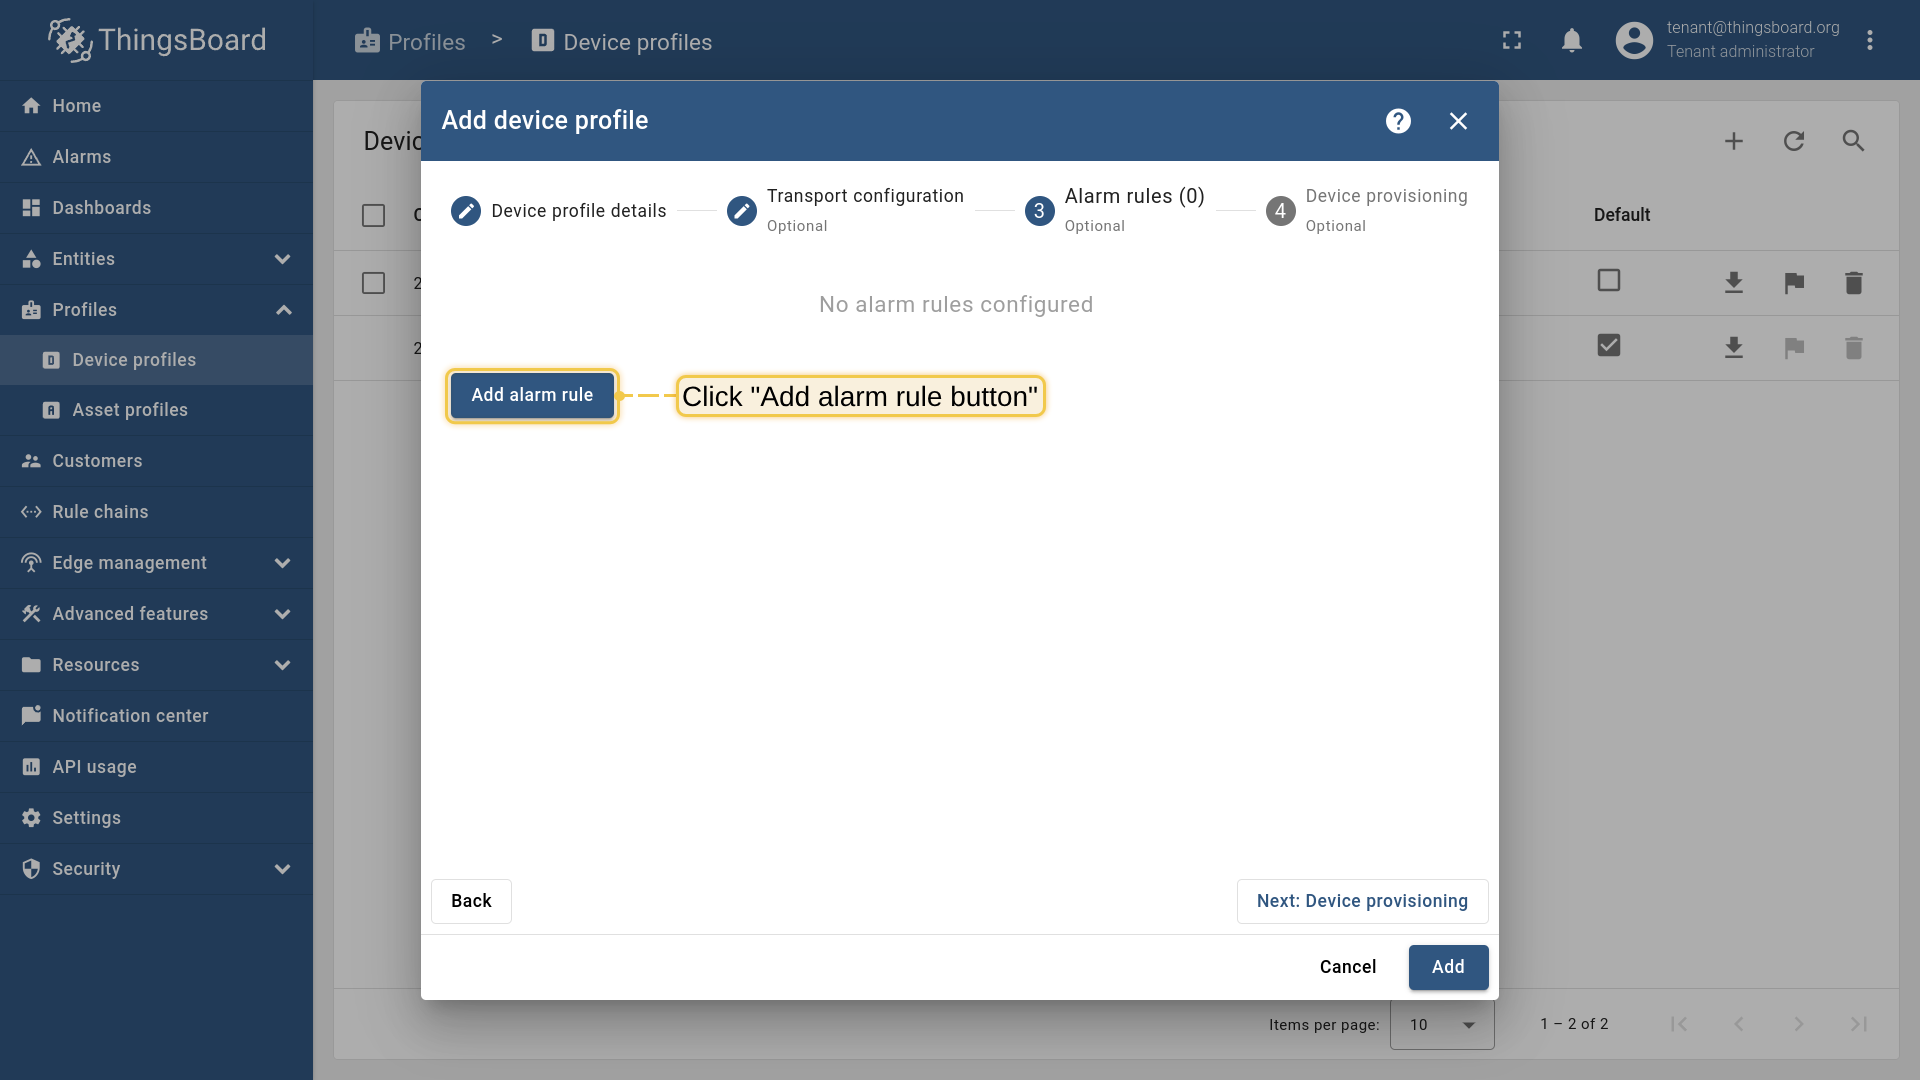
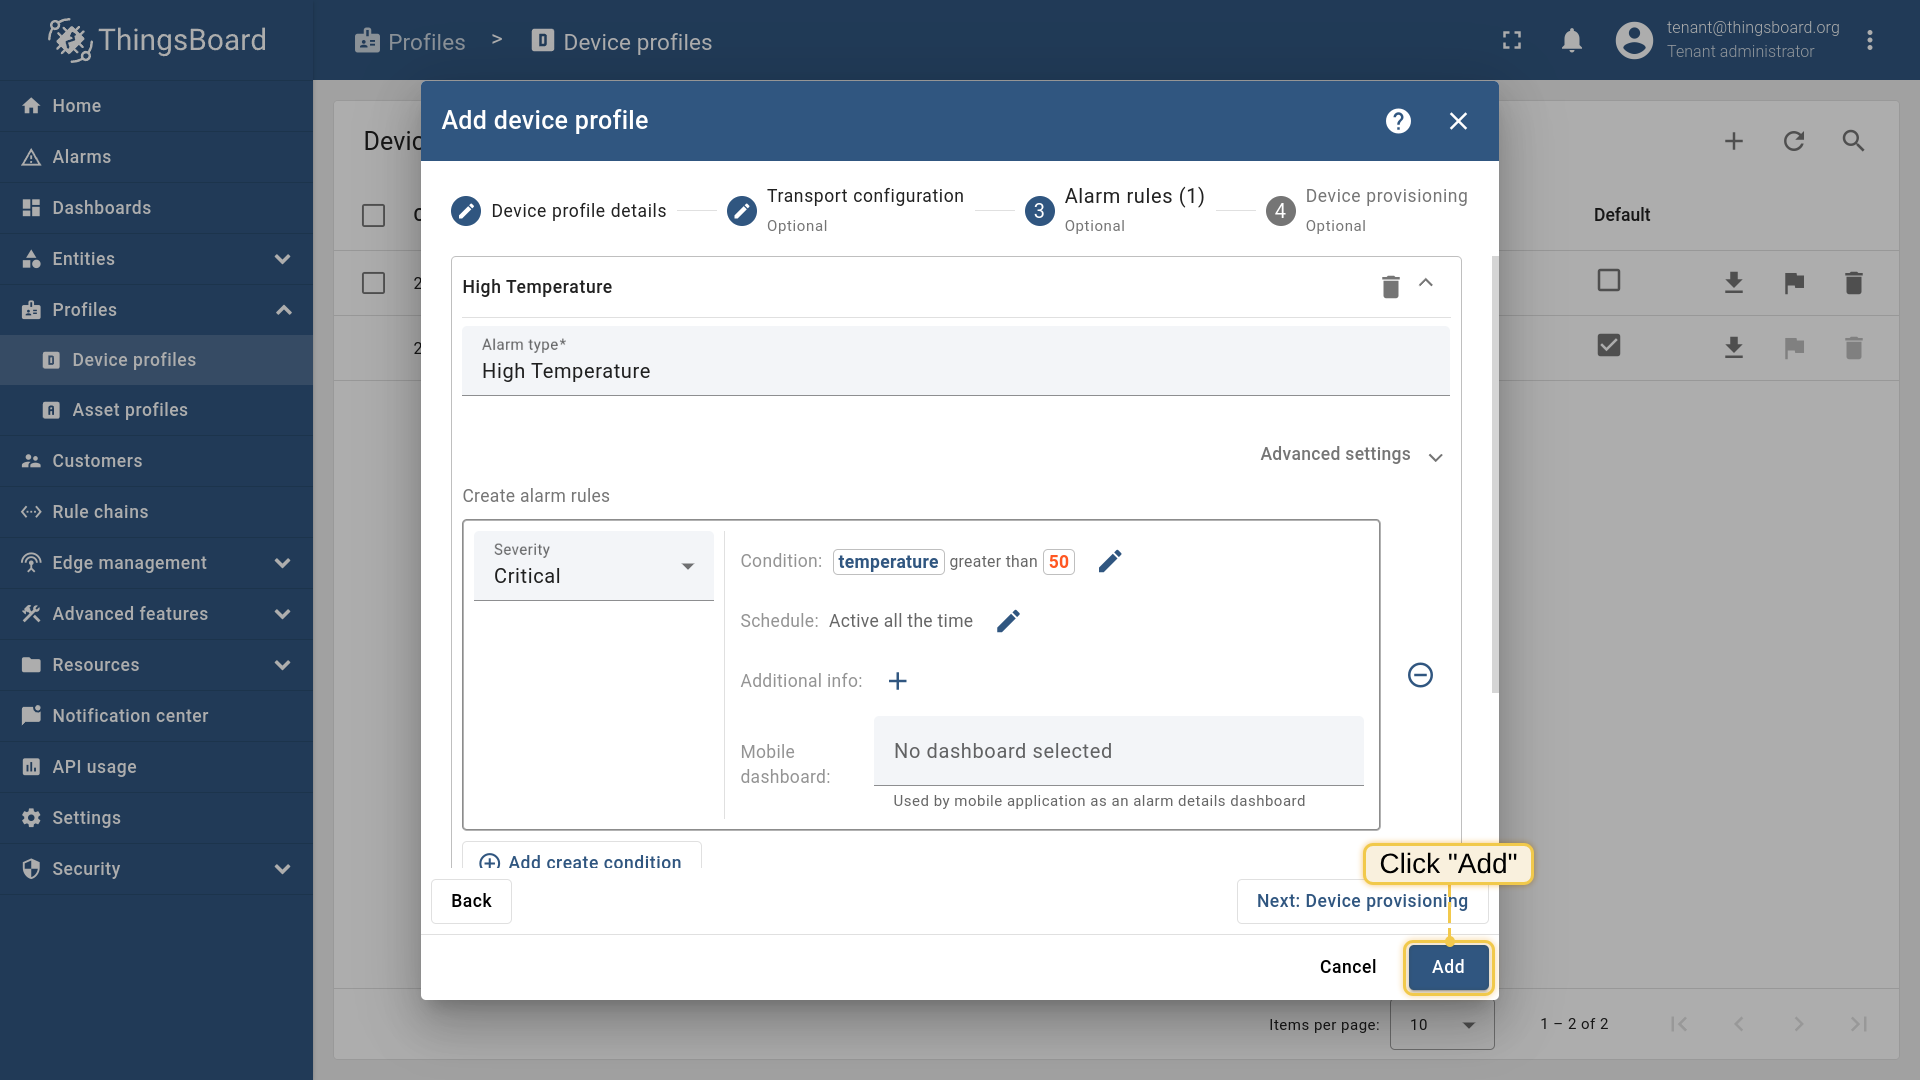
- Click on the Add alarm rule button.
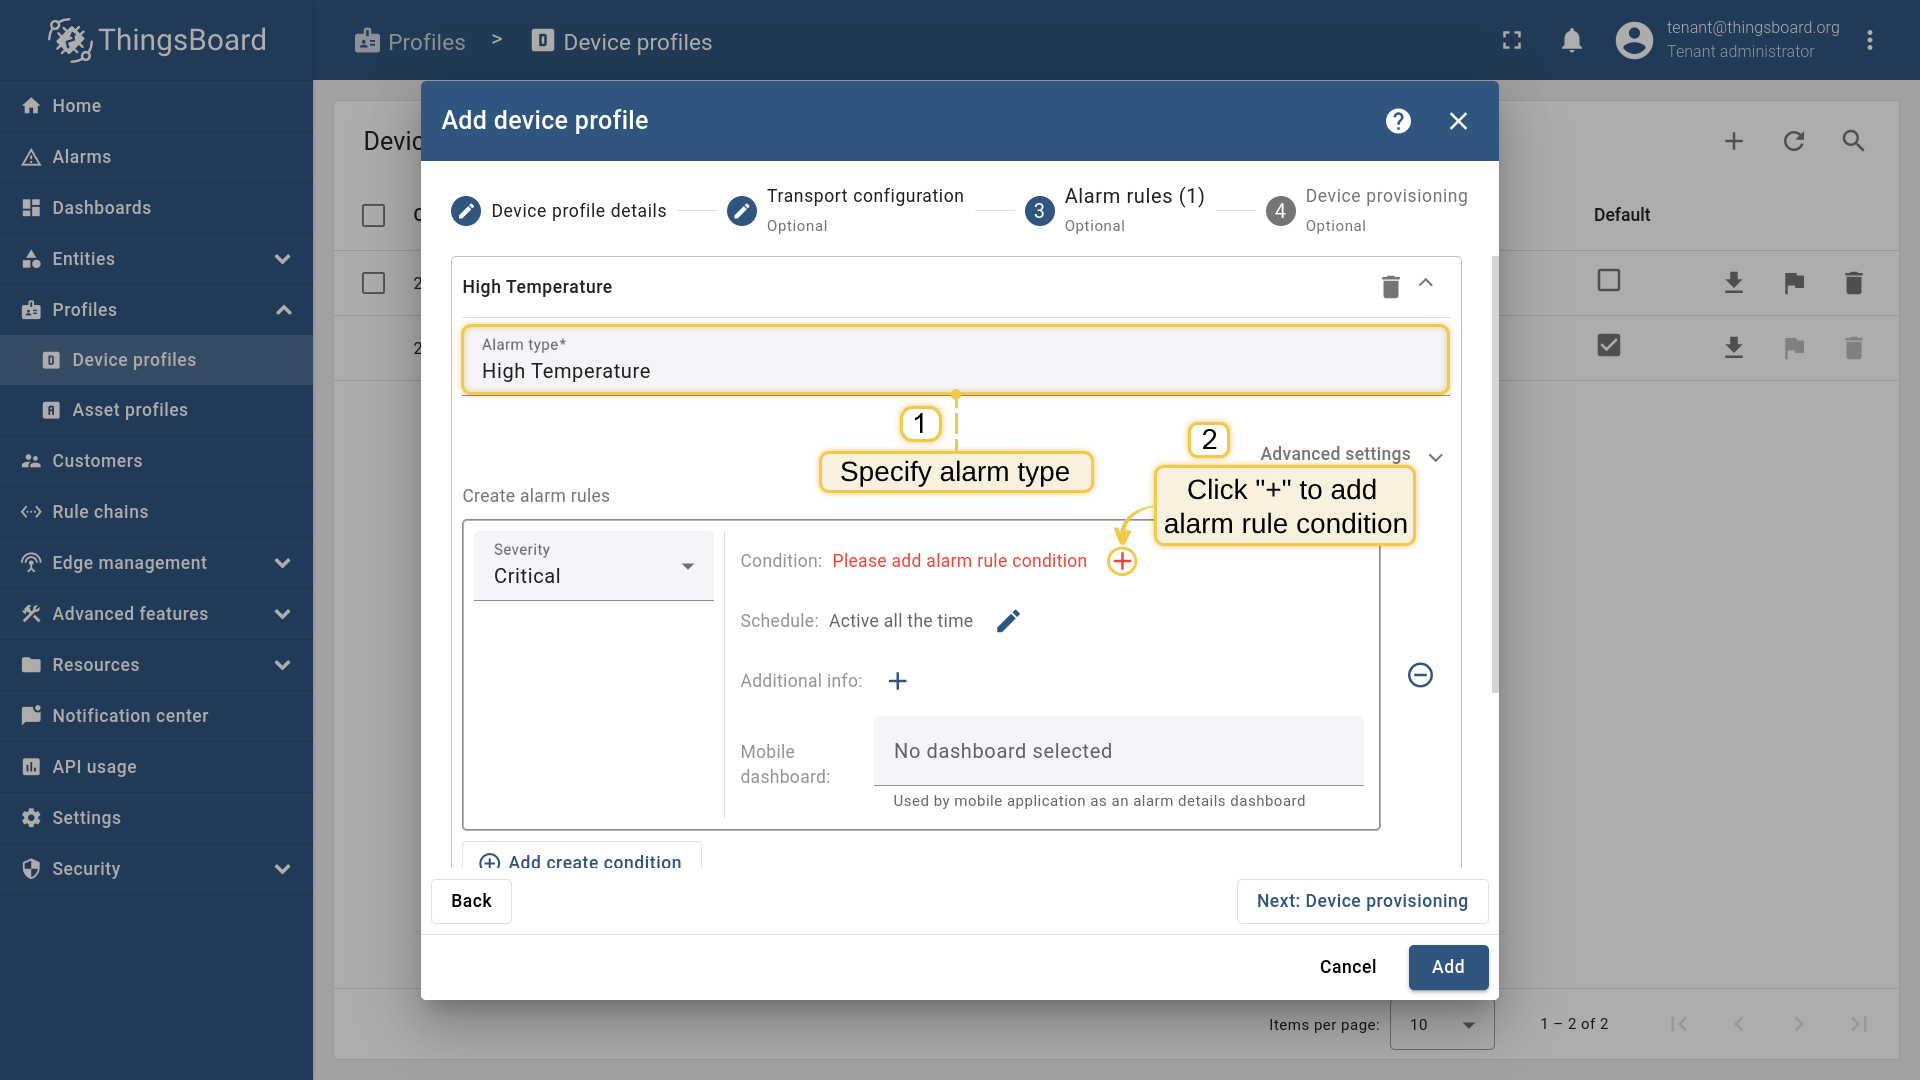
- 1. Specify alarm type. For e.g., High temperature. 2. Click on the ("+") icon to add new alarm condition.
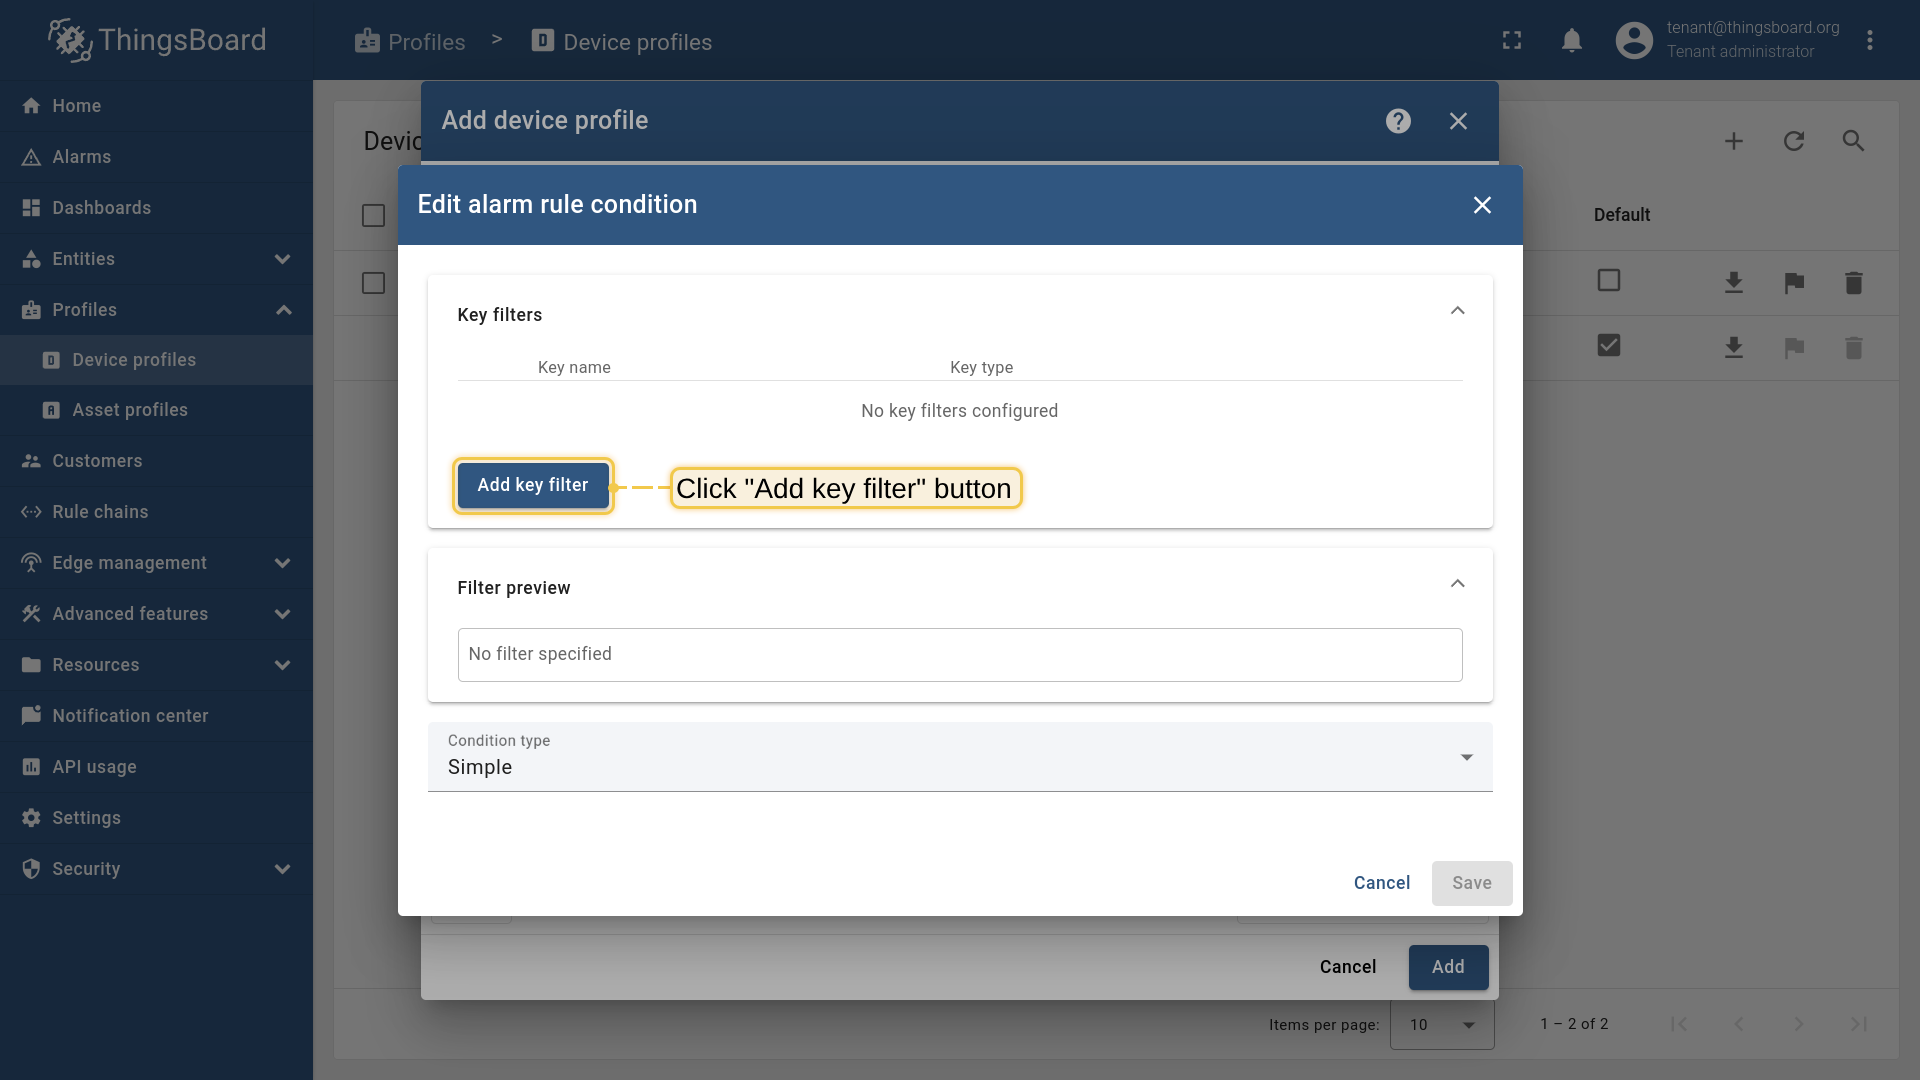
- Click on the Add key filter button.
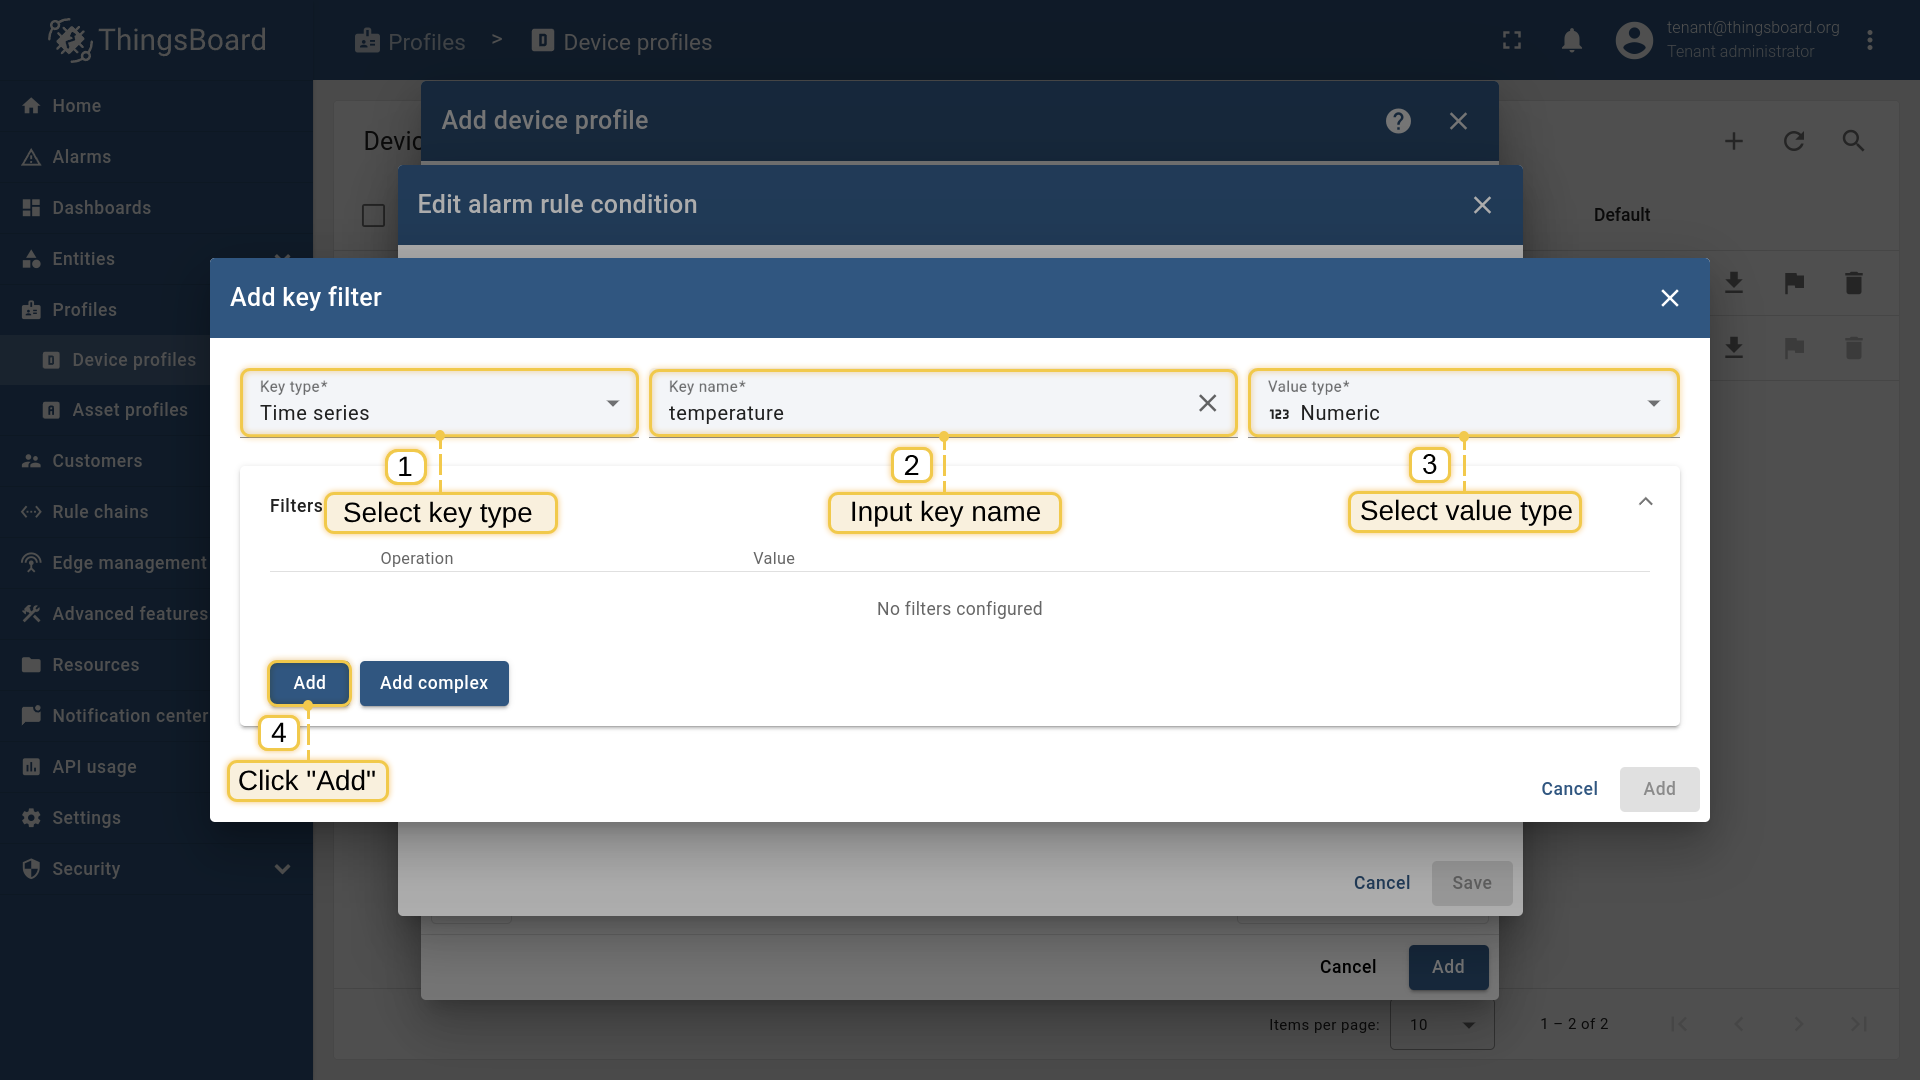
- 1. Select key type Time series. 2. Input key name temperature. 3. Select value type Numeric. 4. Click on the Add button.
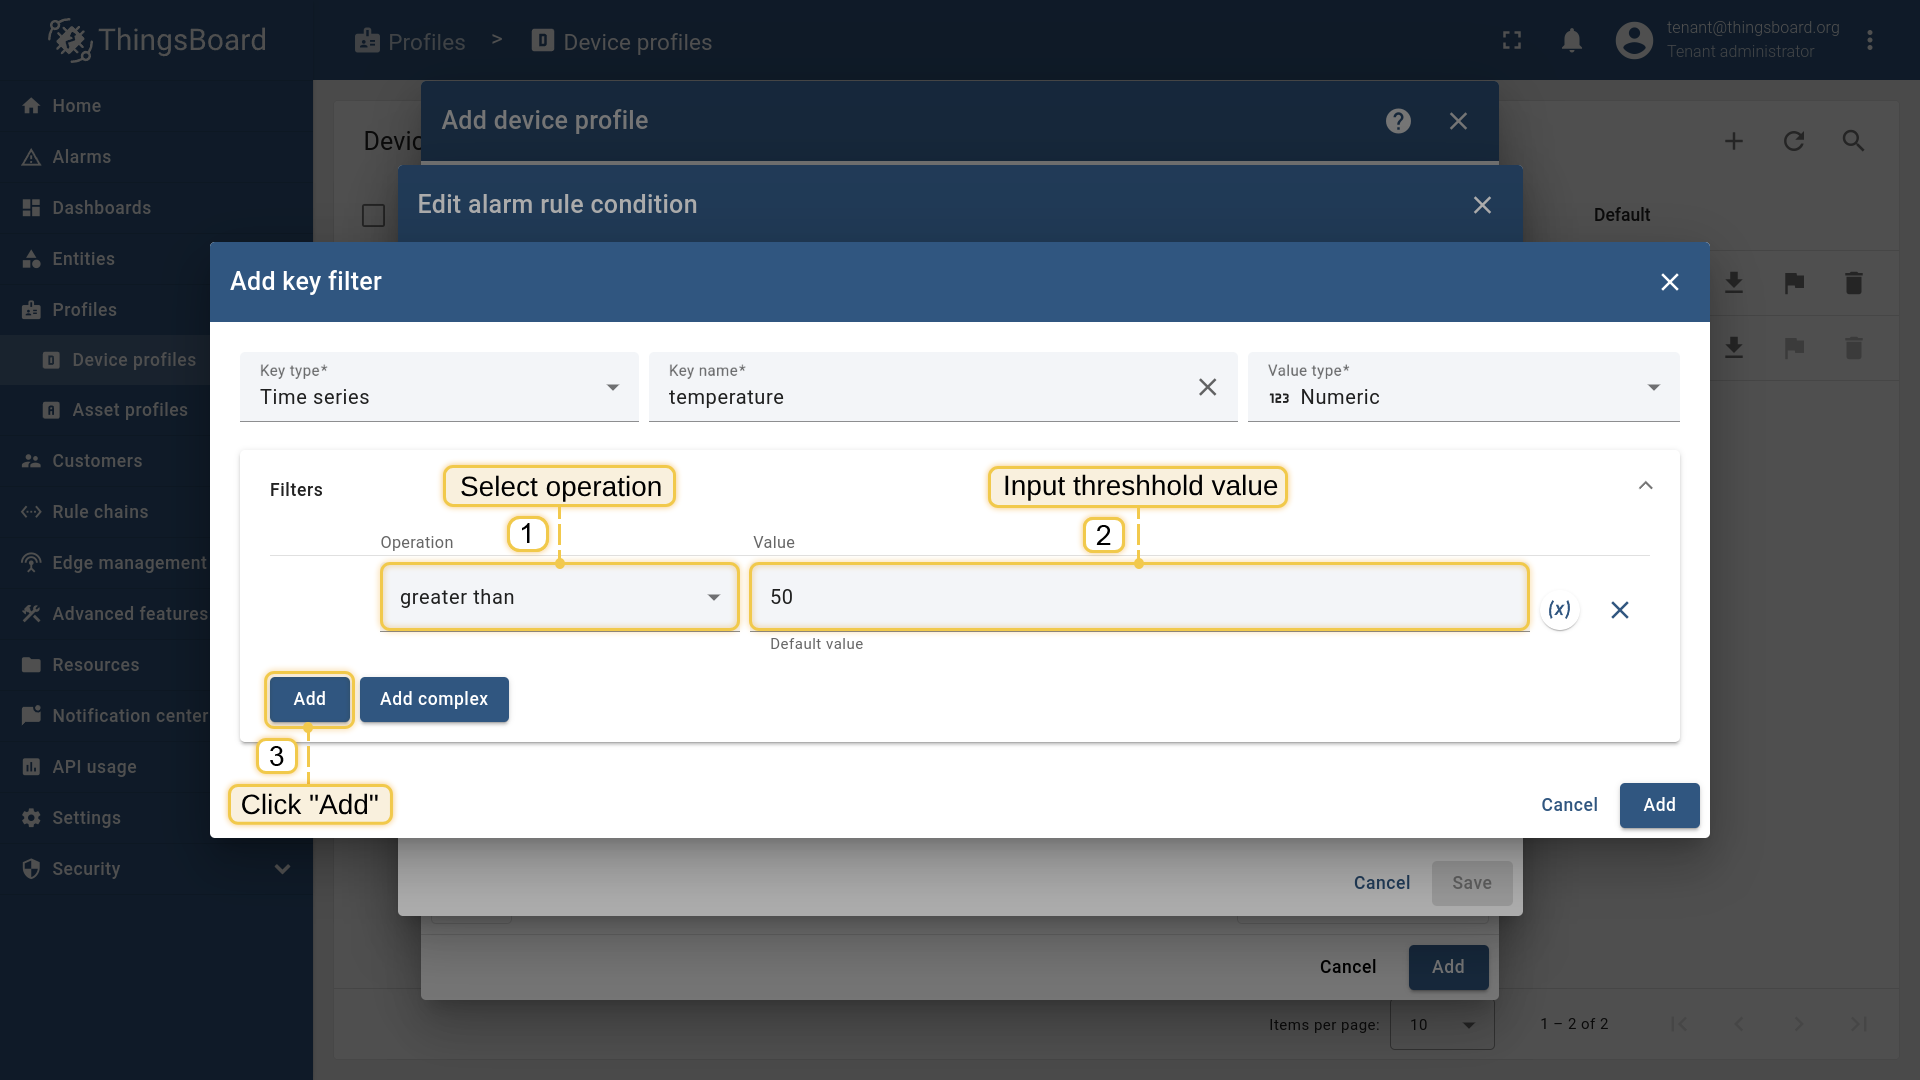
- 1. Select operation greater than. 2. Input threshold value 50. 3. Click on the Add button.
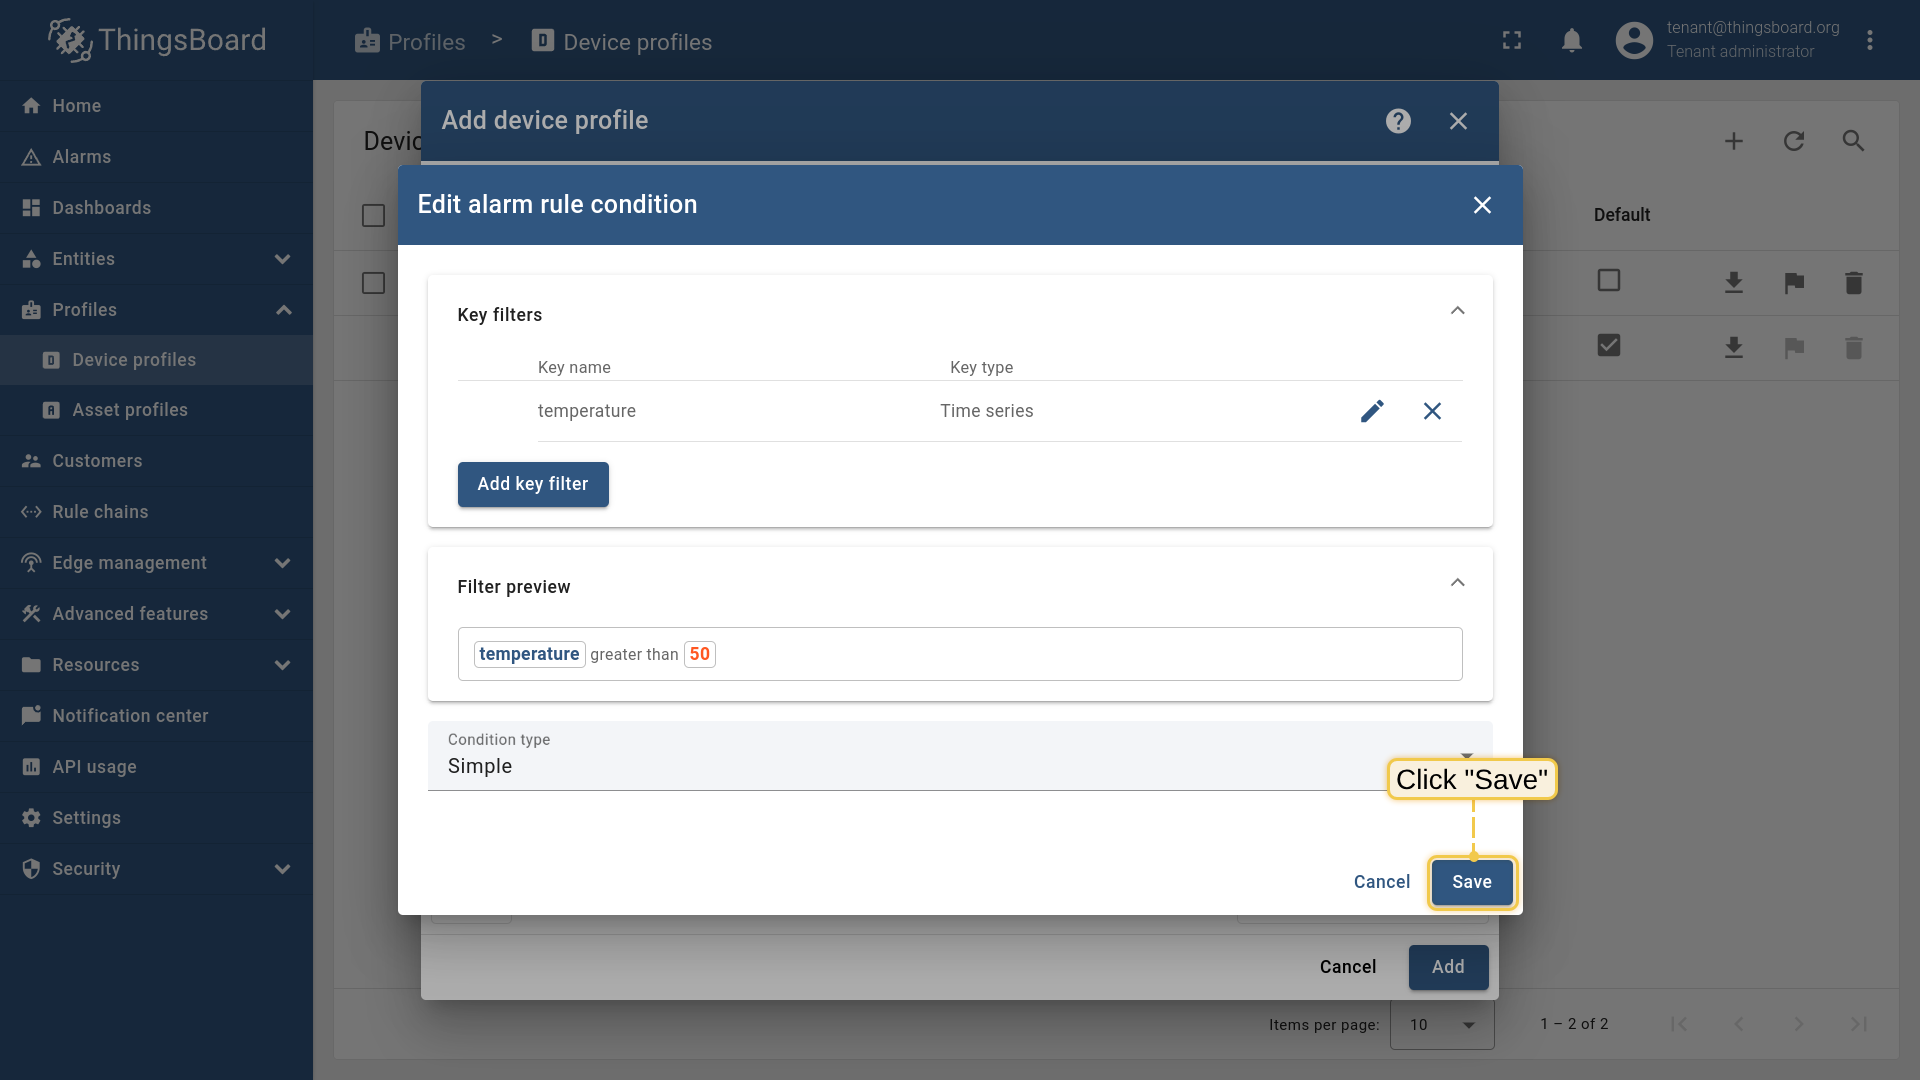
- Click on the Save button.
- Click on the Add button.
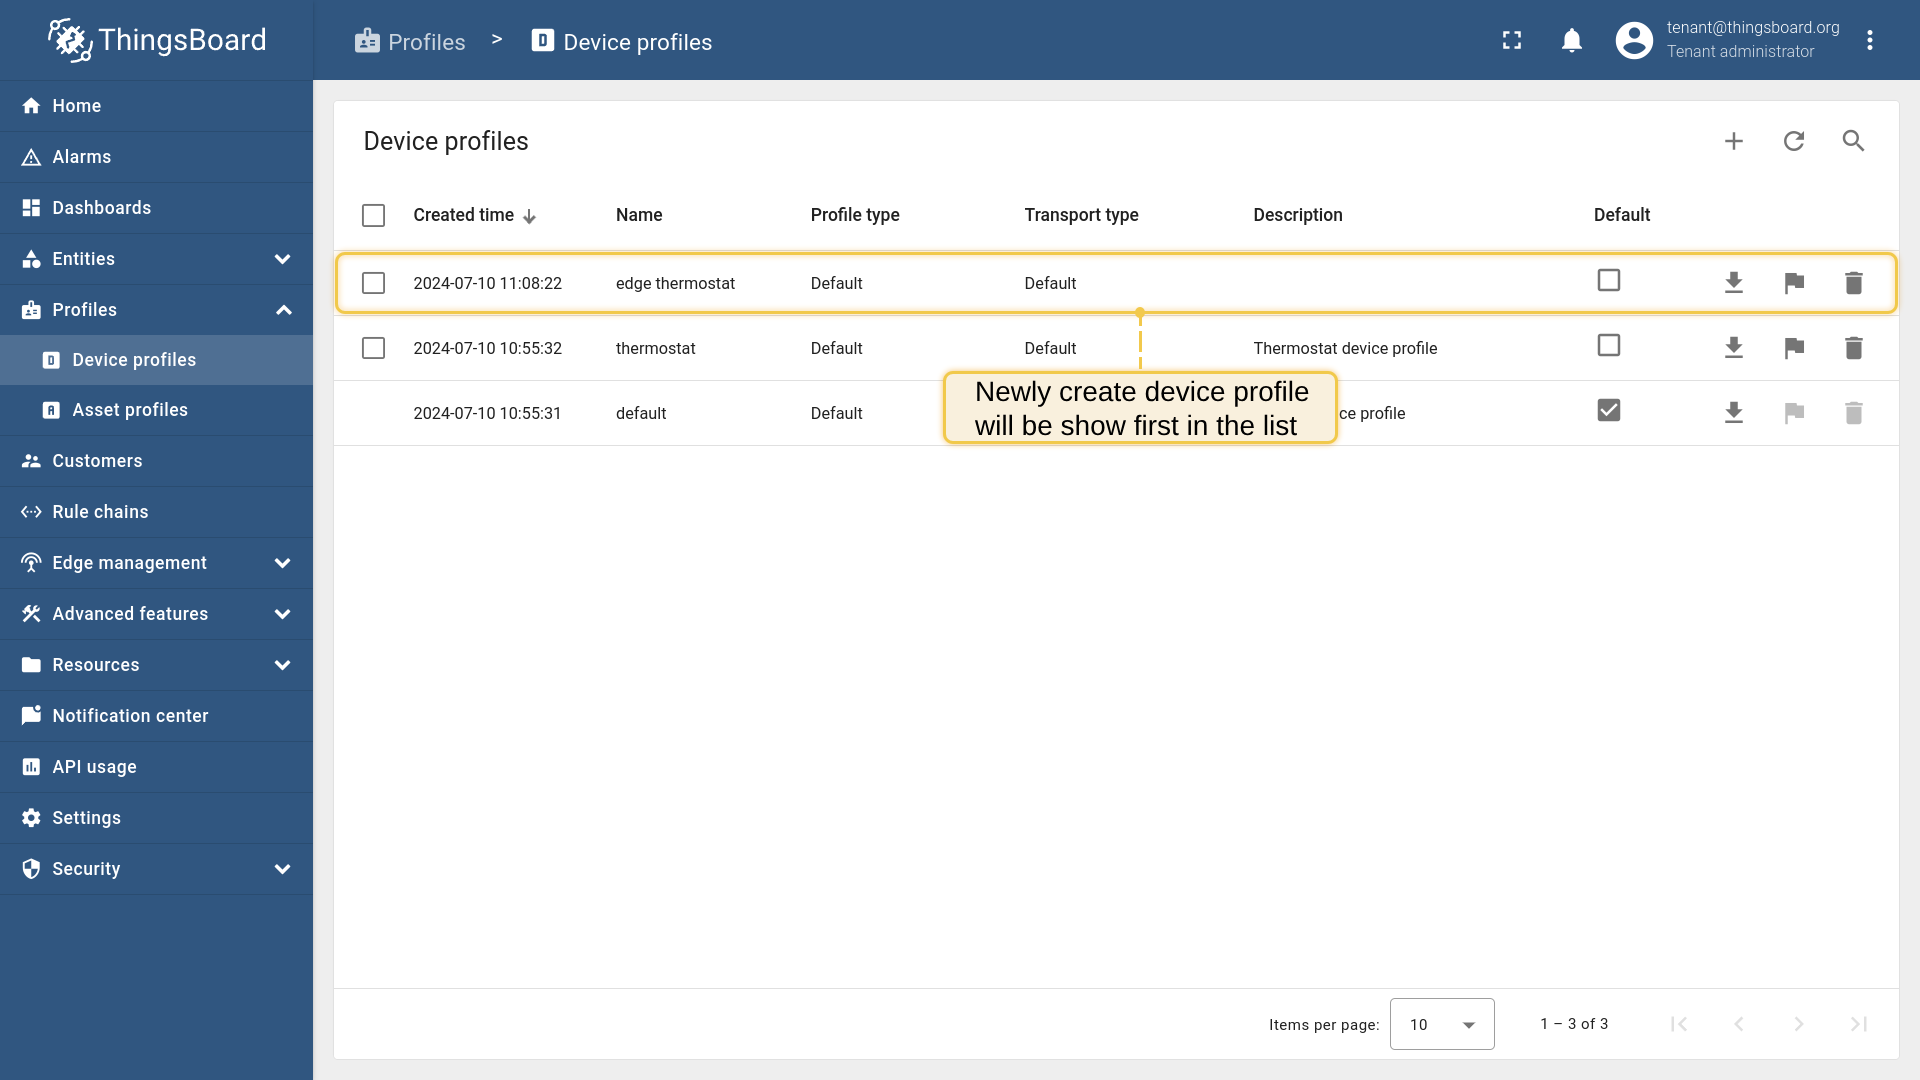
- Newly create device profile will be show first in the list, because default sort order is by created time.


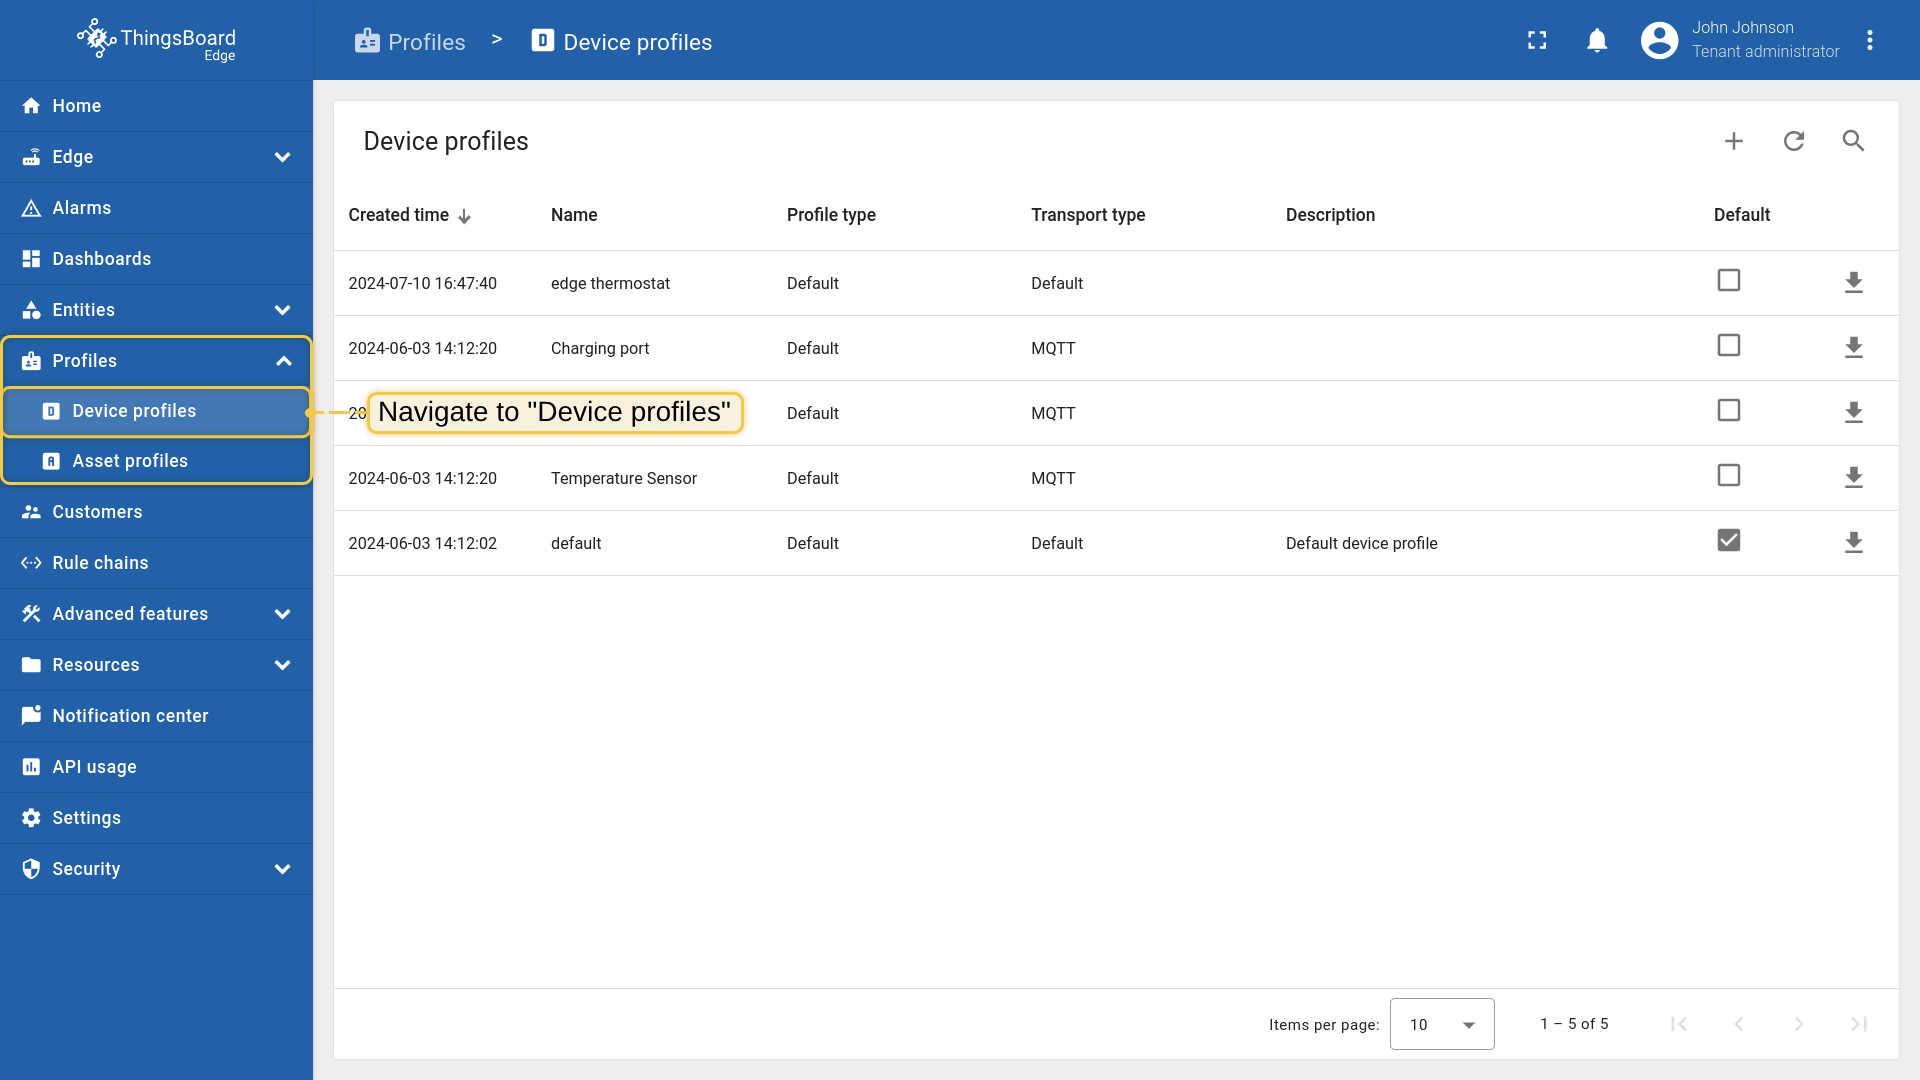
Please open ThingsBoard Edge UI using the URL: EDGE_URL to see provisioned device profiles.
- Login to your ThingsBoard Edge instance and open Device profiles menu page.
- Verify that edge thermostat was provisioned to edge as well.

Provision devices
For simplicity, we will provision device manually using the UI.
Let’s first create DHT22 temperature sensor and Air Conditioner devices on the edge and add relation between these devices. This relation will be used to find related Air Conditioner device once DHT22 temperature sensor will send critical temperature value.
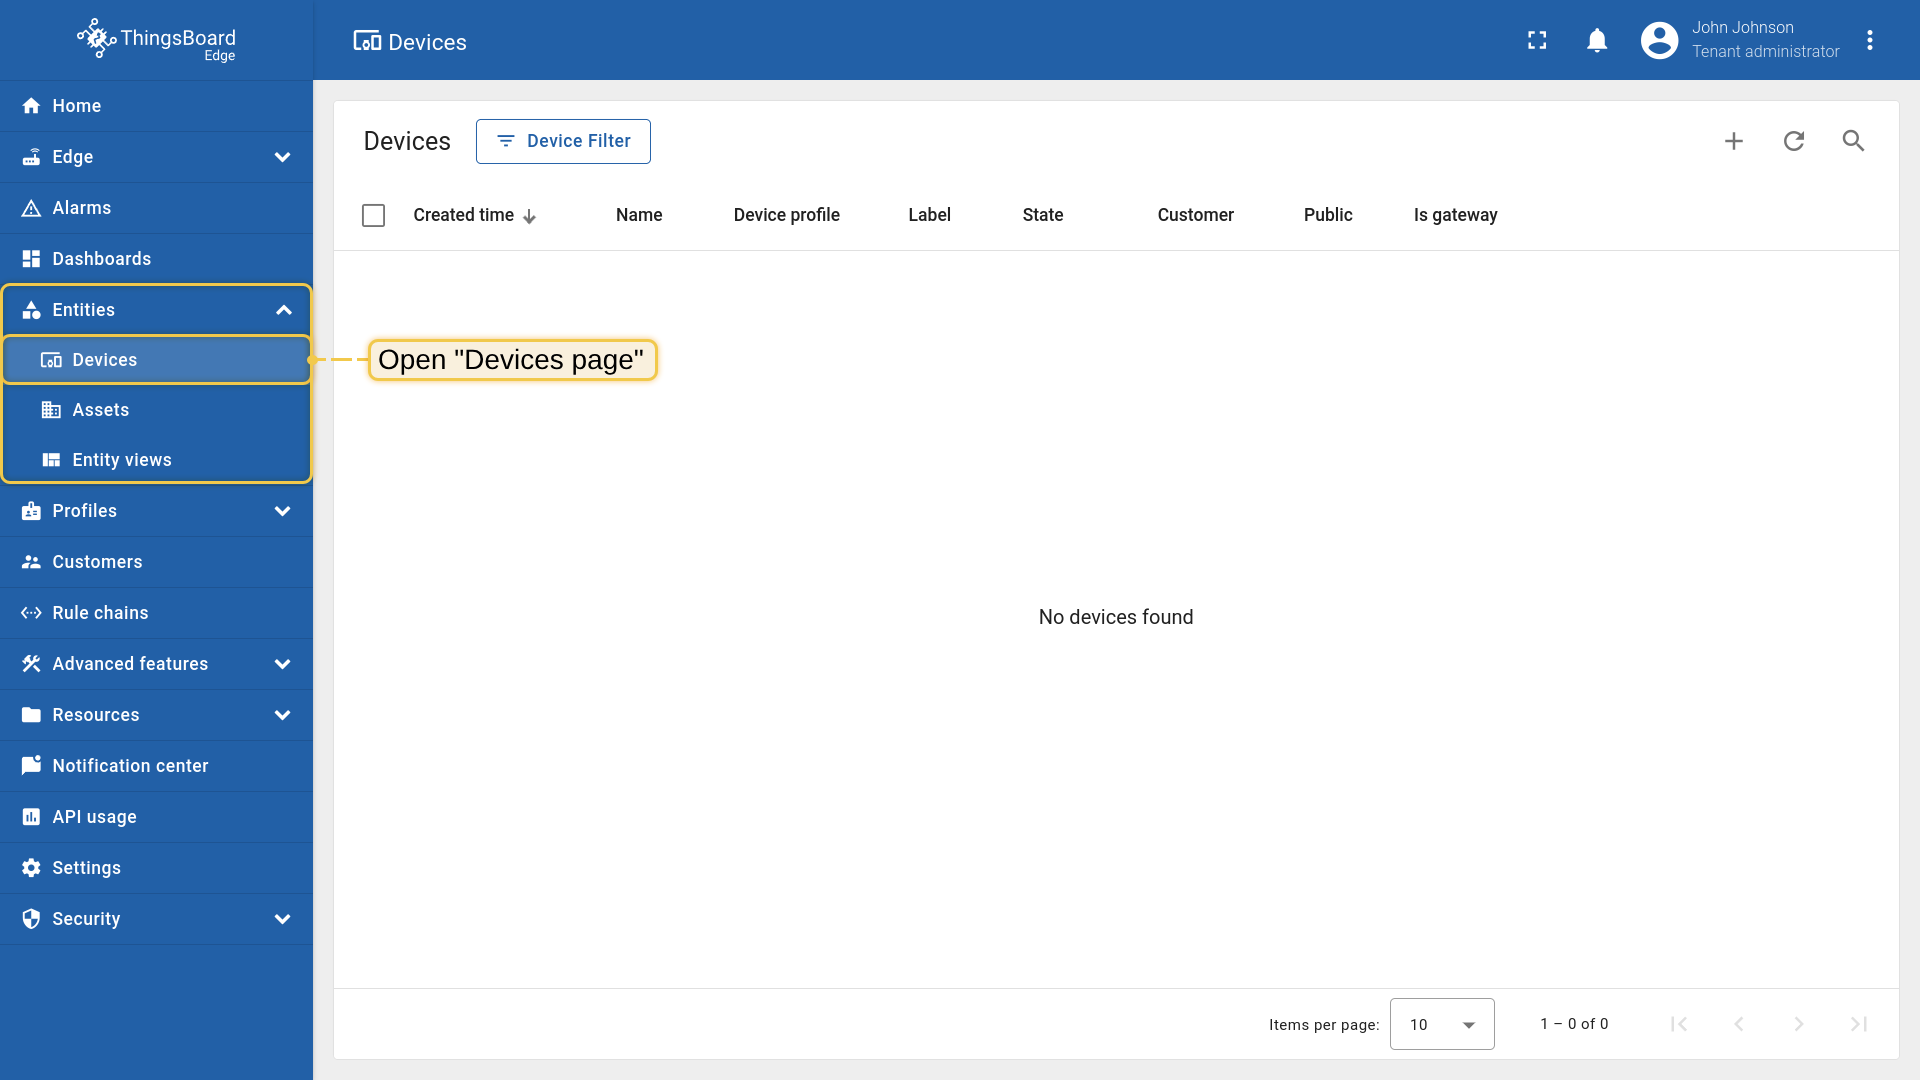
We are going to provision device on the Edge. Please open ThingsBoard Edge UI using the URL: EDGE_URL.
- Login to your ThingsBoard Edge instance and open Devices menu page.
- Click on the ("+") icon in the top right corner of the table.
- 1. Input device name. For e.g., DHT22. 2. Select edge thermostat from device profiles list. No other changes required at this time. 3. Click Add to add the device.
- Now your DHT22 device should be listed first, since table sort devices using created time by default.
- To add more devices, click on the ("+") icon then Add new device.
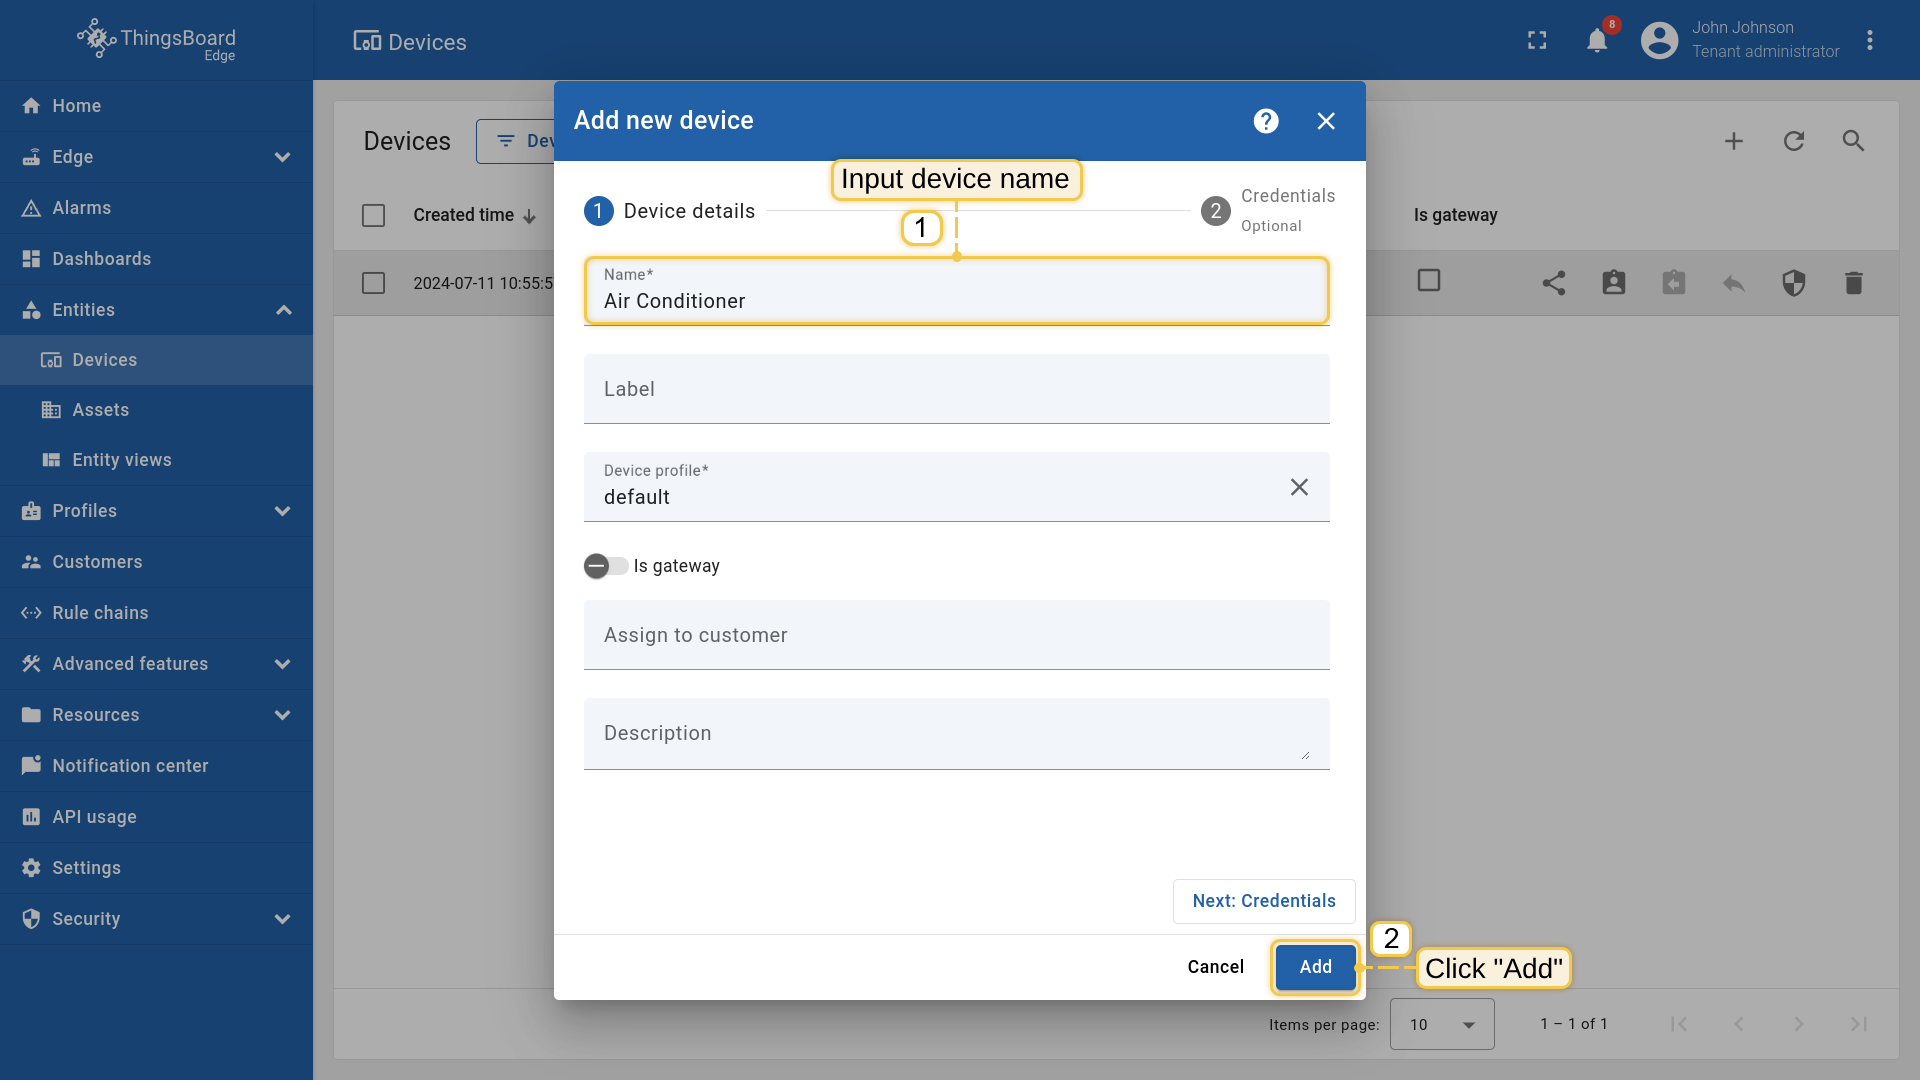
- 1. Input device name. For e.g., Air Conditioner. No other changes required at this time. 2. Click on the Add to add the device.
- Now your Air Conditioner device should be listed first, since table sort devices using created time by default.
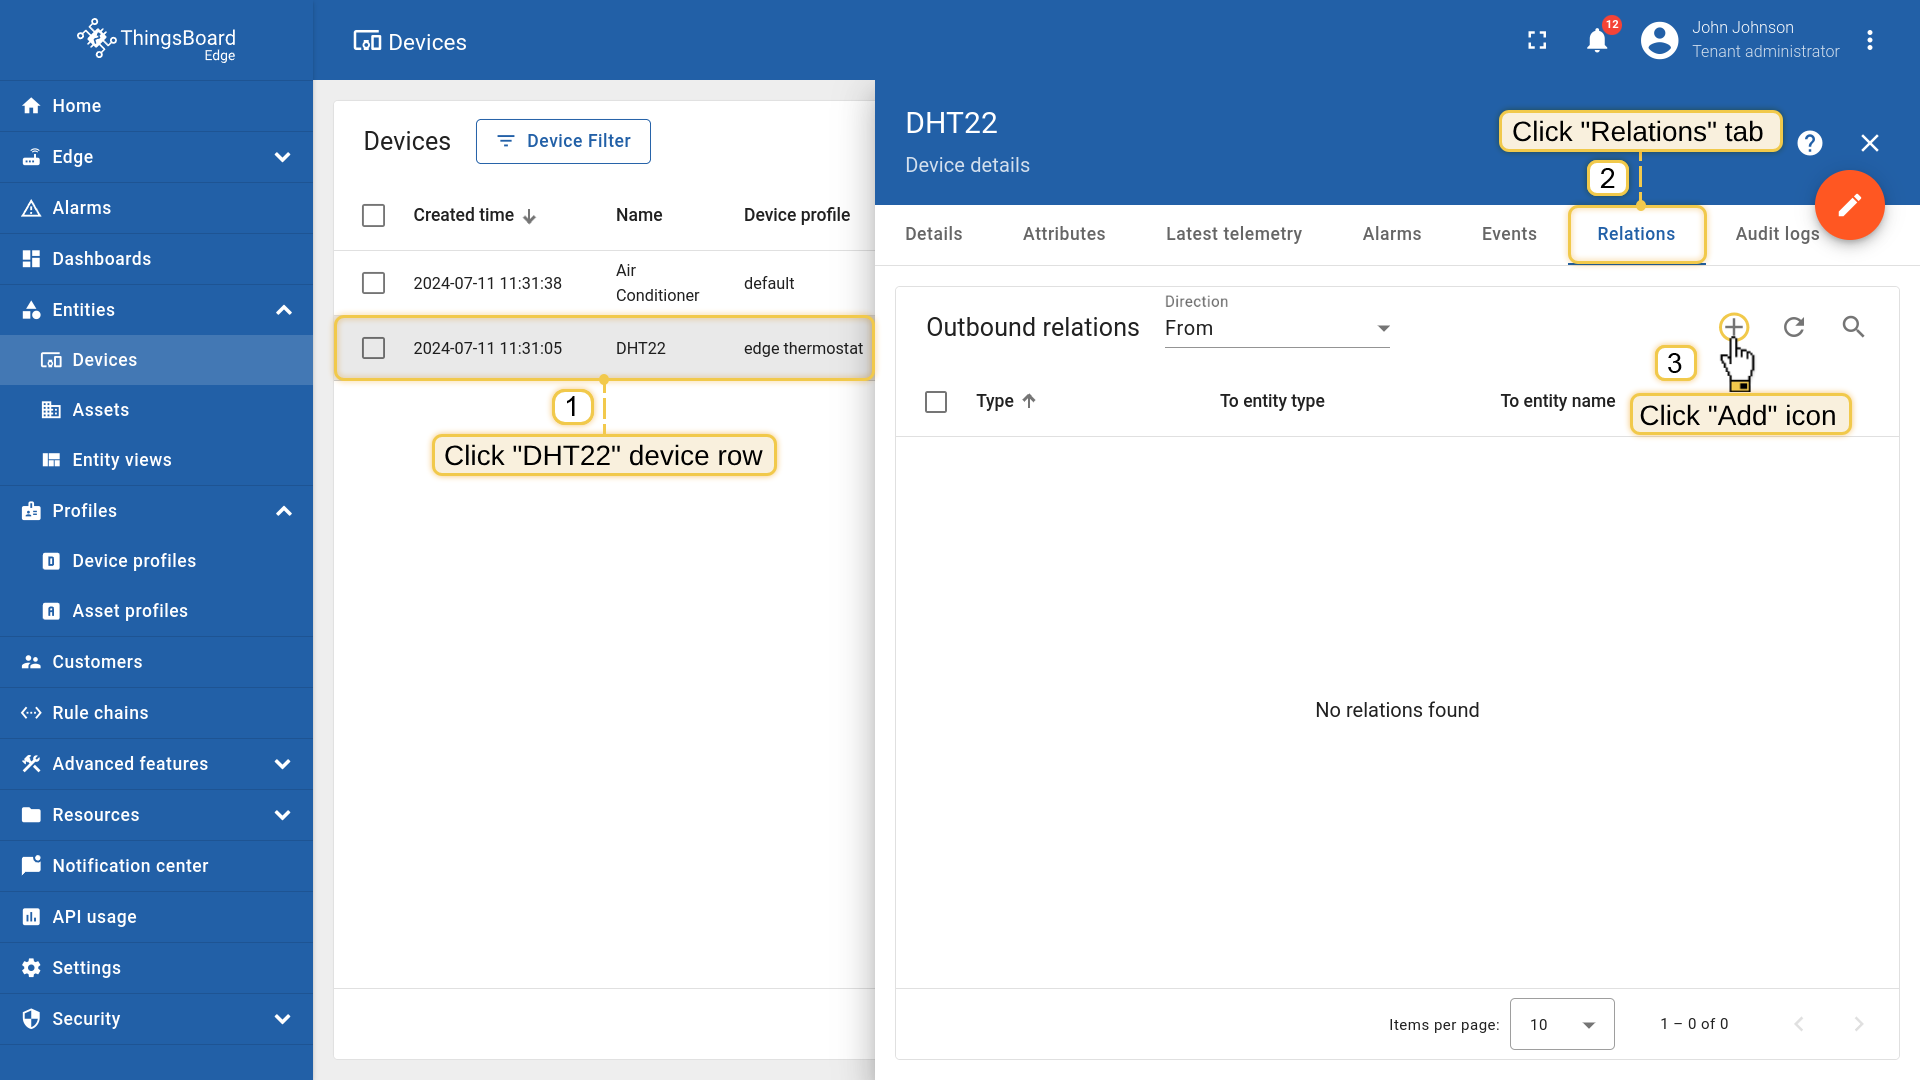
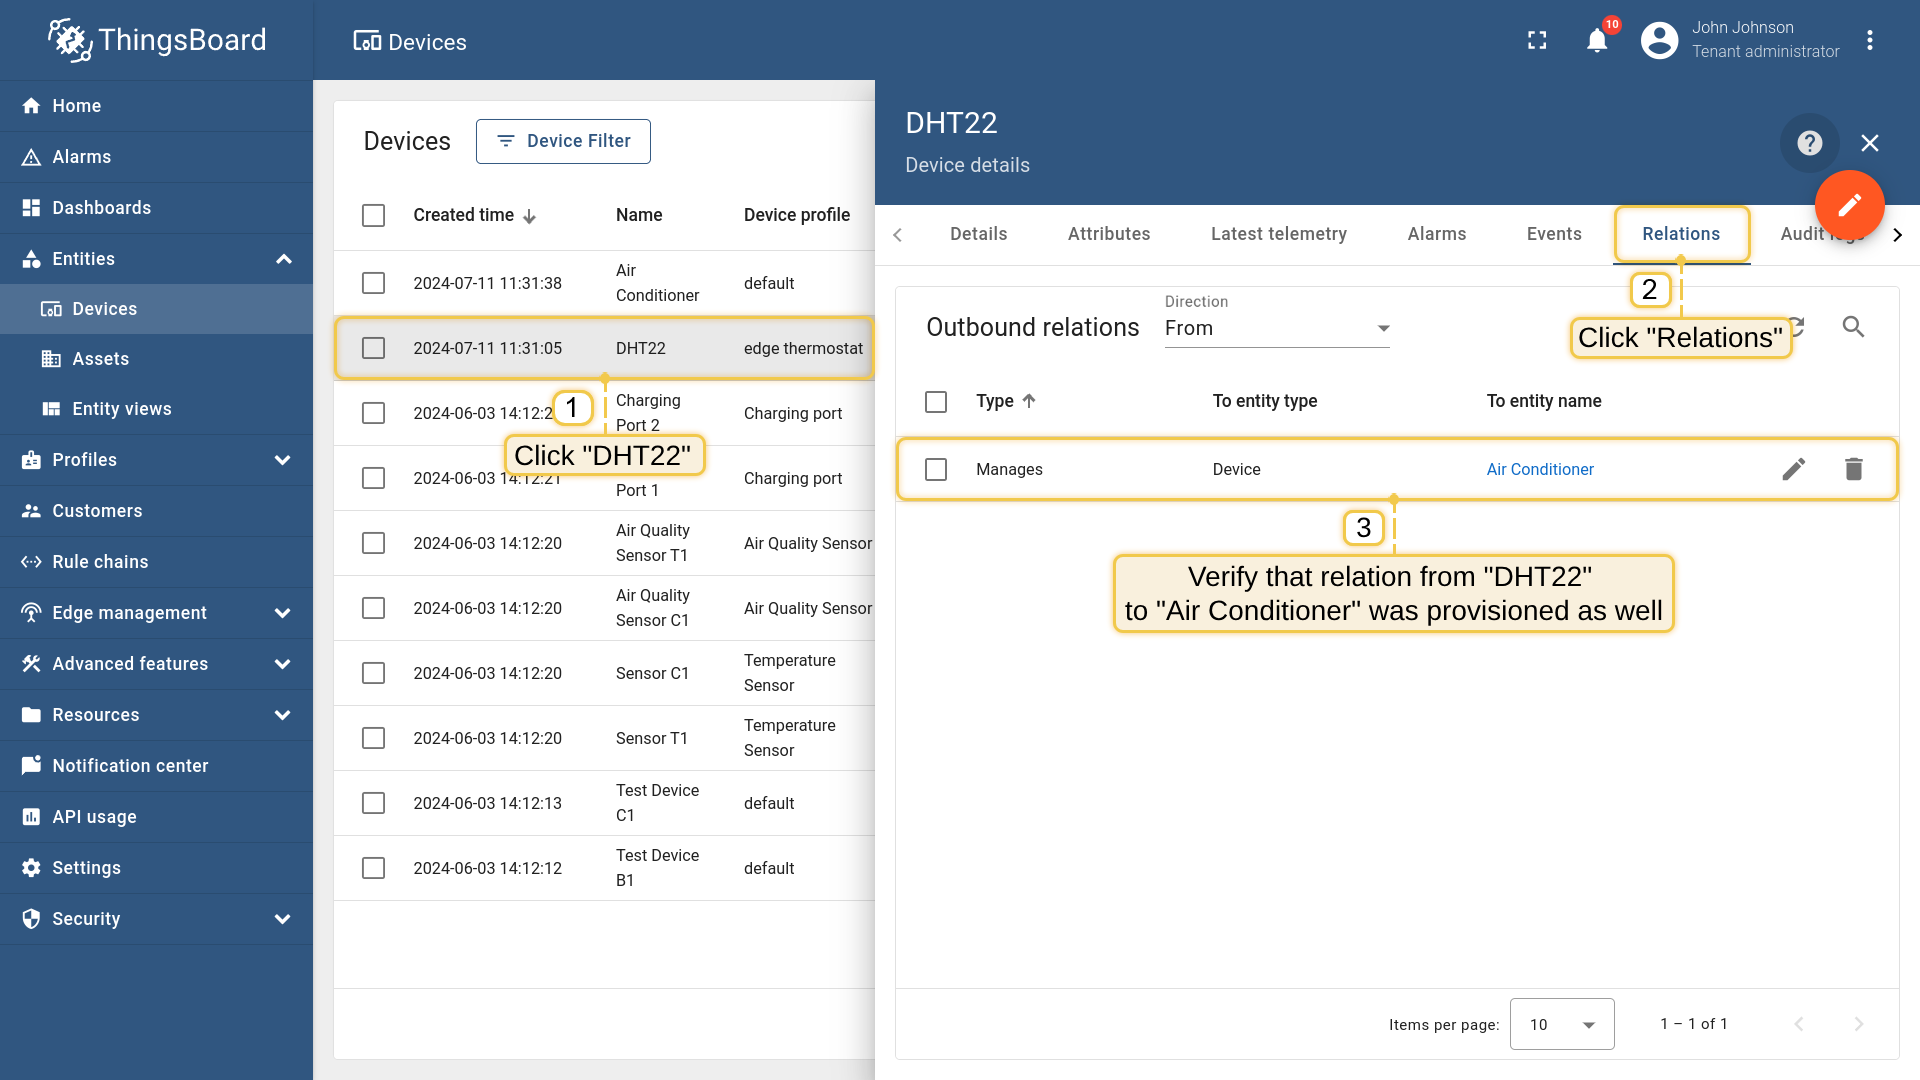
- 1. Click on the DHT22. 2. Click on the Relations. 3. Click on the ("+") icon.
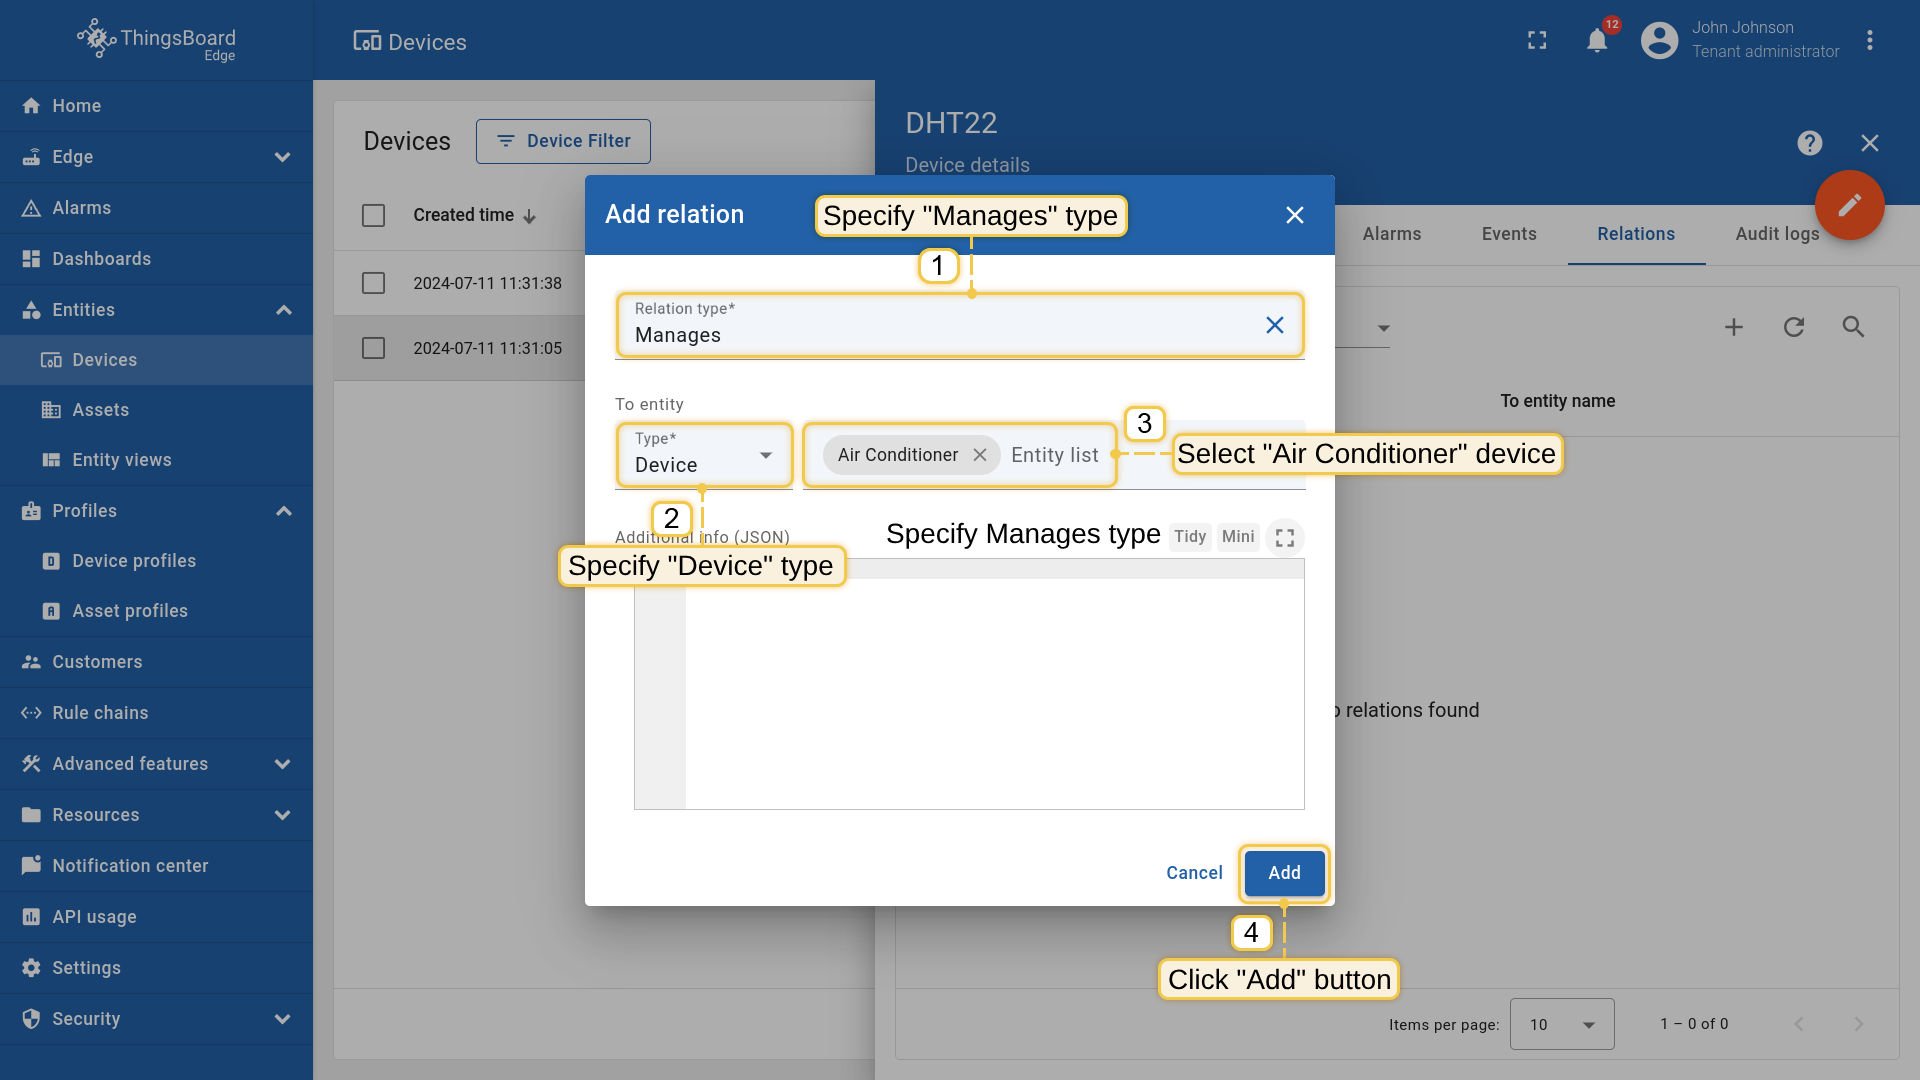
- 1. Specify Manages type. 2. Specify Device type. 3. Select Air Conditioner device. 4. Click on the "Add" button. Now we verify that devices were provisioned to cloud.


Please open ThingsBoard using the URL SERVER_URL:
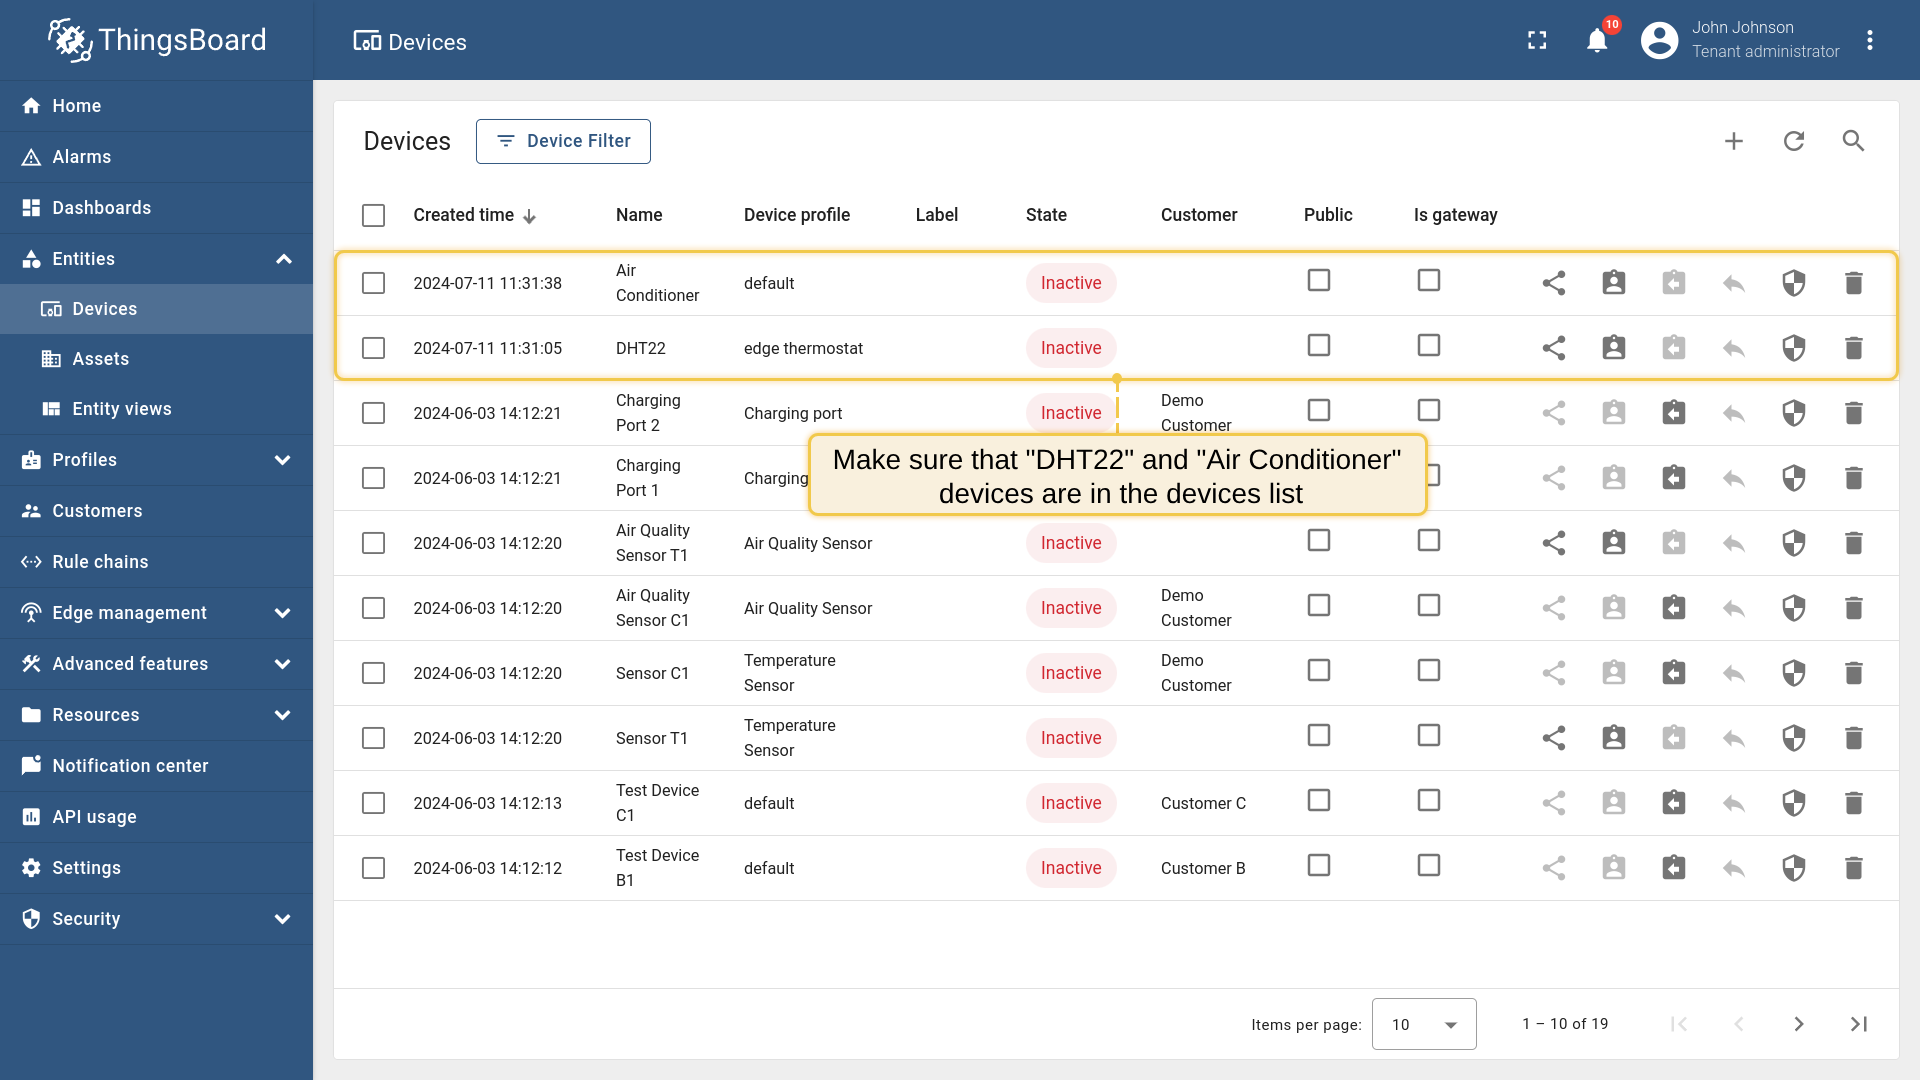
- Login to your ThingsBoard instance and open Devices menu page.
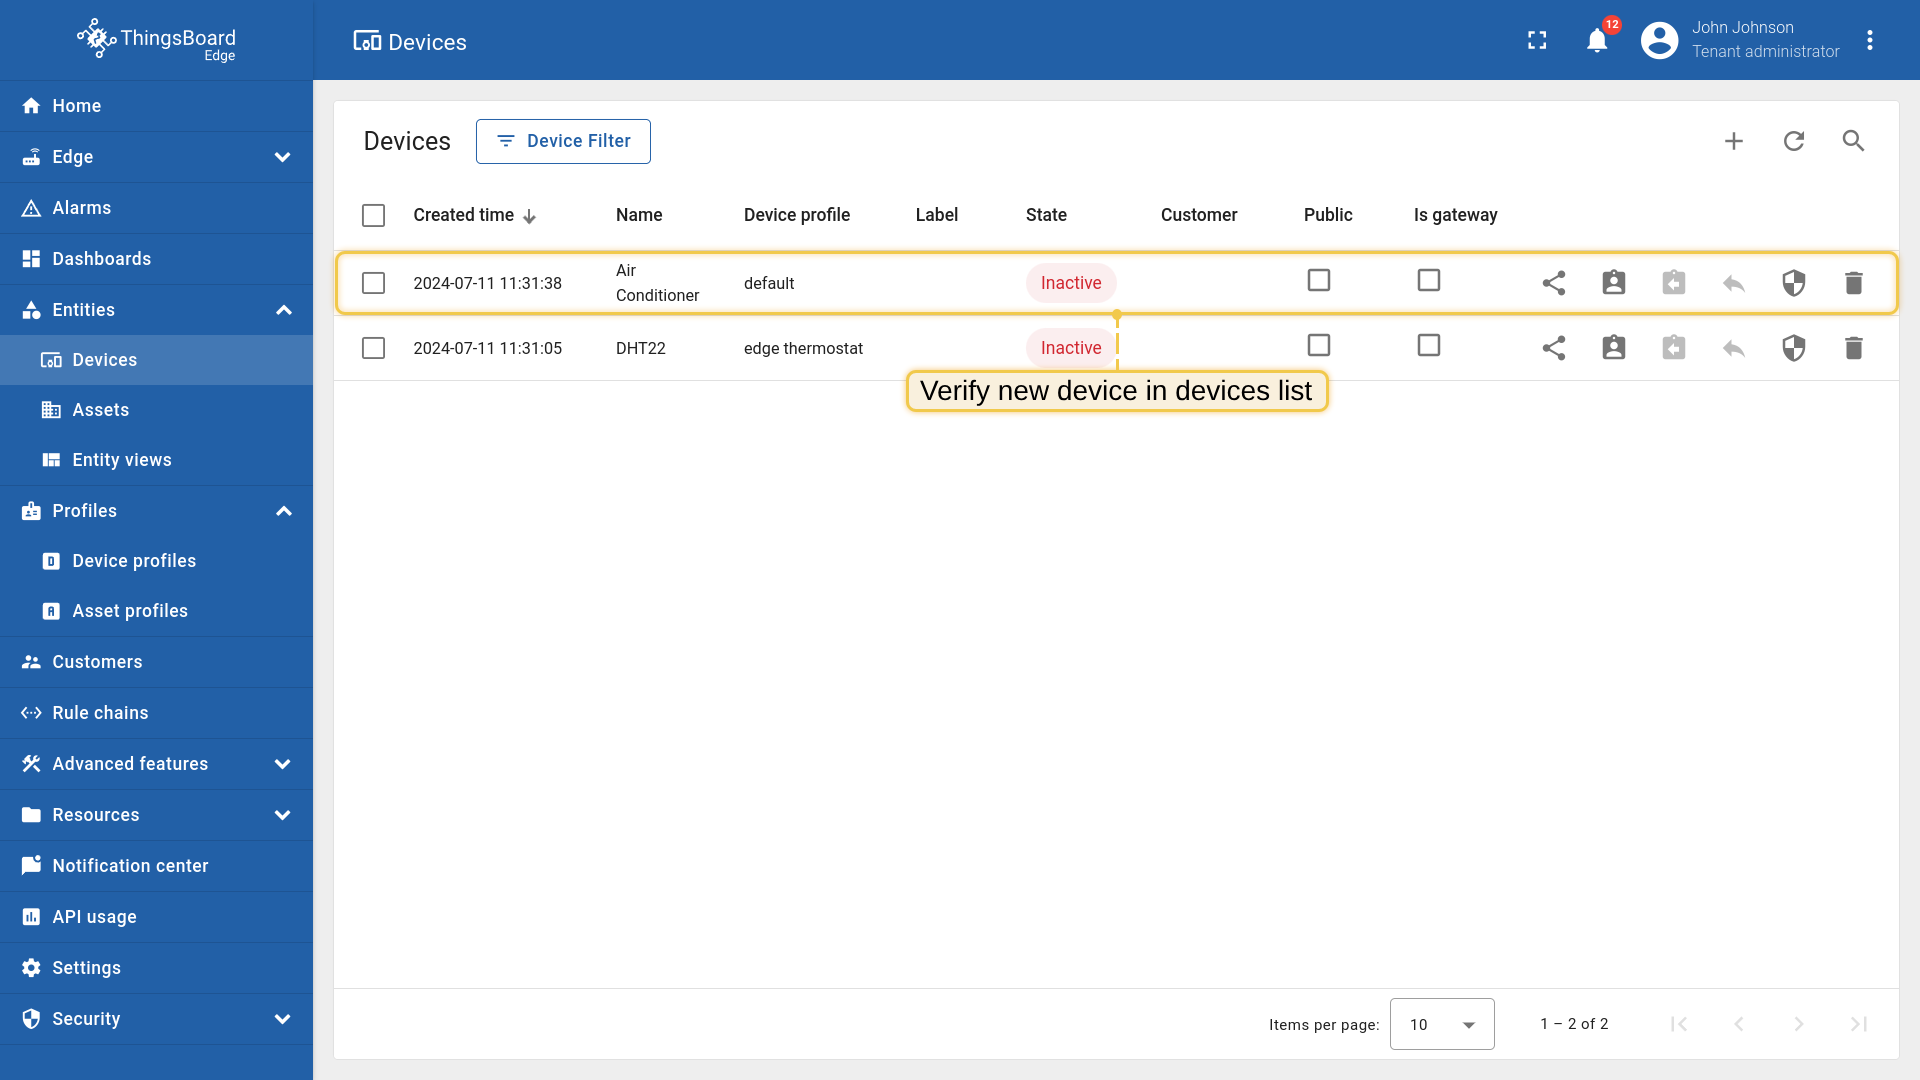
- Make sure that DHT22 and Air Conditioner devices are in the devices list.
- Verify that relation from DHT22 to Air Conditioner was provisioned as well.

Configure edge rule engine to handle alarms and send RPC calls
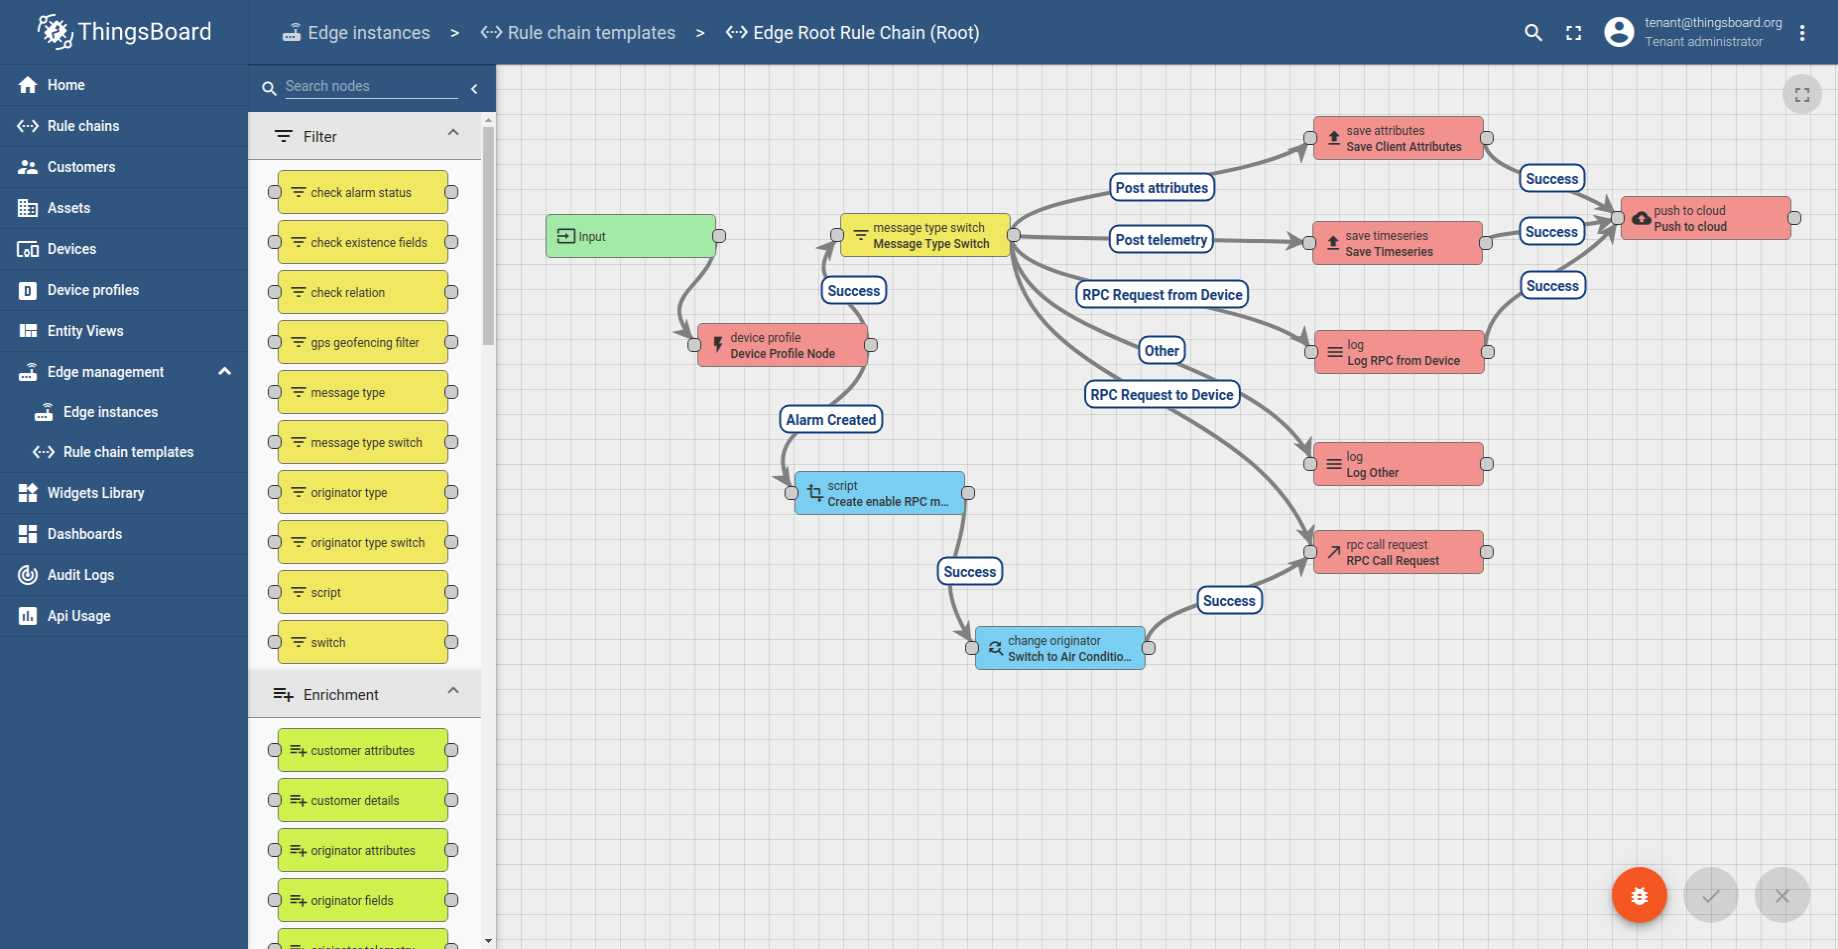
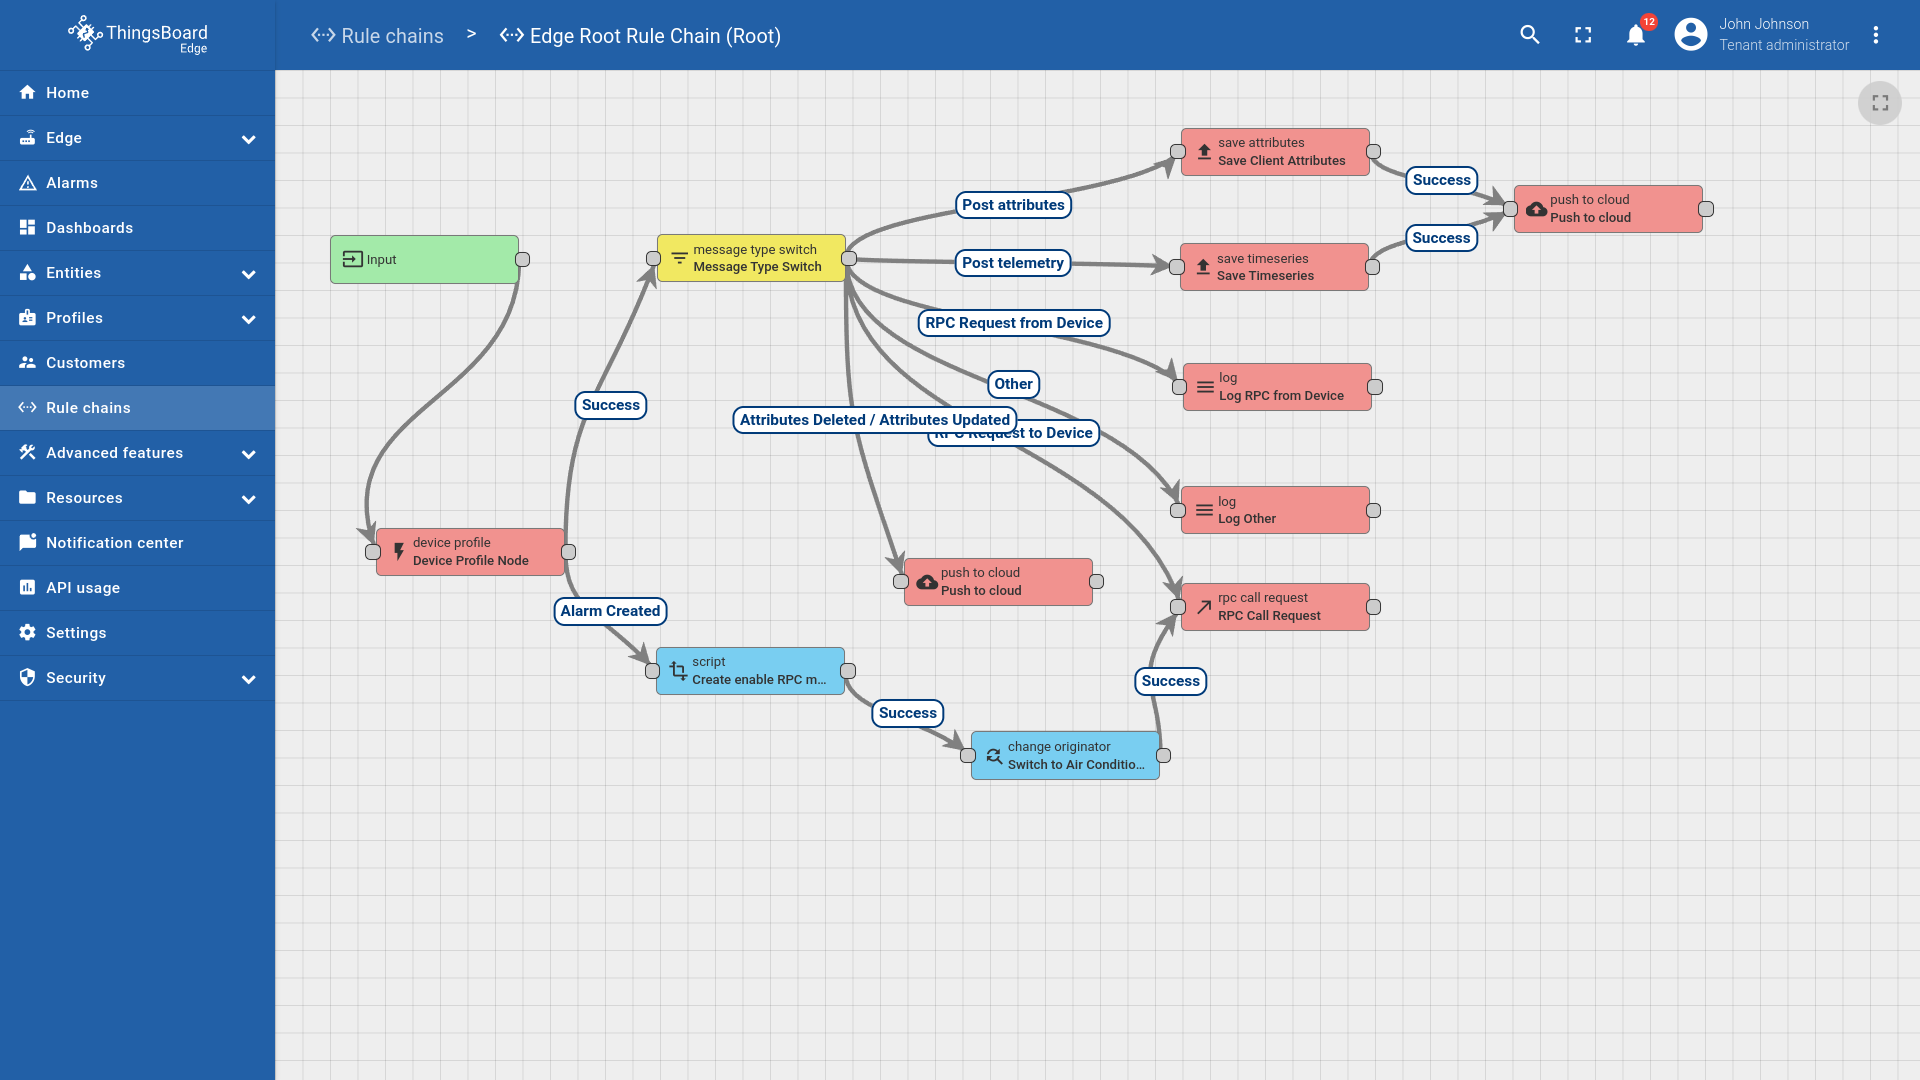
We are going to update “Edge Root Rule Chain” that will handle Alarm Created events for “DHT22” sensor and will send appropriate commands to the “Air Conditioner” device. Here is the final configuration of edge root rule chain:
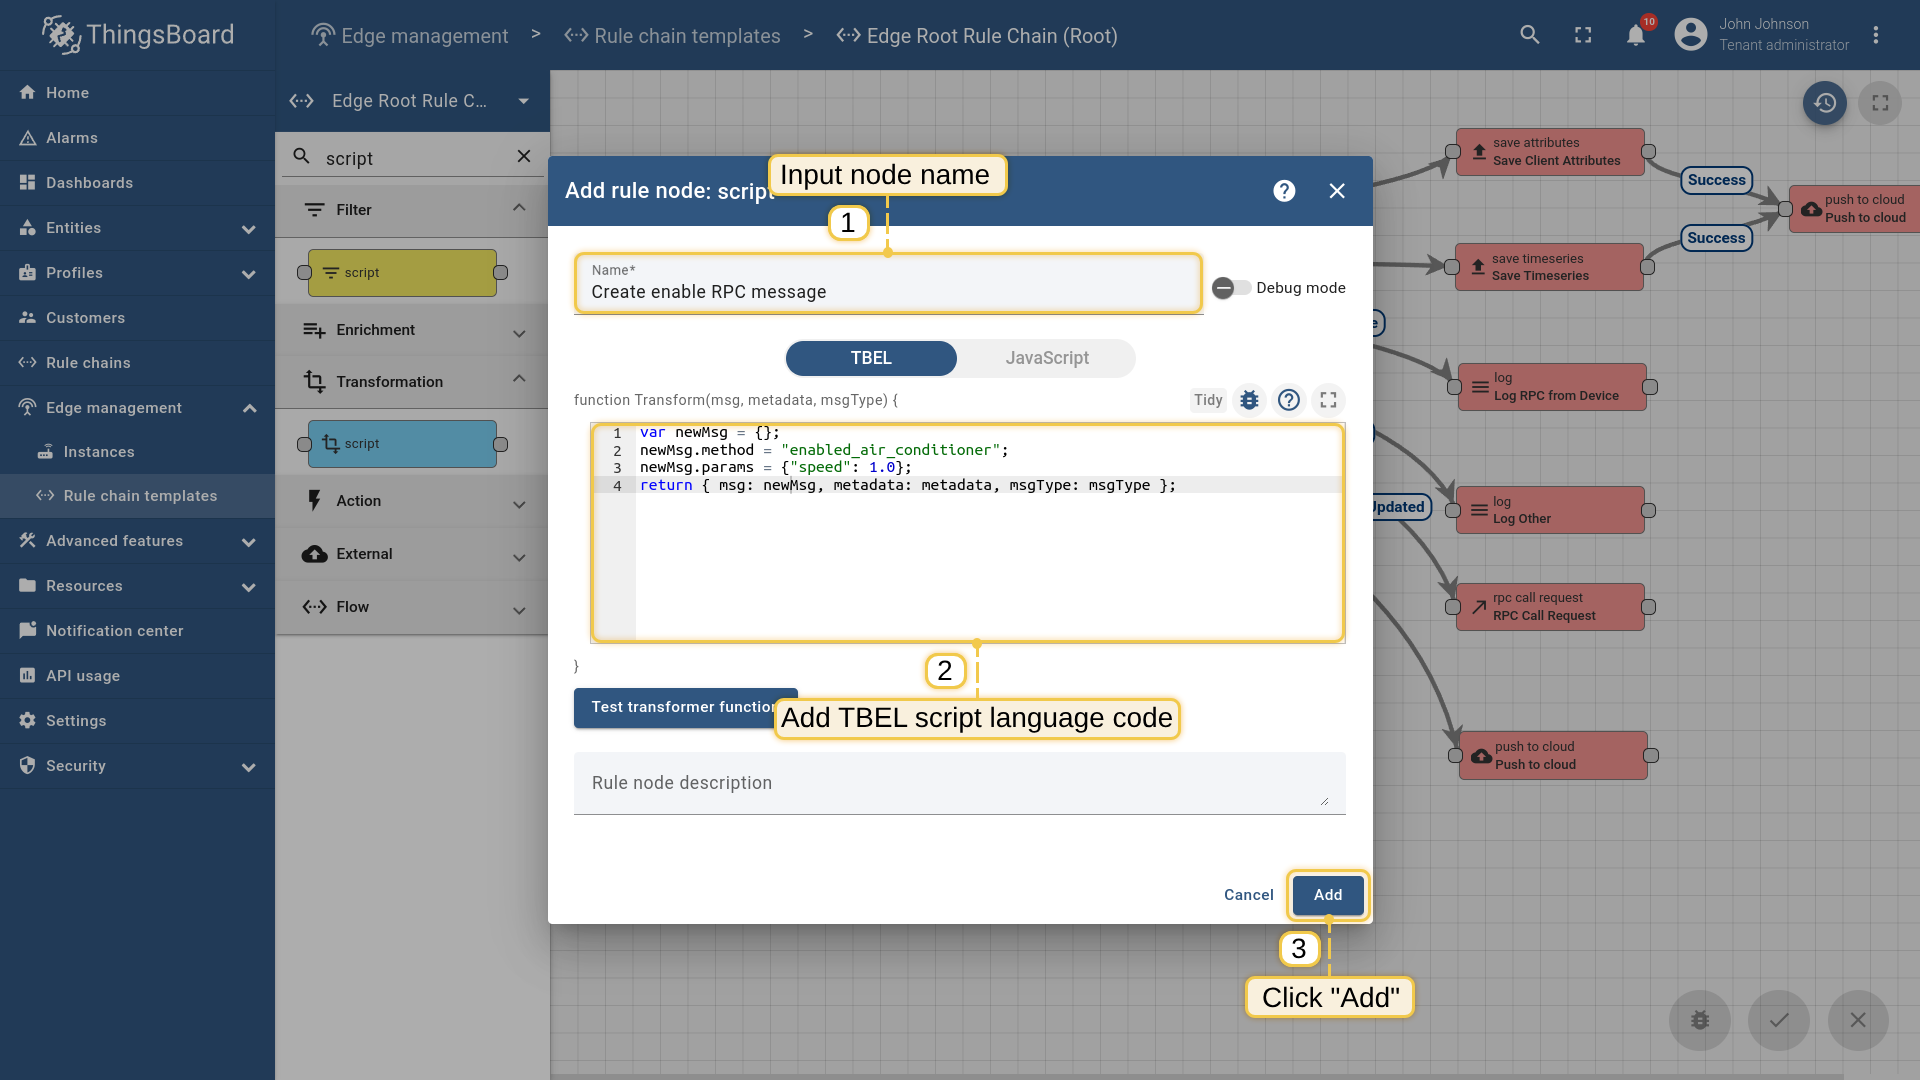
In the next steps we are going to create TBEL script language node to create appropriate RPC commands to the Air Conditioner device. JavaScript for script node that will emulate enabling of Air Conditioner:
1
2
3
4
var newMsg = {};
newMsg.method = "enabled_air_conditioner";
newMsg.params = {"speed": 1.0};
return { msg: newMsg, metadata: metadata, msgType: msgType };
Please use this snippet in the next steps, if required.
Here are the steps to update default edge “Root Rule Chain” to the rule chain above:
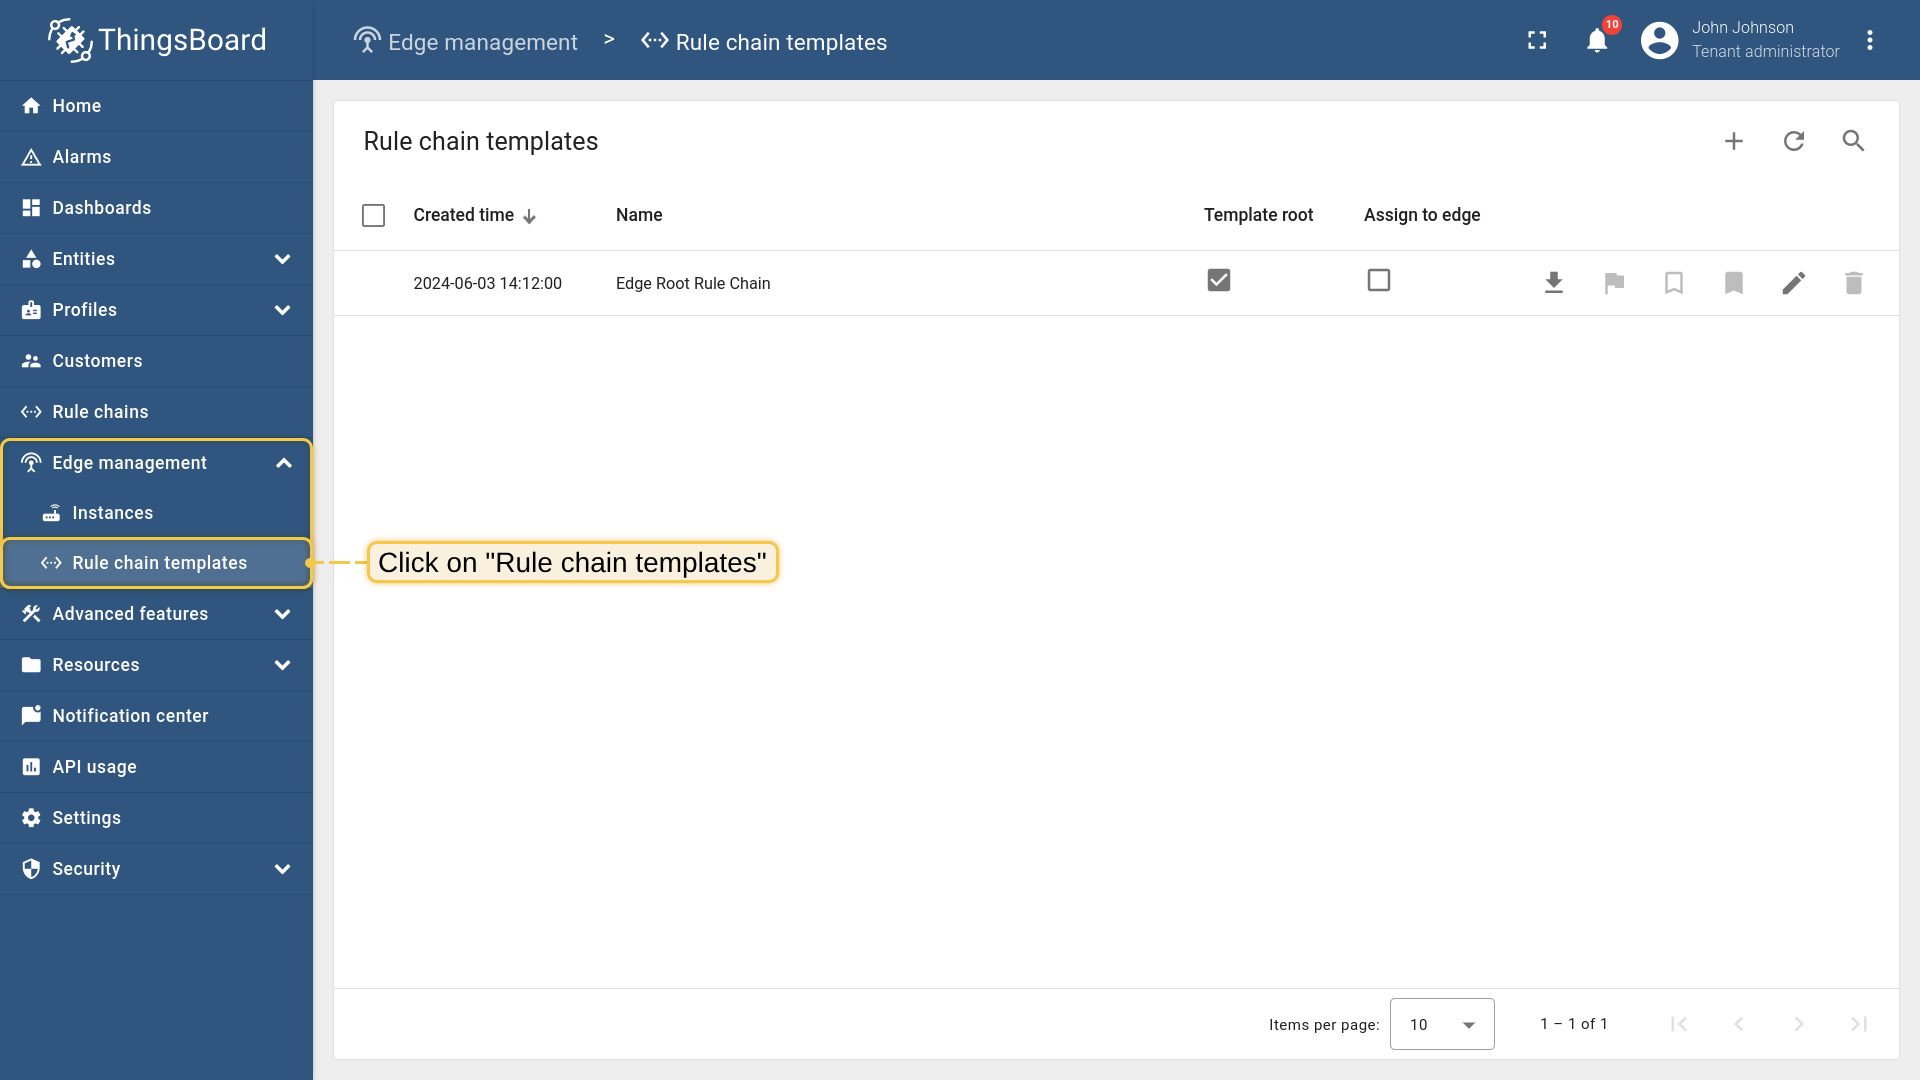
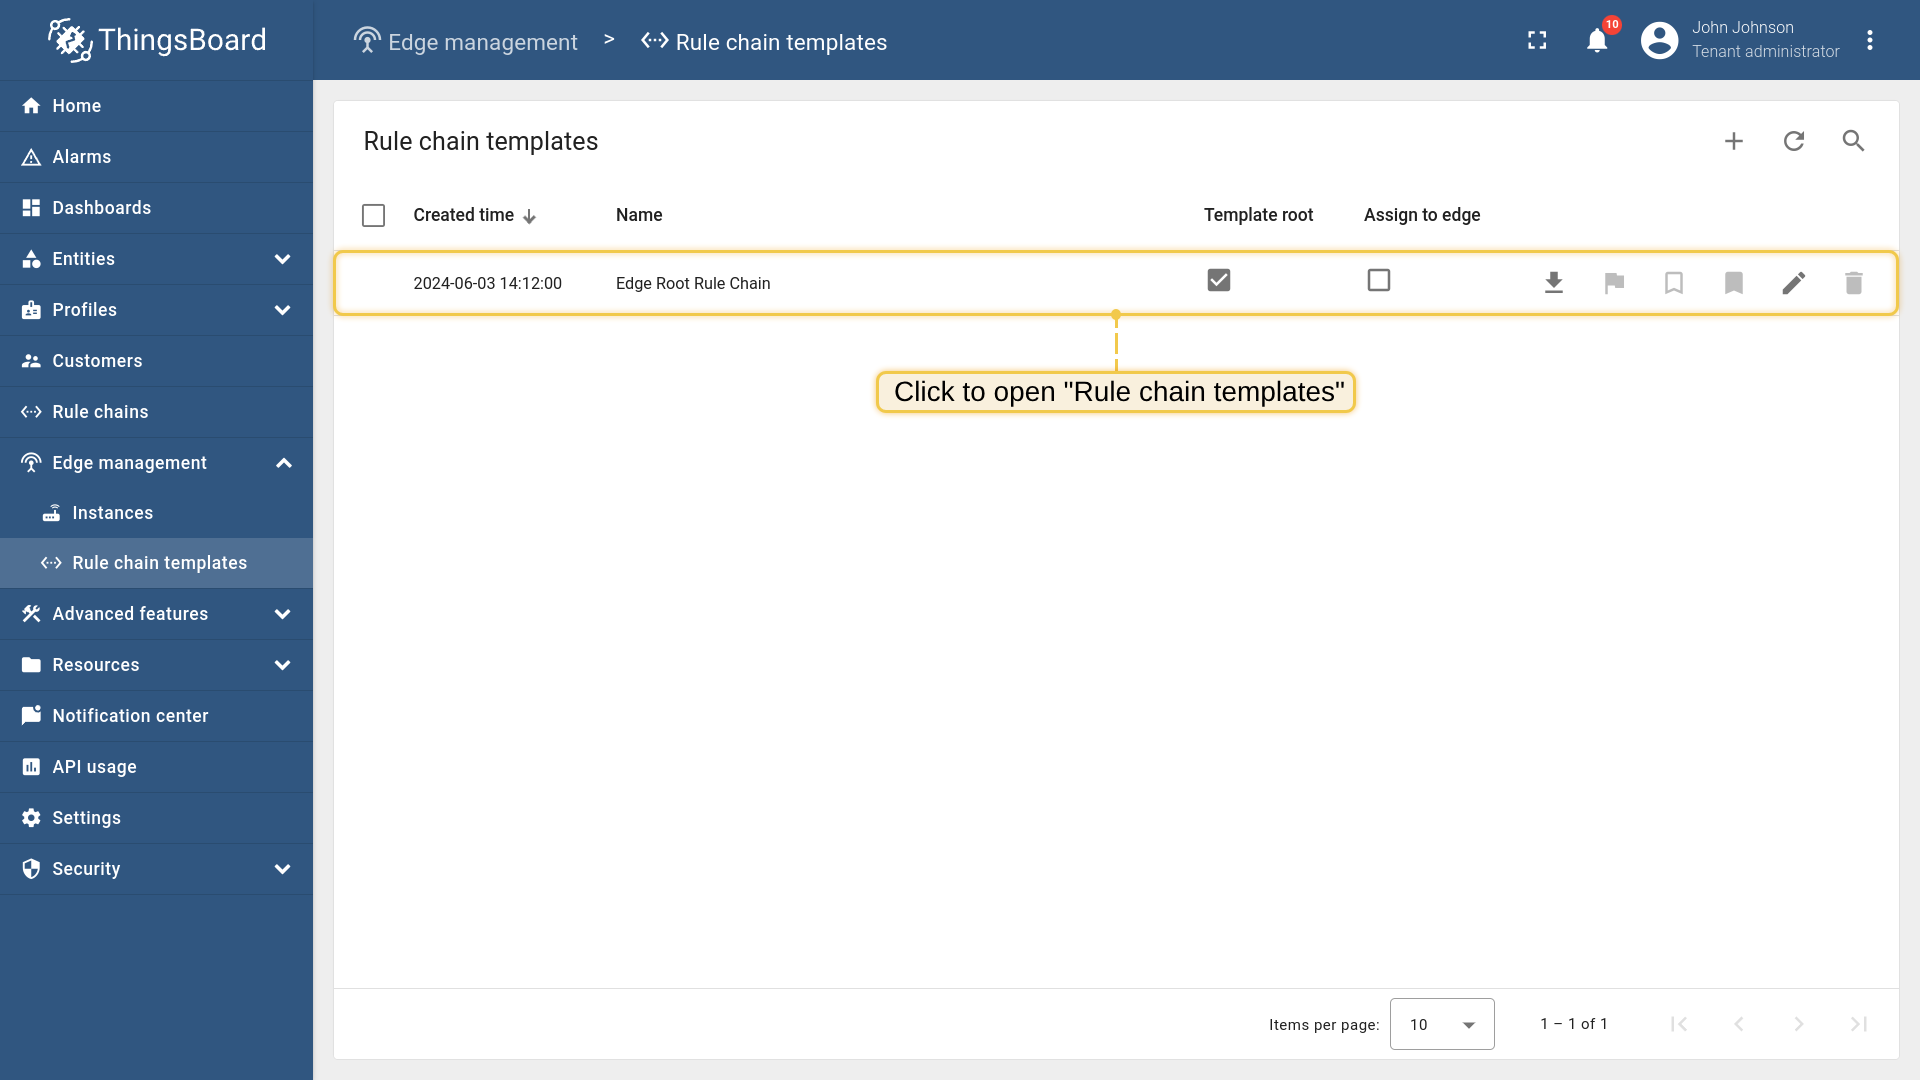
- Login to your ThingsBoard instance and open Rule chain templates menu page.
- Open default Edge Root Rule Chain.
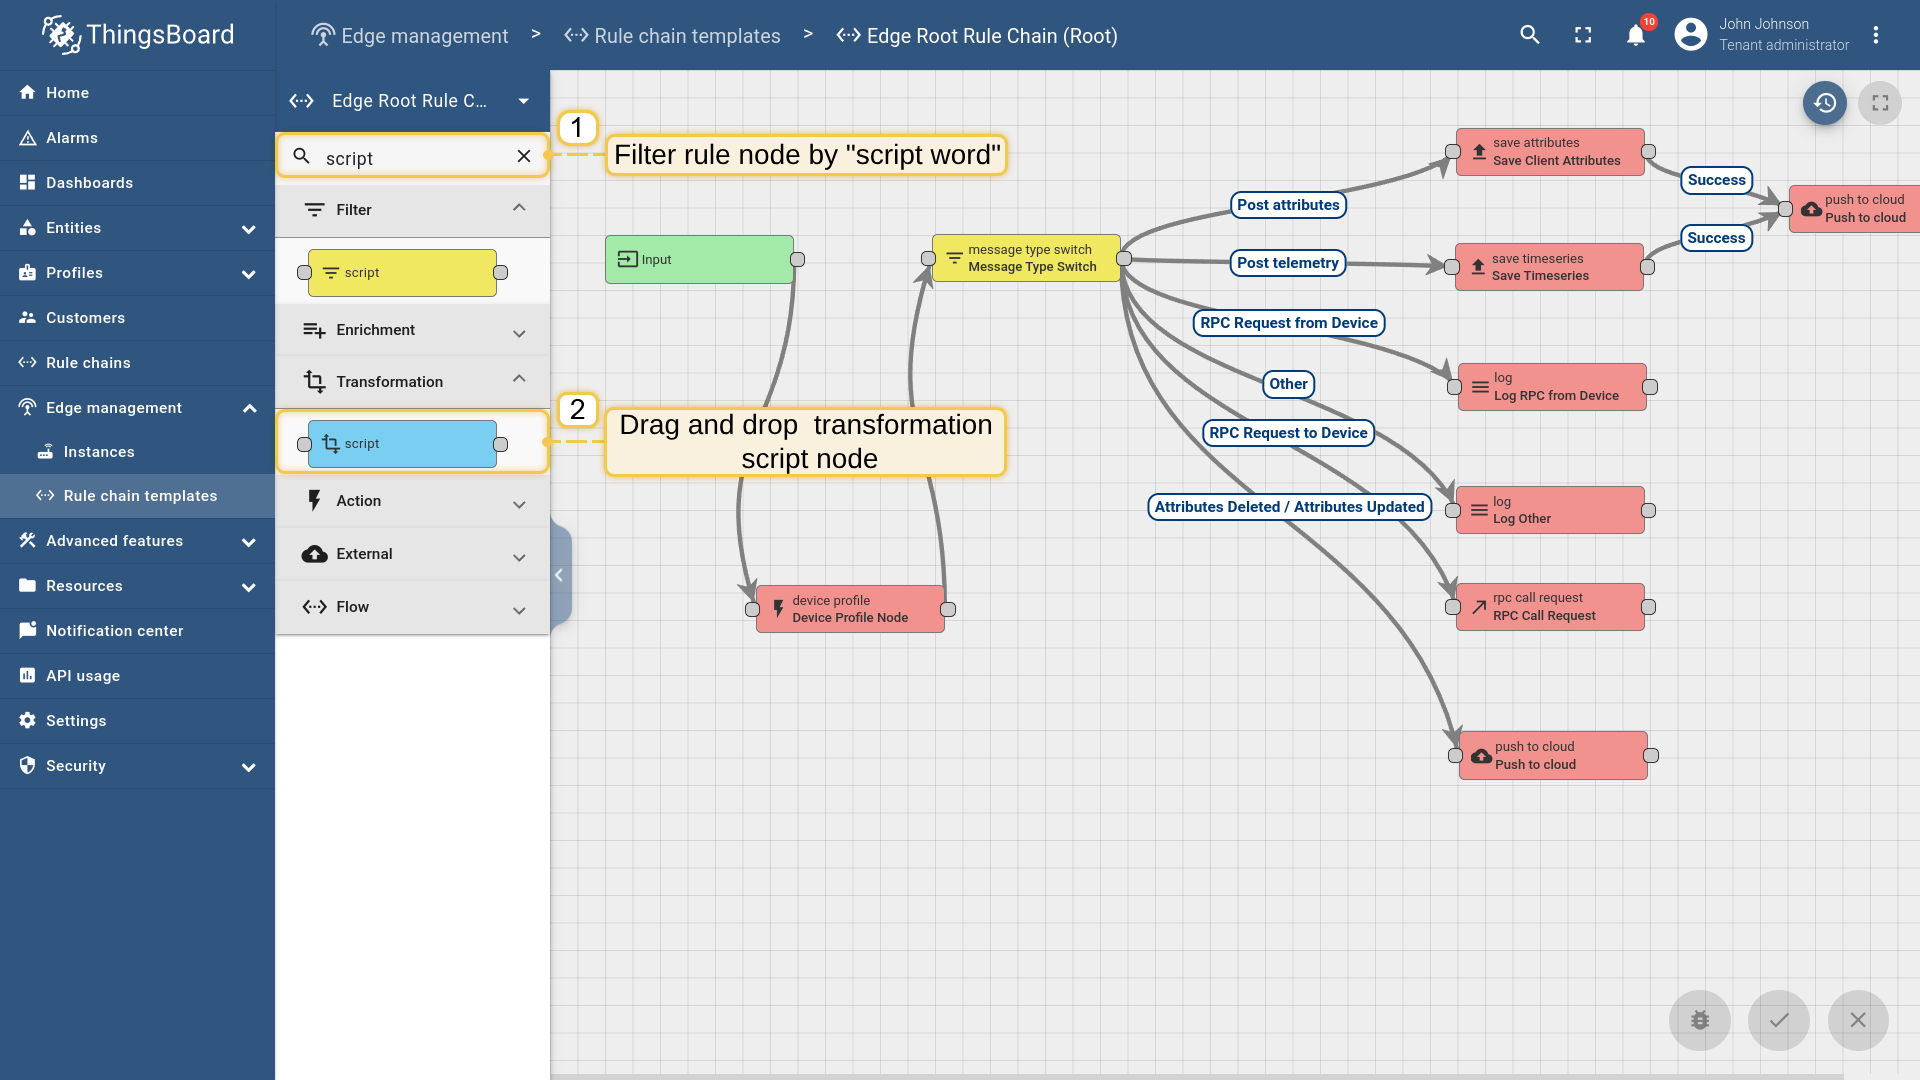
- Filter node by script word and drag script node (Transformation) to rule chain.
- Input node name and add TBEL script language code (you can copy and paste it from the snippet above) to create proper enable command for Air Conditioner device. Click Add to proceed.
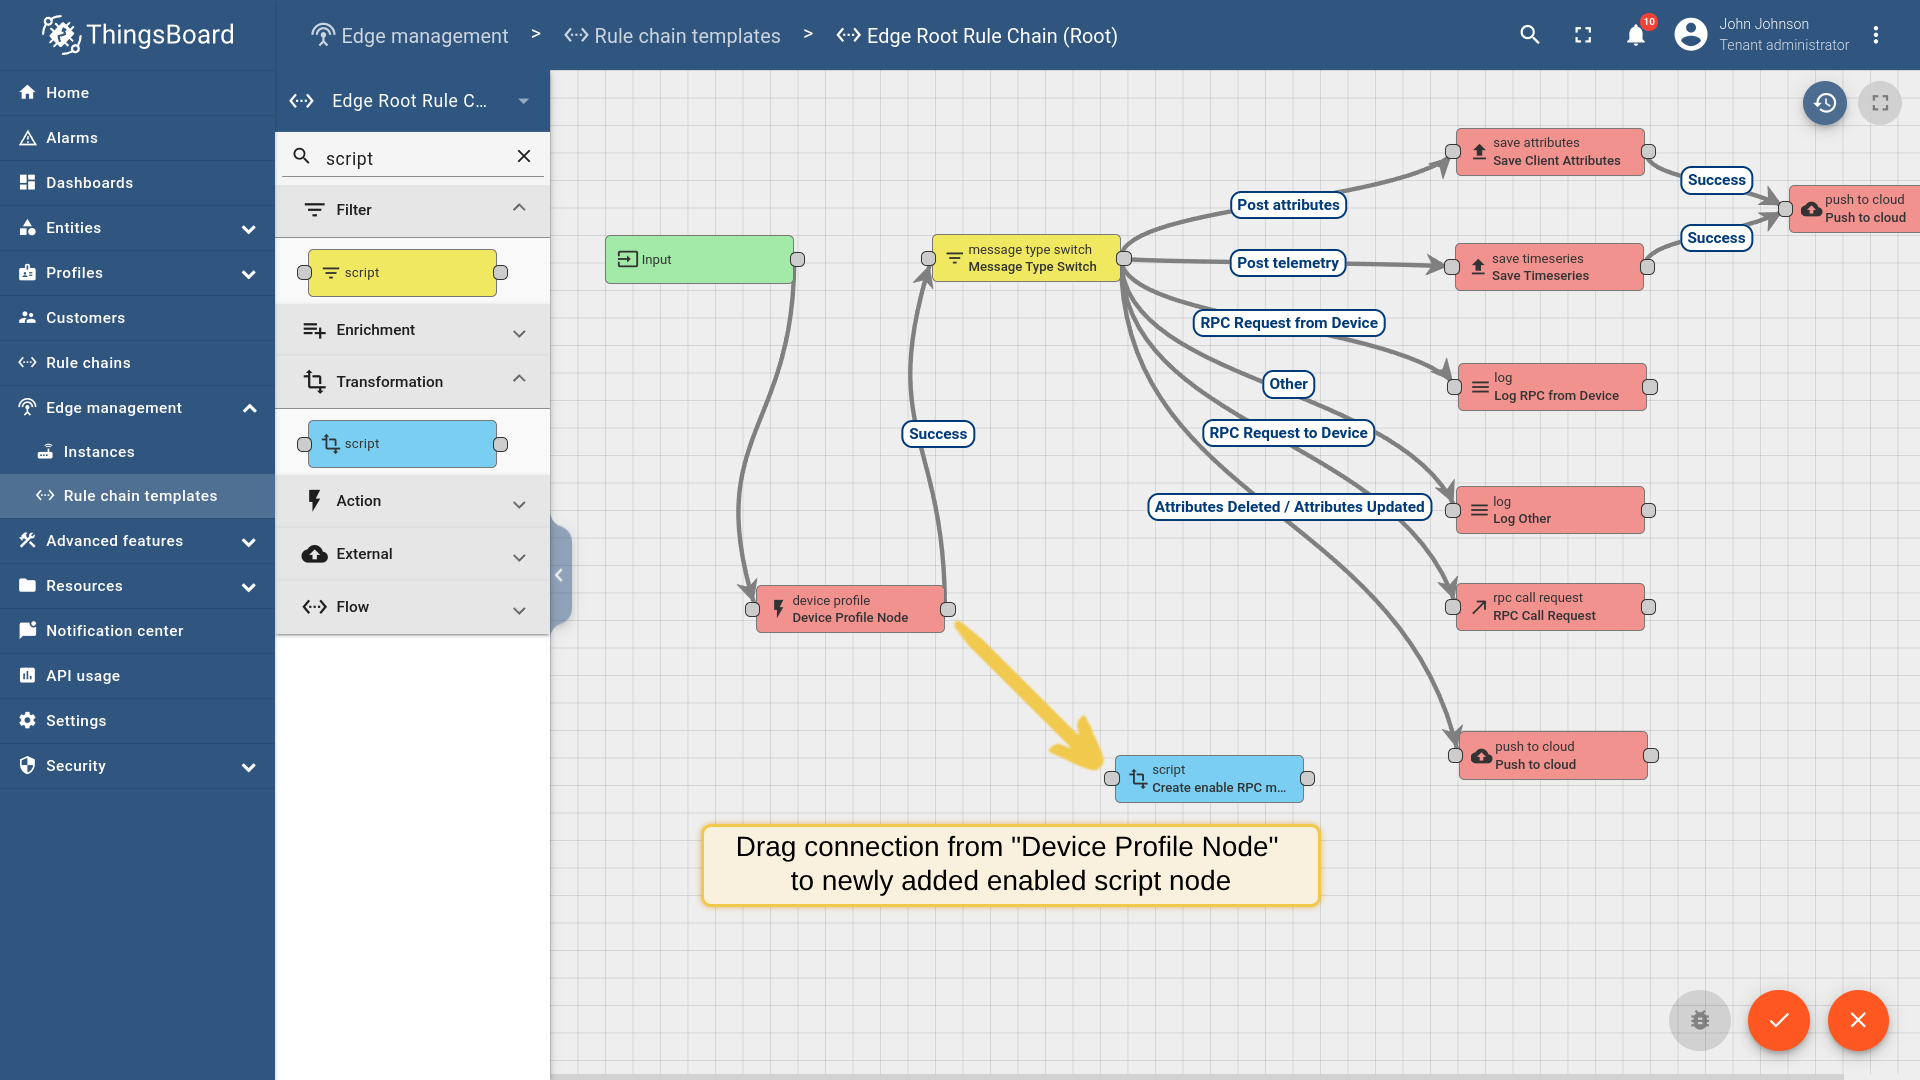
- Drag connection from Device Profile Node to newly added enabled script node.
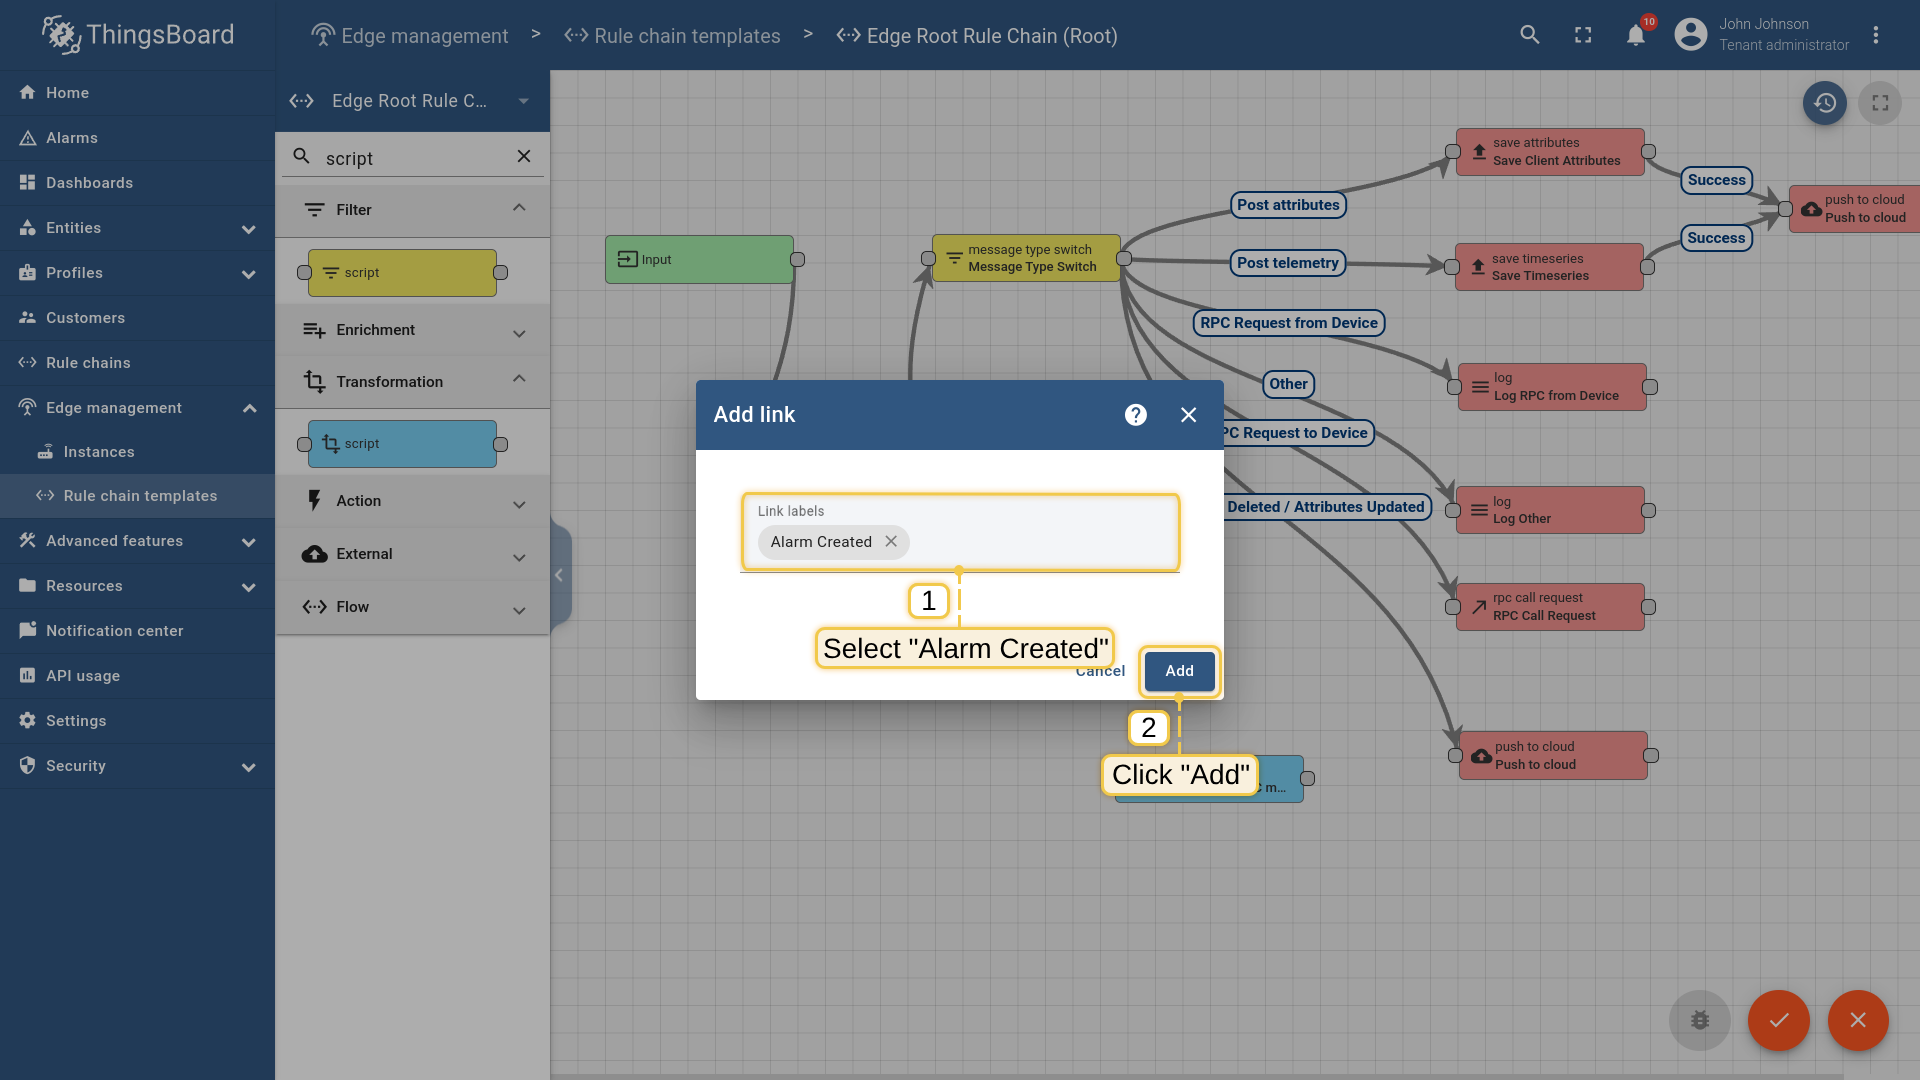
- Select Alarm Created from the list and click on the Add button.
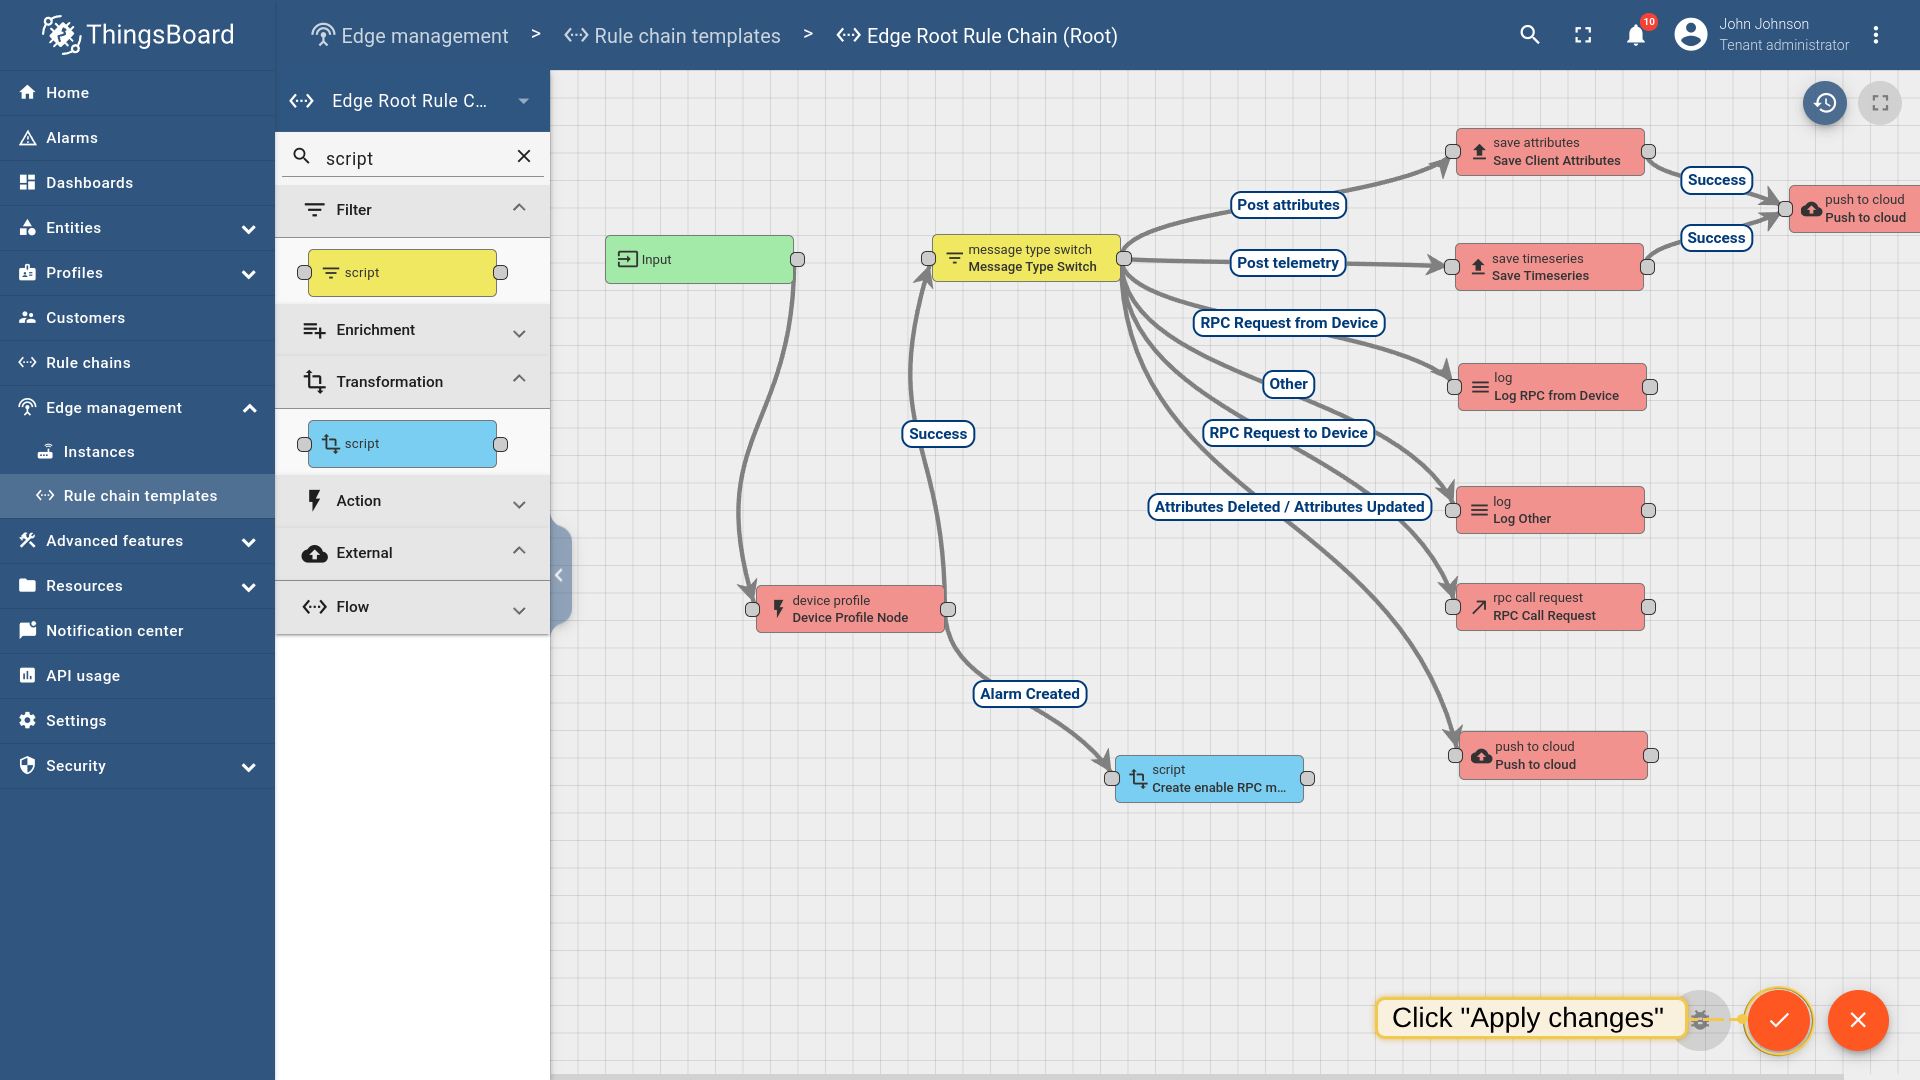
- Click on the Apply changes button to save current progress.
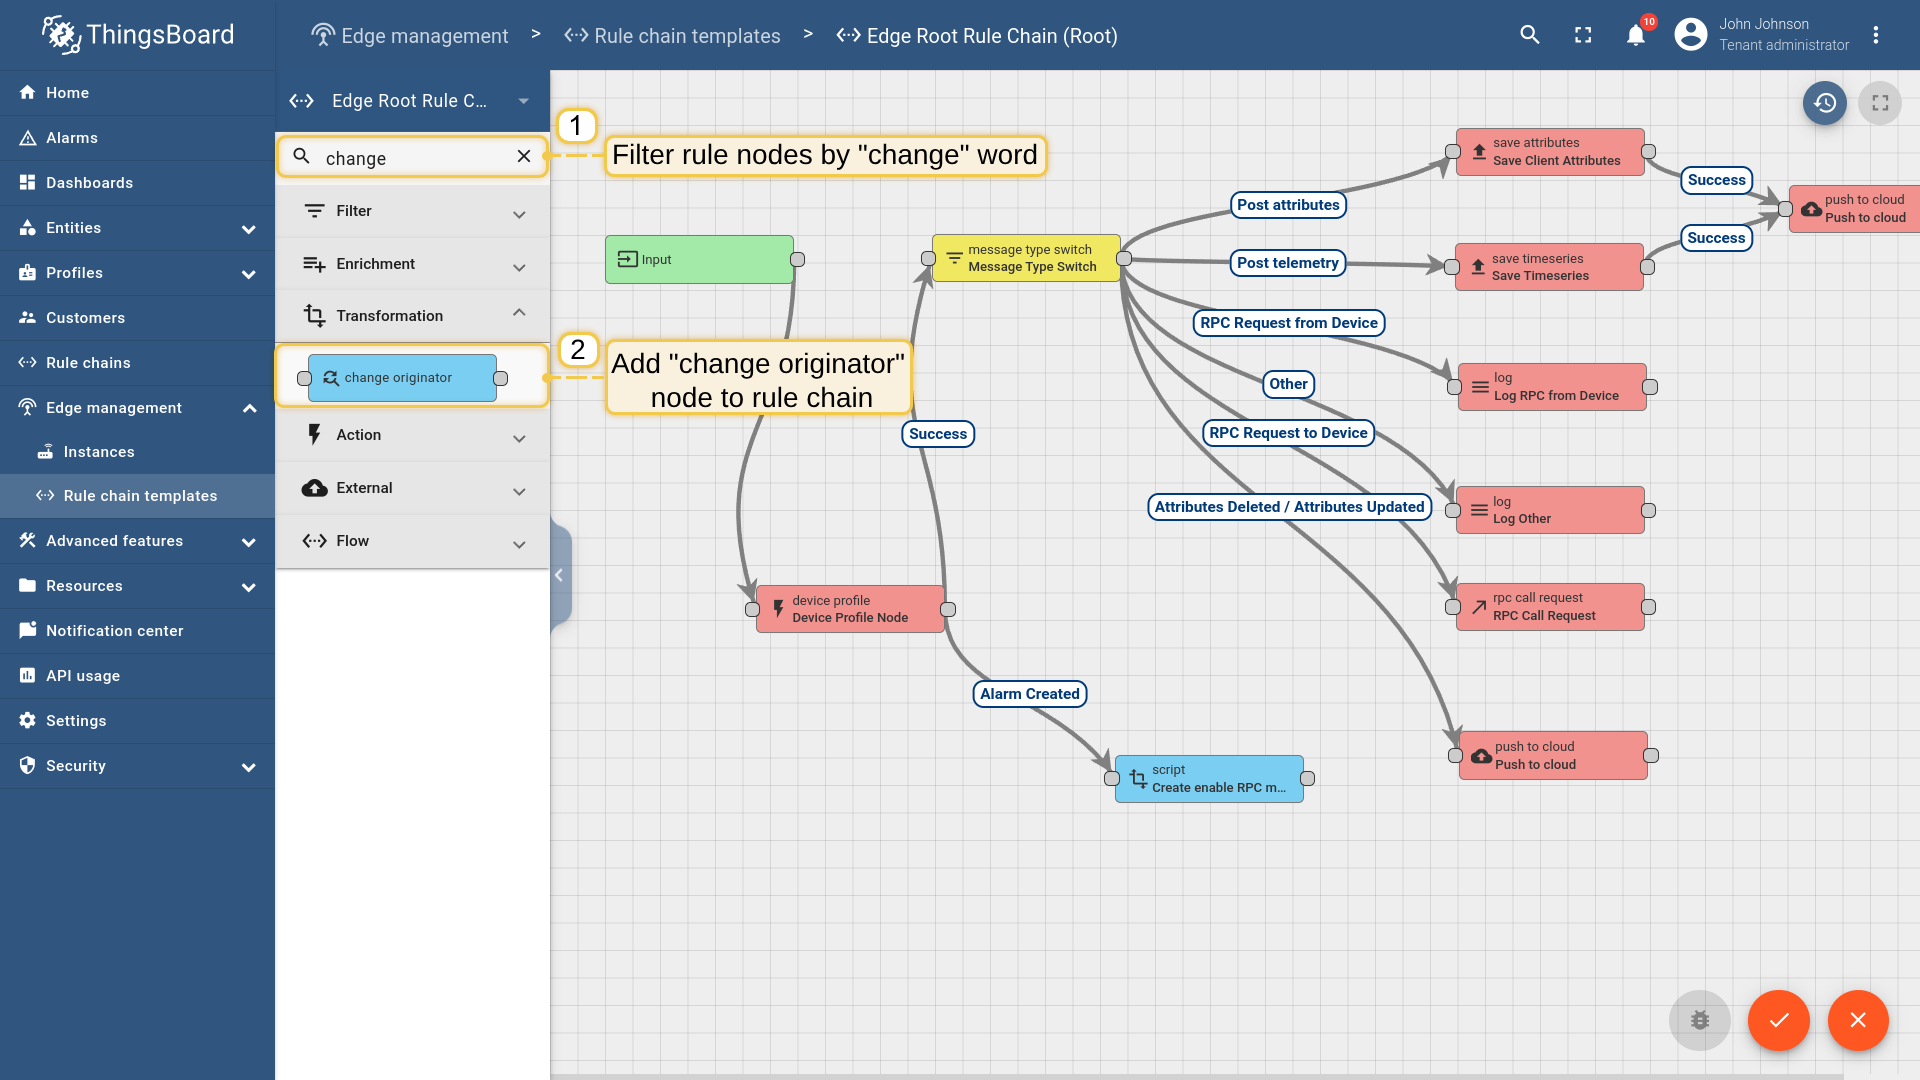
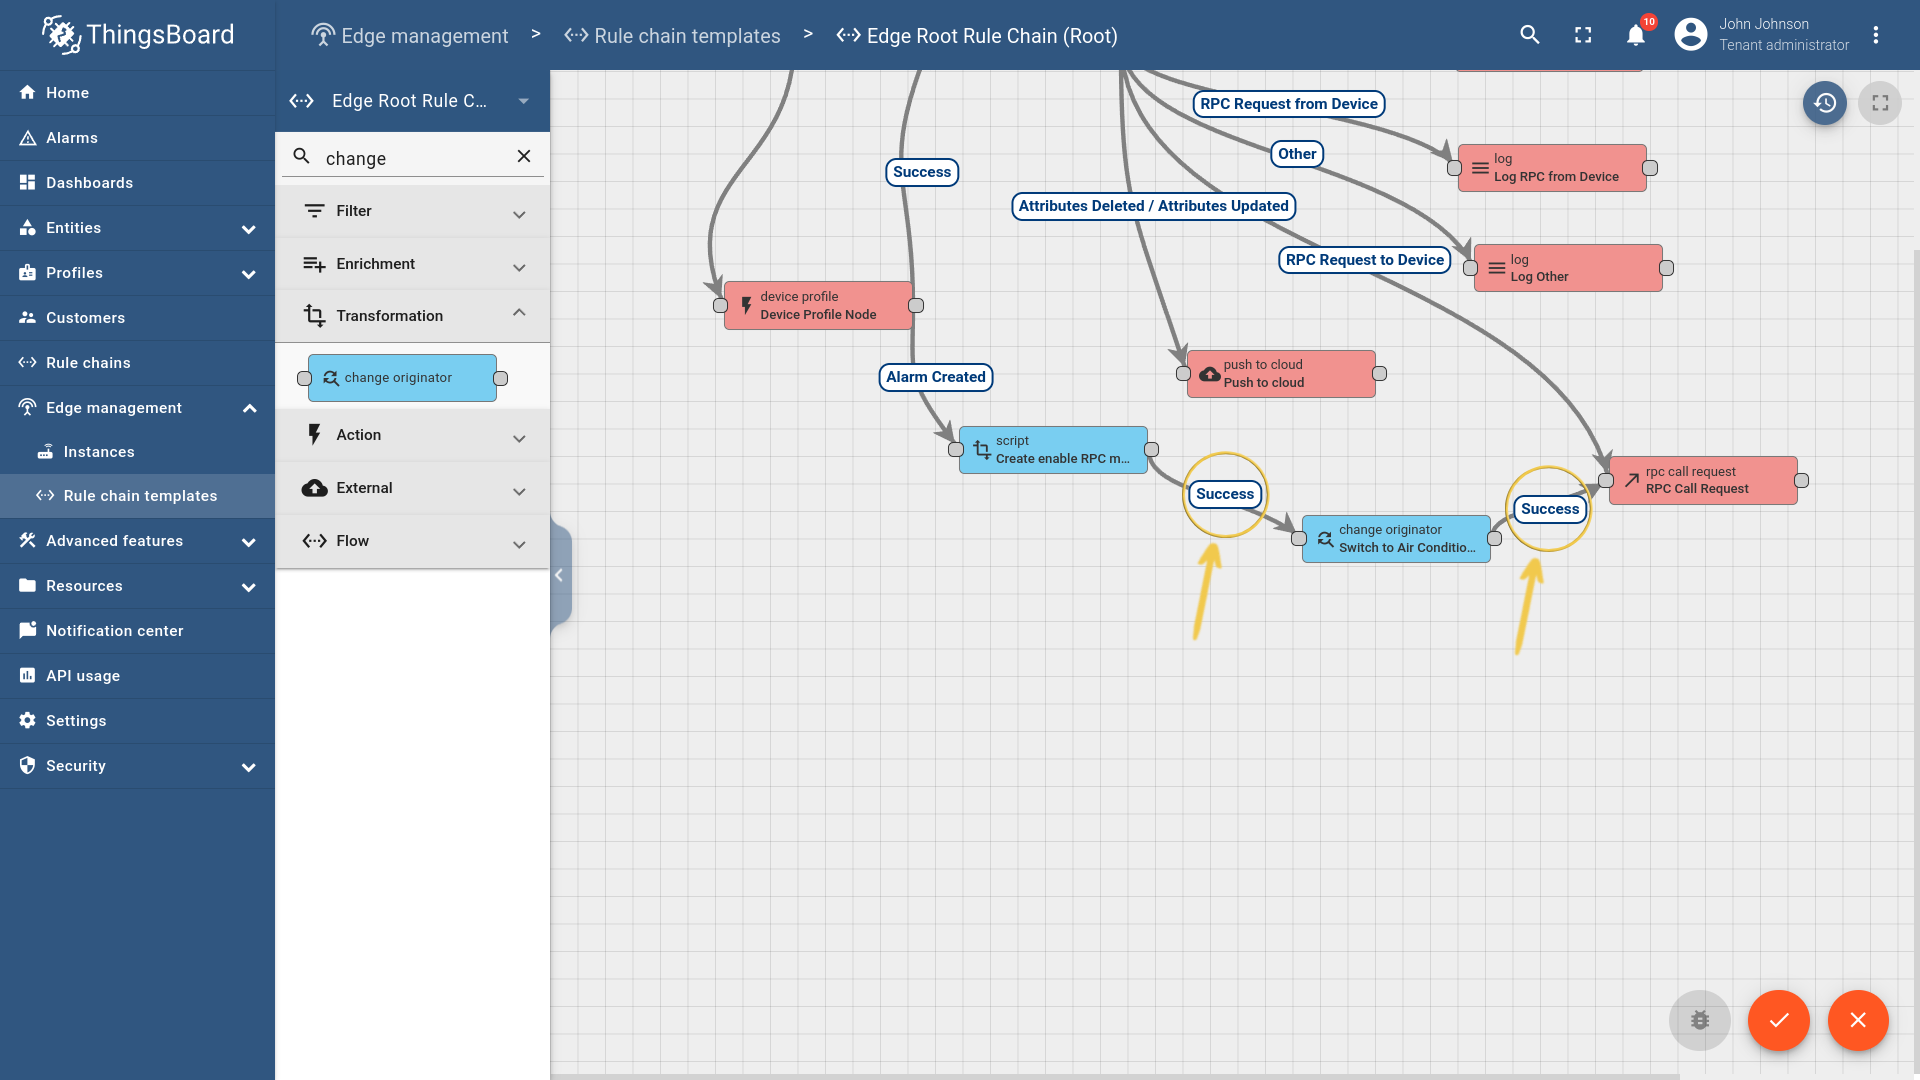
- Filter rule nodes by change word and add change originator node to rule chain.
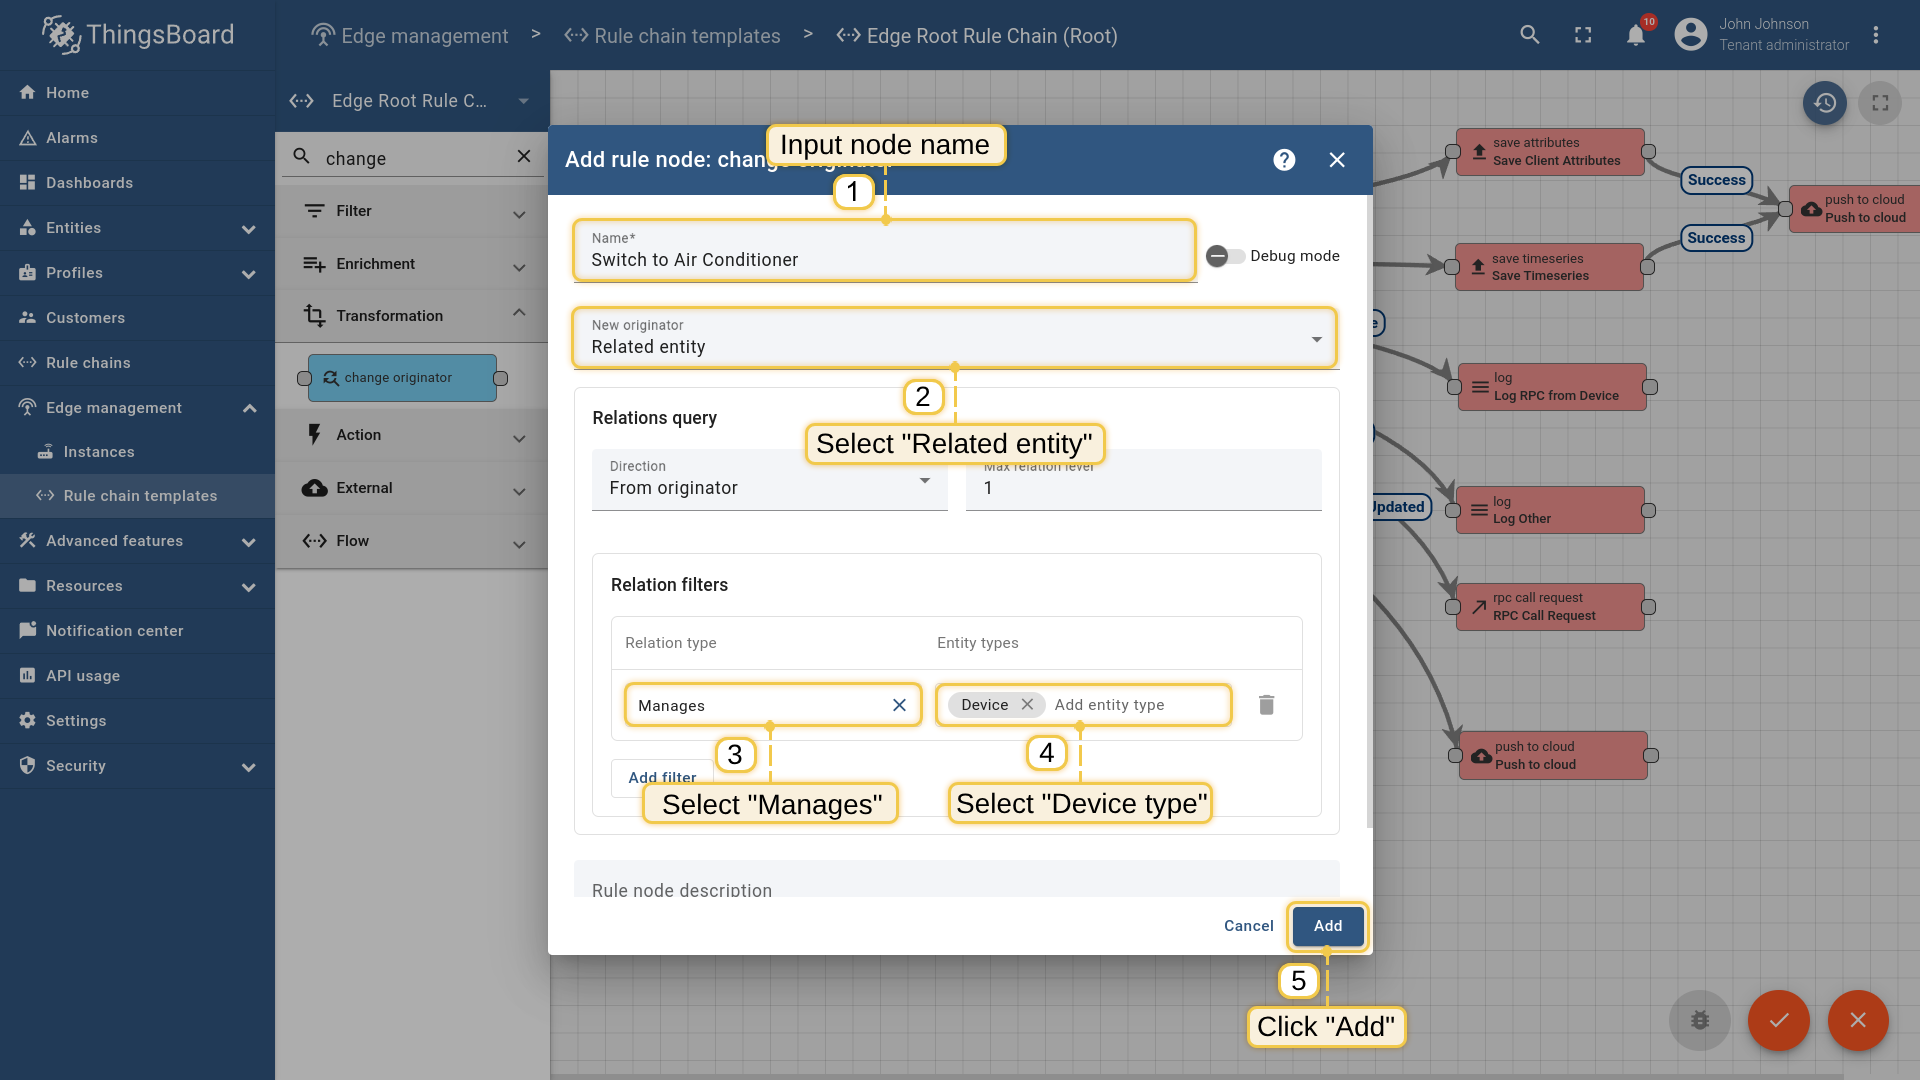
- 1. Input Switch to Air Conditioner. 2. Select Related entity. 3. Select Manages. 4. Select Device type. 5. Click on the "Add" button
- Add Success relations from script node to change originator and Success relation from change originator to RPC Call Request node. Save changes.
Now let’s open ThingsBoard Edge UI to see updated root rule chain:
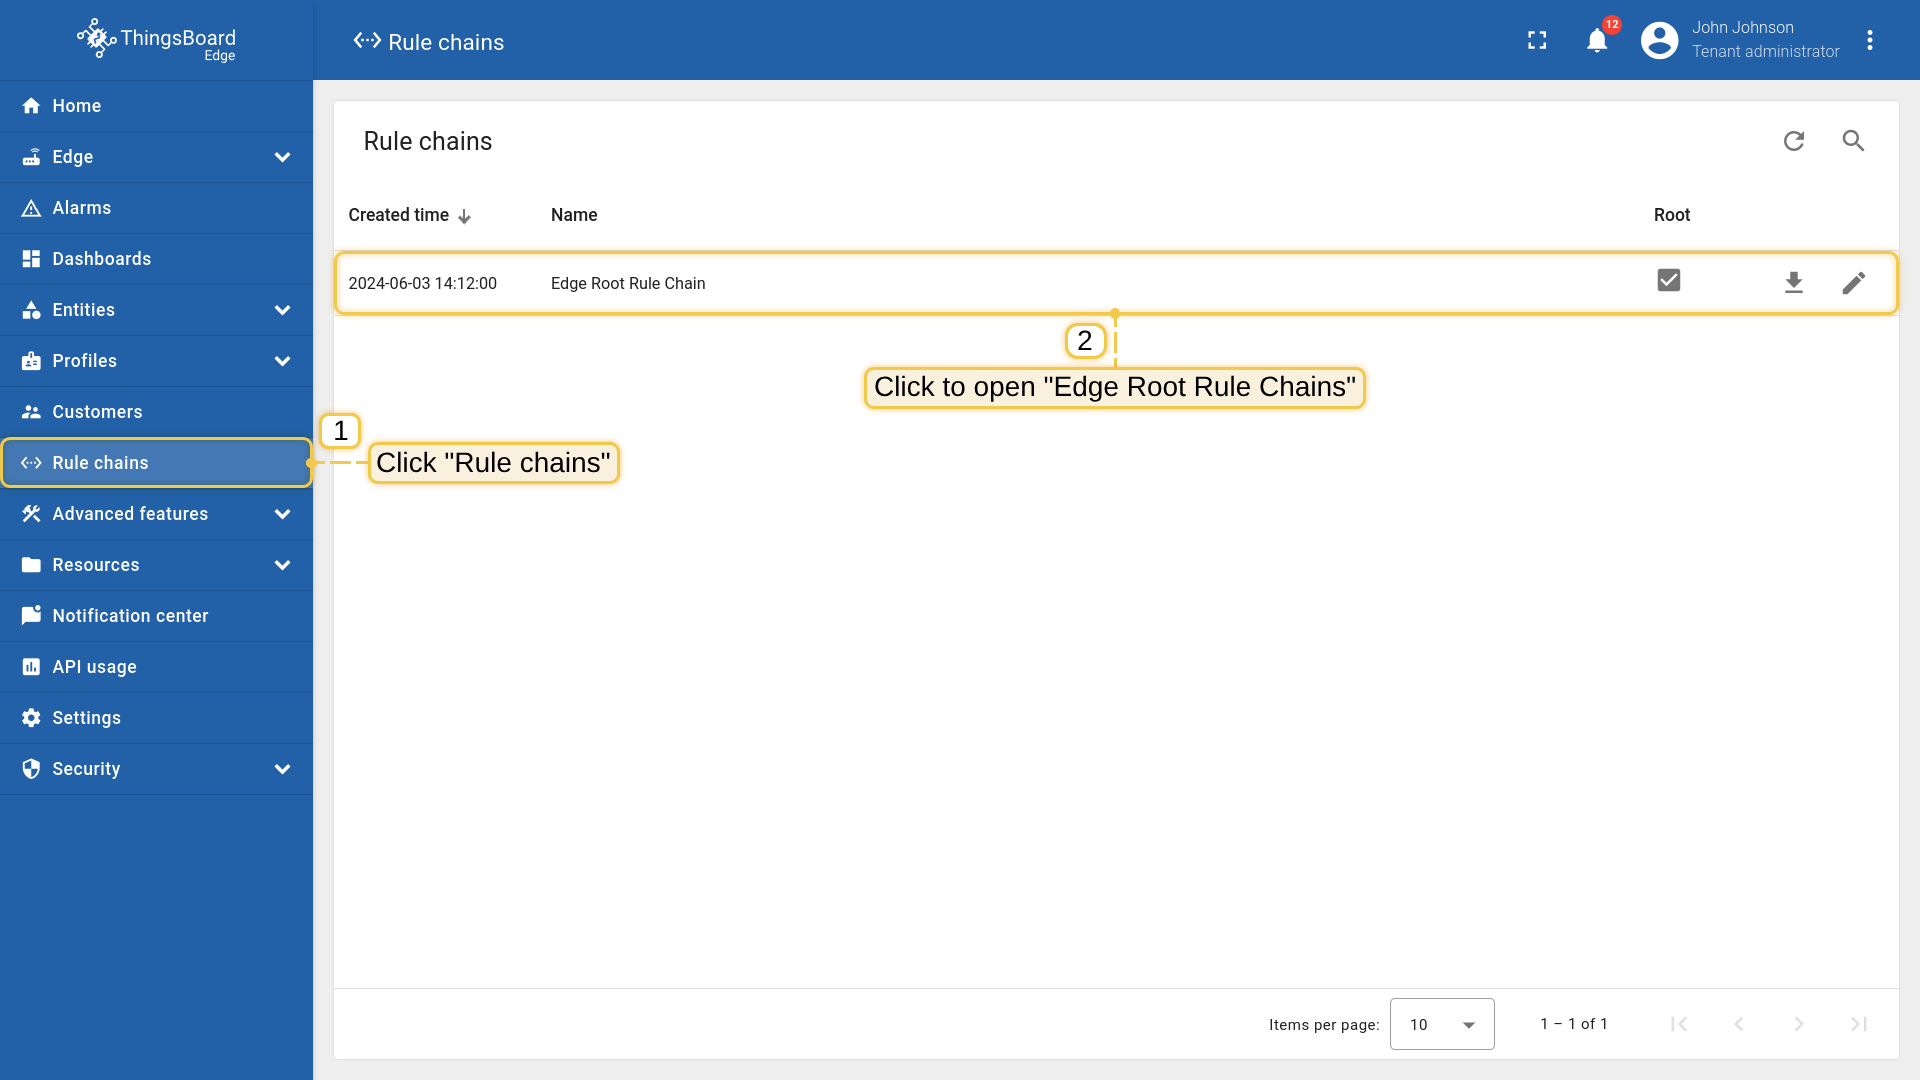
- Login to your ThingsBoard Edge instance and open Rule chains menu page.
- Open Edge Root Rule Chain to verify changes.
Connect “Air Conditioner” to edge and subscribe for RPC commands
To subscribe to RPC commands from edge for the Air Conditioner device you need to get the Air Conditioner device credentials first. ThingsBoard supports different device credentials. We recommend to use default auto-generated credentials which is access token for this guide.
Please open ThingsBoard Edge UI using the URL: EDGE_URL.
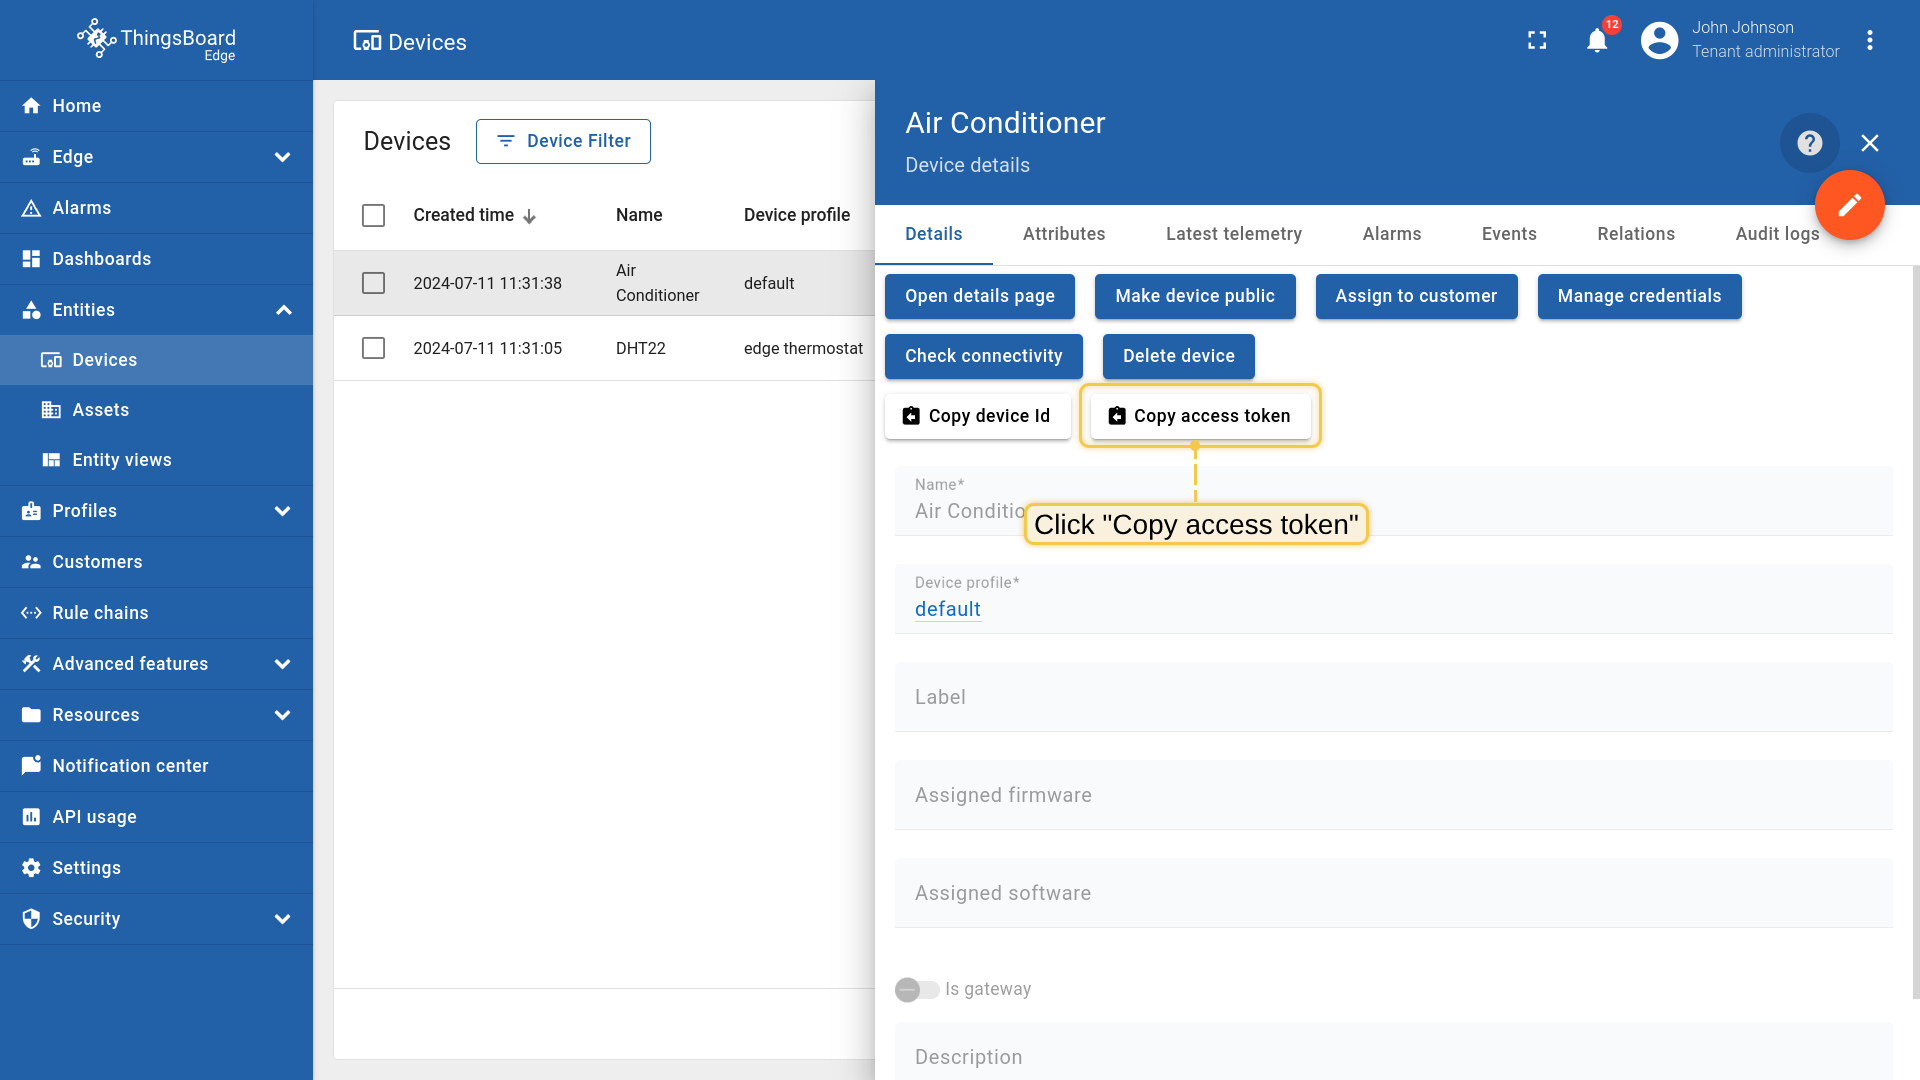
- Open Devices menu page in the ThingsBoard Edge instance.
- Click on the Air Conditioner device row in the table to open device details.
- Click on the Copy access token. Token will be copied to your clipboard. Save it to a safe place.


Now you are ready to subscribe to RPC commands for Air Conditioner device. We will use simple commands to subscribe to RPC commands over MQTT protocol in this example.
Please download following scripts to your local folder:
We assume that you have Node.js and NPM installed on your local PC.
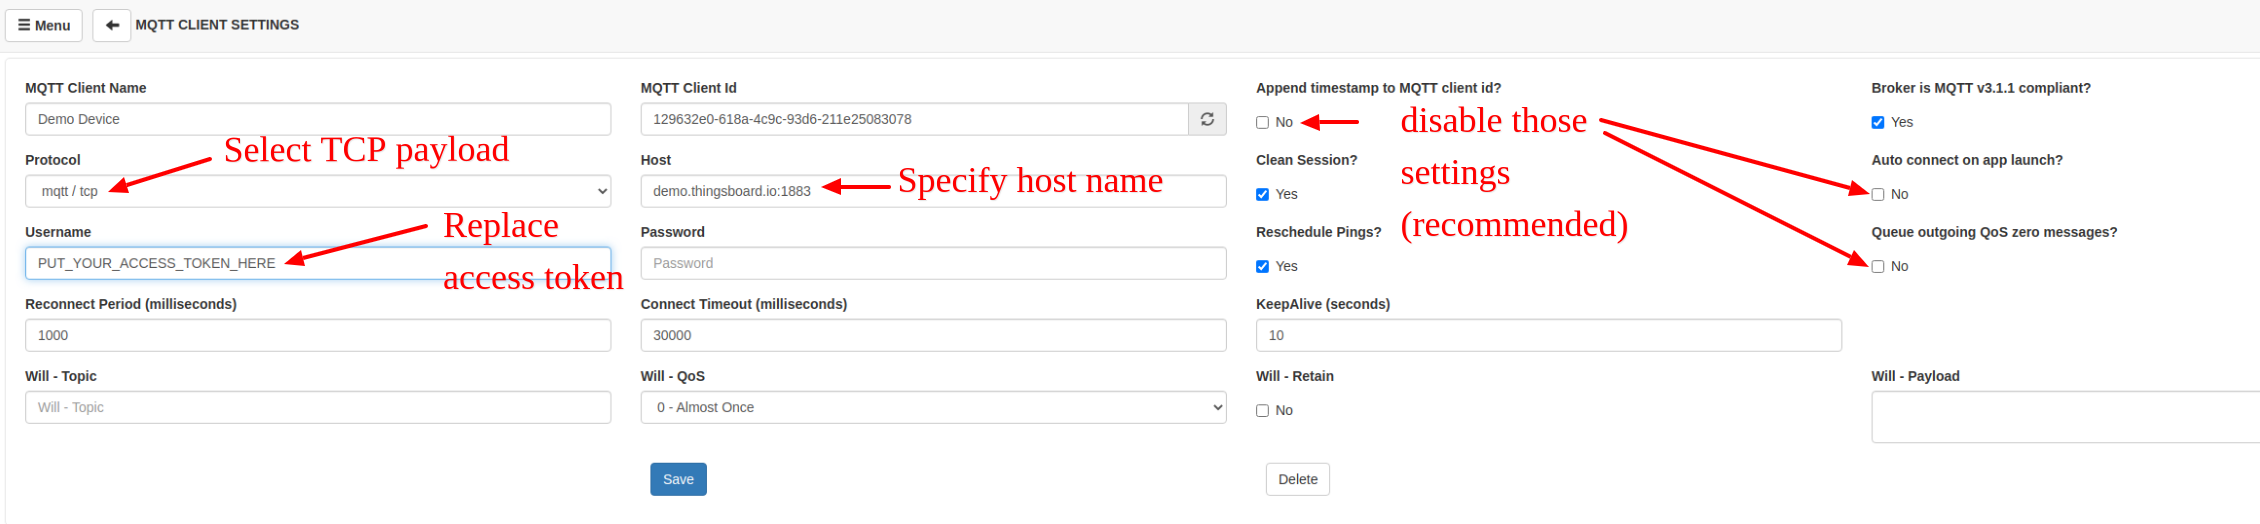
Before running the scripts, please modify mqtt-js.sh accordingly:
-
Replace YOUR_ACCESS_TOKEN with Air Conditioner device access token copied from the steps above.
-
Replace YOUR_TB_EDGE_HOST with your ThingsBoard Edge host. For example, localhost.
-
Replace YOUR_TB_EDGE_MQTT_PORT with your ThingsBoard Edge MQTT port. For example, 11883 or 1883.
Open the terminal, go to the folder that contains mqtt-js.sh and cooler.js scripts and make sure it is executable:
1
 chmod +x *.sh
Install mqtt node module to be able to use mqtt package in the cooler.js script:
1
npm install mqtt --save
Then run the following command:
1
bash mqtt-js.sh
You should see the following screen with your host and device token:
1
2
3
pc@pc-XPS-15-9550:~/alarm-tutorial$ bash mqtt-js.sh
Connecting to: localhost:1883 using access token: sFqoF18PTyViO8L0qo7c
Cooler is connected!
Please open a new terminal tab to push temperature telemetry to device and leave this running in the background until end of the guide.
Post telemetry to “DHT22” sensor to create alarm
To post temperature telemetry to the DHT22 sensor you need to get the DHT22 sensor credentials first. ThingsBoard support different device credentials. We recommend to use default auto-generated credentials which is access token for this guide.
Please open ThingsBoard Edge UI using the URL: EDGE_URL.
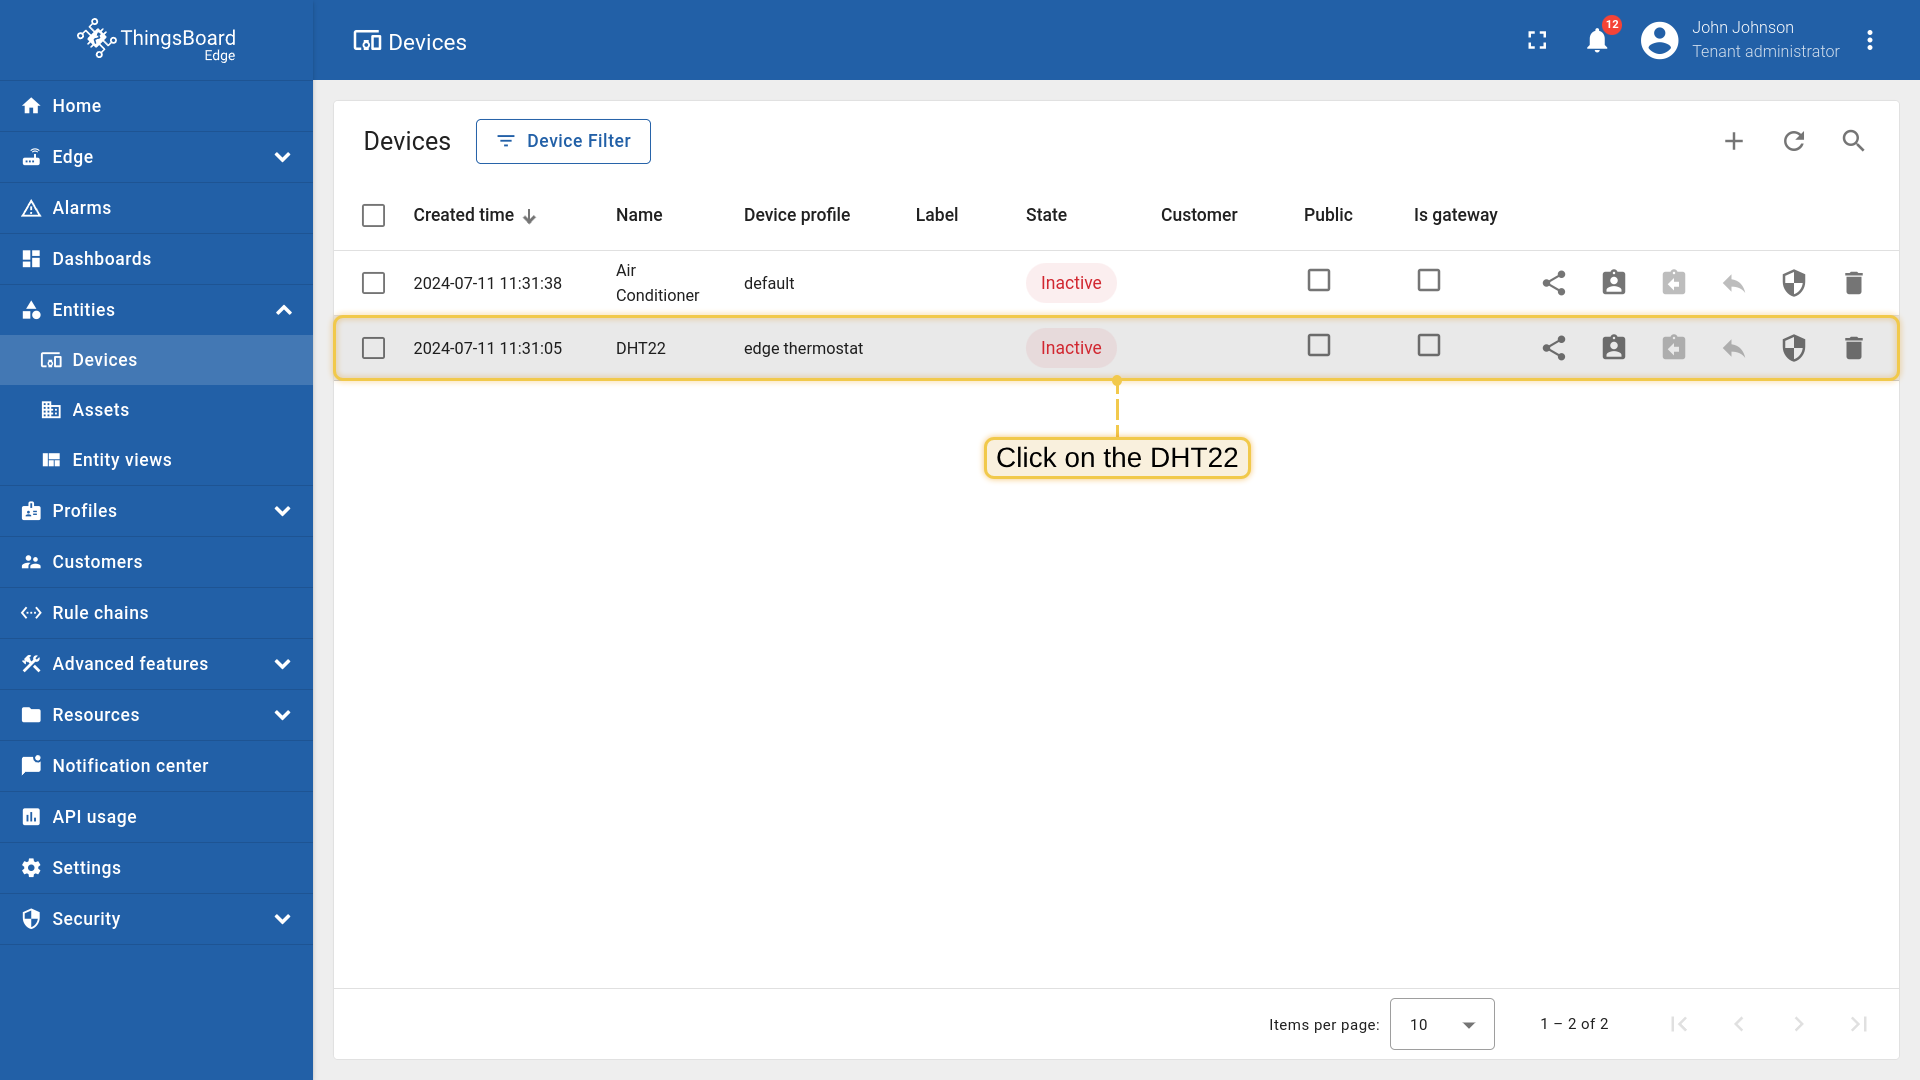
- Open Devices menu page in the ThingsBoard Edge instance.
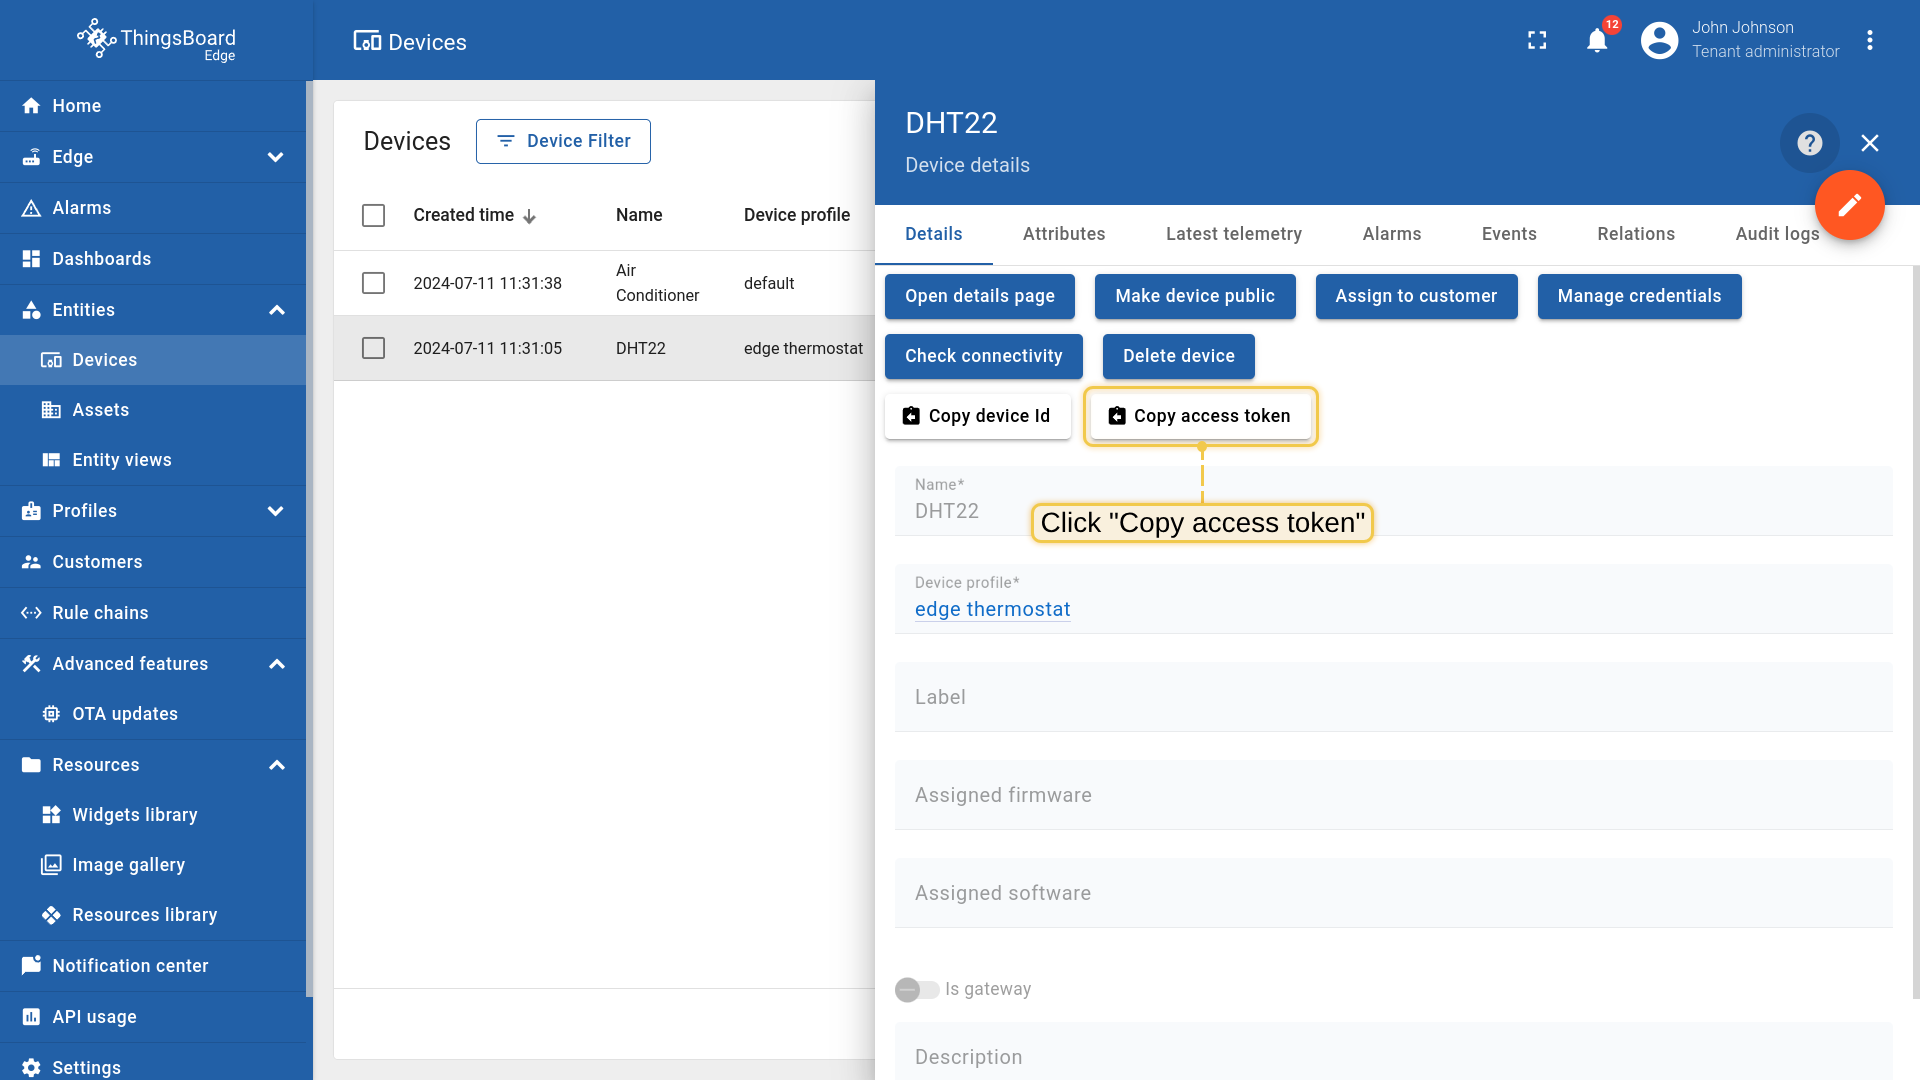
- Click on the DHT22 device row in the table to open device details.
- Click on the Copy access token. Token will be copied to your clipboard. Save it to a safe place.
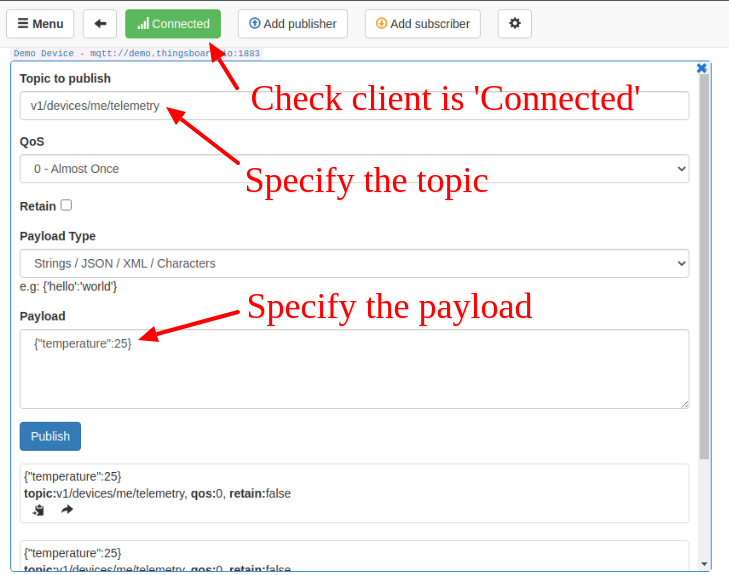
Now you are ready to publish temperature telemetry data on behalf of your device. We will use simple commands to publish temperature data over HTTP or MQTT in this example.
Install cURL for Ubuntu: Install cURL for macOS: Install cURL for Windows: Starting Windows 10 b17063, cURL is available by default. More info is available in this MSDB blog post. If you are using older version of Windows OS, you may find official installation guides here. This command works for Windows, Ubuntu and macOS, assuming the cURL tool is already installed. Replace $HOST_NAME and $ACCESS_TOKEN with corresponding values. For example, $HOST_NAME reference your local ThingsBoard Edge installation, access token is ABC123: |
Install mqtt client for Ubuntu: Install cURL for macOS: Replace $HOST_NAME, $MQTT_PORT and $ACCESS_TOKEN with corresponding values. For example, $HOST_NAME reference your local ThingsBoard Edge installation, MQTT port is 1883 and access token is ABC123: Successful output should look similar to this one: Note: Since ThingsBoard 3.2, you are able to use basic MQTT credentials (combination of client id, user name and password ) and customize topic names and payload type using Device Profile. See more info here. |
|
Install MQTTBox plugin for Chrome. Use the instructions listed below:
  |
Install coap-cli. Assuming you have Node.js and NPM installed on your Windows/Linux/MacOS machine, execute the following command: Replace $HOST_NAME, $COAP_PORT and $ACCESS_TOKEN with corresponding values. If $COAP_PORT is not specified, default 5683 used. For example, $HOST_NAME reference your local ThingsBoard Edge installation, coap port is 5683 and access token is ABC123: |
Once you have successfully published the “temperature” readings with value 51:
|
|
Using MQTTBox please publish temperature telemetry with value 51. |
|
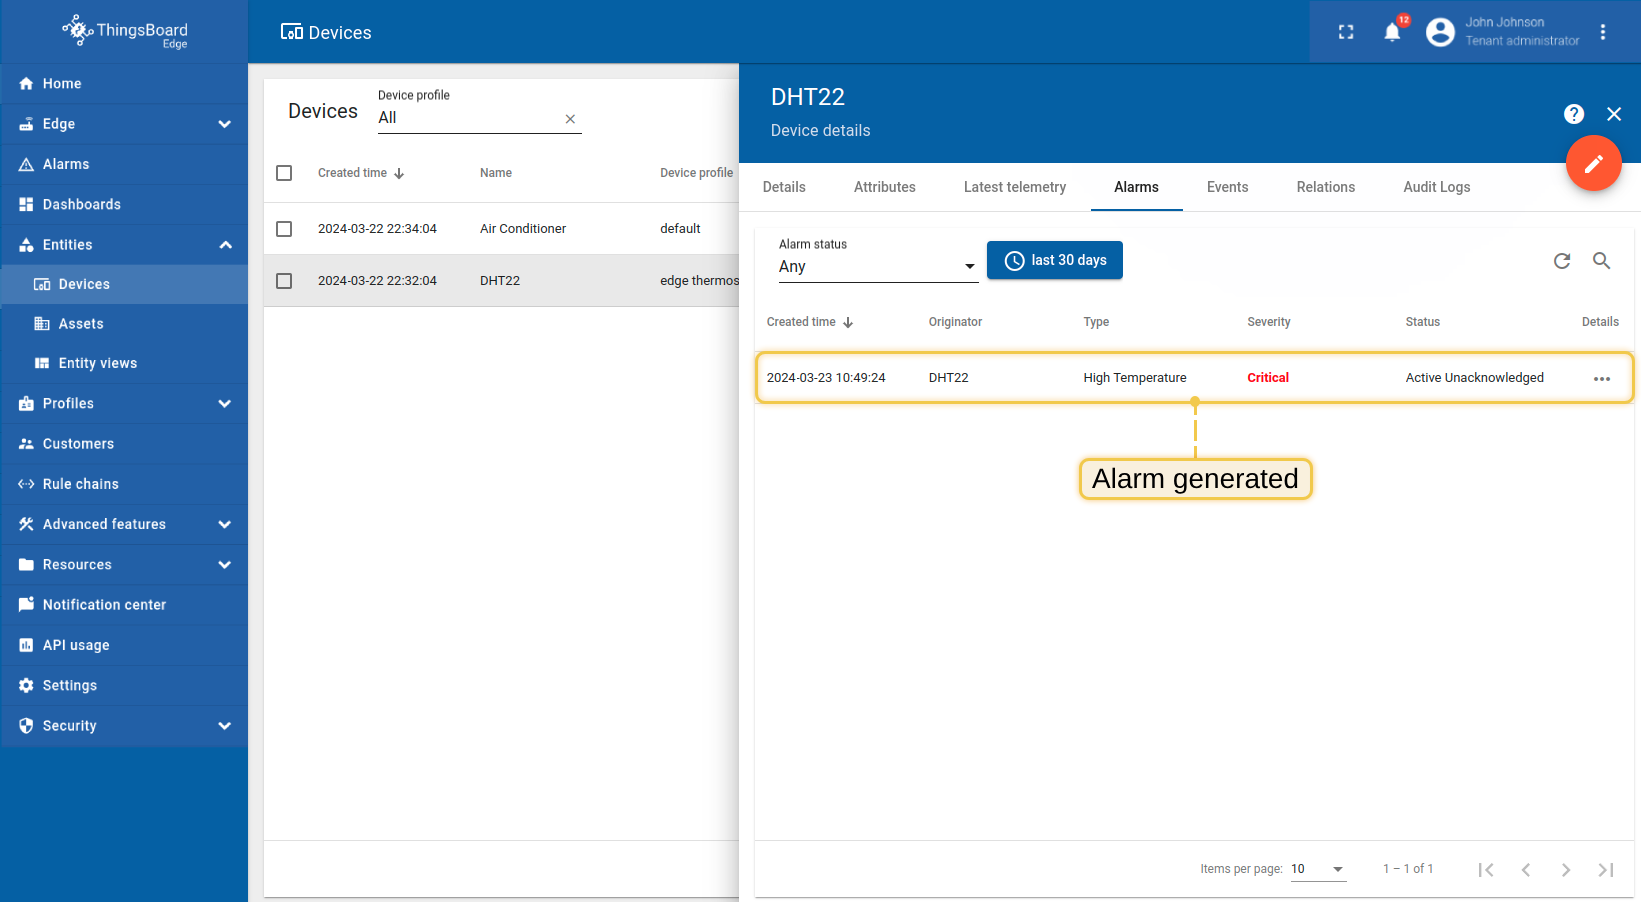
You should immediately see alarm in the Device Alarm Tab:
- Click on the row of the DHT22 device in the table to view the device details
- Navigate to the alarm tab.
Verify that RPC request was send to “Air Conditioner” device
Open the terminal where mqtt-js.sh script is running. You should see similar messages on the screen:
1
2
3
4
5
6
pc@pc-XPS-15-9550:~/alarm-tutorial$ bash mqtt-js.sh
Connecting to: localhost:1883 using access token: sFqoF18PTyViO8L0qo7c
Cooler is connected!
Received RPC command from edge!
Method: enabled_air_conditioner
Speed params: 1
Congratulations! RPC request was successfully sent to Air Conditioner device based on the temperature readings from the DHT22 sensor.
Next Steps
-
Getting started guide - Provide quick overview of main ThingsBoard Edge features. Designed to be completed in 15-30 minutes:
-
Installation guides - Learn how to setup ThingsBoard Edge on various available operating systems and connect to ThingsBoard Server.
-
Edge Rule Engine:
-
Rule Chain Templates - Learn how to use ThingsBoard Edge Rule Chain Templates.
-
Provision Rule Chains from cloud to edge - Learn how to provision edge rule chains from cloud to edge.
-
- Security:
- gRPC over SSL/TLS - Learn how to configure gRPC over SSL/TLS for communication between edge and cloud.
-
Features:
-
Edge Status - Learn about Edge Status page on ThingsBoard Edge.
-
Cloud Events - Learn about Cloud Events page on ThingsBoard Edge.
-
-
Use cases:
- Data filtering and traffic reduce - This guide will show how to send to cloud from edge only filterd amount of device data:
- Roadmap - ThingsBoard Edge roadmap.