Overview
The Asset entity is an abstract entity that helps group and manage the IoT ecosystem. Assets represent real-world objects such as factories, vehicles, warehouses, etc., and establish a relational hierarchy between these objects and other entities. Edge Assets enable grouping of Edge entities and visualizing the data they send. This approach applies whenever the devices or transmitted data are specific to a particular Edge.
Edge Assets are designed in the same way as the Cloud Assets. Please refer to the Assets documentation to gain a general understanding of its functionality.
Edge Asset Management
The Asset entity can be created and configured locally on the Edge instance, in the same way as on the Cloud. If the Asset entity has been created on the Cloud, it must be assigned to the Edge instance before use.
Creating a New Asset
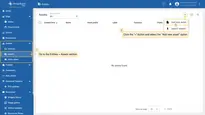
To create the Asset entity on the Edge, log in to your instance and go to the Entities > Assets section.
- Click the "+" button and select the “Add new asset” option.
- The "Import assets" option allows bulk deployment using the CSV file.
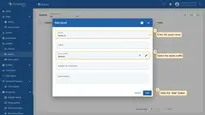
- In the “Add asset” pop-up window:
- Enter the asset name in the “Name” field.
- Select the asset profile in the “Asset profile” field (default: "default").
- Other fields are optional.
- Click the “Add” button.
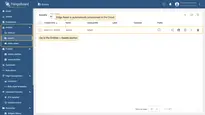
- Once created, the Asset will be automatically provisioned to the Cloud.
- The "Import assets" option allows bulk deployment using the CSV file.
- Enter the asset name in the “Name” field.
- Select the asset profile in the “Asset profile” field (default: "default").
- Other fields are optional.
- Click the “Add” button.
Creating Relations
Several parameters define the relation hierarchy between the entities:
- Direction: Describes how the entities are associated with each other.
- “Outbound relation - From”: Indicates that the relation originates from the entity (the entity is a source).
- “Inbound relation - To”: Indicates that the relation points to the entity (the entity is a recipient).
- Relation type: Describes the nature of the connection between the entities.
- “Contains”: Indicates that the entity is a part of another entity (e.g., Device A is the part of Asset A).
- “Manages”: Indicates that the entity is responsible for another entity (e.g., Asset A manages Device A).
To construct relations between the Asset and another entity (e.g., device), go to the Entities > Assets section and do the following:
- Click on the asset to open the "Asset details" page and select the "Relations" tab. Then, select the "Outbound relation - Direction: From" option.
- To add the relation, click the "+"(Add) button.
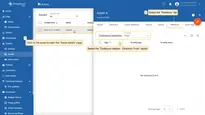
- On the "Add relation" pop-up window, fill out the following fields:
- Relation type: Select the "Manages" option.
- To entity: select "Device" as the type and add the corresponding device(s) from the drop-down menu.
- Click the "Add" button.
- The newly created relations will appear in the "Relations" tab.
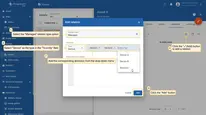
- On the "Add relation" pop-up window, fill out the following fields:
- Relation type: Select the "Manages" option.
- To entity: select "Device" as the type and add the corresponding device(s) from the drop-down menu.
- Click the "Add" button.
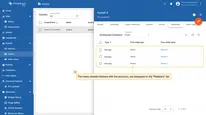
Using Relations in Dashboards
Once the relations between the entities are established, they can be reflected on a dashboard. Transmitted data from asset-related devices can be dynamically filtered by relation type with aliases.
To configure an alias, go to the Dashboards section and enter the Edit mode for a new or existing dashboard. Read on how to create the dashboard here.
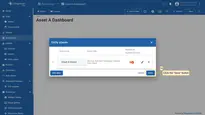
- Within the dashboard "Edit mode", click the "Entity aliases" button to create the alias. In the "Entity aliases" pop-up window, click the "Add alias" button.
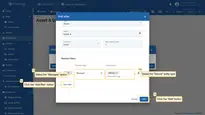
- On the "Add alias" pop-up window, fill out the following fields:
- Alias name: Enter the alias name.
- Filter Type: Select the "Relations query" option.
- Type: Select the "Asset" entity.
- Asset: Select the asset from the drop-down menu (e.g., "Asset A").
- Direction: Select the "From" option.
- Max relation level: Enter the number representing the depth of the entity relations.
Root entity block:
- Scroll down to create the filter in the Relation filters block:
- Click the "Add filter" button to add conditions to filter data.
- Relation type: Select the "Manages" option.
- Entity types: Select the "Device" entity type.
In this way, the data from the devices that are managed by the asset will be displayed on the dashboard.
Click the "Add" button to add the alias.
- To save the alias, click the "Save" button.
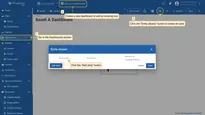
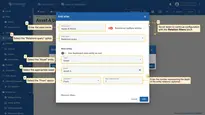
- Alias name: Enter the alias name.
- Filter Type: Select the "Relations query" option.
- Type: Select the "Asset" entity.
- Asset: Select the asset from the drop-down menu (e.g., "Asset A").
- Direction: Select the "From" option.
- Max relation level: Enter the number representing the depth of the entity relations.
Root entity block:
- Click the "Add filter" button to add conditions to filter data.
- Relation type: Select the "Manages" option.
- Entity types: Select the "Device" entity type.
In this way, the data from the devices that are managed by the asset will be displayed on the dashboard.
Click the "Add" button to add the alias.
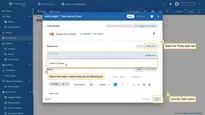
Continue with the configuration of a widget. Within the “Edit mode”, click the “Add widget” button to add the widget. Select the Charts > Time series chart widget. Read more about how to add and configure a new widget here.
- Select the "Entity alias" tab. Select the newly created alias from the drop-down menu as the Datasource. Click the "Add" button.
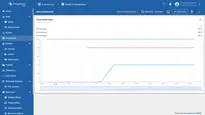
- The widget will display real-time data from the associated devices.
Provisioning From Cloud
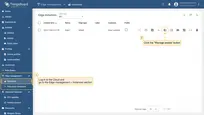
To provision the Asset entity from the ThingsBoard Cloud to the Edge instance, log in to the Cloud and go to the Edge management > Instances section:
- Click the "Manage assets" button.
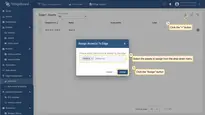
- On the Edge assets page, click the "+" button and select the assets to assign from the drop-down menu in the "Assign Asset(s) To Edge" pop-up window. Click the "Assign" button.
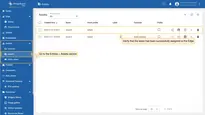
- To verify that the assigned asset is on the Edge, go to the Entities > Assets section.
Next Steps
-
Getting started guide - Provide quick overview of main ThingsBoard Edge features. Designed to be completed in 15-30 minutes:
-
Installation guides - Learn how to setup ThingsBoard Edge on various available operating systems and connect to ThingsBoard Server.
-
Edge Rule Engine:
-
Rule Chain Templates - Learn how to use ThingsBoard Edge Rule Chain Templates.
-
Provision Rule Chains from cloud to edge - Learn how to provision edge rule chains from cloud to edge.
-
- Security:
- gRPC over SSL/TLS - Learn how to configure gRPC over SSL/TLS for communication between edge and cloud.
-
Features:
-
Edge Status - Learn about Edge Status page on ThingsBoard Edge.
-
Cloud Events - Learn about Cloud Events page on ThingsBoard Edge.
-
-
Use cases:
-
Manage alarms and RPC requests on edge devices - This guide will show how to generate local alarms on the edge and send RPC requests to devices connected to edge:
-
Data filtering and traffic reduce - This guide will show how to send to cloud from edge only filterd amount of device data:
-
- Roadmap - ThingsBoard Edge roadmap.