- Prerequisites
- Devices connection
- Controller configuration
- Creating and configuring ThingsBoard IoT Gateway
- Check data on ThingsBoard
- Conclusion
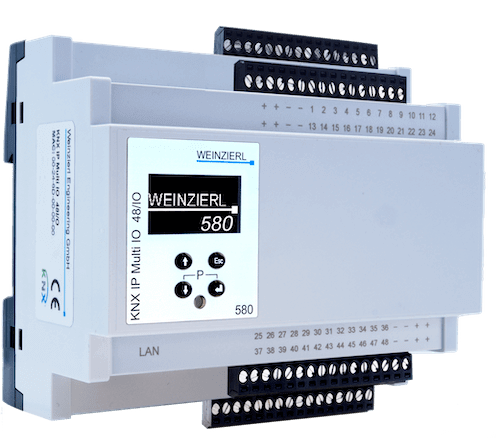 The KNX IP Multi IO 580 (48I/O) is a universal binary interface for building control. It provides 48 I/O lines. Each line can be used as binary input as well as binary output. The peripherals can be fed by an external voltage of 24 V⎓. Channels which are configured as inputs can be used to control lights or blinds via the KNX network. They also can be used to count impulses, e.g. as interface for energy meters. Channels which are configured as outputs can directly drive signal LEDs, external coupling relays.
Prerequisites
To continue with this guide we will need the following:
- Multi IO Extension Switch 590
- Multi IO Extension Shutter 592
- Coupling relay for Multi IO
- ETS software installed
- ThingsBoard IoT Gateway installed
- ThingsBoard account
Devices connection
According to the user manual from official site, firstly you need to wired connection between the controller and switch, shutter, and relay. The controller has to be connected to the network using LAN port. Also, you need to download and install the ETS software from the official website.
Controller configuration
To connect controller - we need to configure it in ETS software. Also, you need to connect the controller to your network over Ethernet.
Adding device to ETS project
First we need to create project and add device to our topology, for this purpose, use the following steps:
-
In the opened ETS main window, create new project (use default setting for creating, except “Name” field);
-
Under the projects tabs bar click on “Buildings” dropdown list and select “Topology” from the list.
-
Right click on “1 New area” subitem and select “+ Add” button from the dropdown list, and click on “Devices” button.
-
In the window that opens at the bottom side, use the search field to look for “Multi 580”. Double click on found device. New device will be added.
-
After device installation, drag and drop it to the sidebar above “1 New area”. Device added.
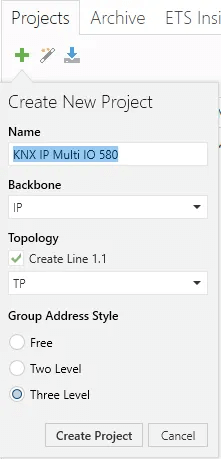
In the opened ETS main window, create new project (use default setting for creating, except “Name” field);
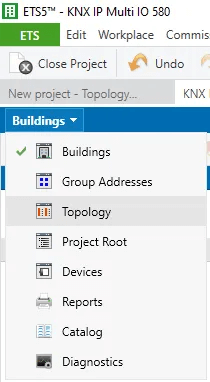
Under the projects tabs bar click on “Buildings” dropdown list and select “Topology” from the list.
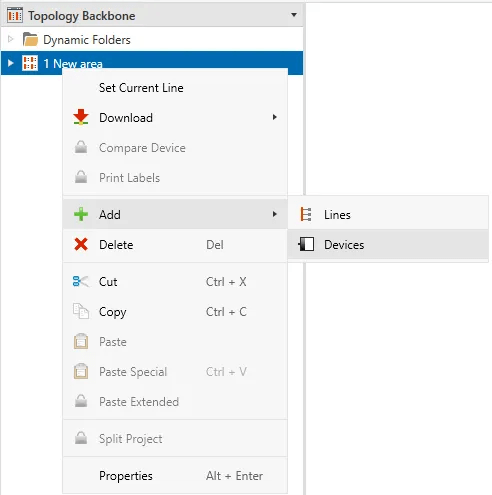
Right click on “1 New area” subitem and select “+ Add” button from the dropdown list, and click on “Devices” button.
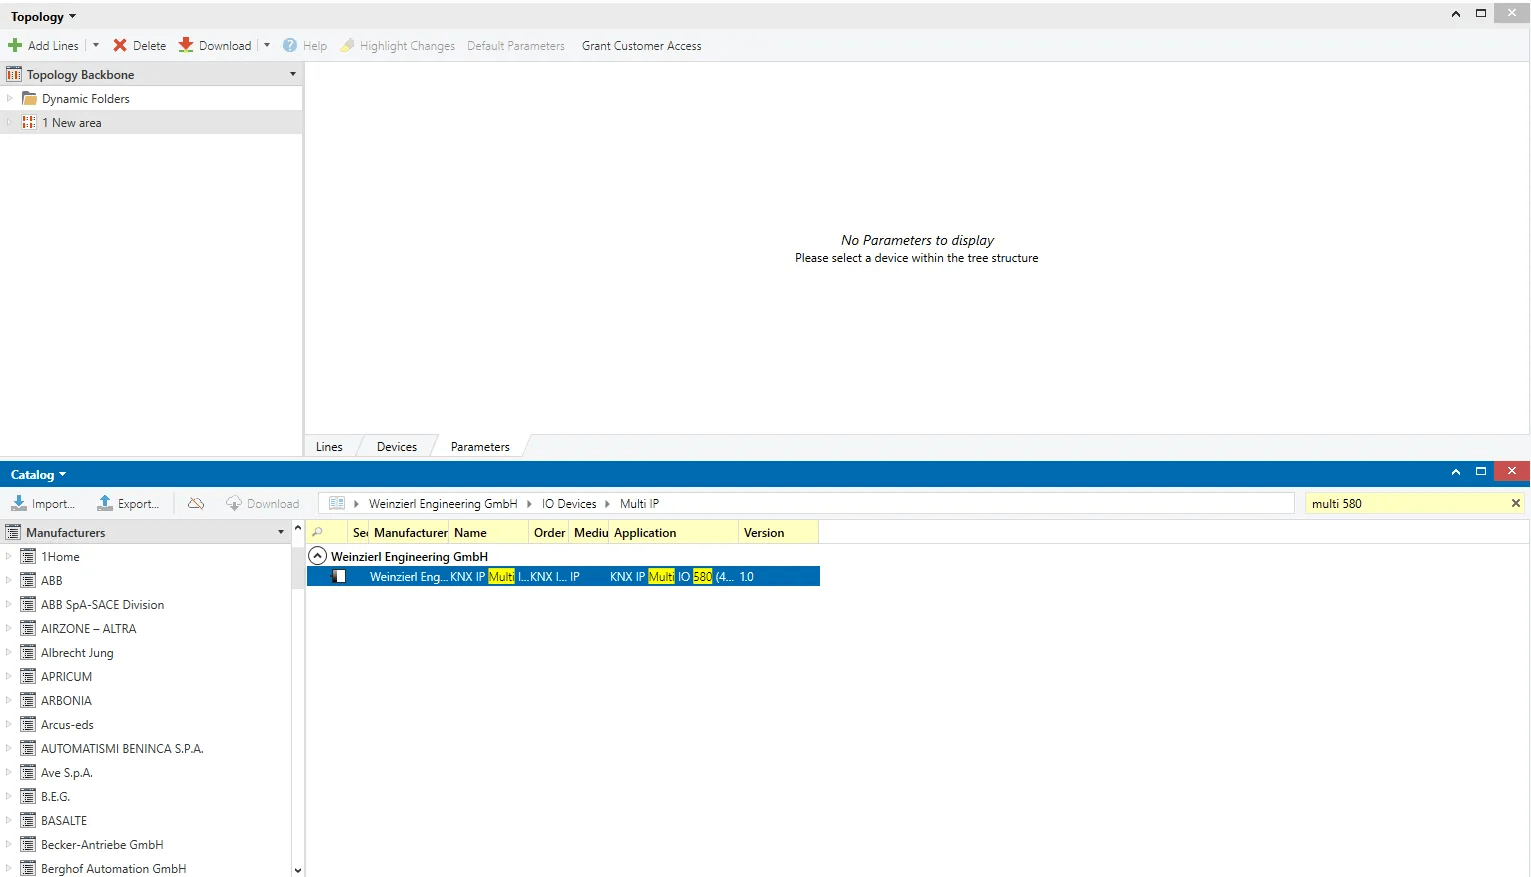
In the window that opens at the bottom side, use the search field to look for “Multi 580”. Double click on found device. New device will be added.
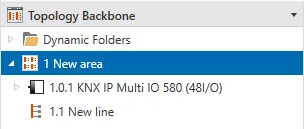
After device installation, drag and drop it to the sidebar above “1 New area”. Device added.
Configuring device
After adding device to topology new area, we need to configure device. To do this, follow the steps below:
-
Click on added device, on the right sidebar, select “Properties” tab and click on “IP” button. Select “Use a static IP address” option and fill in “IP Address”, “Subnet Mask”, “Default Gateway” fields with your corresponding controller (you can find controller IP address on the built-in display) and network settings.
-
Click on “Settings” button under “Properties” tab and fill in “Individual Address” with “1.0.1”, click on “Park” button.
-
On the right side of the main window, click on the “Down arrow” button near “Download” button and select “Download all”. Controller configuration settings should be saved.
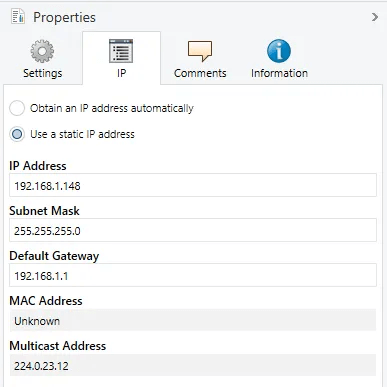
Click on added device, on the right sidebar, select “Properties” tab and click on “IP” button. Select “Use a static IP address” option and fill in “IP Address”, “Subnet Mask”, “Default Gateway” fields with your corresponding controller (you can find controller IP address on the built-in display) and network settings.
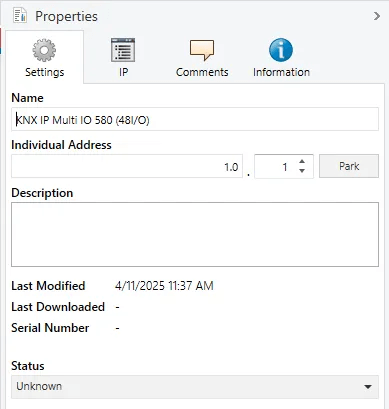
Click on “Settings” button under “Properties” tab and fill in “Individual Address” with “1.0.1”, click on “Park” button.
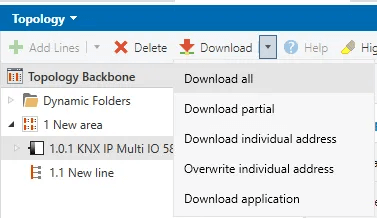
On the right side of the main window, click on the “Down arrow” button near “Download” button and select “Download all”. Controller configuration settings should be saved.
Adding group addresses
To read data from the Weinzierl KNX IP Multi IO 580 (48I/O) after configuring, we need to configure the appropriate Group Addresses in the ETS software, for this purpose, use the following steps:
-
Under the projects tabs bar click on “Topology” dropdown list and select “Group Addresses” from the list. Click on “Add Main Groups” and in the opened modal window fill in “Name” field with “Main” value, click “OK” button.
-
Click on “Add Middle Groups” and in the opened modal window fill in “Name” field with “Middle” value, click “OK” button.
-
Click on “Add Group Addresses” and in the opened modal window fill in “Name” field with “Relay” value, click “OK” button.
-
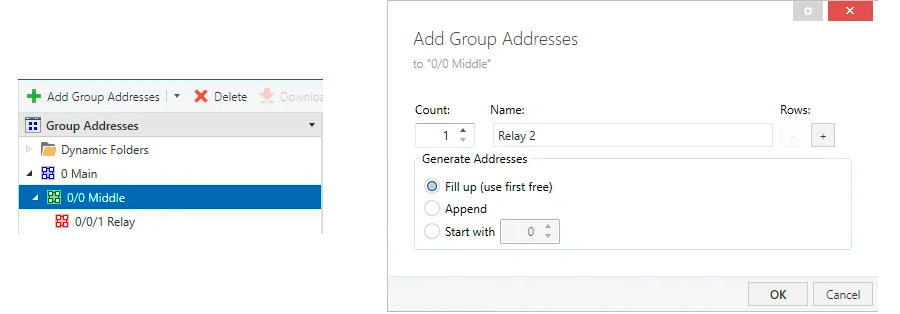
Click on “Add Group Addresses” and in the opened modal window fill in “Name” field with “Relay 2” value, click “OK” button.
-
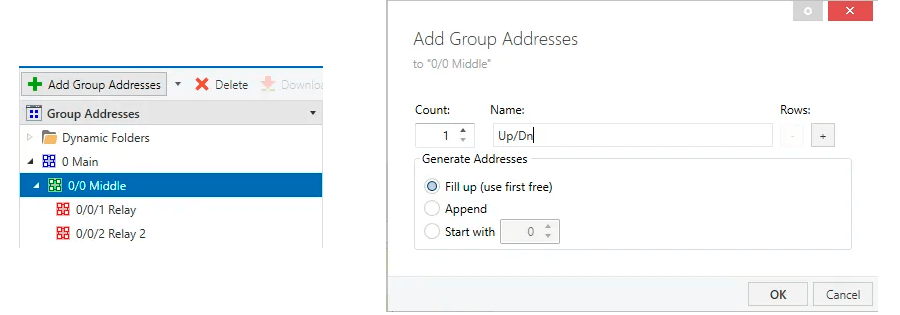
Click on “Add Group Addresses” and in the opened modal window fill in “Name” field with “Up/Dn” value, click “OK” button.
-
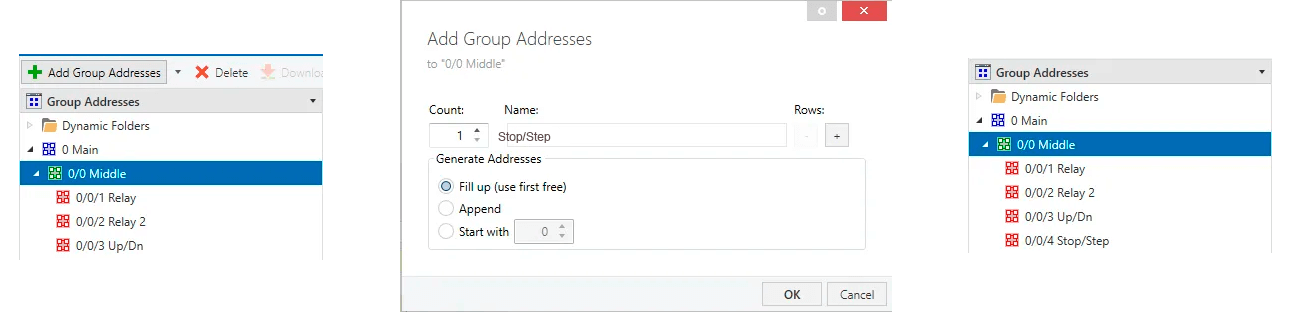
Click on “Add Group Addresses” and in the opened modal window fill in “Name” field with “Stop/Step” value, click “OK” button.
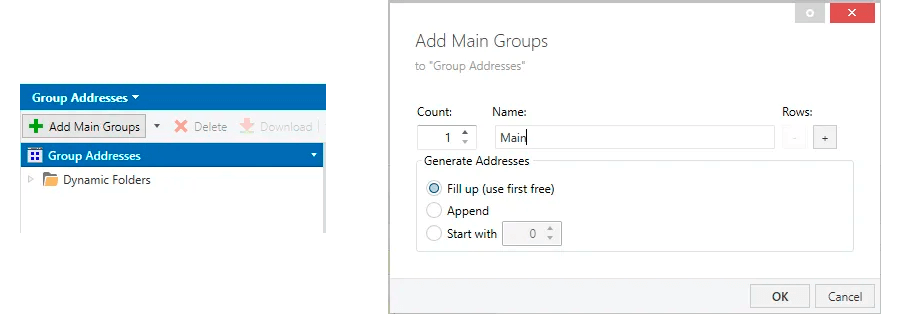
Under the projects tabs bar click on “Topology” dropdown list and select “Group Addresses” from the list. Click on “Add Main Groups” and in the opened modal window fill in “Name” field with “Main” value, click “OK” button.
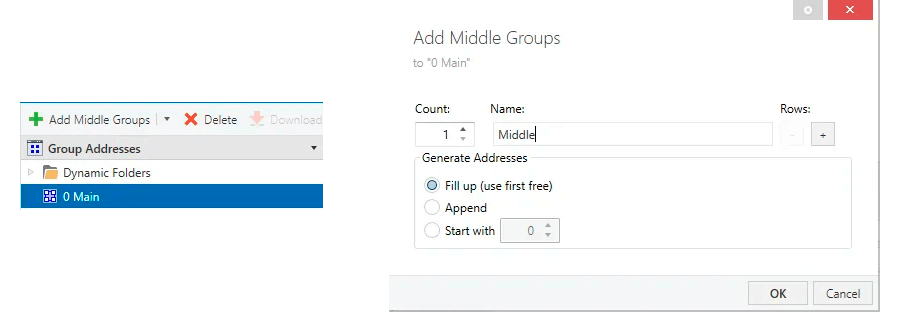
Click on “Add Middle Groups” and in the opened modal window fill in “Name” field with “Middle” value, click “OK” button.
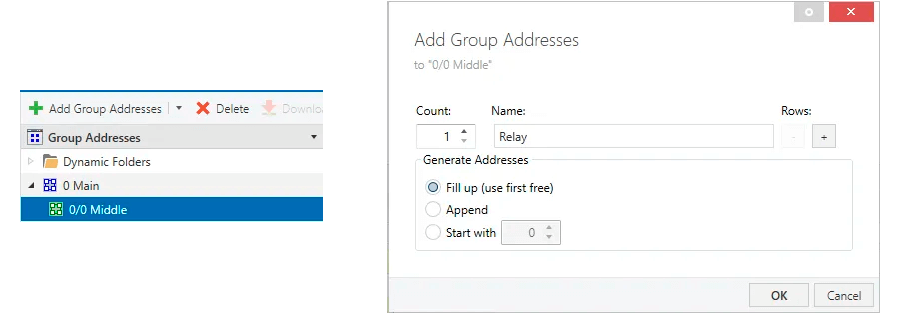
Click on “Add Group Addresses” and in the opened modal window fill in “Name” field with “Relay” value, click “OK” button.
Click on “Add Group Addresses” and in the opened modal window fill in “Name” field with “Relay 2” value, click “OK” button.
Click on “Add Group Addresses” and in the opened modal window fill in “Name” field with “Up/Dn” value, click “OK” button.
Click on “Add Group Addresses” and in the opened modal window fill in “Name” field with “Stop/Step” value, click “OK” button.
Configuring device channels
The next step, we need to enable device channels by specifying his type. To do this, follow the steps below:
-
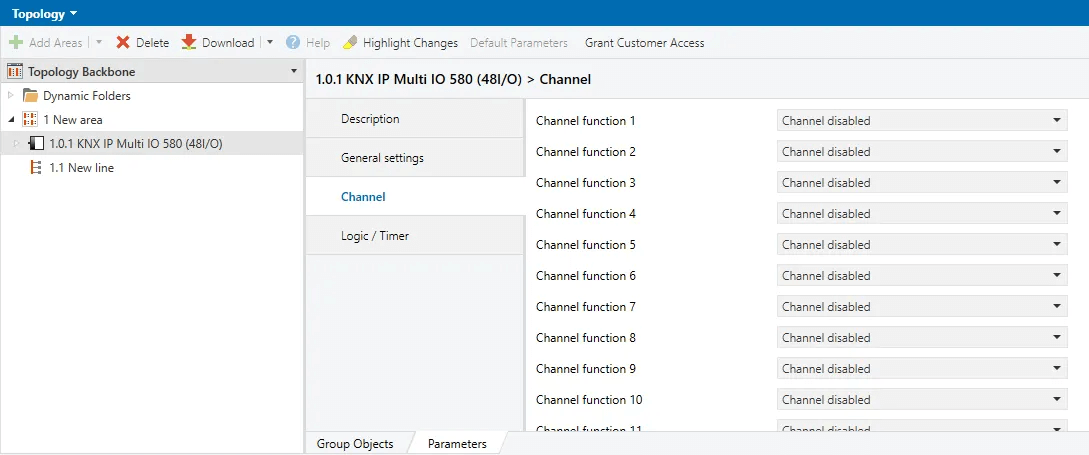
Click on added device in the left sidebar and select “Parameters” tab in the side right window. Select “Channel” tab.
-
Select “Shutter Actuator” for “Channel function 1”, “Switching Actuator” for “Channel function 2” and “Channel function 3”. You can find added Group Objects in the “Group Objects” tab.
Click on added device in the left sidebar and select “Parameters” tab in the side right window. Select “Channel” tab.
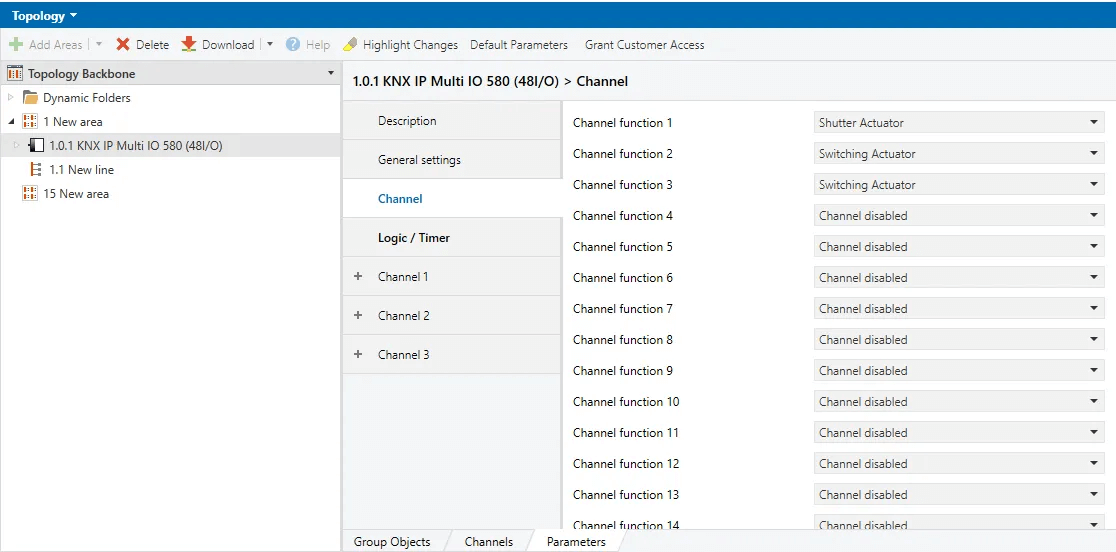
Select “Shutter Actuator” for “Channel function 1”, “Switching Actuator” for “Channel function 2” and “Channel function 3”. You can find added Group Objects in the “Group Objects” tab.
The last thing that we need to do is set group objects ability to read and write, and link them with group addresses. For this purpose, use the following steps:
- In the “Group Objects” tab click on first group object and in the right sidebar in the section “Flags” enable Write and Read. Repeat this actions for the rest group objects.
- In the “Group Objects” tab right click on first group object (Jalousie 1: Drive stop) and select “Link with…” button.
- In the opened modal window click on “…” button, in the opened window select “0/0/4” group address. Repeat this action for the rest group objects using the following table:
| Group Object Name | Group Address |
|---|---|
| Jalousie 1: Drive stop | 0/0/4 |
| Jalousie 1: Drive start | 0/0/3 |
| Actuator 3: Output | 0/0/2 |
| Actuator 2: Output | 0/0/1 |

In the “Group Objects” tab click on first group object and in the right sidebar in the section “Flags” enable Write and Read. Repeat this actions for the rest group objects.
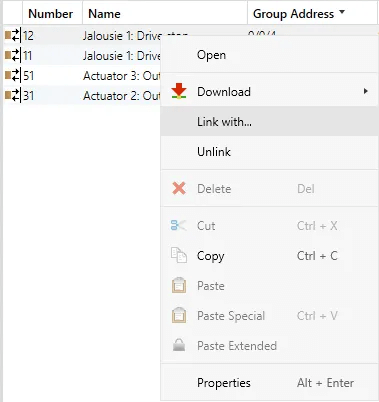
In the “Group Objects” tab right click on first group object (Jalousie 1: Drive stop) and select “Link with…” button.
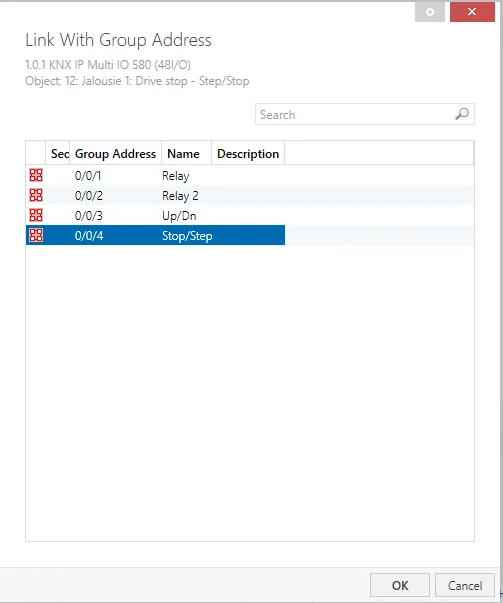
In the opened modal window click on “…” button, in the opened window select “0/0/4” group address. Repeat this action for the rest group objects.
-
On the right side of the main window, click on the “Down arrow” button near “Download” button and select “Download all”. Controller configuration settings should be saved.
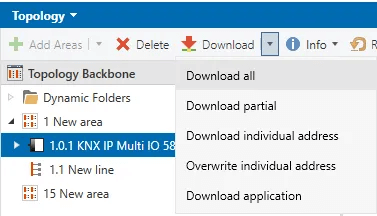
On the right side of the main window, click on the “Down arrow” button near “Download” button and select “Download all”. Controller configuration settings should be saved.
Creating and configuring ThingsBoard IoT Gateway
-
Open the ThingsBoard in your browser and log in. Go to “Entities” > “Gateways” tab in the sidebar and click on “+” button. Fill in “Name” and “Device profile” fields and click “Create” button;
-
Start gateway using launch command;
-
The gateway has been created. Click on the “Connectors configuration” button in the sidebar menu;
-
Click on “+” button to add a new connector;
-
Select “KNX” connector type, fill in the “Name” field, disable filling configuration with default values and click “Add” button;
-
In the created connector, go to “Advanced” section and paste the JSON configuration below. Replace host and port configuration parameter values with the device's host and port. Click on “Save” button
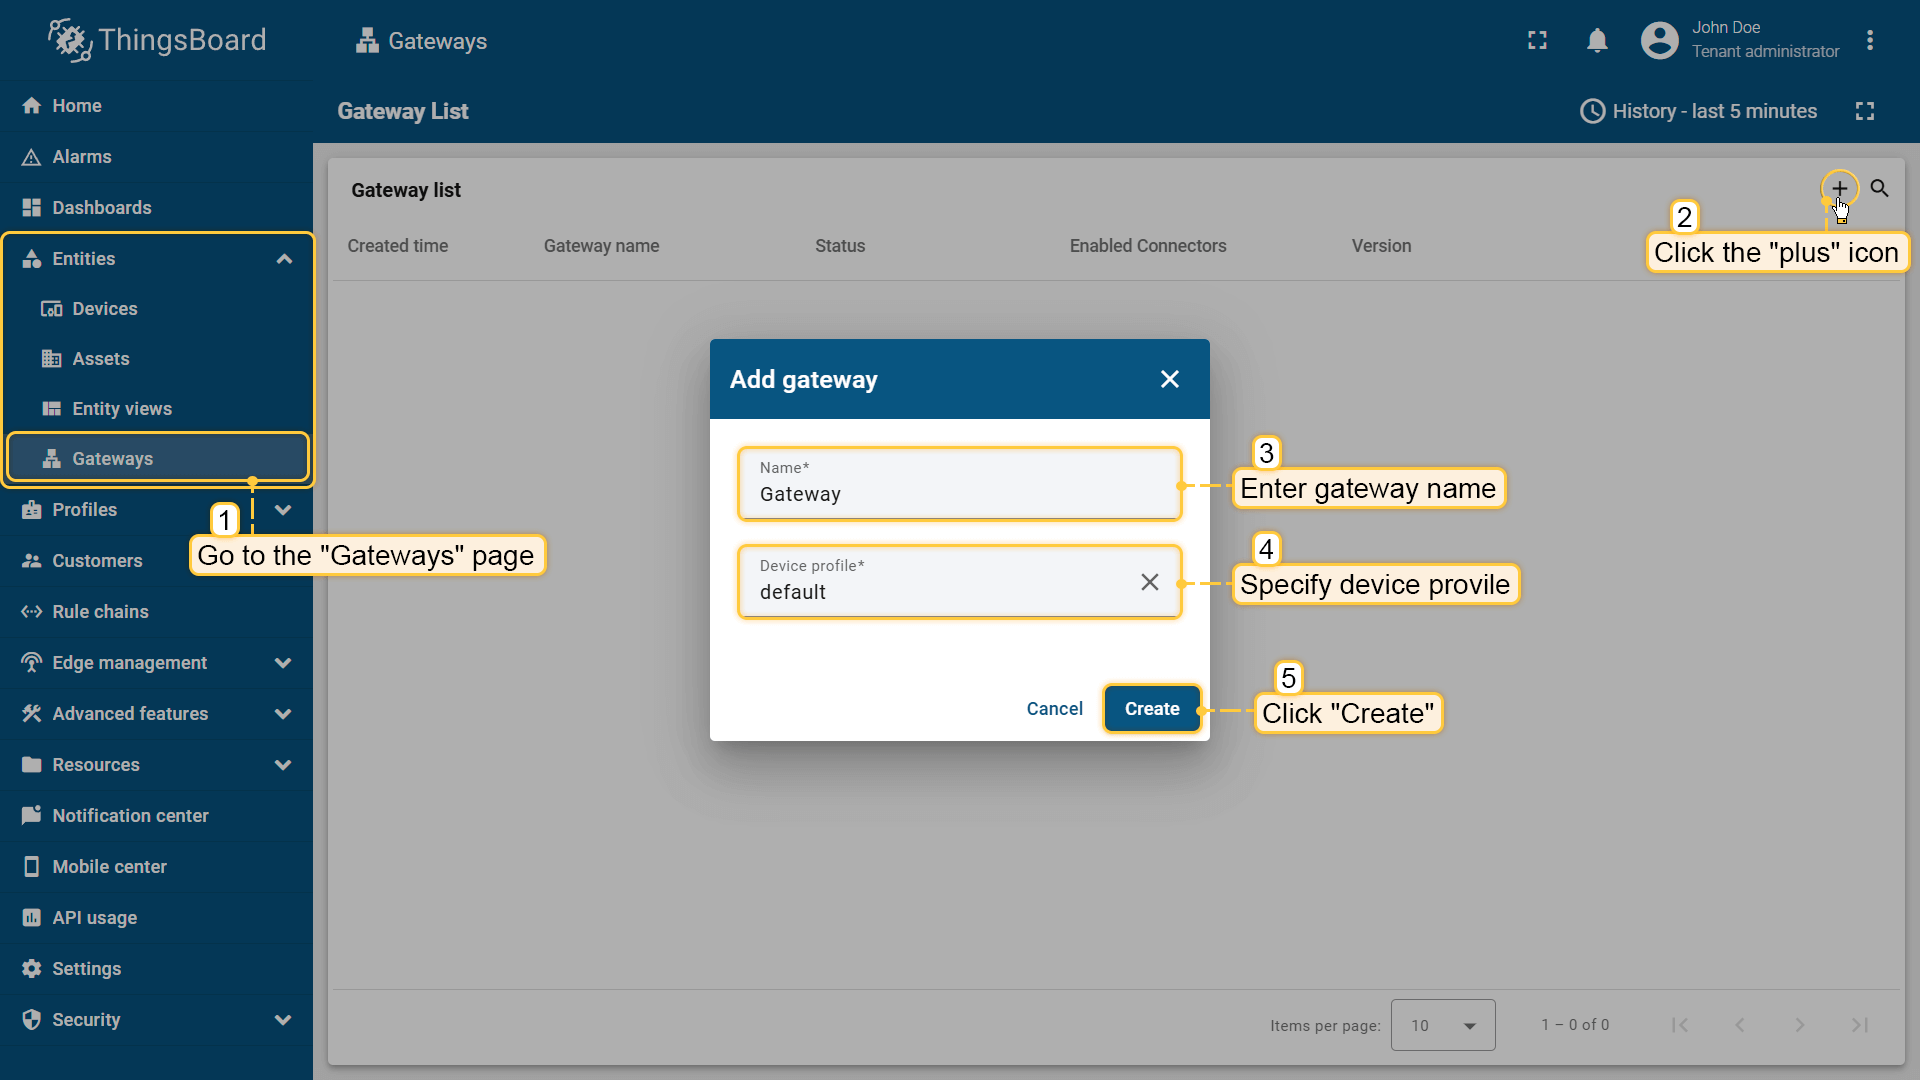
Open the ThingsBoard in your browser and log in. Go to “Entities” > “Gateways” tab in the sidebar and click on “+” button. Fill in “Name” and “Device profile” fields and click “Create” button;
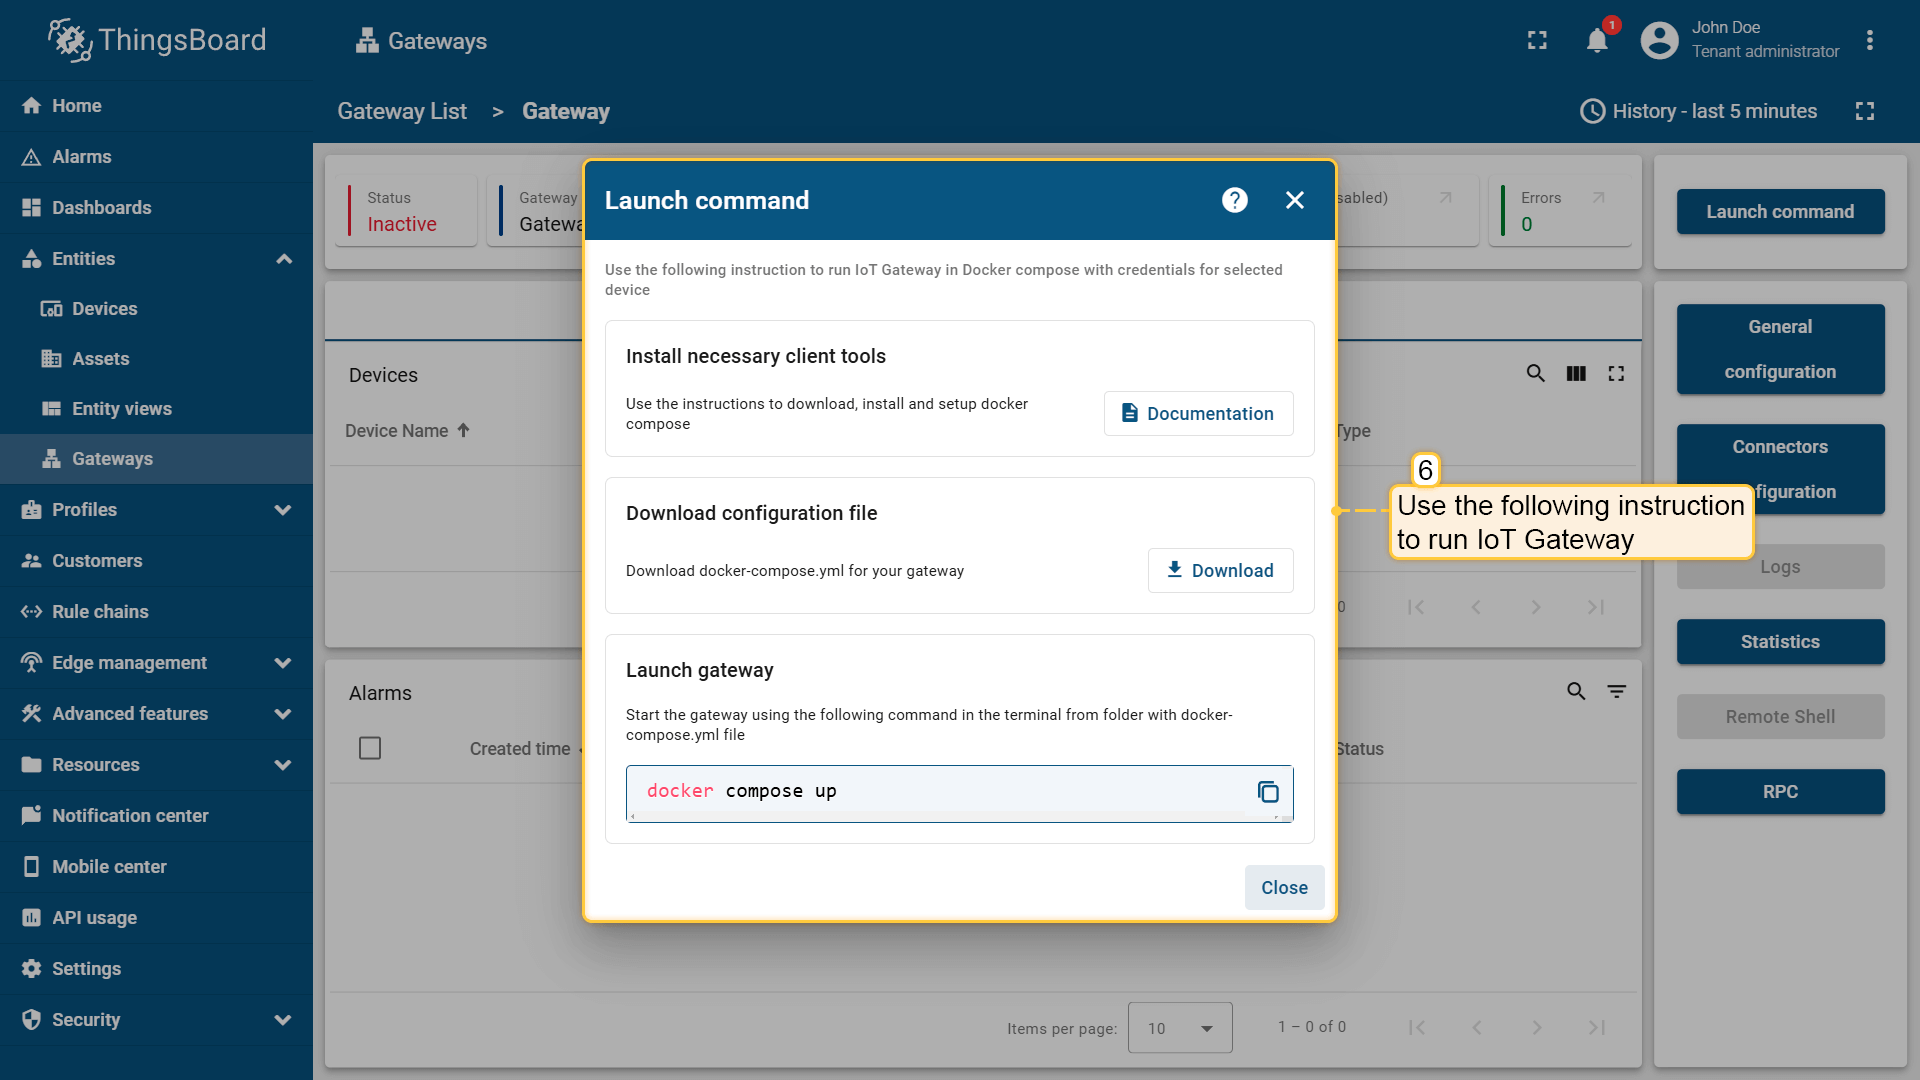
Start gateway using launch command;
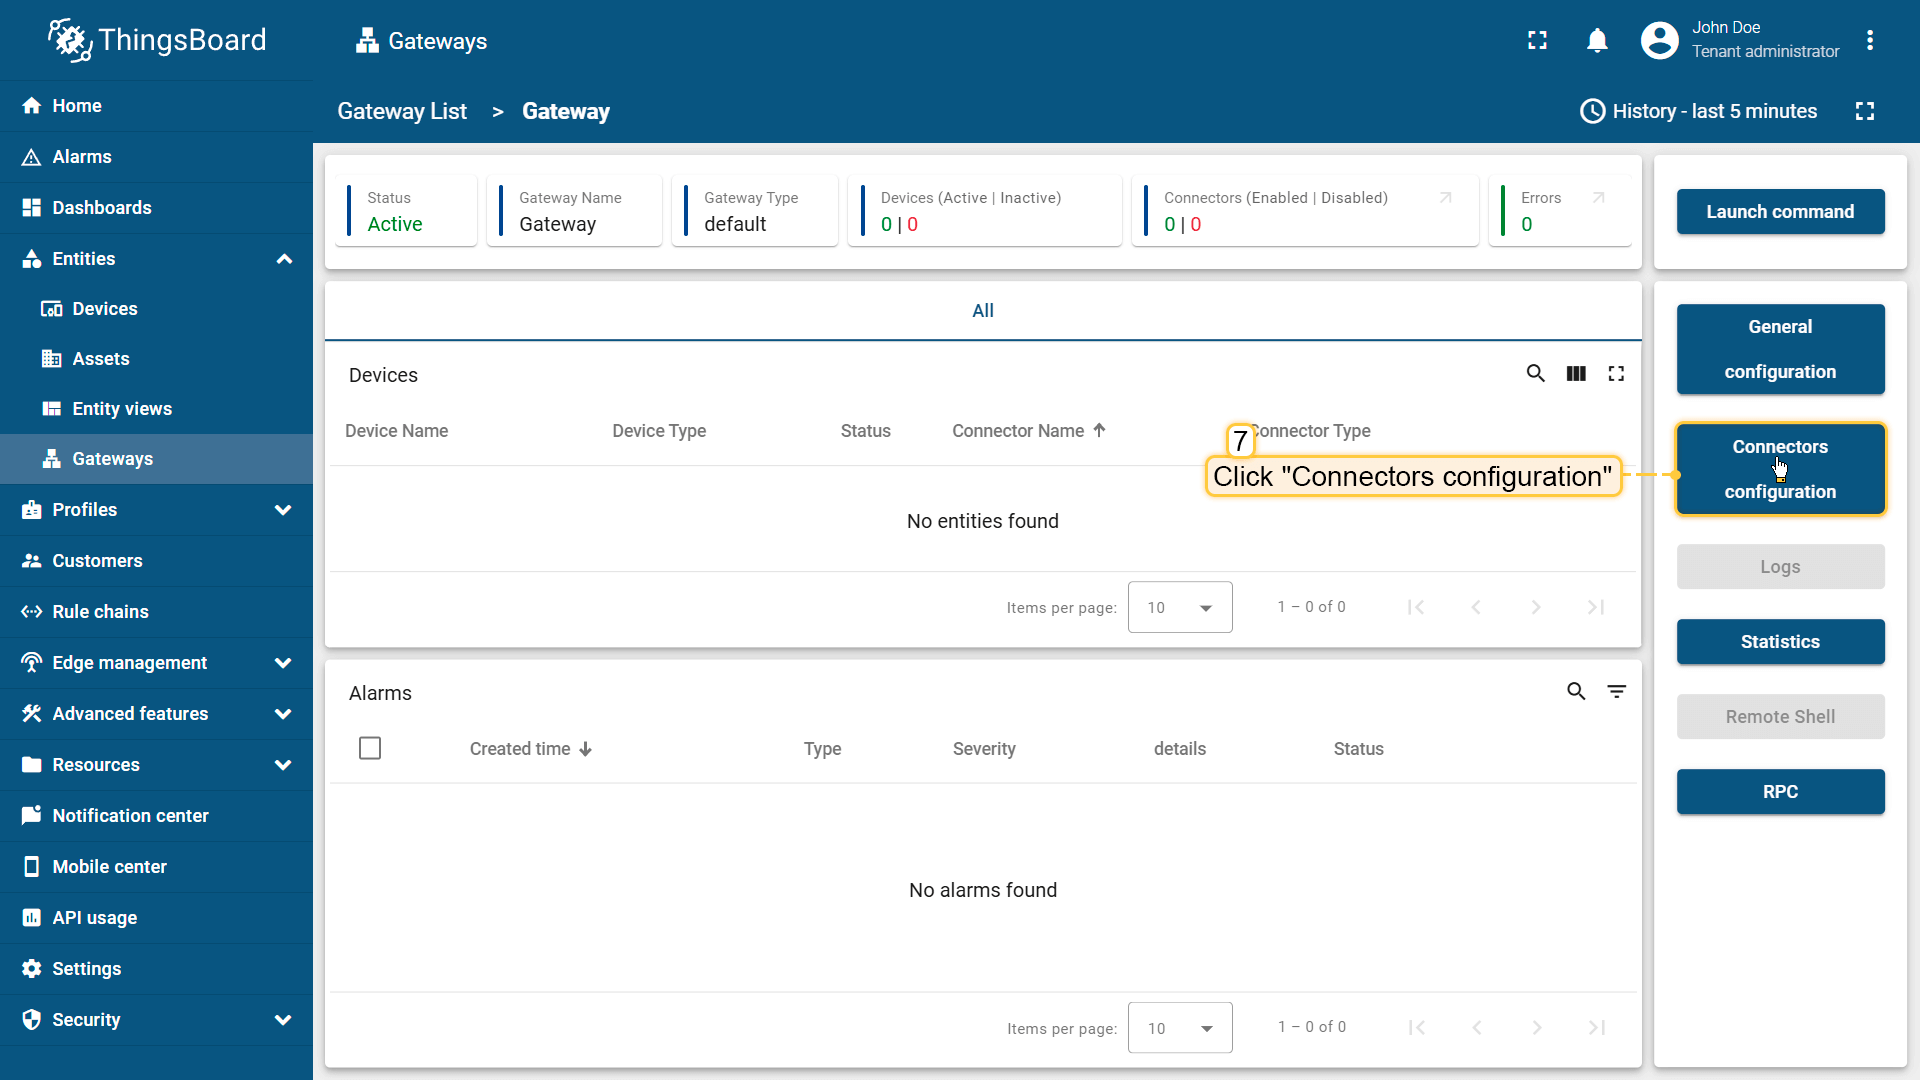
The gateway has been created. Click on the “Connectors configuration” button in the sidebar menu;
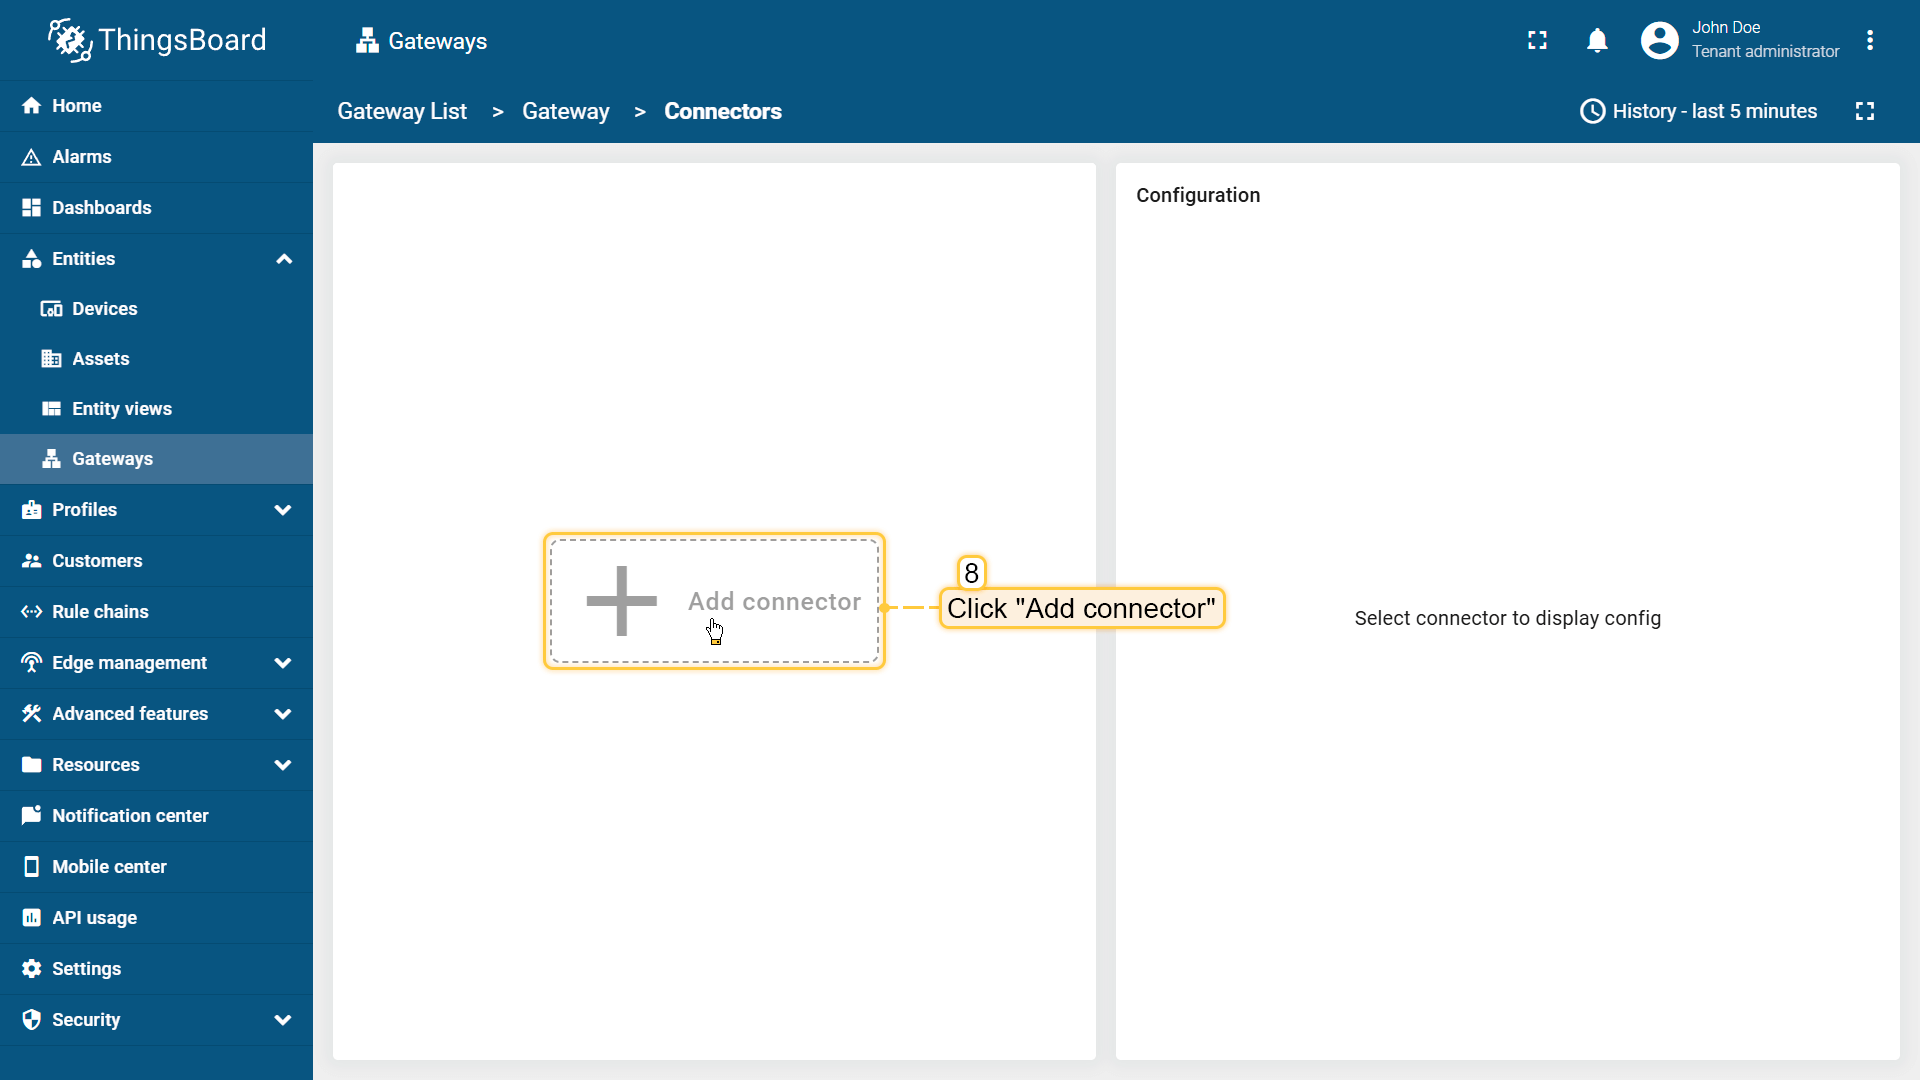
Click on “+” button to add a new connector;
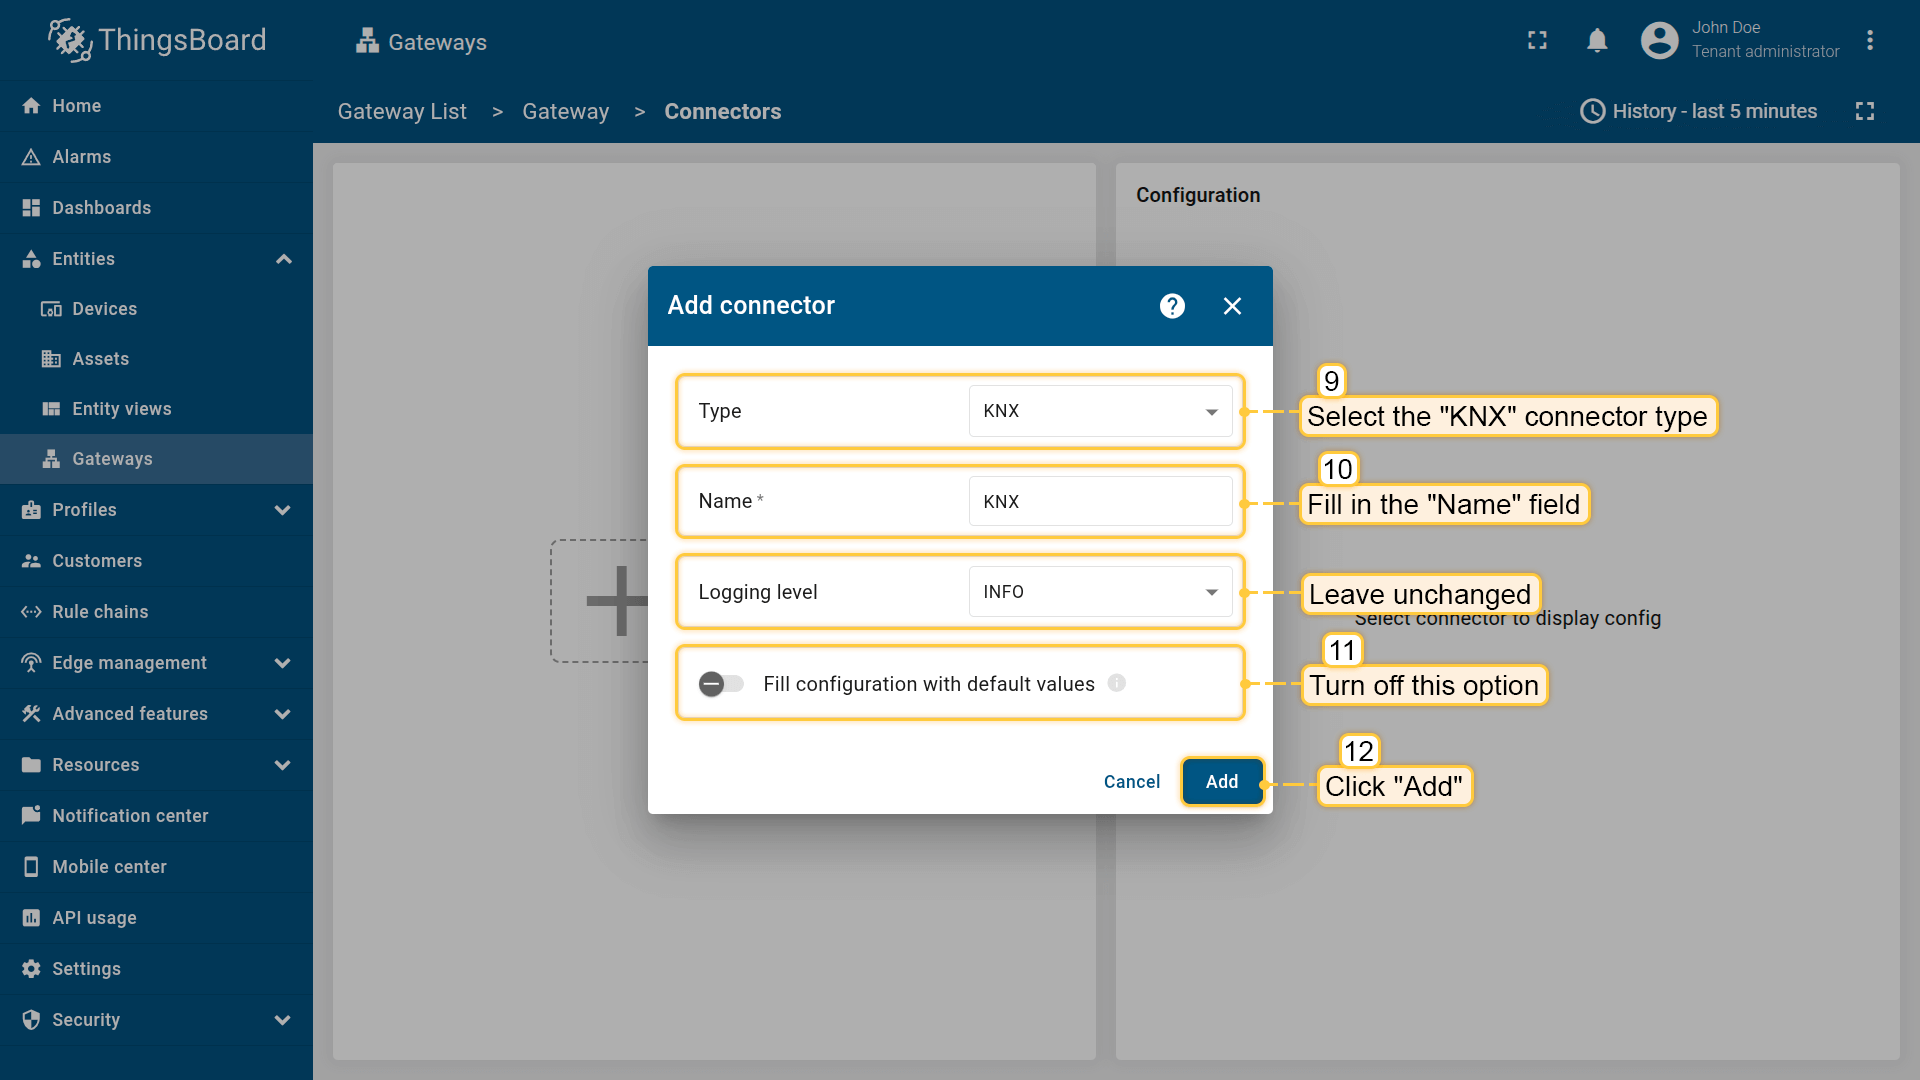
Select “KNX” connector type, fill in the “Name” field, disable filling configuration with default values and click “Add” button;
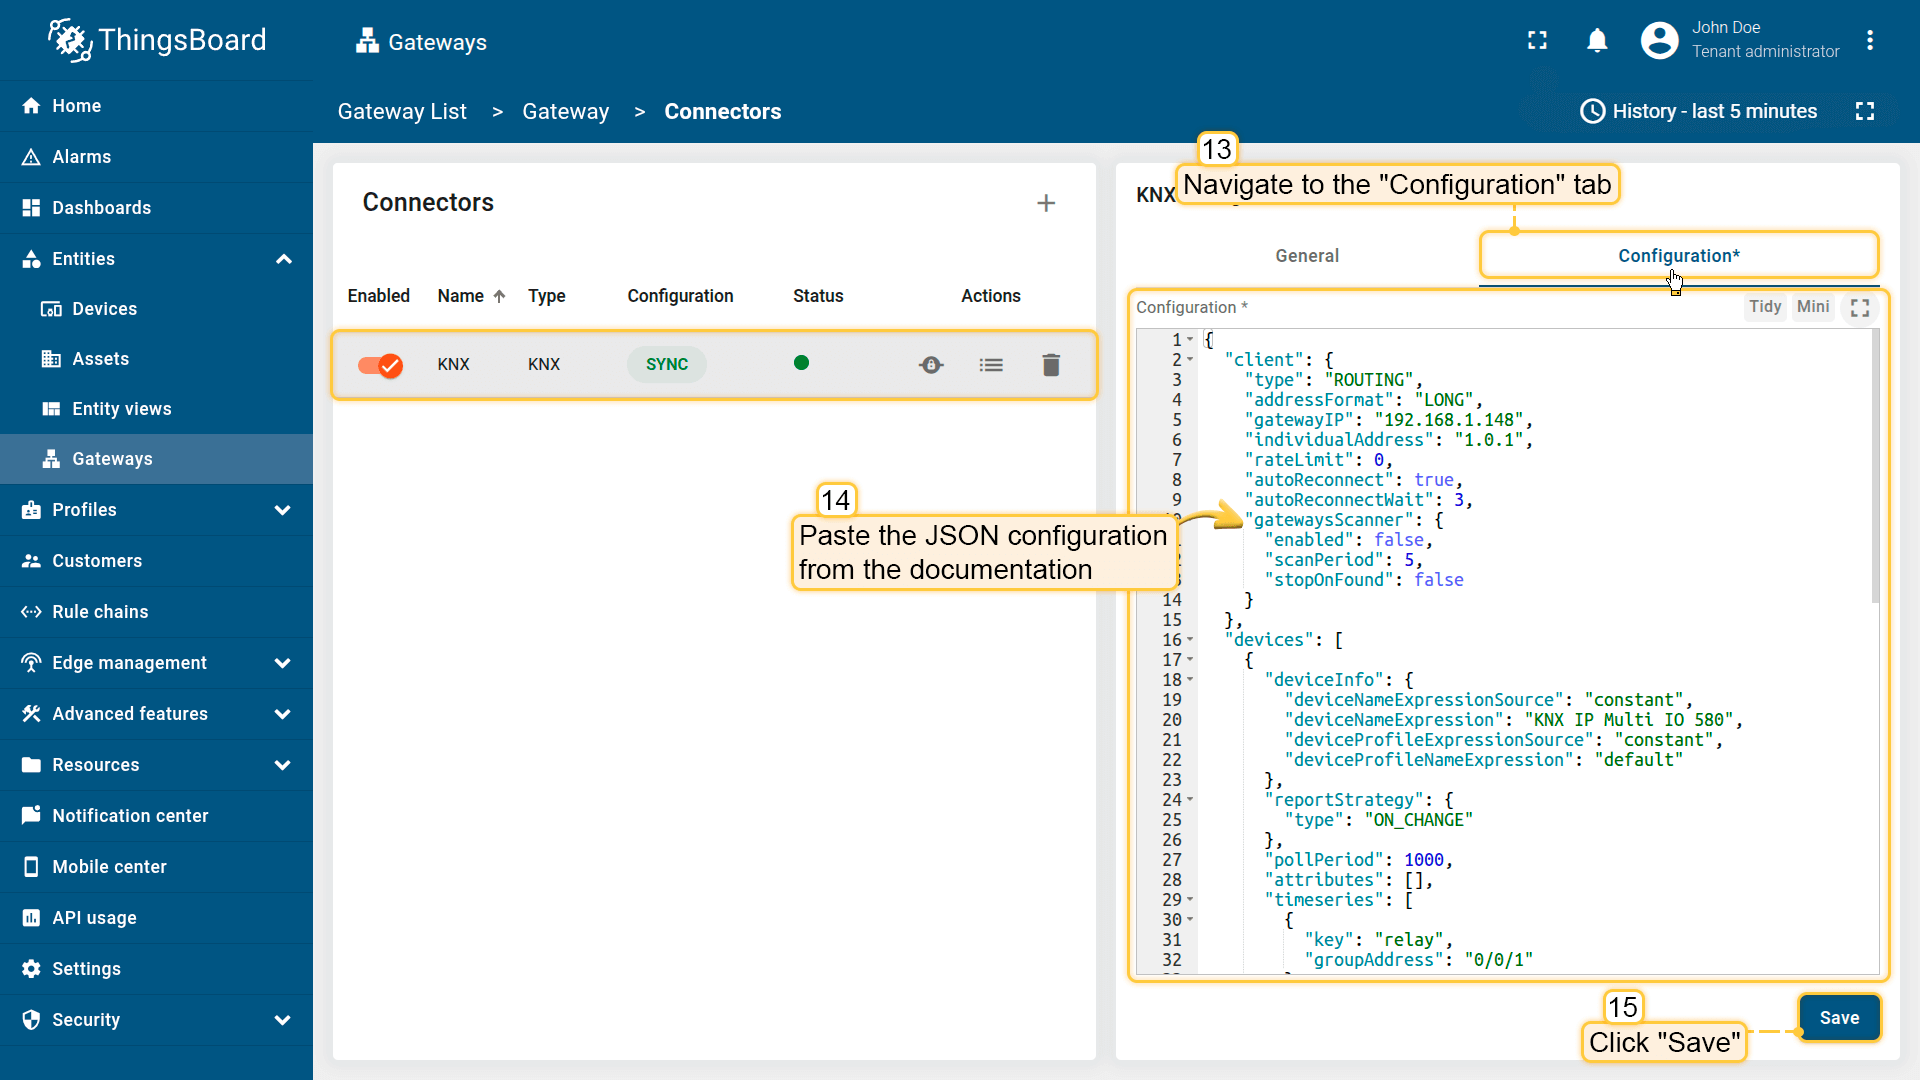
In the created connector, go to “Advanced” section and paste the JSON configuration below. Replace host and port configuration parameter values with the device's host and port. Click on “Save” button
Check data on ThingsBoard
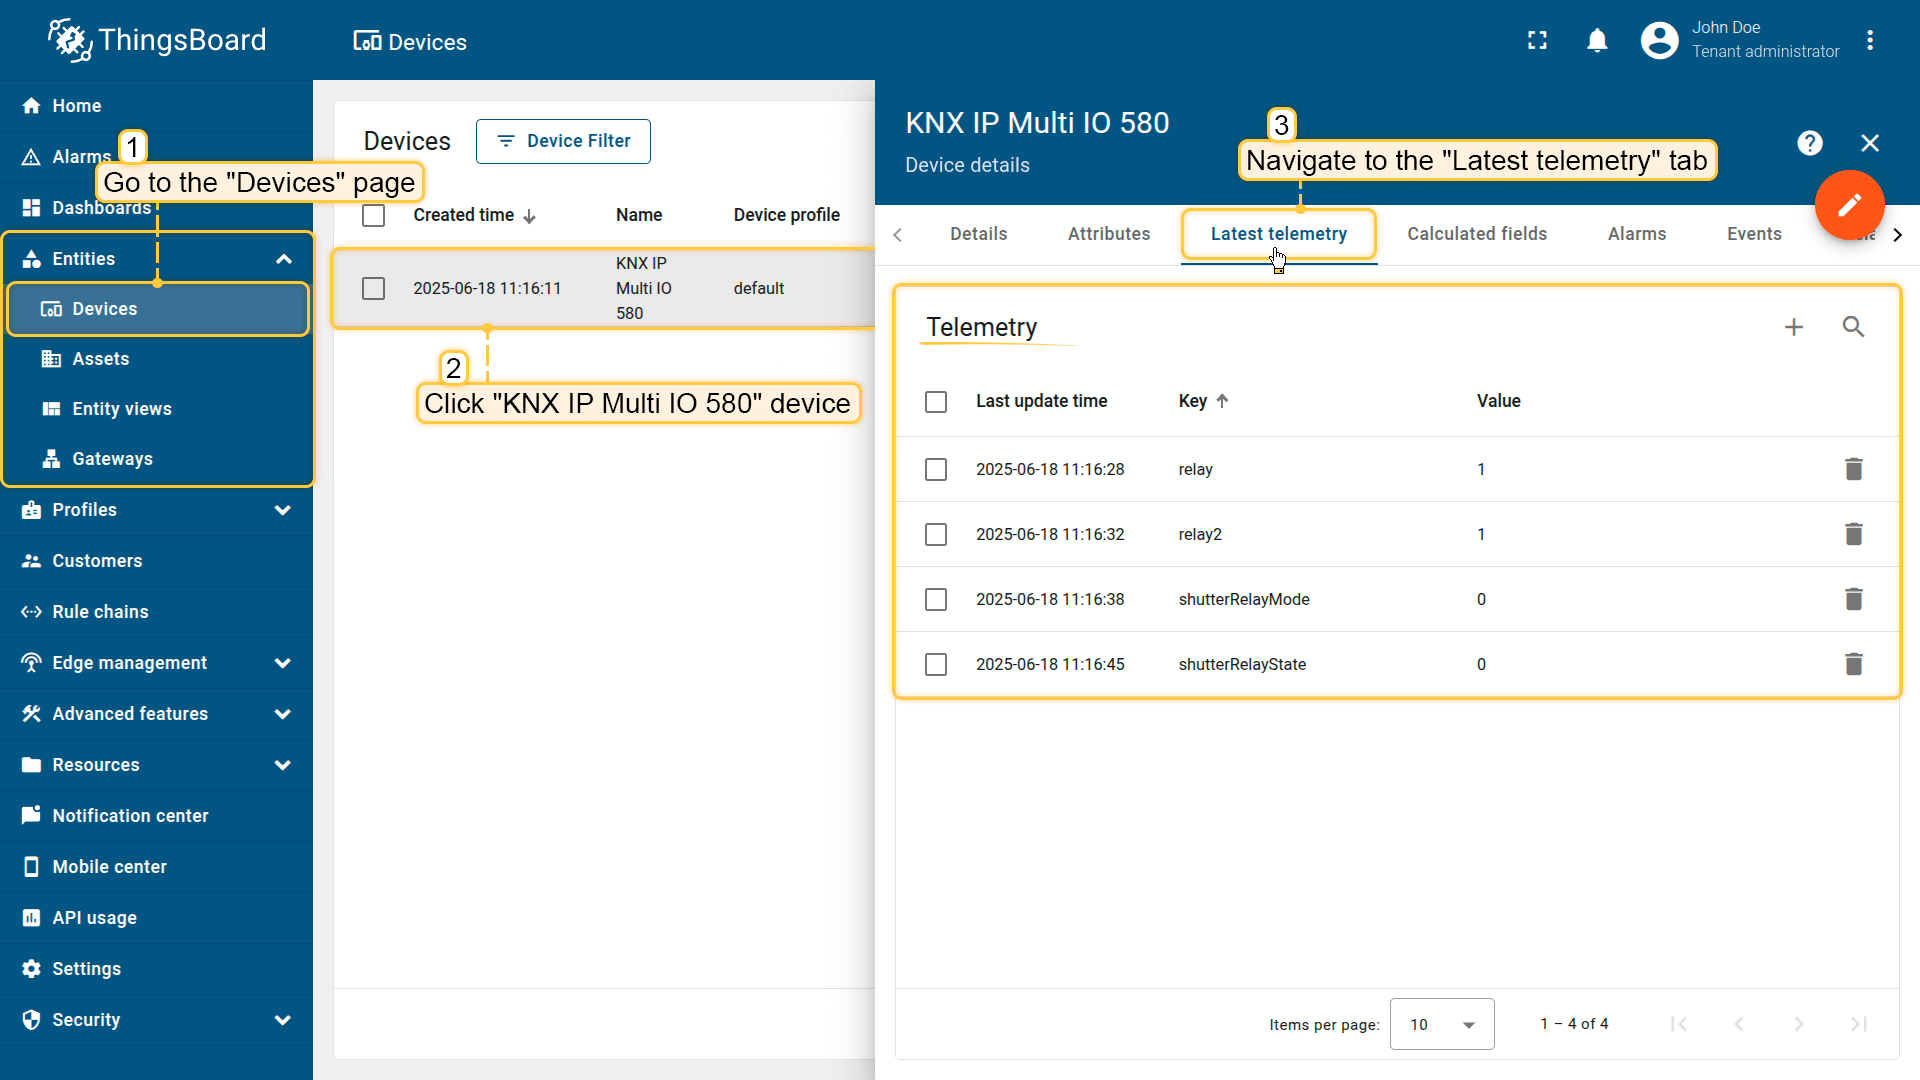
Once you have successfully done all the steps above and Gateway sent data, you can see it in the device telemetry tab:
- Click on the device row in the table to open its details;
- Navigate to the “Latest telemetry” tab.
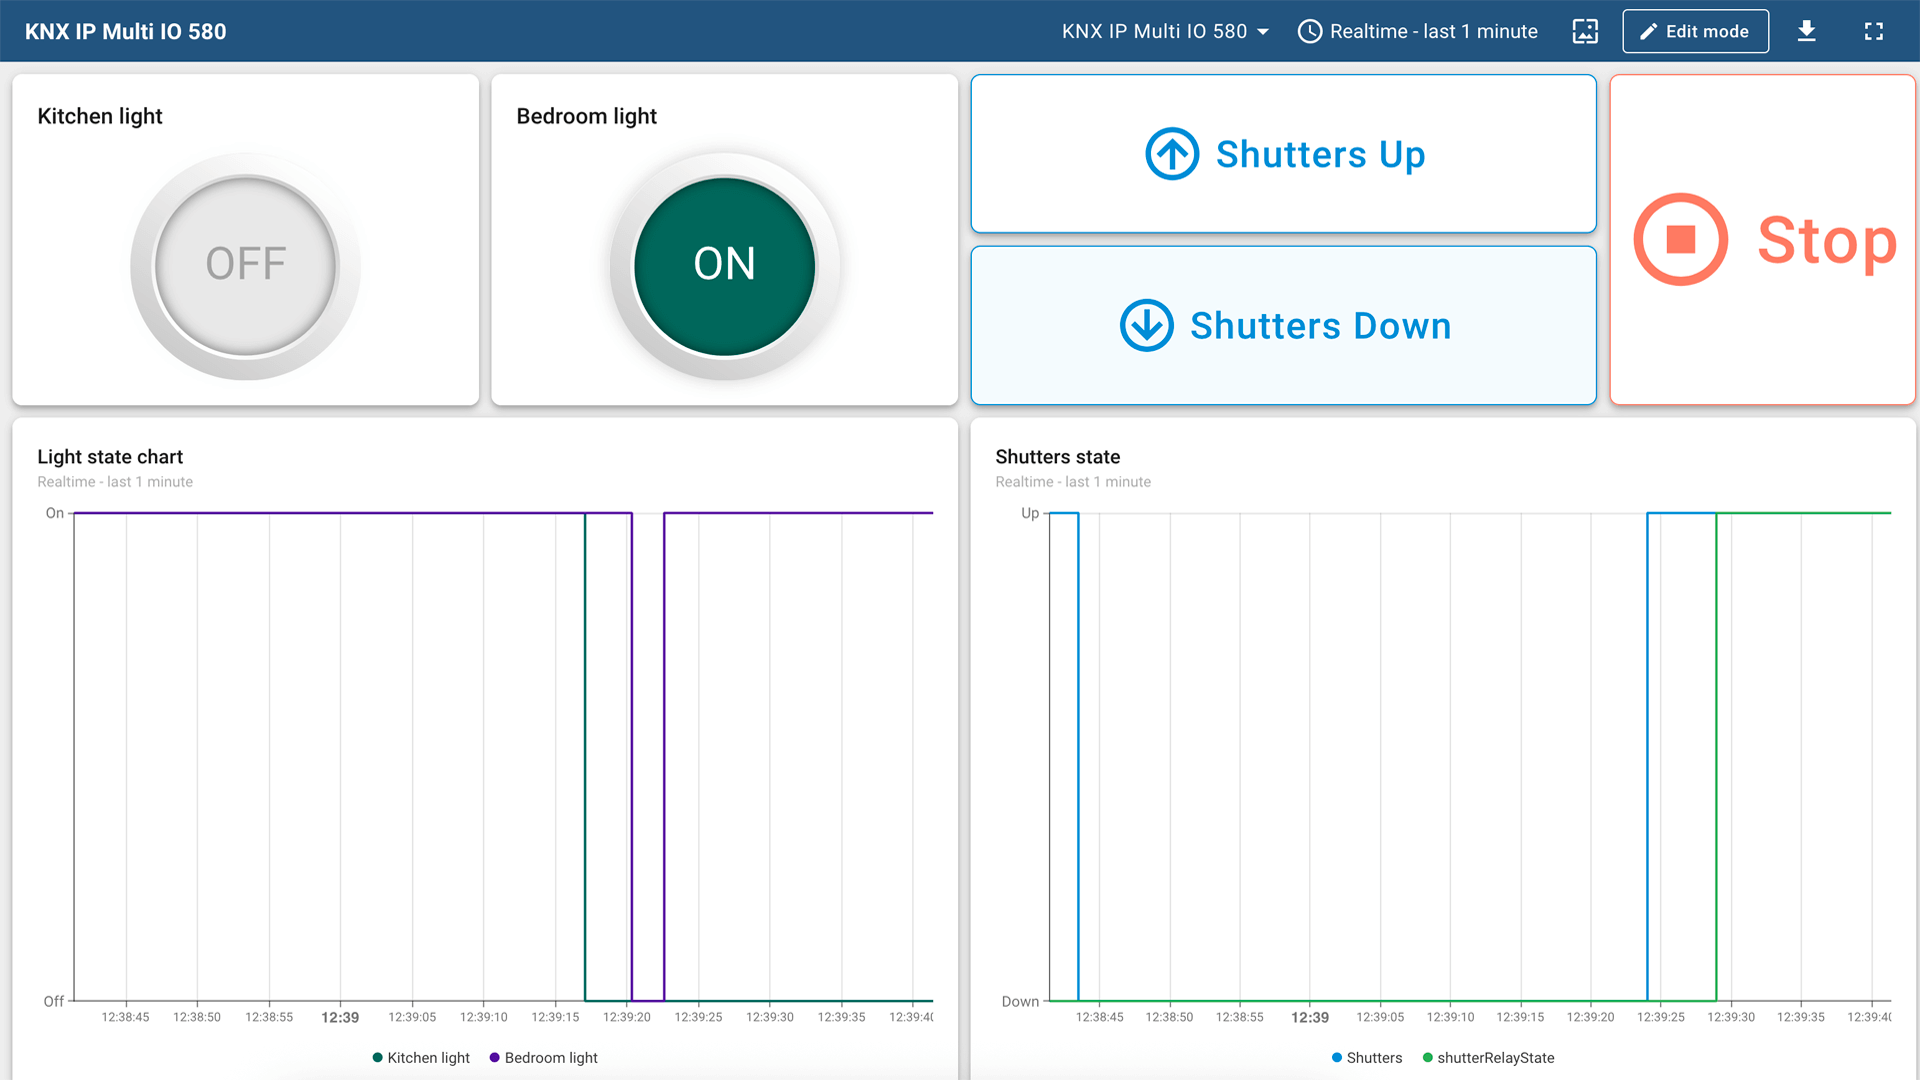
Let's display KNX IP Multi IO 580 time series on a dashboard. For this purpose, you can create your own dashboard with your custom widgets or use a ready-made dashboard and simply import it.
Conclusion
With the knowledge in this guide, you can easily connect your KNX IP Multi IO 580 controller with switch, shutter, and relay to ThingsBoard. After connecting the devices to the gateway, you will be able to see and process the data coming from the devices on the ThingsBoard.
Explore the platform documentation to learn more about key concepts and features.